
RFX-1100 - Guitar Effects ZOOM - Free user manual and instructions
Find the device manual for free RFX-1100 ZOOM in PDF.
| Product Type | Digital effects processor (reverb and multi-effects) |
| Brand | ZOOM |
| Model | RFX-1100 |
| Dimensions | 482 (W) x 115 (D) x 44 (H) mm |
| Weight | 1.8 kg |
| Power Supply | AC 100-120V or 220-240V, 50/60 Hz, 10 VA |
| Power Consumption | 10 VA |
| Fuse | 250V T160mAL (220-240V) / 250V T300mAL (100-120V) |
| Sampling Frequency | 44.1 kHz |
| A/D Converter | 18-bit, 64x oversampling |
| D/A Converter | 18-bit, 8x oversampling |
| Line Inputs | 2 x standard mono jack (L/MONO, R), impedance 10 kΩ (mono) / 20 kΩ (stereo) |
| Mic Input | 1 x combo XLR/jack (balanced), impedance 4.5 kΩ, pin 2 hot |
| Outputs | 2 x standard mono jack (L, R), impedance 500 Ω |
| Reference Input Level | -10 to +4 dBm |
| Reference Output Level | -10 to +4 dBm |
| Control Input | BYPASS jack for FS01 footswitch (optional) |
| Preset Effects | 363 (11 effects x 3 banks x 11 variations) |
| Effect Banks | REVERB, EFFECTS, MIX&SFX |
| Supplied Components | Power cord |
| Cleaning | Soft dry cloth, slightly damp if necessary. Do not use abrasive products, wax, or solvents. |
| Rack Mounting | Standard 19-inch compatible (EIA, DIN) |
| Safety | Do not open the case, do not expose to water, use only specified fuses, disconnect before cleaning or moving. |
Frequently Asked Questions - RFX-1100 ZOOM
User questions about RFX-1100 ZOOM
0 question about this device. Answer the ones you know or ask your own.
Ask a new question about this device
Download the instructions for your Guitar Effects in PDF format for free! Find your manual RFX-1100 - ZOOM and take your electronic device back in hand. On this page are published all the documents necessary for the use of your device. RFX-1100 by ZOOM.
USER MANUAL RFX-1100 ZOOM
Thank you for selecting the ZOOM RFX-1100 (hereafter simply called the "RFX-1100"). The RFX-1100 is a sophisticated digital reverb and multi-effect processor with the following features and functions.
• 33 immediately usable effects
The RFX-1100 comes with a full complement of preset effects (11 effects x 3 banks). Right out of the box, the unit is ready to create great sound. The REVERB bank in particular provides a wide spread and natural sounding ambience that meets even demanding professional standards.
• Built-in professional quality reverb
The reverb effects alone allow 121 different settings. The convincing sound stage created by the RFX-1100 far surpasses anything else available in this class.
- Innovative choices
Lo-Fi EFX purposely degrades sound quality for special effect. RESONANCE processes the input signal with sophisticated filtering. MIC SIMULATOR produces condenser mic sound from a dynamic microphone. These and various other effects are great for recording and give full scope to your creativity.
- Attractive mixdown effects
Mixdown effects can be used effectively to tailor the overall mood of a song when performing mixdown (mixing multiple tracks onto two final stereo tracks) or mastering (fine-tuning the sound and level of a final 2-track mix).
- Intuitive editing controls
Convenient knobs on the front panel let you directly adjust items such as the mixing ratio of original sound and effect sound. Editing effect parameters on the fly is also easy and straightforward. This allows quick fine-tuning for optimum sound.
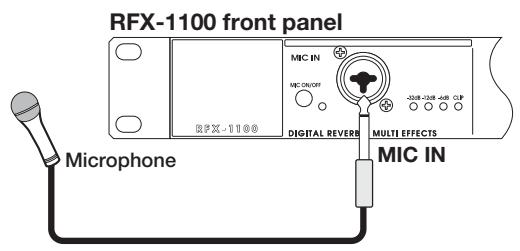
- MIC IN connector
The MIC IN connector on the front panel serves as an additional input for a microphone. This is convenient for applying effects to a vocal part and for controlling the VOCODER effect with your voice.
Please take the time to read this manual carefully so as to get the most out of your RFX-1100 and to ensure optimum performance and reliability. Retain this manual, the warranty card and all other documentation for future reference.
Contents
Controls and Functions 2
Front Panel 2
Rear Panel 2
Rack Mounting 4
Getting Connected 4
Trying Out the Effects 6
Changing the Sound of an Effect 7
RFX-1100 Effects 8
Troubleshooting 15
Specifications 15
Safety Precautions/Usage Precautions
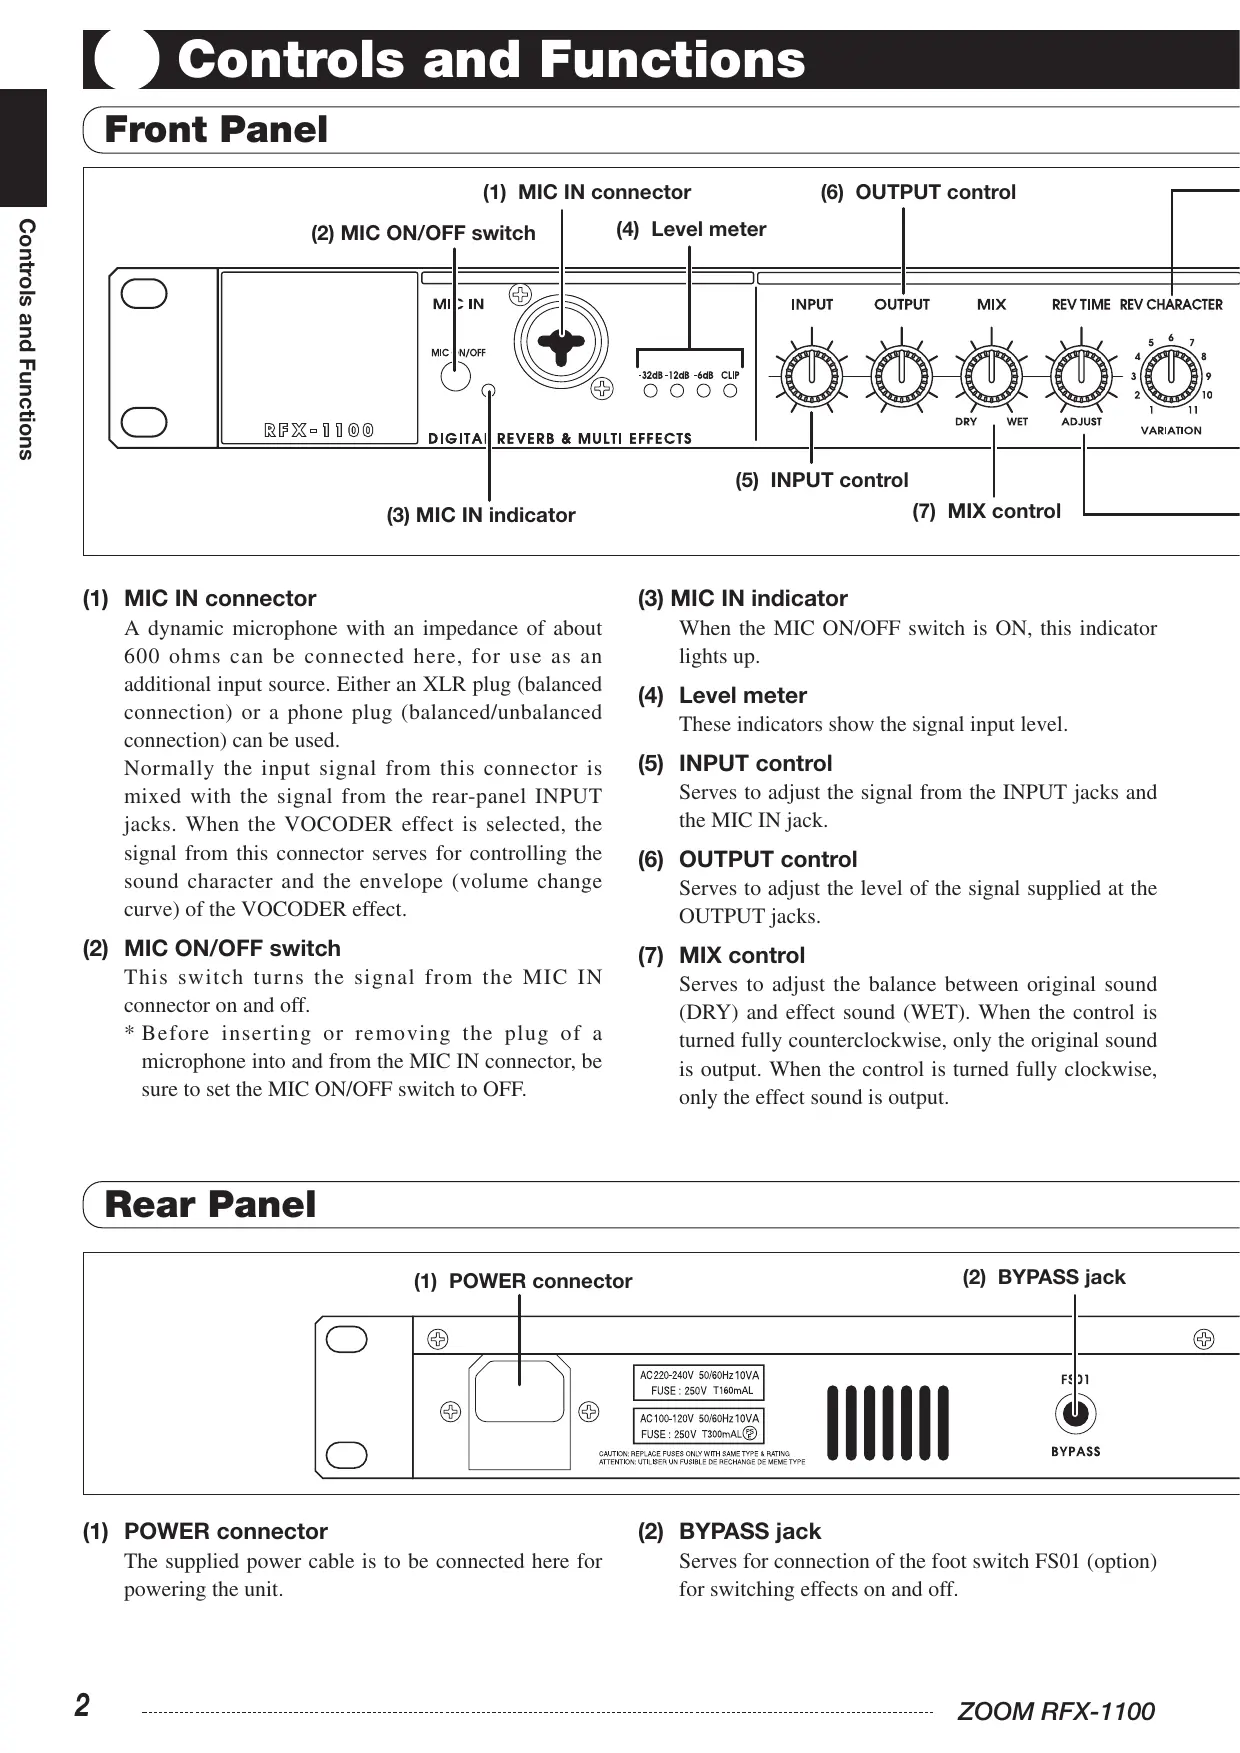
Front Panel
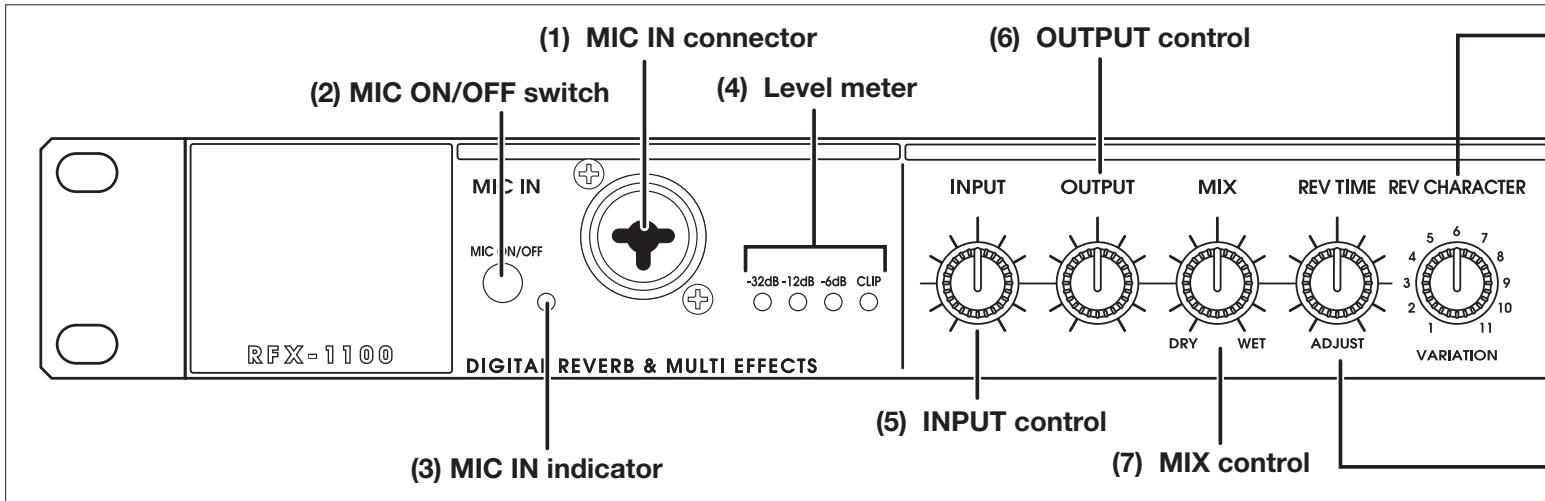
(1) MIC IN connector
A dynamic microphone with an impedance of about 600 ohms can be connected here, for use as an additional input source. Either an XLR plug (balanced connection) or a phone plug (balanced/unbalanced connection) can be used.
Normally the input signal from this connector is mixed with the signal from the rear-panel INPUT jacks. When the VOCODER effect is selected, the signal from this connector serves for controlling the sound character and the envelope (volume change curve) of the VOCODER effect.
(2) MIC ON/OFF switch
This switch turns the signal from the MIC IN connector on and off.
* Before inserting or removing the plug of a microphone into and from the MIC IN connector, be sure to set the MIC ON/OFF switch to OFF.
(3) MIC IN indicator
When the MIC ON/OFF switch is ON, this indicator lights up.
(4) Level meter
These indicators show the signal input level.
(5) INPUT control
Serves to adjust the signal from the INPUT jacks and the MIC IN jack.
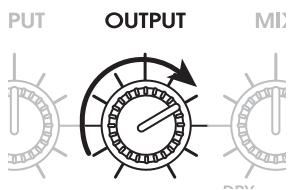
(6) OUTPUT control
Serves to adjust the level of the signal supplied at the OUTPUT jacks.
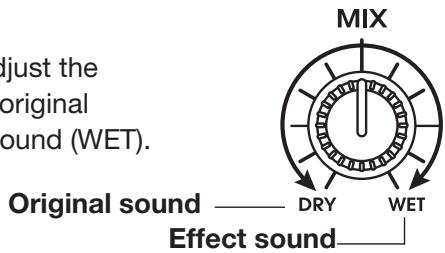
(7) MIX control
Serves to adjust the balance between original sound (DRY) and effect sound (WET). When the control is turned fully counterclockwise, only the original sound is output. When the control is turned fully clockwise, only the effect sound is output.
Rear Panel
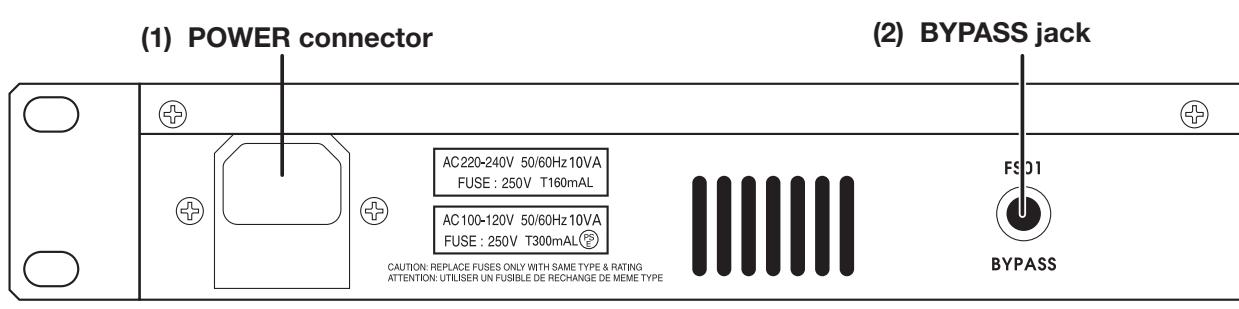
(1) POWER connector
The supplied power cable is to be connected here for powering the unit.
(2) BYPASS jack
Serves for connection of the foot switch FS01 (option) for switching effects on and off.
(9) CHARACTER/VARIATION selector
(11) EFFECT TYPE selector
(12) POWER switch
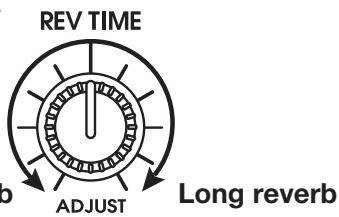
(8) REVERB TIME/ADJUST control
(8) REVERB TIME/ADJUST control
Serves to adjust an effect parameter of the currently selected effect.
(9) CHARACTER/VARIATION selector
Serves to choose one of 11 character settings for the currently selected effect, or to adjust an effect parameter.
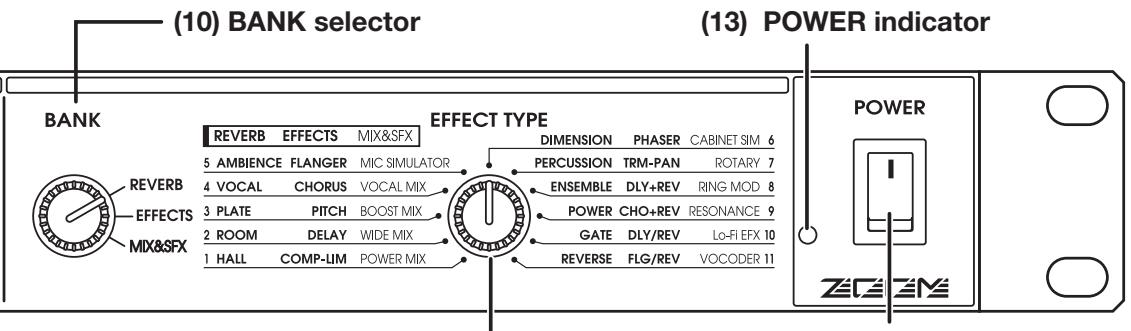
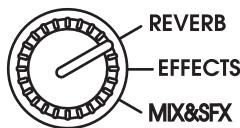
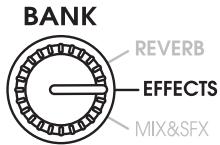
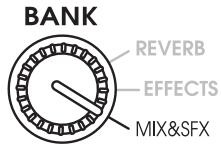
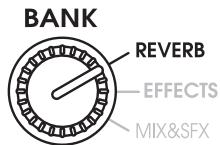
(10) BANK selector
Serves to select the effect bank (group of effects). The following three effect banks are available.
- REVERB bank
Contains various reverb effects.
- EFFECTS bank
Contains single effects for instruments and voice, and combined effects.
- MIX&SFX bank
Contains special effects and effects particularly suited for mixdown (mixing multiple tracks onto two final stereo tracks).
(11) EFFECT TYPE selector
Serves to choose an effect from the currently selected bank.
(12) POWER switch
Serves to turn the unit on and off.
(13) POWER indicator
When the RFX-1100 is on, this LED indicator is lit in green. When the foot switch FS01 (option) was used to switch the effects off, the indicator flashes red.
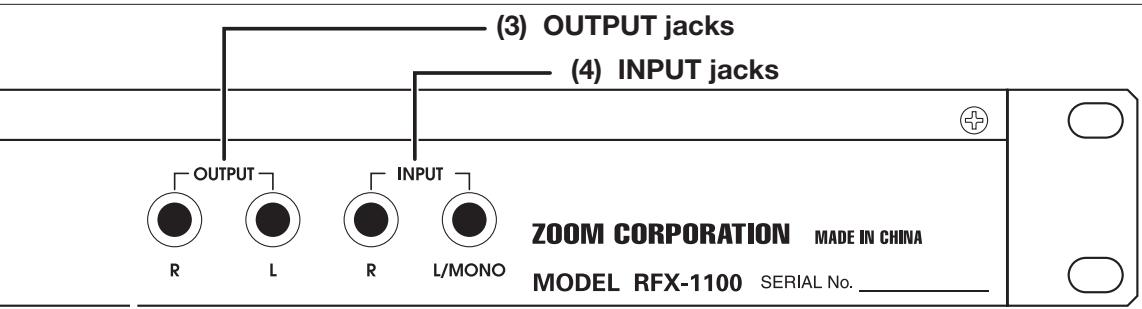
(3) OUTPUT jacks
Connect these jacks to the recorder or playback system.
(4) INPUT jacks
Connect a line-level source, such as an instrument or
the send output of a mixer, to these jacks. If a plug is inserted only in the L/MONO jack, the signal from this plug will be supplied to both channels. A high-impedance source such as an electric guitar should be routed through a preamplifier or a guitar effect first.
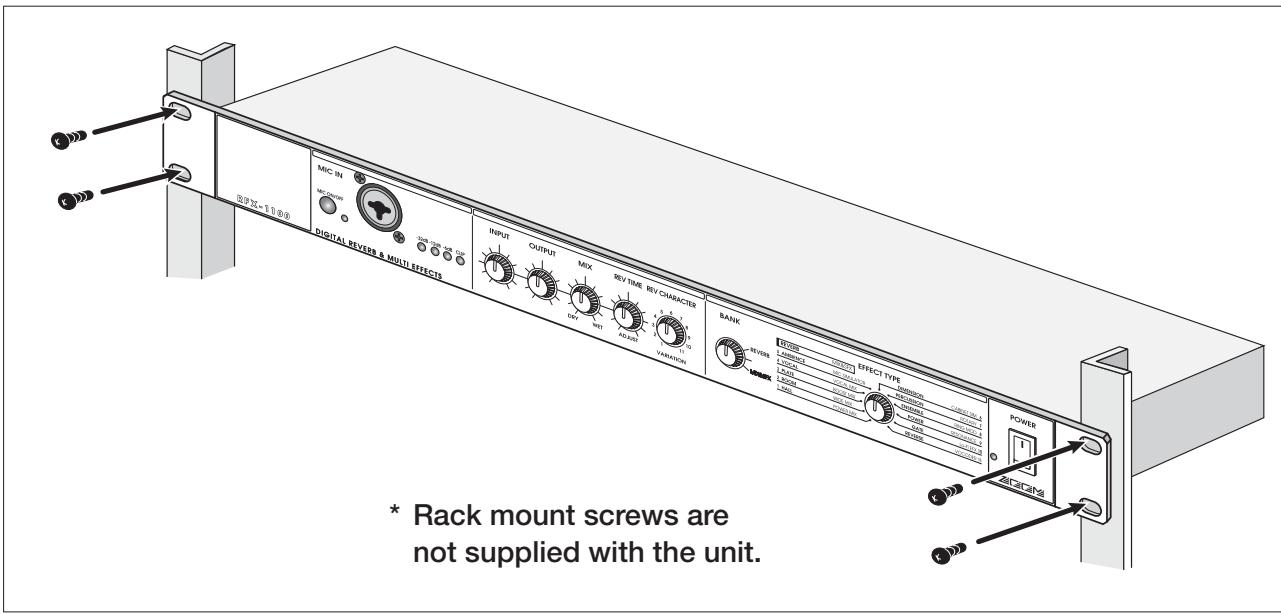
Rack Mounting
The RFX-1100 is compatible with international 19-inch rack standards (EIA, DIN). Because the unit has been designed for rack installation, it is preferable to operate the unit in this way, rather than simply placing it on a table or similar. Align the four screw holes with the rack screw holes and securely fasten the unit to the rack with screws.

- The RFX-1100 uses a metal frame, making the unit heavier than it might seem at first glance. While installing the unit in a rack, carefully support the weight of the unit until all screws are securely tightened. Otherwise the unit may drop, possibly causing injury to persons or damage to itself or to other equipment.
- Do not directly stack the unit on top of other equipment. Otherwise heat may
lead to a fire risk or cause performance degradation.
- Before installation, always unplug any connecting cables and the power cable. Otherwise the equipment or the cables may be damaged.
- Make sure that the rack in which the unit is installed is placed on a firm, solid surface, so that it cannot shake or topple over. Otherwise there is a risk of injury to persons or damage to the unit or to other equipment.
Getting Connected
Basic Connections
RFX-1100 is connected to an electronic instrument, microphone, and mixer or other audio device


Always turn the power to all components off before making any connections. Otherwise there is a risk of hearing damage or equipment damage by sudden loud noise.
Insert Connection
This is an example for inserting the RFX-1100 between the sound source and a playback system or multi-track recorder (MTR). A stereo source should be connected to the INPUT L/MONO and R jacks. A mono source should be connected to the L/MONO jack only.
In this example, the signal from the mic or the instrument is effect processed by the RFX-1100 and then sent to the playback system or MTR. The balance between original sound and effect sound is adjusted at the RFX-1100.

flowchart
graph TD
    A["Micro Rhythm/Hz 2000/MRT-3"] -->|Rhythm machine, synthesizer, or similar| B["Guitar"]
    B --> C["Guitar effect"]
    C --> D["INPUT L/MONO"]
    D --> E["R"]
    E --> F["L"]
    F --> G["OUTPUT R"]
    G --> H["INPUT"]
    H --> I["Mixer or amplifier/speaker"]
    J["Microphone"] --> K["MIC IN"]
    K --> L["Digital Revers"]
    L --> M["MULTI EFFECTS"]
    M --> N["INPUT OUTPUT MIX REV TIME REV CHARACTER"]
    N --> O["BANK"]
    O --> P["OUTPUT REFLECTIVE EFFECT TYPE"]
    P --> Q["RFX-1100"]
    Q --> R["POWER ZCGRS"]
Getting Connected
flowchart
graph TD
    A["FS01"] --> B["OUTPUT R L"]
    B --> C["INPUT L/MONO"]
    C --> D["ZOOM CORPORATION MADE IN CHINA MODEL RFX-1100 SERIAL No. ____"]
    D --> E["Amplifier/speaker"]
    F["Synthesizer or similar"] --> D
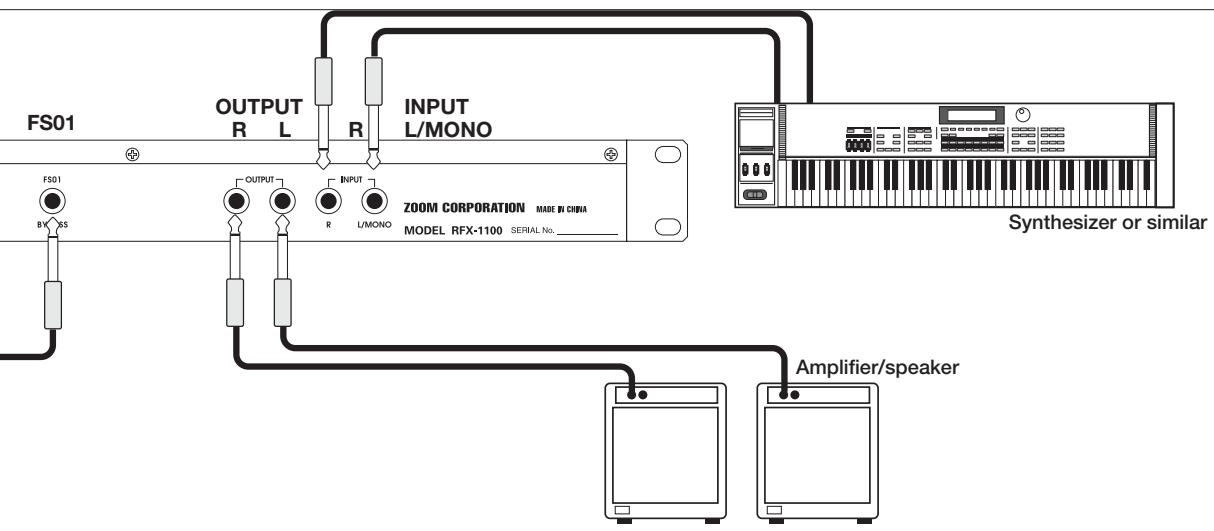
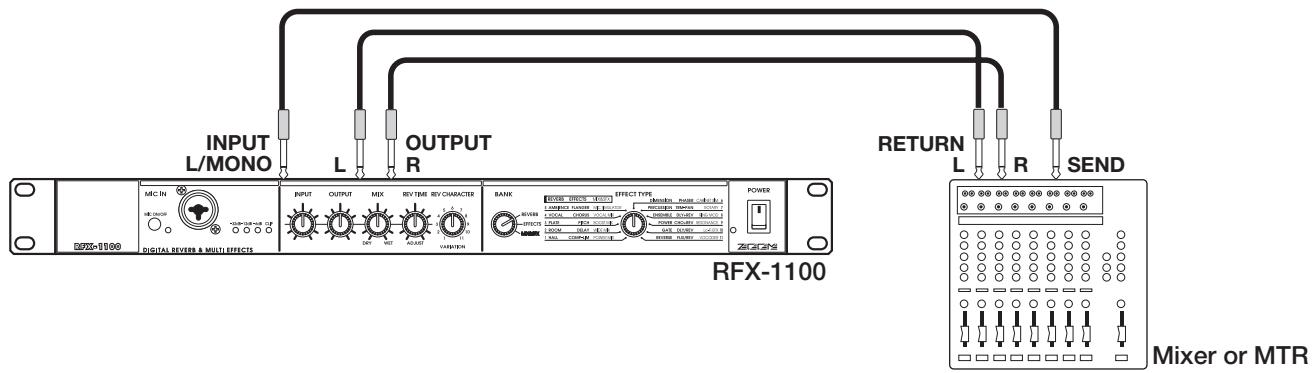
Send/Return Connection
This is an example for connecting the RFX-1100 to the send/return jacks of a mixer or multi-track recorder. Connect the send jack of the mixer or MTR to the INPUT L/MONO jack of the RFX-1100, and connect the OUTPUT L/R jacks of the RFX-1100 to the return jacks (or the stereo line input jacks) of the mixer or MTR.
In this configuration, the RFX-1100 should be set so that it outputs only the effect sound, and the balance between original sound and effect sound should be adjusted at the mixer or multi-track recorder. Supplying the send signal to the RFX-1100 in stereo is also possible.
Using the VOCODER Effect
This is a connection example for using the VOCODER effect from the MIX&SFX bank. Connect a dynamic microphone to the front-panel MIC IN jack on the RFX-1100. Connect a synthesizer or other instrument to the rear-panel INPUT L/MONO jack. You can then use the mic to vary the envelope (volume change curve) and the sound character of the VOCODER effect. Instead of the mic, it is also possible to use the right-channel signal for controlling the effect. In this case, the signal supplied to the INPUT L/MONO jack is controlled by the signal supplied to the INPUT R jack. Verify that the MIC IN indicator is lit. If not, press the MIC ON/OFF switch so that the indicator comes on.

flowchart
graph TD
    A["Synthesizer"] -->|MIX:IN| B["Digital Receiver"]
    A -->|MIC IN| C["Multi Effects"]
    A -->|R| D["RFX-1100"]
    A -->|R| E["Keyboard amplifiers"]
    A -->|R| F["Output"]
    A -->|L/MONO| G["MD player or sampler or similar with recorded voice"]
    A -->|R| H["Microphone"]
    A -->|R| I["Power"]
    style A fill:#f9f,stroke:#333
    style B fill:#ccf,stroke:#333
    style C fill:#cfc,stroke:#333
    style D fill:#fcc,stroke:#333
    style E fill:#cff,stroke:#333
    style F fill:#ffc,stroke:#333
    style G fill:#fcc,stroke:#333
    style H fill:#ffc,stroke:#333
    style I fill:#fcc,stroke:#333
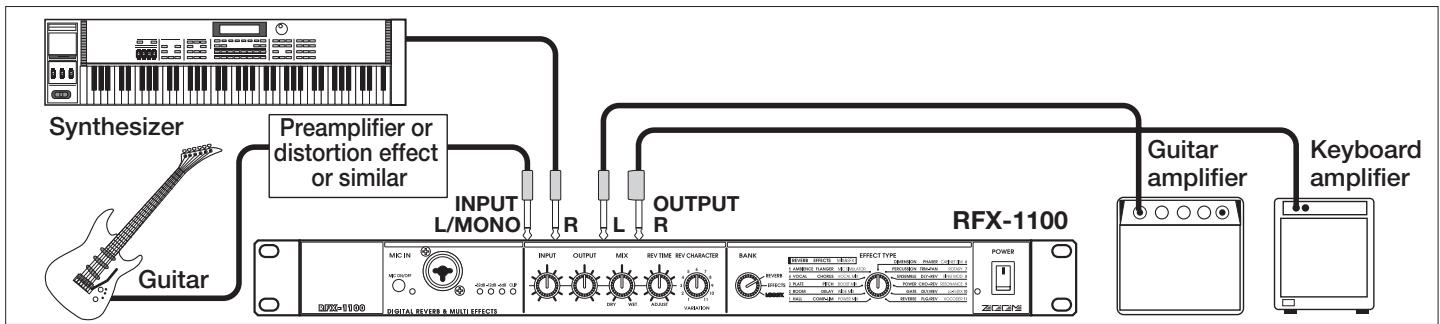
Using Two Effects in Parallel
The RFX-1100 allows using two effects at the same time (in parallel). This is possible with effects from the EFFECTS bank which have a double name separated with a slash ("/"). The following illustration shows a connection example for using two effects independently in the left and right channel.
flowchart
graph LR
    A["Synthesizer"] --> B["Guitar"]
    B --> C["Preamplifier or distortion effect or similar"]
    C --> D["INPUT L/MONO"]
    D --> E["R"]
    E --> F["L"]
    F --> G["OUTPUT R"]
    G --> H["RFX-1100"]
    H --> I["Guitar amplifier"]
    I --> J["Keyboard amplifier"]
    C --> K["MODI IN"]
    K --> L["Digital Reverb & Multi Effects"]
    L --> M["INPUT OUTPUT MEX REV TIME REV CHARACTER BANK"]
    M --> N["EFFECT TYPE"]
    N --> O["POWER"]
    O --> P["ZCIGNS"]
Trying Out the Effects
- Verify that the AC cable, sound source, and playback system are correctly connected to the RFX-1100.
The INPUT control and OUTPUT control of the RFX-1100 as well as the volume control of the playback system should be set to minimum.
-
Turn on the system in the following order: sound source → RFX-1100 → playback system.
-
While playing the sound source, turn up the INPUT control of the RFX-1100 to adjust the input level.
To minimize noise and distortion, the INPUT control should be set as high as possible without causing the CLIP LED to light.
- Adjust the OUTPUT control and the volume control of the playback equipment to obtain a suitable playback volume.
- Use the BANK selector and the EFFECT TYPE selector to select the desired effect.
Depending on the position of the BANK selector, the available effects are as shown below.
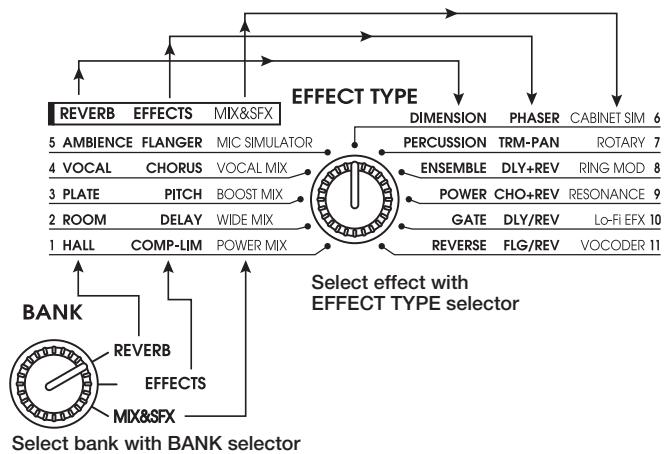
flowchart
graph TD
    A["SELECT bank with BANK selector"] --> B["BANK"]
    B --> C["Reverb EFFECTS MIX&sfx"]
    B --> D["REVERB EFFECTS"]
    C --> E["MIX&sfx"]
    D --> F["EFFECT TYPE"]
    E --> G["Select effect with EFFECT TYPE selector"]
    F --> H["Dimension PHASER CABINET SIM 6"]
    F --> I["PERCUSSION TRM-PAN ROTARY 7"]
    F --> J["ENSEMBLE DLY+REV RING MOD 8"]
    F --> K["POWER CHO+REV RESONANCE 9"]
    F --> L["GATE DLY/REV Lo-Fi EFX 10"]
    F --> M["REVERSE FLG/REV VOCODER 11"]
The following controls are available for changing the sound character and intensity of the preset effects of the RFX-1100 and for adjusting the balance between original sound and effect sound.
(1) MIX control
Adjusts the mixing balance between the original sound and the effect sound.
- When using the insert type connection pattern
Use the MIX control to adjust the mixing balance between original sound (DRY) and effect sound (WET).
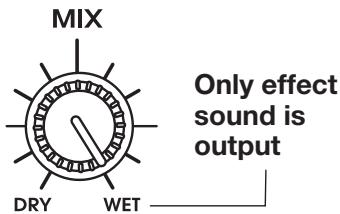
- When using the send/return type connection pattern
The MIX control should be turned fully to WET, so that only the effect sound is output. The mixing balance between original sound and effect sound should be adjusted at the mixer or multi-track recorder.
For effects such as compressor/limiter or microphone simulator where the output is the processed original sound, turn the MIX control fully to WET.
Unprocessed sound (original sound)

flowchart
graph LR
    A["OUTPUT"] --> B["DRY"]
    B --> C["WET"]
    C --> D["REV TIME"]
    D --> E["ADJUST"]
    E --> F["VARIATION"]
    F --> G["1"]
    F --> H["2"]
    F --> I["3"]
    F --> J["4"]
    F --> K["5"]
    F --> L["6"]
    F --> M["7"]
    F --> N["8"]
    F --> O["9"]
    F --> P["10"]
    F --> Q["11"]
    F --> R["12"]
    F --> S["13"]
    F --> T["14"]
    F --> U["15"]
    F --> V["16"]
    F --> W["17"]
    F --> X["18"]
    F --> Y["19"]
    F --> Z["20"]
BANK
| REVERB | EFFEC |
| 5 AMBIENCE | FLAN |
| 4 VOCAL | CHO |
| 3 PLATE | PIT |
| 2 ROOM | DEL |
| 1 HALL | COMP-I |
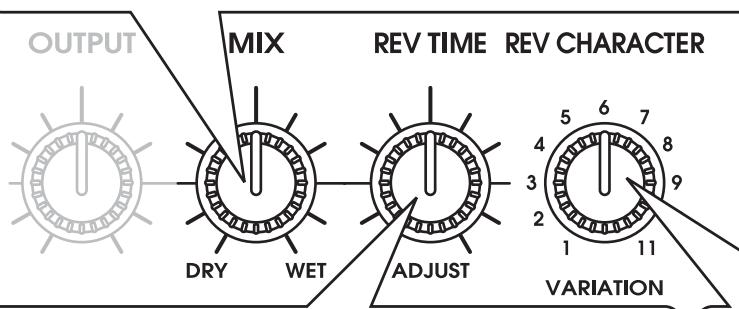
(2) REVERB TIME/ADJUST control
The function of this control differs, depending on which effect bank is currently selected with the BANK switch.
• REVERB bank selected with BANK selector
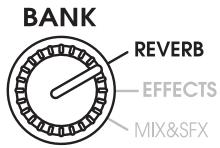
The control adjusts the reverb duration.
- EFFECTS/MIX&SFX bank selected with selector
The control adjusts a major parameter of the currently selected effect.
For information on which parameters can be adjusted for each effect, see pages 8 - 15.
(3) CHARACTER/VARIATION selector
The function of this selector differs, depending on which effect bank is currently selected with the BANK switch.
• REVERB bank selected with BANK selector
REV CHARACTER

VARIATION 11 reverb character settings
The selector can be used to choose one of 11 reverb sound characteristics (settings with different tone and intensity).
• EFFECTS/MIX&SFX bank selected with selector


The control adjusts a major parameter of the currently selected effect.
For information on which parameters can be adjusted for each effect, see pages 8 - 15.
RFX-1100 Effects
This section lists all the effects available in the RFX-1100 and describes the character or parameter variations that are possible.
Effects suitable for a send/return connection are marked with the S/R symbol.
• REVERB Bank
This bank contains a variety of reverb effects. For effects 1 - 9, the CHARACTER control can be used to select one of eleven character variations.
| 1. HALL | These effects simulate the reverb in various types of medium to large size buildings. | ↓↑S/R | ||
| CHARACTER | REVERB TIME | Recommended setting | ||
| 1 | Large Hall | Simulates a large concert hall. | Reverb TimeSets the reverb duration. | |
| 2 | Bright Hall | Simulates a medium-size hall with strong, bright reverb. | ||
| 3 | Recital Hall | Simulates a small hall. | ||
| 4 | Municipal | Simulates a fairly large municipal style hall. | ||
| 5 | Wood Hall | Simulates a medium-size hall with predominantly wooden interior. | ||
| 6 | Cathedral | Simulates a large cathedral. |  | |
| 7 | Medconcert | Simulates a medium-size concert hall. | ||
| 8 | Strings Hall | Simulates a concert hall designed for classical music. | ||
| 9 | Castle Hall | Simulates a medieval castle. | ||
| 10 | Small Hall | Simulates a small hall with warm sound character. | ||
| 11 | Gymnasium | Simulates a gymnasium. | ||
| 2. ROOM | These effects simulate the reverb in various types of interior spaces, ranging from small rooms to large clubs. | ↓↑S/R | ||
| CHARACTER | REVERB TIME | Recommended setting | ||
| 1 | Tile Chamber | Simulates the acoustics of a tiled room. | Reverb TimeSets the reverb duration. | |
| 2 | Warm Room | Simulates the acoustics of a room with warm sound character. | ||
| 3 | Big Wooden | Simulates the acoustics of a fairly large room made of wood. | ||
| 4 | Meeting Room | Simulates the acoustics of a conference room. | ||
| 5 | Large Club | Simulates the acoustics of a large club with strong reverb. | ||
| 6 | GtrSpace | Reverb with a pronounced midrange. |  | |
| 7 | Strings Room | Reverb emphasizing the low range and midrange. | ||
| 8 | Small Chamber | Reverb which makes the spoken voice stand out clearly. | ||
| 9 | Glass Room | Reverb with lean low end. | ||
| 10 | Rehearsal Space | Simulates a rehearsal room with strong reverb. | ||
| 11 | Garage | Simulates the reverb character of a garage. | ||
| 3. PLATE | These effects simulate the so-called "plate reverb" sound (as produced by a pickup mounted to a large, free-hanging iron plate). | ↓↑S/R | ||
| CHARACTER | REVERB TIME | Recommended setting | ||
| 1 | Large Plate | Simulates the reverb produced by a large plate. | Reverb TimeSets the reverbduration. |  |
| 2 | Bright Plate | Bright plate reverb suitable for percussion. | ||
| 3 | Dark Plate | Plate reverb with a feeling of depth. | Reverb TimeSets the reverb duration. |  |
| 4 | Clear Plate | Transparent plate reverb suitable for vocals. |  | |
| 5 | Short Plate | Plate reverb with short reverb time. |  | |
| 6 | Slap Plate | Reverb with a long pre-delay. |  | |
| 7 | Lo-Pass Plate | Plate reverb acting on the low frequencies. |  | |
| 8 | Hi-Pass Plate | Plate reverb acting on the high frequencies. |  | |
| 9 | Rich Plate | Dense, rich-sounding plate reverb. |  | |
| 10 | Endless Plate | Smooth plate reverb with long duration. |  | |
| 11 | Tunnel | Simulates the reverb as heard in a tunnel. |  |
- VOCAL
Reverb effects best suited for vocals and narration.

| CHARACTER | REVERB TIME | Recommended setting | ||
| 1 | Female Rock | Reverb suitable for female rock singers. | Reverb TimeSets the reverb duration. |  |
| 2 | Male Ballad | Reverb suitable for ballads sung by male vocalists. |  | |
| 3 | Chorus | Reverb suitable for chorus music. |  | |
| 4 | Female Folk | Natural sounding reverb great for female vocals. |  | |
| 5 | Hi Male Rock | Reverb suitable for fairly high-pitched male vocals. | [52HZ] | |
| 6 | Narration | Reverb suitable for emphasizing narration. |  | |
| 7 | Chanting | Reverb suitable for chanting. |  | |
| 8 | Slapback | Emphasizes vocals without changing other characteristics. |  | |
| 9 | Enhancer | Reverb with emphasized high end. |  | |
| 10 | LushVerb | Wide simulated space suitable for vocals. |  | |
| 11 | EchoVerb | Reverb with long pre-delay. |  | |
- AMBIENCE
These effects lend a natural sounding ambience to the sound source which is suitable not only for single instruments but also for stereo music sources.

| CHARACTER | REVERB TIME | Recommended setting | ||
| 1 | Rock Mix | Reverb for rock type music sources. | Reverb TimeSets the reverb duration. |  |
| 2 | Jazz Band | Reverb for jazz band type music sources. |  | |
| 3 | Reggae Mix | Reverb with a strong wet feeling, for reggae and related genres. |  | |
| 4 | Keyboard | Great ambience for keyboard playing. |  | |
| 5 | Hip Hop | Ambience for rap and hip hop type music. |  | |
| 6 | Film Score | Ambience for film music. |  | |
| 7 | Electronic Mix | Spatial effect suitable for synthesizer. |  | |
| 8 | New Age | Ambience suitable for MIDI sound sources. |  | |
| 9 | Strings Quartet | Warm, midrange centered ambience for strings. |  | |
| 10 | Choral Mix | Rich ambience for chorus and vocal ensembles. |  | |
| 11 | Percussion Mix | Ambience suitable for percussion ensembles. |  | |
| 6. DIMENSION | These effects control the spatial expansiveness of the sound.↓↑S/R | |||
| CHARACTER | REVERB TIME Recommended setting | |||
| 1 | Super Wide | Emphasizes the stereo spread of music sources. | Reverb TimeSets the reverb duration. | |
| 2 | Stereo→Mono | Changes the sound localization from stereo to mono. | ||
| 3 | Left→Right | Changes the sound localization from left to right. | ||
| 4 | Right→Left | Changes the sound localization from right to left. | ||
| 5 | Big Delay | Effect with long pre-delay for creating a wide space. | ||
| 6 | Mono→Stereo | Changes the sound localization from mono to stereo. | ||
| 7 | StereoMids | Adds a wide, expansive feeling to the midrange. | ||
| 8 | Huge Bass | Creates an expansive low end. | ||
| 9 | Ping-Pong | Reverb bouncing back and forth between left and right. | ||
| 10 | Bass/Treble | Adds reverb to the low and high range. | ||
| 11 | Millennium | Creates a vast reverb space. | ||
| 7. PERCUSSION | These reverb effects are most suitable for drums and percussion. | ||
| CHARACTER | REVERB TIME  Rec#nded Rec#nded  | ||
| 1 | Rock Kit/1 | Reverb suitable for rock drum. | Reverb Time Sets the reverb duration. |
| 2 | LatinPerc | Light ambience for percussion. | |
| 3 | Jazz Drums | Reverb for jazz drums. | |
| 4 | Tom | Slightly deep effect for tom-toms. | |
| 5 | Shaker | Creates optimum ambience for shakers and similar percussion instruments. | |
| 6 | Reggae Drums | Midrange-centered effect for reggae drums. | |
| 7 | Rock Kit/2 | Allows adding reverb to snares or cymbals without affecting the low range. | |
| 8 | MalletPerc | Mallet type percussion can be enhanced with this effect. | |
| 9 | Slap | Reverb with short pre-delay, emphasizing the low frequencies. | |
| 10 | Afro Drums | Reverb suitable for Afro type drums. | |
| 11 | Bells | High range effect suitable for bells. | |
| 8. ENSEMBLE | These effects are best for ensemble sections such as strings or brass.[IMAGE] | ||
| CHARACTER | REVERB TIME  Recommended Recommended g g | ||
| 1 | Strings | Reverb suitable for strings. | Reverb TimeSets the reverb duration. |
| 2 | Brass | Reverb suitable for brass ensembles. | |
| 3 | Piano | Warm, extended reverb great for piano solos. | |
| 4 | Winds | Reverb suitable for woodwinds. | |
| 5 | Synth/1 | Reverb suitable for synthesizer. | |
| 6 | Solo Strings | Reverb suitable for solo strings. | |
| 7 | Jazz Organ | Light reverb for highlighting organ sound. | |
| 8 | Chorus | Wide reverb for chorus groups. | Reverb TimeSets the reverb duration. |  | ||
| 9 | Solo Winds | Subdued reverb great for wind instrument solos. |  | |||
| 10 | Church Organ | Reverb for adding a spacious feeling to organ music. |  | |||
| 11 | Synth/2 | Great reverb sound for synthesizer. |  |
| 9. POWER | These effects add a feeling of power and energy to sound sources. |   | ||
| CHARACTER | REVERB TIME Recol $   | Iaded | ||
| 1 | Kick/1 | Stresses the body impact of bass drums. | Reverb TimeSets the reverb duration. |  |
| 2 | Kick/2 | Increases the perceived size of the bass drum image. |  | |
| 3 | Snare/1 | Stresses the body sound of snare drums. |  | |
| 4 | Snare/2 | Adds a bright reverb sound to snare drums. |  | |
| 5 | Toms/1 | Suitable for low toms and floor-standing toms. |  | |
| 6 | Toms/2 | Emphasizes the midrange sound of tom-toms. |  | |
| 7 | Hand Perc | Suitable for hand percussion. |  | |
| 8 | DistGtr/1 | Suitable for distortion guitar sound with strong box character. |  | |
| 9 | DistGtr/2 | Suitable for distortion guitar sound with bright character. | [ZZZK] | |
| 10 | Vocal/1 | Increases the power impact of vocals. |  | |
| 11 | Vocal/2 | Suitable for ballad type vocals. |  | |
| 10. GATE | Special effect where the reverb is briskly cut by a gate. | ||
| CHARACTER | REVERB TIME | ||
| Threshold | Adjusts the threshold level where the gate becomes active. | Reverb Time | Sets the reverb duration. |
| 11. REVERSE | This achieves a similar effect as a tape run in reverse. | ||
| CHARACTER | REVERB TIME |  | |
| Threshold | Adjusts the sensitivity of the effect, that is the level from which the reverb is applied. | Reverb Time | Sets the reverb duration. |
- EFFECTS Bank
This bank contains seven sophisticated single effects (1 - 7) as well as four combined effects (8 - 11) which use two effects simultaneously. The combined effects marked with a "+" are made up of two effects connected in series. The combined effects marked with a "/" use two effects in parallel in the left and right channel.
| 1. COMP. LIM(Compressor • Limiter) | This effect serves for keeping signal levels within a certain range.The compressor raises the level of signals below a certain threshold and reduces the level of strong signals. The limiter only reduces the level of strong signals. | ||
| VARIATION | REVERB TIME/ADJUST | ||
| Comp Lim Release | Switches between compressor and limiter and adjusts the release time. | Threshold | Sets the level where the compressor/limiter becomes active. |
| 1 - 6: Compressor Higher values mean longer release time. | 7 - 11: Limiter Higher values mean longer release time. | ||
| 2. DELAY | A delay effect with a maximum delay time of up to 1486 ms.↓↑S/R | ||
| VARIATION | REVERB TIME/ADJUST | ||
| Feedback | Adjusts the amount of feedback (number of delay sound repetitions). | Delay Time | Sets the delay duration. |
| Cross-feedback6: Feedback = 0Normal feedback | Short delayLong delay | ||
| 3. PITCH | Stereo pitch shifter which adds a pitch-shifted component to the original sound. | |||||||||||||||
| VARIATION | REVERB TIME/ADJUST | |||||||||||||||
| Pitch Shift Interval | Sets the amount of pitch shift. The range extends from slight detune to 1 octave up or down. | Pitch Shift Up/Down | Determines the direction of pitch shift. | |||||||||||||
| VARIATION value | 1 | 2 | 3 | 4 | 5 | 6 | 7 | 8 | 9 | 10 | 11 | Downward shift | Upward shift | |||
| Shift (cent) | 7 | 20 | 100 | 200 | 300 | 400 | 500 | 700 | 900 | 1100 | 1200 | |||||
| 100 cent = 1 semitone | ||||||||||||||||
| 4. CHORUS | A stereo chorus with three voices per channel.↓↑S/R | ||
| VARIATION | REVERB TIME/ADJUST | ||
| Chorus Depth | Adjusts the depth of pitch modulation. Turning the control clockwise increases modulation. | Chorus Rate | Adjusts the pitch modulation rate. |
| Light modulation Heavy modulation | Slow Fast | ||
| [Setting example] High-grade chorus with smooth presence VARIATION = 4 ADJUST | |||
| 5. FLANGER | Stereo flanger with a wide range. | ||
| VARIATION | REVERB TIME/ADJUST | ||
| Flanger Depth | Specifies the range over which the effect is active. Turning the control clockwise makes the range broader. | Flanger Rate | Adjusts the flanger modulation rate. |
| Narrow range Broad range | Slow Fast | ||
| [Setting example] Ultra-slow flanger great for hi-hat VARIATION = 10 ADJUST | |||
| 6. PHASER | Phaser with pronounced fluctuation. | ||
| VARIATION | REVERB TIME/ADJUST | ||
| Phaser Depth | Adjusts the intensity of the fluctuation.Turning the control clockwise results in more intense fluctuation. | Phaser Rate | Adjusts the phaser fluctuation rate. |
| Slight fluctuation Intense fluctuation | Slow Fast | ||
| [Setting example] Fluctuation optimized for electric piano VARIATION = 7 ADJUST | |||
| 7. TRM-PAN | Effect ranging from tremolo to auto-panning.↓↑S/R | |||
| VARIATION | REVERB TIME/ADJUST | |||
| Depth | Turning the control counterclockwise gives tremolo.Turning it clockwise gives auto-panning with a wider spread. | Rate | Adjusts the tremolo to auto-panning rate. | |
| Strong tremolo 4567831213141516171819110 Strong auto-panning | Slow Fast | |||
| 8. DLY+REV | This is an in-series combination of delay and reverb. | |||
| VARIATION | REVERB TIME/ADJUST | |||
| Reverb Mix | Adjusts the mixing ratio of the reverb sound.Turning the control clockwise increases thereverb ratio. | Delay Time | Adjusts the delay time up toa maximum of 743 ms.(Feedback is fixed.) | |
| 9. CHO+REV | This is an in-series combination of chorus and reverb. | |||
| VARIATION | REVERB TIME/ADJUST | |||
| Reverb Mix | Adjusts the mixing ratio of the reverb sound.Turning the control clockwise increases thereverb ratio. | Chorus Depth | Adjusts the modulation depth.(Modulation rate is fixed.) | |
| 10. DLY/REV | This is a parallel combination of delay and reverb. The left channelcarries the delay effect and the right channel the reverb effect. | |||
| VARIATION | REVERB TIME/ADJUST | |||
| Reverb Mix | Adjusts the mixing ratio of the reverb sound.Turning the control clockwise increases thereverb ratio. | Delay Time | Adjusts the delay time up toa maximum of 743 ms.(Feedback is fixed.) | |
| Weak reverb Strong reverb | Short delay Long delay | |||
| 11. FLG/REV | This is a parallel combination of flanger and reverb. The left channelcarries the flanger effect and the right channel the reverb effect. | |||
| VARIATION | REVERB TIME/ADJUST | |||
| Reverb Mix | Adjusts the mixing ratio of the reverb sound.Turning the control clockwise increases thereverb ratio. | Flanger Rate | Adjusts the modulation rate.(Modulation depth is fixed.) | |
| Weak reverb Strong reverb | Slow modulation Fast modulation | |||
• MIX&SFX Bank
This bank comprises special effects such as MIC SIMULATOR and VOCODER as well as mixdown effects useful for mixdown (mixing multiple tracks onto two final stereo tracks).
The effects from this bank are best used with the MIX control turned fully clockwise, so that only the WET sound is output.

WET sound only
For effects 1 - 4, the parameters adjusted by the VARIATION control and REVERB TIME/ADJUST control are the same.
| 1. POWER MIX | Mixdown effect which emphasizes the bass and gives the sound a powerful punch. | ||
| 2. WIDE MIX | Mixdown effect which stresses the left/right stereo spread. | ||
| 3. BOOST MIX | Mixdown effect which gives the sound a tight low end and snappy high end. | ||
| 4. VOCAL MIX | Brings out suppleness and warmth in vocals by stressing the midrange and adding plate type reverb. | ||
| VARIATION | REVERB TIME/ADJUST | ||
| Reverb Color | Switches the reverb sound character. | Intensity Adjusts the intensity of the respective effects. | |
| 2 - 6: Short reverb mix ratio increases towards higher numbers.1: Reverb = Off | 7 - 11: Long reverb mix ratio increases towards higher numbers. | Weak effect Strong effect | |
| 5. MIC SIMULATOR | Simulates the characteristics of a high-quality condenser microphone while using an economical dynamic microphone. | |||
| VARIATION | REVERB TIME/ADJUST | |||
| Vocal/Inst Comp | Switches the characteristics for vocals or instruments, and adjusts the limiter sensitivity. | Enhance | Adjusts the intensity of the treble enhancer. | |
1 - 6: Vocals Higher numbers result in higher limiter sensitivity.  | 7 - 11: Instruments Higher numbers result in higher limiter sensitivity. | |||
| 6. CABINET SIM | Adds the sound character of an amplifier speaker cabinet to the sound of an electric guitar. | |||
| VARIATION | REVERB TIME/ADJUST | |||
| Combo/Stack & Depth | Selects the amplifier type (combo or stack) and adjusts the effect intensity. | Presence | Adjusts the level of the ultra high range. | |
1 - 6: Combo type Higher numbers result in stronger cabinet sound.  | 7 - 11: Stack type Higher numbers result in stronger cabinet sound. | |||
| 7. ROTARY | Simulates a rotary speaker where the speaker is turned by mechanical means. | |||
| VARIATION | REVERB TIME/ADJUST | |||
| Drive | Adjusts the amount of distortion. Turning the control clockwise increases distortion. | Rotary Rate | Adjusts the speaker rotation speed. | |
Weak distortion  | Strong distortion | Slow rotation | Fast rotation | |
| 8. RING MOD | This is a ring modulator with short delay. | |||
| VARIATION | REVERB TIME/ADJUST | |||
| Delay Mode | Switches the delay mode. | Frequency | Sets the frequency with which the input signal is to be multiplied. | |
1: Delay = Off Varies the input signal modulation frequency.  | - 2 - 10: Varies the delay time from flanging to repeat delay. | |||
| 11: Feedback = Off | ||||
| 9. RESONANCE | This is a filter effect with a resonance component. | |||
| VARIATION | REVERB TIME/ADJUST | |||
| Type & Q | Selects the filter type and adjusts the resonance intensity. | Frequency / Sensitivity | When the Type & Q parameter is set to manual (1 - 6), this control adjusts the cutoff frequency. When the Type & Q parameter is set to automatic (7 - 11), this control adjusts the sensitivity. | |
1 - 6: Manually adjusts the cutoff frequency. Turning the control clockwise increases the resonance.  | 7 - 11: Uses the input signal envelope to automatically alter the cutoff frequency. Turning the control clockwise increases the resonance. | |||
| 10. Lo-Fi EFX | This is a special effect that can be used to purposely degrade sound quality. | |||
| VARIATION | REVERB TIME/ADJUST | |||
| Lo-Fi Color | Selects the sound character. | Tone | Adjusts the effect tone. | |
| 11. VOCODER | This effect lets you use a mic connected to the MIC IN jack to control the signal from a synthesizer supplied to the INPUT L jack. The signal supplied to the INPUT R jack is mixed with the MIC IN signal and can also be used as control signal.To use this effect, turn the MIX control fully to WET. | ||||
| VARIATION | REVERB TIME/ADJUST | ||||
| Mode & Character | Selects the number of filter bands for the VOCODER and the sound character. | Sensitivity | Adjusts the VOCODER sensitivity. | ||
 | 12345 | 18 bands | Fast attack | VOCODER only+ chorus+ distortion + chorus | Low sensitivity High sensitivity |
| Slow attack | VOCODER only+ distortion | ||||
| 67891011 | 10 bands | Fast attack | VOCODER only+ chorus+ distortion + chorus | ||
| Slow attack | VOCODER only+ chorus+ distortion + chorus | ||||

Troubleshooting
| Symptom | Check | Remedy |
| No sound or very low volume | Is sound source connected correctly to INPUT jacks and are OUTPUT jacks connected correctly to playback system? | Follow the instructions in "Getting Connected". |
| Are all shielded cables used for the connection okay? | Try replacing the shielded cables. | |
| Are the connected sound source and playback system operating normally? Is the volume set to a proper position? | Check all components and set the volume to a suitable position. | |
| Are INPUT control and OUTPUT control of RFX-1100 set properly? | Follow the instructions in "Trying Out the Effects" and adjust the controls properly. | |
| Is a microphone connected to the rear-panel INPUT jack? | Connect the microphone to the front-panel MIC IN jack. | |
| Are effects turned off and is the MIX control fully turned to the WET position? | Turn the MIX control towards DRY. | |
| Is MIC ON/OFF switch set to OFF? | To use a microphone connected to the MIC IN connector, the MIC ON/OFF switch must be set to ON. | |
| Input sound breaks up or is distorted | Is input signal level too high? | Adjust INPUT control so that CLIP LED does not light at signal peaks. |
| Is a line-level device such as a synthesizer connected to the front-panel MIC IN connector? | The sensitivity of the MIC IN connector is optimized for microphones. Connect line-level devices to the rear-panel INPUT jacks. | |
| No effect sound | Were effects turned off with foot switch FS01 connected to rear panel? | Press foot switch again to turn effects on. |
| Is incorrect foot switch connected? | Use only ZOOM FS01. |

Specifications
| Preset programs | 363(11 effects x 3 banks x 11 variations) | (Unbalanced operation) Input impedance 50 kilohms | |
| Sampling frequency | 44.1 kHz | Reference input level -56 dBm | |
| A/D converter | 18 bit, 64 times oversampling | Outputs | 2 x standard mono phone jack |
| D/A converter | 18 bit, 8 times oversampling | Output impedance 500 ohms | |
| Reference output level -10 to +4 dBm | |||
| Inputs | Control input | FS01 | |
| Line input | 2 x standard mono phone jack | ||
| Input impedance 10 kiloohms (mono), 20 kiloohms (stereo) | Dimensions | 482 (W) x 115 (D) x 44 (H) mm | |
| Weight | 1.8 kg | ||
| Reference input level -10 to +4 dBm | Supplied accessory | Power cord | |
| Microphone input | XLR-3-31/standard phone combo jack(Balanced operation) Input impedance 4.5 kilohm, pin 2 hot | * 0 dBm = 0.775 Vrms | |
| * Design and specifications are subject to change without notice. | |||
Safety Precautions/Usage Precautions
Safety Precautions
In this manual, symbols are used to highlight warnings and cautions for you to read so that accidents can be prevented. The meanings of these symbols are as follows:

This symbol indicates explanations about extremely dangerous matters. If users ignore this symbol and handle the device the wrong way, serious injury or death could result.

This symbol indicates explanations about dangerous matters. If users ignore this symbol and handle the device the wrong way, bodily injury and damage to the equipment could result.
Please observe the following safety tips and precautions to ensure hazard-free use of the RFX-1100.
Power requirements

- Connect only to AC power outlets rated 100-120 V or 220-240 V 50/60Hz (depending on the voltage range of the unit; refer to the back panel).
- Ground the unit by connecting the ground terminal of the power plug to a good external ground. Do not ground to water pipe, gas pipe, telephone wiring, or lightning arrestor to prevent the risk of electric shock or explosion.
- During lightning or when not using the unit for an extended time, disconnect the power cord from the AC outlet.
- Do not pinch the power cord, bend it forcedly, or place heavy objects on the power cord.
Environment

Avoid using your RFX-1100 in environments where it will be exposed to:
• Extreme temperatures
- Heat sources such as radiators or stoves.
• High humidity or moisture
• Excessive dust or sand
• Excessive vibration or shock

Keep space around the unit for sufficient ventilation.
Do not impede the ventilation openings with objects such as newspapers or curtains.
Handling

- Never place objects filled with liquids, such as vases, on the RFX-1100 since this can cause electric shock.
- Do not place naked flame sources, such as lighted candles, on the RFX-1100 since this can cause fire.

The RFX-1100 is a precision instrument. Do not exert undue pressure on the keys and other controls. Also take care not to drop the unit, and do not subject it to shock or excessive pressure.
Alterations

Never open the case of the RFX-1100 or attempt to modify the product in any way since this can result in damage to the unit.
Volume

Do not use the RFX-1100 at a loud volume for a long time since this can cause hearing impairment.
Connecting cables and input and output jacks

You should always turn off the power to the RFX-1100 and all other equipment before connecting or disconnecting any cables. Also make sure to disconnect all connection cables and the power cord before moving the RFX-1100.
Usage Precautions
Electrical interference For safety considerations, the RFX-1100 has been designed to provide maximum protection against the emission of electromagnetic radiation from inside the device, and protection from external interference. However, equipment that is very susceptible to interference or that emits powerful electromagnetic waves should not be placed near the RFX-1100, as the possibility of interference cannot be ruled out entirely.
With any type of digital control device, the RFX-1100 included, electromagnetic interference can cause malfunctioning and can corrupt or destroy data. Care should be taken to minimize the risk of damage.
Cleaning
Use a soft, dry cloth to clean the RFX-1100. If necessary, slightly moisten the cloth. Do not use abrasive cleanser, wax, or solvents (such as paint thinner or cleaning alcohol), since these may dull the finish or damage the surface.
Please keep this manual in a convenient place for future reference.
The FCC regulation warning (for U.S.A.)
This equipment has been tested and found to comply with the limits for a Class B digital device, pursuant to Part 15 of the FCC Rules. These limits are designed to provide reasonable protection against harmful interference in a residential installation. This equipment generates, uses, and can radiate radio frequency energy and, if not installed and used in accordance with the instructions, may cause harmful interference to radio communications. However, there is no guarantee that interference will not occur in a particular installation. If this equipment does cause harmful interference to radio or television reception, which can be determined by turning the equipment off and on, the user is encouraged to try to correct the interference by one or more of the following measures:
- Reorient or relocate the receiving antenna.
- Increase the separation between the equipment and receiver.
- Connect the equipment into an outlet on a circuit different from that to which the receiver is connected.
- Consult the dealer or an experienced radio/TV technician for help.

ZOOM CORPORATION
ITOHPIA Iwamotocho 2chome Bldg., 2-11-2, Iwamoto-cho,
Chiyoda-ku, Tokyo 101-0032, Japan
Web Site: http://www.zoom.co.jp
- • 33 immediately usable effects
- • Built-in professional quality reverb
- - Innovative choices
- - Attractive mixdown effects
- - Intuitive editing controls
- - MIC IN connector
- Contents
- Front Panel
- MIC IN connector
- MIC ON/OFF switch
- MIC IN indicator
- Level meter
- INPUT control
- OUTPUT control
- MIX control
- Rear Panel
- POWER connector
- BYPASS jack
- REVERB TIME/ADJUST control
- CHARACTER/VARIATION selector
- BANK selector
- - MIX&SFX bank
- EFFECT TYPE selector
- POWER switch
- POWER indicator
- OUTPUT jacks
- INPUT jacks
- Rack Mounting
- Getting Connected
- Basic Connections
- Insert Connection
- Send/Return Connection
- Using the VOCODER Effect
- Using Two Effects in Parallel
- Trying Out the Effects
- MIX control
- - When using the insert type connection pattern
- - When using the send/return type connection pattern
- REVERB TIME/ADJUST control
- • REVERB bank selected with BANK selector
- - EFFECTS/MIX&SFX bank selected with selector
- CHARACTER/VARIATION selector
- • EFFECTS/MIX&SFX bank selected with selector
- RFX-1100 Effects
- • REVERB Bank
- - EFFECTS Bank
- • MIX&SFX Bank
- Troubleshooting
- Specifications
- Safety Precautions/Usage Precautions
- Safety Precautions
- Power requirements
- Environment
- Handling
- Alterations
- Volume
- Connecting cables and input and output jacks
- Usage Precautions
- Cleaning
- The FCC regulation warning (for U.S.A.)
- ZOOM CORPORATION
Brand : ZOOM
Model : RFX-1100
Category : Guitar Effects