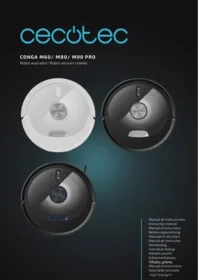
Conga M80 Pro - Robot vacuum CECOTEC - Free user manual and instructions
Find the device manual for free Conga M80 Pro CECOTEC in PDF.


| Product type | Robot vacuum cleaner |
| Brand | Cecotec |
| Model | Conga M80 Pro |
| Dimensions (L x W x H) | 34 x 34 x 9 cm |
| Weight | 3 kg |
| Power supply | Lithium-ion battery 14.4 V / 2600 mAh |
| Battery life | Up to 100 minutes |
| Charging time | Approximately 4 to 5 hours |
| Dustbin capacity | 400 ml |
| Suction power | 2000 Pa |
| Filtration | HEPA filter |
| Noise level | 55 dB |
| Scheduling | Weekly scheduling |
| Sensors | Anti-drop and obstacle |
| Cleaning modes | Auto, turbo, edge, spot |
| Maintenance | Regularly clean the dustbin, brushes, and filter |
| Safety | Anti-drop sensors, overload protection |
| Spare parts available | Side brushes, HEPA filter, battery |
| Warranty | 2 years |
Frequently Asked Questions - Conga M80 Pro CECOTEC
User questions about Conga M80 Pro CECOTEC
0 question about this device. Answer the ones you know or ask your own.
Ask a new question about this device
Download the instructions for your Robot vacuum in PDF format for free! Find your manual Conga M80 Pro - CECOTEC and take your electronic device back in hand. On this page are published all the documents necessary for the use of your device. Conga M80 Pro by CECOTEC.
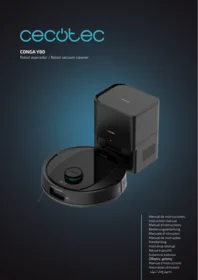
USER MANUAL Conga M80 Pro CECOTEC
Robot aspirador/ Robot vacuum cleaner


- Parts and components 71
- Before use 72
- Installation 72
- Operation 73
- Wi-Fi connectivity and mobile App 75
- Cleaning and maintenance 76
- Troubleshooting 78
- Recycling of electrical and electronic equipment 79
- Information on data stored by connected products in accordance with Regulation (EU) 2023/2854
("Data Regulation") 80 - Copyright 80
- EU Declaration of Conformity 80
SOMMAIRE
EU01_122029-Conga M60 Pro
EU01_122030-Conga M80 Pro
EU01_122031-Conga M90 Pro
EN • The coding in this manual is generic and applies to all code variants of the appliance.
Read the following instructions carefully before using the appliance. Keep this instruction manual for future reference or new users.
- This appliance must be used in accordance with these operating instructions. Cecotec will not be held liable or responsible for any damages or injuries caused by improper use.
- Ensure that the mains voltage matches the voltage stated on the product's rating label and that the socket is properly earthed.
- Check the power cord regularly for visible damage. If the cord is damaged, it must be repaired by Cecotec's Official Technical Support Service to avoid any hazard.
- This appliance is intended for domestic use only and is not suitable for use in commercial establishments such as bars, restaurants, farms, hotels, motels, and offices.
- Do not attempt to repair the appliance yourself. Contact Cecotec's Official Technical Support Service for any query or repair.
- Do not use the appliance to vacuum liquids, lit matches, cigarette ends, hot ash, or on wet surfaces.
- Do not use this appliance on concrete, asphalt, or other rough surfaces.
- Stop using the appliance if you notice an abnormal sound or sense a temperature higher than usual.
- Do not block the appliance openings or airflow. Keep openings free of any objects, and do not block them with clothes or your fingers.
- Switch off and ensure the appliance is unplugged from the mains power supply when not in use for extended periods, before cleaning, before assembling or disassembling
components and before removing the battery. To unplug the appliance, pull the plug, not the cord.
- WARNING: the appliance has rotating parts which may pose a risk of entrapment. Exercise extreme caution.
- Do not immerse the cord, plug, or any other non-removable part of the appliance in water or any other liquid or expose electrical connections to water. Make sure your hands are dry before handling the plug or switching on the appliance.
- This appliance can be used by children aged 8 years and above and people with reduced physical, sensory, or mental capabilities or lack of experience and knowledge if they have been given supervision or instruction concerning the use of the appliance in a safe way and understand the hazards involved. Children must not play with the appliance. Cleaning and user maintenance must not be carried out by children without supervision.
- Never touch the cord or the power socket with wet hands.
- Do not expose the appliance to direct sunlight, fire, water, or moisture.
- Do not sit or place sharp or heavy objects on top of the appliance.
- Before operating the robot vacuum cleaner, prepare the room and supervise it. To do so, remove any objects and cables that may affect its operation.
- Keep the appliance away from clothing, curtains, and similar materials.
- Always place the appliance on a flat and stable surface. Avoid placing it on unstable surfaces it could fall from (such as tables or chairs).
- Before operation, make sure all the robot vacuum cleaner and charging base connections are in good condition.
-
Avoid operating the robot vacuum cleaner under extremely high or low temperatures.
-
The appliance must only be used with the battery supplied with the appliance or with compatible charging units approved by Cecotec.
- Non-rechargeable batteries must not be recharged.
- Make sure the appliance is not plugged to a mains socket before cleaning it or carrying out maintenance on it.
- Make sure the charging base is not plugged to a power outlet before cleaning it.
Battery instructions
- The appliance includes a Li-ion battery. Do not incinerate or expose it to high temperatures, as it may explode.
- Batteries may leak under extreme conditions. Should that be the case, do not touch the liquid. If the liquid comes into contact with skin, wash immediately with soap and water. If the liquid gets into the eyes, rinse them immediately with clean water for at least 10 minutes and seek medical attention. Wear gloves when handling the battery and dispose of it immediately in accordance with local regulations.
- Avoid contact between batteries and small metal objects such as paper clips, coins, keys, nails, or screws.
- Never modify the battery in any way.
- Batteries must be removed from the appliance for safe disposal.
- Keep batteries out of the reach of children if they can be swallowed.
- Battery ingestion can cause burns, perforation of soft tissue, and death. It can cause severe burns within two hours of the ingestion.
-
In case of battery ingestion, please seek medical help immediately.
-
WARNING: to recharge the battery, use only the charging base supplied with the appliance.
- The batteries' supply terminals must not be short-circuited.
- If the appliance is to be stored for a long period of time, it is advisable to remove the batteries.
- Batteries must be inserted in the correct position. Pay attention to polarity when inserting it.
INSTRUCTIONS DE SÉCURITÉ
https://cecotec.es/es/information/declaration-of-conformity
1. PARTS AND COMPONENTS
Figure 1:
- Laser
- Top cover
- Back Home button
- Power ON/OFF button
- Object recognition sensor
- Bumper
- Wall sensor
Figure 2:
- Anti-collision sensors
- Side brush
- Main brush
- Omnidirectional wheel
- Drive wheels
- Battery
- Main brush cover latch
- Mop pad
Figure 3:
- Mixed tank release button
- Charging contacts
- Mixed tank
Figure 4:
- Mixed tank lid
- Filter
- Filter cover
- Water inlet
- Mop holder
- Suction inlet
Figure 5:
- Status indicator light
- Charging terminals
Note:
The graphics in this manual are schematic representations and may not exactly match the product.
2. BEFORE USE
- This appliance comes in a packaging designed to protect it during transport. Remove the appliance from its box. You can keep the original box and other packaging materials in a safe place to prevent damage to the appliance if you need to transport it in the future. If you wish to dispose of the original packaging, make sure all items are recycled properly.
- Check that all parts and components are included and in good condition. If any of them are missing or damaged, please contact Cecotec's Official Technical Support Service immediately.
Box content:
- Robot vacuum cleaner
- Charging base
- Mop pad
- Side brush
- Instruction manual
- Do not remove the product's serial number in order to keep proper traceability if technical assistance is required.
3. INSTALLATION
Charging base installation
Reserve a space of at least 0.6 m to the left and right and 1.5 m in depth. Fig. 6.
Make sure the location has good Wi-Fi access to enhance the mobile app experience. Connect the base and check that the status indicator is lit.
Note:
- Place the base against a wall on a hard, level surface (wood, tile, etc.).
- Remove wires, hard or sharp objects (such as nails or glass) and loose items from the floor, and remove any unstable, fragile, valuable or dangerous objects that may block or slow down the operation of the robot vacuum cleaner.
When using the robot in elevated area, always use a physical safety barrier to prevent accidental falls that could result in personal injury or property damage.
Installing the mop pad and filling the water tank
Fig. 7
- Remove the mixed tank (18), open the filler cap (22) and fill the tank with water.
- Reinstall the mixed tank (18).
- Attach the mop pad (15) to the mop holder (23) in the correct position and firmly.
- Align and install the mop holder (23) on the robot until you hear a "click".
4. OPERATION
On/Off
Press and hold the On/Off button (4) to switch the robot on or off. The power indicator will light up when the robot is switched on.
Note:
To ensure proper operation and achieve the best cleaning result:
- Fully charge the robot before first use.
- Fill the mixed tank (18) with water before the first operation, as indicated above.
Pause
When the robot is running, press any button to pause it. Press the On/Off button (4) to resume cleaning. Press the Back Home button (3) to send it back to the charging base.
Note:
Placing the paused robot manually on the charging base will end the cleaning cycle in progress.
Charging
- After cleaning, the robot vacuum cleaner will automatically return to the base to recharge.
- In Pause mode, press the Back Home button (3) to send the robot back to the base.
Starting operation
- Press the On/Off button (4) to start cleaning. The robot will plan the route based on its recognition of the layout, divide the room into zones, first delimit the edges of each zone, and then fill them in with a zigzag pattern.
ENGLISH
- In this way, the robot cleans all areas one by one, performing an efficient cleaning of the house.
Notes:
- For the robot to clean and automatically return to the charging base, start it from the base. Do not move the base during cleaning.
- Cleaning cannot begin if the battery level is too low. Allow the robot to charge before starting.
- Before cleaning, pick up cables (including the base power cord) and valuable objects from the floor. The robot may drag them and cause disconnection of electrical appliances or damage to cables and property.
- If the battery runs low during cleaning, the robot will automatically return to the base. After recharging, it will resume cleaning where it left off.
- Before each cleaning task, ensure the mop pad (15) is correctly installed on the mop holder (23).
Suction power and water flow adjustment (custom mode)
In the app, activate custom mode and select the desired setting.
Manual mode
The robot vacuum cleaner can be moved manually by selecting manual mode in the app and using the arrow keys (directional controls).
Restricted Area mode
Mark on the map the areas you do not want the robot to clean.
Selected areas cleaning
Mark on the map the areas you want the robot to clean.
Standby mode
- If no operation is performed for 10 minutes, the robot will automatically enter sleep mode and the power indicator light will turn off.
- In sleep mode, press any button on the robot to reactivate it.
- If no operation is performed for 13 hours, the robot will automatically power off.
Do Not Disturb mode
- It can be modified or cancelled from the app.
- When this mode is activated, the robot does not automatically resume cleaning and does
not self-empty into the charging base after finishing cleaning; furthermore, the power indicator and voice prompts remain disabled.
5. WI-FI CONNECTIVITY AND MOBILE APP
Scan the following QR code to download the app, access the manual, guides, and technical support.
| Reference | EU01_122029 – Conga M60 Pro | EU01_122030 – Conga M80 Pro | EU01_122031 – Conga M90 Pro |
| QR code |  |  |  |
- Download the Cecotec app from Google Play or the App Store.
- If this is the first time you are using the app you will need to create an account, otherwise log in.
- Within the Cecotec App, go to the top right corner and press the "+" icon. Then select the "Add device" option.
The device will appear flashing at the top of the application, indicating that it is ready to be paired. Select it to continue with the process and follow the steps shown in the App.
You can also search and add the product manually. Go to the side menu and select the corresponding range and locate the model of your product. Tap on it to start the pairing process and follow the steps indicated in the App. Once successfully paired for the first time, the device will be saved on your phone and you will be able to access it from the application to control all its functions.
Notes:
- The device is in pairing mode by default when turned on. If not, press and hold the robot's "Home" button for a few seconds until you hear a sound. The device will then automatically enter visible mode and is ready for pairing.
- You can unlink the device from the App by accessing the device panel (where all its functions are displayed), going into Settings and selecting "Remove device", where you can also delete the recorded data.
If you prefer to do this manually, press and hold the "Home" button on the robot for a few seconds until you hear a sound. The device will then unlink automatically.
6. CLEANING AND MAINTENANCE
Side brush
Fig. 8
- Pull the side brush (9) upwards to remove it.
- Remove debris from the side brush (9) and its housing.
- Reinstall the side brush (9) by pressing down until you hear a "click".
Main brush
Fig. 9
- Press in the latches on the main brush cover (10) and release the main brush cover latch (14) to remove the cover.
- Remove the main brush (10) and remove any hair and dirt accumulated on the brush and its ends.
- Replace the main brush (10) and close the cover until you hear a "click", securing the main brush cover latch (14).
Tank and filter
Fig. 10
- Press the mixed tank release button (16) and remove the mixed tank (18).
- Open the mixed tank (18) and empty its contents into a rubbish bin.
- Use the self-cleaning brush to clean the interior of the mixed tank (18).
- Open the filter cover (21), remove the filter (20) and tap it gently to remove any dust; then reinstall the filter (20) and close the filter cover (21).
- Reinstall the mixed tank (18) on the robot until the mixed tank release button (16) is locked.
Note:
Do not touch the surface of the filter (20) with your hands, brushes or hard objects to avoid damage.
Sensors
Fig. 11
- Clean all sensors with a soft, dry cloth: Laser (1), object recognition sensor (5), wall sensor (7) and anti-collision sensors (8).
Note: the laser (1) is a sensitive sensor. Do not exert force, insert objects or attempt to adjust it. Do not sit on or place objects on the robot's top cover (2).
Omnidirectional wheel
Fig. 12
- Using a flat-head screwdriver as a lever, firmly grasp the omnidirectional wheel (11) and pull it outwards.
- Clean the omnidirectional wheel (11) and all its components, including the wheel assembly and housing.
- Press the omnidirectional wheel (11) down to lock it in place.
Charging base
Fig. 13
- Unplug the charging base from the power socket.
- Use a clean, soft cloth to clean the charging terminals (26).
Note: Do not use corrosive liquids to clean the charging terminals (26).
Mopping assembly maintenance
Fig. 14
- Remove the mop holder (23) with the mop pad (15) from the robot.
- Remove the mixed tank (18) and empty the waste water through the water inlet opening (22).
- Gently shake to remove any residue accumulated on the mop holder (23).
- Wash the mop pad (15) with clean water. Allow all parts to air dry before reinstalling.
Note:
Empty the water from the tank after each use to avoid possible water damage.
Charging and battery replacement
Fig. 15
- Using a Phillips screwdriver, open the battery compartment (13).
- Disconnect the old battery (13), connect the new one and screw the compartment cover back on.
Note:
- To extend battery life, leave the robot vacuum cleaner charging on the charging base whenever not in use.
- If the robot is not to be used for an extended period of time, remove the battery and store it in a safe, dry place.
- Do not use this product's rechargeable battery in other devices.
Table - Recommended maintenance frequency
| Item | Maintenance method | Frequency | Replacement |
| Mixed tank (18) | Cleaning | Daily | — |
| Filter (20) | Cleaning | Weekly | Every 3-6 months |
| Side brush (9) | Cleaning | Weekly | Every 3-6 months |
| Main brush (10) | Cleaning | Weekly | Every 3-6 months |
| Sensors (1, 5, 7, 8) | Cleaning | Weekly | — |
| Omnidirectional wheel (11) | Cleaning | Weekly | — |
| Battery (13) | Replacement | — | Every 12-24 months |
7. TROUBLESHOOTING
| Problem | Solution |
| The robot does not switch on. | Low battery. Place the robot on the base and charge it before use. |
| The battery temperature is too high or too low. Use the robot only within 0-40°C range. | |
| Unable to charge battery. | The charging base is not connected to the mains. Check that both ends of the power cord are properly connected. |
| Poor contact. Clean the charging connectors (17) on the robot and the charging contacts on the base. | |
| Confirm that the status indicator on the charging base is lit. |
| Problem | Solution |
| The robot cannot be docked. | There are too many obstacles near the charging base. Move it to an open area. |
| The robot is too far away from the charging base. Bring it closer and try again. | |
| The base locating element may be dirty. Clean it with a dry cloth. | |
| Unable to connect to Wi-Fi. | Wi-Fi disabled. Reset the Wi-Fi and try again. |
| Weak Wi-Fi signal. Move the robot to an area with good coverage. | |
| Abnormal Wi-Fi connection. Reset the Wi-Fi, download the latest version of the mobile app and try again. | |
| The Wi-Fi connection is unstable. Reset the router, check if there are any app updates and try again. | |
| Noise during cleaning. | The main brush (10), side brush (9), drive wheels (12) or omnidirectional wheel (11) may be blocked. Switch off the robot with the On/Off button (4) and clean these components. |
| Cleaning does not resume after recharging. | Check that the robot is not in Do Not Disturb mode. |
| The “Skip carpets” option is enabled in the app. Check the settings in the app. | |
| The programmes are not effective. | Check that the robot is not in Do Not Disturb mode. |
| Programmes only run when the battery level is above 20%. | |
| Mopping is not effective. | Check the water flow rate setting in the app. |
| Verify that the tank (18) has been refilled as required by opening the water inlet (22). |
8. RECYCLING OF ELECTRICAL AND ELECTRONIC EQUIPMENT


This symbol indicates that, according to the applicable regulations, the product and/or battery must be disposed of separately from household waste. When this product reaches the end of its shelf life, you should dispose of the batteries/accumulators and take them to a collection point designated by the local authorities.
For detailed information on how to properly dispose of electrical and electronic equipment and/or the corresponding batteries, consumers should contact their local authorities.
Information regarding national packaging recycling systems and their marking can be found on our website.
Compliance with the above guidelines will help protecting the environment.
9. INFORMATION ON DATA STORED BY CONNECTED PRODUCTS IN ACCORDANCE WITH REGULATION (EU) 2023/2854 ("DATA REGULATION")
Cecotec's connected products and related services are those that generate different data and information during use. In accordance with the provisions of the Data Regulation, through this document Cecotec provides you with information about your rights concerning the data generated and about how to access such data.
This right allows you to use the data for any lawful purpose, including, among others, product and/or service optimisation or contracting post-sale services with third parties.
As a user, you may exercise your right of access, within the limits provided for by the Data Regulation, through the email address data.act@cecotec.es. To protect the generated data—and in order to prevent fraud or identity theft—CECOTEC may require additional information to verify your status as a user.
Data is stored for a determined period of time.
10. COPYRIGHT
The intellectual property rights over the texts in this manual belong to CECOTEC INNOVACIONES, S.L. All rights reserved. The content of this publication may not, either in part or in its entirety, be reproduced, stored in a retrieval system, transmitted or distributed by any means (electronic, mechanical, photocopying, recording or similar) without prior authorisation from CECOTEC INNOVACIONES, S.L.
11. EU DECLARATION OF CONFORMITY

Cecotec Innovaciones hereby declares that these robot vacuum cleaners, models EU01_122029 - Conga M60 Pro, EU01_122030 - Conga M80 Pro y EU01_122031 - Conga M90 Pro, are in conformity with the
Radio Equipment Directive 2014/53/EU.
The full text of the EU Declaration of Conformity can be found on the following website: https://cecotec.es/es/information/declaration-of-conformity
1. PIÈCES ET COMPOSANTS
Image 1:
| Referenz | EU01_122029 – Conga M60 Pro | EU01_122030 – Conga M80 Pro | EU01_122031 – Conga M90 Pro |
| QR Code |  |  |  |
https://storececotec.de/de/information/declaration-of-conformity
1. PARTI E COMPONENTI
Figura 1:
5. CONNESSIONE WI-FI E APP
https://storececotec.it/it/information/declaration-of-conformity
1. PEÇAS E COMPONENTES
Figura 1:
https://cecotec.es/es/information/declaration-of-conformity
1. ONDERDELEN EN COMPONENTEN
Fig. 1
7. PROBLEEMOPLOSSING
https://cecotec.es/es/information/declaration-of-conformity
1. CZĘŚCI I KOMPONENTY
Rysunek 1:
5.ŁĄCZNOŚĆ I APLIKACJA WIFI
5.PŘIPOJENÍ A APLIKACE K WIFI
https://cecotec.es/es/information/declaration-of-conformity
1. PARÇALAR VE BILEŞENLER
Şekil 1:
| Referans | EU01_122029 – Conga M60 Pro | EU01_122030 – Conga M80 Pro | EU01_122031 – Conga M90 Pro |
| QR Kodu |  |  |  |
https://cecotec.es/es/information/declaration-of-conformity
1. MEPH KAI E≡APTHMATA
Σχήμα 1:
https://cecotec.es/es/information/declaration-of-conformity
1. PECES I COMPONENTS
Figura 1:
https://cecotec.es/ca/information/declaration-of-conformity
https://cecotec.es/es/information/declaration-of-conformity
https://cecotec.es/es/information/declaration-of-conformity

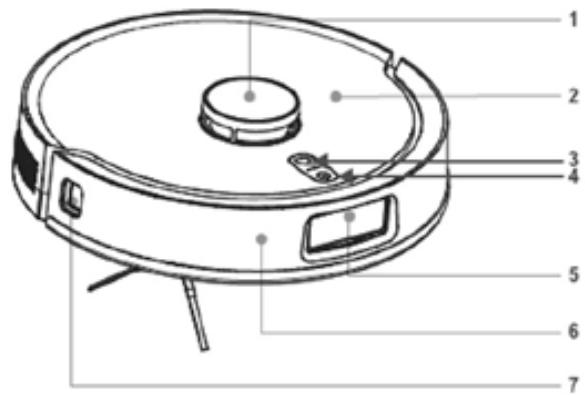
Fig./Img./Abb./Afb./ Rys. 1
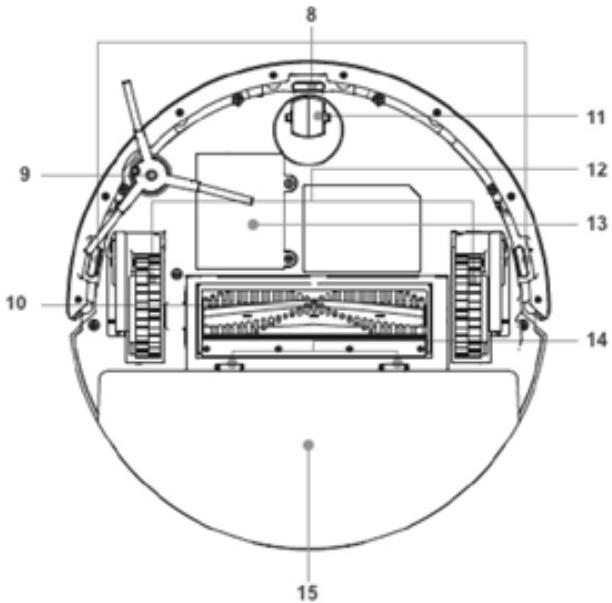
Fig./Img./Abb./Afb./Rys. 2

Fig./Img./Abb./Afb./Rys. 3
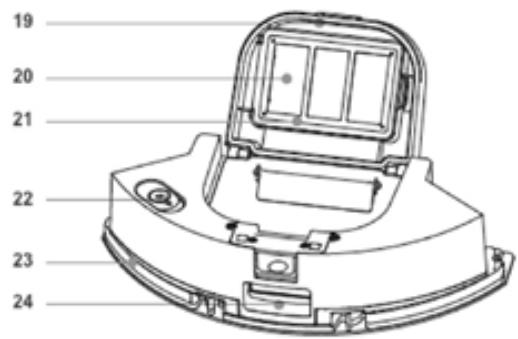
Fig./Img./Abb./Afb./Rys. 4
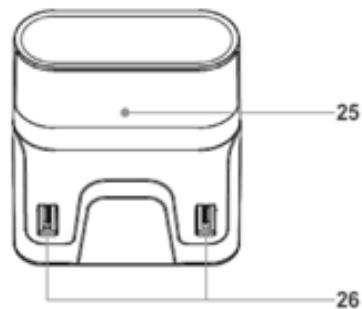
Fig./Img./Abb./Afb./Rys. 5

Fig./Img./Abb./Afb./Rys. 6
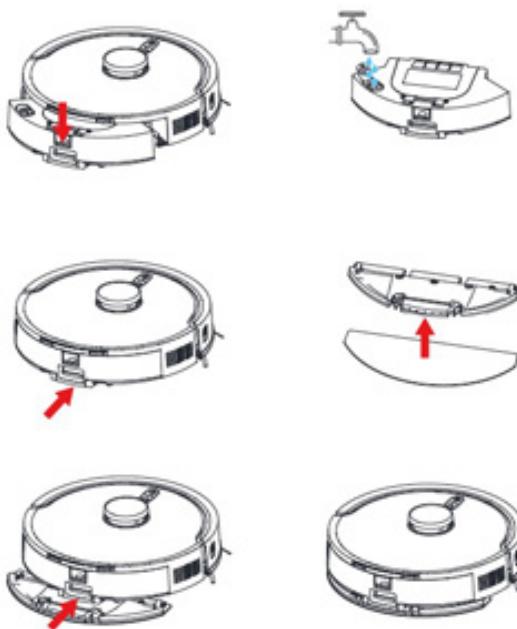
Fig./Img./Abb./Afb./Rys. 7
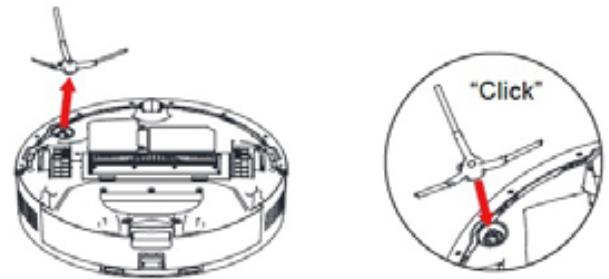
Fig./Img./Abb./Afb./Rys. 8

Fig./Img./Abb./Afb./Rys. 9

Fig./Img./Abb./Afb./Rys. 10
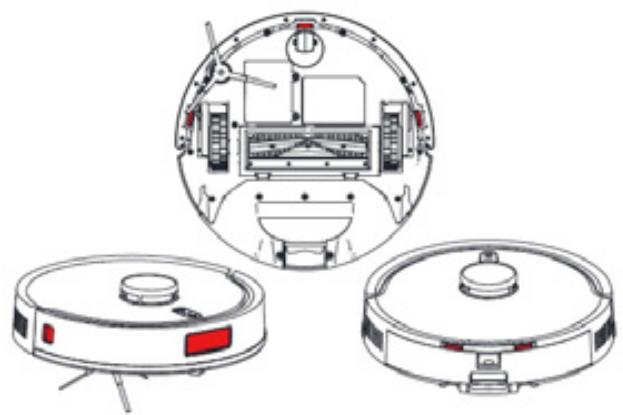
Fig./Img./Abb./Afb./Rys. 11

Fig./Img./Abb./Afb./Rys. 12

Fig./Img./Abb./Afb./Rys. 13

Fig./Img./Abb./Afb./Rys. 14

Fig./Img./Abb./Afb./Rys. 15
www.cecotec.es
- SOMMAIRE
- Battery instructions
- INSTRUCTIONS DE SÉCURITÉ
- PARTS AND COMPONENTS
- Figure 1:
- Figure 2:
- Figure 3:
- Figure 4:
- Figure 5:
- BEFORE USE
- Box content:
- INSTALLATION
- Charging base installation
- Note:
- Installing the mop pad and filling the water tank
- OPERATION
- On/Off
- Pause
- Charging
- Starting operation
- ENGLISH
- Notes:
- Suction power and water flow adjustment (custom mode)
- Manual mode
- Restricted Area mode
- Selected areas cleaning
- Standby mode
- Do Not Disturb mode
- WI-FI CONNECTIVITY AND MOBILE APP
- CLEANING AND MAINTENANCE
- Side brush
- Main brush
- Tank and filter
- Sensors
- Omnidirectional wheel
- Charging base
- Mopping assembly maintenance
- Charging and battery replacement
- TROUBLESHOOTING
- RECYCLING OF ELECTRICAL AND ELECTRONIC EQUIPMENT
- INFORMATION ON DATA STORED BY CONNECTED PRODUCTS IN ACCORDANCE WITH REGULATION (EU) 2023/2854 ("DATA REGULATION")
- COPYRIGHT
- EU DECLARATION OF CONFORMITY
- PIÈCES ET COMPOSANTS
- Image 1:
- PARTI E COMPONENTI
- Figura 1:
- CONNESSIONE WI-FI E APP
- PEÇAS E COMPONENTES
- ONDERDELEN EN COMPONENTEN
- Fig. 1
- PROBLEEMOPLOSSING
- CZĘŚCI I KOMPONENTY
- Rysunek 1:
- 5.ŁĄCZNOŚĆ I APLIKACJA WIFI
- 5.PŘIPOJENÍ A APLIKACE K WIFI
- PARÇALAR VE BILEŞENLER
- Şekil 1:
- MEPH KAI E≡APTHMATA
- Σχήμα 1:
- PECES I COMPONENTS
Brand : CECOTEC
Model : Conga M80 Pro
Category : Robot vacuum