MOODD - Stroller QUINNY - Free user manual and instructions
Find the device manual for free MOODD QUINNY in PDF.

User questions about MOODD QUINNY
0 question about this device. Answer the ones you know or ask your own.
Ask a new question about this device
Download the instructions for your Stroller in PDF format for free! Find your manual MOODD - QUINNY and take your electronic device back in hand. On this page are published all the documents necessary for the use of your device. MOODD by QUINNY.
USER MANUAL MOODD QUINNY
French Guide Included
Install Infant Car Seat 8
To Remove Seat Pad 9
Stroller Care and Maintenance 10
Replaceable Parts 10
Warranty 10
FOR THE SAFETY OF YOUR CHILD, PLEASE READ THE FOLLOWING WARNINGS AND ASSEMBLY INSTRUCTIONS AND KEEP FOR FUTURE REFERENCE.
- Adult assembly required.
- CAUTION: Keep small parts away from children during assembly.
- NEVER LEAVE CHILD UNATTENDED. ALWAYS keep child in view when in stroller.
- AVOID SERIOUS INJURY from falling or sliding out. ALWAYS use seat belt. Check frequently to make sure it is secure.
- ALWAYS keep fingers away from moving parts, when folding, unfolding or adjusting stroller to prevent finger entrapment.
- ALWAYS make sure stroller is FULLY OPEN AND LOCKED before using.
- ALWAYS use the brakes when stroller is stopped.
- ALWAYS remove protective material and poly bags and dispose before assembly.
- NEVER use stroller on stairs or escalators.
- NEVER rollerblade with stroller.
- NEVER allow children to play with or hang onto the stroller.
- NEVER allow children to climb into the stroller unassisted. Stroller may tip over and injure child.
- NEVER place or hang parcels, bags or accessories on the handle or canopy. The stroller may tip over or the canopy may collapse.
- This product will become unstable if a parcel bag or rack is used when there is no provision for one.
- This product may become unstable if a parcel bag, other than the one recommended by the manufacturer is used.
- This product will become unstable if the manufacturer's recommended load is exceeded.
- DO NOT carry additional children, goods or accessories in or on this product except as recommended in the manufacturer's instructions.
- NEVER place more than 11-LBS. (5-kg) in the storage basket. If weight is exceeded, hazardous unstable conditions may exist.
- STROLLER is only for use with children up to 50-LBS. (22.73-kg), and WHEN SEATED, the midpoint of the child's head is at or below the top of the stroller seat.
- ONLY use this stroller with ONE child at a time.
- STROLLER is for use with children who can sit up unassisted, and is NOT recommended for newborns.
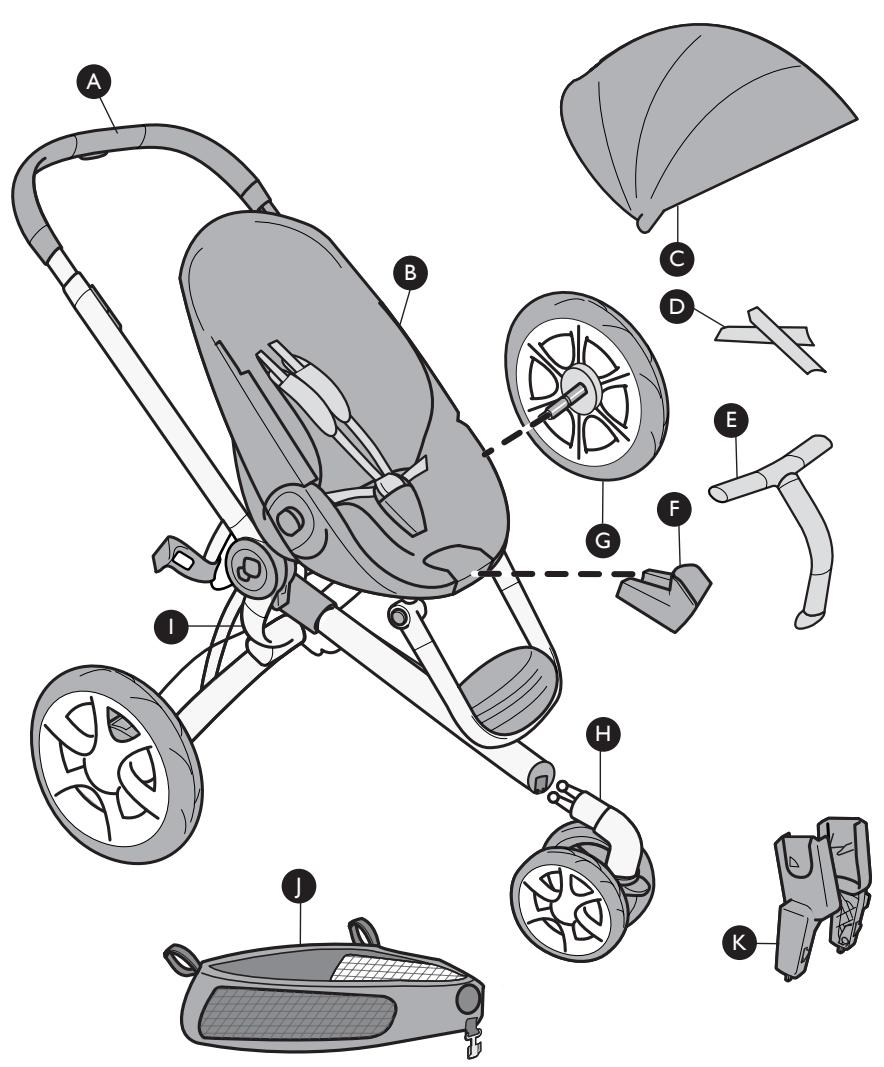
Adjustable height handle
B Seat
Canopy
Canopy inserts (2)
E Front bar
F Front bar insert plate
Rear wheels (2)
Front wheel unit
Transport strap
Shopping basket
K Maxi-Cosi Mico® car seats and Quinny Dreami™ bassinet adapters* (2)
-
Maxi-Cosi Mico® Infant Car Seats and Quinny Dreamami™ bassinet sold separately.
-
Keep these instructions for future use.
- Lay out and identify all parts.
- Do not return this product to the place of purchase. If any parts are missing, call Consumer Relations at (800) 951-4113. Or visit our website at www.quinny.com.
- Include the model number and manufacture date (found on the bottom rail of stroller).
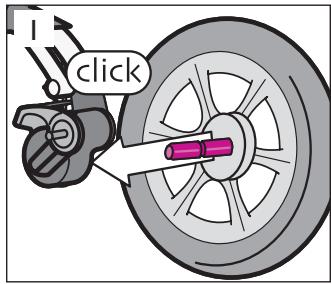
Install Rear Wheels
Slide the rear wheel axle into the frame until you hear a "click" (Figure 1). Repeat for other rear wheel. Pull to confirm each is assembled securely.
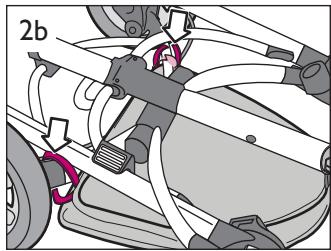
2 Attach Shopping Basket
Slide basket onto frame tube through opening (Figure 2) then slide tab into tube at the front center (Figure 2a).
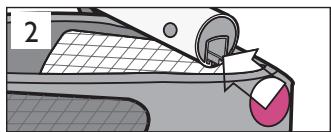
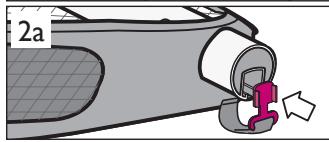
Secure hook-and-loop strap around frame above each rear wheel (Figure 2b).
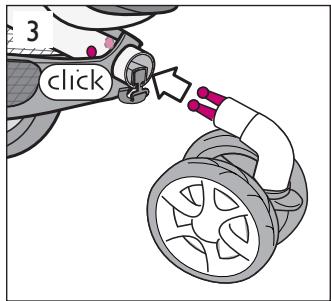
3 Install Front Wheel Unit
Squeeze the front wheel fork while inserting it into the frame tube. Push front wheel into frame tube until you hear a "click"
(Figure 3).
Pull to confirm it is assembled securely.
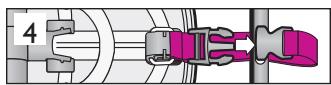
4 Unfold Stroller
Unfasten transport strap (Figure 4).
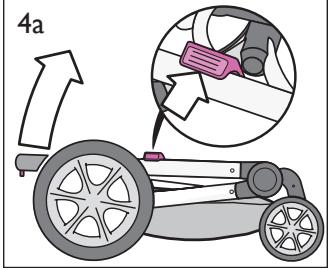
Push back on frame lock to release and gently pull up on frame from handlebar (Figure 4a).
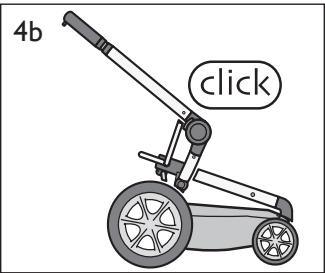
Frame will begin to unfold automatically and click into place (Figure 4b).
NOTE: The Moodd stroller frame has a unique mechanism that enables the automatic unfolding of the frame. The temperature can affect the functioning of this mechanism. In cold or frosty weather, the stroller may unfold more slowly than usual (at room temperature).
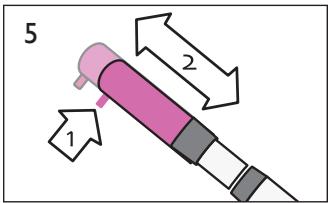
5 Adjust Handlebar Height
Squeeze the adjustment button and slide the handlebar to desired height (Figure 5). The handlebar will click into place.
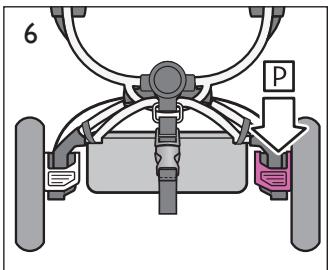
6 Parking Brake
Always use the parking brake, even when standing still for only a few moments! Push firmly down on the red pedal (P) behind the rear wheel to set the parking brake (Figure 6). Push the opposite pedal to release the parking brake.
NOTES: The seat can be positioned facing the handlebar or forward. The Moodd stroller seat is suitable for children from 6 months (maximum 50-LBS. / 22.73-kg).
7 Attach Seat Facing Handlebar or Forward
Slide both sides of the seat into the frame until you hear each side click.
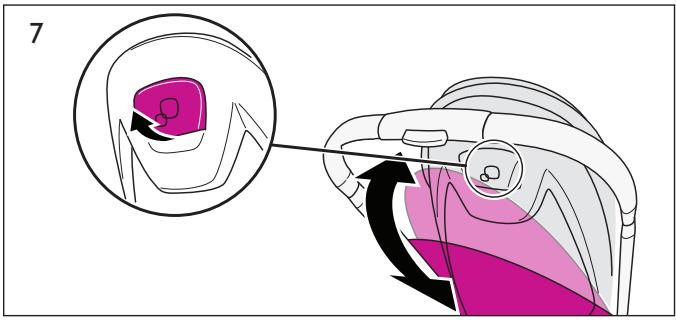
To Recline Seat Facing Handlebar or Forward
To recline the seat use recline mechanism located behind seat. Recline to desired position, seat will click into place (Figure 7). There are only THREE positions in each orientation.
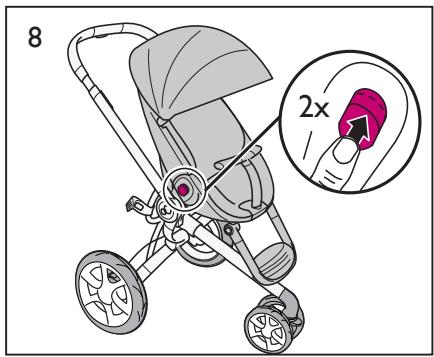
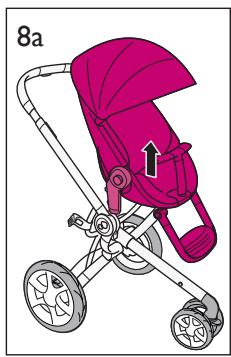
8 To Remove Seat
Squeeze up on the buttons on both sides (Figure 8) and lift the seat from the frame (Figure 8a).
NOTE: When buttons are depressed they stay depressed until the seat is locked into the stroller.
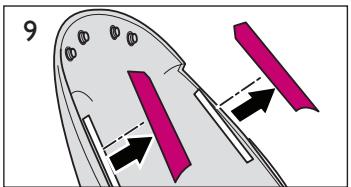
9 Canopy
Remove inserts before installing canopy (Figure 9).
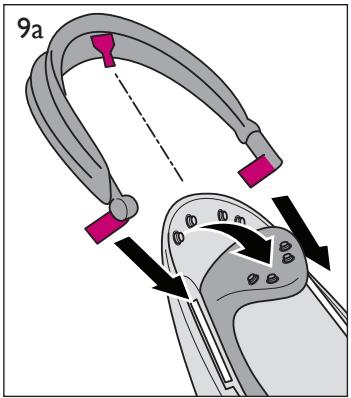
Align tabs to rails on each side of seat and slide down into place (Figure 9a).
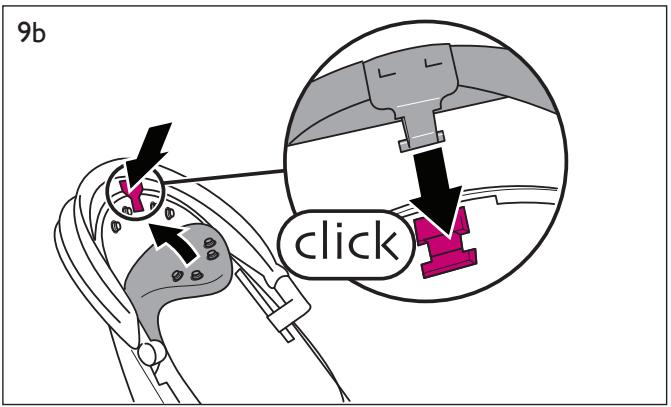
Unsnap and pull back top of seat fabric. Line up tab on top of canopy with top of seat and slide into place until it clicks (Figure 9b).
NOTE: Once canopy is fully attached re-attach the seat pad.
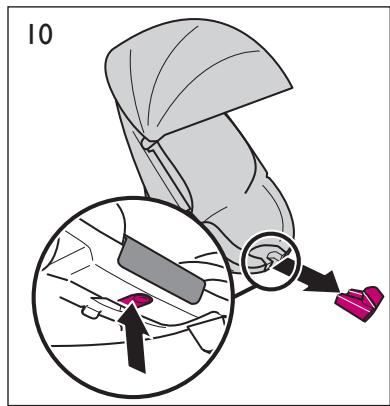
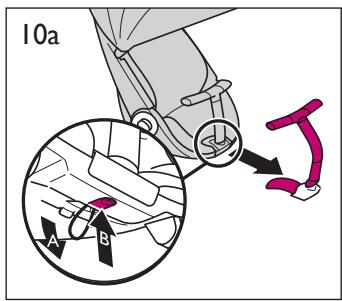
10 Front Bar
Remove insert on seat from underneath as shown by pushing on depression underneath (Figure 10). Slide front bar into place until it clicks. Attach elastic underneath seat as shown (Figure 10a).
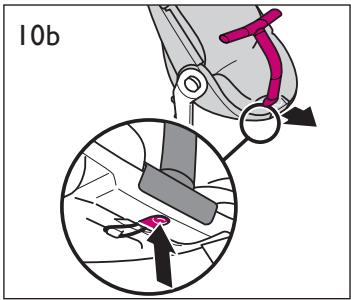
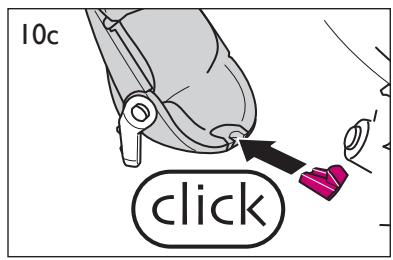
To Remove Front Bar
Unhook elastic under seat. Push depression under seat and slide front bar out (Figure 10b). Replace with front insert (Figure 10c).
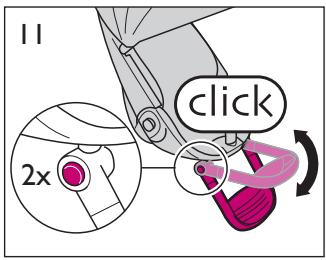
1 Footrest
To adjust the footrest up, pull footrest up. To adjust down, press the buttons on both sides and push down (Figure 11).
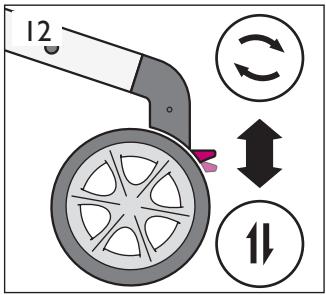
12 Swivel Wheel
Lock the swivel wheel when using the stroller in a straight direction for a long period. To lock, push the lock lever downward and rotate wheel until it locks into place (Figure 12). To unlock, push the lock lever upward.
TIRE PRESSURE NOTE: Maximum tire pressure is 25-psi. Use a manual bike pump to inflate tires. NEVER use an air compressor to fill tires with air (like those used at gas stations).
WARNING
- NEVER LEAVE CHILD UNATTENDED. ALWAYS keep child in view when in stroller.
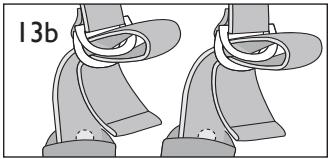
- AVOID SERIOUS INJURY from falling or sliding out. ALWAYS use seat belt. Check frequently to make sure it is secure. Belts must be threaded exactly as shown (Fig. 13b).
- Failure to follow these instructions could result in the serious injury or death of your child.
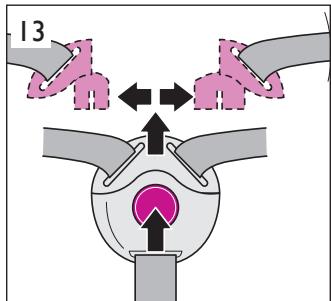
13 To Use Restraint System
Unbuckle restraint system by pressing center button. Place child in seat. Fit clips together. Slide clips into buckle until you hear a "click" (Figure 13).
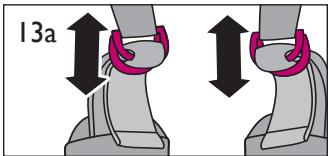
Adjust straps snugly around your child (Figure 13a).
To tighten strap, pull strap end down (Figure 13a).
To loosen strap, back strap back through loops (Figure 13b).
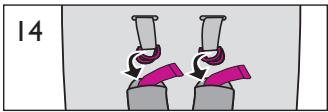
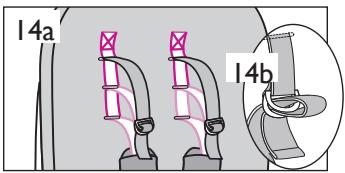
14 Adjust Restraint Height
The shoulder straps have three height positions for your growing child. Unsnap shoulder cushions from harness. Unthread shoulder straps (Figure 14). Push shoulder straps through back of the seat pad into the desired slot (Figure 14a). Thread straps as shown (Figure 14b). Secure restraint covers with snaps.
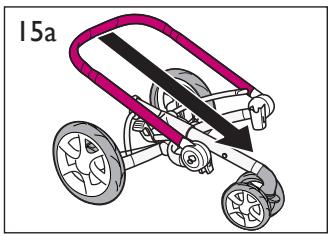
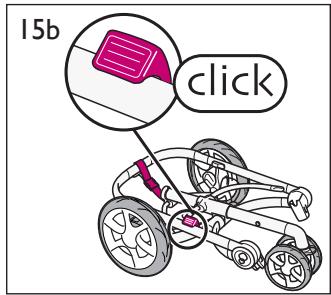
15 Fold Stroller
NOTE: You have the option of removing the seat before folding.
Seat must be in forward facing and upright position. Before folding stroller we suggest that you fold back the canopy, lower handlebar and lock the wheels.
Stand behind stroller, slide up tabs on inside of stroller frame (Figure 15).
Push down on stroller towards front wheels (Figure 15a).
Continue to fold until stroller locks into place (Figure 15b).

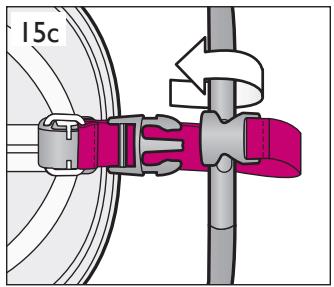
With stroller locked and handlebar adjusted to lowest position, wrap transport strap around handlebar and secure buckle (Figure 15c). Pull strap to confirm it is assembled securely.
NOTE: When stroller is in use, attach buckle to prevent from dragging.
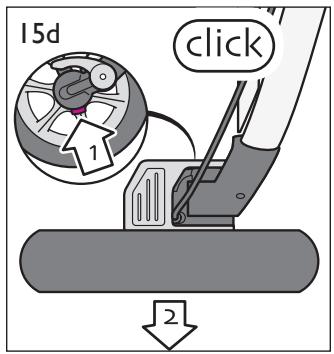
To make the stroller more compact, you may remove the wheels. Press the rear wheel release button to pull each rear wheel out (Figure 15d).
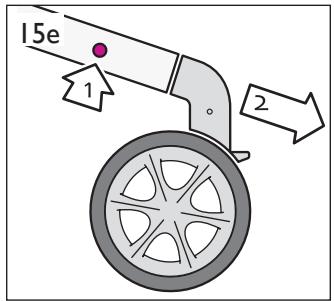
Press both front wheel release buttons to pull the front wheel out of the frame tube (Figure 15e).

WARNING
To avoid serious injury:
- Use ONLY Maxi-Cosi Mico® infant car seat and Quinny Dreami™ Bassinet with adapters included with this stroller.
- Please refer to the manufacturer's instructions for the use of your infant car seat.
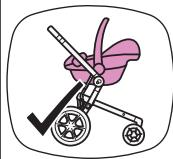
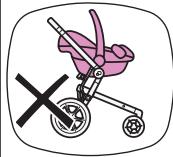
- ALWAYS install car seat facing to the rear of the stroller.
- ALWAYS use the restraint system in the car seat.
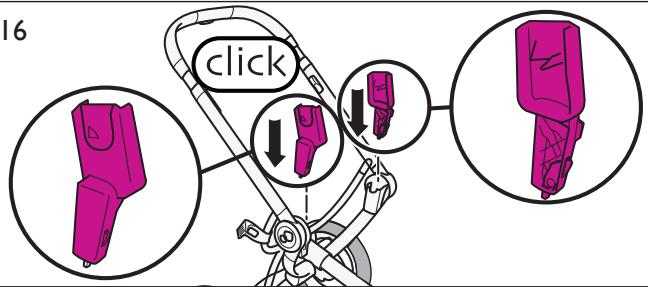
16 Install Maxi-Cosi Mico® Infant Car Seats or Quinny Dreami™ Bassinet
Push the parking brake pedal down. Remove the seat.
Insert the adapters into the frame hubs until you hear a "click" (Figure 16). Each adapter is designed to fit into appropriate side. If adapter does not fit, try other side.
Car seat and bassinet must be positioned so that child faces the stroller handle (Figure 16a).
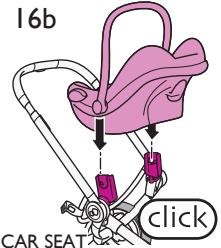
Lower car seat or bassinet into car seat adapters until both sides "click" (Figure 16b).
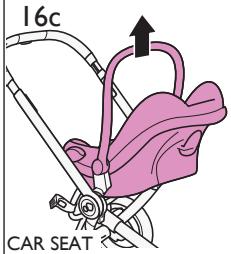
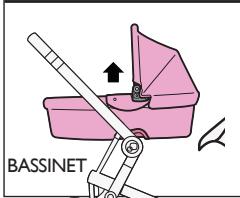
Pull up on car seat or bassinet to ensure that it is locked into place (Figure 16c).
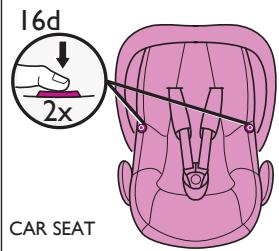
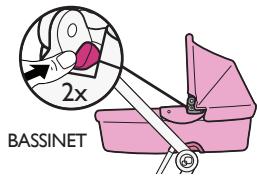
To remove car seat, press both buttons on car seat while lifting car seat up (Figure 16d). To remove bassinet, press both buttons on bassinet while lifting bassinet up (Figure 16d).
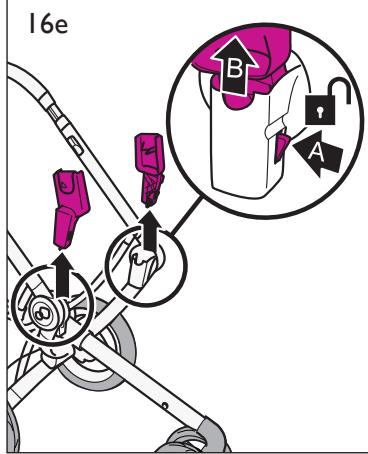
To remove car seat adapters, press release button and slide adapter off the frame hubs (Figure 16e).
16
16a
16b

CAR SEAT
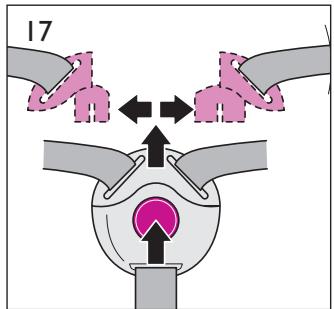
17 To Remove Seat Pad
- Unfasten harness (Figure 17).
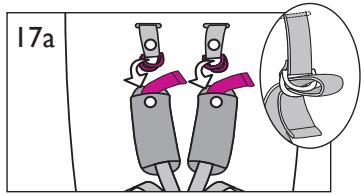
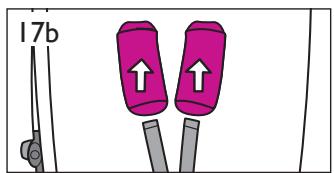
- Remove straps from D-rings (Figure 17a). Unsnap and remove shoulder pads (Figure 17b).
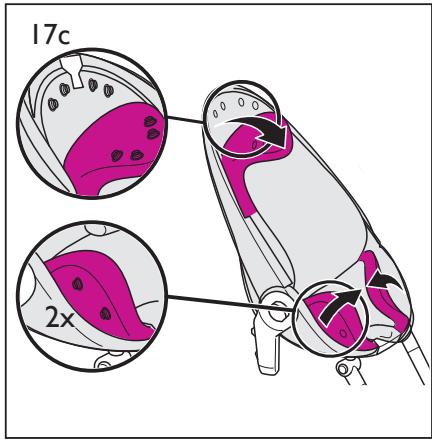
- Unfasten snaps located under seat pad (Figure 17c).
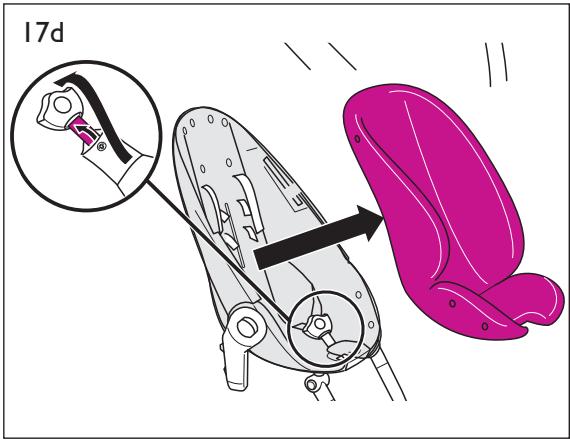
- Slide harness out from seat pad (Figure 17d). Remove seat pad (Figure 17d).
To Reattach Seat Pad
I. Slide harness through lower slot in seat pad (reverse Figure 17d).
2. Fasten seat pad snaps to seat (reverse Figure 17c).
3. Slide shoulder pads onto shoulder straps (reverse Figure 17b).
4. Thread straps onto D-rings (reverse Figure 17a). Snap shoulder pads to straps (reverse Figure 17b).
Stroller Care and Maintenance
- Hand wash seat cushion in cold water. Line dry. Do not iron or dry clean.
- Periodically check for loose screws, worn parts, tom material or loose stitching. Tighten or replace parts as needed.
Replaceable Parts
- Front Wheel Unit
Rear Wheels
Shopping Basket - Car Seat/Bassinet Adapters
- Front Bar
- Front Bar Insert Plate
- Canopy
- Seat Pad
Transport Strip - Canopy Inserts
Available Accessories (sold separately)
DreamamiTM Bassinet
Maxi-Cosi Mico Infant Car Seat
- Weathershield
- Parasol
- Cup Holder
Footmuff
Travel Bag
- Storage Box
- Multi-Model Infant Car Seat Adapter for other manufacturer's car seats
To order parts call (800) 951-4113.
- Include the model number and manufacture date (found on the bottom rail of stroller frame) and a brief description of the part.
Two-Year Limited Warranty
Dorel Juvenile Group, Inc. warrants to the original purchaser that this product (Moodd stroller), is free from material and workmanship defects when used under normal conditions for a period of two (2) years from the date of purchase. Should the product contain defects in material or workmanship Dorel Juvenile Group, Inc., will repair or replace the product, at our option, free of charge. Purchaser will be responsible for all costs associated with packaging and shipping the product to Dorel Juvenile Group Consumer Relations Department at the address noted on the front of this document and all other freight or insurance costs associated with the return. Dorel Juvenile Group will bear the cost of shipping the repaired or replaced product to the purchaser. Product should be returned in its original package accompanied by a proof of purchase, either a sales receipt or other proof that the product is within the warranty period. This warranty is void if the owner repairs or modifies the product or the product has been damaged as a result of misuse.
This warranty excludes any liability other than that expressly stated previously, including but not limited to, any incidental or inconsequential damages.
SOME STATES DO NOT ALLOW THE EXCLUSION OR LIMITATION OF INCIDENTAL OR CONSEQUENTIAL DAMAGES, SO THE ABOVE LIMITATION OR EXCLUSION MAY NOT APPLY TO YOU.
THIS WARRANTY GIVES YOU SPECIFIC LEGAL RIGHTS, AND YOU MAY ALSO HAVE OTHER RIGHTS THAT MAY VARY FROM STATE TO STATE.
AVENTISSEMENT
POUR LA SECURITE DE VOITRE ENFANT, VEUILLEZ LIRE LES AVERTISSEMENTS SUIVANTS ET LES INSTRUCTIONS D'ASSEMBLAGE ET CONSERVEZ POUR RÉFERENCE ULTÉRIEURE.
Two-Year Limited Warranty
Distributed by (distribué par) Dorel Juvenile Group, Inc., 2525 State St., Columbus, IN 47201-7494
Dorel Distribution Canada, 873 Hodge, St. Laurent, QC H4N 2B1
01/15/12 4358-5791A