USER MANUAL WII MOTION PLUS NINTENDO
The official seal is your assurance that this product is licensed or manufactured by Nintendo. Always look for this seal when buying video game systems, accessories, games and related products.
NEED HELP WITH INSTALLATION, MAINTENANCE OR SERVICE?
Nintedco Customer Service SUPPORT.NINTENDO.COM or call:1-800-255-3700
BESOIN D'AIDE POUR L'INSTALLATION,
L'ENTRETIEN OU LA REPARATION?
NOTE: If you are attaching Wii MotionPlus to a new Wii Remote controller, the remote must be synchronized with your Wii console before use. See the Wii Operations Manual for instructions.
Before setup and use of the Wii system, please review this safety information to ensure an enjoyable and safe play experience.
-
WEAR THE WRIST STRAP WHEN USING THE Wii REMOTE CONTROLLER.
-
Make sure all players use the wrist strap and that the strap lock is correctly tightened.
- When sharing the Wii Remote between multiple players, make sure each person uses the wrist strap properly.
-
Wearing the wrist strap will prevent you from accidentally dropping or throwing the remote during game play, which could damage the remote or surrounding objects, or cause injury to other people.
-
DO NOT LET GO OF THE REMOTE DURING GAME PLAY.
-
Read the Instruction booklet for the game you are playing and follow all game control instructions for correct use of the Wii Remote or accessory controllers.
-
Hold the remote securely and avoid excessive motion, as it may cause you to let go of the remote and may break the wrist strap.
If your hands become moist, stop and dry your hands.
-
ALLOW ADEQUATE ROOM AROUND YOU DURING GAME PLAY.
-
Stay at least three (3) feet away from the television.
-
As you may move around during game play, make sure objects and other people are out of your range of movement or arm motion to prevent damage or injury.
-
DO NOT USE Wii MOTIONPLUS WITHOUT THE JACKET.
Unlicensed Accessories
Do not attach unlicensed accessories to the Wii Remote, as the use of unlicensed accessories may lead to injury to yourself or others and may cause performance issues and/or damage to the system. Use of any such unlicensed accessories will invalidate your Nintendo product warranty.
TM, 們 and the Wii logo are trademarks of Nintendo. © 2009 Nintendo.
Nintendo
Wii MotionPlus™
Operations Manual
IMPORTANT: FIRST CAREFULLY READ THE SEPARATE Wii MOTIONPLUS INSTALLATION GUIDE INCLUDED WITH THIS PRODUCT FOR INSTRUCTIONS ON ATTACHING Wii MOTIONPLUS TO YOUR Wii REMOTE™ CONTROLLER.
IMPORTANT : VEVUILZ LIRE LE GUIDE D'INSTALLATION DU Wii MOTIONPLUS INCLUS AVEC CE PRODUIT POUR EN SAVOIR PLUS SUR LA FACTION DE BRANCHER LE Wii MOTIONPLUS À VOTURE MANETTE Wii REMOTE™.
IMPORTANTE: LEE CUIDADOSAMENTE LA GUIA DE INSTALLACION DE Wii MOTIONPLUS QUE VIENE INCLUDEA CON ESTE PRODUCTO PARA VER INSTRUCCIONES DE CÓMOCONNECTARLO A TU CONTROL Wii REMOTE™.
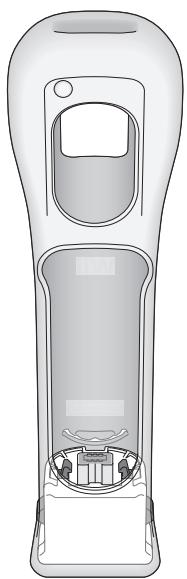
Table of Contents
Components 2
Attaching Wii accessories 3
Removing Wii accessories 4
Tips on using Wii MotionPlus 6
Tips on using Wii MotionPlus with the Nunchuk™. 7
Replacing the batteries in the Wii Remote 8
Troubleshooting 10
Warranty and Service Information 13
FCC and Industry Canada Information 13
Please carefully and completely read the Wii™ Operations Manual - System Setup before using this accessory. The manual contains important health and safety information. Be sure to read the sections on:
Health and Safety
- Setup of the Wii Remote™
- The Wii Console Usage Precautions in the System Setup section
If this product will be used by young children, this manual should be read and explained to them by an adult.
Wii MotionPlus can be used only with a Wii Remote controller. Additionally, you must use Wii game software that supports Wii MotionPlus gameplay features. Look for this icon on game packaging for games that are designed to be used with Wii MotionPlus.

NOTE: Your Wii Remote will still function normally with games that do not include Wii MotionPlus gameplay features. The Wii Remote does not need to be disconnected from Wii MotionPlus once it is installed, unless you are using your Wii Remote with the Wii Zapper™, Wii Wheel, or other accessories that attach in a similar way.
NOTE: This product does not contain latex.
This product complies with applicable laws barring the use of toxic materials such as lead, mercury, cadmium, hexavalent chromium, PBB or PBDE in consumer products.
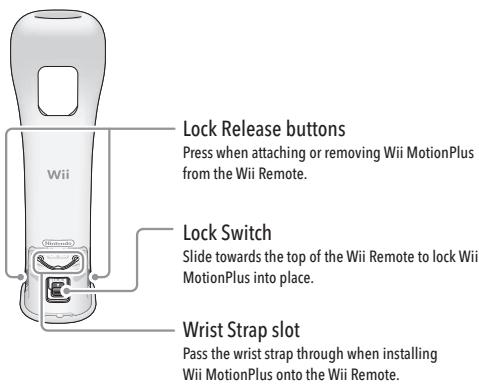
Components
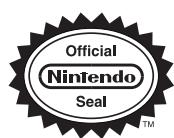
Front view
Back view
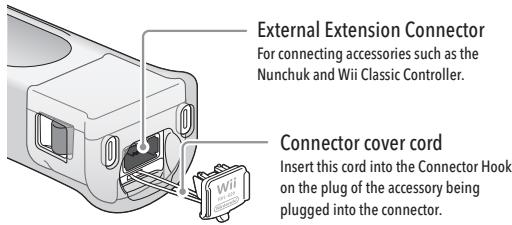
Bottom view Connector cover attached

Bottom view Connector cover removed
2
Attaching Wii accessories
The Nunchuk, Classic Controller, or other accessories that connect to the External Extension Connector, can be used while Wii MotionPlus is attached to the Wii Remote. Follow these procedures to connect these accessories to Wii MotionPlus.
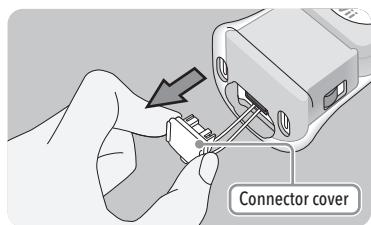
- Remove the connector cover from the bottom of Wii MotionPlus. Grasp the cover by the sides as shown.
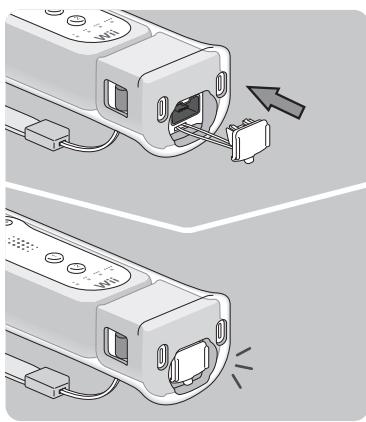
- Insert the connector plug into the External Extension Connector on the bottom of Wii MotionPlus until it clicks into place.
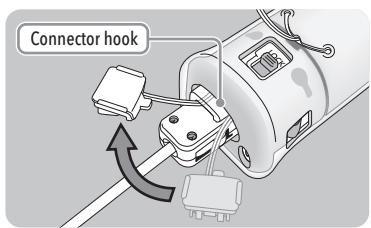
- Pass the Connector Cover cord through the connector hook on the back of the connector.
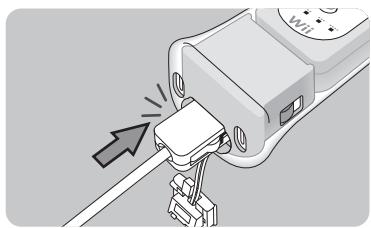
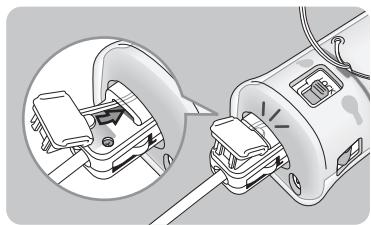
- Insert the tab on the edge of the connector cover into the connector hook. Press the connector cover firmly into place on the connector plug.
Continued next page
3
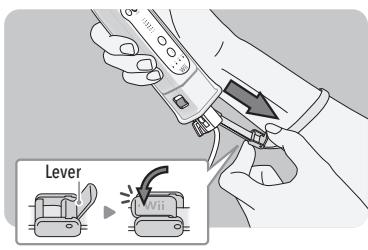
- Place your hand through the wrist strap and adjust the strap lock so that the strap will not fall off your wrist. Do not over tighten the strap lock so that it's uncomfortable. It should just be tight enough to hold the wrist strap in place.
Close the lever (if your strap lock has one) until it clicks to hold the strap lock in place.
Removing Wii accessories
Follow these procedures to remove the Nunchuk, Classic Controller, or other accessories that you have connected to Wii MotionPlus.
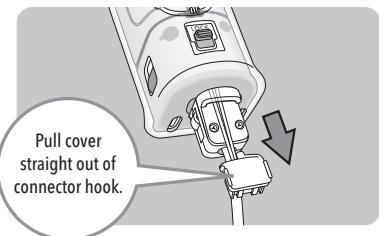
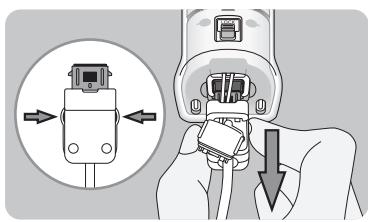
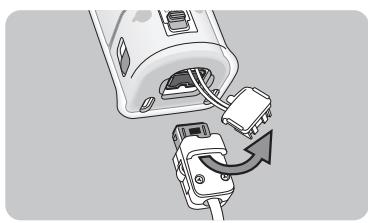
- Remove the connector cover from the accessory connector plug. Be sure to pull the connector cover straight out of the connector hook to prevent damage to the tab on the edge of the cover.
- Press the lock release levers on the sides of the accessory connector plug and pull the plug straight out of the connector.
- Remove the connector cover cord from the accessory plug's connector hook.
4
- Insert the connector cover into the External Extension Connector on the bottom of Wii MotionPlus.
5
Tips on using Wii MotionPlus
- Grip the Wii Remote firmly and use the wrist strap to prevent losing your grip on the remote and causing damage to the remote or surrounding objects, or injury to other people.
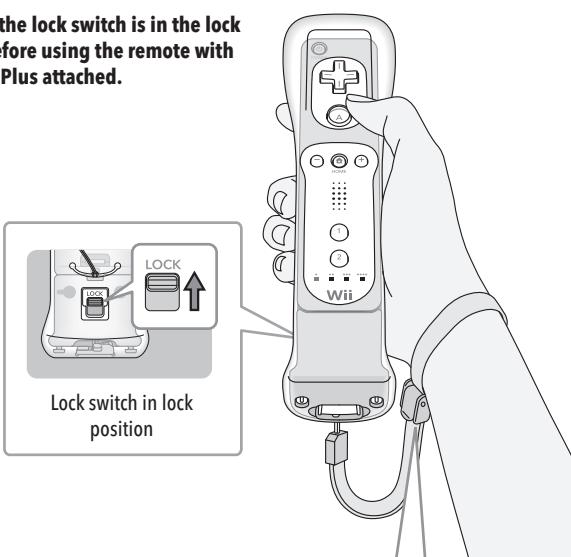
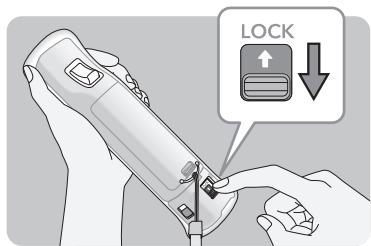
- Make sure the lock switch is in the lock position before using the remote with Wii MotionPlus attached.
Make sure all players use the wrist strap and that the strap lock is correctly tightened.
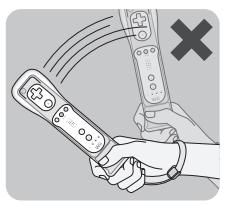
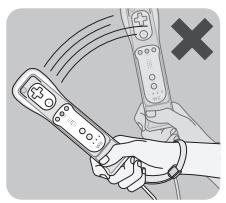
IMPORTANT: Do not hold or swing the Wii Remote by the Wii MotionPlus accessory.
Hold the Wii Remote securely and do no let go of it.
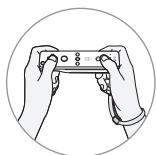
When using the Wii Remote controller in the horizontal position, you can remove Wii MotionPlus if it is difficult to press the 1 and 2 Buttons.
6
Tips on using Wii MotionPlus with the Nunchuk
- Grip the Wii Remote and Nunchuk firmly and use the wrist strap to prevent losing your grip on the remote and causing damage to the remote or surrounding objects, or injury to other people.
- Make sure the connector cover cord is fed through the connector hook and that the connector cover is securely locked in place by inserting the tab into the connector hook.

Make sure all players use the wrist strap and that the strap lock is correctly tightened.
IMPORTANT: Do not hold or swing the Wii Remote by the Wii MotionPlus accessory.
Hold the Wii Remote securely and do no let go of it.
Replacing the batteries in the Wii Remote
The Wii Remote uses AA batteries. Nintendo recommends high quality alkaline batteries for best performance and longevity of battery life. If you use rechargeable nickel metal hydride (NiMH) batteries, be sure to follow the manufacturer's guidelines for safety and proper usage.
WARNING - Battery Leakage
Leakage of battery fluid can cause personal injury as well as damage to your remote. If battery leakage occurs, thoroughly wash the affected skin and clothes. Keep battery fluid away from your eyes and mouth. Leaking batteries may make popping sounds.
To avoid battery leakage:
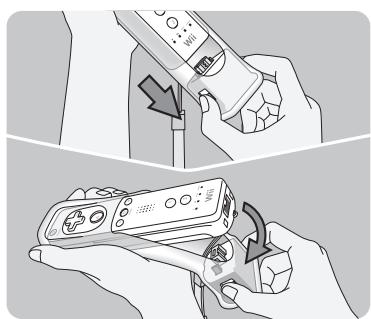
- Pull the sensor unit out of the Wii Remote while holding down the lock release buttons. Swing the sensor unit down and away from the base of the Wii Remote.
8
- Remove the Wii Remote from the jacket. Carefully pull the wrist strap through the wrist strap slot.

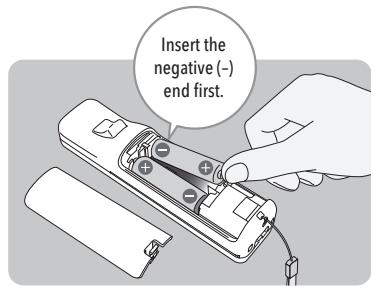
- Remove the battery cover and the old batteries, pulling the positive (+) end out first. Insert the new batteries, inserting the negative (-) end first.
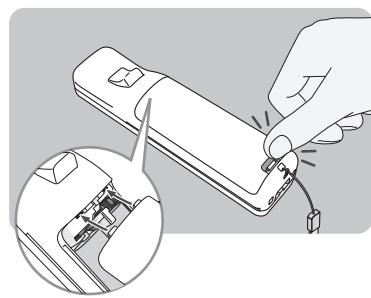
- Replace the battery cover, making sure the two clips on the end are correctly inserted into the Wii Remote, pushing until it clicks firmly in place.
- Reinstall Wii MotionPlus onto the Wii Remote. Review the separate Wii MotionPlus Installation Guide included with this product for instructions.
9
Troubleshooting
If Wii MotionPlus fails to operate, or operates incorrectly, follow the steps below before seeking assistance.
-
The Wii Remote with Wii MotionPlus attached does not respond.
-
Make sure the Wii MotionPlus connector plug is fully inserted into the Wii Remote.
- Review the setup procedure and make sure Wii MotionPlus has been installed correctly.
- Make sure the batteries have been installed correctly and are not depleted. You can press the HOME Button on the Wii Remote to check battery life from the HOME Menu.
- Check the game package and manual (or the Wii Shop Channel screen, if it was downloaded) for the game you are playing to make sure it includes Wii MotionPlus features.
-
If none of the above steps resolve the problem, remove and insert the Wii MotionPlus connector plug into the connector on the bottom of the Wii Remote several times and check the operation again.
-
The cursor on the TV screen moves even when the Wii Remote is not being moved or moves differently than when I move the Wii Remote.
-
Wii MotionPlus may need to be recalibrated due to the following:
-
Changing batteries in the Wii Remote during gameplay.
- Disconnecting and reconnecting Wii MotionPlus during gameplay.
- Moving Wii MotionPlus from a cold environment into a warm environment.
To recalibrate the Wii MotionPlus accessory, place it on a flat horizontal surface with the buttons facing down. Wait for a few seconds and check the operation. Also, review the Instruction Manual for the game you are playing for more information.
NOTE: This procedure must be done during gameplay, and with the Wii MotionPlus accessory attached to the Wii Remote controller.
-
The Wii Remote with Wii MotionPlus attached responds slowly.
-
Some televisions process graphics internally for input signals. This may delay the display of graphics but does not damage the Wii Console, Wii Remote, Wii MotionPlus, or the television.
- The jacket has been removed and I'm having difficulty replacing it.
- The jacket is important for proper and safe operation of the Wii MotionPlus accessory. Please see the next page for instructions on correctly replacing the jacket if it has become detached. Also review the separate Wii MotionPlus Installation Guide included with this product for installation instructions.
If Wii MotionPlus still does not work after all of the above steps, visit support.nintendo.com or call 1-800-255-3700.
10
Replacing the Jacket
- Hold the jacket and accessory so they both face forwards.
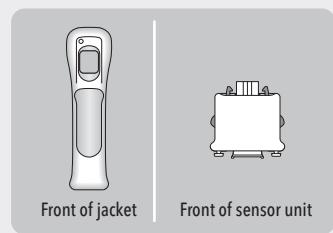
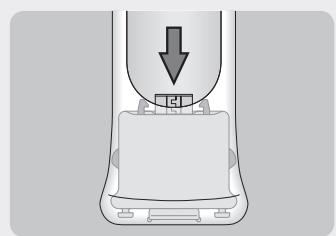
- Press the sensor unit into the bottom of the jacket, being careful not to damage the connector or other parts of the accessory.
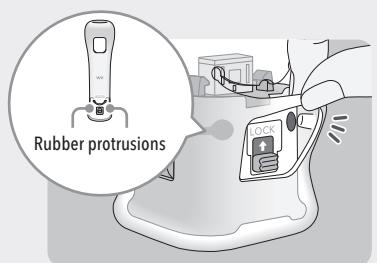
- Fit the two rubber protrusions on the inside of the jacket into the holes on the back of the sensor unit.
Continued next page 11
11
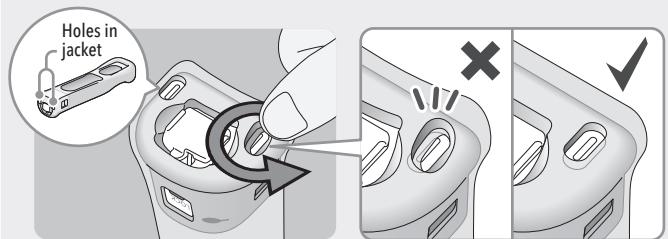
- Using your finger tips, work the bottom of the jacket around so that the plastic hooks on the bottom of the sensor unit fit snugly into the holes in the jacket.
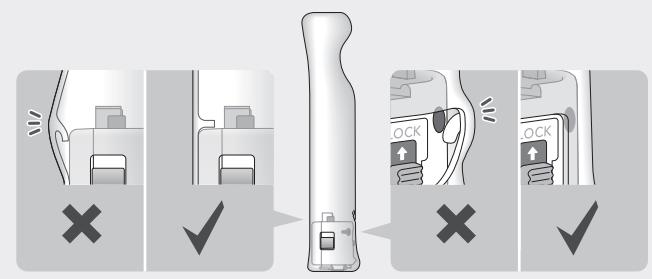
- Check the fit of the jacket to make sure the walls are not pinched between the Wii Remote and the sensor unit, and that the rubber protrusions are correctly located.
You may need only simple instructions to correct a problem with your product. Try our website at
support.nintendo.com or call our Consumer Assistance Hotline at 1-800-255-3700, rather than going to your retailer. Hours of operation are 6 a.m. to 7 p.m., Pacific Time, Monday - Sunday (times subject to change). If the problem cannot be solved with the troubleshooting information available online or over the telephone, you will be offered express factory service through Nintendo. Please do not send any products to Nintendo without contacting us first.
HARDWARE WARRANTY
Nintendo of America Inc. ("Nintendo") warrants to the original purchaser that the hardware product shall be free from defects in material and workmanship for twelve (12) months from the date of purchase. If a defect covered by this warranty occurs during this warranty period, Nintendo will repair or replace the defective hardware product or component, free of charge. The original purchaser is entitled to this warranty only if the date of purchase is registered at point of sale or the consumer can demonstrate, to Nintendo's satisfaction, that the product was purchased within the last 12 months.
GAME & ACCESSORY WARRANTY
Nintendo warrants to the original purchaser that the product (games and accessories) shall be free from defects in material and workmanship for a period of three (3) months from the date of purchase. If a defect covered by this warranty occurs during this three (3) month warranty period, Nintendo will repair or replace the defective product, free of charge.*
SERVICE AFTER EXPIRATION OF WARRANTY
Please try our website at support.trintendo.com or call the Consumer Assistance Hotline at 1-800-255-3700 for troubleshooting information and repair or replacement options and pricing.*
*In some instances, it may be necessary for you to ship the complete product, FREIGHT PREPAID AND INSURED FOR LOSS OR DAMAGE, to Nintendo. Please do not send any products to Nintendo without contacting us first.
WARRANTY LIMITATIONS
THIS WARRANTY SHALL NOT APPLY IF THIS PRODUCT: (a) IS USED WITH PRODUCTS NOT SOLD OR LICENSED BY NINTENDO (INCLUDING, BUT NOT LIMITED TO, NON-Licensed GAME ENHANCEMENT AND COPIER DEVICES, ADAPTERS, AND POWER SUPPLIES); (b) IS USED FOR COMMERCIAL PURPOSES (INCLUDING RENTAL); (c) IS MODIFIED OR TAMPERED WITH; (d) IS DAMAGED BY NEGLIGENCE, ACCIDENT, UNREASONABLE USE, OR BY OTHER CAUSES UNRELATED TO DEFECTIVE MATERIALS OR WORKMANSHIP; OR (e) HAS HAD THE SERIAL NUMBER ALTERED, DEFACED OR REMOVED. ANY APPLICABLE IMplied WARRANTYINGS, INCLUDING WARRANTY OF MERCHANTABILITY AND FITNESS, FOR A PARTICUAR
ANY APPLICABLE IMPLIED WARRANTY, INCLUDING WARRANTY OF MERCHANTABILITY AND FITNESS FOR A PARTICULAR PURPOSE, ARE HEREBY LIMITED IN DURATION TO THE WARRANTY PERIODS DESCRIBED ABOVE (12 MONTHS OR 3 MONTHS, AS APPLICABLE). IN NO EVENT SHALL NINTENDO BE LIABLE FOR CONSEQUENTIAL OR INCIDENTIAL DAMAGES RESULTING FROM THE BREACH OF ANY IMPLIED OR EXPRESS WARRANTY. SOME STATES DO NOT ALLOW LIMITATIONS ON HOW LONG AN IMPLIED WARRANTY LASTS OR EXCLUSION OF CONSEQUENTIAL OR INCIDENTIAL DAMAGES, SO THE ABOVE LIMITATIONS MAY NOT APPLY TO YOU.
This warranty gives you specific legal rights. You may also have other rights which vary from state to state or province to province. Nintendo's address is: Nintendo of America Inc., P.O. Box 957, Redmond, WA 98073-0957 U.S.A. This warranty is only valid in the United States and Canada.
Regulations for Equipment Use in U.S.A. and Canada
This device complies with Part 15 of the FCC rules and ICES-003 of Industry Canada. Operation is subject to the following two conditions: (1) this device may not cause harmful interference, and (2) this device must accept any interference received, including interference that may cause undesired operation. Changes or modifications not expressly approved by the manufacturer could void the user's authority to operate this device.
12
13
François
manette will remote remote site is protected to record