
Conga Rockstar 700 X Treme - Stick vacuum CECOTEC - Free user manual and instructions
Find the device manual for free Conga Rockstar 700 X Treme CECOTEC in PDF.


| Product type | Stick vacuum cleaner |
| Brand | Cecotec |
| Model | Conga Rockstar 700 X Treme |
| Dimensions (L x W x H) | 25 x 18 x 110 cm |
| Weight | 2.6 kg |
| Power source type | Removable lithium-ion battery |
| Battery voltage | 22.2 V |
| Battery capacity | 2500 mAh |
| Maximum runtime | 45 minutes (Eco mode) |
| Charging time | 4 to 5 hours |
| Suction power | 20 kPa |
| Dust container capacity | 600 ml |
| Noise level | 75 dB(A) |
| Filtration system | Washable HEPA filter |
| Suction modes | 2 modes: Eco and Turbo |
| Motorized brush | Yes, with carpet detection |
| Conversion to hand vacuum | Yes |
| Included accessories | Crevice tool, 2-in-1 brush, pet tool |
| LED display | Yes, with battery indicator |
| Maintenance | Filter and container washable with water |
| Motor warranty | 10 years (subject to conditions) |
| Spare parts available | Battery, filter, brush, accessories |
| Repairability | Repairability index available (see manual) |
Frequently Asked Questions - Conga Rockstar 700 X Treme CECOTEC
User questions about Conga Rockstar 700 X Treme CECOTEC
0 question about this device. Answer the ones you know or ask your own.
Ask a new question about this device
Download the instructions for your Stick vacuum in PDF format for free! Find your manual Conga Rockstar 700 X Treme - CECOTEC and take your electronic device back in hand. On this page are published all the documents necessary for the use of your device. Conga Rockstar 700 X Treme by CECOTEC.
USER MANUAL Conga Rockstar 700 X Treme CECOTEC
Handstick vacuum cleaner
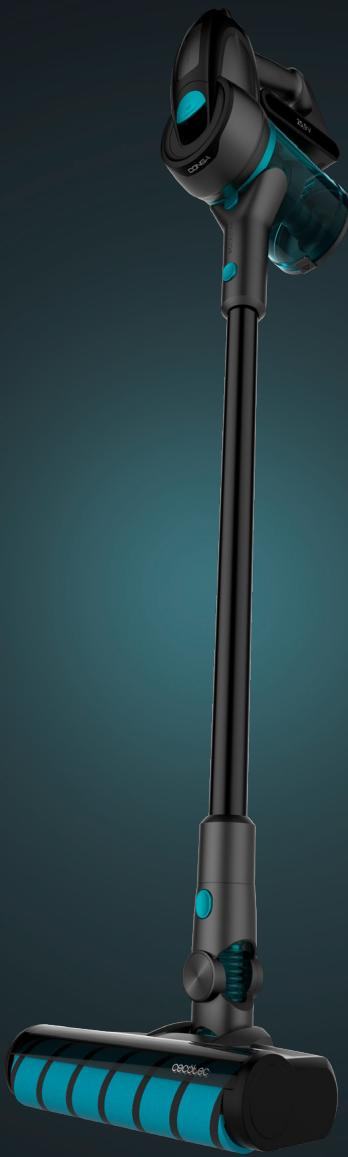
Instrucciones de seguridad 4
Safety instructions 6
Instructions de sécurité 8
Sicherheitshinweise 10
Istruzioni di sicurezza 12
Instruções de segurança 14
Instrukcje bezpieczeństwa 17
Bezpečnostní pokyny 19
ÍNDICE
- Parts and components 29
- Before use 29
- Product assembly 29
- Operation 30
- Cleaning and maintenance 32
- Troubleshooting 33
- Technical specifications 34
- Disposal of old electrical appliances 34
- Technical support and warranty 34
SOMMAIRE
Read these instructions thoroughly before using the appliance. Keep this instruction manual for future reference or new users. Make sure that the mains voltage matches the voltage stated on the rating label of the appliance and that the outlet is grounded.
This appliance is intended for domestic use only. It is not suitable for commercial or industrial use.
Check the power cord regularly for visible damage. If the cord is damaged, it must be replaced by the official Technical Support Service of Cecotec, in order to avoid any type of danger.
Do not use the device if it has been dropped or if there are any visible signs of damage.
Do not try to repair the appliance by yourself. Contact the official Technical Support Service of Cecotec for advice.
Do not use any accessory that has not been recommended by Cecotec, as they might cause injuries or damage.
Do not place the appliance close to heat sources, flammable substances, wet surfaces where it can fall or be pushed into water or allow it to come into contact with water or other liquids. Do not use it outdoors.
Do not use the appliance to vacuum liquids, lighted matches, cigarette ends, hot ash or on wet surfaces.
Do not use on concrete, tarmac or other rough surfaces.
Take special care when using the device to clean stairs.
Do not block the appliance's openings or hinder air flow. Close supervision is necessary when the appliance is being used by
or near children.
Keep the packaging out of range of children, it could be hazardous.
The appliance is not intended to be used by children under the age of 8. It can be used by children over the age of 8, as long as they are given continuous supervision.
This appliance is not intended to be used by persons with reduced physical, sensory, or mental capabilities, or lack of experience or knowledge, unless they have been given supervision or instruction concerning the use of the appliance in a safe way by a person responsible for their safety, and understand the hazards involved. Do not let children play with the device.
Supervise children to prevent them from playing with the device. Close supervision is necessary when the appliance is being used by or near children.
Battery instructions
This appliance includes Li-ion batteries, do not incinerate or expose them to high temperatures, as they may explode.
Leaks from the battery or battery cells can occur under extreme conditions. Do not touch any liquid that leaks from the battery. If the liquid gets into contact with skin, wash immediately with soap and water. If the liquid gets into the eyes, flush them immediately with clean water for a minimum of 10 minutes and seek medical attention. Wear gloves to handle the battery and dispose of immediately in accordance with local regulations.
Avoid contact between the battery and small metallic objects such as paper clips, coins, keys, nails or screws.
Before a new battery is used or the battery is used for the first time after long-term storage, fully charge the battery. When the device is stored and not used for long periods of time,
ensure that the battery pack is fully charged, and ensure that the battery is charged and discharged at least once every three months.
INSTRUCTIONS DE SÉCURITÉ
- Suction base release button
- Vacuuming tube release button
- Dust tank release button
- High-efficiency filter
- Power button
- Power push button
- Power supply
- Battery
- Power adapter
- Vacuuming tube
- Suction base
- Narrow brush for furniture and corners
- Wide brush for furniture and corners
- Wall bracket
- Wall plugs
- Screws
- Dust tank
- Jalisco brush
- Silicone and bristles brush
- Adhesive for wall bracket
- Water tank for scrubbing (Optional)
2. BEFORE USE
Take the product out of the box.
Check for any visible damage, if any is observed, contact as soon as possible the Technical Support Service of Cecotec for advice or reparation.
3. PRODUCT ASSEMBLY
Vacuuming tube and suction base assembly
Fig. 2
To install the suction base into the vacuuming tube, align both of them making sure the tab on the suction base matches the guides on the tube, and introduce one into the other until they are firmly fixed. To disassemble them, press the suction base release button and pull from the vacuuming tube while you hold the suction base.
ENGLISH
When assembling these 2 parts, make sure the handle and the brush are facing the same direction.
Battery and handheld vacuum cleaner assembly
Introduce the battery in the slot located in the handheld vacuum cleaner. Once it is introduced, move it slightly to ensure it is properly assembled in place.
Fig. 3
Following the below illustration, keep the vacuuming tube vertically, align the tab on the vacuuming tube with the guides in the handheld vacuum cleaner and introduce the tube.
Dust tank and handheld vacuum cleaner
To assemble the dust tank to the handheld vacuum cleaner, first separate the handheld vacuum cleaner from the vacuuming tube.
Then, press the vacuuming tube release button with one hand and, holding from the handle with the other one, turn the dust tank anticlockwise to the unlock position indicated on the dust tank edge.
To disassemble the dust tank, turn it clockwise until it reaches the unlock position.
Fig. 4
Suction base, vacuuming tube and handheld vacuum cleaner installation
To complete the full installation of the device, hold the vacuuming tube with the suction base assembled upright and introduce the tube in the handheld vacuum cleaner as shown on the illustration.
Fig. 5
4. OPERATION
Handheld vacuum cleaner
Once the handheld vacuum cleaner has been disassembled from the vacuuming:
Press the On/off button to turn the device on.
Press the power push button to select the desired power level.
It will automatically operate in Eco mode. The power level can be adjusted at any moment by pressing this button.
Press once to switch to Daily mode.
Press again to operate it at Turbo mode.
Press the On/off button to turn the device off.
Fig. 6
Upright Vacuum Cleaner
Press the On/off button to turn the device on.
Press the power push button to select the desired power level.
It will automatically operate in Eco mode. The power level can be adjusted at any moment by pressing this button.
Press once to switch to Daily mode.
Press again to operate it at Turbo mode.
Press the On/off button to turn the device off.
The device includes Auto Carpet that is activated automatically when it detects a carpet or a large amount of dirt.
Accessories
This device includes different accessories that allow cleaning different types of surfaces, objects and dirt. Some of them are suitable for the upright vacuum cleaner, and others are preferably used with the handheld one.
Jalisco brush
Assemble this brush to the upright vacuum cleaner. This brush is designed especially for cleaning hard floors, but can be used to clean efficiently soft floors too.
The brush counts on a protection system that avoids tangles and prevents the device from being damaged. As the brush stops rotating and the device stops operating automatically when it vacuums big objects or excessive dirt.
Fig. 7
Silicone and bristles brush
Interchangeable brush made of silicone and bristles, ideal for cleaning carpets and pet hair. This accessory is used with the upright vacuum cleaner.
2-in-1 wide brush for furniture and corners
This accessory is used with the handheld vacuum cleaner and allows cleaning furniture without damaging it and reaching less accessible dirt in corners.
2-in-1 narrow brush for furniture and corners
This accessory is used with the handheld vacuum cleaner and allows cleaning furniture without damaging it and reaching less accessible dirt in corners.
Fig. 8
Wall bracket
This product includes a wall bracket that allows hanging the vacuum cleaner from the wall. The same bracket has different accessory holders that allow storing accessories while not in use.
It can be assembled with screws (included with the product), or with an adhesive (included
ENGLISH
with the product).
When using the adhesive, make sure to use it on a clear flat surface. Also make sure that the suction base rests on the floor when hanging the device.
If not, it may fall.
Fig. 9
Charging
The device can be charged in 2 different ways. It can be charged directly through the handheld vacuum cleaner or the battery can be removed and charged separately.
It is important to charge it when the battery is low. The battery indicator will light as follows:
Steady green: 100-50 %
Steady orange: 50-25 %
Flashing red light: 25-0 %
Disconnect it from the power adapter when the battery indicator is lit up in green.
Fig. 10
5. CLEANING AND MAINTENANCE
Do not use abrasive scouring pads, powders or cleaners to clean the product.
Use a soft, dampened and clean cloth to clean the product's outer housing.
Do not let water enter into the vacuum cleaner.
Keep the appliance in a cool, dry place and out of reach from children.
Do not immerse the device in water and do not clean any of its parts in the dishwasher.
Dust tank
Fig. 11
To empty the dust tank, first disassemble the handheld vacuum cleaner from the rest of the unit. Use the tab on the dust tank to open its cover and empty it. If necessary, shake it gently to remove all the dust.
To clean it, press the dust tank release button and turn the dust tank anticlockwise to the unlock position.
Remove it. Use water to rinse it. If necessary, clean it with soap to remove all the dust.
Recommendation: It is suggested to clean the dust tank after each use.
Fig. 12
Filters
It is suggested to clean the filters regularly to ensure maximum efficiency. They can be cleaned with warm water. Dry them thoroughly before installing them back in the device.
To take filters out:
Open the dust tank following the instructions on the before section.
Turn the metallic filter anticlockwise and remove it.
Fig. 13
Unscrew the plastic cyclone and remove it too.
Pull from the tab located on the top of the handheld vacuum cleaner and remove the high-efficiency filter.
Wash all of them with warm water.
Allow them to dry completely before installing and using them again.
Fig. 14
Jalisco brush
Recommendation: It is important to clean the brush regularly to avoid hair and other foreign objects from tangling and to prevent blockages.
Press the brush release button on the bottom part of the suction base and remove the brush.
Wash it with warm water. Do not use detergents or soap.
Make sure it is completely dry before installing it back in the device.
Fig. 15
6. TROUBLESHOOTING
| Problem | Possible reason | Solution |
| The motor does not operate. | No battery.The vacuuming tube, brush, battery, suction base or handheld vacuum cleaner are not assembled in place. | Charge the vacuum cleaner.Check that the components and the handheld vacuum cleaner are assembled correctly. |
| Suction power level is very low | The dust tank is full.Filters are dirty or blocked.Air inlet of the vacuuming tube or suction base are blocked. | Empty the dust tank.Clean or replace the filter.Clean the dirt attached to the brush. |
| Green and red light blinking. | The charger is not connected to the mains. | Plug the charger to a socket base. |
| The operating time after charging has decreased. | It has not been enough charged.Battery is damaged or too old. | Charge the battery completely.Replace the battery. |
Note: For any further doubt, please contact the official Technical Support Service of Cecotec.
7. TECHNICAL SPECIFICATIONS
Product reference: 05489
Product: Conga Rockstar 700 X-Treme
Battery: 25,9 V DC, 2500 mAh
Voltage and frequency: 100-240 V \~, 50/60 Hz
Made in China | Designed in Spain
8. DISPOSAL OF OLD ELECTRICAL APPLIANCES

The European directive 2012/19/EU on Waste Electrical and Electronic Equipment (WEEE), specifies that old household electrical appliances must not be disposed of with the normal unsorted municipal waste. Old appliances must be collected separately, in order to optimise the recovery and recycling of the materials they contain, and reduce the impact on human health and the environment.
The crossed out “wheeled bin” symbol on the product reminds you of your obligation to dispose of the appliance correctly.
Consumers must contact their local authorities or retailer for information concerning the correct disposal of old appliances and/or their batteries.
9. TECHNICAL SUPPORT AND WARRANTY
This product is under warranty for 2 years from the date of purchase, as long as the proof of purchase is submitted, the product is in perfect physical condition, and it has been given proper use, as explained in this instruction manual.
The warranty will not cover the following situations:
The product has been used for purposes other than those intended for it, misused, beaten, exposed to moisture, immersed in liquid or corrosive substances, as well as any other fault attributable to the customer.
The product has been disassembled, modified, or repaired by persons, not authorised by the official Technical Support Service of Cecotec.
Faults deriving from the normal wear and tear of its parts, due to use.
The warranty service covers every manufacturing defects of your appliance for 2 years, based on current legislation, except consumable parts. In the event of misuse, the warranty will not apply.
If at any moment you detect any problem with your product or have any doubt, do not hesitate to contact Cecotec Technical Support Service at +34 963 210 728.
1. PIÈCES ET COMPOSANTS
Img. 1
Fig./Img./Abb./Afb./Rys./Obr. 2
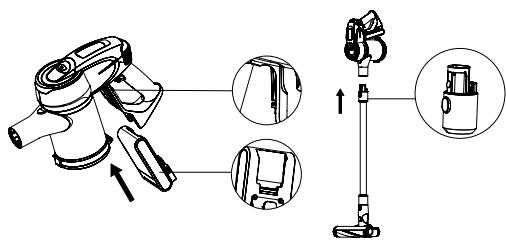
Fig./Img./Abb./Afb./Rys./Obr. 3
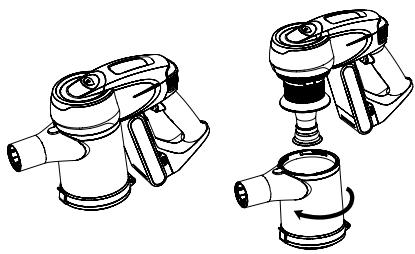
Fig./Img./Abb./Afb./Rys./Obr. 4

Fig./Img./Abb./Afb./Rys./Obr. 5

Fig./Img./Abb./Afb./Rys./Obr. 6

Fig./Img./Abb./Afb./Rys./Obr. 7

Fig./Img./Abb./Afb./Rys./Obr. 8

Fig./Img./Abb./Afb./Rys./Obr. 9
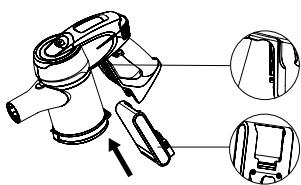
Fig./Img./Abb./Afb./Rys./Obr. 10

Fig./Img./Abb./Afb./Rys./Obr. 11

Fig./Img./Abb./Afb./Rys./Obr. 12
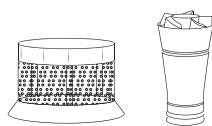
Fig./Img./Abb./Afb./Rys./Obr. 13
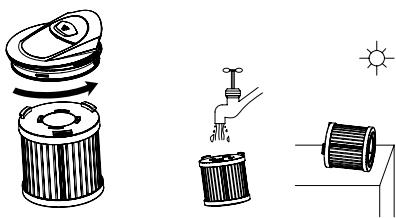
Fig./Img./Abb./Afb./Rys./Obr. 14
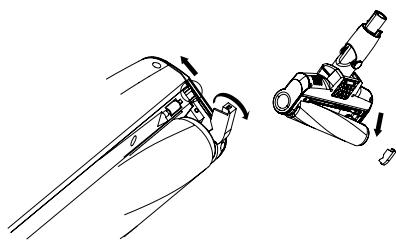
Fig./Img./Abb./Afb./Rys./Obr. 15
www.cecotec.es
- ÍNDICE
- SOMMAIRE
- Battery instructions
- INSTRUCTIONS DE SÉCURITÉ
- BEFORE USE
- PRODUCT ASSEMBLY
- Fig. 2
- ENGLISH
- OPERATION
- Accessories
- Jalisco brush
- Silicone and bristles brush
- 2-in-1 wide brush for furniture and corners
- 2-in-1 narrow brush for furniture and corners
- Wall bracket
- CLEANING AND MAINTENANCE
- TROUBLESHOOTING
- TECHNICAL SPECIFICATIONS
- DISPOSAL OF OLD ELECTRICAL APPLIANCES
- TECHNICAL SUPPORT AND WARRANTY
- PIÈCES ET COMPOSANTS
- Img. 1
Brand : CECOTEC
Model : Conga Rockstar 700 X Treme
Category : Stick vacuum