
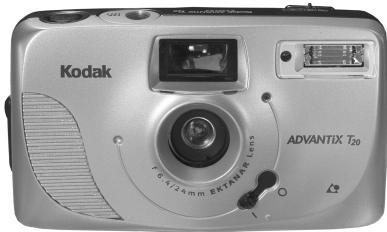
ADVANTIX T20 - Film camera KODAK - Free user manual and instructions
Find the device manual for free ADVANTIX T20 KODAK in PDF.

| Brand | KODAK |
| Model | ADVANTIX T20 |
| Type | Film camera |
| Film type | KODAK ADVANTIX films for color photos (APS) |
| Lens | KODAK EKTANAR 24 mm, 3 hybrid elements with lens cover |
| Focus | Fixed |
| Focus range | 1 m to infinity |
| Aperture | Fixed f/6.4 |
| Viewfinder | Inverted Galilean type with C, H, P format display |
| Film speed | DX 100 to 400 ISO |
| Flash | Built-in, automatic, red-eye reduction |
| Flash range (200 ISO) | 1 m to 4.3 m |
| Shutter speed | Fixed 1/125 s |
| Photo formats | Classic (C), Group/HDTV (H), Panoramic (P) |
| Double exposure prevention | Yes, film status check |
| Auto power off | After 4 minutes of inactivity |
| Power supply | 2 AAA alkaline batteries |
| Flash recycle time | Approximately 7 seconds with new batteries |
| Dimensions | 10.9 × 6.9 × 3.9 cm |
| Weight (without batteries or film) | 140 g |
| Care | Clean the lens with a soft, lint-free cloth |
| Safety | Do not disassemble or repair yourself |
| Repairability | Repairs should be entrusted to a professional |
Frequently Asked Questions - ADVANTIX T20 KODAK
User questions about ADVANTIX T20 KODAK
0 question about this device. Answer the ones you know or ask your own.
Ask a new question about this device
Download the instructions for your Film camera in PDF format for free! Find your manual ADVANTIX T20 - KODAK and take your electronic device back in hand. On this page are published all the documents necessary for the use of your device. ADVANTIX T20 by KODAK.
USER MANUAL ADVANTIX T20 KODAK

Consumer Imaging
EASTMAN KODAK COMPANY
Rochester, NY 14650
© Eastman Kodak Company, 2002
New 11/02
Pt. No. 20230091
KodakADVANTiX
T20 AutoCamera
User's Manual
| This device complies with part 15 of the FCC Rules. Operation is subject to the following two conditions: (1) this device may not cause harmful interference, and (2) this device must accept any interference received, including interference that may cause undesired operation. |
| NOTE: Your model camera has been tested and found to comply with the limits for a Class B digital device, pursuant to Part 15 of the FCC Rules. These limits provide reasonable protection against interference in residential use. The camera generates, uses and can radiate radio frequency energy and, if not used in accordance with the instructions, may cause interference to radio communications. There is no guarantee that interference will not occur. If this camera does cause interference to radio or television reception, which can be determined by turning the camera off and on, you may reduce the interference by the following: — Reorient or relocate the receiving antenna. — Increase the separation between the camera and the receiver. — Consult the dealer or an experienced radio/television technician for help. Changes or modifications not approved by the party responsible for compliance could void the user's authority to operate the equipment. |
| This Class B digital apparatus meets all requirements of the Canadian Interference-Causing Equipment Regulations. |
NEED HELP WITH YOUR CAMERA OR MORE INFORMATION ABOUT THE ADVANCED PHOTO SYSTEM?
Visit our Web site at http://www.kodak.com (for US) or http www.kodak.ca (for Canada) or call: Kodak (US only) from 9:00 a.m. to 7:00 p.m. (Eastern time) Monday through Friday at 1-800-242-2424.
Kodak (Canada only) from 8:00 a.m. to 5:00 p.m. (Eastern time)
Monday through Friday at 1-800-465-6325, ext. 36100; for the Toronto area, call 416-766-8233, ext. 36100.
Have your camera available when you call.
For warranty purposes, keep your sales receipt as proof of the date of purchase.
CONTENTS
CAMERA IDENTIFICATION.....3
CAMERA FEATURES 6
ATTACHING THE STRAP ....... 8
LOADING THE BATTERIES .... 9
Low-batteries indicator 10
Battery tips 10
Power shutdown 12
LOADING THE FILM 12
TAKINGPICTURES 14
Typical print sizes
(formats) 16
Tips for better pictures 17
TAKING FLASH PICTURES .. 18
Flash-to-subject distance ... 19
UNLOADING THE FILM 19
Automatic rewind 19
Manual rewind 20
CARING FOR
YOUR CAMERA 21
TROUBLESHOOTING 22
SPECIFICATIONS 24
CAMERA IDENTIFICATION
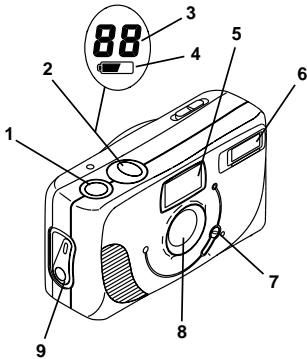
1 shutter button
2 LCD panel
3 picture counter
4 battery symbol
5 viewfinder
6 flash
7 lens-cover switch
8 lens
9 film-door lever
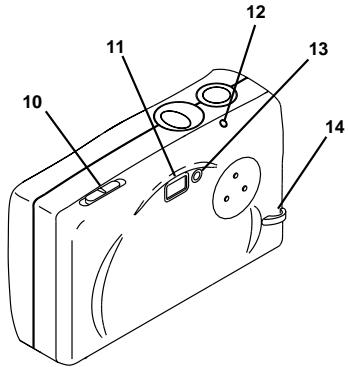
10 print-format switch
11 viewfinder eyepiece
12 film-rewind button
13 flash-ready lamp
14 strap post
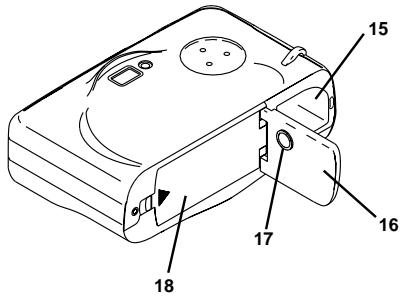
15 film chamber
16 film door
17 tripod socket
18 battery door
CAMERA FEATURES
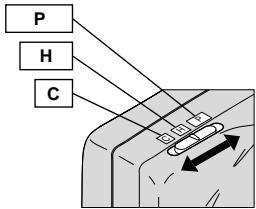
Three Print Formats
- Choose from 3 picture sizes: Classic (C), Group/HDTV (H), or Panoramic (P). The masking inside the viewfinder changes to match each format selection.
Double Exposure Protection (DEP)
- You don't need to worry about accidentally re-exposing your film. Your camera reads the Film Status Indicator (FSI) on the film cassette to prevent double exposures.
Easy, Drop-in Loading
- Easy, drop-in loading is fast and virtually error-free. The camera uses KODAK ADVANTIX Film. The film cassette communicates the status of film and becomes the carrier and storage container for the processed film.
Safety-Locked Film Door
- The safety interlock on the film door prevents the door from opening before the film is completely rewound.


Look for this logo to be certain that the film you buy is made for this camera.
Look for this logo to select a certified photofinisher for developing your film and to assure that you get all the features of the Advanced Photo System.
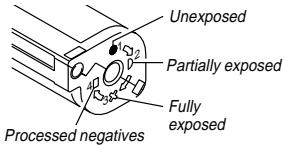
Film Status Indicator (FSI)
- An indicator advances from one symbol to another to identify the status of the film inside the cassette.
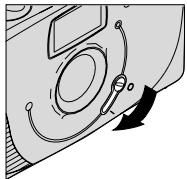
ATTACHING THE STRAP
Thread the strap's shorter looped end under the strap post (14). Pull the longer end through the shorter loop and pull it tight.
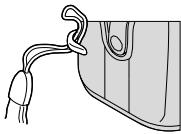

NOTE: You can use the knob on the clasp of the camera strap to actuate the buttons on the camera.
LOADING THE BATTERIES
This camera uses 2 AAA-size alkaline batteries that supply power for all camera operations.
NOTE: Insert the batteries before you load the film.
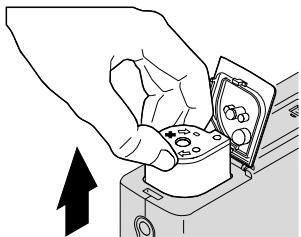
- Open the battery door (18).
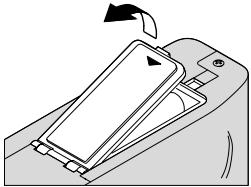
- Place the batteries over the battery-pull strap and insert into the chamber as shown.
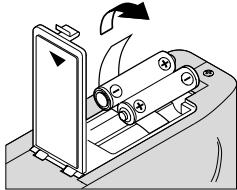
- Close the battery door.
NOTE: Before you remove the old batteries, slide the lens-cover switch (7) to turn off the camera.
Low-batteries indicator
It's time to replace the batteries when the battery symbol (4) appears in the LCD panel (2) or when the flash-ready lamp (13) takes longer than 12 seconds to turn on.
Battery tips
- Dispose of batteries according to local and national regulations.
- Keep spare batteries with you at all times.
- Keep batteries away from children.
- Store the batteries in their original packaging prior to use.
- Remove the batteries when you store the camera for an extended time.
- Do not use rechargeable batteries.
- Replace both batteries at the same time with the same brand and alkaline type.
CAUTION: Do not put the batteries in your pocket or in a container that contains coins or metal objects. If the batteries touch the metal objects, they may short circuit, discharge energy, become hot, or leak.
CAUTION: Do not try to take apart, recharge or short circuit the batteries, or subject them to high temperature or fire.
WARNING: In the unlikely event that battery fluid leaks onto your skin, rinse immediately with plenty of water. For additional information, contact Kodak Health, Safety and Environment Information in the U.S. at 1-585-722-5151. Customers outside the U.S. can contact their local health care provider.
WARNING: In the unlikely event that battery fluid leaks inside the camera, U.S. customers can contact the Kodak Information Center (KIC) at 1-800-242-2424. Customers outside the U.S. can contact their local Kodak Customer Service representative.
Automatic Energy Saving Features
Power shutdown
To conserve battery power, the camera automatically goes to sleep after 4 minutes of nonuse. To wake up the camera, take a picture or close and reopen the lens cover. Turn off the camera when it is not in use to further extend the battery life.
LOADING THE FILM
You can load film with the camera on or off.
NOTE: Insert the batteries before you load the film.
- Push the film-door lever (9) to open the film door (16).
-
Insert the film cassette completely into the film chamber (15).
-
Make sure the Film Status Indicator (FSI) on the film cassette is at (#1 position) for a new cassette.
- Do not force the film cassette into the film chamber.
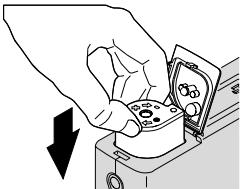
- Close the film door to start the automatic film prewind.
The picture counter (3) in the LCD panel (2) displays the number of pictures remaining on the film.
After you close the safetyinterlocked film door and the film starts to prewind, you cannot open the door until the film is completely rewound into the film cassette.
TAKING PICTURES
You can take Classic (C), Group/HDTV (H)*, and Panoramic (P) pictures on the same film cassette. Your photofinishing costs are based on the format used.
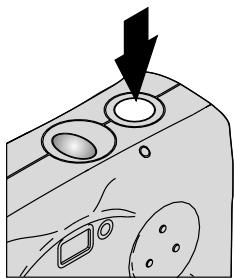
- Slide the lens-cover switch (7) to uncover the lens (8) and to turn on the camera.
- Slide the print-format switch (10) to C, H, or P. The viewfinder changes to show the selected field of view.
- Frame your subject within the viewfinder eyepiece (11).
For a sharp picture, stand at least 3.3 ft (1.0 m) from your subject.
-
For low-light conditions, wait until the flash-ready lamp (13) glows green.
-
Press the shutter button (1) to take the picture.
Typical print sizes (formats)
C
H
P
| Classic | Group (HDTV) | Panoramic |
| 3.5 x 5 in. or 4 x 6 in. | 3.5 x 6 or 4 x 7 in. | 3.5 x 8.5 in. to 4 x 11.5 in. |
| (88.9 x 127 mm or 102 x 152 mm) | (88.9 x 152 mm or 102 x 178 mm) | (88.9 x 216 mm to 102 x 292.7 mm) |
NOTE: Your photofinisher generally provides 4 × 6 , 4 × 7 and 4 × 11.5 in. (102 x 152, 102 x 178 and 102 x 292.7 mm) sizes. Some local printers may offer 3.5 × 5 , 3.5 × 6 , and 3.5 × 8.5 in. (88.9 x 127, 88.9 x 152 and 88.9 x 216 mm) sizes.
Tips for better pictures
- Hold your camera steady by keeping your elbows close to your body when you press the shutter button to avoid blurry pictures.
- Keep your pictures simple. Move close enough to your subject so that it fills the viewfinder but not closer than 3.3 ft (1.0 m).
Take pictures at the subject's level. Kneel down to take pictures of children and pets. -
Keep the sun behind you to provide the best subject illumination.
-
Hold your camera vertically with the flash positioned upward to capture tall, narrow subjects, such as a waterfall, skyscraper, or a person.
- Add interest to your picture by framing it with a tree branch, a window, or even the rails of a fence.
- Stand at an angle to shiny surfaces like windows or mirrors to avoid flash reflection and bright spots in your pictures.
- Turn on all the room lights and have your subject look at the lights to reduce red eyes in flash pictures.
TAKING FLASH PICTURES
In dim light, such as indoors or outdoors in heavy shade, or on dark overcast days, you need flash. Your camera has a built-in automatic flash that fires when needed.
- Slide the lens-cover switch (7) to uncover the lens (8) and to turn on the camera.
- Frame your subject within the viewfinder eyepiece (11).
-
Keep the subject within the distance range for the speed of film in your camera (see Flash-to-subject distance table).
-
Don't take pictures beyond the maximum distance or your pictures will be dark.
-
Wait for the flash-ready lamp (13) to glow green.

- Press the shutter button (1) to take a picture.
Flash-to-subject distance
| ISO film speed | Flash-to-subject distance |
| 100 | 3.3 to 10 ft (1.0 to 3.1 m) |
| 200 | 3.3 to 14 ft (1.0 to 4.3 m) |
| 400 | 3.3 to 18 ft (1.0 to 5.5 m) |
UNLOADING THE FILM
Automatic rewind
The camera automatically rewrites the film into the cassette after the last exposure.
- Wait for the camera motor to stop to ensure that the film is completely rewound into the film cassette.
-
The picture counter (3) in the LCD panel (2) displays "0." The picture-counter display disappears when you close the lens cover.
-
Push the film-door lever (9) to open the film door (16).
-
Remove the film cassette from the camera and reload with new KODAK ADVANTIX Film.
- The FSI on the fully exposed film cassette is at X (#3 position).
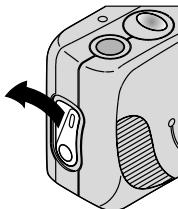
Manual rewind
If you do not want to use the entire film, you can manually start the automatic rewind.
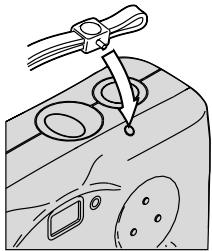
Gently press the film-rewind button (12) by using the knob on the clasp of the camera strap.
NOTE: You cannot reload a partially exposed film cassette and continue to take pictures.
CARING FOR YOUR CAMERA
- Protect the camera from dust, moisture, sudden impact, and excessive heat.
CAUTION: Do not use solvents or harsh cleansers on the camera body.
- If the lens appears dirty, breathe on it to form a mist and wipe the surface gently with a soft, lintless cloth or camera lens-cleaning tissue. Never wipe a dry lens.
CAUTION: Use solvents or solutions designed for cleaning camera lenses. Do not use chemically treated tissues intended for cleaning eyeglasses.
- Remove the batteries when you store the camera for an extended time.
WARNING: To prevent possible damage and electrical shock, do not attempt to disassemble or repair the camera or flash unit by yourself.
DISPOSAL: The camera contains a small amount of lead in the circuit board. Disposal of lead may be regulated due to environmental considerations. For disposal or recycling information, contact your local authorities. In the US, you can also visit Electronics Industry Alliance at www.eiae.org.
TROUBLESHOOTING
| What happened | Probable cause | Solution |
| Camera will not operate | There are no more pictures remaining | Rewind film and remove from camera |
| Batteries weak, dead, missing, or improperly inserted | Replace or reload the batteries | |
| Film does not advance or rewind | Batteries weak, dead, missing, or improperly inserted | Replace or reload the batteries |
| LCD panel is blank | Batteries weak, dead, missing, or improperly inserted | Replace or reload the batteries |
| LCD panel is blank (continued) | Camera in sleep mode | Take a picture or close and reopen lens cover |
| Lens cover closed | Open lens cover | |
| Flash does not fire | Flash not fully charged | Wait for flash-ready lamp to turn green |
| Film cassette does not fit completely into film chamber; film door does not close | Loaded exposed (X), or processed film (■) into the camera | Load only new film (●) |
SPECIFICATIONS
Film Type: KODAK ADVANTIX Film for color prints
Lens: KODAK EKTRANAR Lens; 24 mm, 3-elements hybrid with protective lens cover
Focus System: Fixed focus
Focus Range (Daylight): 3.3 ft (1.0 m) to infinity
Viewfinder: Reverse Galilean with C, H, & P format display
Film-Speed:DXIX(ISO)100-400
Flash Unit: Built-in, automatic flash
Flash Range (ISO 200):
3.3-14 ft (1.0-4.3 m)
Aperture: Fixed at f/6.4
Shutter Speed: Fixed 1/125 seconds
Power Source: 2 AAA-size alkaline batteries; 7 seconds flash-recycle time with fresh battery
Dimensions:
4.3 in. x 2.7 in. x 1.5 in.
(108.8 mm x 69.7 mm x 39.3 mm)
Weight (without batteries and film):
5 oz. (140 g)
Kodak, Advantix, Ektanar, "e" mark, and the Advanced Photo System symbol and logotype are trademarks.