
AS120E - Hot air brush BABYLISS - Free user manual and instructions
Find the device manual for free AS120E BABYLISS in PDF.
| Product type | Smoothing blow-dry brush |
| Brand | Babyliss |
| Model | AS120E |
| Power | 1200 W |
| Ionic technology | Yes (blue LED) |
| Included accessories | BE Liss straightening head, Ø38 mm ceramic thermal brush, Ø20 mm round boar bristle brush, storage pouch |
| Number of airflow settings | 3 (I, II, III) + off 0 |
| Cool shot button | Yes, separate |
| Adjustable tension (straightening head) | 4 levels (wavy to very curly) |
| Thermal brush diameter | 38 mm |
| Round brush diameter | 20 mm |
| Thermal brush material | Ceramic |
| Round brush bristles | Boar bristles |
| Maintenance | Clean regularly with a comb and a dry or slightly damp cloth |
| Dimensions (approx.) | 30 cm x 7 cm x 7 cm (approx.) |
| Weight (approx.) | 600 g (approx.) |
| Cord length | 2 m (approx.) |
| Cord storage | Not specified |
| Voltage | 220-240 V, 50/60 Hz (standard approx.) |
| Warranty | 2 years (manufacturer standard) |
Frequently Asked Questions - AS120E BABYLISS
User questions about AS120E BABYLISS
0 question about this device. Answer the ones you know or ask your own.
Ask a new question about this device
Download the instructions for your Hot air brush in PDF format for free! Find your manual AS120E - BABYLISS and take your electronic device back in hand. On this page are published all the documents necessary for the use of your device. AS120E by BABYLISS.
USER MANUAL AS120E BABYLISS
very long lasting blow drying: straightening, volume and smoothness
multistyle 1200
your hairdresser's skills at home
FRANÇAIS
MULTISTYLE 1200,YOUR nouveau complice beauté!
LA BROSSE RONDE COIFFANTE
Multistyle 1200, your new partner in beauty!
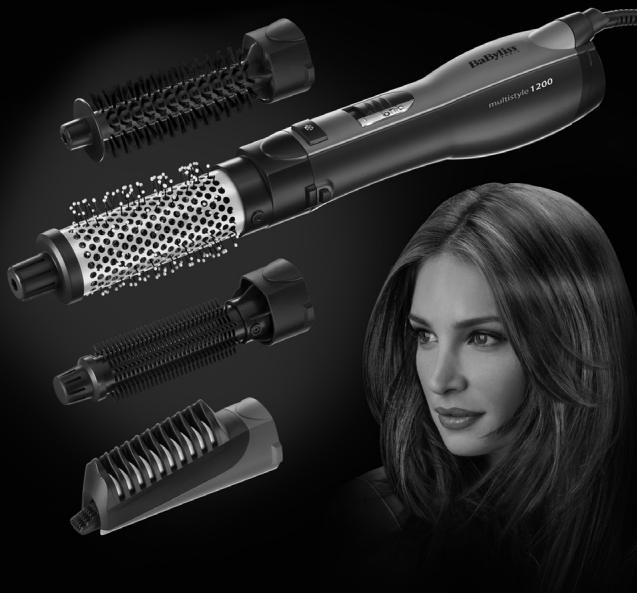
Your new hot-air straightening brush comes with 4 accessories, each one indispensable for reproducing your hair stylist's creations at home.
Multistyle 1200 is the ideal tool for creating your blow-dry look and all the trendiest styles.
With the four accessories, you can use the brush to straighten your hair and give it volume and shape in no time at all.
It's powerful (1200W) and without an attachment it dries or pre-dries your hair quickly.
The ionic technology (blue LED) controls static electricity and also improves the efficiency of leave-in hair care products. It makes styling easier and your hair shiny and soft. With no frizz, your hair will be easier to style and shape.
Fitting and removing the attachments
Fit the brushes and the straightening head onto the body of the unit by lining up the guides on the two parts and then press the two together until you hear a click.
USE
The brush has 4 settings: 0 (off), I (low), II (medium) and III (high).
The low setting is ideal for fine hair, the high setting for thicker hair.
The separate 'cool air' button makes it easy to use a shot of cool air at the end of straightening or blow-drying to set the movement of each section and give it a 'long-lasting' effect.
Use your hot air straightening brush on pre-dried, slightly damp hair that is completely tangle free.
Use clips to separate hair so that you can work on one section at a time. Start with the sections underneath. Sections should be a maximum of 2cm wide and as even as possible. Always work from the roots to the tips and slide the brush slowly down the length of the section.
Perfect straightening and shine!
- Select the tension for your hair type using the Tensio Control System (1. waves, 2. loose curls, 3. medium curls, 4. tight curls)
Advice from the hairstylist
-
When using the straighteners for the first time, select tension setting 1 (the lowest setting) to become familiar with the BE Liss straightening head.
-
Then gradually increase the setting until you find the tension that works best with your hair.
Careful! Whatever straightening
you adopt, we recommend holding the tips of the section to be straightened with your free hand so that you can keep your hair evenly distributed between the teeth of the straightening head. And before each stroke make sure the thin section is properly positioned with the roots at the base of the comb, then slowly and steadily slide the unit down the length of hair while holding the tips with your free hand.
More or less volume?
To reduce volume of thick hair, place the straightening comb on top of the section of hair and, starting from the roots, gently slide the unit down the section from the top to the bottom.
- To add volume to fine or flat hair, place the straightening combs under the section, they will straighten while lifting the roots and will add volume to your hair.
- Repeat on all sections of your hair and don't forget the shot of cool air to perfect the hold.
Adding volume to the roots
Take up a section of about 3 cm and place the straightening combs under the section as close as possible to the roots. Make sure the combs go right through the hair.
- Turn the BE Liss straightening head about 45^ while gently sliding it down to the tips. The curved movement will add
maximum volume to your roots!
Repeat if necessary and don't forget the shot of cool air over the section to perfect the hold.
Shaping
The BE Liss straightening head is also perfect for daily combing: you want to tame an unruly section, you want to add life to your style, etc. In precisely 2 minutes, you will give shine and volume back to your style by using the same techniques described above, but this time on dry hair.
An ideal travel companion!
THE 38MM THERMAL BRUSH WITH CERAMIC COATING for perfect glide and to offer your hair better protection.
The combination 'brush/hair dryer' will revolutionise your blow drying!
This ideal diameter, recommended by BaByliss, creates a smooth movement and adds body to your hair without tangling it and for the best blow-dry results for hair full of softness.
The hot air of the unit heats the metal barrel of the attachment. The heat is thus distributed directly over your hair making it soft and smooth.
THE 20MM ROUND BOAR-HAIR BRUSH
This size is more specially suited for the finishing touches: this brush will accentuate the shaping of certain sections like the fringe,
the tips or the roots.
The use can also vary according to the length of your hair:
-on short hair, it can be used horizontally, like the thermal brush, for gentle and natural blow-drying with the ends flicked out or turned under
-on long hair, it can be used vertically for a spiral curl effect at the tips
This brush can be used on dry or damp hair and is perfect for curling and adding body to your hair!
Take up a section of hair, brush it from the roots to the tips with the brush then coil the hair around it. Hold for 15 to 20 seconds depending on the thickness of the section. Let the hair cool before combing it out.
MAINTENANCE OF THE UNIT
- Unplug the unit and allow to cool completely before cleaning or storing.
- We advise you clean the straightening head and brushes regularly to avoid build-up of hair, styling products, etc. Use a comb to remove hair from the brushes. Use a dry or very slightly damp cloth for the plastic and ceramic surfaces.
- Store the body of the unit and the attachments in the case provided until the next time you use it.
DEUTSCH
VEDLIKEHOLD AV APPARATET
MynbTnCTnbl 1200,HOBbl COIO3HnK Baue Kpacotbl!
BaSHA HOBAI ⅢeTKa-Φen dIpa3rnaKbAHAH BONOC OshaueHa 4-MaKcEccyapAMn, KaXdbIu3 KOTOpBIX Heo6xOaUM dIPO TOrO, UTo6bl BocpOn3BecTNI KeCTbI BaWero napKmMaxepa y c68doma.
MynbTnCTnB 1200 - ndeanbHbI IN- CTpyMeHT dIra TORO, yTO6bl 6e3 Oc06bX cNoKHOtei Co3daT bIIO6yU yKnAky u NIO6yU camyo TEHNDeHUNO3Hy npNueCKy.
OchaenHHa YeTbpbM RAeCCcyapam,IeKTa-FeHONoKemT BAM pa3nAINb BONoCbl NpnpaTb NM obem HOFMy OdHM DBMKeHNHeM pyKu.
3TOT MOUHbI annapat (1200W) 6bCTO BbCyuIN IIN npEbaPITeNBO NODCyuIN BAaIN BOLOCb 6e3 NOMOaKaceCcyapOB.
TexHONORINOHN3aUN (CINHN CBTOI
ND) OBOONIT YKPOTNITb CTaTHUeCKOE 3NEKTPNCTEBO NUCNIHTb ΦΦEKTMBHOCTb npenapATOB JYN yXOJa
3a BONOCAMn, He Tpe6yUOxns ONONKAKBAHN. INOH3aUN OBONeYaET
yKLADky BOLON, pnpdaet NM 6JIeCK N
MRAKOCTb. BOONCb 6e3 ZALOMOB IerYe paCuecTb yNLOXNTb.
KaK yctahOBHTb n Chrtb akceccya- pbl
CoomeTte HnapraJIuOIOH na HeIcKax nIIH na roJOLBKe IaIpa3rJaMBAHn CnnapraJIUOIMMI HA KopRyCE
annapata N hacaTe akceccyap Ha Kopnyc Do ⅡeJUka.
YTO6bI CHATB HACdKy, HAKMNTe Ha KONKn 6NOKINBOKN, paCNOKKeHHe cO6eNx CTOPOH annapata, nAkkypatHO NOrTHNE 3a akccecypar.
NCIOJIb3OBAHME
Ha丶賊Kne npedymoTpeHb 4 no3nHm: O (bblkJIOueHo), I (cpedHn NOTOK BO3- yxa), II (HOPmAbHbN NOTOK BO3yxa) H III (cInbHbN NOTOK BO3yxa). CpeHn NOTOK BO3yxa NPeaJIbHO NpOxoIHT dAN ToHKIN BONOC, CInbHbN -IaB60nee rCytbX.
OTdienbHnag KhoNkA XoNoDHyB Bo3DyX) DaCT Bo3MOxHOCTc B NOMOoiBTO CPyrn XoNOHORO BO3Dyxa B KOHJe pa3rJaMBAhaH INu YknAdKn BONOC 3aOnKcNPOBaT hAnpabNeHne YknAdKn KaJdo npraDi NOMOKTe eJ depKxtBaCDOJIbIe.
Pb3ytecb qetKoH-FeHOM dpa3
rnaBnBaHOB NO pneDbapntBb
HO NOcUeHbX, HO cNerKa BnaXbXb,
u TaaTeBbPOacceAHBX BONcA.
Pa3deneTO BocbI yHaactK, npn
OIOHN b HAKTMn, nnn
YnHnAte C HnKHX NpRaei. PpIaDnIy n 3akpeINbIX 3axJMMAm. HauHnAte C HnKHX INpRaei. PpIaDnIy KkLAdKn DOnKhBi 6bIT He ToJISe 2 cm
n KaK MoxHo 6OeepaBOHMepHbIMn.
PaobTaIe C pRabBo, NaHnAra C Kop
He No HapRaBLeHIO K KOHnKaM Bo
LOC; MeDNeHNO nepeDbVraIte 5eTky
BDOb IpRaN CKoJIb3aUMm DBInKeHem.
TOLOBKAДПАЗЛАЖИBAHINBE LISS
Be3yKOpn3HeHHoe pa3rnaXmBaHne n 6Neck!
- BbIepeHte CTeHbHaTJxHeHn, COOTBETCTYIOU TYN BauNXBONC, C NOMOsbu CNTembl KOHTPOJIa HATJxHeHn Tensio Control System (1. BOHNCTble, 2. BbIOUmeC, 3. KypuaBbIe, 4. CINbHO KypuaBbIe).
Cobemblnapukmaxepa
-Пу nepbom nonb308aHu annapamom b6bepume cmehenb harnaxenue 1 (camoe cnaoae harnaxenue), ymob6iocboumcbc paozakuaiaouie zonokou BE Liss.
-3aemnocmenenHObyeenuuubaume Hamxeneue do mex nop, noka He nodbepeme mycmeneh, Komoparbam lyuue bceo nodxodum.
6bI cnoC6 p3aNkBAHn, Mbl peKOMeHyem yepKJBvBaT KoHNK npRn dpyroyn pyKo, TTOb6 bONc6 bbln paBHOpHPO paCnpedeBHeMekdy 3y6uKAMn pa3rNaXBAOuei roJOnKn. Pnpi KaKdOm pa3rNaXBAHn CneJyET cHauA yNoXt ToHkyo npRbB BoLOC y KOPHe Na CamyU rny6HnY paCyeckn, 3aTeM MeDJIeHNO n paBHOpHPO nepeBnRaTb annapat BHN3 no npRn, yapedxNBaD pyroyn pyKo KOHNK BOLOC.
XecktKoe nn o6bemHoe pa3rnaJnBaanHe?
-
Yto6bI yMeHbWHTb ObeM rCytbX BO-loc,pacnOLOKNTpea3rnaJXMa0uNce paCcNEKnADPnBIO nAkkypaTHbIM cKoJIb3aUMDnJKeHEmpepeBnraTne HNO pRan CBepy BHN3,Ha-YNHNAOT KOpEH.
-
Yto6bI npndaTb 0bem ToHKIM nIN npBbIM BONOCAM, pacNOJoxNte pa3rAnkBaOuJIe paCecKn NOD npAdbIO; OHN pa3rNaIaT BONcB, npINOHNMAH Ix y KOpHei co3DaBAa 3ofoekt 0bema.
-ПовтореoningаибсхпрадгИн He 3a6bte CTpyx OXoIOnHOrO BO3dya,чTO6bl yKlnaДаDepkAnlaCb donshe.
3ΦΦeKT ΜbemaуКорнш
- OTeJeInte npraB BONOC shpHnHOJ OKOJI 3 cM n paCIOJNOIXe pA3rJaXnBaIOUne paCyeCK KAK MOxHO6 Blnke K KopHM, NOD npraBb. IpoCneIte 3a TEM, YTO6bl 3y6b paCyeCOK XOPWO npOHKnB BONOsIb.
-Повернite paarnaЖивоу roNobky BE Liss Ha np6bIa3nteIbH0 45^ akkypaTHO nepeDbirraee cKoJIb3aUM dBIXeHMeNo hAnpaBLeHIO K KOHNKAM BONc. 3To dBIXeHne NOBOPOTA npndact BaWIM BONocAM MAcCImaJIbHi obem y KopHei!
-Пи Heo6xOdMOnCTN NOBtOpNE onepaunIO nHe 3a6yIbTe noPabTcTyO xoIanHO rO3dyHa nPraIb,TOcbIo yKnlaDa dEcpKJIaIb nyuIe.
yknadka
Pa3rnaJbuaOaJraonOBKaBE Liss
IeaeJIbHOIOXoUdITIpaEJeDHeBHO
roOCBeXeHnIaPncEckn:YKpOToTb
BbIbNByUOcIaPncpeckn pRdB,
OxMBrTbYklaDky,...3a2MNHTb,He
6BoIbSe,BblBepHe6neKnOBbem
BaBaeIpnpeCKe,prpImENHBOniCaH
hIbe BblIeTexHueCKne pnpeMbI,HoB
3OTaP3HaCuyXHXBOONCAx.
IeanbHbIKOMnHaBcNdBaunx
noe3dk!
HARPEBAIOUJACR JETKA DNAMETPOM 38 MM C KEPAIMUJECKIM NOKPbITMEMOe6cneuBaeT 6be3ykoPI3HNHHe CKoNbJxKeHn E yNuYuaaTe 3aunTy BauinX BOLOC.
CooTahnHe 1IeTeKa/feH KopeHHbIM o6pa3OM IImMeHNT BaWy MaHepY kNlaDbbaT bONOcbl!
3TO uEaeBnHbI dAmEtP nlaUeTKn, pekOMenyEmbI pnmO BaByliss; c ee NOMoBbO bI pa3rJaIteN npndaDnte Oobem BOLOCam, He 3anyTbBaIbcB H INX, NOyNUBc BYpeYbIaTe Tne UeAebHO YIyoJKeHHBe MIRKMe BOLOCbI.
Topruyu bo3dyu, noctmnaiauui om annapama, na2peaem Memannuueckyio mpy6ky hacadku. Takum oba3am, menno deucmbyeem HencopredcmBEmHO haBoIc6, CmRua u pa3znaueua ux.
KPYTLA JETKA I3 JETINHbI DNA-METPOM 20 MM
TOT dAmetp cneuHaBn npncnco6bHn DOKHauTeBHO DOBOKn: C NOMOJIbTO TToI UeTKN MOXHO CDeNaTb AKcHT Na YKLaJky OTJeBbHbIX pRJaI, YekN, KOHNKOB INI KOPHeB BO-LOC.
PImMeHHeNeIeTKeIMoKTe6bItbpa3- HbIM B 3aBcUMMOCTOn OT dNInHb BOJIOC:
-
Ha KQPOTKHX BONOCAX EIO MOKHO NOLB3OBAtCBR GPO3HOaJIbHO KAK IETKOH C HAPREBOmI INOlyeHnI MRAKOH NECTCTBEHHOn YKlaJKn, BHYTpB IVIN HApYKy.
-
Hā DīnHbIbx BONOcA xIeTKOJ MOKHO NIOJIb3OaBtCBaBePθTKaJIbHO dIaC03-dAHHaΦeKaT cNIPAleBnHbIx NO-KOHOB HA KOHNKIAx PRAJEi.