
QPCD05NXTW - Air conditioner HAIER - Free user manual and instructions
Find the device manual for free QPCD05NXTW HAIER in PDF.
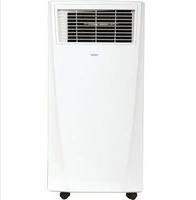


| Type | Portable Air Conditioner |
| Brand | Haier |
| Model | QPCD05NXTW |
| Cooling Capacity | 5,000 BTU/h |
| Power Consumption (Cooling) | 500 W |
| Voltage | 115 V |
| Frequency | 60 Hz |
| Refrigerant | R32 |
| Air Flow | 150 CFM |
| Noise Level | 52 dB |
| Dehumidification Capacity | 1.1 pts/h |
| Dimensions (H x W x D) | 26.8 x 17.5 x 13.0 in |
| Weight | 55 lbs |
| Timer | 24-hour programmable |
| Remote Control | Yes |
| Filter Type | Washable mesh |
| Cord Length | 6 ft |
| Window Kit Included | Yes |
| Casters | Yes |
| Self-Evaporative Operation | Yes |
Frequently Asked Questions - QPCD05NXTW HAIER
User questions about QPCD05NXTW HAIER
0 question about this device. Answer the ones you know or ask your own.
Ask a new question about this device
Download the instructions for your Air conditioner in PDF format for free! Find your manual QPCD05NXTW - HAIER and take your electronic device back in hand. On this page are published all the documents necessary for the use of your device. QPCD05NXTW by HAIER.
USER MANUAL QPCD05NXTW HAIER
Design may vary by model number.
Some models may have an additional letter after the model number
SAFTEY INFORMATION ....4
CONTROL PANEL....5
PARTS AND FEATURES 8
INSTALLATION REQUIREMENTS 9
INSTALLATION INSTRUCTIONS ....10
AIR CONDITIONER USE 13
AIR CONDITIONER CARE 13
TROUBLESHOOTING 14
LIMITED WARRANTY 15
RECORD KEEPING
Thank you for purchasing this Haier product. This user manual will help you get the best performance from your new range.
For future reference, record the model and serial number located on the front behind the range storage drawer, and the date of purchase.
Staple your proof of purchase to this manual to aid in obtaining warranty service if needed.
Model number
Serial number
Date of purchase
HAIER WEBSITE
Have a question or need assistance with your appliance? Try the Haier Website 24 hours a day, any day of the year! You can also shop for more great Haier products and take advantage of all our on-line support services designed for your convenience. In the US: Haierappliances.com
SAFETY INFORMATION
IMPORTANT SAFETY INFORMATION
READ ALL INSTRUCTIONS BEFORE USING THE APPLIANCE
IMPORTANT SAFETY INSTRUCTIONS
WARNING
To reduce the risk of fire, electrical
shock, injury to persons, or damage when using the air conditioner, follow basic precautions, including the following:
- Read all of the instructions before using this appliance.
- Plug into a grounded 3 prong outlet.
- Do not remove ground prong.
- Do not use an adapter.
- Do not use an extension cord.
- Do not operate the air conditioner if it has a damaged cord or plug, if it is not working properly, or if it has been damaged or dropped.
- The air conditioner should be serviced only by qualified service personnel. Call an authorized service company for examination, repair, or adjustment.
- Disconnect power before servicing.
- Disconnect power before cleaning.
NOTE: Turning off power by pressing the Power button does NOT disconnect the appliance from the power supply.
- Do not install or use the air conditioner in any area where the atmosphere contains combustible gases or where the atmosphere is contaminated. Avoid any chemicals coming in contact with your air conditioner.
- Do not store anything directly on top of the air conditioner.
- Use two or more people to move and install air conditioner.
- Never operate the air conditioner without the filters in place.
- Do not use the air conditioner near a bathtub, shower or wash basin or other wet area.
READ AND SAVE THESE INSTRUCTIONS
CONTROL PANEL
Features and appearance will vary.
Lights next to the touch pads on the air conditioner control panel indicate the selected settings.

BUTTONS
A Display
B. Warning Light
Condensed water may accumulate in the unit. If the internal tank becomes full, the warning light will light up and the unit will not operate until the unit has been drained.
C. Power Control
The power control turns the unit on and off.
D. Mode Control
The mode control has three settings: COOL, DEHUMIDIFY, and FAN. The settings are adjusted with Mode Control button. A light will indicate which setting is currently being used.
Cooling Mode.
When cool mode is selected, the indicator light turns blue. During the cooling mode the air is cooled and hot air is exhausted to the outside through the exhaust tube. Adjust fan speed and air temperature to suite your desired comfort level. NOTE: The air exchange hoses must vent outside the room when using cool mode.
Dehumidify Mode.
When dehumidify mode is selected, the indicator light turns yellow. Air is dehumidified as it passes through the unit, without being in full cooling mode. If room temperature is higher than 77 degrees Fahrenheit, fan speed can be adjusted; otherwise fan speed is fixed to "Low". NOTE: If the unit is to be used as a dehumidifier, do not connect the exhaust hose let the warm air return to the room. Continuous drainage is then necessary.
Fan Mode
When fan mode is selected the indicator light will shine green. Air is circulated throughout the room with no cooling. NOTE: Unit does not need to be vented in Fan mode.
E. Fan Speed Control
Select between multiple fan speeds. Number of fan
speeds vary by model.
Hold the FAN button for 3 seconds, the fan will continue running even when the compressor stops due to the temperature being reached.
F. Timer
Auto Turn Off:
With machine in running mode, press timer button to select number of hours you would like the unit to run in air conditioning mode until it automatically shuts off.
Auto Turn On:
With machine in stand by mode, press timer button to select number of hours until you would like the unit to automatically start running in air conditioning mode.
F. Timer/Temp Set Controls
• Used for adjusting the timer and thermostat.
- The default display is room temperature.
- In cooling mode when or button is pressed, the set temperature is displayed and may be adjusted. After 15 seconds the display will revert back to room temperature. Temperature is only adjustable in cool mode. The time is adjustable between 1-24 hours.
NOTE: By pressing both ^ and ∨ buttons at the same time, the display will toggle between Celsius and Fahrenheit. The temperature cannot be adjusted in the fan or dehumidification modes.
After switching the air conditioner off, you must wait 3 minutes before switching it back on again.
CONTROL PANEL
The display will always default to show the room temperature.
When the air conditioner is turned on, it will automatically start in the last mode and fan settings selected.
Cool Mode
Use the COOL mode for cooling and for economy cooling. To set the COOL mode:
- Press the MODE pad until the COOL indicator light is lit.
- Press the FAN pad to set HIGH or LOW fan speed.
- Press + or - to set the desired temperature between 61° F and 89° F in 1° F increments.
After settings have been made, the display will change back to show the room temperature.
The temperature control is used to maintain the room temperature. The compressor will cycle on and off to keep the room at the set level of comfort. Set the temperature control at a lower number and the indoor air will become cooler. Set the temperature control at a higher number and the indoor air will become warmer.
NOTE: If the air conditioner is off and is then turned on while set to COOL, it will take approximately 3 minutes for the compressor to start and cooling to begin.
Cooling Descriptions
For Normal Cooling—Select the COOL mode or HIGH fan speed with a middle set temperature.
For Maximum Cooling—Select the COOL mode and HIGH fan speed with a lower set temperature.
For Quieter & Nighttime Cooling—Select the COOL mode and LOW fan speed with a middle set temperature.
NOTE: If you switch from COOL or DRY mode setting to OFF wait 3 minutes before restarting.
In Cool mode, the fan will cycle off with the compressor when the room temperature is reached. Then the fan will cycle 10 minutes off and 2 minutes on to sample the air temperature.
Constant Cool Mode
Use Constant Cool mode when you do not want the fan to stop running.
To Set Constant Cool Mode:
- Press the FAN pad for 3 seconds until the Constant Cool indicator light is lit.
-
Press the FAN pad to set High or Low fan speed.
-
Press + or - to set the desired temperature between 61°F and 89°F in 1°F increments.
In Constant Cool Mode, the fan will continue running even when the compressor stops due to the set temperature being reached.
DRY Mode—Dehumidification
Use the DRY mode to provide dehumidification only. The fan will run at a fixed speed at this setting, so a fan speed cannot be set. Keep windows and doors closed for the best dehumidifying effects.
To set the DRY mode:
- Press the MODE pad until the DRY indicator light is lit. In the DRY mode, a set temperature will not be displayed. After DRY mode has been set, the display will change back to show the room temperature.
NOTE: If you switch from a DRY setting to OFF or to a fan setting, wait at least 3 minutes before switching back to a DRY setting.
If using the unit in the DRY mode as a dehumidifier for an extended time.
- Unplug the power cord.
- Connect a drain hose (not included) to the center drain port (see page 9, upper drain #8) and lead hose to floor drain.
- Reconnect the power cord and press the MODE pad until the DRY indicator light is lit.
FAN Mode
Use the FAN mode to provide air circulation and filtering without cooling.
To set the FAN mode:
- Press the FAN pad until the desired indicator light for HIGH or LOW fan speed is lit.
Since fan only settings do not provide cooling, a set temperature will not be displayed. After FAN speed has been set, the display will change back to show the room temperature.
Power Outage Recovery Feature
In the case of a power outage or interruption, the unit will automatically re-start in the settings last used after the power is restored.
NOTE: If the TIMER was set before the power outage, it will need to be reset after power is restored.
REMOTE CONTROL
1. Power On/Off

2. Mode

Cool: Blue LED lights when in cooling mode.
Dehumidification: Yellow LED lights when in dehumidification mode.
Fan: Green LED lights when in fan mode.
3. Fan Speeds

Select between multiple fan speeds. Number of fan speeds vary by model. In dehumidification mode, and room temperature is greater than 77° F, fan speed can be adjusted; Otherwise fan speed is fixed to "low".
4. On/Off Timer

To set the timer for a 1-24-hour delay until the air conditioner turns off:
- When you use the timer setting button while the unit is operating, you can preset a time for the unit to turn off.
- When you use the timer setting button while the unit is on standby, you can preset a time for the unit to turn on.
- If you press the "ON/OFF" button, the preset timer function will be canceled.
- Timer setting range is 1-24 hours.
To clear Timer Delay program:
NOTE: Air conditioner can be either on or off.
- Press the Timer Button.
- Press the + or - buttons continuously till "00" appears to cancel the timer function.
To change the remaining time (in hours):
- Press the Timer Button.
- Press the plus or minus button to change the delay time from 1 to 24 hours.
- The new delay time will display.
5. Setting the Temperature

To set the temperature, press the or ν keys to raise or lower the temperature. The temperature can be raised or lowered in the cool mode. The temperature cannot be adjusted in fan or dehumidification mode.
NOTE; The temperature can be set between 61° F to 89° F (Cool Mode).

PARTS AND FEATURES
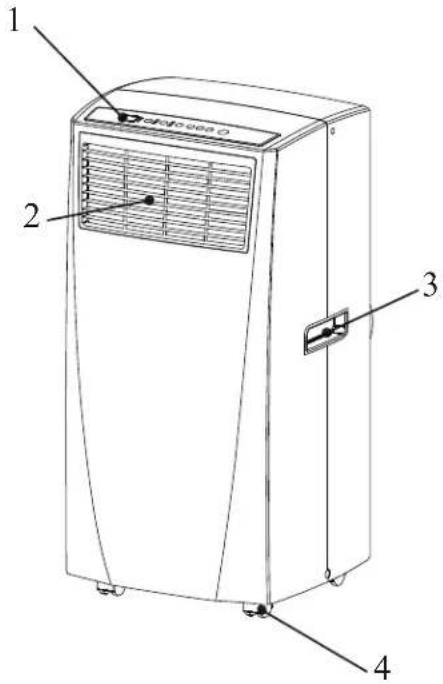
- Control Panel
- Air Outlet
- Handle hole
- Caster
- Air Filter
- Exhaust Hose Connection

- Air Intake
- Upper Drain
- Lower Drain NOTE: Please ensure if the water outlet drain is well installed before use.
- Power Supply Cord
- Rocker Switch
Power Cord

TEST: When this button is pressed or when there is a current leak, the unit will not operate.
RESET: After resolving the problem, press the reset button to resume operation.
INSTALLATION REQUIREMENTS
TOOLS AND PARTS
Gather the required tools and parts before starting installation.
TOOLS NEEDED
- Flat-blade Screwdriver
• Phillips Screwdriver
PARTS SUPPLIED

Exhaust Hose

Hose Connector

Hose Connector

Cover #5

Window Panel and Extension Panel (3)

Foam Seals
INSTALLATION INSTRUCTIONS
Questions? Call Haier Appliances at 1.877.337.3639 or visit our Website at: HaierAppliances.com.
BEFORE YOU BEGIN
Read these instructions completely and carefully.
- IMPORTANT — Save these instructions for local inspector's use.
- IMPORTANT — Observe all governing codes and ordinances.
- Note to Installer – Be sure to leave these instructions with the Consumer.
- Note to Consumer – Keep these instructions for future reference.
- Skill level – Installation of this appliance requires basic mechanical skills.
- Completion time – Approximately 1 hour
• We recommend that two people install this product. - Proper installation is the responsibility of the installer.
- Product failure due to improper installation is not covered under the Warranty.
- You MUST use all supplied parts and use proper installation procedures as described in these instructions when installing this air conditioner.
ELECTRICAL REQUIREMENTS

Some models require a 115/120-volt AC, 60-Hz grounded outlet protected with a 15-amp time-delay fuse or circuit breaker.
The 3-prong grounding plug minimizes the possibility of electric shock hazard. If the wall outlet you plan to use is only a 2-prong outlet, it is your responsibility to have it replaced with a properly grounded 3-prong wall outlet.
CAUTION
Do not, under any circumstances, cut or remove the third (ground) prong from the power cord.
Do not change the plug on the power cord of this air conditioner.
Aluminium house wiring may present special problems—consult a qualified electrician.
Power cord includes a current interrupter device. A test and reset button is provided on the plug case. The device should be tested on a periodic basis by first pressing the TEST button and then the RESET button while plugged into the outlet. If the TEST button does not trip or if the RESET button will not stay engaged, discontinue use of the air conditioner and contact a qualified service technician.
Location Requirements
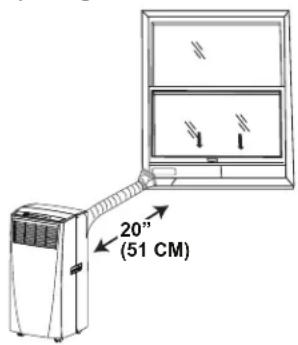
- Place the air conditioner on a flat, level surface in a location that is at least 20" (51 cm) from any wall.
NOTE: A minimum clearance of 30" (76.2 cm) from the air conditioner to the wall must be maintained to ensure proper airflow.
- Maintain a minimum 20" (51 cm) clearance around the air conditioner to not block airflow.
- Keep the air conditioner free of any obstructions such as drapes, curtains, blinds, etc.
- The exhaust hose should be free of any obstructions.
- Do not place the air conditioner on an unstable or raised surface because it could fall and cause damage or injury.
- Do not place the air conditioner in direct sunlight or near a heat source such as baseboard heaters, stoves, etc.
- The window panel can be installed in a window with a minimum 20" (51 cm) to a maximum 40" (101.6 cm) opening.

INSTALLATION INSTRUCTIONS
1. Unpack the Air Conditioner
WARNING
Excessive Weight Hazard
- Use two or more people to move and install air conditioner.
- Failure to do so can result in back or other injury.
- Remove packaging materials. Save the carton and the foam packaging for storing the air conditioner when not in use.
NOTE: There are NO packing materials inside the air conditioner to remove—Do Not open the cabinet.
• Properly dispose of/recycle all packing material.
- Handle the air conditioner gently.
- Keep the air conditioner upright and level. Do not set the air conditioner on its side, front, back or upside down.
2. Install Exhaust
- Connect the connectors #2 and #3 to two sides of exhaust hose #1 to create an exhaust assembly.
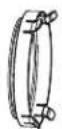

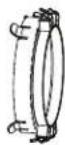
2 1 3

2. Install Exhaust (cont.)
- Sliding in one end of hose assembly (with hose connector #2) to rear panel.
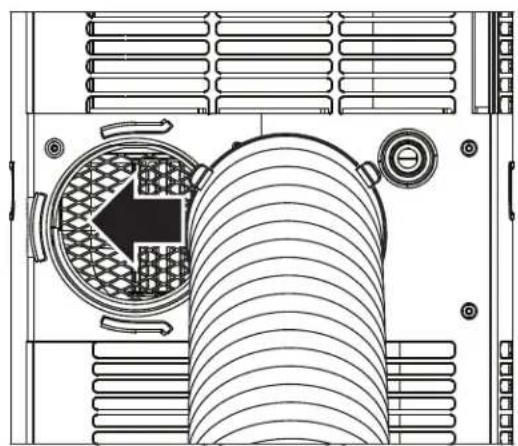
Then push the rocker switch to fix the hose assembly firmly.

INSTALLATION INSTRUCTIONS
3. Install Window Panels
- Insert the window panel B and C to each end of the main panel A. Adjust to fix the length of window.

C

A

B
- Open the window and place window panels into window. Adjust the extension panels to fit width or height of window by the screw and nut sets mounted on the main ptanel A.


4. Attach Exhaust Hose to the Exhaust Nozzle
- Insert the other end of the exhaust hose assembly (with hose connector #3) onto the window bracket.

5. Complete Installation
WARNING
Electrical Shock Hazard:
- Plug into a grounded 3 prong outlet.
- Do not remove the ground prong from the power cord plug.
- Do not use an adapter.
- Do not use an extension cord.
-
Failure to do so can result in death, fire or electrical shock.
-
Plug the power cord into a grounded 3 prong outlet.
-
Press the Reset button on the power cord to ensure the safety plug is providing power to the air conditioner.
AIR CONDITIONER USE
IMPORTANT: If the air conditioner has been tilted on its side, wait 24 hours before turning on the air conditioner to allow the oil to return to the compressor. This will prevent the air conditioner from failing prematurely.
- Allow 20" (51 cm) of space around the unit for proper air circulation.
- Do Not operate the air conditioner without air filters in place.
- Do not spill liquid on the control panel; it may cause an electrical short to the interior electronic parts that would either disable them or cause them to function improperly.
-
When turning on the air conditioner for the first time after plugging it into an electrical outlet, the unit will start in Cooling mode set at 75°F (24°C), and at High fan speed. The control panel will display the current room temperature.
-
When turning on the unit after previous use, it will remember the last settings used.
- After a normal shut down, please wait for 3 minutes before restarting the unit.
- In Cooling mode, this unit should not require water to be removed. This model has a unique design that continuously evaporates the water.
- When the unit is operated in high humidity conditions, you may need to empty the water tank periodically.
- The unit will shut down automatically when the water tank is full. The Full indicator illuminates to alert you of this condition.
AIR CONDITIONER CARE
WARNING
Electrical Shock Hazard:
- Disconnect power before cleaning.
- Failure to do so can result in death or electrical shock.
Cleaning
- Unplug or disconnect power.
- Use only a soft cloth dampened with water to clean the cabinet.
NOTE: Do not use a liquid or spray cleaner to clean the air conditioner.
NOTE: DO NOT use chemicals, abrasives, ammonia, chlorine bleach, concentrated detergents, solvents or scouring pads. Some of these chemicals/items may damage and/or discolor your air conditioner.
-
Dry thoroughly with a soft cloth.
-
Plug in or reconnect power.
Air Filters
The air filters should be cleaned at least once a week for your unit to operate at optimum efficiency.
IMPORTANT: Do Not operate the air conditioner without the air filters in place.
- Unplug or disconnect the power.
-
Pull on the tabs to slide out the filters from the back of the air conditioner.
NOTE: The secondary filters are accessible once the main filters are removed. -
Wash or vacuum the dust from the air filters.
NOTE: If washed, gently shake the filter to remove the excess water and dust particles trapped in the filter.
- Reinstall the filters.
- Plug in or reconnect power.
Internal Water Tank
The Full indicator illuminates, when the internal water tank has filled with condensed water.
To Empty the Internal Water Tank:
- Unplug or disconnect power.
- Place a shallow 1 quart or larger pan (not included) below the lower drain located on the back (near the bottom) of the air conditioner.
- Remove the cap and the rubber plug and drain the water tank.
- Re-insert the drain plug and screw the cap snugly into place.
- Plug in or reconnect power.
Storage
If the unit is not being used for a long period of time:
- Unplug or disconnect power.
- Drain the water from the water tank. See "Air Conditioner Care."
- Use the original packaging to repack the unit to avoid a buildup of dust or dirt.
- Store the air conditioner in a cool, dry location.
TROUBLESHOOTING
| Problem Possible Causes Solution | ||
| Unit does not start or operate | Power supply cord is not plugged into an outlet. | Plug the power cord into a grounded 3 prong outlet. |
| Power supply cord has tripped. Press and release the RESET button on the power supply cord. | ||
| The Power button has not been pressed. Press | the Power button on the Control Panel or Remote Control to turn ON the air conditioner. | |
| There is no power to the electrical outlet. Plug | a working lamp into the outlet to check for power. | |
| A household fuse has blown or a circuit breaker has tripped. | Replace the fuse or reset the circuit breaker. | |
| The control was programmed for a Time Delay | Cancel the Time Delay. See "Control Panel." | |
| The batteries in the remote control are dead. | Replace the batteries. | |
| The internal water tank is full.NOTE: The air conditioner automatically turns off, and the Water Full indicator illuminates to alert you of this condition. | Empty the water tank. See "Air Conditioner Care." | |
| Remote control is not working | Batteries are dead. Replace the batteries. | |
| Batteries are installed incorrectly. Make sure the batteries are inserted in the correct position. | ||
| Air conditioner is working but the room is not cooling. | The room temperature is hot.NOTE: On extremely hot and humid days,the air conditioner will take longer to cool the room. | Allow time for the room to cool when you first turn on the unit.Make sure the air conditioner has an adequate BTU rating for the size of the room being cooled. |
| The control is set incorrectly to Fan or Dehum mode. | Set the Mode to Cool and the Fan Speed to High. | |
| Airflow is restricted. Remove any obstacles to the airflow and redirect airflow for uniform cooling. | ||
| Temperature set too high. Lower the set temperature. | ||
| Air filters are dirty or restricted. | Clean the air filter. See "Air Conditioner Care." | |
| Air conditioner installed incorrectly | Check the exhaust hose and window panel for proper installation. | |
| Doors and windows are open. | Close the doors and windows to the room being cooled to prevent cooled air from escaping. | |
LIMITED WARRANTY
| For The Period Of: Will Replace: | |
| One YearFrom the date of the original purchase | Replacement, repair, or refund of the original retail price for any product which fails due to a defect in materials or workmanship. If the unit is exchanged, the replacement unit is warranted for the remainder of your product's original one-year warranty period. GE will, at its sole discretion, replace the product with a product of the same or comparable functionality and quality or refund the original retail price. |
In Order to Make a Warranty Claim During the First 90 Days from the Date of Original Purchase:
■ Properly pack your unit. We recommend using the original carton and packing materials.
■ Return the product to the retail location where it was purchased.
■ Include in the package a copy of the sales receipt or other evidence of date of original purchase. Also print your name and address and a description of the defect.
In Order to Make a Warranty Claim During the Remainder of the One-Year Warranty:
- Locate your original sales receipt and make a note of your model and serial number.
■ Call 1.877.337.3639 (in the United States) to initiate the product replacement process.
■ You will be asked to provide your name, address, date of purchase, model and serial number.
■ GE Appliances will arrange for a carton to be sent to your home to recover the product.
■ Please return all requested materials (postage pre-paid) in the carton provided. Please include a description of the defect.
■ You should receive your replacement product or refund within 7 to 10 business days after your package is received.
What Will Not Cover:
- Customer instruction. This owner's manual provides information regarding operating instructions and user controls.
- Improper installation. If you have an installation problem, or if the air conditioner is of improper capacity, contact your dealer or installer. You are responsible for providing adequate electrical connecting facilities.
■ Failure of the product resulting from modifications to the product or due to unreasonable use including failure to provide reasonable and necessary maintenance.
■ Replacement of house fuses or resetting of circuit breakers.
■ Failure due to corrosion on models not corrosion-protected.
■ Damage to the product caused by improper power supply voltage, accident, fire, floods or acts of God.
■ Incidental or consequential damage caused by possible defects with this air conditioner.
■ Damage caused after delivery.
EXCLUSION OF IMPLIED WARRANTIES - Your sole and exclusive remedy is product repair as provided in this Limited Warranty. Any implied warranties, including the implied warranties of merchantability or fitness for a particular purpose, are limited to one year or the shortest period allowed by law.
For US Customers: This limited warranty is extended to the original purchaser and any succeeding owner for products purchased for home use within the USA. If the product is located in an area where service by a GE Appliances Authorized Servicer is not available, you may be responsible for a trip charge or you may be required to bring the product to an Authorized GE Appliances Service location for service. In Alaska, the limited warranty excludes the cost of shipping or service calls to your home.
Some states do not allow the exclusion or limitation of incidental or consequential damages. This limited warranty gives you specific legal rights, and you may also have other rights which vary from state to state. To know what your legal rights are, consult your local or state consumer affairs office or your state's Attorney General.
Warrantor US:
GE Appliances, a Haier company
Louisville, KY 40225
NOTES
ÍNDICE
SEGURIDAD DEL ACONDICIONADOR DE AIRE 19
PANEL DE CONTROL 20
PIEZAS Y CARACTERÍSTICAS 23
Features and appearance will vary.
Lights next to the touch pads on the air conditioner control panel indicate the selected settings.

BOTONES

Window Panel and Extension Panel (3)

Foam Seals


4. Adhiera La Manguera Del Extractor A La Boca Del Extractor
GE Appliances, a Haier company
Louisville, KY 40225
IMPORTANT
Do Not Return This Product To The Store
If you have a problem with this product, please call 1-877-337-3639 for the name and telephone number of the nearest authorized service center.
DATED PROOF OF PURCHASE REQUIRED FOR WARRANTY SERVICE
IMPORTANTE
- RECORD KEEPING
- HAIER WEBSITE
- SAFETY INFORMATION
- IMPORTANT SAFETY INFORMATION
- READ ALL INSTRUCTIONS BEFORE USING THE APPLIANCE
- IMPORTANT SAFETY INSTRUCTIONS
- WARNING
- READ AND SAVE THESE INSTRUCTIONS
- CONTROL PANEL
- BUTTONS
- A DISPLAY
- WARNING LIGHT
- POWER CONTROL
- MODE CONTROL
- COOLING MODE
- DEHUMIDIFY MODE
- FAN MODE
- FAN SPEED CONTROL
- TIMER
- AUTO TURN OFF
- AUTO TURN ON
- TIMER/TEMP SET CONTROLS
- COOL MODE
- COOLING DESCRIPTIONS
- CONSTANT COOL MODE
- TO SET CONSTANT COOL MODE
- DRY MODE—DEHUMIDIFICATION
- TO SET THE DRY MODE
- TO SET THE FAN MODE
- POWER OUTAGE RECOVERY FEATURE
- REMOTE CONTROL
- POWER ON/OFF
- MODE
- FAN SPEEDS
- ON/OFF TIMER
- TO CLEAR TIMER DELAY PROGRAM
- TO CHANGE THE REMAINING TIME (IN HOURS)
- SETTING THE TEMPERATURE
- PARTS AND FEATURES
- POWER CORD
- INSTALLATION REQUIREMENTS
- TOOLS AND PARTS
- TOOLS NEEDED
- PARTS SUPPLIED
- INSTALLATION INSTRUCTIONS
- BEFORE YOU BEGIN
- ELECTRICAL REQUIREMENTS
- CAUTION
- LOCATION REQUIREMENTS
- UNPACK THE AIR CONDITIONER
- EXCESSIVE WEIGHT HAZARD
- INSTALL EXHAUST
- INSTALL EXHAUST (CONT.)
- INSTALL WINDOW PANELS
- ATTACH EXHAUST HOSE TO THE EXHAUST NOZZLE
- COMPLETE INSTALLATION
- ELECTRICAL SHOCK HAZARD
- AIR CONDITIONER USE
- AIR CONDITIONER CARE
- CLEANING
- AIR FILTERS
- INTERNAL WATER TANK
- TO EMPTY THE INTERNAL WATER TANK
- STORAGE
- IF THE UNIT IS NOT BEING USED FOR A LONG PERIOD OF TIME
- TROUBLESHOOTING
- LIMITED WARRANTY
- IN ORDER TO MAKE A WARRANTY CLAIM DURING THE FIRST 90 DAYS FROM THE DATE OF ORIGINAL PURCHASE
- IN ORDER TO MAKE A WARRANTY CLAIM DURING THE REMAINDER OF THE ONE-YEAR WARRANTY
- WHAT WILL NOT COVER
- NOTES
- ÍNDICE
- SEGURIDAD DEL ACONDICIONADOR DE AIRE
- PANEL DE CONTROL
- PIEZAS Y CARACTERÍSTICAS
- BOTONES
- ADHIERA LA MANGUERA DEL EXTRACTOR A LA BOCA DEL EXTRACTOR
- IMPORTANT
- IMPORTANTE
Brand : HAIER
Model : QPCD05NXTW
Category : Air conditioner