
HPIM25S - Ice Maker HAIER - Free user manual and instructions
Find the device manual for free HPIM25S HAIER in PDF.
| Product Type | Portable Ice Maker |
| Brand | HAIER |
| Model | HPIM25S |
| Dimensions (W x D x H) | 9.5 in x 14.1 in x 12.9 in (24.1 cm x 35.8 cm x 32.8 cm) |
| Weight | 20.5 lb (9.3 kg) |
| Power Supply | 115 V ~ 60 Hz, 2.7 A |
| Production Current | 1.5 A |
| Harvest Current | 2.0 A |
| Refrigerant | R134a, 2.3 oz (65 g) |
| Rated High Pressure | 290 psig |
| Rated Low Pressure | 88 psig |
| Housing Material | ABS Plastic |
| Capacity per Cycle | 12 ice cubes |
| Cycle Time (small ice cubes) | Approximately 7 minutes |
| Cycle Time (large ice cubes) | Approximately 12 minutes |
| Size Selection | Small (S) or Large (L) |
| Indicator Lights | Power On, ADD WATER, ICE FULL, size selected |
| Automatic Shut-off | Yes, when the bin is full or the tank is empty |
| Water Tank Capacity | Approximately 1.1 L (fill to mark) |
| Maintenance | Clean regularly with mild detergent; drain water every 24 hours |
| Safety | Grounding mandatory; do not immerse in water; keep away from children |
| Warranty | 12 months parts and labor (domestic) |
| Customer Service | 1-877-337-3639 (Haier America) |
Frequently Asked Questions - HPIM25S HAIER
User questions about HPIM25S HAIER
0 question about this device. Answer the ones you know or ask your own.
Ask a new question about this device
Download the instructions for your Ice Maker in PDF format for free! Find your manual HPIM25S - HAIER and take your electronic device back in hand. On this page are published all the documents necessary for the use of your device. HPIM25S by HAIER.
USER MANUAL HPIM25S HAIER
Portable Electronic Icemaker
When using electrical appliances, basic safety precautions should always be followed, including the following:
- Read all instructions carefully.
- DANGER! To protect against risk of electric shock, do not immerse cord, plug or any parts of the unit in water or other liquids.
- Close supervision is necessary when using this appliance near children. This appliance is not suitable for use by children.
- Never leave an appliance unattended while in use.
- Do not place an appliance on or near a hot gas or electric burner, or in a heated oven. Do not place on top of any other appliance.
- Do not let the power cord of an appliance hang over the edge of a table or countertop or touch any hot surface.
- Do not operate any electrical appliance with a damaged cord or plug or after the appliance malfunctions or has been dropped or damaged in any manner. If damage is suspected, contact the nearest authorized service center for examination, repair or electrical or mechanical adjustment.
- Unplug from power outlet when not in use, before putting on or taking off attachments, and before cleaning.
- The use of accessory attachments that are not recommended by the appliance manufacturer may cause fire, electric shock or injury.
- Avoid contact with moving parts when the unit is in operation.
- Never touch the cooling elements when the unit is in operation.
- Do not use outdoors.
- Do not use appliance for other than its intended use.
SAVE THESE INSTRUCTIONS HOUSEHOLD USE ONLY
UNPACKING YOUR ICE MAKER


- Inspect and remove all packing materials. This includes the foam and any adhesive tape both inside and outside of the unit.
- Inspect and remove any remains of packing, tape, or printed materials before powering on your Haier appliance.
WARNING
Please read this manual carefully before using. Retain it for your future reference.
PRODUCT REGISTRATION
Keep for your records to obtain Warranty Service
Thank you for using our Haier product. This easy-to-use manual will guide you in getting the best use out of your appliance.
Remember to record the model and serial number. They are on a label in back of the appliance.
Model number
Icemaker serial number
Date of purchase
Staple your receipt to your manual.
You will need it to obtain warranty service.
Please register online at www.prodregister.com/Haier.
SAFETY INSTRUCTIONS
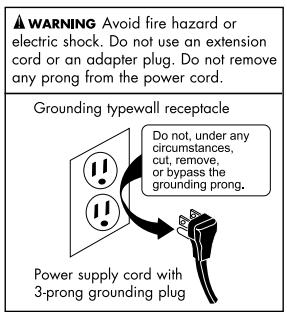
Electrical Requirements Wiring and Grounding Instructions
This appliance must be plugged into at least a 15 AMP 110-115 VOLT 60Hz GROUNDED OUTLET. This appliance must be grounded. It is equipped with a 3-wire cord having a grounding plug. The plug must be plugged into an outlet that is properly installed and grounded.
WARNING! Improper use of grounded wire can result in the risk of electric shock. Consult a physician if necessary. Do not attempt to defeat this safety feature by modifying the plug.
Avoid the use of an extension cord because it may overheat and cause a risk of fire. However, if it is necessary to use an extension cord:
A. Use only 3-wire extension cords with 3-blade grounding plug.
B. The marked rating of an extension cord must be be equal to or greater than the rating of this appliance.
C. It should be positioned such that it does not drape over the counter or tabletop where it can be pulled on by children intentionally.
Attempting any maintenance or cleaning:
To minimize the possibility of electric shock, unplug this appliance from the power supply or disconnect at the household distribution panel by removing the fuse or switching off the circuit breaker before attempting any maintenance or cleaning.
NOTE: Pressing the Power ON/OFF button to an off position does NOT disconnect the appliance from the power supply.
TABLE OF CONTENTS
Important Safeguards 1-2
Safety Instructions 3
Parts and Accessories 5-6
Operating Instructions 7
Pre-Operating Instructions 7
Operating Instructions 8
Operating Process. 9
Cleaning and Maintenance 10
Troubleshooting Guide 11
Limited Warranty 12
| Specifications | Model # HPIM25SS/S |
| Electrical Shock Protection | Class 1 |
| Power | 115V/60Hz 2.7 A |
| Ice Making Current | 1.5 A |
| Ice Harvest Current | 2.0A |
| Refrigerant | R134a/2.3 Oz. |
| Design Pressure | |
| High Side | 290 Psig |
| Low Side | 88 Psig |
| Dimensions | 9.5" x 14.1" x 12.9" |
| Weight | 20.5 lbs. |
| Enclosure | ABS plastic |
PARTS, FUNCTIONS AND FEATURES
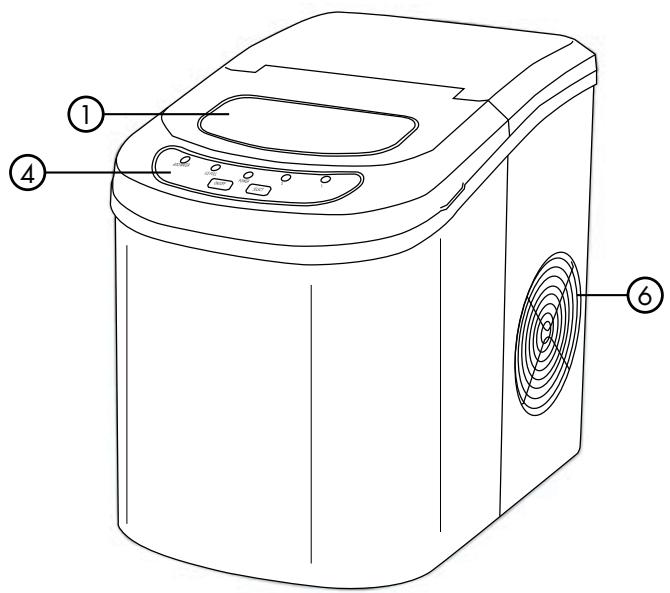
- Cover with transparent window
- Ice maker and pusher
- Water reservoir (Not shown)
- Control panel
- Water drain cap: For draining water from ice water (Front Button of Unit)
- Compressor cooling fan (Do not block air flow)
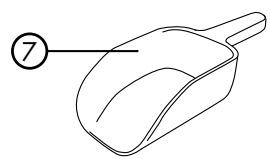
- Ice shovel
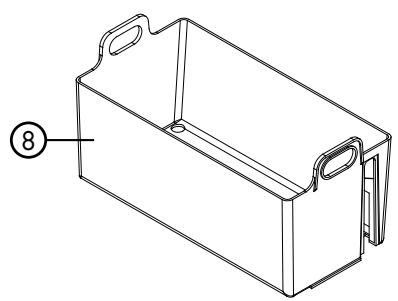
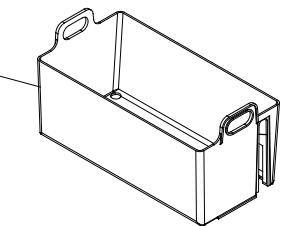
- Ice basket
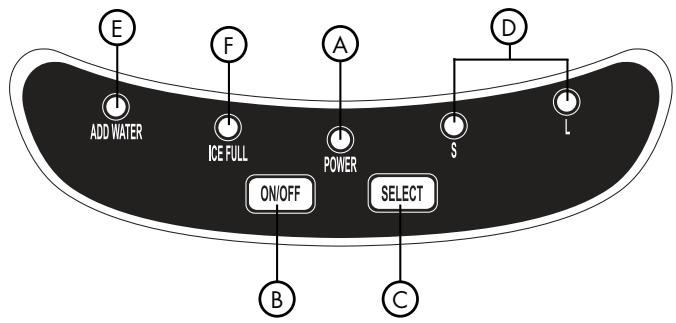
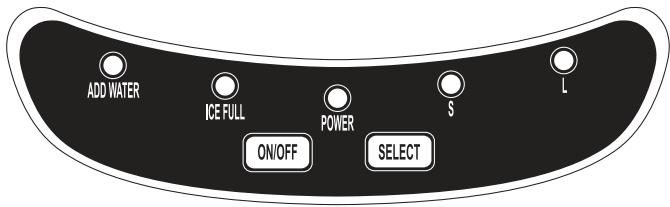
Control Panel: Easy to use, button function with LED indicators
A. Power ON LED indicator light
B. Power ON/OFF button
C. Ice cube SELECT SIZE button
D. Selected ice size LED light indicator displaying: SMALL, and LARGE ice cubes to make
E. "ADD WATER" (Alerts that there is no water in the water reservoir), must add water
F. "ICE FULL" LED indicator
OPERATING INSTRUCTIONS
This portable icemaker uses a fully automatic control system, with an advanced microcomputer for easy and convenient ice making. Making ice is simple and fast. Just add water, plug into an outlet, and press the ON button. You can select one of the two ice cube sizes with the touch of a button. When first turning on the unit or during icemaking cycles, the compressor will stay idle for 3 minutes, while energizing.
There are warning indicators that alert you to fill water when the reservoir is empty and to remove ice when the storage basket is full. The icemaker also has built-in safeguards that can limit accidental damage, automatically shutting down the system when necessary.
Pre-Operating Instructions
Please read carefully.

The incline angle of the icemaker cabinet should not exceed 45^ during transportation or use. Do not turn the icemaker upside down.
Doing so could cause the compressor or refrigerating system to operate incorrectly. When the icemaker is moved or transported, please allow time for the fluids in the compressor to settle. Before using the icemaker for the first time, please wait 2 hours after the unit has been leveled and positioned in its proper place.
- Please ensure the icemaker is level and on a stable table or platform to avoid malfunction.
- The machine must be placed on a dry and level surface with sufficient ventilation, far from heat sources such as ovens, heaters and corrosive gases. Leave an 8-inch clearance on all sides of the icemaker for proper ventilation.
- Do not fill the water reservoir with hot water. This may damage the icemaker. It is best to fill the water reservoir with water of room temperature or lower.
Operating Instructions
- Open the top cover, take out the ice storage basket and fill the water reservoir with drinkable (tap, purified or bottled) 2.3 quarts water to the level mark and replace the ice storage basket.
Lift ice basket to add water
Make sure that the water level does not reach above the level mark or the bottom of the ice storage basket. Close the top cover.
Note: During the operation process, if the level of water in the water reservoir becomes too low, the machine will automatically stop operating and the "Add Water" indicator will display on the LED.
- Plug the unit into a grounded outlet. Push the ON / OFF button on the control panel to turn on the machine.
- Select the desired size of ice cube by pressing the S or L ice selector button.
S = Small ice cubes (Approx. 7 minutes)
L = Large ice cubes (Approx. 12 minutes)
The icemaker will start making ice soon after. The next cycle of 9 ice cubes is complete (based on water temperature, ambient room temperature and selected ice cube size).
Note: To stop the operation, press the ON/OFF button.
Operating Process
- Water is pumped from the water storage tank to the water box, which may take up to 1 minute.
- The icemaking cycle begins when the evaporator rods are dipped into the water box. You will hear the compressor working.
- It will take approximately 5-13 minutes for each icemaking cycle, depending on the size selected. The larger the size, the more time is needed to make the ice. After the cycle is finished, the water box will tilt forward and the remaining water will flow back into the water storage tank. The evaporator rods will then release the ice cubes.
Note: If the room ambient temperature is below 60^ F, then small ice cube sizes are suggested to prevent ice cubes from fusing together.
- Approximately 60 seconds later, the water box will tilt backwards and the ice pusher will push the ice into the ice storage basket. After the water box flips back to its original position, the next icemaking cycle will begin.
- When the maximum capacity of ice cubes is collected and the ice reaches the temperature sensor, the icemaker will automatically stop operating. The "ICE FULL" LED indicator will light up.
If more ice is needed, remove the ice from the ice storage basket; then replace the basket into the machine, making sure that the basket is placed back to its original position. Note: When replacing the basket, ensure that the temperature sensor is above the basket so that the machine operates properly.
- To continue making ice, check that there is water in the water storage tank. If there is no water in the water storage tank, then no water will be pumped into the water box, and the operation will stop. The "Add Water" LED display will light up. Press the "OFF" button. Fill the water storage tank with water, and then press the "ON" button for the icemaker to begin operating again. Allow the refrigerant inside the compressor at least 3 minutes to settle before restarting.
- If the compressor stops for any reason such as water shortage, too much ice, power off, etc., do not restart the machine right away.
Wait at least 3 minutes before restarting the machine.
CLEANING AND MAINTENANCE
Before using your icemaker, it is strongly recommended that you clean the icemaker thoroughly. Be sure to clean the icemaker regularly.
- When cleaning, please make sure the power has been turned off and the plug is disconnected from the outlet. When plugging or unplugging the unit from the outlet, pull directly on the plug. Never pull on the power cord.
- Remove the ice storage basket.
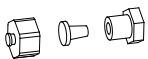
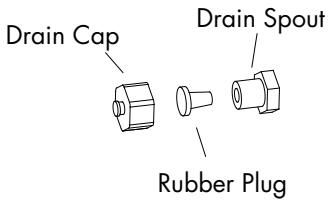
- Drain remaining water from unit. Remove the cap, then the rubber plug from the spout. When assembling back together, the rubber plug must be inserted first into the spout, and then capped. Otherwise, the icemaker will leak.
- Use a mild detergent diluted in warm water and wipe with a soft towel or sponge.

Solvents, detergents and abrasives must never be used for cleaning.
- Wipe the inner parts, such as the ice storage basket, water reservoir, water box, ice pusher, and evaporator rods.
- The outside of the icemaker should be cleaned regularly with a mild detergent solution, warm water, and a soft cloth.
- Dry the interior and exterior with a soft cloth.
- To begin making ice once the unit has been cleaned, pour clean water into the water reservoir and fill up to the level line follow operating instructions.

Never tilt or place the icemaker on its side, otherwise you must wait 10 hours for compressor coolant to settle.
- To ensure the cleanliness of the ice cubes, the water in the water storage tank should be replaced every 24 hours.
- When the machine is not in use or will not be used for an extended period of time, unscrew the drain cap, then remove the rubber plug behind the unit to empty the remaining water in the water reservoir completely. (Follow the instructions in number 4 above.)
TROUBLESHOOTING GUIDE
| Problem | Possible Causes | Solution |
| “ADD WATER” indicator light turns on. | Low water level or lack of water. | Add water and the icemaker will operate automatically. |
| There is no indication on the control panel. | Disconnection of plug. | Check that the plug is plugged into the electrical outlet. |
| “Ice Full” and “Add Water” indicators light up simultaneously. | Electrical Power Surge or There may be air in the lines or the lines are blocked. The water tank cannot detect water level. | Turn off the icemaker, pull out the electric plug, fill it with water if needed, replace the plug and then restart the unit. or Inspect relative parts; remove the drain cap on the back of the unit and drain out a small amount of water. Replace the drain cap and attempt to use the unit again. or Check if ice is blocking the ice pusher. Turn off the unit; let the ice melt and restart. Otherwise, call Haier America Customer Service. |
| The “Ice Full” indicator light is on. | The ice basket is full. | Remove ice from the ice storage basket to make more. |
| The unit does not operate. | Power is not being supplied to the unit. The ambient temperature or the water temperature is too high. | Plug the unit into a standard 110/120 Volt, 60 Hertz power source. Please run the icemaker in temperatures below 90°F and/or pour colder water into the water reservoir. |
| Ice blockage. No ice is being made. | Making ice takes too much time. | Turn off the machine. Start the machine after the ice block melts. Or change the size selector to small ice cubes. |
| The icemaking cycle seems normal but no ice is produced. | There is refrigerant leakage. A pipe in the cooling system is blocked. | Consult a qualified technician or call Haier America Customer Service. |
Note: There is protective circuitry inside this icemaker to protect the circuitry from overheating and the icemaker will automatically shut down to prevent damage if activated. Please disconnect power cord and restart after 30 minutes of cooling down time.
For Haier America Customer Service, please call: 1-877-337-3639
LIMITED WARRANTY
What is covered and for how long?
This warranty covers all defects in workmanship or materials for a period of: 12 months for labor 12 months for parts (Functional Parts Only)
The warranty commences on the date of item purchase. Customer shall provide Haier with proof of the date of purchase and the original receipt along with: brand, model and serial number for verification prior to any warranty service being provided.
Carry-In Service is available for selected products at the discretion of Haier America.
EXCEPTIONS:
Commercial or Rental Use warranty 90 days for labor 90 days for parts No other warranty applies.
What is covered.
- The mechanical and electrical parts of the appliance which serve the functional purpose of this appliance are covered for a period of 12 months or as stated above. This includes all parts except finish, trim and glass.
- The limited warranty does not cover any credit or refund for any loss or injury caused by the product or defects to the product including but not limited to incidental or consequential damages.
What will be done?
- Any mechanical or electrical part that proves to be defective in normal usage during the specified warranty period will be repaired or replaced at Haier's discretion.
ALL WARRANTY SERVICE MUST BE PROVIDED BY ONLY OUR FACTORY SERVICE CENTERS, OR BY AN AUTHORIZED HAIER CUSTOMER TECHNICIAN.
If it is determined that repair is not appropriate or replacement parts are unavailable for repair, Haier will exchange the product with a refurbished or new product the same or similar to the original at its discretion.
- There will be no charge to the purchaser for functional replacement parts and labor on any covered items during the initial 12-month period or as stated above.
- THIS WARRANTY COVERS APPLIANCES WITHIN THE CONTINENTAL UNITED STATES, PUERTO RICO AND CANADA. IT DOES NOT COVER THE FOLLOWING:
Damages from improper installation.
Damages incurred during shipping.
Defects other than manufacturing. Damage
from misuse, abuse, accident, alteration,
lack of proper care and maintenance
or incorrect current or voltage or acts of God. Damage from other than household use. Damage from service by other than an authorized dealer or service center.
Decorative trims, glass or replaceable light bulbs. Transportation and shipping costs.
Labor (after the initial 12 months). Credit or Refund for products over 30 days past date of purchase. Food loss for food spoiled as a direct result of mechanical failure of the product or of any delay in providing service, repair, replacement. This limited warranty doesn't apply to refurbished product or unit purchased as/like new or second-hand. THIS LIMITED WARRANTY IS GIVEN IN LIEU OF ALL OTHER
WARRANTIES, EXPRESSED OR INCLUDING THE WARRANTYES OF MERCHANTABILITY AND FITNESS FOR A PARTICULAR
PURPOSE. The remedy provided in this warranty is exclusive and is granted in lieu of all other remedies. This warranty does not cover incidental or consequential damages, so the above limitations may not apply to you. Some states do not allow limitations on how long an implied warranty lasts, so the above limitations may not apply to you. This warranty gives you specific legal rights, and you may have other rights, which vary from state to state..
Haier America
New York, NY 10018
CONSIGNES DE SECURITE IMPORTANTES

TROUBLESHOOTING GUIDE
If you have a problem with this product, please contact the "Haier Customer
Satisfaction Center" at 1-877-337-3639.
DATED PROOF OF PURCHASE REQUIRED FOR WARRANTY SERVICE
IMPORTANT
- SAVE THESE INSTRUCTIONS HOUSEHOLD USE ONLY
- UNPACKING YOUR ICE MAKER
- WARNING
- PRODUCT REGISTRATION
- Keep for your records to obtain Warranty Service
- SAFETY INSTRUCTIONS
- Electrical Requirements Wiring and Grounding Instructions
- Attempting any maintenance or cleaning:
- TABLE OF CONTENTS
- PARTS, FUNCTIONS AND FEATURES
- OPERATING INSTRUCTIONS
- Pre-Operating Instructions
- Operating Process
- CLEANING AND MAINTENANCE
- TROUBLESHOOTING GUIDE
- LIMITED WARRANTY
- What is covered and for how long?
- What is covered.
- What will be done?
- CONSIGNES DE SECURITE IMPORTANTES
- IMPORTANT
Brand : HAIER
Model : HPIM25S
Category : Ice Maker