
HSU-12LEA13-M - Air conditioner HAIER - Free user manual and instructions
Find the device manual for free HSU-12LEA13-M HAIER in PDF.


| Product Type | Split Air Conditioner |
| Cooling Capacity | 12000 BTU/h |
| Heating Capacity | 12000 BTU/h |
| Energy Efficiency Ratio (EER) | 12.0 |
| Seasonal Energy Efficiency Ratio (SEER) | 15.0 |
| Power Supply | 220-240V ~ 50/60Hz |
| Refrigerant | R410A |
| Indoor Unit Dimensions (WxHxD) | 800 x 280 x 190 mm |
| Outdoor Unit Dimensions (WxHxD) | 700 x 500 x 250 mm |
| Indoor Unit Weight | 9 kg |
| Outdoor Unit Weight | 30 kg |
| Controls | Remote control included |
| Modes | Cool, Heat, Fan, Dehumidify, Auto |
| Features | Sleep mode, 24-hour timer, Turbo mode, Self-cleaning |
| Air Flow Speed | 3-speed fan + auto |
| Indoor Noise Level | 25-40 dB(A) |
| Outdoor Noise Level | 50 dB(A) |
| Filter Type | Washable, anti-bacterial |
| Installation | Professional required |
| Warranty | 5 years compressor, 1 year parts |
Frequently Asked Questions - HSU-12LEA13-M HAIER
User questions about HSU-12LEA13-M HAIER
0 question about this device. Answer the ones you know or ask your own.
Ask a new question about this device
Download the instructions for your Air conditioner in PDF format for free! Find your manual HSU-12LEA13-M - HAIER and take your electronic device back in hand. On this page are published all the documents necessary for the use of your device. HSU-12LEA13-M by HAIER.
USER MANUAL HSU-12LEA13-M HAIER
SPLIT TYPE ROOM AIR CONDITIONER
OPERATION MANUAL
HSU-24HEA03
HSU-09HEA03
HSU-12HEA03
HSU-18HEA03
HSU-22HEA03
HSU-09LEA13-F
HSU-12LEA13-F
HSU-09LEA13-W
HSU-12LEA13-W
HSU-18LEA13-W
HSU-22LEA13-W
HSU-24LEA13-W
HSU-12LEA13-M
HSU-18LEA13-M
HSU-09LEA13-M
HSU-24LEA13-M
- Please read this operation manual before using the air conditioner.
Cautions
Disposal of the old air conditioner
Before disposing an old air conditioner that goes out of use, please make sure it's inoperative and safe. Unplug the air conditioner in order to avoid the risk of child entrapment.
It must be noticed that air conditioner system contains refrigerants, which require specialized waste disposal. The valuable materials contained in an air conditioner can be recycled. Contact your local waste disposal center for proper disposal of an old air conditioner and contact your local authority or your dealer if you have any question. Please ensure that the pipework of your air conditioner does not get damaged prior to being picked up by the relevant waste disposal center, and contribute to environmental awareness by insisting on an appropriate, anti-pollution method of disposal.
Disposal of the packaging of your new air conditioner
All the packaging materials employed in the package of your new air conditioner may be disposed without any danger to the environment.
The cardboard box may be broken or cut into smaller pieces and given to a waste paper disposal service. The wrapping bag made of polyethylene and the polyethylene foam pads contain no fluorochloric hydrocarbon.
All these valuable materials may be taken to a waste collecting center and used again after adequate recycling.
Consult your local authorities for the name and address of the waste materials collecting centers and waste paper disposal services nearest to your house.
Safety Instructions and Warnings
Before starting the air conditioner, read the information given in the User's Guide carefully. The User's Guide contains very important observations relating to the assembly, operation and maintenance of the air conditioner.
The manufacturer does not accept responsibility for any damages that may arise due to non-observation of the following instruction.
- Damaged air conditioners are not to be put into operation. In case of doubt, consult your supplier.
- Use of the air conditioner is to be carried out in strict compliance with the relative instructions set forth in the User's Guide.
- Installation shall be done by professional people, don't install unit by yourself.
- For the purpose of the safety, the air conditioner must be properly grounded in accordance with specifications.
• Always remember to unplug the air conditioner before opening inlet grill. Never unplug your air conditioner by pulling on the power cord. Always grip plug firmly and pull straight out from the outlet.
- All electrical repairs must be carried out by qualified electricians. Inadequate repairs may result in a major source of danger for the user of the air conditioner.
- Do not damage any parts of the air conditioner that carry refrigerant by piercing or performing the air conditioner's tubes with sharp or pointed items, crushing or twisting any tubes, or scraping the coatings off the surfaces. If the refrigerant spurts out and gets into eyes, it may result in serious eye injuries.
Cautions
- Do not obstruct or cover the ventilation grille of the air conditioner.Do not put fingers or any other things into the inlet/outlet and swing louver.
- Do not allow children to play with the air conditioner. In no case should children be allowed to sit on the outdoor unit.
Specifications
• The refrigerating circuit is leak-proof.
The machine is adaptive in following situation
- Applicable ambient temperature range:
| Cooling | Indoor | Maximum:D.B/W.BMinimum:D.B/W.B | 32°C/23°C18°C/14°C |
| Outdoor | Maximum:D.B/W.BMinimum:D.B | 43°C/26°C18°C | |
| Heating | Indoor | Maximum:D.BMinimum:D.B | 27°C15°C |
| Outdoor | Maximum:D.B/W.BMinimum:D.B | 27°C/18°C-7°C |
- If the power supply cord is damaged, it must be replaced by the manufacturer or its service agent or a similar qualified person.
- If the fuse of indoor unit on PC board is broken, please change it with the type of T. 3.15A/250V.
- The wiring method should be in line with the local wiring standard.
- After installation, the power plug should be easily reached.
-
The waste battery should be disposed properly.
-
The appliance is not intended for use by young children or infirm persons without supervision.
- Young children should be supervised to ensure that they do not play with the appliance.
- Please employ the proper power plug, which fit into the power supply cord.
- The power plug and connecting cable must have acquired the local attestation.
- In order to protect the units, please turn off the A/C first, and at least 30 seconds later, cutting off the power.
Cautions
Safety Instruction
- Please read the following Safety Instructions carefully prior to use.
- The instructions are classified into two levels, WARNING and CAUTION according to the seriousness of possible risks and damages as follows. Compliance to the instructions are strictly required for safety use.
Installation
⚠ WARNING
Please call Sales/Service Shop for the Installation.
Do not attempt to install the air conditioner by yourself because improper works may cause electric shock, fire, water leakage.
Installation in a inadequate place may cause accidents. Do not install in the following place.
| CAUTION | |||
Connect the earth cable. | Do not install in the place where there is any possibility of inflammable gas leakage around the unit. PROHIBITION PROHIBITION PROHIBITION PROHIBITION | Do not get the unit exposed to vapor or oil steam.[HE5D] | Check proper installation of the drainage securely 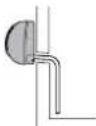 STRICT ENFORCEMENT STRICT ENFORCEMENT |
Cautions
| ⚠ WARNING | |||
| When abnormality such as burnt-small found,immediately stop the operation button andcontact sales shop. | Use an exclusive power source with acircuit breaker | ||
 OFF OFF |  STRICTENFORCEMENT STRICTENFORCEMENT | ||
Connect power supply cordto the outlet completely |  STRICTENFORCEMENT STRICTENFORCEMENT | Use the proper voltage | Do not use power supply cordextended or connected in halfway PROHIBITION PROHIBITION |
Do not use power supply cordin a bundle. PROHIBITION PROHIBITION | [YZK2]PROHIBITION | Take care not to damagethe power supply cord. PROHIBITION PROHIBITION | Do not insert objects into the airinlet or outlet. PROHIBITION PROHIBITION |
Do not start or stop theoperation by disconnectingthe power supply cord and so on. PROHIBITION PROHIBITION |  PROHIBITION PROHIBITION | Do not channel the air flow directlyat people, especially at infants orthe need ROHIBITION ROHIBITION | Do not try to repair or reconstructby yourself. |
| CAUTION | |||
Do not use for the purpose of storage of food, art work, precise equipment, breeding, or cultivation.  PROHIBITION PROHIBITION | Take fresh air occasionally especially when gas appliance is running at the same time.  STRICTENFORCEMENT STRICTENFORCEMENT | Do not operate the switch with wet hand.  PROHIBITION PROHIBITION | |
Do not install the unit near a fireplace or other heating apparatus.  PROHIBITION PROHIBITION | Check good condition of the installation stand  PROHIBITION PROHIBITION | Do not pour water onto the unit for cleaning  PROHIBITION PROHIBITION | |
Do not place animals or plants in the direct path of the air flow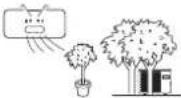 [W8HB]PROHIBITION [W8HB]PROHIBITION | Do not place any objects on or climb on the unit.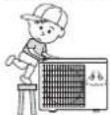  PROHIBITION PROHIBITION | Do not place flower vase or water containers on the top of the unit.  PROHIBITION PROHIBITION | |
Parts and Functions
Indoor Unit

Actual inlet grille may vary from the one shown in the manual according to the product purchased
Outdoor Unit


HSU-09HEA03 HSU-12HEA03
HSU-09LEA13-F
HSU-09LEA13-W
HSU-12LEA13-W HSU-18LEA13-W
HSU-09LEA13-M
HSU-18HEA03
HSU-12LEA13-F
HSU-12LEA13-M
HSU-18LEA13-M
HSU-22HEA03
HSU-22LEA13-W
HSU-24LEA13-W
HSU-24HEA03
HSU-24LEA13-M
① OUTLET
③ CONNECTING PIPING AND ELECTRICAL WIRING
② INLET
④ DRAIN HOSE
Parts and Functions
Remote controller
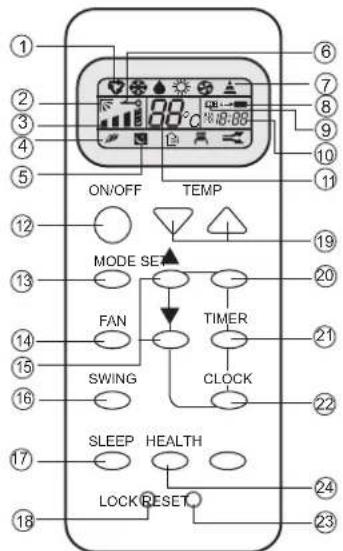
Display board


Clock set
- Operation mode display
| Operation mode | AUTO | COOL | DRY | HEAT | FAN |
| Remote controller | |||||
| Display board A | |||||
| Display board B |
-
SWING display
-
FAN SPEED display
-
HEALTH display
-
SLEEP display
-
LOCK display
-
SIGNAL SENDING display
-
TIMER OFF display
-
TIMER ON display
-
CLOCK display
-
TEMP display
-
POWER ON/OFF
Used for unit start and stop.
- MODE
Used to select AUTO run, COOL, DRY and FAN operation
- FAN
Used to select fan speed LO, MED, HI, AUTO
- HOUR
Used to set clock and timer setting.
- SWING
Used to set auto fan direction.
- SLEEP
Used to select sleep mode.
- LOCK
Used to lock buttons and LCD display.
- TEMP.
Used to select your desired temp.
- SET
Used to confirm timer and clock settings.
- TIMER
Used to select TIMER ON, TIMER OFF, TIMER ON-OFF
- CLOCK
Used to set correct time
- RESET
Used to reset the controller back to
normal condition.
- HEALTH
Used to operate the healthy function
(This functionis unavailable on some models.)
-
Singal receiver hole
-
Ambient temp.display
When receiving the remote control signal, display the set temperature and in the rest time the room temperature is displayed and this room temperature is only for reference.
When unit is started for the first time and after replacing batteries in remote controller, clock should be adjusted as follows:
Press CLOCK button, "AM" or "PM" flashes.
Press△ or▽ to set correct time. Each press will increase or decrease 1min. If the button is kept depressed, time will change quickly.
After time setting is confirmed, press SET, "AM" and "PM" stop flashing, while clock starts working. NOTE: Cooling only unit do not have displays and functions related with heating
Hints
After replacing with new batteries, remote controller will conduct self-check, displaying all information on LCD. Then, it will become normal.
Operation
Remote controller's operation
- When in use, put the signal transmission head directly to the receiver hole on the indoor unit.
- The distance between the signal transmission head and the receiver hole should be within 7m without any obstacle as well.
- Don't throw the controller, prevent it from being damaged.
- When electronic-started type fluorescent lamp or change-over type fluorescent lamp or wireless telephone is installed in the room, the receiver is apt to be disturbed in receiving the signals so the distance to the indoor unit should be shorter.

Loading of the battery
Load the batteries as illustrated. 2 R-03 batteries, resetting key (cylinder)
Remove the battery cover:
Slightly press "▼" and push down the cover.
Load the battery:
Be sure that the loading is in line with the" + "/"-pole request as illustrated.
Put on the cover again
Confirmation indicator:
In disordered, reload the batteries or load the new batteries after 6mins.
![graph TD A["Device 1"] --> B["Switch"] B --> C["Display Unit"] C --> D["Product"]](/content/2026/07/1494012/images/dbb20082d5556407fd52b6583ea67bec39e6cbbb9a03eeef22148ebd86197768.jpg)
Note:
Use two new same-typed batteries when loading.
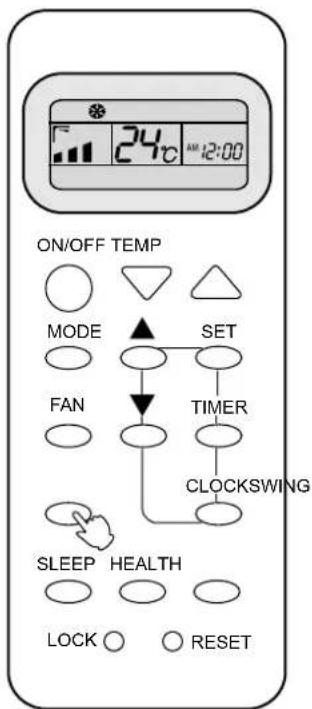
If the remote controller can't run normally or doesn't work at all, use a sharp pointed item to press the reset key.
Hint:
Remove the batteries in case unit won't be in usage for a long period. If there are any display after taking-out just need to press reset key.
Power failure resume(please set and apply as necessary)
If sudden power failure occurs, the unit will resume original operation when power is supplied again.
Note: When sudden power failure happens during unit operation in power failure resume mode, if the air conditioner is not desired for use in a long period, please shut off the power supply in case that the unit automatically resume operation when power is re-supplied, or press ON/OFF to turn off the unit when power resumes.
Operation
Auto Operation
(1) Unit start
Press ON/OFF on the remote controller, unit starts.
(2) Select operation mode
Press MODE button. For each press, operation mode changes as follows:
Remote controller:

Then
Select Auto operation
(3) Fan speed selection
Press FAN button. For each press, fan speed changes as follows:
Remote controller:

Air conditioner is running under displayed fan speed.
When FAN is set to AUTO, the air conditioner automatically adjusts the fan speed according to room temperature.
(4)Unit stop
Press ON/OFF button, the unit stops.
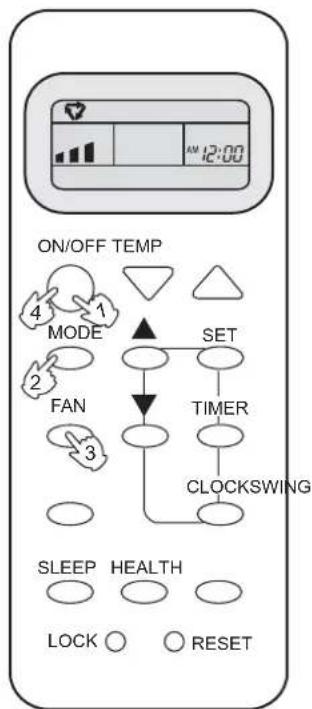
Hints
Remote controller can memorize settings in each operation mode. To run it next time just select the operation mode and it will start with the previous setting.
No reelecting is needed.(TIMER ON/OFF、SLEEP、SWING needs reelecting)
Cautions: Note:
On cooling only unit, heating mode is not available. The above information is the After replacing batteries, press ON/OFF, and display explanation of the displayed becomes as follows: information therefore varies
Operation mode: AUTO, Temp. : No with those displayed in actual
operation.
Operation
Cool Operation
(1) Unit start
Press ON/OFF button, unit starts.
Previous operation status appears on display. (Not Timer setting)
(2) Select operation mode
Press MODE button. For each press, operation mode changes as follows:

Unit will run in operation mode displayed on LCD. Stop display at your desired mode.
(3) Select temp. setting
Press TEMP button.
△ Every time the button is pressed, temp. setting increases 1° C
∇ Every time the button is pressed, temp. setting decreases 1°C
Unit will start running to reach the temp. setting on LCD.
(4) Fan speed selection
Press FAN button. For each press, fan speed changes as follows:
Remote controller:
![graph LR A["AUTO"] --> B["→"] B --> C["→"] C --> D["→"] style A fill:#f9f,stroke:#333 style D fill:#f9f,stroke:#333 note right of A: "roller: AUTO LO MED HI"](/content/2026/07/1494012/images/6c32a957a6e0e0efa5ccaf27589727f7e58d4e05b75567e35f1a02745c746aa0.jpg)
Air conditioner is running under displayed fan speed.
When FAN is set to AUTO, the air conditioner automatically adjusts the fan speed according to room temperature.
(5) Unit stop
Press ON/OFF button, the unit stops.
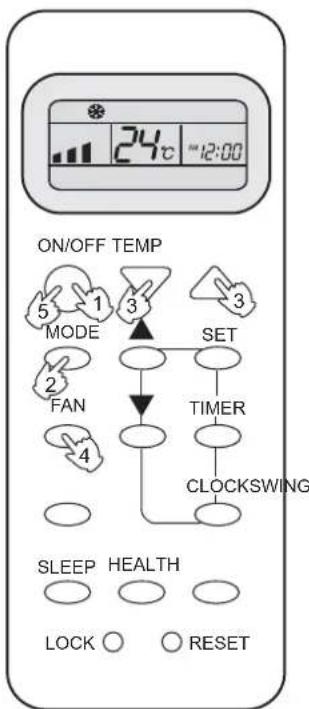
Hints
On cooling only unit, heating mode is not available.
Remote controller can memorize each operation status. When starting it next time, just press ON/OFF button and unit will run in previous status.
No reelecting is needed.(TIMER ON/OFF、SLEEP、SWING needs reelecting)
Operation
Heat Operation
(1) Unit start
Press ON/OFF button, unit starts.
Previous operation status appears on display. (Not Timer setting)
(2) Select operation mode
Press MODE button. For each press, operation mode changes as follows:

Unit will run in operation mode displayed on LCD.
Stop display at your desired mode.
(3) Select temp. setting
Press TEMP button.
△ Every time the button is pressed, temp. setting increases 1° C
∇ Every time the button is pressed, temp. setting decreases 1°C
Unit will start running to reach the temp. setting on LCD.
(4) Fan speed selection
Press FAN button. For each press, fan speed changes as follows:
Remote controller:
![graph LR A["Start"] --> B["Auto LO MED HI"] B --> C["Step 1"] C --> D["Step 2"] D --> E["Step 3"] E --> F["Step 4"]](/content/2026/07/1494012/images/728fbd84bbc8acd04d818a34c5d06a4a3f9517e31c1a170c106729a59ba37c7e.jpg)

IN HEAT mode, warm air will blow out after a short period of the time due to cold-draft prevention function. When FAN is set to AUTO, the air conditioner automatically adjusts the fan speed according to room temperature.
(5) Unit stop
Press ON/OFF button, the unit stops.
Hints
On cooling only unit, heating mode is not available.
Remote controller can memorize each operation status. When starting it next time, just press ON/OFF button and unit will run in previous status.
Operation
Dry Operation
(1) Unit start
Press ON/OFF button, unit starts.
Previous operation status appears on display. (Not Timer setting)
(2) Select operation mode
Press MODE button. For each press, operation mode changes as follows:

Unit will run in operation mode displayed on LCD. Stop display at your desired mode.
(3) Select temp. setting
Press TEMP button.
△ Every time the button is pressed, temp. setting increases 1° C
∇ Every time the button is pressed, temp. setting decreases 1°C
Unit will start running to reach the temp. setting on LCD.
(4) Fan speed selection
Press FAN button. For each press, fan speed changes as follows:
![graph LR A["Bar 1"] --> B["Bar 2"] B --> C["Bar 3"] C --> D["Bar 4"] D --> E["Bar 5"]](/content/2026/07/1494012/images/367594f5dfd42aa07a3b8304c79b91d1714d07637f101158c7485593a7c1f213.jpg)
Unit runs at the speed displayed on LCD.
In DRY mode, when room temperature becomes lower than temp. setting+2°C, unit will run intermittently at LOW speed regardless of FAN setting.
(5)Unit stop
Press ON/OFF button, the unit stops.
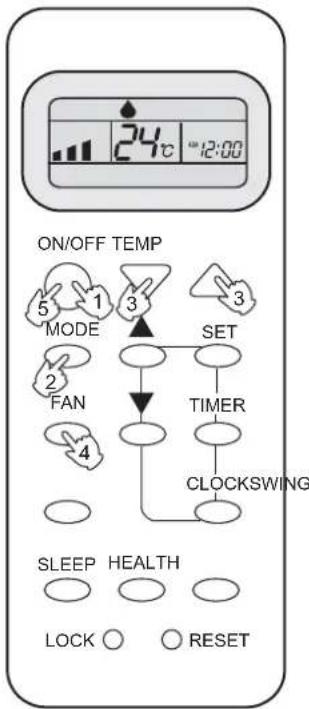
![graph TD A["COOL operation starts when room temp. is higher than temp. setting."] --> B["Temp. setting+2C"] B --> C["On reaching temp. setting, unit will run in mild DRY mode."] D["Ultra-low air flow"] --> E["End"]](/content/2026/07/1494012/images/464aae9b12183876f5456bd2bfb031ed746b14724185b482cbabf2d02929d73b.jpg)
Hints
On cooling only unit, heating mode is not available.
Remote controller can memorize each operation status. When starting it next time, just press ON/OFF button and unit will run in previous status.
No reelecting is needed.(TIMER ON/OFF、SLEEP、SWING needs reelecting)
Operation
Fan Operation
(1) Unit start
Press ON/OFF button, unit starts.
Previous operation status appears on display. (Not Timer setting)
(2) Select operation mode
Press MODE button. For each press, operation mode changes as follows:

Unit will run in operation mode displayed on LCD. Stop display at your desired mode.
(3) Fan speed selection
Press FAN button. For each press, fan speed changes as follows:
![graph LR A --> B["LO MED HI"] B --> C["Output"]](/content/2026/07/1494012/images/d06a0adbd341efc254246889c84150d1b8e2c9b47741cd9fdbc1659ddddf5173.jpg)
Unit runs at the speed displayed on LCD.
(4) Unit stop
Press ON/OFF button, the unit stops.

Hints
In FAN operation mode, the unit will not operate in COOL mode but only in FAN mode, AUTO is not available in FAN mode. And temp. setting is disabled.
In FAN mode, SLEEP operation is not available.
Operation
Air Flow Direction Adjustment
1. Status display of air sending
| Horizontal flap | Remote controller |
| Pos.1 ( Cool/Dry standard position) | Blank |
| Pos.2 ( Upward swing ) | |
| Pos.3 ( Downward swing ) | |
| Pos.4 ( Auto swing ) |
2. Up and down air flow direction (Use remote controller)
For each press of SWING button, air flow direction on remote controller display as follows according to different operation modes:

The horizontal flap will swing according to the above positions
3. Left and right air flow adjustment(manual)
Move the vertical blade by a knob on air conditioner to adjust left and right direction referring to Fig.


Cautions:
- Do not try to adjust the flap by hand.
- When adjusting the flap by hand, turn off the unit, and use the remote controller to restart the unit.
- When humidity is high, condensate water might occur at air outlet if all vertical louvers are adjusted to left or right.
- It is advisable not to keep horizontal flap at downward position for a long time in COOL or DRY mode, otherwise, condensate water might occur..
Hints
- As cold air flows downward in COOL mode, adjusting air flow horizontally will be much more helpful for a better air circulation.
Operation
Comfortable SLEEP
Operation
Before going to bed, you can simply press the SLEEP button and unit will operate in SLEEP mode and bring you a sound sleep.
Use of SLEEP function
After the unit starts, set the operation status, then press SLEEP button before which the clock must be adjusted and time being set.

Operation Mode
1. In COOL, DRY mode
1 hours after SLEEP mode starts, temp. will become 1° C higher than temp. setting. After another 1 hours, temp. rises by 1° C further. The unit will run for further 6 hours then stops. Temp. is higher than temp. setting so that room temperature won't be too low for your sleep.
![graph TD A["SLEEP operation starts SLEEP operation stops"] --> B["Approx.6hrs"] B --> C["1 hr"] C --> D["Rises 1°C"] D --> E["1 hr"] E --> F["Rises 1°C"] F --> G["Unit stop"] style A fill:#f9f,stroke:#333 style G fill:#ccf,stroke:#333](/content/2026/07/1494012/images/d33dfd990d76fb607601f4bbe427461ef32bab95d04256af1d279f3a66c93e92.jpg)
2. In HEAT mode
1 hours after SLEEP mode starts, temp will become 2° C lower than temp. setting. After another 1 hour, temp decrease by 2° C further. After more another 3 hours, temp. rises by 1° C further. The unit will run for
further 3 hours then stops. Temp. is lower than temp. setting so that room temperature won't be too high for your sleep.
![graph TD A["Temp. setting"] --> B["1 hr"] B --> C["Decreases 2°C"] B --> D["1 hr"] D --> E["Decreases 2°C"] D --> F["3 hrs"] F --> G["3 hrs"] G --> H["Rises 1°C"] H --> I["SLEEP operation stops"] style A fill:#f9f,stroke:#333 style I fill:#ccf,stroke:#333](/content/2026/07/1494012/images/090b66d77b3947d42a9f744f677b527caa1cbd4f247f14c7ee31817ec1ed685d.jpg)
3. In AUTO mode
The unit operates in corresponding sleep mode adapted to the automatically selected operation mode.
4. In FAN mode
It has no SLEEP function.
- When TIMER function is set, the sleeping function can't be set up. After the sleeping function is set up, if user resets TIMER function, the sleeping function will be cancelled; the machine will be in the state of timing-on.
6. Note to the power failure resume:
press the sleep button ten times in five seconds and enter this function after hearing four sounds. And press the sleep button ten times within five seconds and leave this function after hearing two sounds.
Power Failure Resume Function
If the unit is started for the first time, the compressor will not start running unless 3 minutes have elapsed. When the power resumes after power failure, the unit will run automatically, and 3 minutes later the compressor starts running.
Operation
HEALTH Operation
1. Unit start
Press the ON/OFF switch
2. Health anion function
Press the "HEALTH" once, "☐" is displayed, now the air conditioner is operating the healthy function.
3. To Cancel HEALTH Model
Press the "HEALTH" again, then the healthy function stops.
4. This function is unavailable on some models.
![graph TD A["ON/OFF TEMP"] --> B["MODE"] B --> C["SET"] C --> D["TIMER"] D --> E["CLOCKSWING"] E --> F["SLEEP"] F --> G["HEALTH"] G --> H["LOCK"] G --> I["RESET"] style A fill:#f9f,stroke:#333 style B fill:#ccf,stroke:#333 style C fill:#cfc,stroke:#333 style D fill:#fcc,stroke:#333 style E fill:#cff,…](/content/2026/07/1494012/images/7ea39b711cd3764260af8af2996e35fd8eb85fe58e010a0803c3bde09c5f162e.jpg)
Brief introduction to health anion function
The anion generator in the air conditionercangenerate alotofani effectively balance the quantity of position and anion in the air and also to kill bacteria and speed up the dust sediment in the room and finally clean the air in the room.
Operation
Timer On/Off Operation
Set Clock correctly before starting Timer operation
You can let unit start or stop automatically at following times: Before you wake up in the morning, or get back from outside or after you fall asleep at night.
TIMER ON/OFF
(1) After unit start, select your desired operation mode. Operation mode will be displayed on LCD.
(2)TIMER mode selection
Press TIMER button to change TIMER mode. Every time the button is pressed, display changes as follows:
![graph LR A["ON"] --> B["OFF"] B --> C["ON"] C --> D["OFF"] D --> E["ON"] E --> F["OFF"] F --> G["blank"] style A fill:#f9f,stroke:#333 style G fill:#f9f,stroke:#333](/content/2026/07/1494012/images/605ab8200ee5ebbad1b7c7e339cc48db17dd1b1875adaf472f634a2cc64fc60c.jpg)
Select your desired TIMER mode (TIMER ON or TIMER OFF) ON or OFF will flash.
(3)Timer setting
Press HOUR △ button.
△ Every time the button is pressed, time increases 10 min. If button is kept depressed, time will change quickly. ▽ Every time the button is pressed, time decreases 10 min. If button is kept depressed, time will change quickly. Time will be shown on LCD. It can be adjusted within 24 hours.
(4) Confirming your setting
After setting correct time, press SET button to confirm, "ON" or "OFF" stops flashing Time displayed: Unit starts or stops at x hour x min. (TIMER ON or TIMER OFF). Timer mode indicator on indoor unit lights up.
To cancel TIMER mode
Just press TIMER button several times until TIMER mode disappears.
Hints
After replacing batteries or a power failure happens, Time setting should be reset. Remote controller possesses memory function, when use TIMER mode next time, just press SET button after mode selecting if timer setting is the same as previous one.

Operation
Timer On-Off Operation
(1) After unit start, select your desired operation mode Operation mode will be displayed on LCD.
(2) Press TIMER button to change TIMER mode. Every time the button is pressed, display changes as follows:
![graph LR A["ON"] --> B["OFF"] B --> C["ON"] C --> D["OFF"] D --> E["ON"] E --> F["OFF"] F --> G["blank"] style A fill:#f9f,stroke:#333 style G fill:#f9f,stroke:#333](/content/2026/07/1494012/images/996e5ee608502250c25e79636ca5a6b732c2704e640442b8da04b849e9e2c064.jpg)
Select TIMER ON-OFF. "ON" will flash.
(3)Time setting for TIMER ON
Press HOUR button.
△ Every time the button is pressed, time increases 10 min. If button is kept depressed, time will change quickly.
▽ Every time the button is pressed, time decreases 10 min. If button is kept depressed, time will change quickly.
Time will be shown on LCD.
It can be adjusted within 24 hours.
AM refers to morning and PM to afternoon
(4) Time confirming for TIMER ON
After time setting, press TIMER button to confirm.
"ON" stops blinking, While "OFF" starts blinking.
Time displayed: Unit starts at x hour x min.
(5)Time setting for TIMER OFF
Follow the same procedures in "Time setting for TIMER ON".
(6) Time confirming for TIMER OFF
After time setting, press SET button to confirm, "OFF" stops flashing
Time displayed: Unit stops at X hour X min.
To cancel TIMER mode
■ Just press TIMER button several times until TIMER mode disappears.

Operation
Emergency operation and test operation
Emergency Operation:
- Use this operation only when the remote controller is defective or lost.
- When the emergency operation switch is pressed, the "Pi" sound is heard once, which means the start of this operation.
- In this operation, the system automatically selects the operation modes, cooling or heating, according to the room temperature:
| Room temperature | Designated temperature | Timer mode | Fan speed | Operation mode |
| Above 23°C | 26°C | No | AUTO | COOL |
| Below 23°C | 23°C | No | AUTO | HEAT |
- It is impossible to change the settings of temp.and fan speed,It is also not possible to operate in timer or dry mode.

Test operation:
Test operation switch is the same as emergency switch.
- Use this switch in the test operation when the room temperature is below 16° C , do not use it in the normal operation.
- Continue to press the test operation switch for more than 5 seconds. After you hear the "Pi" sound twice, release your finger from the switch: the cooling operation starts with the air flow speed "Hi".
• After 30 minutes, test operation ends automatically(Only for 22K unit).

Removal of the restriction of emergency or test operation:
- Press the emergency operation switch once more, or manipulate through the remote controller; the "Pi" sound, the emergency or test operation is terminated.
- When the remote controller is manipulated, it gets the system back to the normal operation mode.
Maintenance
For Smart Use of The Air Conditioner
Setting of proper room temperature | Do not block the air inlet or outlet |
Close doors and windows during operation | Use the timer effectively  |
If the unit is not to be used for a long time, turn off the power supply main switch. OFF OFF | Use the louvers effectively |
Maintenance
For Smart Use of The Air Conditioner
⚠ WARNING
Before maintenance, be sure to turn off the system and the circuit breaker.
Remote Controller

Do not use water, wipe the controller with a dry cloth. Do not use glass cleaner or chemical cloth.
Indoor Body
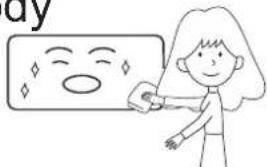
Wipe the air conditioner by using a soft and dry cloth. For serious stains, use a neutral detergent diluted with water. Wring the water out of the cloth before wiping then wipe off the detergent completely.
Do not use the following for cleaning

Gasoline, benzine, thinner or cleanser may damage the coating of the unit.

Hot water over 40° C( 104° F) may cause discoloring or deformation.
Air Filter cleaning
1 Open the inlet grille by pulling it upward.
2 Remove the filter.
Push up the filter's center tab slightly until it is released from the stopper, and remove the filter downward.
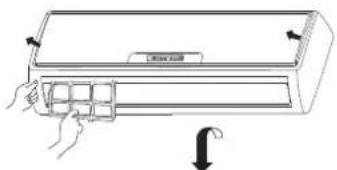
3 Clean the filter.
Use a vacuum cleaner to remove dust, or wash the filter with water. After washing, dry the filter completely in the shade.
4 Attach the filter.
Attach the filter correctly so that the "FRONT" indication is facing to the front. Make sure that the filter is completely fixed behind the stopper. If the right and left filters are not attached correctly, that may cause defects.

5 Close the inlet grille.
Maintenance
Replacement of Air Purifying Filter
1.Open the Inlet Grille
Prop up the inlet grille by using a small device named grille-support which located in the right side of the indoor unit.
2. Detach the standard air filter
Slide the knob slightly upward to release the filter, then withdraw it.
3. Attach Air Purifying Filter
Put air purifying filter appliances into the right and left filter frames.


Detach old Air Purifying Filter
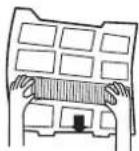
4. Attach the standard air filter
(Necessary installation)

ATTENTION:
The white side of the photocatalyst air purifying filter face outside, and the blackside facade unit.
The green side of the bacteria-killing medium air purifying filter face outside, and the white side face the unit.
5. Close the Inlet Grille
Close the Grille surely
NOTE:
- The photocatalyst air purifying filter will be solarized in fixed time. In normal family, it will be solarized every 6 months.
- The bacteria-killing medium air purifying filter will be used for a long time, no need for replacement. But in the period of using them, you should remove the dust frequently by using vacuum cleaner or flaping them lightly, otherwise, its performance will be affected.
- Please keep the bacteria-killing medium air purifying filter in the cool and dry conditions avoid long time directly sunshine when you stop using it, or its ability of sterilization will be reduced.
Trouble shooting
Before asking for service, check the following first.
| Phenomenon | Cause or check points | |
| Normal Performance inspection | The system does not restart immediately. | When unit is stopped, it won't restart immediately until 3 minutes have elapsed to protect the system.When the electric plug is pulled out and reinserted, the protection circuit will work for 3 minutes to protect the air conditioner. |
Noise is heard | During unit operation or at stop, a swishing or gurgling noise may be heard. At first 2-3 minutes after unit start, this noise is more noticeable. (This noise is generated by refrigerant flowing in the system.)During unit operation, a cracking noise may be heard. This noise is generated by the casing expanding or shrinking because of temperature changesShould there be a big noise from air flow in unit operation, air filter may be too dirty. | |
| Smells are generated. | This is because the system circulates smells from the interior air such as the smell of furniture, paint, cigarettes. | |
Mist or steam are blown out. | During COOL or DRY operation, indoor unit may blow out mist. This is due to the sudden cooling of indoor air. | |
| In dry mode, fan speed can't be changed. | In DRY mode, when room temperature becomes lower than temp. setting+2°C, unit will run intermittently at LOW speed regardless of FAN setting. | |
| Multiple check |  | Is power plug inserted?Is there a power failure?Is fuse blownout? |
Poor cooling | Is the air filter dirty? Normally it should be cleaned every 15 days.Are there any obstacles before inlet and outlet?Is temperature set correctly?Are there some doors or windows left open?Is there any direct sunlight through the window during the cooling operation?(Use curtain)Are there too much heat sources or too many people in the room during cooling operation? |
Application temp. range of air conditioner -7°C\~43°C.
Cargar la batería
Precauciones:
Hot water over 40° C ( 104° F) may cause discoloring or deformation.

ATENCIÓN
- SPLIT TYPE ROOM AIR CONDITIONER
- OPERATION MANUAL
- CAUTIONS
- DISPOSAL OF THE OLD AIR CONDITIONER
- DISPOSAL OF THE PACKAGING OF YOUR NEW AIR CONDITIONER
- SAFETY INSTRUCTIONS AND WARNINGS
- SPECIFICATIONS
- SAFETY INSTRUCTION
- INSTALLATION
- ⚠ WARNING
- PARTS AND FUNCTIONS
- INDOOR UNIT
- OUTDOOR UNIT
- CLOCK SET
- HINTS
- OPERATION
- REMOTE CONTROLLER'S OPERATION
- LOADING OF THE BATTERY
- POWER FAILURE RESUME(PLEASE SET AND APPLY AS NECESSARY)
- AUTO OPERATION
- UNIT START
- SELECT OPERATION MODE
- FAN SPEED SELECTION
- (4)UNIT STOP
- COOL OPERATION
- SELECT TEMP. SETTING
- UNIT STOP
- HEAT OPERATION
- DRY OPERATION
- (5)UNIT STOP
- FAN OPERATION
- AIR FLOW DIRECTION ADJUSTMENT
- STATUS DISPLAY OF AIR SENDING
- UP AND DOWN AIR FLOW DIRECTION (USE REMOTE CONTROLLER)
- LEFT AND RIGHT AIR FLOW ADJUSTMENT(MANUAL)
- COMFORTABLE SLEEP
- USE OF SLEEP FUNCTION
- OPERATION MODE
- IN COOL, DRY MODE
- IN HEAT MODE
- IN AUTO MODE
- IN FAN MODE
- NOTE TO THE POWER FAILURE RESUME
- POWER FAILURE RESUME FUNCTION
- HEALTH OPERATION
- HEALTH ANION FUNCTION
- TO CANCEL HEALTH MODEL
- THIS FUNCTION IS UNAVAILABLE ON SOME MODELS
- BRIEF INTRODUCTION TO HEALTH ANION FUNCTION
- TIMER ON/OFF OPERATION
- TIMER ON/OFF
- TO CANCEL TIMER MODE
- TIMER ON-OFF OPERATION
- EMERGENCY OPERATION AND TEST OPERATION
- EMERGENCY OPERATION
- TEST OPERATION
- REMOVAL OF THE RESTRICTION OF EMERGENCY OR TEST OPERATION
- MAINTENANCE
- FOR SMART USE OF THE AIR CONDITIONER
- REMOTE CONTROLLER
- INDOOR BODY
- DO NOT USE THE FOLLOWING FOR CLEANING
- AIR FILTER CLEANING
- REPLACEMENT OF AIR PURIFYING FILTER
- OPEN THE INLET GRILLE
- DETACH THE STANDARD AIR FILTER
- ATTACH AIR PURIFYING FILTER
- ATTACH THE STANDARD AIR FILTER
- ATTENTION
- CLOSE THE INLET GRILLE
- NOTE
- TROUBLE SHOOTING
- CARGAR LA BATERÍA
- PRECAUCIONES
- ATENCIÓN
Brand : HAIER
Model : HSU-12LEA13-M
Category : Air conditioner