
ESAM055-C - Coffee machine HAIER - Free user manual and instructions
Find the device manual for free ESAM055-C HAIER in PDF.
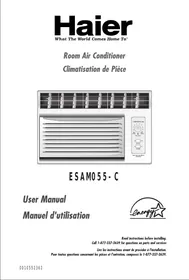


| Product type | Automatic coffee machine |
| Brand | HAIER |
| Model | ESAM055-C |
| Dimensions (W x D x H) | 28 x 34 x 42 cm |
| Net weight | 9.5 kg |
| Power supply | 220-240 V, 50-60 Hz, 1450 W |
| Water tank capacity | 1.8 L |
| Bean hopper capacity | 250 g |
| Pump pressure | 15 bar |
| Main functions | Whole bean coffee, ground coffee, espresso, cappuccino, latte macchiato, hot water |
| Steam wand | Yes, adjustable |
| Heating system | Thermoblock |
| Control panel | LCD screen and buttons |
| Custom settings | Coffee strength, cup length, temperature |
| Water filter | Yes, included |
| Maintenance | Automatic descaling program, rinsing, removable brew group |
| Steam wand cleaning | Automatic cleaning function |
| Safety | Automatic shutdown, overheating protection, child safety |
| Available spare parts | Water filter, drip tray, cleaning kit, seals |
| Warranty | 2 years |
Frequently Asked Questions - ESAM055-C HAIER
User questions about ESAM055-C HAIER
0 question about this device. Answer the ones you know or ask your own.
Ask a new question about this device
Download the instructions for your Coffee machine in PDF format for free! Find your manual ESAM055-C - HAIER and take your electronic device back in hand. On this page are published all the documents necessary for the use of your device. ESAM055-C by HAIER.
USER MANUAL ESAM055-C HAIER
What The World Comes Home To
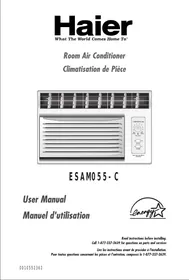
Room Air Conditioner
Read instructions before installing.
Call 1-877-337-3639 for questions on parts and services
Thank you for buying a dependable, energy-saving, and easy-to-operate HAIER room air conditioner. This manual contains useful information for you to maintain, operate, install, and safely use your room air conditioner. Your air conditioner cleans, cools, and dehumidifies the air in your room to provide you with the ultimate level of comfort.
Please read instructions carefully before using the product. Also, do not forget to fill out and mail the Product Registration Card.
Product Registration
Record Your Model and Serial Number.
For all your service calls during the warranty period, the following information will be needed. Attach the sales receipt to this guide and keep for future reference. This information can be obtained from the serial plate, which is on your air conditioner. This is either on the cabinet (side or back) or you may have to remove the front grille to locate it.
Model Number:
Serial Number:
Date of Purchase:
Dealer's Name:
Dealer's Address:
Dealer's Phone Number:
| TABLE | |||||
| RECEPTACLE AND FUSE TYPES | |||||
| RATED VOLTS | 125/60 | 250/60 | |||
| AMPS | 15 | 20 | 15 | 20 | 30 |
| WALL OUTLET | |||||
| FUSE SIZE | 15 | 20* | 15 | 20* | 30 |
| TIME DELAY FUSE (or circuit braker) | Plug | Plug | Plug | ||
SAFETY PRECAUTIONS
WARNING: Following these basic precautions will reduce the

risk of fire, electrical shock, injury or death when using your air conditioner.


1) Air conditioner must be connected to proper electrical outlet with the correct electrical supply. (see table) 2) Proper grounding must be ensured to reduce the risk of shock and fire. DO NOT CUT OR REMOVE THE GROUNDING PRONG. If you do not have a three-prong electric receptacle outlet in the wall, have a certified electrician install the proper receptacle. The wall receptacle MUST be properly grounded. 3) Do not use if power cord is frayed or otherwise damaged. Also avoid using it if there are cracks or abrasion damage along the length, plug or connector. 4) DO NOT USE AN ADAPTER OR AN EXTENSION CORD. 5) When installing your air conditioner in a window, make sure the window is strong enough to hold the weight of the air conditioner. You also want to secure and correctly install your air conditioner properly to prevent it from falling. Extra brackets and or support may be required depending on your window. 6) Do not block airflow inside or outside the air conditioner with blinds, drapes, protective covers, shrubs or bushes. 7) Be careful of sharp edges on the front and rear fins of the unit that could cut and cause serious injury. 8) Be careful when lifting the air conditioner to install or remove the unit. Always use two or more people for this. 9) Always unplug the air conditioner before servicing it or moving it.
Table Of Contents
PAGE
A Word From Haier 1
Product Registration 1
Safety Precautions 2
Warnings 4
Electrical Safety 4
Tips 5
Energy Saving Guide 5
Features 6
Operating Guide 7-8
Normal Operating Sounds 7
Operating Instructions 7-8
Installations 9-13
Parts Supplied 10
Tools 10
Steps for Installation 11-13
Clean and Care Guide 14-15
Troubleshooting 15-16
Warranty Information 17
WARNING

Following the safety messages is very important. These messages can save you from being injured or killed. Warning symbols alert you to be careful and mean Danger. Always follow instructions to be safe and reduce chances of injury or death. Warning and Danger signs will precede safety messages.
Electrical Safety

Grounding: This room air conditioner must be grounded. Grounding reduces the risk of electric shock by providing an escape wire for the electric current. The power cord has a grounding wire with a grounding plug. Plug it into an outlet that is properly installed and grounded.
WARNING: Improper use of the grounding plug can result in a risk of electric shock. Call a qualified electrician if you don't understand the grounding instructions or if you are not sure if the air conditioner is properly grounded. If the wall outlet is not grounded, please contact an electrician to have it replaced with a properly grounded outlet.
Do not, under any circumstances, cut or remove the third (ground) prong from the power cord.
Adapter Plug: We strongly advise against using an adapter plug.
Tips
- This air conditioner is designed for use in a double-hung window.
- When installing the unit, be sure to tilt it 5 degrees outward so that water drips outside the house.
- Install the unit on the north side, as that is normally the shaded side. This will enhance the operation of your unit.

- The window must be strong enough for installation. Extra brackets and support may be required depending on your window. (Brackets and supports are not included in all models.)
- Measure the window before installing. If the window is too big for the unit, you may require professional installation.

- Use the correct electrical voltage and proper amperage for the unit to run effectively.

- Only let a certified electrician make any modifications to your electrical outlet.
- Use a dedicated line for the operation of your air conditioner to avoid the possibility of an electrical surge.
Energy Saving Guide
- When installing your air conditioner, make sure to seal all areas where there is a possibility of air leakage.
- Airflow should not be blocked inside by curtains, drapes, or furniture, or outside by shrubs or bushes.
- Do not needlessly use electrical lights or other appliances that produce heat.
- Keep the blinds and drapes drawn on all other windows.
- While cooking, use an exhaust fan in the kitchen to remove the excess heat produced.
- Always use the correct BTU size air conditioner to cool the room to attain optimum efficiency.
Features
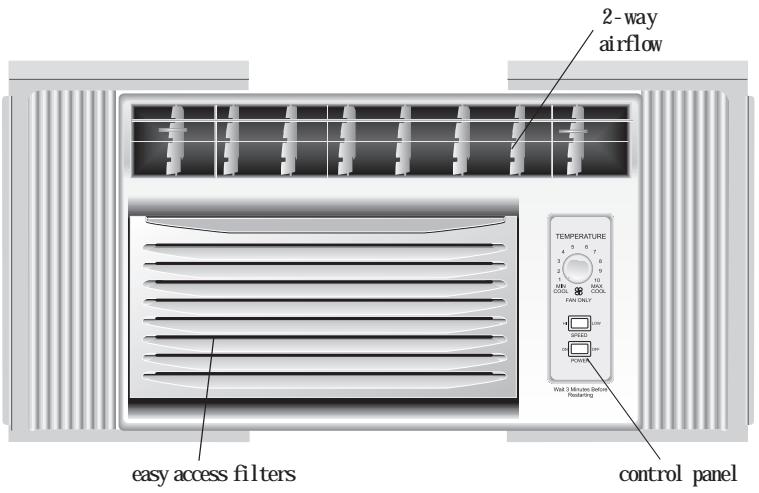
1. Temperature Set Knob
This knob adjusts the temperature of the air.
The higher the setting, the cooler the air
temperature. With this knob, you can set the
temperature to your desired comfort level. Min. Cool being the warmest and Max. Cool being the coldest.
- MODE Set Switch
With this knob, you can control the fan speed as well as the cooling speed.
You have 2 fan speeds to choose from: HI and LO.
3. 2-Way Air Flow
The air directional louvers let you control the direction of the airflow in your required direction. The airflow can be directed right side - left side.
4. Window Install Kit.
Enables you to install the air conditioner in a double hung window. Extra brackets or support may be needed depending on your window.
Operating Guide
Normal Operating Sounds
The following sounds are normally heard during the operation of an air conditioner.
- Thermostat clicks. As the thermostat cycles on/off you will hear this sound. Cool airflow movement as dictated by the set fan speed.
- Water sounds. This is normal since your air conditioner acts as a dehumidifier also. Thus you will hear water sounds from water drops falling on the condenser.
- As the refrigerant flows through the inner sealed tubing a rushing noise may be heard.
- Rattling or vibrating noises may be heard due to poor wall or window installation.
- High pitch compressor sound may be heard.
Operating Instructions
(See fig.#1)
Fig. # 1 TEMPERATURE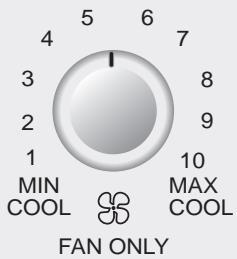
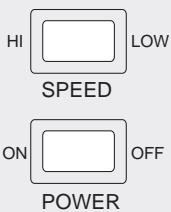
After installing your air conditioner, plug it into the proper electrical outlet in the wall.
POWER Turns air conditioner off.
SPEED "LOW" Low speed fan operation with cooling or not.
SPEED "HI" High speed fan operation with cooling or not.
This automatically controls the temperature of indoor air. Turn the knob so that the arrow points to the cooler marks for more moderate cooling.
Normal Fan
- Turn the SPEED mode switch to the "HI" or the "LOW" setting.
- Set the thermostat control to the temperature mark "FAN ONLY".
Normal cooling
- Turn the SPEED mode switch to the "HI" or the "LOW" setting.
- Set the thermostat control to the desired temperature (the mid-point is a good starting position).
If the room temperature is not satisfactory after a reasonable time, adjust the control to a warmer setting, as appropriate.
Maximum cooling
- Turn the SPEED mode switch to the "HI" setting.
- Set the thermostat control to the MAX COOL temperature mark.
Quieter operation
- Turn the SPEED mode switch to the "LOW" setting.
- Set the thermostat control as needed.
CAUTION:
1) Remember the compressor of your air conditioner will not work when the temperature goes below 65°F. 2) Also, when you shut off the air conditioner, wait for 3 minutes before turning it on again. This is the compressor cycle time. 3) If you have any trouble in operating your air conditioner, please refer to the Trouble Shooting section.
Installations
Before you install your air conditioner, check the following:
1) The unit is free of all obstructions inside and outside the room, e.g., drapes, curtains, furniture, plants, shrubs, bushes, trees, other structures like buildings, garages, etc. The air conditioner must have clear, unobstructed airflow through the condenser to remove the heat. 2) The window is strong enough to hold the weight of the air conditioner. Extra brackets or supports may be needed depending on your windows. (Brackets or supports are not provided in all models.) 3) The window sill and track are strong enough to hold the weight of the air conditioner. 4) The wall is strong enough to hold the unit. Extra brackets or supports may be needed depending on the wall. (Brackets or supports are not provided in all models.) 5) There is adequate and proper power supply near the air conditioner.

6) DO NOT use adapter plugs.

7) DO NOT use extension cords.

8) DO NOT cut or remove the ground prong.

9) DO NOT modify the plug or the electrical wall outlet in any way. If the plug does not fit the electrical outlet, have a certified electrician do the necessary change.

10) DO NOT connect electrical power to the unit before installation.

11) DO NOT use if the power cord is worn out, frayed, or otherwise damaged. Avoid using if there are cracks or abrasion damage along the length, plug, or connection.

12) DO NOT install into any existing cabinet or sleeve which does not have side and top air vents.

13) Be careful of exposed sharp edges of the cabinet and sharp coils (fins) on the back of the unit that could cut and cause serious injury.
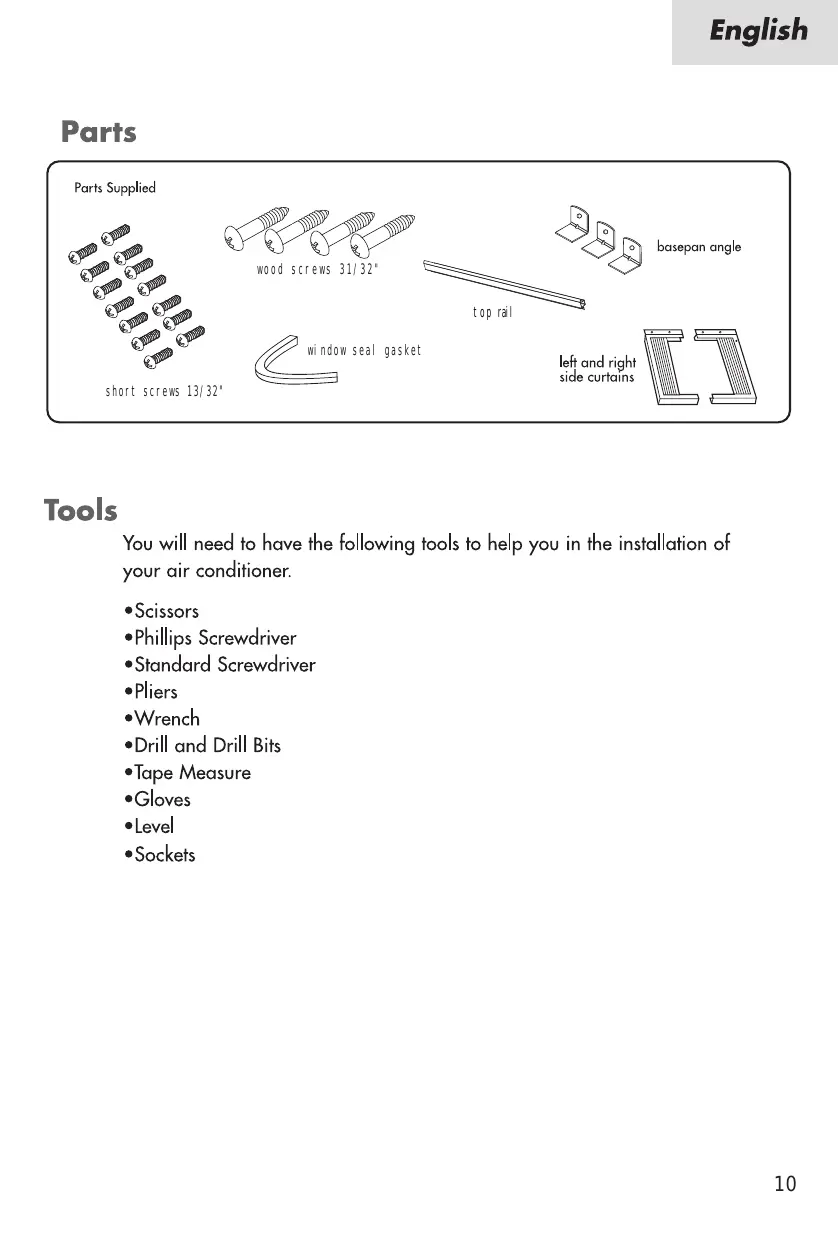
Parts
Parts Supplied
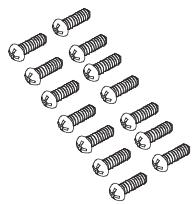
Short screws 13/32"
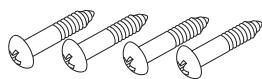
wood screws 31/32"
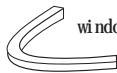
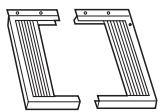
left and right side curtains
basepan angle
Tools
You will need to have the following tools to help you in the installation of your air conditioner.
- Scissors Phillips Screwdriver Standard Screwdriver
- Pliers Wrench
- Drill and Drill Bits Tape Measure Gloves
- Level
- Sockets
Installing Unit into A Window
Window Opening Requirements
The air conditioner is designed to fit into double or single hung sash type windows. Each of the units comes with an installation kit that provides adjustable mounting louvers, to fill the gaps between the sides of the unit, and the window frame. The chart below reflects the dimensions of the units with, and without installation kits. Measure your window opening width and compare it to the chart below to ensure that it meets the minimum and maximum window width requirements.
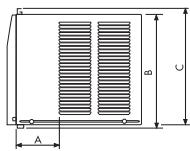
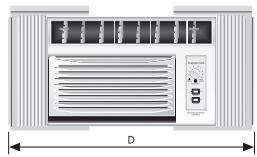
| Model Dimension | ESAM055-C |
| A(inch) | 5 3/25" |
| B(inch) | 12 3/5" |
| C(inch) | 13 2/5" |
| D(inch) Max | 33 1/5" |
| D(inch) Min | 22 1/2" |
| Case High | 12 7/16" |
| Case Width | 18 9/16" |
| Case Depth | 13 3/8" |
ASSEMBLE CURTAINS/TOPT RAIL
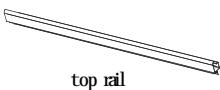
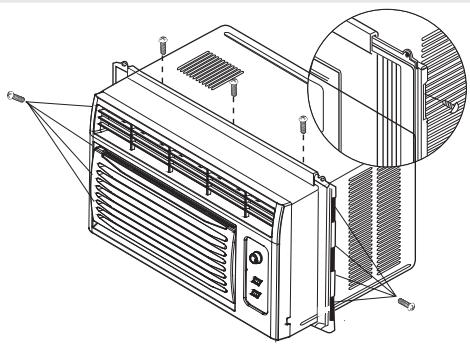
Install top rail with 3 short screws13/32".
Insert the side curtains into the top and bottom rails of the air conditioner. Fasten the curtains to the unit with 8 short screws 13/32".
Caution: Never expose plastic front or grille to extreme temperatures.
2 PREPARE WINDOW FOR INSTALLATION
- This unit is designed for installation in standard double hung windows with actual opening 30" wide. The upper and lower sash must open sufficiently to allow a vertical opening of 14" from the bottom of the sash to the window stool.
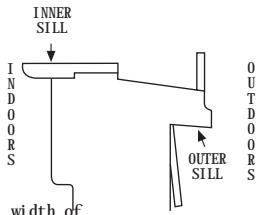
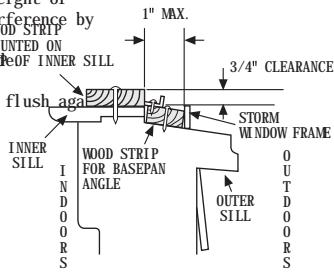
- If a storm window is present, install a wood strip (not included) (OUTER SILL) to the inner window sill across the full width of the sill. The wood strip should be thick enough to raise the height of the window sill so that the unit can be installed without interference by the storm window frame (STORM WINDOW FRAME) or wood strip mounted on (OUTDOORS) to help condensation to drain properly to the outside of the inner sill.
- Install a second wood strip approximately 6" thick (same thickness as first strip) in the center of the outer sill and the back of the inner sill. This will raise the basepan angle.
- If the distance between the storm window frame and the wood strip mounted on top of the inner sill is more than 1", the strips are not necessary.
3 LOCATING UNIT IN WINDOW
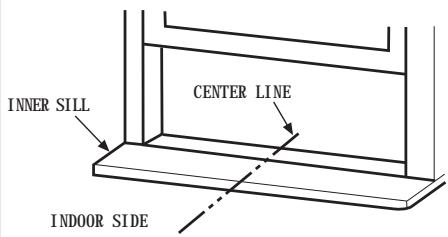
Place the unit in the center of the inner sill.
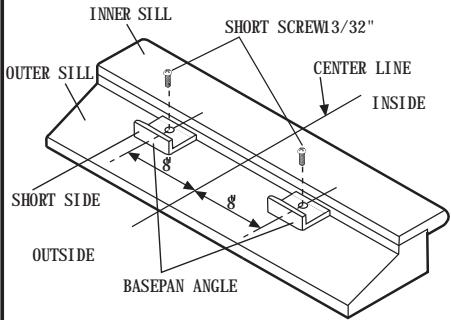
4 ATTACH BASEPAN ANGLE
Install the basepan angle behind the inner window sill, with the short side of the basepan angle as shown. Use the 2 short screws 13/32" provided. The basepan angle helps to hold the unit securely in place. Be sure to place the basepan angle edge flush against the back of the inner sill.

IN THE WINDOW
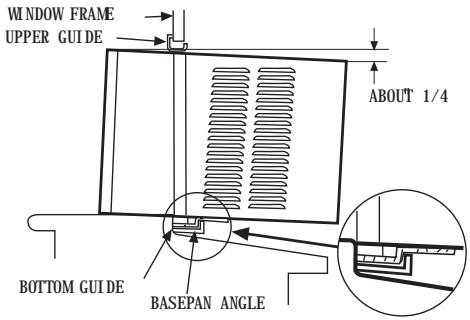
Carefully lift the air conditioner and slide it into the open window. Make sure the bottom guide of the air conditioner drops into the notches of the basepan angle. While steadying the air conditioner, carefully bring the window sash down behind the upper guide of the air conditioner.

INSTALL THE SEAL GASKET AND SASH LOCK
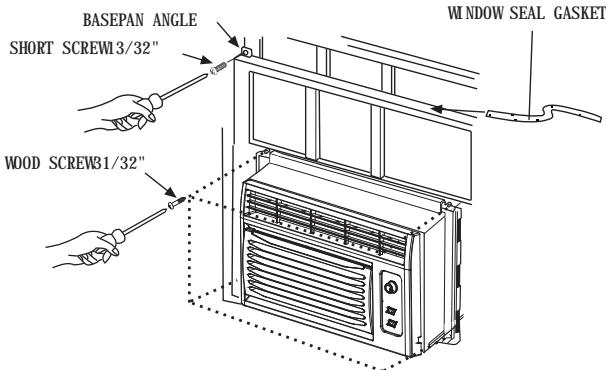
Extend the side curtains to fill the window opening using 4 wood screws 31/32" to secure them. Cut the seal gasket to the window width. Stuff the sash seal between the glass and the window to prevent air and insects from getting into the room. Fasten the basepan angle, using a short screw 13/32".
Care and Cleaning Guide
- Always unplug your air conditioner before cleaning.
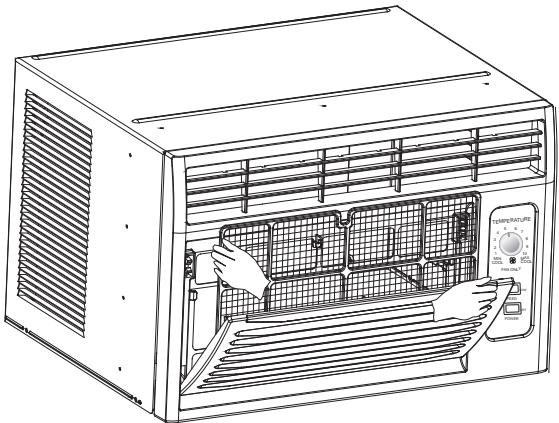
- The air filter behind the front grille should be checked and cleaned at least once every 2 weeks or more often if necessary. To remove:
- Open the inlet grille downward by pulling out the top of the inlet grille.
- Remove the air filter from the front grille assembly by pulling the air filter up slightly.
- Clean the filter with warm, soapy water below 40°C (104°F).
- Rinse and gently shake the water from the filter and let it dry before replacing it. DO NOT use your air conditioner without the air filter in place.
- To clean the front panels or the cabinet DO NOT use harsh chemicals, abrasives, ammonia, chlorine, bleach, concentrated detergents, solvents or metal scouring pads.
Some of these chemicals may dissolve, damage and/or discolor your air conditioner.
- Always use a soft cloth dampened with water or mild soap and water solution to wipe the front of the cabinet.
Wipe dry with a soft cloth.
- To store your air conditioner, after the season, remove the unit from the window as per the installation guide. Repack the unit in its original box and store away. If you do not intend to remove it from the window, then cover the outside with a winter cover.
This can be purchased from the retailer where you purchased your air conditioner or from your local hardware store.
- Before putting away your unit, make sure any water left in the pan is removed and drained away. Water left in the pan could lead to rusting or damage to the electrical connections.
Troubleshooting
If the air conditioner does not operate:
- Check if the unit is plugged in. The plug may have come loose.
- Check if the unit is in "Off" mode.
- The fan control may be in the "Off" position.
Air from the air conditioner is warm:
- The A/C setting may need to be raised.
- The temperature outside the room is below 65°F. The compressor will not cycle on if the temperature outside is below 65°F.
Ice formation on cooling coils:
- Outside temperature too cold. Set the unit on fan only setting to defrost ice.
- Lower temperature setting. The temperature setting may be too cold.
- Unit BTU may be too high for the room.
Air conditioner working but room not cooling:
- Room may have appliances that produce heat. Use an exhaust fan to remove excess heat.
- Redirect the airflow. Remove any obstacles.
- All doors and windows need to be closed so cool air does not escape the room. Air filter may need cleaning.
- Unit BTU may be too low for the required cooling area.
- On extreme hot & humid days air conditioners may take a little longer to cool.
Air conditioner is making noise when cooling:
You may hear sounds of air movement, water, compressor clicking on and off or window vibrations. Please read Operating Guide - Normal
Operating Sounds. (see page 7)
Water in the air conditioner cabinet:
This is normal as your air conditioner not only cools but also dehumidifies the air. If there is water dripping inside the room, check the installation of the unit. The unit may need to be reinstalled. (see page 13)
Limited Warranty
This warranty covers all defects in workmanship or materials for:
- The mechanical and electrical parts (including labor costs) contained in this Haier product, for a period of 12 months, from the date of purchase, (commercial or rental application, the warranty is 90 days).
- The sealed system and compressor contained in this Haier product are warranted for a period of 5 years from the date of purchase (excluding labor costs after the initial 12-month period). In commercial or rental use, the additional limited compressor warranty is for 1 year and 9 months (excluding labor costs after the initial 90-day period).
You must keep and be able to provide your original sales receipt as proof of the date of purchase.
Who is covered?
The original retail purchaser of this Haier product.
What will be done?
Haier will repair or replace, in your home, any mechanical or electrical part or the compressor that proves defective in normal household use for a period of 12 months. Haier will repair or replace (excluding labor costs) the sealed system and compressor (parts only) for an additional 4-year period.
How can you get service?
- Contact your nearest Haier authorized Service Depot. For the name of the Service Depot nearest you, contact Haier at (877) 337-3639.
- All service must be performed by an authorized Haier Service Depot.
THIS WARRANTY COVERS UNITS WITHIN THE CONTINENTAL UNITED STATES, CANADA AND PUERTO RICO.
THIS WARRANTY DOES NOT COVER:
- Damages from improper installation
- Damages in shipping
- Damages from misuse, abuse, accident, alteration, lack of proper care and maintenance
- Damages from service by other than an authorized dealer or service center. Labor, service, transportation, and shipping charges for the removal of defective parts and installation of a replacement part, beyond the initial 12-month period.
THIS LIMITED WARRANTY IS GIVEN IN LIEU OF ALL OTHER WARRANTIES, EXPRESS OR IMPLIED, INCLUDING THE WARRANTIES OF MERCHANTABILITY AND FITNESS FOR A PARTICULAR PURPOSE.
The remedy provided in this warranty is exclusive and is granted in lieu of all other remedies. This warranty does not cover incidental or consequential damages. Some states do not allow the exclusion of incidental or consequential damages, so this limitation may not apply to you. Some states do not allow limitations on how long an implied warranty lasts, so this limitation may not apply to you. This warranty gives you specific legal rights, and you may also have other rights, which vary from state to state.
- ROOM AIR CONDITIONER
- PRODUCT REGISTRATION
- RECORD YOUR MODEL AND SERIAL NUMBER
- SAFETY PRECAUTIONS
- WARNING: FOLLOWING THESE BASIC PRECAUTIONS WILL REDUCE THE
- TABLE OF CONTENTS
- PAGE
- WARNING
- ELECTRICAL SAFETY
- TIPS
- ENERGY SAVING GUIDE
- FEATURES
- TEMPERATURE SET KNOB
- WAY AIR FLOW
- WINDOW INSTALL KIT
- OPERATING GUIDE
- NORMAL OPERATING SOUNDS
- OPERATING INSTRUCTIONS
- CAUTION
- INSTALLATIONS
- PARTS
- TOOLS
- INSTALLING UNIT INTO A WINDOW
- WINDOW OPENING REQUIREMENTS
- ASSEMBLE CURTAINS/TOPT RAIL
- PREPARE WINDOW FOR INSTALLATION
- LOCATING UNIT IN WINDOW
- ATTACH BASEPAN ANGLE
- INSTALL THE SEAL GASKET AND SASH LOCK
- CARE AND CLEANING GUIDE
- TROUBLESHOOTING
- IF THE AIR CONDITIONER DOES NOT OPERATE
- AIR FROM THE AIR CONDITIONER IS WARM
- ICE FORMATION ON COOLING COILS
- AIR CONDITIONER WORKING BUT ROOM NOT COOLING
- AIR CONDITIONER IS MAKING NOISE WHEN COOLING
- WATER IN THE AIR CONDITIONER CABINET
- LIMITED WARRANTY
- THIS WARRANTY COVERS ALL DEFECTS IN WORKMANSHIP OR MATERIALS FOR
- YOU MUST KEEP AND BE ABLE TO PROVIDE YOUR ORIGINAL SALES RECEIPT AS PROOF OF THE DATE OF PURCHASE
- WHO IS COVERED
- WHAT WILL BE DONE
- HOW CAN YOU GET SERVICE
- THIS WARRANTY COVERS UNITS WITHIN THE CONTINENTAL UNITED STATES, CANADA AND PUERTO RICO
- THIS WARRANTY DOES NOT COVER
Brand : HAIER
Model : ESAM055-C
Category : Coffee machine