
HORLOGE MÉTÉO - Clock OREGON SCIENTIFIC - Free user manual and instructions
Find the device manual for free HORLOGE MÉTÉO OREGON SCIENTIFIC in PDF.

| Product type | Radio-controlled weather clock with thermometer |
| Brand | Oregon Scientific |
| Model | JM828WF |
| Dimensions (H × W × D) | 247 × 214 × 36 mm |
| Weight (without batteries) | Approximately 660 g |
| Power supply | 4 UM4/AAA 1.5 V batteries |
| Display | Extra-large screen (viewing area 155 × 107 mm) |
| Radio reception | Automatic via DCF77 signal (Frankfurt, Germany) |
| Clock functions | 24h display, day/month calendar, day of week (EN/DE/FR/IT/ES), crescendo alarm 1 min, snooze 8 min |
| Weather forecast | Symbols (sunny, partly cloudy, cloudy, rainy) for 12-24h, range 30-50 km |
| Pressure trend indicator | Rising/steady/falling arrows (last hour) |
| Indoor temperature | Range -5°C to +50°C, display in °C |
| Clock accuracy | +/- 0.5 second/day |
| Material | Plastic case |
| Maintenance | Clean with a soft, lint-free cloth, do not immerse, avoid abrasive products |
| Safety | Do not expose to shocks, dust, extreme temperatures, humidity. Do not open (no user-serviceable parts) |
| Spare parts | Not available, repair by manufacturer recommended |
| Warranty | Not specified (refer to retailer) |
Frequently Asked Questions - HORLOGE MÉTÉO OREGON SCIENTIFIC
User questions about HORLOGE MÉTÉO OREGON SCIENTIFIC
0 question about this device. Answer the ones you know or ask your own.
Ask a new question about this device
Download the instructions for your Clock in PDF format for free! Find your manual HORLOGE MÉTÉO - OREGON SCIENTIFIC and take your electronic device back in hand. On this page are published all the documents necessary for the use of your device. HORLOGE MÉTÉO by OREGON SCIENTIFIC.
USER MANUAL HORLOGE MÉTÉO OREGON SCIENTIFIC
Congratulations for purchase of the JM828WF Weather Forecast RF Clock.
The JM828WF is a multifunction Radio Frequency (RF) controlled clock. When brought within radio signals generated from Frankfurt, Germany (DCF77) the unit will automatically synchronize with the current time and date.
The JM828WF can indicate weather forecasts and pressure change trends.
Other features include a daily crescendo alarm with an eight-minute snooze function, and extra-large display.
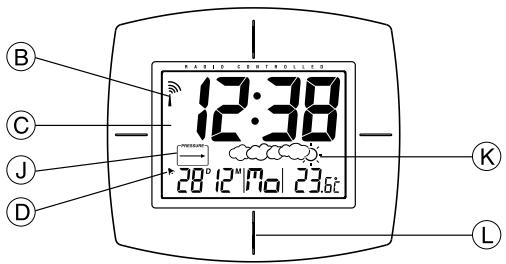
MAIN FEATURES
SNOOZE BUTTON
Activates the snooze function
⑧ RADIO RECEPTION SIGNAL
Indicates the condition of radio reception
EXTRA-LARGE DISPLAY
Displays the time, date, alarm status, and temperature
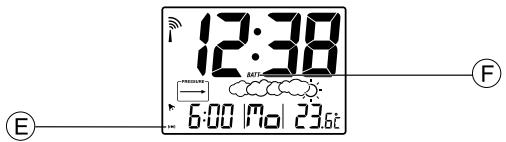
ALARM ON ICON [ ]
Appears when the alarm is activated
ALARM ICON [( )]
Appears when the alarm time is displayed
BATTERY LOW (BATT) INDICATOR
Lights up when the batteries are running dry
UP [ ] AND DOWN [ ] BUTTONS
Increases or decreases the value of a setting
CLOCK BUTTON
Toggles the calendar clock display modes or activates the calendar clock setting mode
① ALARM BUTTON
Displays the alarm time or sets the alarm status
① TREND INDICATOR
Indicates the trend of pressure changes
WEATHER FORECAST
Indicates the change of weather pattern
SENSOR
For indoor temperature reading
RESET BUTTON
Resets the unit by returning all settings to their default values

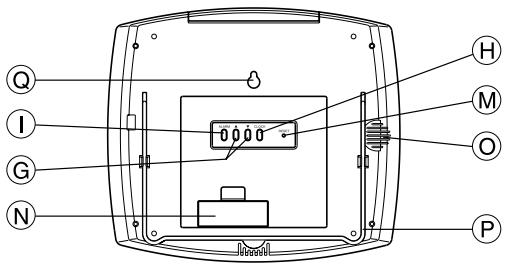
BATTERY COMPARTMENT
Accommodates four UM4 or AAA-size batteries
ALARM
Speaker alarm
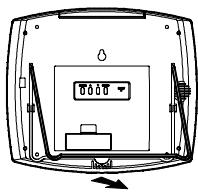
TABLESTAND
For mounting the unit on a flat horizontal surface
WALL-MOUNT HOLE
For mounting the unit on a wall
BATTERY INFORMATION
The unit requires four UM4 or AAA-size batteries for operation.
How to insert batteries:
- Press the door tab and click open the door.
- Insert the batteries strictly according to the polarities shown therein.
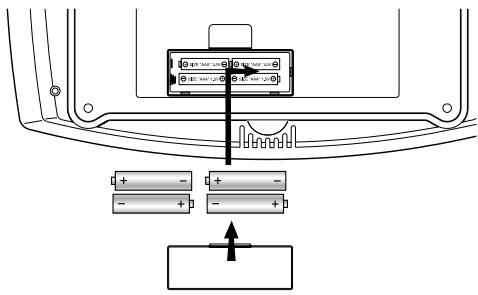
- Replace the door until it clicks in place.
Replace the batteries when the battery low indicator lights up.
ABOUT RADIO RECEPTION
The JM828WF is designed to automatically synchronize its current time and date when brought within range of the DCF77 RF signal.
When the unit is within range, its radio-control mechanism will override all manual settings.
When the unit is receiving radio signal, the reception icon will start to blink. The reception icon will show either strong, weak or no signal depending on the strength of the radio signal. A complete reception generally takes about two to 10 minutes.
| Receiving radio signal | No signal | Weak signal | Strong signal |
When the reception is completed the reception icon will stop blinking. The reception icon will show [ ] for no reception or [ ] for successful reception.
| Reception complete | No reception, or manually adjusted | Successful reception |
For better reception of radio signals, place the clock away from metal objects and electrical appliances to minimize interference.
To disable the auto-reception feature, hold down the [▲] and [▼] buttons simultaneously for two seconds. The Antenna Icon [■] will appear but it will not blink. The unit will NOT respond to radio signals.
To enable the feature again, hold down the buttons again. The Antenna Icon [^≤] signal will start blinking to initiate reception automatically.
Note: Interference from sources such as TV sets can affect the signal. If, after batteries have been inserted for ten minutes, the DCF-77 signal is not received, then set the time manually (see below, How To Set The Calendar Clock Manually).
TIME DISPLAY MODES
When the calendar is displayed, press CLOCK once to toggle between hour, minute, second mode or the hour, minute, day-of-the-week mode.
When the alarm-time is displayed, pressing CLOCK once will display the calendar instead. Then use the button again to toggle the time modes.
hour, minute, and day-of-the-week mode

hour, minute, and second mode

CALENDAR AND ALARM TIME DISPLAY
The calendar and the alarm-time share the same section of the display.
The calendar is displayed in a day-month format.
When the calendar is displayed, press ALARM once to change the display to the alarm-time. Press ALARM again to activate the alarm. The ALARM ON icon is displayed when the alarm is active.
To display the calendar, press CLOCK once.
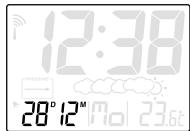
calendar mode
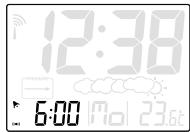
alarm mode
HOW TO SET THE CALENDAR CLOCK MANUALLY
When the calendar is displayed, press CLOCK for two seconds. The month digits will start to blink.
Enter the month using the [▲] and [▼] buttons. Hold down either button to rapidly increase or decrease the value.
Press CLOCK to confirm and proceed to set the day. Again, once the day is set press CLOCK to proceed to the language display.
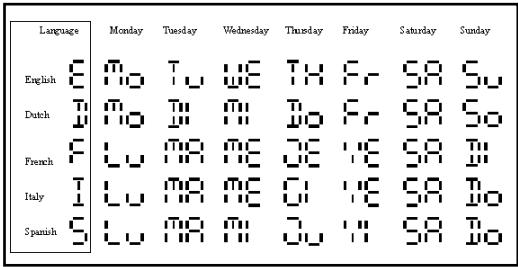
Days of the week can be indicated as an abbreviation in five different language, (E) for English, (D) for German, (F) for French, (I) for Italian, (S) for Spanish.
To choose a language use the or button.
Press CLOCK to proceed to the hour and minute functions.
TO SET AND ACTIVATE THE ALARM
The CALENDAR mode and the ALARM mode share the same section of the display.
When in CALENDAR mode, press ALARM button to enter ALARM mode, the alarm time is displayed.
To set the alarm-time, press and hold ALARM for two seconds, the alarm time will flash.
Enter the value for the hour digits. To confirm, press ALARM and proceed to the minute digits. Again, press ALARM to confirm. Now, the alarm should be activated.
To deactivate the alarm, press ALARM once.
ALARM AND SNOOZE FUNCTION
When the alarm function is active, the unit will alarm at the set time.
Resulting from the crescendo function, the alarm initially starts gently and increases in intensity in three stages. Without interruption, the alarm will activate for one minute.
To stop the alarm, press any key. However, if the SNOOZE button is pressed, the SNOOZE function will be triggered. The alarm will stop for eight minutes before activates again.
INDOOR TEMPERATURE
The JM828WF displays temperature in Centigrade (^) , and is capable of measuring temperatures within the -5^ and +50^ range. If the temperature goes above or below these levels, the display will show -5^ or +50^ .
HOW TO READ THE PRESSURE TREND
The JM828WF gives a pressure trend for the last hour. As illustrated below, a rising trend (arrow) indicates improving weather. Deteriorating weather conditions are indicated with a falling trend (arrow).
| Arrow Indicator | PRESSURE | PRESSURE | PRESSURE |
| Pressure Trend | Rising | Steady | Falling |
WEATHER FORECAST FUNCTION
The JM828WF detects barometric pressure changes and displays the illustrated weather symbols that indicate weather forecasts for 12 to 24 hours. The radius of the forecast is approximately 30 - 50 km.
| Indicator displays on the unit | ||||
| Forecast | Sunny | Slightly Cloudy | Cloudy | Rainy |
Important:
- The accuracy of weather forecasting, when only using pressure trends, is approximately 70 to 75 percent.
- The weather forecast symbols may not reflect current weather condition. The symbols are forecasting the future.
- A 'SUNNY' forecast covering the nighttime reflects fine clear weather.
HOW TO RESET THE UNIT
Press RESET to return all settings to the factory values, which are 1-1 (1st of January) for date, 12:00 for time and 06:00 for the alarm, which will be deactivated.
The button is required only when the unit is not operating in a favorable way, such as in the rare case of a malfunction.
HOW TO WALL MOUNT OR TABLE STAND
Flip the table stand open to place the unit on a steady, flat surface. To wall mount the device, use the recessed hole on the back.
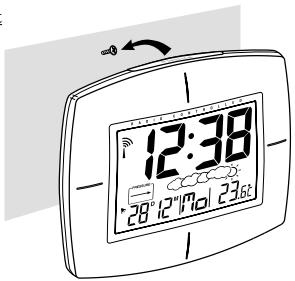
Wall-mount
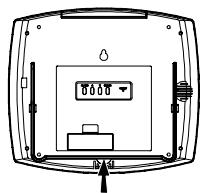
Table Stand
MAINTENANCE
When handled properly, this unit is engineered to give you years of satisfactory service. Here are a few product care instructions:
- Do not immerse the unit in water. If the unit comes in contact with a liquid, dry it immediately with a soft lint-free cloth.
- Do not clean the unit with abrasive or corrosive materials. Abrasive cleaning agents may scratch the plastic parts and corrode the electronic circuit.
- Do not subject the unit to excessive force, shock, dust, temperature, or humidity. Such treatment may result in malfunction, a shorter electronic life span, damaged batteries, or distorted parts.
- Do not tamper with the unit's internal components. Doing so will terminate the unit's warranty and may cause damage. The unit contains no user-serviceable parts.
- Only use new batteries as specified in this instruction manual. Do not mix new and old batteries as the old batteries may leak.
- Read this instruction manual thoroughly before operating the unit.
SPECIFICATIONS
Operating Temperature : -5°C to 50°C
Clock Functions
Radio Control : Auto synchronize current time and date by Radio signal generated from Germany DCF77
Calendar : Day of week in English/German/ French/Italian/Spanish, Date/Month
Clock Time : 24-hour format
Alarm Duration : 1-minute crescendo
Snoopze : 8 minutes
Accuracy : +/- 0.5 second/day
Temperature Measurement
Indoor measurement : -5°C to 50°C
General specification
Battery Type : 4 piece of UM4 or "AAA" size 1.5V battery
LCD Dimension : viewing area - 155 × 107 ~mm
Unit Dimension : 247 × 214 × 36 ~mm (H x W x T)
Unit Weight : Approx. 660g (not include battery)
CAUTION
The content of this manual is subject to change without further notice.
Due to printing limitation, the displays shown in this manual may differ from the actual display.
The manufacturer and its suppliers held no responsibility to you or any other person for any damage expenses, lost profits, or any other claim arise by using this product.
The contents of this manual may not be reproduced without the permission of the manufacturer.
WIDE-SCREEN WEATHER FORECAST RF CLOCK WITH THERMOMETER
Instruction Manual
***
Mode D'emploi
***
Bedienungsanleitung
***