
TG425XL - Electric grill BREVILLE - Free user manual and instructions
Find the device manual for free TG425XL BREVILLE in PDF.

| Product Type | Electric Grill / Panini Press |
| Brand | Breville |
| Model | TG425XL |
| Power Supply | 110-120 V, 1500 W (estimated) |
| Dimensions (L x W x H) | Approximately 35 x 30 x 20 cm (estimated) |
| Weight | Approximately 5 kg (estimated) |
| Capacity | 4 steaks or 4 paninis |
| Plate Coating | Scratch-resistant Quantanium nonstick |
| Cleaning | Plates cleaned with warm soapy water, removable drip tray hand washable |
| Height Adjustment | Height adjustment clip for thin or thick foods |
| Adjustable Feet | Lower plate tilt to prevent rolling |
| Thermostat | Low (panini) and High (grilling) settings |
| Indicator Lights | Red (power), Green (temperature reached), Blue (keep warm) |
| Hinge | Floating for even pressing |
| Cord | Short, with storage under the unit |
| Polarized Plug | Yes, for safety |
| Warranty | 1 year limited |
| Included Accessories | None, built-in drip tray |
| Use | Flat or closed grilling, panini press |
| Material | Plastic and steel (estimated) |
Frequently Asked Questions - TG425XL BREVILLE
User questions about TG425XL BREVILLE
0 question about this device. Answer the ones you know or ask your own.
Ask a new question about this device
Download the instructions for your Electric grill in PDF format for free! Find your manual TG425XL - BREVILLE and take your electronic device back in hand. On this page are published all the documents necessary for the use of your device. TG425XL by BREVILLE.
USER MANUAL TG425XL BREVILLE
On the purchase of your new Breville Panini Grill
CONTENTS
4 Breville recommends safety first
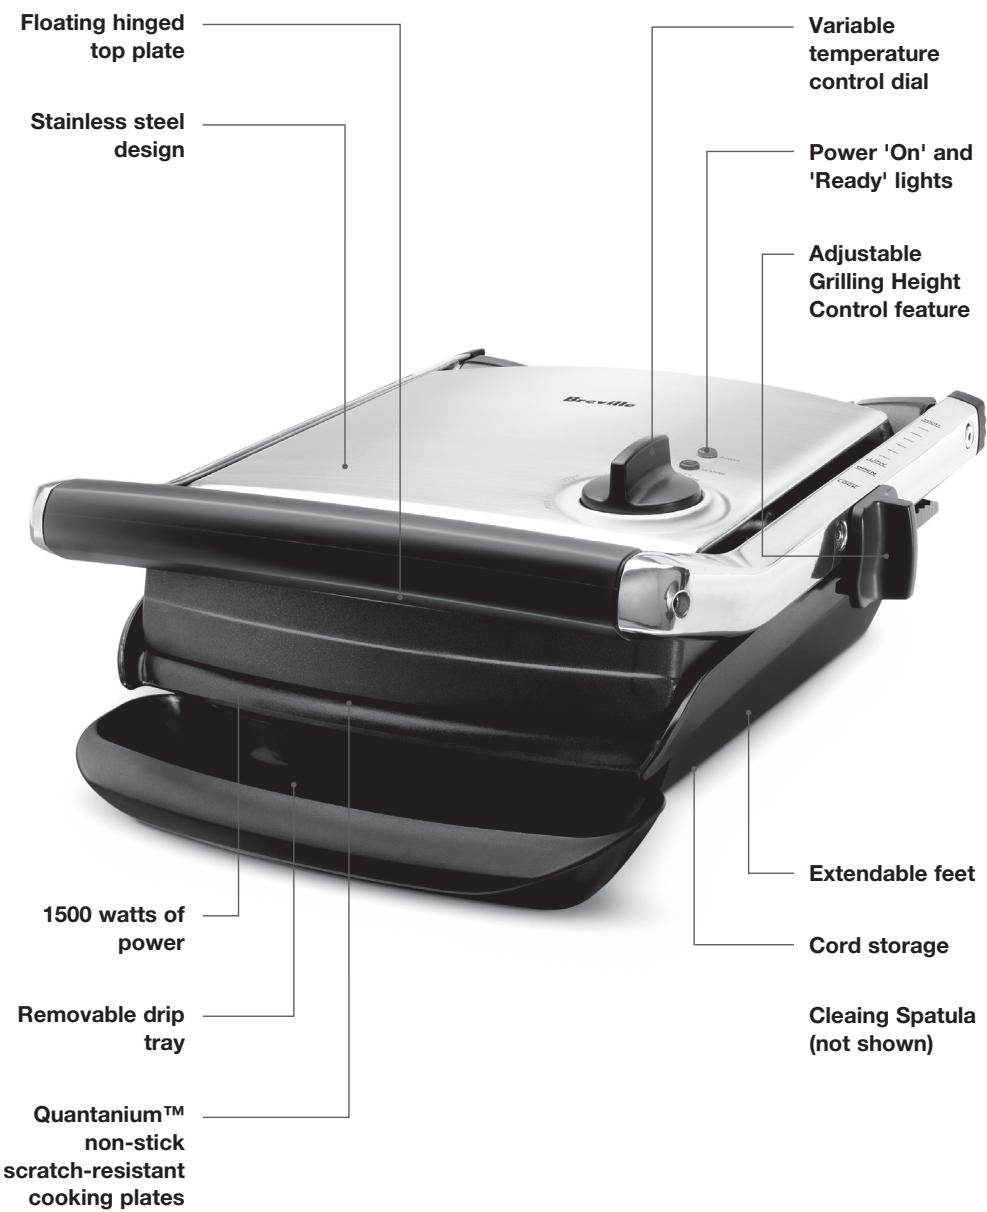
6 Know your Breville Panini Grill
8 Operating your Breville Panini Grill
12 Grilling guide
16 Care & cleaning your Breville Panini Grill
18 Recipes
22 One year limited warranty
BREVILLE RECOMMENDS SAFETY FIRST
We at Breville are very safety conscious. We design and manufacture consumer products with the safety of you, our valued customer, foremost in mind. In addition we ask that you exercise a degree of care when using any electrical appliance and adhere to the following precautions:
IMPORTANT SAFEGUARDS

READ ALL INSTRUCTIONS
- Carefully read all instructions before operating and save for future reference.
- To protect against fire, electrical shock and injury to persons, do not immerse the appliance, cord or plug in water or any other liquid.
Always use the Grill on a dry level surface. - Do not leave the appliance unattended when in use.
- When using this appliance, provide adequate air space above and on all sides for circulation.
- On surfaces where heat may cause a problem, an insulating mat is recommended.
- Do not place this appliance on or near a hot gas or electric burner, or where it could touch a heated oven.
- Do not touch hot surfaces. Use the handle to lift the top plate.
- Do not let the cord hang over the edge of a table or counter where it can be pulled on by children or tripped over unintentionally. Do not let the cord touch hot surfaces or become knotted.
- This appliance is not intended for use near or by young children or infirm persons without supervision.
-
Young children or infirm persons should be supervised to ensure that they do not play with or misuse the appliance.
-
Always remove the plug from the power outlet before attempting to move the appliance, when the appliance is not in use, before cleaning and storing.
- Do not use harsh abrasives, caustic cleaners or oven cleaners when cleaning this appliance.
- Do not use this appliance for anything other than its intended use.
- Regularly inspect the supply cord, plug and actual appliance for any damage. If found damaged in any way, immediately cease use of the appliance and call Breville Customer Service at 1-866-BREVILLE.
- This appliance has a polarized plug (one blade is wider than the other). To reduce the risk of electric shock, this plug is intended to fit into a polarized outlet only one way. If the plug does not fit, contact a qualified electrician. Do not attempt to modify the plug in any way.

UNPLUG FROM OUTLET
WHEN NOT IN USE AND
BEFORE CLEANING. ALLOW
TO COOL BEFORE PUTTING
ON OR TAKING OFF PARTS,
AND BEFORE CLEANING THE
APPLIANCE.
THE USE OF ACCESSORY ATTACHMENTS NOT RECOMMENDED BY THE APPLIANCE MANUFACTURER MAY CAUSE INJURIES.
BREVILLE RECOMMENDS SAFETY FIRST

FULLY UNWIND THE CORD FROM THE CORD STORAGE FACILITY BEFORE USE
- No user-serviceable parts inside.
Refer servicing to qualified personnel.
NOTE:
Your appliance comes with the exclusive Breville Assist Plug™, conveniently designed with a finger hole in the power plug, for easy and safe removal from the outlet. For safety reasons it is recommended you plug your Breville appliance directly into the power outlet.
DO NOT use in conjunction with a power strip or extension cord.
ELECTRIC CORD STATEMENT
Your grill has a short cord as a safety precaution to prevent personal injury or property damage resulting from pulling, tripping or becoming entangled with the cord. Do not allow children to be near or use this appliance without close adult supervision. If you must use a longer power cord or an extension cord when using the appliance, the cord must be arranged so it will not drape or hang over the edge of a countertop, tabletop or surface area where it can be pulled on by children or tripped over.
To prevent electric shock, personal injury or fire, the electrical rating of the extension cord you use must be the same or more than the wattage of the appliance (wattage is marked on the underside of the appliance).
SAVE THESE INSTRUCTIONS
KNOW
your Breville Panini Grill
KNOW YOUR BREVILLE PANINI GRILL
OPERATING
your Breville Panini Grill
Remove any promotional material and packaging material before use. Check that the cooking plates are clean and free of dust. If necessary, wipe over with a damp cloth.
To use as a Grill
- Place the Panini Grill on a flat, dry surface such as a bench top.
- Insert the plug into a 110/120V power outlet. The red power 'ON' light will illuminate.
- Turn the variable temperature control to 'High' to heat the grill quickly.
- Allow the Panini Grill to preheat until the green 'Ready' light illuminates.
- Place meat or foods to be cooked on the bottom cooking plate. Refer to Grilling recipes or Grilling Guide for cooking times.
NOTE:
Foods may be cooked with the top cooking plate in the open or closed position. Cooking with the top plate closed will create grill marks on both sides of the food.
- Close the top cooking plate, which has a floating hinge that is designed to evenly press down on the food.
- When the food is cooked, use the handle to open the lid. Remove the food using a plastic spatula.
NOTE:
The green 'Ready' light will cycle on and off during the cooking process indicating that the correct temperature is being maintained.
To use as a Panini Press
- Insert the plug into a 110/120V power outlet. The red power 'ON' light will illuminate.
- Turn the variable temperature control to 'Low'.
- Allow the Panini Grill to preheat until the green 'Ready' light illuminates.
- During this time, prepare the panini and place it onto the bottom cooking plate. Always place paninis towards the rear of the bottom cooking plate.
- Close the top cooking plate, which has a floating hinge that is designed to evenly press down on the panini. The top plate must be fully lowered to cook paninis.
- Toast for 5-8 minutes. Exact toasting time will be a matter of taste. It will also depend on the type of filling used.
- When the panini is cooked use the handle to open the lid. Remove the panini with a plastic spatula.
Always allow the Panini Grill to preheat until the green 'READY' light illuminates.
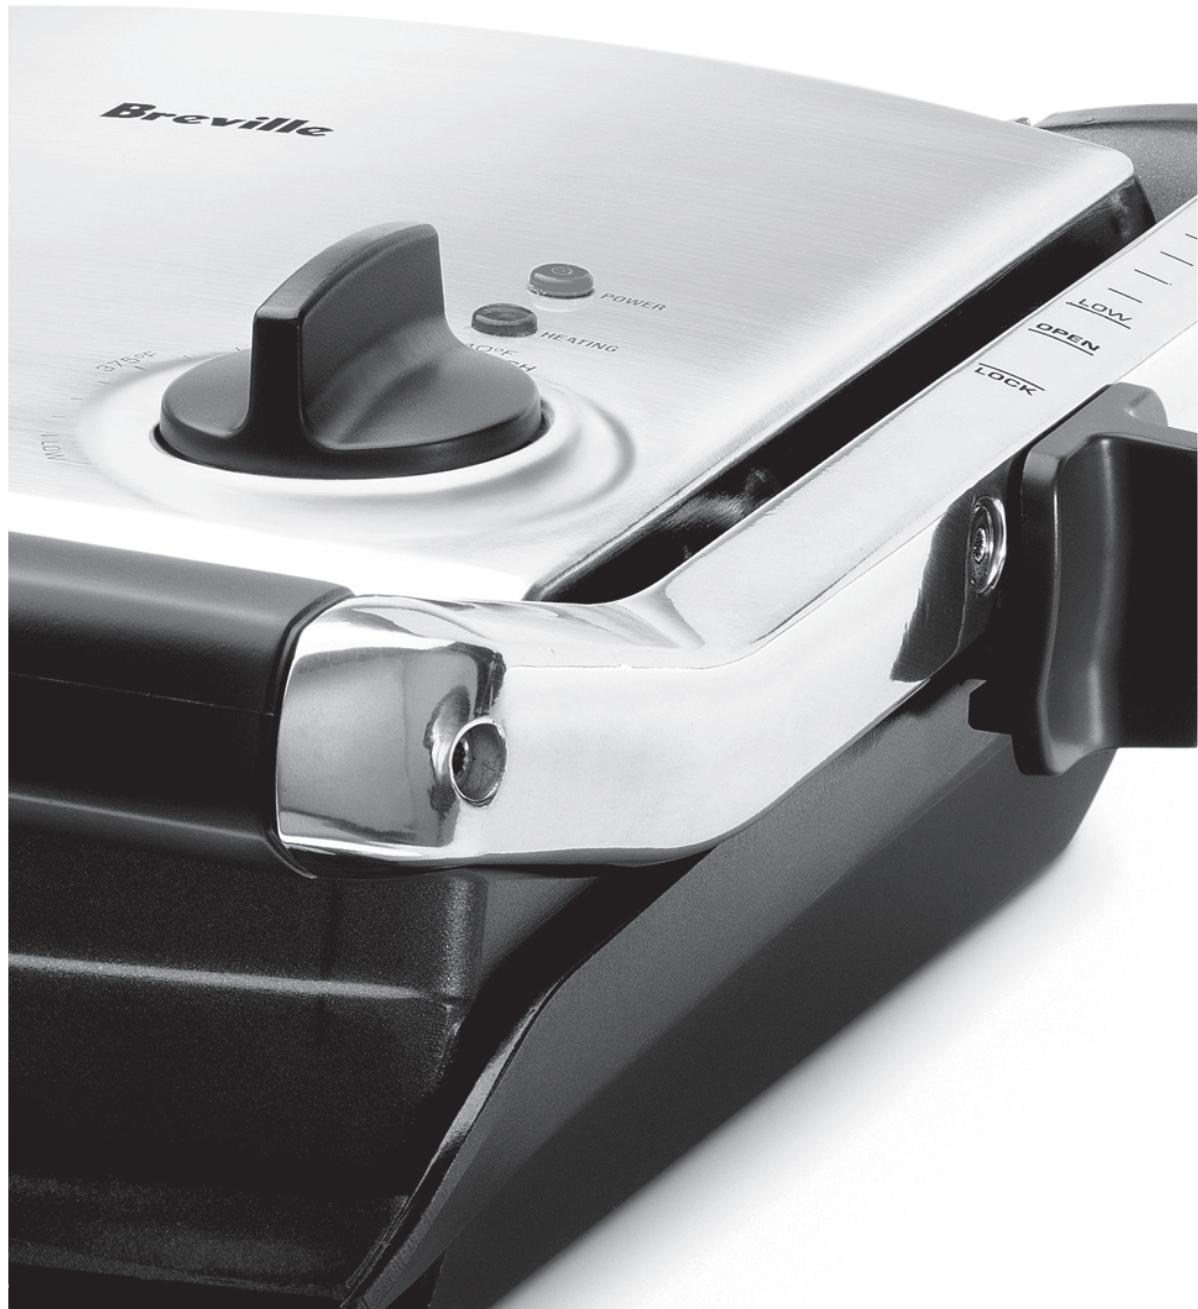
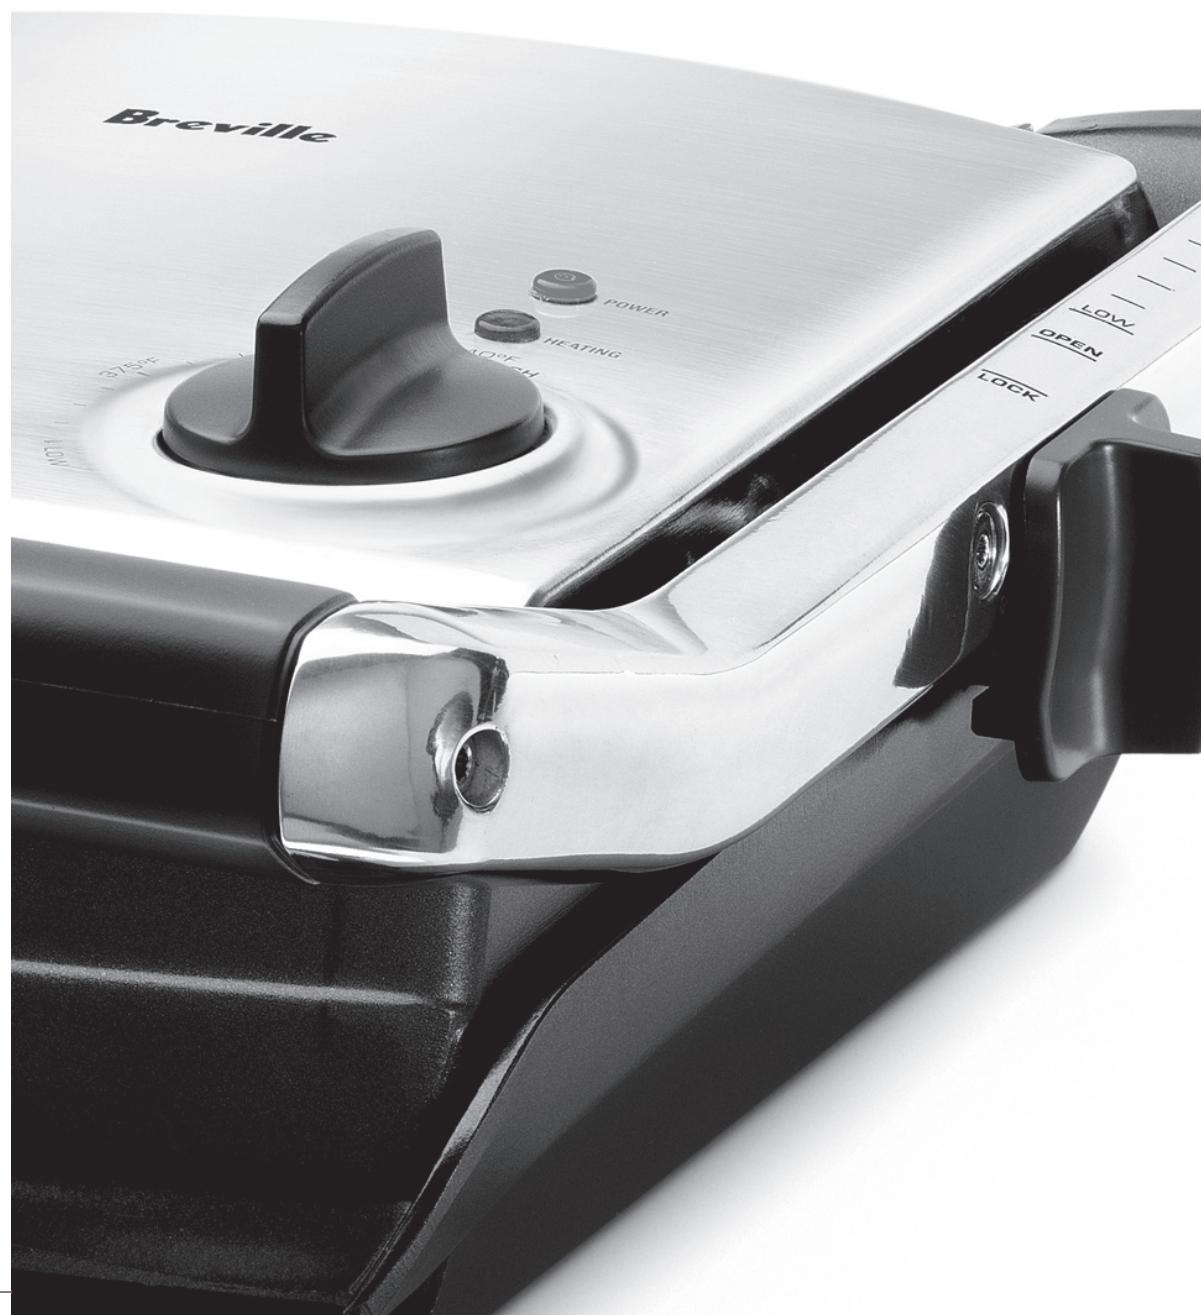
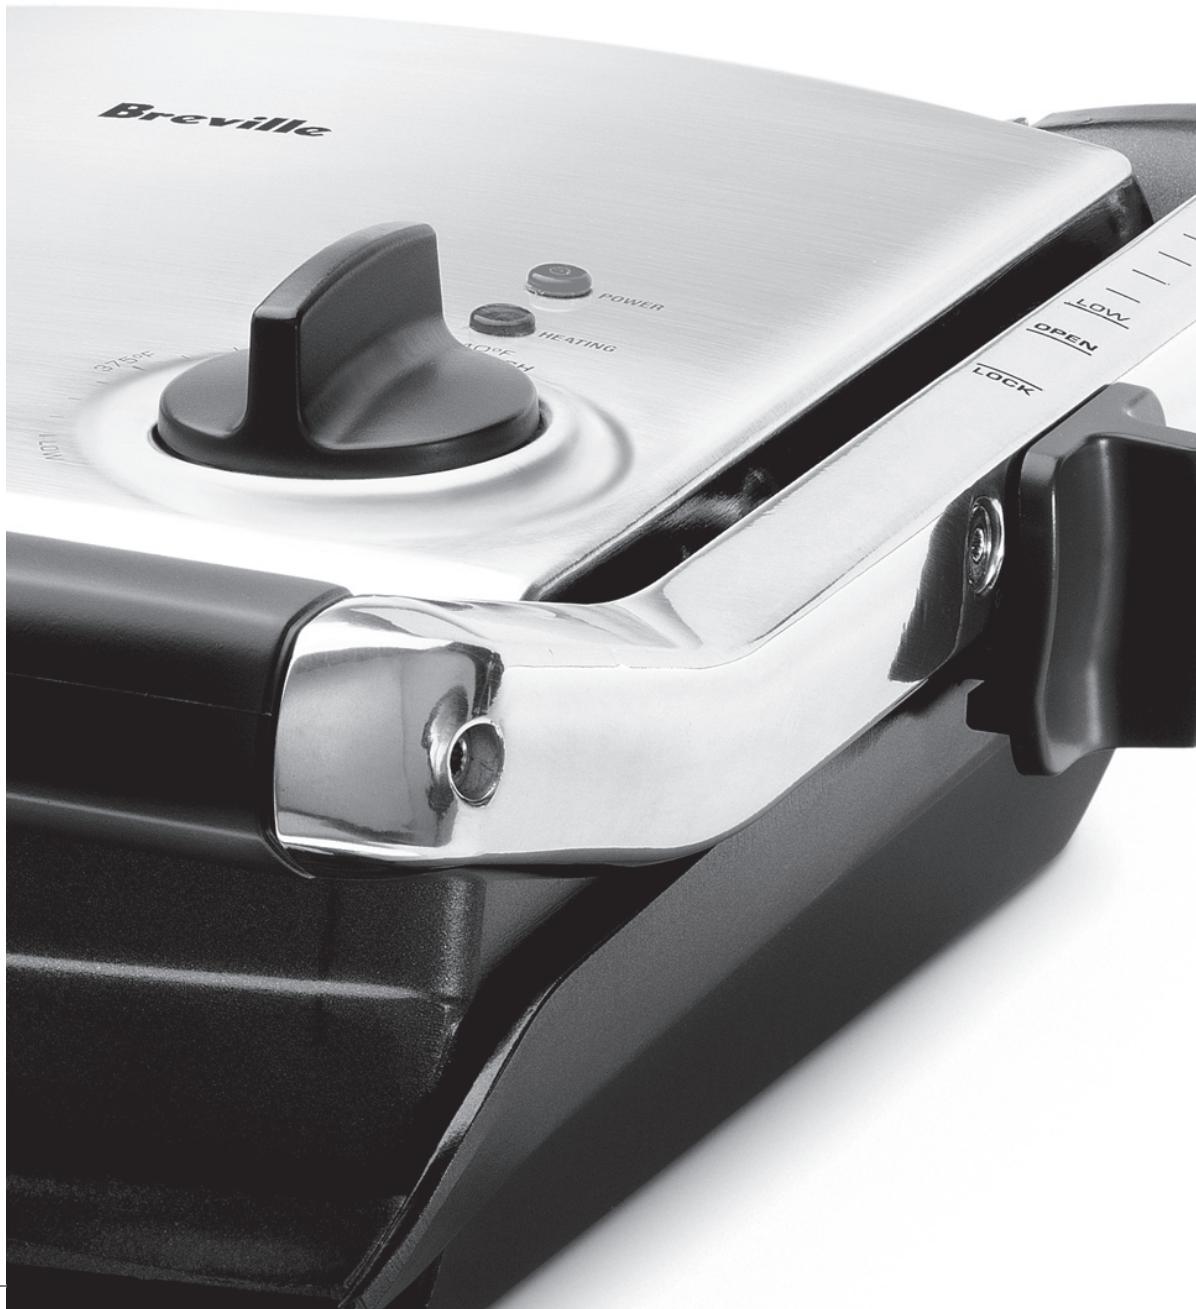
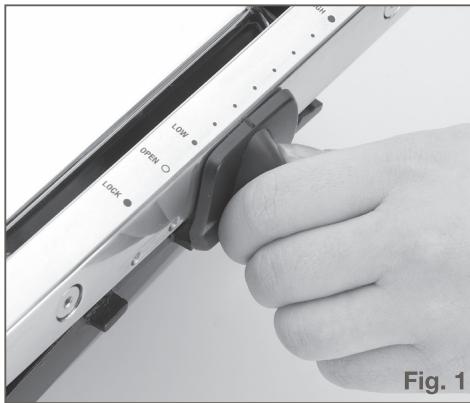
Adjustable Grilling Height Control feature
Your Panini Grill features an Adjustable Grilling Height Control feature which allows you to fix the top plate to a range of positions above the bottom plate.
This allows your Panini Grill to be used to grill delicate ingredients such as fish and hamburger buns without squashing.
- Allow the Panini Grill to preheat until the green 'READY' light illuminates.
- Place the food to be grilled on the bottom plate.
- Move the Adjustable Grilling Height Control clip on the right hand side of the Panini Grill to the desired height (see fig 1).
- Slowly lower the top plate until it rests on the height control clip.
- The top plate will radiate the desired heat to lightly grill foods.
NOTE:
The Adjustable Grilling Height Control can be moved to accommodate thick or thin foods by sliding the clip forwards or backwards along the arm.
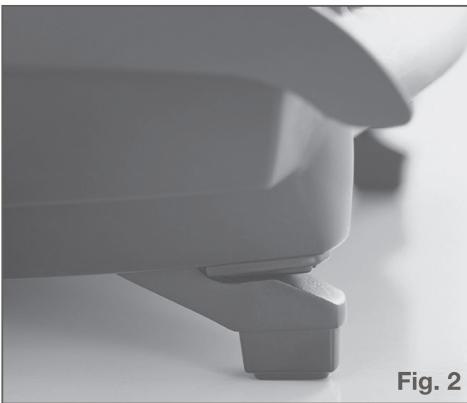
Using the extendable feet
Your Panini Grill features extendable feet, which are designed to level the bottom cooking plate when cooking foods such as sausages. This ensures the sausages do not roll off the grill but still drain the maximum amount of fat while cooking. The extendable feet are also perfect to use while toasting paninis.
Simply flip the feet forward to level the bottom cooking plate (fig 2), or flip the feet backwards to angle the bottom plate.
Variable Temperature Control dial
The Breville Panini Grill features a Variable Temperature Control dial which allows a variety of foods to be cooked.
When the dial is set to 'High' the temperature is correctly suited to grill meats or other foods.
When the dial is set to 'Low' the temperature is correctly suited to toasting paninis.
Hints for grilling meat
For the best grilling results, use meat cuts which are not too thick. The top cooking plate should rest completely on-top of the entire cut of meat.
Recommended Cuts
Beef Sirloin (New York), rump, rib eye, filet.
Lamb Trim lamb leg steaks, filet, eye of loin, cutlets and diced lamb.
Pork Butterfly loin steaks, spare ribs, leg steaks, filet, diced pork.
- Tougher cuts such as beef blade, topside steak, lamb forequarter or neck chops can be used. To tenderize these cuts, marinate them for a few hours or overnight in a marinade with wine or vinegar to help break down the connective tissue.
- Do not salt meat before cooking. Salt will draw out the juices toughening the meat.
-
If using a marinade recipe or premarinated meats from your meat retailer, drain excess marinade off and dab with kitchen paper before placing on the Panini Grill. Some marinades contain high sugar levels, which can scorch on the Grill plate when cooked.
-
Do not over cook meat; even pork is better served pink and juicy.
- Do not pierce meat with a fork or cut meat while cooking. This will let the juices escape, resulting in a tougher dry steak. Use tongs instead.
- When removing fish pieces, use a flat heat resistant plastic spatula to support the food.
- Pre-boiling sausages can alleviate the need to pierce sausages before cooking.
GRILLING GUIDE
Contact grilling is a healthy and efficient way to cook. The cooking times are approximates due to variances in ingredients and meat thicknesses.
It is not recommended to cook meats with thick bones such as T-bone steaks.
| Ingredient and Type | Cooking Time |
| Beef ·Sirloin steak ·Minute steak ·Hamburger patties | 3 minutes for medium rare 5-6 minutes for well done 1-2 minutes 4-6 minutes |
| Pork ·Filet ·Loin steaks | 4-6 minutes |
| Lamb ·Loin ·Cutlets ·Leg steaks | 3 minutes 4 minutes 4 minutes |
| Chicken ·Breast fillet ·Thigh fillet | 6 minutes or until cooked through 4-5 minutes or until cooked through |
| Sausages ·Thin ·Thick | 3-4 minutes 6-7 minutes |
| Panini or Foccacia | 3-8 minutes or until golden brown |
| Vegetables sliced 1/2" (1.25cm) thick ·Eggplant ·Zucchini ·Sweet potato | 3-5 minutes |
| Seafood ·Fish fillet ·Fish cutlets ·Octopus (cleaned) ·Shrimp ·Scallops | 2-4 minutes 3-5 minutes 3 minutes 2 minutes 1 minutes |
CARE & CLEANING
your Breville Panini Grill
CARE & CLEANING YOUR BREVILLE PANINI GRILL
- Before cleaning, disconnect the Panini Grill from the power outlet.
- Allow your Panini Grill to cool before cleaning. The unit is easier to clean when slightly warm.
Always clean your Panini Grill after each use to prevent a build up of baked-on foods. Wipe cooking plates with a soft cloth to remove food residue.
For baked-on food residue, squeeze some warm water mixed with detergent over the food residue then clean with a plastic washing pad or nylon washing brush.
The included Cleaning Spatula can also be used to remove baked-on food residue.
NOTE:
The cooking plates are coated with a non-stick surface; do not use abrasives.
Do not leave plastic cooking utensils in contact with the Panini Grill while cooking.
Cleaning the drip tray
Remove and empty the Drip Tray after each use and wash the tray in warm, soapy water. Do not use metal (or other abrasive) cleansers or harsh detergents as they may damage the surface.
Rinse and dry thoroughly with a clean, soft cloth and replace.
Quantanium scratch resistant coating
Your Panini Grill features a special scratch resistant non-stick coating.

DO NOT IMMERSE ANY PART OF THE BREVILLE PANINI GRILL IN WATER OR ANY OTHER LIQUID.
Do not use sharp objects or cut food inside the Panini Grill. Breville will not be liable for damage to the non-stick coating where metal utensils have been misused.
Cooking on a non-stick surface minimizes the need for oil, food does not stick and cleaning is easier.
Any discoloration that may occur will only detract from the appearance of the Panini Grill and will not affect the cooking performance.
When cleaning the non-stick coating, do not use metal (or other abrasive) cleansers. Wash with warm soapy water. Remove stubborn residue with a plastic washing pad or nylon washing brush.
CARE & CLEANING YOUR BREVILLE PANINI GRILL
Storage
To store your Panini Grill:
- Disconnect the appliance from the power outlet.
- Allow the Grill to fully cool.
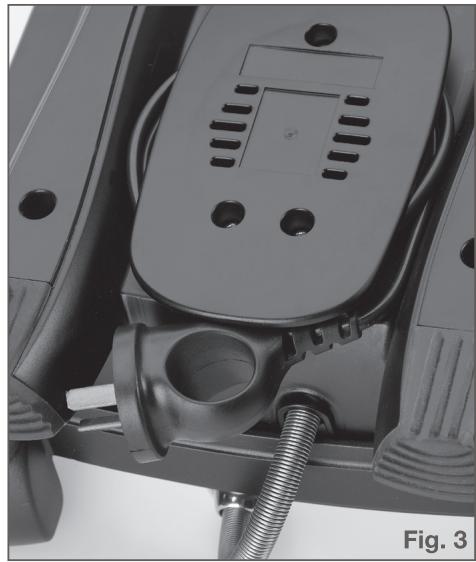
- Storage clip. We have referred to this as the Adjustable Grilling Height Control clip.
Slide the Adjustable Grilling Height Control clip towards the front of the handle to the 'LOCK' position so that the top and bottom cooking plates are locked together.
- Click the removable drip tray into place.
- Wrap the cord in the cord storage area below the unit (see fig 3).
- Store on a flat, dry level surface.
RECIPES

RECIPES
CHEESEBURGER
1lb (500g) ground beef
1 cup fresh bread crumbs
1 small onion, peeled and finely chopped
1 teaspoon minced garlic
1 tablespoon dried parsley flakes
1 egg, lightly beaten
Serve with;
6 bacon strips
6 hamburger buns or full grain rolls
2 tomatoes, thinly sliced
6 cheese slices (any kind of cheese)
1/4 iceberg lettuce heart, shredded
Preheat the Panini Grill until the green 'Ready' light illuminates.
- Combine the first 6 ingredients in a large mixing bowl and mix thoroughly. Form into 4 patties and set aside.
- Place patties on grill and allow the top plate to rest on the patties. Adjust the Grilling Height Control to the thickness of the patty. Cook for 4-5 minutes.
3.Cook bacon on grill.
4. Assemble burger with bacon, cheese, lettuce, tomato and any desired condiments.
TERIYAKI CHICKEN FILES
4 half chicken breast files
1 tablespoon mirin
2 tablespoons soy sauce
2 teaspoons sugar
2 teaspoons cooking sake
To serve:
Lemon wedges
Steamed rice
Salad of green leaves
Preheat the Panini Grill until the green 'Ready' light illuminates.
- Combine mirin, soy sauce, sugar and sake. Place chicken in a stainless steel baking dish and pour prepared marinade over. Marinate for 30 minutes before cooking.
- Place chicken on grill and allow top plate to gently rest on chicken.
- Cook for 4-5 minutes until chicken is cooked through.
- Remove and allow to rest for 5 minutes before serving on a bed of steamed rice. Garnish with lemon wedges and serve with a green salad.
RECIPES
OREGANO LAMB KEBABSS
1lb (500g) boneless lean lamb, cut into
1 inch (2.5cm) cubes
1 tablespoon olive oil
1 tablespoon lemon juice
1 tablespoon dried oregano leaves
1 teaspoon of minced garlic
freshly ground black pepper
Preheat the Panini Grill until the green 'Ready' light illuminates.
- Combine oil with lemon juice and garlic in a large mixing bowl. Add lamb and allow to marinate for 30 minutes before threading onto 4 kebab skewers.
- Season each kebab generously with pepper and place on grill.
- Allow the top plate to rest lightly on lamb. Cook for 4-5 minutes.
- Serve with crusty bread and a Greek salad with black olives and crumbled feta cheese.
BABY OCTOPUS WITH CHILI AND GARLIC
1lb (500g) baby octopus, cleaned
2 tablespoons olive oil
1 tablespoon Thai style sweet chili sauce
Juice and zest of 1 lime
1 teaspoon of minced garlic
To garnish:
Lime wedges
Cilantro sprigs
To serve:
Lightly steamed vermicelli thin pasta noodles
Preheat the Panini Grill until the green 'Ready' light illuminates.
- In a large mixing bowl combine octopus with oil, chili sauce, lime zest, juice and garlic. Toss well to combine and season with pepper.
- Place octopus on pre-heated grill and lower the top plate. Allow to cook for 3 minutes.
- Remove from grill and serve in a bowl on a bed of vermicelli thin pasta noodles, garnish with lime and cilantro.
RECIPES - SAUCES
MARINATED NEW YORK CUT STEAK
4 New York cut steaks - cut 1 inch (2.5cm) thick
1 cup red wine
2 tablespoons olive oil
1 tablespoon Dijon style mustard
1 teaspoon of minced garlic
Preheat the Panini Grill until the green 'Ready' light illuminates.
- Combine wine, oil, mustard and garlic in a screw top jar and shake well. Place steaks in a shallow dish, not plastic or aluminum, and pour over marinade.
- Marinate at room temperature for 30 minutes to 1 hour.
- Grill steaks for 3 minutes for medium rare.
- Serve with creamy mashed potato and a crisp salad.
ATLANTIC SALMON STEAK WITH TARRAGON AND PEPPER CRUST
4 Atlantic salmon steaks - weighing approx 6oz (180g) each
2 tablespoons olive oil
2 tablespoons dried tarragon leaves
freshly ground black pepper
To garnish:
Lime or lemon wedges
To serve:
Shoe string fries or steamed baby potatoes
Preheat the Panini Grill until the green 'Ready' light illuminates.
- Combine oil with tarragon and a generous and coarse grinding of black pepper.
- Brush salmon on both sides with mixture and place on grill.
- Adjust the grilling height control to just touch the top of the fish steak.
- Allow to cook for 2 minutes for fish to be golden on the outside and 'rosy' pink on the inside. Cook a little longer if you prefer your fish more cooked.
- Serve immediately.
ONE YEAR LIMITED WARRANTY
Breville®* warrants this Breville® appliance against defects that are due to faulty material or workmanship for a period of one (1) year from the date of original consumer purchase. This warranty does not cover damage from abuse, neglect, use for commercial purposes, or any other use not found in the printed "Instructions for use" booklet. There is no warranty for glass parts, glass containers, filter basket, blades and agitators. HWI Breville® expressly claim all responsibility for consequential damages for incidental losses caused by use of this appliance. Some states or provinces do not allow this exclusion or limitation for incidental or consequential losses, so the foregoing disclaimer may not apply to you.
ANY WARRANTY OF MERCHANTABILITY OR FITNESS WITH RESPECT TO THIS PRODUCT IS ALSO LIMITED TO THE ONE YEAR LIMITED WARRANTY PERIOD.
Some states or provinces do not allow disclaimer of the implied warranty with respect to consumer goods, so the foregoing disclaimer may not apply to you.
This warranty gives you specific legal rights and you may also have other legal rights which vary from state to state or province to province.
If the appliance should become defective within the warranty period, do not return the appliance to the store. Please contact our Customer Service Center.
Toll free phone number:
1-866-BREVILLE (1-866-273-8455)
Internet email:
AskUs@BrevilleUSA.com
AskUs@Breville.ca (in Canada)
*HWI Breville® products are distributed in Canada by Anglo Canadian Housewares, L.P. and in USA by Metro/Thebe Inc.
NOUS VOUS FÉLICITONS
HAMBURGER AU FROMAGE
Breville Customer Service Center
US Customers
Mail: 19400 S.Western Ave Torrance CA 90501-1119
Phone: Customer Service 1 (866) BREVILLE
Email: Customer Service askus@brevilleusa.com
Canada Customers
Mail: Anglo Canadian 2555, Avenue de l'Aviation Pointe-Claire (Montreal) Quebec H9P 2Z2
Phone: Customer Service: 1 (866) BREVILLE
Email: Customer Service askus@breville.ca
www.breville.com
Breville is a registered trademark of Breville Pty Ltd. A.B.N. 98 000 092 928.
USA: 19400 S.Western Ave, Torrance, CA90501-1119, Tel: 1 866 BREVILLE.
CANADA: 2555, Avenue de l'Aviation, Pointe-Claire (Montreal) Quebec, H9P2Z2. Tel: 1 866 BREVILLE
Copyright Breville Pty Ltd 2008. Due to continued product improvement, the products illustrated/photographed in this brochure may vary slightly from the actual product.
Model TG425XL Issue NA-4/08
- CONTENTS
- BREVILLE RECOMMENDS SAFETY FIRST
- IMPORTANT SAFEGUARDS
- READ ALL INSTRUCTIONS
- FULLY UNWIND THE CORD FROM THE CORD STORAGE FACILITY BEFORE USE
- NOTE:
- ELECTRIC CORD STATEMENT
- SAVE THESE INSTRUCTIONS
- KNOW
- KNOW YOUR BREVILLE PANINI GRILL
- OPERATING
- To use as a Grill
- To use as a Panini Press
- Adjustable Grilling Height Control feature
- Using the extendable feet
- Variable Temperature Control dial
- Hints for grilling meat
- Recommended Cuts
- GRILLING GUIDE
- CARE & CLEANING
- CARE & CLEANING YOUR BREVILLE PANINI GRILL
- Cleaning the drip tray
- Quantanium scratch resistant coating
- Storage
- RECIPES
- CHEESEBURGER
- TERIYAKI CHICKEN FILES
- OREGANO LAMB KEBABSS
- BABY OCTOPUS WITH CHILI AND GARLIC
- RECIPES - SAUCES
- MARINATED NEW YORK CUT STEAK
- ATLANTIC SALMON STEAK WITH TARRAGON AND PEPPER CRUST
- ONE YEAR LIMITED WARRANTY
- ANY WARRANTY OF MERCHANTABILITY OR FITNESS WITH RESPECT TO THIS PRODUCT IS ALSO LIMITED TO THE ONE YEAR LIMITED WARRANTY PERIOD.
- Toll free phone number:
- Internet email:
- NOUS VOUS FÉLICITONS
- HAMBURGER AU FROMAGE
- Breville Customer Service Center
- US Customers
- Canada Customers
Brand : BREVILLE
Model : TG425XL
Category : Electric grill