
KH 4410 - Laminator LERVIA - Free user manual and instructions
Find the device manual for free KH 4410 LERVIA in PDF.
User questions about KH 4410 LERVIA
0 question about this device. Answer the ones you know or ask your own.
Ask a new question about this device
Download the instructions for your Laminator in PDF format for free! Find your manual KH 4410 - LERVIA and take your electronic device back in hand. On this page are published all the documents necessary for the use of your device. KH 4410 by LERVIA.
USER MANUAL KH 4410 LERVIA
Operating Instructions
| Laminator KH 4410 | Page |
| 1. Intended Use | 4 |
| 2. Package contents | 4 |
| 3. Appliance description | 4 |
| 4. Technical data | 4 |
| 5. Safety Instructions | 5 |
| 6. Suitable laminating pouches | 6 |
| 7. Operating levels | 6 |
| 8. Preparing for hot lamination | 7 |
| 9. Preparing for cold lamination | 8 |
| 10. Lamination process | 8 |
| 11. Anti block system (ABS) | 9 |
| 12. Cleaning and care | 9 |
| 13. Storage | 10 |
| 14. Disposal | 10 |
| 15. Warranty & service | 10 |
| 16. Importer | 10 |
Read the operating instructions carefully before using the appliance for the first time and preserve this booklet for later reference. Hand over the manual to anyone, whom you pass on the appliance to.
Laminator KH 4410
1. Intended Use
The laminator is intended exclusively for hot and cold lamination of documents of paper or cardboard in private households.
It is not intended for use with other materials. It is also not intended for commercial or industrial use.
No warranty is provided for damages resulting from improper use of the appliance!
2. Package contents
1 Laminator Lervia KH 4410
10 80 micron laminating pouches DIN A4 for hot lamination
10 80 micron laminating pouches DIN A5 for hot lamination
10 80 micron laminating pouches for hot lamination of business cards
1 Operating instructions
1 Warranty card
3. Appliance description
Pouch guide (rear)
2 Pouch format lock
3 LED indicator light "Ready" OK
4 ON/OFFLEDindicatorlight
ON/OFF switch
Selector switch for pouch thickness and cold lamination
Pouch ejector slot (front)
3 Anti block (ABS) switch
Slot for manual pouch input
4. Technical data
Mains voltage: 220-240 V\~, 50 Hz
Rated output: 308 W
Laminating speed: approx. 0.4m /minute
Lamination thickness: max. 1 mm
Pouch width: max. 230 mm
Pouch thickness: max. 2 × 125 (250)
micron
5. Safety Instructions
- Do not allow children handle electronic appliances unsupervised, as they may not always be able to assess the possible injury hazards.
- Unplug the power cord after every use and before cleaning, so as to prevent the appliance from switching on inadvertently.
- Check the appliance and all the parts for visible damages. The safety concept can work only if the appliance is in an immaculate condition.
- Never perform hot lamination on flammable, heat-sensitive and/or meltable materials and do not laminate drawings on temperature-sensitive paper or material that will undergo changes in colour or quality when subjected to heat.
- Never laminate valuable, unique documents. Although the laminator satisfies all typical safety norms and standards, errors can never be completely prevented - as with all electrical appliances. Errors with the laminator can result in damage to the document being laminated.
- Do not laminate any materials with pouch in a thickness greater than 1.0 mm. Otherwise, the laminating pouch can be angled incorrectly inside the device. This can damage the laminating pouch, the document being laminated as well as the laminator.
Danger of electrical shock!
- Connect the appliance to a power socket with a mains voltage of 220 - 240V /50Hz
- Do not operate the appliance with damaged connecting cable or power plug.
- Get customer service to repair or replace connecting cables and/or appliances that are not functioning properly or have been damaged.
- Never immerse the appliance in water. Just wipe it with a damp cloth.
- Do not expose the appliance to the rain and never use it in a humid or wet environment.
- Make sure that the power cord does not become wet during operation.
- Unplug the appliance immediately after use. The appliance is completely disconnected, only when you pull out the power plug from the power socket.
- Do not open or repair the appliance casing yourself. In this case, the appliance is not safe and the warranty is voided.
Fire hazard!
- Do not use the appliance near hot surfaces.
- Do not keep the appliance in places that are exposed to direct sunlight, as this could lead to overheating and cause irreparable damage.
- Do not leave the appliance unattended when in use.
- Never cover the ventilation slits on the top of the appliance while it is on.
Injury hazard!
- Keep children away from the connecting cable and the appliance. Children frequently underestimate the danger from electrical appliances.
- Make sure to find a safe place for the appliance.
- Do not operate the appliance if it has sustained a fall or is damaged. Get the appliance checked and repaired by experts, if necessary.
- Some parts of the appliance become very hot during operation. To avoid burns, do not touch these parts.
6. Suitable laminating pouches
- You can use laminating pouches with a width of up to 230mm and a thickness of max. 2x 125 (250) micron.
- Please note that each laminating pouch may only be used once for laminating.
For hot lamination, use only laminating pouches that are expressly intended for hot lamination. For cold lamination, use only laminating pouches that are expressly intended for cold lamination.
① Note that the laminating pouches included with the laminator are intended exclusively for hot lamination.
7. Operating levels
| Switch setting | Laminating pouch thickness |
| 80 | > 60 - 80 |
| Cold | to 200 |
| 125 | 85 - 125 |
Tip: For high-gloss photos, select the switch setting "125".
8. Preparing for hot lamination
Insert the pouch guide 1 into the holes on the back side of the laminator.
Insert the power plug of the laminator into a power socket.
Be sure to find a stabile location for the appliance.
Switch on the appliance by flipping the ON/OFF switch ① ⑤. The red ON/OFF LED indicator light ④ turns on.
Set the selector switch for the pouch thickness and cold lamination 6 to the desired pouch thickness (80 or 125 micron). The laminator now heats up to the operating temperature.
- As soon as the green LED indicator light "Ready" OK lights up, the laminator has reached its operating temperature.
① As soon as the operating temperature is reached, the green LED indicator light "Ready" OK will light up. For a more even laminating result, we recommend that you only begin the laminating process after waiting for an additional approx. 2-3 minutes, particularly when using thinner pouches (less than 125 micron), or when adjusting a different pouch thickness.
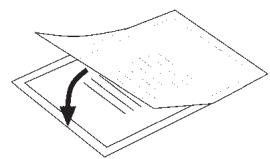
Lay the document to be laminated into a laminating pouch of the appropriate size.
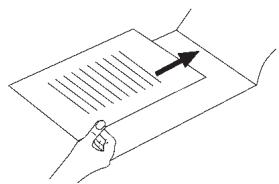
① Make certain that all corners of the document have at least two millimetres of space to the edge of the laminating pouch as shown in Fig. 1. Make certain that you only use a single pouch for laminating. Open it up first, as shown in Fig. 2.

Fig. 1

For information about the lamination process, please read section 10.
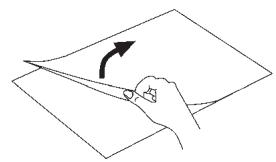
Fig. 2
9. Preparing for cold lamination
If you have previously performed hot lamination: Allow the laminator to cool completely after hot lamination before you begin the cold lamination. Otherwise the rolls inside the laminator are still hot. This can damage the laminating pouch and the document to be laminated!
Insert the pouch guide 1 into the holes on the back side of the laminator.
Insert the power plug of the laminator into a power socket.
Be sure to find a stabile location for the appliance.
Switch on the appliance by flipping the ON/OFF switch ⑤. The red ON/OFF LED indicator light ④ turns on.
Set the selector switch for pouch thickness and cold lamination to "COLD".
- As soon as the green LED indicator light "Ready" ③ lights up, you can begin the cold lamination.
Lay the document to be laminated into a laminating pouch of the appropriate size.
Make certain that all corners of the document have at least two millimetres of space to the edge of the laminating pouch as shown in Fig. 1.
(1) Make certain that you only use a single pouch for laminating. Open it up first, as shown in Fig. 2.
For information about the lamination process, please read section 10.
10. Lamination process
Lay the laminating pouch onto the pouch guide ①. Lay the right or left edge of the laminating pouch against the pouch format lock ② (closed side first). Slide the pouch format lock together until the selected format is reached. This prevents the laminating pouch from being pulled in at an angle.
If the pouch is still pulled in at an angle, use the "Anti block system" as described in section 11.
Now slide the laminating pouch slowly into the slot for manual pouch input 9.
When you have slid the laminating pouch several centimetres into the slot, it will be pulled in automatically. Let go of the laminating pouch as soon as you notice that it is being pulled in automatically.
Make certain that there is at least 30 cm of open space in front of the laminator. Otherwise the laminating pouch will not be output completely from the laminator after lamination. This could damage the laminated pouch.
The laminated pouch is output from the pouch ejector slot of the laminator.
(1) (Only after hot lamination) When the laminated pouch is output from the pouch ejector slot of the laminator, it is still hot and its shape may change slightly. For this reason, let the laminated pouch cool for one minute before touching it. To improve the lamination result, you can weigh down the still hot laminated pouch with a book, a file folder or another heavy, flat object. This achieves a flat, flawless surface.
11. Anti block system (ABS)
At the start of the lamination process, the pouch may be pulled in at an angle or jam up inside the appliance.
Press the Anti block switch (ABS) 8 upward.
The pouch is then released again.
Pull out the pouch, then release the Anti block switch 8.
Start the lamination process over.
12. Cleaning and care
Life-threatening danger of electrical shock:
- Never open the appliance housing. There are no operating elements inside.
- Never immerse the appliance components into water or other liquids!
Cleaning the casing:
Clean the surface of the casing with a slightly damp wash cloth.
First pull the power plug.
Let the appliance cool down completely.
Make certain that no moisture enters into the inside of the appliance.
Lervia KH 4410
Cleaning the inside of the appliance:
With every lamination, contaminants are deposited on the rollers inside the laminator. Over time, this reduces the performance of the laminator. You should therefore clean the rollers inside the laminator after use.
Prepare the appliance as described in section 8 "Hot lamination" until the green LED indicator light "Ready" ③ ⑥ K lights up.
Then run a sheet of DIN A4 paper folded in the middle (maximum thickness 1.0mm ) ...
- without a laminating pouch and
with the fold first
... slowly into the slot for manual pouch input 9.
Let go of the sheet as soon as you notice that it is being pulled in automatically.
- The contaminants on the rollers inside the laminator are now transferred to the sheet of paper. The paper is output from the pouch ejector slot ① of the laminator.
Repeat the cleaning several times. Each time, use a new, clean sheet of paper.
If you no longer see any contaminants on the paper, the rollers inside the laminator are clean.
13. Storage
Let the appliance cool off completely before storing it.
① Do not store the laminator in damp locations as moisture could enter inside the appliance. (E.g. cellars)!
14. Disposal

Do not dispose of the device in normal domestic waste.
Dispose of the device over a registered waste disposal firm or through your communal waste disposal facility. Observe the currently valid regulations. In case of doubt, consult your waste disposal facility.
15. Warranty & service
The warranty conditions and the service address can be found on the warranty slip.
16. Importer
Komperna GmbH
Burgstrasse 21
D-44867 Bochum
www.kompernass.com
Lervia KH 4410