USER MANUAL P122 ZIBRO
For safety reasons, please read this manual carefully before operating. Persons who are not familiar with this manual must not use this air conditioner. We strongly recommend keeping this manual in a safe place for future reference.
A. Do not use a damaged cable.
B. Do not clamp or bend the cable.
C. Do not place unevenly.
D. Do not place in front of an open window.
E. Do not bring in contact with chemicals.
F. Do not place near a heat source.
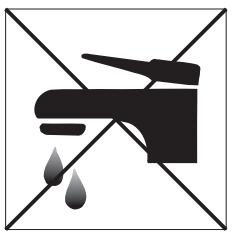
G. Do not immerse in water.
H. Do not spill.
I. Do not insert anything.
J. Do not use an extension cord.
K. Keep out of the reach of children.
L. Do not repair.

F
G

SICUREZZA
Control panel
Air outlet
3 Handle
4 Casters
Filter set
Air inlet
7 Exhaust air outlet
8 Rubber plug
9 Hose adapter
10 Exhaust hose
1 Window air outlet
Remote control
13 Power cord


12
- READ THE DIRECTIONS FOR USE FIRST.
- IN CASE OF ANY DOUBT, CONTACT YOUR DEALER.
Dear Sir, Madam,
Congratulations on the purchase of your air conditioner. This air conditioner has three functions in addition to cooling the air, namely, air dehumidification, circulation and filtration. The mobile air conditioner is extremely easy to operate and move. You have acquired a high quality product that will provide you with many years of pleasure, on condition
that you use it responsibly. Reading these instructions for use before operating your air conditioner will optimise its life span. We wish you coolness and comfort with your air conditioner.
Yours sincerely,
PVG International B.V.
Customer service department
A SAFETY INSTRUCTIONS
Install the device only when it complies with local regulations, by-laws and standards. The unit is only suitable for use in dry locations, indoors. Check the mains voltage and frequency. This unit is only suitable for earthed sockets, connection voltage 220-240 V. / 50 Hz.

IMPORTANT
The device MUST always have an earthed connection. If the power supply is not earthed, you may not connect the unit. The plug must always be easily accessible when the unit is connected. Read these instructions carefully and follow the instructions.
Before connecting the unit, check the following:
- The voltage supply must correspond with the mains voltage stated on the rating label.
- The socket and power supply must be suitable for the current stated on the rating label.
- The plug on the cable of the device must fit into the wall socket.
The device must be placed on a flat and stable surface.
The electricity supply to the device must be checked by a recognised professional if you have any doubts regarding the compatibility.
- This device is manufactured according to CE safety standards. Nevertheless, you must take care, as with any other electrical device.
- Do not cover the air inlet and outlet grill.
- Empty the water reservoir before moving the unit.
- Never allow the device to come into contact with chemicals.
- Never spray the unit with or submerge in water
- Do not insert objects into the openings of the unit.
- Always remove the plug from the electric power supply before cleaning or replacing the unit or components of the unit.
- Never use an extension cable to connect the device to the electric power supply. If there is no suitable, earthed wall socket available, have one installed by a recognised electrician.
- For safety reasons take care when children are in the surrounding of the device, as with any other electrical device.
- Have any repairs only carried out by a recognised service engineer or your supplier. Follow the instructions for use and maintenance as indicated in the user manual of this device.
Always remove the plug of the unit from the wall socket when it is not in use.
- A damaged power cord or plug must always be replaced by a recognised electrician or your supplier.


ATTENTION!
- Never use the device with a damaged power cord, plug, cabinet or control panel. Never trap the power cord or allow it to come into contact with sharp edges.
- Never seal the room - where this device will be used - completely airtight. This will prevent under pressure in this room. Under pressure can disrupt the safe operation of geysers, ventilation systems, ovens, etc.
- Failing to follow the instructions may lead to nullification of the guarantee on this device.
B INSTALLATION

WARNING
Before using the air conditioner it should be left in an upright position for at least 2 hours.
This unit is portable and can easily be moved from one room to another. In doing so keep this in mind:


1 Ensure that the unit is positioned upright and on a level surface.
2 Place the loose filters in the filter holder.
Take the filter holder 5 out of the air conditioner
- Open the filter holder and place the active carbon filter (black) and 3MTM HAF filter (white) in the filter holder ⑤.
- Place the filter fixing component back in the holder.
- Place the filter holder back in the air conditioner.
3 Do not operate the unit inside the bathroom, shower, or in any other very humid environment.
4 Please keep a distance of 50 cm between the unit and the wall or other objects to ensure proper air circulation.
5 Insert both ends of the air exhaust hose in the round connectors. Fasten the connectors by turning them clockwise onto the hose.
6 Insert one round connector 9 in the backside of the unit 7. Fasten the other connector 9 to the window air outlet 11.
7 Ensure that the window air outlet 1 has a free flow outside. Close the window or door as much as possible to prevent outside air from entering the room.

IMPORTANT
The flexible exhaust hose should be less than 1m during operation, which provides the best performance. This length has been designed especially according to the specifications of the air conditioner. Do not use an extension or exchange for a different hose as that may lead to malfunctioning. The exhaust air must flow freely, any blockage can lead to overheating of the air conditioner. Take care to prevent any bow or bend in the exhaust hose.
C OPERATION

1 Insert the plug into the wall outlet.
Press the () -button to switch on the air conditioner.
3 With button you can change the operating mode of the unit. By pressing the button the following modes appear:
Cooling, the green light lits.
Dehumidifying, the orange light lits.
Air circulation, the yellow light lits.
COOLING
When the unit is in the cooling mode, the following functions apply:
- The fan speed can be adjusted by pressing the × -button
Maximum setting.
Medium setting.
Lowest setting.
- The temperature can be set by pressing the and buttons, anywhere between 16° C en 32° C . The display will show the set temperature for 15 seconds and the "set temp" will light up. Fifteen seconds after setting the required temperature, the display will show the room temperature.

It depends on the environment whether the required temperature will be reached. It is not a malfunction of the air conditioner if the room temperature remains above the "set temp".
DEHUMIDIFYING
When the unit is primarily used as a dehumidifier, then please follow these instructions: Do not connect the air exhaust hose and let the warm air go back into the room. Connect a drainage hose onto the permanent drain connector on the back of the unit (refer to Chapter G). You must connect a drain tube to the water outlet (refer to Chapter G).
When the unit is in the dehumidifying mode, the fan speed cannot be adjusted. The fanspeed will be automatically set on 'Medium setting'. The buttons and can also not be adjusted.
AIR CIRCULATION
In this mode the unit only circulates air; the unit will not cool or dehumidify. The air entering the unit is not cooled or dehumidified, but is filtered.
When the unit is in this mode, the following functions apply:
- The fan speed can be adjusted by pressing the × -button
Maximum setting.
Medium setting.
Lowest setting.
4 When the unit is switched off the most recent setting will be stored in memory.
The timer function allows you to switch the unit on or off at a certain time.
TO SWITCH ON THE UNIT AT A CERTAIN TIME
- Ensure that the unit is set in the required operating mode, of x .
-
Switch off the unit by pressing the () -button. Ensure that the plug is properly inserted into the wall outlet.
-
Press the -button. The light "Timer set" will flash.
Use the and buttons to set a time between 1 and 12 hours.
- When the set time has expired the unit will switch on.
TO SWITCH OFF THE UNIT AT A CERTAIN TIME
- When the unit is operating in the required mode press the -button. The light "Timer set" will flash.
- Use the and buttons to set a time between 1 and 12 hours.
- When the set time has expired the unit will switch off.

NOTE!
The compressor has been set so that it starts functioning three minutes after the (re)start of the air conditioner.
The cooling will switch off when the room temperature is lower than the set one. Air circulation will however continue to work on the set level. When the room temperature rises above the selected value, the cooling will work again.
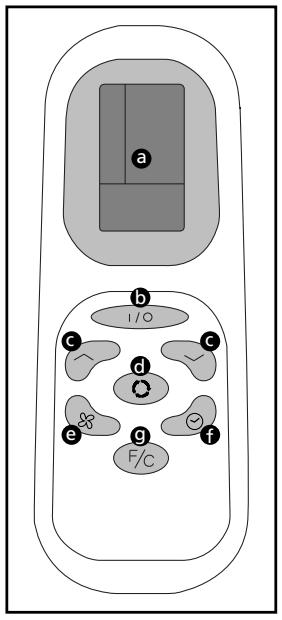
REMOTE CONTROL
a. LCD Screen
b. Power on/off button
c. Timer and thermostat setting buttons
d. Mode button (select A/C, Fan or Dehumidifier)
e. A/C Fan Speed button (High, Medium, Low)
f. Timer ON / OFF button
g. Celsius / Fahrenheit selector
The remote control works in combination with the control panel. Aim the front end of the remote control at the red window. The maximum operating distance from the air conditioner is approximately 5 metres. Place AAA Batteries before use.
TIMER PROGRAMMING
1 Press the button on the remote or the "Timer Setting" button on the control panel to turn on the Timer Function.
Press the or buttons on the remote or the or buttons on the control panel to set the desired shut-off period.
3 The unit will shut off when the set time elapses.
Press the button on the remote or the MODE button on the control panel to select the dehumidifier mode. The fan will operate on medium speed.
The dehumidifier indicator light will illuminate and stay solid while the unit is dehumidifying. When the humidity in the room is 50% or lower, the compressor will not run, the unit will not dehumidify, and the dehumidifier light will blink. Remember, the exhaust hose does not need to be used in dehumidifier mode.
AIR FILTER
The P122 and P125 air conditioners are equipped with a 3-layer filter package to clean the circulated room air. The filters are delivered with a separately packed 3MTM HAF filter and an active carbon filter. These filters must be placed according to instructions before operating the air conditioners.
- Screen filter; to remove bigger dust particles.
- 3MTM HAF filter to remove particles from the air such as pollen, animal dander and dust.
- Active carbon filter sheet; to remove odours.
The filter holder on the backside of the unit can be opened. Active carbon filter and 3MTM HAF filter can be removed. Screen filter is part of the filter holder.
- The screen filter has to be cleaned regularly with a vacuum cleaner to avoid blocking of the air flow.
- The positive/negative electro statically charged 3MTM HAF filter is recommended to be changed every 3 months. Unusual dirt, construction work, pets, the presence of smokers and running the air-conditioning unit continuously can shorten the life time of the 3MTM HAF filter.

Recommended change of filter
- The active carbon sheet can be cleaned with a vacuum cleaner when dusty but has to be changed at the same time as the 3MTM HAF filter.

NOTE!
- Remove the 3MTM HAF filter and active carbon filter before seasonal storage and install new filters at the beginning of the new season. The old filters can be disposed in the 'Non-biological garbage container'.
- Never use the airconditioner without the air filter.
- Using the unit without the activated carbon filter and/or enzyme filter will not damage your airconditioner. In that case, airborne micro-organisms are not neutralised and unpleasant odours are not removed.
- Only use suitable Zibro filters. This will prevent damage to your airconditioner.
- Suitable filter packages are available at your dealer.

E AIR FLOW
Move the air vent directly to adjust the air flow direction of the horizontal louvres.
F EMPTY INTERNAL WATER CONTAINER
Under extreme (environmental) circumstances it may be necessary to empty the internal water container regularly. When the internal water container is full the light will flash and the unit will beep continuously. The unit will switch off automatically. To empty the water container do the following:
1 Do not move the unit. Drastic movements can cause water leakage.
2 Switch off the unit and remove the plug from the wall outlet.
Place a pan or appropriate tray on the floor underneath the permanent drain tube.
4 Remove the rubber plug 3 from the drain tube and let the water run out. (± 0.5 litres).
5 Replace the rubber plug ⑧ , put the plug into the wall outlet, and switch on the unit. The warning light ▲ should be off.

NOTE!
When the air conditioner is in use, under normal circumstances the condensed water will be drained through the air outlet-tube.
G CONTINUOUS DRAINAGE
1 Switch off the unit and remove the plug from the mains.
2 Place a pan or appropriate tray on the floor underneath the permanent drain tube to collect any water draining away.
3 Remove the rubber plug 8.
4 Connect a drain tube (ø 15 mm) into the water outlet and extend with extra water tube as needed.
5 Place the other end of the drain tube at a location suitable for the purpose (a drain hole, for instance). In doing so, take care to ensure that the tube is not twisted and is free of kinks. The tube must be placed so as to be declining along its entire length.
DEHUMIDIFICATION
If the unit will be used mainly as dehumidifier, do not connect the exhaust hose and let the warm air return in the room. Continuous drainage is then necessary and more efficient. You must, however, use a water drain tube (Ø 0.5 inch internal diameter), placing its discharge end at a suitable drainage point.
HCLEANING

WARNING!
Switch off the unit and remove the plug from the mains before cleaning the appliance or filter, or before replacing the filters.
Clean the housing with a soft, damp cloth. Never use aggressive chemicals, petrol, detergents or other cleansing solutions. For maintenance of the filters, refer to Chapter D "Air Filter".

NOTE!
Never use the air conditioner without screenfilter.
STORAGE
1 Empty the internal water container (refer to Chapter F)
2 Clean and replace the mesh filter (see also chapter D).
- Remove the active carbon filter and the 3MTM HAF filter at the end of the season and only place new filters at the beginning of the new season. The old filters do not constitute chemical waste and may be disposed of as regular waste (not organic waste).
- New filters are available at your dealer.
3 Put the unit in air circulation mode for a couple of hours to ensure that the inside becomes completely dry.
Store cable as shown, protect the unit against dust and store in a dry place not accessible to children.
J TROUBLE SHOOTING
| Problem | Cause | Solution |
| The unit does not function | No power supply | Connect to a functioning outlet and switch on |
| Water tank indicator is on | Empty the internal water container (refer to Chapter F) |
| The unit does not seem to perform | In direct sunlight | Close curtains |
| Windows or doors open, many people or heat source in room | Close doors and windows, or place an extra air conditioner |
| Dirty filter | Clean or replace filter |
| Air inlet or air outlet blocked | Remove blockage |
| Room temperature lower than selected value | Change temperature selection |
| The unit is noisy | Unit stands uneven | Place on even surface (less vibrations) |
| The compressor does not work | Overheat protection probably activated | Wait 3 minutes until the temperature has decreased, and turn on the unit again |
| Remote control does not function | Distance too great | Make sure the remote control is correctly aimed at the control panel |
| Remote control signal not detected by control panel |
| Batteries empty | Replace the batteries |
Never try to repair or dismantle the air conditioner yourself. Incompetent repairs result in loss of warranty and can endanger the user.
K GUARANTEE CONDITIONS
The air conditioner is supplied with a 24-month guarantee, commencing on the date of purchase. All material and manufacturing defects will be repaired or replaced free of charge within this period. The following rules apply:
- We expressly refuse all further damage claims, including claims for collateral damage.
- Repairs to or replacement of components within the guarantee period will not result in an extension of the guarantee.
- The guarantee is invalidated if any modifications have been made, non genuine parts are fitted or repairs are carried out by third parties.
- Components subject to normal wear, such as the filter, are not covered by the guarantee.
- The guarantee is valid only when you present the original, dated purchase invoice and if no modifications have been made.
-
The guarantee is invalid for damage caused by neglect or by actions that deviate from those in this instruction booklet.
-
Transportation costs and the risks involved during the transportation of the air conditioner or air conditioner components shall always be for the account of the purchaser.
- Damage caused by not using suitable Zibro filters is not covered by the guarantee.
To prevent unnecessary expense, we recommend that you always first carefully consult the instructions for use. Take the air conditioner to your dealer for repairs if these instructions do not provide a solution.
TECHNICAL DATA
To be used as indication, subject to modifications
| Model | | P 122 | P 125 |
| Cooling capacity* | W | 2200 | 2500 |
| EE Class* | A | A |
| EER* | 2.75 | 2.5 |
| Power consumption | W | 800 | 1000 |
| Current nom. | A | 3.6 | 4.5 |
| Mains | V/Hz/PH | 220 - 240 / 50 / 1 |
| Air delivery max. | m³/h | 280 | 300 |
| Dehumidification max. ** | L/24h | 25 | 28 |
| Room size | m³ | 55 - 75 | 60 - 85 |
| Compressor type | rotary |
| Refrigerant | type/gr | R-407c / 500 | R-407c / 600 |
| Thermostat range | °C | 16 - 32 |
| Fan speeds | 3 |
| Noise level | dB(A) | 52 |
| Dimensions (w x h x d) | mm | 435 x 760 x 420 |
| Weight | kg | 34.2 |
| Unit protection | IP 20 |
| Remote control | yes | yes |
| 3MTM HAF filter | yes | yes |
| Active carbon filter | yes | yes |
| Fuse rating | T3.15A, 250V | T3.15A, 250V |
* Conform EN 14511
** Moisture removal at 32°C, 80% RH
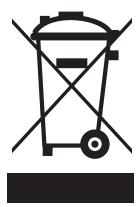
Waste electrical products should not be disposed with household waste. Please recycle where facilities exist. Check with your local authority or retailer for recycling advice.
A ÖSTERREICH
email: appliance@appliance-group.com
E ESPANA
PVG Espana S.A.
Pol. Ind. San José de Valderas II
email: appliance@appliance-group.com
GB UNITED KINGDOM
Listener Gases
Bridge Street
Holloway Bank, Wednesbury
West Midlands WS10 OAW
tel.: +44 121 506 1818
fax: +44 121 505 1744
email: gases@lister.co.uk
ITALIA
PVG Italy SRL
Via Niccolò Copernico 5
50051 CASTELFIORENTINO (FI)
tel: +39 571 628 500
fax: +39 571 628 504
email: pvgitaly@zibro.com
NORGE
Appliance Norge AS
Vogellunden 31
1394 NESBRU
tel: +47 667 76 200
fax: +47 667 76 201
email: appliance@appliance-group.com
NEDERLAND
PVG International B.V.
P.O.Box 96
5340 AB OSS
tel: +31 412 694 694
fax: +31 412 622 893
email: pvgnl@zibro.com
P PORTUGAL
Gardena, Lda
email: appliance@appliance-group.com
TR TURKEY


