
WT 1030 - Irrigation system GARDENA - Free user manual and instructions
Find the device manual for free WT 1030 GARDENA in PDF.
| Brand | GARDENA |
| Model | WT 1030 |
| Product type | Electronic water timer |
| Category | Irrigation system |
| Intended use | Private outdoor use, control of sprinklers and irrigation systems |
| Power supply | 1 9V alkaline battery (IEC 6LR61) |
| Battery life | Approximately 1 year |
| Min./max. operating pressure | 1 bar / 12 bar |
| Max. water temperature | 40 °C |
| Number of watering cycles per day | Up to 3 |
| Watering frequency | Every day, 2nd, 3rd or 7th day |
| Watering duration per cycle | 1, 3, 5, 7, 10, 15, 20, 25, 30, 45, 60, 75, 90, 120, 150 or 180 minutes |
| Faucet connection | G1" (33.3 mm) thread with G3/4" (26.5 mm) adapter |
| Display | LEDs: Time, Start Time, Frequency, Run Time |
| Functions | Time programming, manual watering (30 min), bad weather function (OFF) |
| Anti-theft protection (optional) | Bracket with screw, compatible with GARDENA anti-theft device (ref. 1815-00.791.00) |
| Maintenance | Regular cleaning of the filter in the union nut, battery replacement |
| Storage / Winterizing | Store dry and frost-free before the first frost |
| Safety | Do not use indoors, nor with chemicals, food, flammable or explosive substances |
| Warranty | Statutory warranty covering material and manufacturing defects |
| Customer service | Contact the GARDENA service center or an authorized dealer |
Frequently Asked Questions - WT 1030 GARDENA
User questions about WT 1030 GARDENA
0 question about this device. Answer the ones you know or ask your own.
Ask a new question about this device
Download the instructions for your Irrigation system in PDF format for free! Find your manual WT 1030 - GARDENA and take your electronic device back in hand. On this page are published all the documents necessary for the use of your device. WT 1030 by GARDENA.
USER MANUAL WT 1030 GARDENA
GB Operating Instructions
Water Timer electronic
S Bruksanvising
Welcome to the Garden of GARDENA...

Please read these operating instructions carefully and observe the notes given. Use these instructions to familiarise yourself with the Water Timer electronic and its proper use as well as the notes on safety.

For safety reasons, children and young people under 16 as well as anyone who is not familiar with these operating instructions may not use the Water Timer.
Please keep these operating instructions in a safe place.
Contents
- Where to Use Your GARDENA Water Timer 3
- For Your Safety 3
- Function 5
- Putting Your Water Timer into Operation 6
- Operating Your Water Timer 8
- Trouble-Shooting 12
- Putting Your Water Timer Out of Operation 13
- Technical Data 13
- Service 14
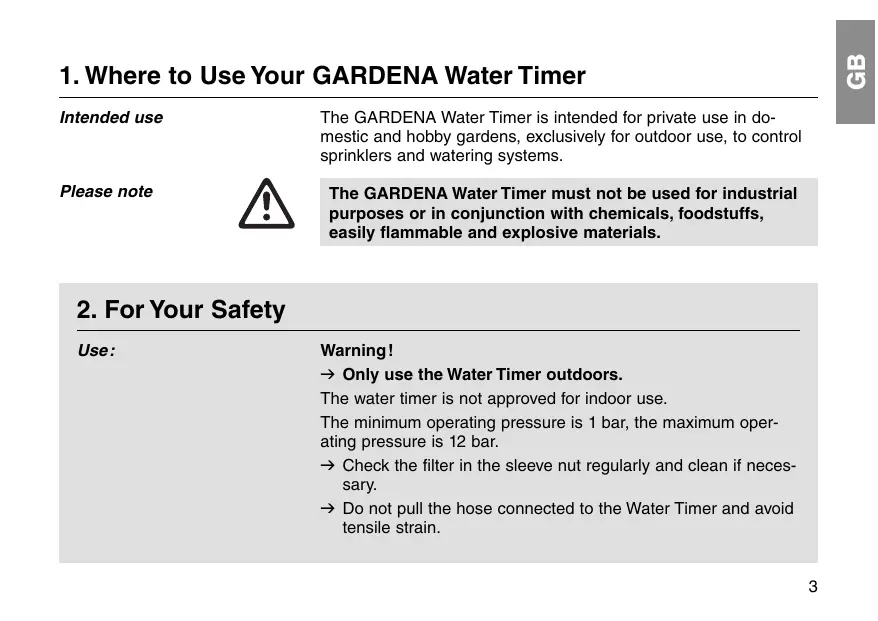
1. Where to Use Your GARDENA Water Timer
Intended use
The GARDENA Water Timer is intended for private use in domestic and hobby gardens, exclusively for outdoor use, to control sprinklers and watering systems.
Please note

The GARDENA Water Timer must not be used for industrial purposes or in conjunction with chemicals, foodstuffs, easily flammable and explosive materials.
2. For Your Safety
Use:
Warning!
Only use the Water Timer outdoors.
The water timer is not approved for indoor use.
The minimum operating pressure is 1 bar, the maximum operating pressure is 12 bar.
Check the filter in the sleeve nut regularly and clean if necessary.
Do not pull the hose connected to the Water Timer and avoid tensile strain.
Battery:
For functional safety reasons, only use a 9V alkali-manganese (alkaline) battery type IEC 6LR61.
The Water Timer will only run for approx. 1 year if the new alkaline battery has a nominal voltage of at least 9V .
Check the battery before you buy it.
Putting your Water Timer into operation:
To prevent water entering the battery compartment, the Water Timer must only be mounted in a perpendicular position with the sleeve nut pointing upwards.
After you have selected the watering program, the Water Timer opens at the selected starting time. To avoid getting wet when operating the Water Timer, connect the hose or turn off the tap before selecting the program. Alternatively, the control unit can be removed for programming.
Water flow:
The max. temperature for the water is 40^
Only use clear fresh water.
3. Function
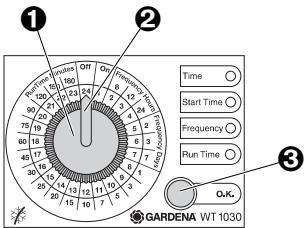
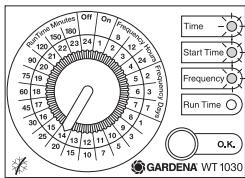
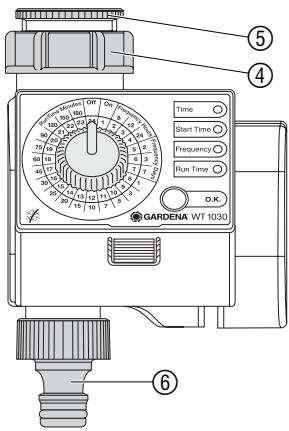
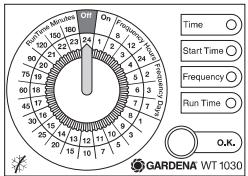
Control knob and OK button:
Control knob
Control knob pointer
OK button
Battery status display:
The GARDENA Water Timer electronic allows you to set different watering cycles for different watering times independent of whether you are using a sprinkler, a sprinkler system installation or driphead watering system to irrigate your garden.
Your Water Timer electronic will water your garden completely automatically according to the program you choose. You can set the timer to water your garden early in the morning or late at night when water evaporates the least, or while you are away on holiday.
You simply program the time (to the nearest hour), watering starting time / duration and cycle by turning the pointer ② of the control knob ① to the correct time and pressing the OK button ③. The Water Timer opens at the starting time you have selected.
The 3 LEDs Time, Start Time and Frequency flash to indicate that the battery is flat.
Replace the battery (see 4. Operation "Inserting the Battery").
The functional safety of the water timer depends on the capability of the battery.
If you change the battery the program is not saved. You must reprogram the Water Timer (see 5. Operation).
4. Putting Your Water Timer into Operation
Inserting the battery:
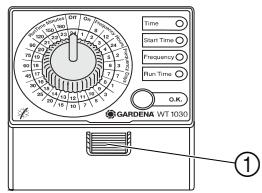
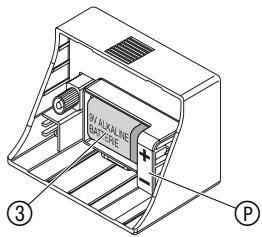
- Press the release button ① and remove the control unit ② from the housing of the Water Timer.
- Insert the battery ③ in the battery compartment. Pay attention to the polarity ⑨ (+/- markings).
- Re-attach the control unit ② to the housing.
Make sure you exchange the battery at the right time to prevent the Water Timer failing due to a low battery when you are away for longer periods of time.
Make sure that the time the battery has been in operation and the time you are planning to be away does not add up to more than a year.
Even if the battery is almost empty, the Water Timer ensures that an open valve is always closed since less energy is required to close the valve than to open it.
Connecting your Water Timer:
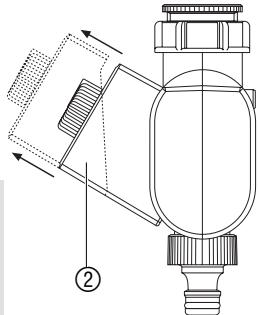
The Water Timer is fitted with a sleeve nut ④ for taps with a 33.3 mm (G1") thread. The adapter supplied ⑤ allows the Water Timer to be connected to taps with a 26.5 mm (G 34^ ) thread.
Connecting the Water Timer to taps with a 33.3mm (G1") thread:
- Screw the sleeve nut ④ of the Water Timer onto the thread of the tap by hand (do not use pliers).
- Screw the threaded tap connector ⑥ onto the Water Timer.
Connecting the Water Timer to taps with a 26,5 mm (G 3/4'' ) thread:
- Screw the adapter ⑤ onto the tap by hand (do not use pliers).
- Screw the sleeve nut ④ of the Water Timer onto the thread of the adapter ⑤ by hand (do not use pliers).
- Screw the threaded tap connector ⑥ onto the Water Timer.
Installing the anti-theft protection (optional):
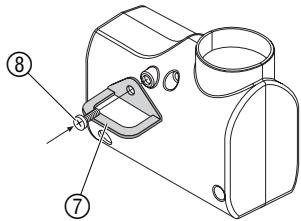
To protect your Water Timer against theft, the GARDENA Anti-Theft Protection Art. No. 1815-00.791.00 is available from the GARDENA Service.
- Fasten the bracket ⑦ to the back of the Water Timer using the screw ⑧.
- The bracket can be used to attach a chain, for example.
The screw cannot be loosened once it has been screwed in.
5. Operation
Setting the watering program:
The Water Timer control unit ② can be removed. This allows you to set the watering program somewhere other than where the Water Timer is to be used.
The time of day and watering starting time are entered to the nearest hour.
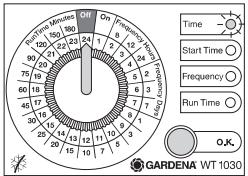
- Turn the control knob to OFF and confirm by pressing the OK button.
The program stored in the memory is overwritten.
The Time LED flashes.
1.
2.

3.
4.

Setting the time of day:
- Set the time on the inner light-grey scale by turning the control knob and confirm the time you have selected by pressing the OK button (e.g.: 10:00 am).
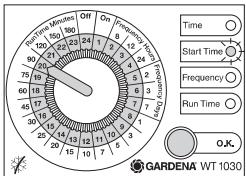
The Start Time LED flashes.
Setting the watering starting time:
- Set the watering starting time on the inner light-grey scale by turning the control knob and confirm the time you have selected by pressing the OK button (e.g.: 20:00).
The Frequency LED flashes.
Setting the Watering Cycle:
- Set the watering cycle on the outer grey scale (Frequency Hours / Days) using the control knob and confirm your selection by pressing the OK button (e.g.: 12 hour cycle).
The Run Time LED flashes.
5.
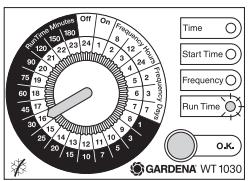
Setting the Watering Time:
- Set the watering time on the outer black scale (Run Time Minutes) using the control knob and confirm your selection by pressing the OK button (e.g.: 30 minutes).
The program you have selected is now active.
Changing the watering time:

On hot or cooler days you can change the watering time before the program starts without having to re-enter the time of day, watering starting time or watering cycle.
- Select the changed watering time on the outer black scale (Run Time Minutes) by turning the control knob. (e.g.: 20 minutes). The Run Time LED flashes.
- Confirm the watering time you have selected by pressing the OK button.
The changed watering time is now active.
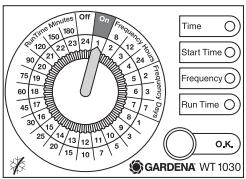
Manual watering (ON):
Bad-weather function (OFF):
On especially hot days the programmed watering cycle is sometimes insufficient. You can then turn on your sprinkler or irrigation system manually.
The program you have set remains unchanged.
Turn the control knob to ON.
The valve opens for 30 minutes independent of the set program.
To activate the set program again, you must reset the watering time to the time originally set.
On rainy days the programmed watering cycle is often unnecessary. You can therefore stop the programmed watering cycle (bad-weather function).
The program you have set remains unchanged.
Turn the control knob to OFF.
The valve closes and remains closed, independent of the watering cycle you have set.
To reactivate the set program, you must first reset the watering time.
6. Trouble-Shooting
| Fault | Possible cause | Remedy |
| Not able to open the Water Timer manually using “ON/OFF”. | Battery capacity too low (3 LEDs flash). | → Insert a new alkaline battery. |
| Tap turned off. | → Turn on tap. | |
| Watering not initiated. | Control knob turned to “Frequency” or “ON/OFF”. | → Turn the control knob to “Run Time Minutes”. |
| Battery capacity too low 3 LEDs flash). | → Insert a new alkaline battery. | |
| Data input/changes made while the program was starting or immediately before. | → Input data or make changes before or after the starting times you have chosen. | |
| Tap turned off. | → Turn on tap. | |
| Battery flat after working for a short time. | The battery you inserted is not an alkaline battery. | → Use an alkaline battery. |
If you have any other problems with your Water Timer, please contact GARDENA Service.
7. Putting Your Water Timer Out of Operation
Disposing of flat batteries:
Please return flat batteries to a GARDENA dealer or dispose of them properly at your nearest recycling centre.
Only dispose of batteries when they are flat.
Storage/Wintering:
Store your Water Timer in a dry place away from frost before the first frost sets in.
Disposal:
(in accordance with RL2002/96/EC)

The product must not be added to normal household waste. It must be disposed of properly.
8. Technical Data
| Min./max. operating pressure: | 1 bar / 12 bar |
| Flow medium: | Clean fresh water |
| Max. water temperature: | 40°C |
| Number of program-controlled watering cycles per day: | Up to 3 |
| Watering cycles per week: | Every day, every 2nd, 3rd or 7th day |
| Watering time per program: | 1, 3, 5, 7, 10, 15, 20, 25, 30, 45, 60, 75, 90, 120, 150 or 180 minutes |
| Battery: | 1 x 9 V alkali-manganese (alkaline) type IEC 6LR61 |
Running time: Approx. 1 year
9. Service
Warranty
GARDENA honours the guarantee legally required for this product (starting from the date of purchase). This guarantee covers all serious defects of the unit that can be proved to be material or manufacturing faults.
Under warranty we will either replace the unit or repair it free of charge if the following conditions apply:
- The unit must have been handled properly and in keeping with the requirements of the operating instructions.
- Neither the purchaser or a non-authorised third party have attempted to repair the unit.
- Faults which occur as a result of incorrectly installed or leaking batteries are not covered by the guarantee.
This manufacturer's guarantee does not affect the user's existing warranty claims against the dealer/seller.
If you have any problems with your Water Timer, please contact our Customer Service or return the defective unit together with a short description of the problem directly to one of the GARDENA Service Centres listed on the back of this leaflet.
EU Certificate of Conformity
The undersigned GARDENA Manufacturing GmbH, Hans-Lorenser-Str. 40, D-89079 Ulm, hereby certifies that, when leaving our factory, the unit indicated below is in accordance with the harmonised EU guidelines, EU standards of safety and product specific standards. This certificate becomes void if the unit is modified without our approval.

EU Tillverkarintyg
Nylex Consumer Products
50-70 Stanley Drive
Somerton
Victoria, 3062
Austria
GARDENA Österreich
Ges.m.b.H.
Stettnerweg 11-15
2100 Korneuburg
Belgium
MARKT (Belgium) NV/SA
Blezard Business Park
Seaton Burn
Newcastle upon Tyne
NE13 6DS
Great Britain
GARDENA UK Ltd.
27-28 Brenkley Way
Blezard Business Park
Seaton Burn
Newcastle upon Tyne
NE13 6DS
Greece
Agrokip
G. Psomadopoulos & Co.
33 A, Ifestou str. - 194 00
Industrial Area Koropi
Athens
Hungary
NYLEX New Zealand Limited
22 Saleyards Road Otahuhu
Private Bag 94001
SAMC Manukau
Norway
GARDENA Norge A/S Postboks 214 2013 Skjetten
Poland
GARDENA Polska Sp. z o.o. Szymanow 9 d 05-532 Baniocha
Portugal
GARDENA Portugal Lda.
Recta da Granja do Marqués
Edif. GARDENA
Algueirão
2725-596 Mem Martins
Romania
- GB Operating Instructions
- S Bruksanvising
- Contents
- Where to Use Your GARDENA Water Timer
- For Your Safety
- Battery:
- Putting your Water Timer into operation:
- Water flow:
- Function
- Putting Your Water Timer into Operation
- Inserting the battery:
- Connecting the Water Timer to taps with a 33.3mm (G1") thread:
- Connecting the Water Timer to taps with a 26,5 mm (G 3/4'' ) thread:
- Installing the anti-theft protection (optional):
- Operation
- Setting the watering program:
- 2.
- 3.
- 4.
- Setting the time of day:
- Setting the watering starting time:
- Setting the Watering Cycle:
- 5.
- Setting the Watering Time:
- Changing the watering time:
- Manual watering (ON):
- Bad-weather function (OFF):
- Trouble-Shooting
- Putting Your Water Timer Out of Operation
- Disposing of flat batteries:
- Storage/Wintering:
- Disposal:
- Technical Data
- Service
- Warranty
- EU Certificate of Conformity
- EU Tillverkarintyg
- Austria
- Belgium
- Great Britain
- Greece
- Hungary
- Norway
- Poland
- Portugal
- Romania
Brand : GARDENA
Model : WT 1030
Category : Irrigation system