
34 E - Electric lawn mower GARDENA - Free user manual and instructions
Find the device manual for free 34 E GARDENA in PDF.

| Product type | Electric lawn mower |
| Brand | GARDENA |
| Model | 34 E |
| Cutting width | 34 cm |
| Motor power | 1200 W |
| Power supply | Mains electric (230 V / 50 Hz) |
| Weight | 12 kg |
| Grass catcher capacity | 35 L |
| Cutting height adjustment | Central, 3 positions (20-60 mm) |
| Blade type | Rotary steel blade |
| Foldable handle | Yes, for compact storage |
| Sound level | 84 dB(A) |
| Vibrations | ≤ 2.5 m/s² |
| Protection class | II (double insulation) |
| Motor protection | Safety switch and overload protection |
| Maintenance | Clean after use, sharpen blade if necessary |
| Spare parts available | Replacement blade, grass catcher |
| Warranty | 2 years (according to conditions) |
Frequently Asked Questions - 34 E GARDENA
User questions about 34 E GARDENA
0 question about this device. Answer the ones you know or ask your own.
Ask a new question about this device
Download the instructions for your Electric lawn mower in PDF format for free! Find your manual 34 E - GARDENA and take your electronic device back in hand. On this page are published all the documents necessary for the use of your device. 34 E by GARDENA.
USER MANUAL 34 E GARDENA
GB Operating Instructions
Electric Flexible Steerable Lawnmower
F Mode d'emploi
Welcome to the Garden with GARDENA...

Please read these operating instructions carefully and observe the notes given. Use these operating instructions to familiarise yourself with the electric flexible steerable mower, its proper use and the notes on safety.

For safety reasons, children under the age of 16 and people not familiar with these operating instructions must not use this electric flexible steerable mower.
Please keep these operating instructions in a safe place.
Contents
- Where to Use Your GARDENA Flexible Steerable Mower ... 12
- Safety instructions 12
- Assembly 14
- Operation 14
- Storage 17
- Maintenance 18
- Trouble-Shooting 18
- Technical Data 20
- Warranty/Service 20
1. Where to Use Your GARDENA Flexible Steerable Mower
Correct use:
The GARDENA flexible steerable mower is designed for cutting lawns in and around the garden.
Do not use the mower on a slope steeper than 20^ maximum.
Please note

To prevent injury, the flexible steerable mower must not be used for trimming bushes, hedges, shrubs, for cutting and pruning of climbers or grass on roofs or in balcony boxes. In addition, the flexible steerable mower must not be used for chopping up branches, twigs or for levelling irregularities in the soil.
2. Safety instructions
Please read the notes on safety on the flexible steerable mower.

Warning!
Please read the operating instructions before using the mower!

Danger!
Cutting mechanism can cause injuries!
Danger!
Risk of injury!
Keep bystanders away!

Unplug from the mains before maintenance or if the mains lead is damaged.
Keep the connection cable away from the mower.
Check each time you use the mower:
Inspect the mower each time before you use it. Do not use the mower if the safety devices (switch handle, protective cover, cable strain relief, start button, grassbox) and/or the cutting mechanism are damaged or worn.
Replace damaged or worn parts. Never disable safety devices.
Check the grass to be cut before you start work. Remove any foreign bodies present (e.g. stones, branches).
Check the cutting tool for damage regularly and have it professionally repaired if necessary.
Operation:
This electric flexible steerable mower can cause serious injuries!
You are responsible for the safety of the working area.
Do not tilt the mower on its side whilst using it.
Never lift or carry the mower with the motor running.
Only use the flexible steerable mower for the purposes specified in these instructions.
Wear sturdy shoes and long trousers to protect your legs.
Keep your fingers and feet away from the cutting tool and the cutting channel!
Make sure you always take up a safe and stable stance whilst working, especially on slopes.
Be particularly careful if you change direction on a slope.
Be careful when going backwards.
Risk of stumbling!
Look out for foreign bodies when working (e. g. stones).
Do not let the handle fall forwards freely when folding it up.
Interruptions of work:
Never leave the flexible steerable mower unattended at the working area.
If you interrupt your work store the unit in a safe place.
Disconnect the mains plug!
When you interrupt work in order to go to another working area, always switch off the electric flexible steerable mower during transport.
Environmental influences:
Only work when visibility is good.
Familiarise yourself with the surroundings of your working area. Check for possible risks which might be not audible due to the noise of the machine.
Make sure that there are no other people (especially children) or animals anywhere near the working area.
If you do strike an obstacle when working, release the switch handle, pull out the mains plug and remove the obstacle.
Check the mower for damage and have it repaired if necessary.
Do not use the flexible steerable mower if it is raining or in moist, wet conditions.
Please observe any local restrictions or noise levels.
Electrical safety:

DANGER!
Electric shock!
If the insulation is damaged on the screw fastening the blade in position, this must be replaced by GARDENA Service or a specialist dealer authorised by GARDENA.
The electric flexible steerable mower must only be operated with an undamaged electric cable. If the electric cable or the extension cable is damaged disconnect the mains plug immediately.
The connection cable must be checked regularly for signs of damage and ageing (e.g. cracks).
The cable strain relief on the steering upright must be used (see 3 Fitting the cable clip).
Do not use the flexible steerable mower close to swimming pools or garden ponds.
For portable units, which are used outdoors, we recommend to use a residual-current device having a residual-current rating ≤ 30mA . In Switzerland use of a residual-current device is obligatory.
The socket of an extension cable should be water-proof and the connection sockets for extension cables must be made of rubber or be encased in rubber.
Only use permitted extension cables.
Ask your electrician.
Keep the extension cable away from the area you are cutting.
The mains voltage and the equipment voltage stated on the type plate must be the same. If extension cables are used, these must comply with the minimum cross-sections in the table below:
| Voltage | Cable length | Cross-section |
| 220-240V/50Hz | Up to 20 m | 1.5 mm² |
| 220-240V/50Hz | 20 - 50 m | 2.5 mm² |
A brief voltage dip may occur when you switch on your shredder (due to conditions of the power supply) that may affect other devices (e.g. a lamp may flicker).
This problem should not occur with supply impedances of Z_max < 0.46 Ohm.
3. Assembly
34 E easyMove Fitting the wheels:
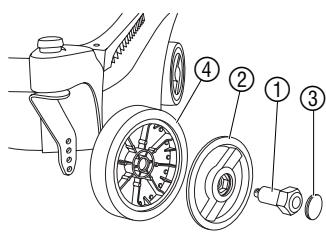
All 4 wheels must always be screwed in at the same cutting height (see 4 Operation "Setting the cutting height").
- Insert screw ① through the bore in the hub cap ② and push the 6-sided head fully into the hub cap ②. Insert the short screw in the small hub cap and the large screw in the large hub cap.
- Press covering cap ③ into the hub cap ② until it snaps in place.
- Insert screw ① through the wheel ④ and screw the wheel ④ firmly in place by hand at the side and ensure it is securely located. Screw in the small wheels (13 cm diameter) at the front and the large wheels (16 cm diameter) at the rear.
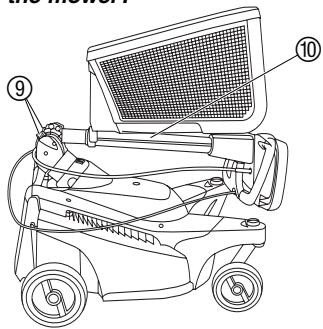
Fitting the grass box:
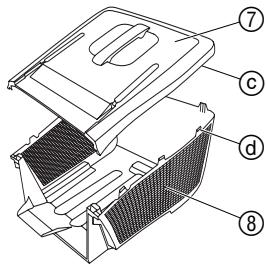
- Place the box cover ⑦ on the grass box ⑧ from above in such a way that ALL the eyes ⑨ are positioned over the hooks ⑩.
- Press the box cover ⑦ on to the grass box ⑧ until the hooks ⑥ engage securely.
- Inspect: Check that all the hooks 品 are engaged securely.
4. Operation

DANGER!
Cutting tool can cause injuries!
Wait until the cutting tool is stationary before undertaking any adjustment work, wear suitable work gloves and pull out the mains plug.
Adjusting the swivelling upright:
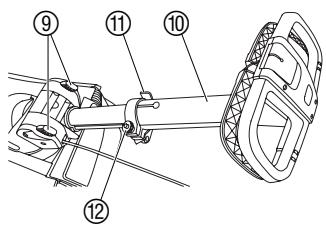
- Press in both slides (9) simultaneously and open up the steering upright (10).
- Open the clamping lever ⑪
- Pull out swivelling upright to the required length.
- Close clamping lever ⑪ again.
For safety reasons, on first use, the upper part of the handle must be drawn out fully. It can then no longer be collapsed to the as-delivered position.
The clamping force can be adjusted via the nut ②. If the clamping effect decreases, open the clamping lever and turn the knurled nut clockwise (e.g. with pliers).
Connecting the extension cable:

- Push extension cable connector ⑬ on to the mower plug ⑭.
- Form a loop with the extension cable ⑤ and guide it thorough the cable strain relief ⑤.
- Hook in extension cable ⑤ in such a way that the cable sags slightly and the cable strain relief can slide along the entire length of the cable clip.
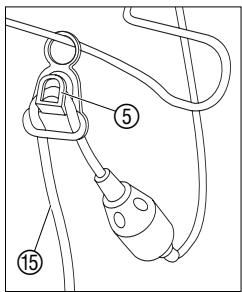
Note: To avoid driving over the extension cable, the extension cable should always be arranged in such a way that when the mower is operating, the cable is routed in from the side which has already been mowed.
Starting the mower:
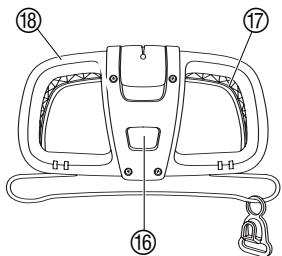

DANGER! Risk of injury if the mower does not switch off automatically!
Do not remove or bypass the safety devices (start button, switch handle).
- Place mower on a flat area of the lawn.
- Press the start button ⑥ and pull the switch handle ⑦ on the steering wheel ⑧.
- After starting the motor, release the start button 16 again.
- Only push the mower forwards and at walking pace.
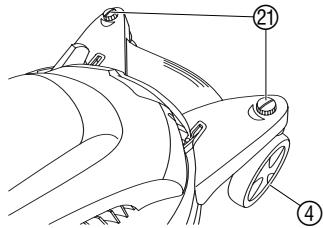
For 34 E easyMove:
The cutting height can be adjusted from 2.0 to 6.5cm in 1.5 cm-stages (4 positions).
Unscrew wheels ④ by hand and screw back in firmly at the cutting height required.
All 4 wheels ④ must always be screwed in at the same cutting height (see scale ⑤ on the back of the wheel mounting).
Adjusting the cutting height:
Mowing on a slope:
Mowing with the grass box:

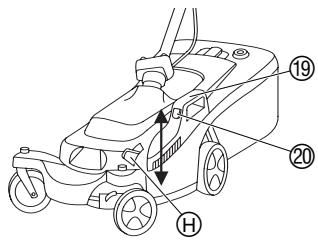
For 38 E:
The cutting height can be adjusted centrally from 2 to 7cm in 1 cm-stages (6 positions).
- Hold handle 19 and press button 20.
- Set the cutting height required by raising or lowering the mower. The cutting height set is displayed on the cutting height display in cm.
- Select cutting height and release the button 20 again.
The cutting height engages automatically.

To prevent sliding sideways on a slope, the front wheels and the steering wheel must be locked in the straight ahead position before pushing the mower on to the slope.
Do not use the mower on a slope steeper than 20^ maximum.
- Turn both red running wheel locks ② by 90^ (groove in direction of travel).
- Bring front wheels ④ into straight ahead position until the lock ② engages.
The wheels are locked in the straight ahead position.
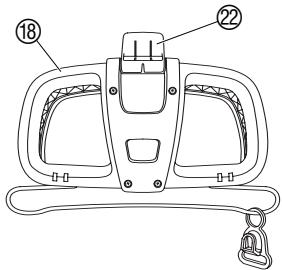
- Lift steering wheel lock ② upwards.
- Bring steering wheel ⑱ into the straight ahead position until the lock engages.
The steering wheel is locked in the straight ahead position.
After mowing on the slope has been completed, the front wheels and the steering wheel can be unlocked again by turning the running wheel lock ② by 90^ and folding the steering wheel lock ② downwards.
When mowing slopes, cut in lines across the slope.
The grass box must be emptied as soon as grass is left lying on the lawn.

DANGER! Foreign bodies thrown out of the mower can cause injuries!
Only lift protective flap with the motor switched off and the cutting tool stationary.
TIP: If the handle is tilted to the side, it is easier to empty the grass box.
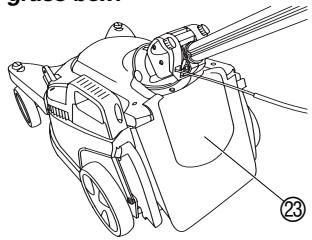
- Lift protective flap ② and take out grass box ⑧ by the handle.
- Empty the grass box ⑧ and hang it on the back again using the mounting hook ④ on the casing.
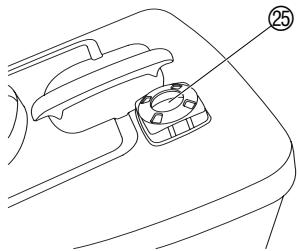
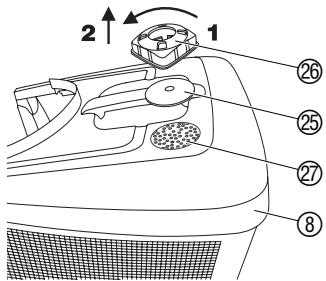
38 E Level Indicator:
The red level indicator 25 is located in the cover of the grass box. After starting the mower, the level indicator move upwards.
Stop immediately when the level indicator goes downwards during mowing.
The grass box is full and must be emptied.
Mowing without the grass box:
Mowing tips:
Do not put your hand in the discharge opening.
When the protective flap ② is released, this closes automatically and covers the discharge opening.
The protective flap ② is arranged in such a way that it is still possible to mow with the protective flap closed but without a grass box. The cut grass is then dropped on the lawn.
If grass residue is left in the discharge opening, pull mower backwards about 1m so that the grass residue can drop out downwards.
To produce a well-maintained lawn, we recommend cutting the lawn regularly once a week if possible. The lawn becomes thicker if cut frequently.
After relatively long intervals between mowing (holiday lawn), first of all cut in one direction with the cutting height as high as possible, then cut in the crosswise direction at the cutting height required.
If possible, only cut the grass when it is dry, if the grass is damp, the cutting pattern will be uneven.
5. Storage
Storing/transporting the mower:
Disposal:
(in accordance with RL2002/96/EC)
Store the mower in a closed room to which children cannot gain access.
- Switch off mower and disconnect extension cable.
- Push in the swivelling handle to save space, press in the two slides ⑨ and tilt the swivelling upright ⑩ forwards (carrying position).
- Store mower in a dry, enclosed and secure place.
TIP: To save space the grass box can be placed on top of the folded up mower.
The product must not be added to normal household waste. It must be disposed of properly.
6. Maintenance

Clean the underside of the mower casing:
DANGER! Cutting tool can cause injuries!
Before maintenance, wait until the cutting tool is stationary, wear suitable work gloves and pull out the mains plug.
DANGER! Injury to persons and damage to property!
Do not clean mower under running water (especially at high pressure).
Deposits make the starting process difficult, impair the quality of the cut and the discharge of the grass. Dirt and grass residues are easiest to remove immediately after mowing.
- Lock steering wheel in the straight ahead position (see 4. Operation "Mowing on a slope").
- Lay mower on its side carefully and remove grass deposits (do not use sharp objects).
Cleaning the grass box (38 E with level indicator):
The grass box must be checked regularly for wear or damage. For 38 E: If the level indicator shows full even though the grass box is not full, the level indicator must be cleaned.
- Remove grass deposits inside and outside the grass box (do not use sharp objects).
- For 38 E: Turn level indicator cover ⑧ by approx. 20^ anticlockwise 1 and remove 2 (bayonet fitting).
- Clean level indicator ⑤, level indicator cover ⑥ and ventilation holes ⑦ (do not use sharp objects).
- Refit level indicator in reverse order.
7. Troubleshooting

Replacing the blade:
DANGER! Cutting tool can cause injuries!
Before rectifying faults, wait for the cutting tool to stop, wear suitable work gloves and pull out the mains plug.

Blades with chipped edges must be replaced and may not be reground because this causes the mower to be out of balance.
The blade may only be replaced by GARDENA Service or a specialist dealer authorised by GARDENA.
Only an original GARDENA blade may be used. GARDENA spares are available from your GARDENA dealer or via GARDENA Service.
E 34 easyMove: GARDENA replacement blade Art. 4091
E 38 easyMove / E 38 mulchCut: GARDENA replacement blade Art. 4092
A damaged or bent blade must be replaced because it will be out of balance.
| Fault | Possible cause | Remedy |
| Motor will not start | Power supply cable faulty. | →Check power supply cable. |
| Extension cable may not have a large enough cross-section. | →Use extension cable with cross-section complying with table (2. For your Safety). | |
| Motor jammed and making a noise | Jammed with foreign body. | →Switch off motor, pull out mains plug and remove foreign body. |
| Cutting height too low for the lawn or mowing speed too high. | →Raise cutting height or or reduce mowing speed. | |
| Loud noises, mower rattling | Screws on motor, its fixing or on the mower casing loose. | →Have screws tightened by an authorised specialist dealer or GARDENA-Service. |
| Runs unevenly, mower vibrates strongly | Blade damaged or blade mounting released from motor shaft. | →Have blade tightened or replaced by an authorised specialist dealer or GARDENA-Service. |
| Out of balance because of very dirty blade. | →Clean mower (see 6. Maintenance). If this does not rectify the fault, contact GARDENA Service. | |
| Lawn is not cleanly cut | Blade blunt. | →Have blade replaced. |
| Cutting height too low. | →Increase cutting height. | |
| Mowing speed too high. | →Reduce mowing speed. | |
| 38 E: level indicator shows full although the grass box is not full yet | Level indicator is dirty. | →Clean level indicator (see 6. Maintenance). |
If any other faults occur, please contact GARDENA Service.
Please contact GARDENA Service before sending the mower. Repairs may only be carried out by GARDENA service centres or dealers authorised by GARDENA.
8. Technical Data
| 34 E easyMove (Art. 4034) | 38 E easyMove (Art. 4038) | 38 E mulchCut (Art. 4039) | |
| Power consumption | 1100 W | 1300 W | 1300 W |
| Voltage / Frequency | 230 V/50 Hz | 230 V/50 Hz | 230 V/50 Hz |
| Cutting width / Cutting height | 34 cm/2-6,5 cm (4 positions) | 38 cm/2-7 cm (6 positions) | 38 cm/2-7 cm (6 positions) |
| Weight | 15 kg | 18 kg | 18 kg |
| Volume of grass box | 30 l | 38 l | 38 l |
| Working area related emission characteristic value \( L_{pA}{}^{1)} \) | 76 dB (A) | 79 dB (A) | 79 dB (A) |
| Noise level \( L_{WA}{}^{2)} \) | measured 87 dB (A) guaranteed 87 dB (A) | measured 89 dB (A) guaranteed 89 dB (A) | measured 87 dB (A) guaranteed 88 dB (A) |
| \( Vibrations\ a_{vhw}{}^{1)} \) | <2,5 m/s2 | <2,5 m/s2 | <2,5 m/s2 |
9. Warranty / Service
GARDENA guarantees this product for 2 years (starting from the date of purchase). This guarantee covers all serious defects of the unit that can be proved to be material or manufacturing faults. Under warranty we will either replace the unit or repair it free of charge if the following conditions apply:
- The unit must have been handled properly and in keeping with the requirements of the operating instructions.
- Neither the purchaser or a non-authorised third party have attempted to repair the unit.
The blade is a wearing part and is not covered by the guarantee. This manufacturer's guarantee does not affect the user's existing warranty claims against the dealer/seller.
If a fault occurs with your Electric Flexible Steerable Lawnmower, please return the faulty unit together with a copy of the receipt and a description of the fault, with postage paid to one of the GARDENA Service Centres listed on the back of these operating instructions.
| DProduktlaufzeit | Wir weisen ausdrücklich darauf auf hin, dass wir nach dem Produkttaftungs-gesetz nicht für durch unsere Geräte hervorgerufene Schäden einzu-stehen haben, sofern diese durch unsachgemäße Reparatur verursucht oder bei einem Teileaustausch nicht unsere Original GARDENA Teile oder von uns freiugegebene Teile verwendet werden und die Reparatur nicht vom GARDENA Service oder dem autorisierten Fachmann durchgeführt wird. Entsprechendes gilt für Ergänzungsteile und Zubehör. |
| G3Product Liability | We expressly point out that, in accordance with the product liability law, we are not liable for any damage caused by our products if it is due to improper repair or if parts exchanged are not original GARDENA parts or parts approved by us, and, if the repairs were not carried out by a GARDENA Service Centre or an authorised specialist. The same applies to spare parts and accessories. |
| FResponsibilité | Nous vous signalons expressément que GARDENA n'est pas respons-sable des dommages causés par ses apparheils, dans la mesure où ces dommages seraient causés suite à une réparation non conforme, dans la mesure où, lors d'un échange de pieces, les pieces d'origine GARDENA n'aurait pas été utilisées, ou si la réparation n'a pas été effectué par le ServiceAprès-Vente GARDENA ou l'un des Centres SAV agrées GARDENA. Ceci est également valable pour tout ajout de pieces et d'accessoires autres que ceux préconsés par GARDENA. |
| NLProductaansprakelijkheid | Wij wijzen er nadrukkelijk op, dat wij op grond van de wet aansprakelijk-heid voor producten Niet aansprakelijk+zijn voor schade ontstaan door once apparaten, indien deze door onvakkundige reparatie veoroorzaakt,zijn, of er bij het uitwisselen van onderdelen geen gebruik gemaaakterd ward van once originèle GARDENA onderdelen of door ons vrijgeveen onderdelen en de reparatie net door de GARDENA technische Dienst of de bevoegtde vak-man uitgevoerd werk. Ditzelfde geldt voor extra-onderdelen en accessoires. |
| SProduktansvar | Tillverkaren ar inte ansvarig für skada som orsakats av Produkten om skadan beror på att produiten har reparerats felaktigt eller om, vid repa-ration aller utbyte, andra øan Original GARDENA reservdeler har anvænts. Samma sak gäller for kompletteringsdeler och tillbehör. |
| IResponsibilitàdel prodotto | Si rende espessamente noto che, conformmente alla législazione sulla responsabilità del prodotto, non si risponde di danni causati da nostri arti-coli se originati da riparazioni eseguite non correttamente o da sostituzioni di parti effettuate con materiale non originale GARDENA o comunque da noi non approvato e, in agli caso, qualora l'intervento non venga eseguito da un centro assistenza GARDENA o da personale specializzato autoriz-zato. Lo stesso vale per le parti complementari e gli accessori. |
| EResponsibilitadede products | Advertimos que conforme a la ley de responsibilitad de produits no nos responsabilizamos de daños causados por nuestros aparatos, sempre y cuando dichos daños hayan sido originados por arreglos o reparaciones indebidas, por recambios con piezas que no Sean piezas originales GARDENA o bien piezas autorizadas por nosotros, asi como en aquellos casos en que la reparacion no haya sido efectuada por un Servicio Téc-nico GARDENA o por un técnico autorizzato. Lo"Myso es aplicable para las piezas complementarias y accesorios. |
| PResponsibilitadeseobre o dato | Queremos salientar que segundo a lei da responsibilitadde fabricante,;nós não nos responsabilizaremos por danos causadosleo nosotros equipa-mentation, quando estes ocorrém em decorrendência de reparações inadequadas ou da substituição de peças por peças não originals da GARDENA, ou peças não autorizadas. A responsibilitadtomar-se-à-nula también deposi de reparações realizadas por oficinas não autorizadas pela GARDENA.Esta restrizione valorá tambem para peças adiconuides e accesorios. |
| DKProduktansvar | Vi gør udtrykkeiligt opmærksom på at i henhold til produktansversloven er viiske ansvarlige for skader forårsaget af vores udstryr, hvist det skyldes uautoriserede reparationser ullhvis dele der skifteet ud og der ikke er an-vendt originale GARDENA deleller dele godkendt af os, eller his repara-tionerne ici er udført af GARDENA-service ellern autoriseret fagmand.Det samme gælder for ekstra udstyr og tilbehör. |
| EU-Konformitätserkläufig MaschinenVerbindung (9. GSGVO) / EMVG / Niederspr. RL Der Unterzeichnete GARDENA Manufacturing GmbH, Hans-Lorenser-Str. 40, D-89079 Ulm, bestätigt, dass die nachfolgenden beziehnten Geräte in der von uns in Verkehr gebrachten Ausführung die Anforderungen der harmonisierten EU-Richtlinien, EU-Sicherheitsstandards und produitspezifischen Standards erfüllen. Bei einer nicht mit uns abgestimmten Änderung der Geräte verliert diese Ermärfung ihrer Gültigkeit. | Bezeichnung des Gerätes: Description of the unit: Designation du matériel: Omschriving van het產品: Produktbeschriving: Descriizione del prodotto: Descrizão do aparelho: Beskrivelse afenhedema: | Elektro-Lenkmaier Electric Steerable Lawnpower Tondeuse multi-directionnelle Elektrische zwenkmaier Flexibelt stybar gräsklippare Rasaerba eletrico "Slalom" Cortacepede con volante Cortar Relva com Volante Flexibel bevægeling plaeneklipper |
| GB EU Certificate of Conformity The undersigned GARDENA Manufacturing GmbH, Hans-Lorenser-Str. 40, D-89079 Ulm, hereby certifies that, when leaving our factory, the units indicated below are in accordance with the harmonised EU guidelines, EU standards of safety and product specific standards. This certificate becomes void if the units are modified without our approval. | Typ: Type: Type: 34 E easyMove Typ: 38 E easyMove Modello: 38 E mulchCut | Art.-Nr.: Art. No.: Référence : 4034 Art. nr.: Art.nr. : 4038 Art. : Art. N°: 4039 Art. N°: Varenr. : |
| F Certificat de conformité aux directives européennes Le constructeur, soussigné : GARDENA Manufacturing GmbH, Hans-Lorenser-Str. 40, D-89079 Ulm, déclare qu'à la sortie de ses usines le matériel ne désigné ci-dessous était conforme aux prescriptions des directives européennes énoncées ci-après et conforme aux règles de sécurité et autres règles qui lui sont applicables dans le cadre de l'Union européenne. Tout modification portée sur ce produit sans l'accord express de GARDENA supprime la validité de ce certificate. | EU-Richtlinien: EU directives: 98/37/EC Directives: 73/23/EC EU-richtlijnen: EU direktiv: 89/336/EC Directive UE: 93/68/EC Normativa UE: 2000/14/EC EU Retningslinier: | Harmonisierte EN: EN ISO 12100-1 EN ISO 12100-2 EN 836 EN 60335-1 EN 60335-2-77 ISO 4871 |
| NL EU-overeenstemmingssverklaring Ondergetekende GARDENA Manufacturing, Hans-Lorenser-Str. 40, D-89079 Ulm, bevestig, dat de volgende genoème appartenin en de doir ons in de handel gebrachte uftvoering voldoen aan de es vian, en in overeenstemming maar met de EU-richtlijnen, de EU-veilighieidsstandaat en de voor het product specifieke staandaard. Bij een net met ons afgestende verandering aan de apparaten verliest deze verwärglaand het geldigeid. | Hinterlegte Dokumentation: GARDENA - Technische Dokumentation | Konformitätsbewertungsverfahren: Nach 2000/14EG Art. 14 Anhang VI |
| S EU Tillverkarintyg Undertechnadirma GARDENA Manufacturing GmbH, Hans-Lorenser-Str. 40, D-89079 Ulm, itygar hämmed att nedan ähnada producerz överensstämmer med EU:s direktiv, EU:s sakerhetssstandaat och produitspecifikation. Detta intyg upphör att gälla om Produkten ärdas utan vårt tillständ. | Schall-Leistungspiegel: Noise level: Puisance acoustique: Geluidsniveau: Ljudniva: Livello rumorosità: Nivel sonoro: Nivel de ruido: Lydtryksniveau: 34 E easyMove: 38 E easyMove: 38 E mulchCut: | gemessen / garantiert measured / guaranteed mesure / garantie gemeten / gegarandeerd upmätt / garanterad testato / garantito medido / garantizo medido / garantido almål / garantitano 87 dB (A) / 87 dB (A) 89 dB (A) / 89 dB (A) 87 dB (A) / 88 dB (A) |
| D Dichiarazione di conformità alle norme UE La sottoscritta GARDENA Manufacturing GmbH, Hans-Lorenser-Str. 40, D-89079 Ulm, certifiche che il prodotto qui di seguito indico, nei modelli da no commercializzati, è conforme alle direttive armonizzate UE nonché agli standardi si sicurezza e agli standardi specifici di prodotto. Qualunque modificata apporbata al prodotto senza notre specifica autorizzazione invalida la presente dichiarazione. | Anbringungsjahr der CE-Kennzeichnung: Year of CE marking: Date d'apposition du marquage CE: Installatiejaar van de CE-aanduiding: CE-Markningsør: Anno di filascio della certificazione CE: Colocacion del distinctivo CE: Ano de marcaçãoPGA: CE-Markningsør: | 2004 |
| E Deciarazione de conformità de la UE El que subscribe GARDENA Manufacturing, Hans-Lorenser-Str. 40, D-89079 Ulm, declares que la presente mercancia, objecto de la presente declaración, cumple con todas las normas de la UE, en lo que a normas tícnicas, de homologação y de seguidad se refiere. En caso de realizarylvania此事ciali, é不错, no alterou; é不错, no alterou; é不错, no alterou; é不错, no alterou; é不错, no alterou; é不错, no alterou; é不错, no alterou; é不错, no alterou; é不错, no alterou; é不错, no alterou; é不错, no alterou; é不错, no alterou; é不错, no alterou; é不错, no alterou; é不错, no alterou; é错过, no alterou; é错过, no alterou; é错过, no alterou; é错过, no alterou; é错过, no alterou; é错过, no alterou; é错过, no alterou; é错过, no alterou; é错过, no alterou; é错过, no alterou; é错过, no alterou; é错过, no alterou; é错过, no alterou; é错过, no alterou; é错过, nontotal: UML den 01.08.2004 UML den 01.08.2004 Fait à Ulm, le 01.08.2004 Ulm, 01-08-2004 Ulm, 01.08.2004 Ulm, 01.08.2004 Ulm, 01.08.2004 Ulm, 01.08.2004 Ulm, 01.08.2004 Ulm, 01.08.2004 | UML den 01.08.2004 UML den 01.08.2004 Fait à Ulm, le 01.08.2004 Ulm, 01-08-2004 Ulm, 01.08.2004 Ulm, 01.08.2004 Ulm, 01.08.2014 Ulm, 01.08.2014 Ulm, 01.08.2014 Ulm, 01.08.2014 Ulm, 01.08.2014 | Quel: Peter Lameli Technische Leitung Technical Dept. Manager Direction technique Hoofd technische Dienst Technical Director Direzione Tècnica Direzione Tècnica Director Tècnico Teknik direktr |
| DK EU Overensstemmelse certificate Undertegnede GARDENA Manufacturing GmbH, Hans-Lorenser-Str. 40, D-89079 Ulm bekrefter hermed, at ehender listet herunder, ved asendelse fra fabrikken, er i overensstemmelse med harmonisierende UE retningsinier, EU sikherhedstandarder og productspecifikationsstandarder. Dette certifikat träeder ud af kraft hisende er endret utden vor godkendelse. |
Deutschland / Germany GARDENA
Manufacturing GmbH
Service Center
Hans-Lorenser-StraBe 40
D-89079 UIm
Produktfragen:
(+49) 731 490-123
Reparaturen:
(+49) 731490-290
service@gardena.com
Argentina
Argensen® S.A.
Nylex Consumer Products
50-70 Stanley Drive
Somerton, Victoria, 3062
Phone: (+61) 395810534
nylex.spareparts@
nylex.com.au
Austria/Österreich GARDENA
GARDENA Belgium NV/SA
2 Luis Ahalier Str. - 7th floor
Sofia 1404
Phone: (+359) 29581821
office@denex-bg.com
Canada
GARDENA Canada Ltd.
100 Summerlea Road
Brampton, Ontario L6T 4X3
Phone: (+1) 905 792 93 30
info@gardenacadada.com
Chile
Antonio Martinic y Cia Ltda.
Cassillas 272
Centro de Cassillas
Santiago de Chile
Phone: (+56) 2 20 10 708
garfar_cl@yahoo.com
Costa Rica
Compania Exim
Euroiberoamericana S.A.
Los Colegios, Moravia,
Blezard Business Park
Seaton Burn
Newcastle upon Tyne
NE13 6DS
info@gardena.co.uk
Greece
Agrokip
G. Psomadopoulos & Co.
33 A, Ifestou str. -
Industrial Area
194 00 Koropi, Athens
Phone: (+30) 210 66 20 225
service@agrokip.gr
www.agrokip.gr
Hungary
GARDENA
Magyarország Kft.
Kesmárk utca 22
1158 Budapest
Phone: (+36) 80 20 40 33
gardena@gardena.hu
Iceland
O. Johnson & Kaaber
Tunguhalsi 1
110 Reykjavik
ooj@ojk.is
Ireland
Michael McLoughlin & Sons
Hardware Limited
Long Mile Road
Dublin 12
Italy
Phone: (+39) 02.93.94.79.1
info@gardenaitalia.it
Japan
KAKUICHI Co. Ltd.
Sumitomo Realty &
Development Kojimachi
BLDG.,8F
5-1 Nibanncyo, Chiyoda-ku
Tokyo 102-0084
m_ishihara@kaku-ichi.co.jp
Phone: (+81) 332644721
Luxembourg
Magasins Jules Neuberg
Boite postale 12
L-2010 Luxembourg
Phone: (+352) 401401
info@neuberg.lu
Netherlands
NYLEX New Zealand Limited
22 Saleyards Road Otahuhu
Private Bag 94001
SAMC Manukau
Phone: (+64) 92701806
david.eeles@nylex.com.au
Norway
GARDENA Norden AB
Salgskontor Norge
Karihaugveien 89
1086 Oslo
info@gardena.no
Poland
GARDENA Polska Sp. z o.o.
Szymanow 9 d
05-532 Baniocha
Phone: (+48) 227275690
gardena@gardena.pl
Portugal
GARDENA Portugal Lda.
- GB Operating Instructions
- F Mode d'emploi
- Contents
- Where to Use Your GARDENA Flexible Steerable Mower
- Correct use:
- Please note
- Safety instructions
- Check each time you use the mower:
- Operation:
- Interruptions of work:
- Environmental influences:
- Electrical safety:
- If the insulation is damaged on the screw fastening the blade in position, this must be replaced by GARDENA Service or a specialist dealer authorised by GARDENA.
- Assembly
- Operation
- DANGER!
- Adjusting the swivelling upright:
- Connecting the extension cable:
- Starting the mower:
- For 34 E easyMove:
- Adjusting the cutting height:
- Mowing on a slope:
- Mowing with the grass box:
- For 38 E:
- TIP: If the handle is tilted to the side, it is easier to empty the grass box.
- E Level Indicator:
- Mowing without the grass box:
- Mowing tips:
- Do not put your hand in the discharge opening.
- Storage
- Storing/transporting the mower:
- Disposal:
- Maintenance
- Troubleshooting
- Technical Data
- Warranty / Service
Brand : GARDENA
Model : 34 E
Category : Electric lawn mower