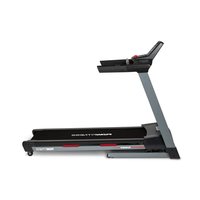
Runner DTM2000i - Treadmills Flow Fitness - Free user manual and instructions
Find the device manual for free Runner DTM2000i Flow Fitness in PDF.


| Product Type | Treadmill |
| Brand | Flow Fitness |
| Model | Runner DTM2000i |
| Motor Power | 2.0 HP continuous |
| Speed Range | 0.8 - 16 km/h |
| Incline Range | 0 - 12% |
| Running Surface | 120 x 40 cm |
| Display | LED with time, distance, speed, calories, pulse |
| Programs | 12 preset programs + 3 user-defined |
| Heart Rate Monitoring | Hand pulse sensors + chest strap compatible (not included) |
| Foldable | Yes, SoftDrop folding system |
| Transport Wheels | Yes |
| Dimensions (folded) | 110 x 65 x 140 cm |
| Dimensions (in use) | 160 x 65 x 130 cm |
| Product Weight | 55 kg |
| Max User Weight | 120 kg |
| Power Supply | 220-240V, 50Hz |
| Safety Key | Yes, emergency stop clip |
| Warranty | 2 years parts and labor |
| Lubrication | Pre-lubricated belt; re-lubricate after 300 km |
| Cleaning | Wipe with damp cloth; do not use solvents |
Frequently Asked Questions - Runner DTM2000i Flow Fitness
Pair it with the console for continuous heart rate monitoring.
User questions about Runner DTM2000i Flow Fitness
0 question about this device. Answer the ones you know or ask your own.
Ask a new question about this device
Download the instructions for your Treadmills in PDF format for free! Find your manual Runner DTM2000i - Flow Fitness and take your electronic device back in hand. On this page are published all the documents necessary for the use of your device. Runner DTM2000i by Flow Fitness.
USER MANUAL Runner DTM2000i Flow Fitness
Manual (English) 40 - 80
Copyright © Flow Fitness.
All rights reserved. Nothing in this instruction manual may be used or reproduced in any form or way without the express written permission of Flow Fitness.
④
x1
②
③

52L

x1
52R

x1
x1
x1
88

x1
x1
80
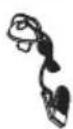
x1
78
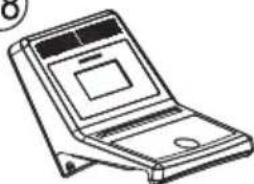
x1
79

x1
4.1 Montage
Stap 1: Bevestigen van de computer buizen


Opklappen
P2 Incline profile

P3 Incline profile

P4 Incline profile

P5 Incline profile

P6 Incline profile


P8 Speed profile

P8 Incline profile

P9 Speed profile

P9 Incline profile

P10 Speed profile
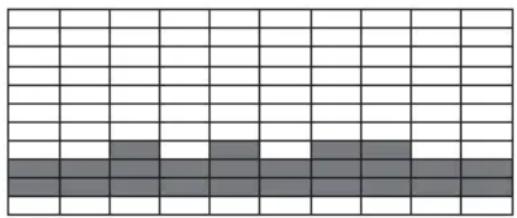
P10 Incline profile

P11 Speed profile

P11 Incline profile

P12 Speed profile

P12 Incline profile

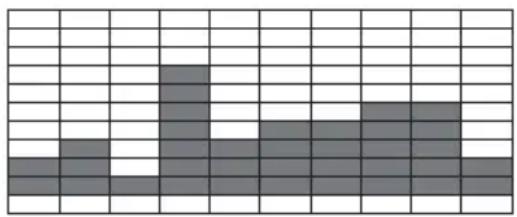
P13 Speed profile - Stel incline handmatig in

P15 Speed profile - Stel incline handmatig in
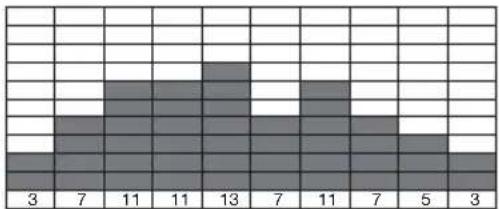
P17 Speed profile - Stel incline handmatig in
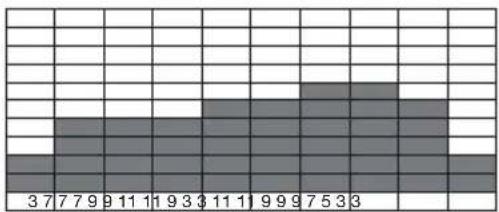
P19 Incline profile - Stel de snelheid handmatig in

P21 Incline profile - Stel de snelheid handmatig in
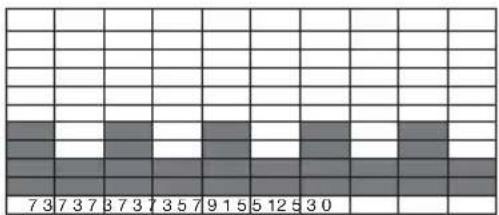
P23 Incline profile - Stel de snelheid handmatig in
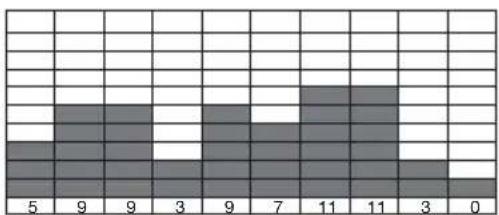
P14 Speed profile - Stel incline handmatig in

P16 Speed profile - Stel incline handmatig in

P18 Speed profile - Stel incline handmatig in
P20 Incline profile - Stel de snelheid handmatig in

P22 Incline profile - Stel de snelheid handmatig in

P24 Incline profile - Stel de snelheid handmatig in

https://itunes.apple.com/us/app/ic-training/id1347028353?mt=8
Google Android Play Store
https://play.google.com/store/apps/details?id=com.changyow.icp4th
https://www.flowfitness.com/handleiding/iconsole.html

Kinomap Fitness
https://apps.apple.com/us/app/zwift-ride-and-run/id1134655040
Google Android Play Store
https://play.google.com/store/apps/details?id=com.zwift.zwiftgame&hl=en
https://www.flowfitness.com/handleiding/zwift.html
Onderhoud na training
spanning verhogen spanning verminderen
5.1 Training schema's
Cooling down 5 minutes.
Trainingsschema week 3 en 4
Cooling down 5 minutes.
Trainingsschema week 5 en 6
Cooling down 5 minutes.
| Nr. | Onderdeel | Aantal | Nr. | Onderdeel | Aantal | ||
| 1 | Hoofdframe | 1 | 51 | Buffer | |||
| 2 | Linker computerbuis | 1 | 52L | Linker computerbuis afdekkap 1 | |||
| 3 | Rechter computerbuis | 1 | 52R | Rechter computerbuis afdekkap 1 | |||
| 4 | Handgreep | 1 | 53 | Platte ring D13*D6.5*1.0T 4 | |||
| 5 | Onderste frame | 1 | 54 | Nylon moer M6*1*6T 2 | |||
| 6 | Incline | frame | 1 | 55 | Afstandbus D10*D6.1*4T 4 | ||
| 7 | Bout M8x1.25x20L | 4 | 56 | Bout M5*0.8*10L 15 | |||
| 8 | Veerring D15.4xD8.2x2T | 6 | 57 | Platte ring D18*D8.5*1.0T 4 | |||
| 9 | Platte ring D16*D8.5*1.2T | 14 | 58 | Inbusbout M8*1.25*30 1 | |||
| 10 | Inbusbout M8*1.25*40L | 6 | 59 | Inbusbout M8*1.25*50L 1 | |||
| 11 | Buffer | 4 | 60 | Gasveer set | |||
| 12 | Running belt | 1 | 61L | Sneltoets sticker links 1 | |||
| 13 | Deck | 1 | 61R | Sneltoets sticker rechts 1 | |||
| 14 | Rails | 2 | 62 | Sneltoets kabel (bovenste) 2 | |||
| 15 | Inbusbout M8*1.25*35L | 2 | 63 | Hartslagkabel 2 | |||
| 16 | Inbusbout M8*1.25*25L | 6 | 64 | Bovenste motor cover 1 | |||
| 17 | Buffer 1 (Blue) D20*32L*M8 | 4 | 65L | Bottom motor cover(links) 1 | |||
| 18 | Buffer 2 (Orange) D20*32L*M8 | 2 | 65R | Onderste motor cover (rechts) 1 | |||
| 19 | Buffer | 66 | Flow Fitness badge 1 | ||||
| 20 | Schroef ST4*1.41*12L | 39 | 67 | Inbusbout M10*35L 4 | |||
| 21 | Wiel | 2 | 68 | Afstandbus D28*D10*9.2 4 | |||
| 22 | Buffer | 69 | Kunststof ring D10*D24*0.4T 4 | ||||
| 23 | Nylon moer M8*1.25*8T | 12 | 70 | Incline motor JS11-B 1 | |||
| 24 | Metalen clip D27*D4.3*2T | 8 | 71 | Platte ring D20xD11x2T 4 | |||
| 25 | Schroef ST4.2*15L | 39 | 72 | Veerring D17.8*D10.2*3.0T 4 | |||
| 26 | Motor cover fixeerplaat | 4 | 73 | Nylon moer M10x1.5x10T 6 | |||
| 27 | Kabellus | 2 | 74 | Inbusbout M10*1.5*65L 1 | |||
| 28 | Schroef ST4*1.41*15L | 2 | 75 | Inbusbout M10*1.5*50L 1 | |||
| 29 | Schroef ST4*1.41*20L | 2 | 76 | Platte ring D30*D10*3.0T 2 | |||
| 30 | Motor DC-2.0HP | 1 | 77L | Eindkapje (links) 1 | |||
| 31 | Platte ring D15*D5.2*1.0T | 4 | 77R | Eindkapje (rechts) 1 | |||
| 32 | Schroef ST2.9x9.5L | 4 | 78 | Computer 1 | |||
| 33 | Schroef M8*1.25*16L | 2 | 79 | Audio kabel 1 | |||
| 34 | Inbusbout M8*1.25*40 | 2 | 80 | Safety clip 1 | |||
| 35 | Voorste roller | 1 | 81 | Bovenste computer kabel 1 | |||
| 36 | Achterste roller | 1 | 82 | Middelste computer kabel 1 | |||
| 37 | V-Snaar | 1 | 83 | Onderste computer kabel 1 | |||
| 38 | Inbusbout M8*1.25*75L | 3 | 84 | Sensor kabel 1 | |||
| 39L | Bovenste afdekkap (links) | 1 | 85 | MCB 1 | |||
| 39R | Bovenste afdekkap (rechts) | 1 | 86 | Filter 10A 1 | |||
| 40L | Onderste afdekkap (links) | 1 | 87 | Spoel 1 | |||
| 40R | Onderste afdekkap (rechts) | 1 | 88 | Elektrische kabels 1 | |||
| 41 | Hartslagsensor (onderste deel) | 2 | 89 | Power module 1 | |||
| 42 | Bout M5*0.8*15L | 6 | 90 | Zekering 1 | |||
| 43L | Handgreep foam links | 1 | 91 | Voeding 1 | |||
| 43R | Handgreep foam rechts | 1 | 92 | Aardedraad 2 1 | |||
| 44 | Hartslagsensor (bovenste deel) | 2 | 93 | Fasedraad 1 1 | |||
| 45 | Schroef ST3.5*25L | 4 | 94 | Fasedraad 2 2 | |||
| 46L | Sneltoets linker handgreep | 1 | 95 | Neutrale draad 1 2 | |||
| 46R | Sneltoets rechter handgreep | 1 | 96 | Neutrale draad 2 1 | |||
| 47 | Stelvoet | 2 | 97 | Magnetische ring 1 | |||
| 48 | Platte ring D25*D10*2T | 2 | |||||
| 49 | Bout M6*1.0*40L | 2 | |||||
| 50 | Transportwiel | 2 |
5.3 Probleemoplossen
Probleem:
https://www.flowfitness.com/nl/registreer-uw-product/
1. Important information 42
1.1 Health 42
1.2 Safety 42
2. Introduction 44
2.1 Contents of package 45
2.2 Important parts 46
2.3 Specifications 47
3. Fitness 48
3.1 Training by heart rate 48
3.2 Warming up and cooling down 50
3.3 Assembly 51
3.4 Storage / Prepare for use 55
3.5 Use of the computer 57
3.6 Maintenance 70
4. General information 72
4.1 Training schedule 72
4.2 Exploded view 74
4.3 Troubleshooting 76
5. Warranty 77
5.1 Warranty 77
1.1 Health
Important: read this instruction manual first and follow the instructions carefully before using the product.
- Consult an expert to determine the training level that is most suitable for you.
- If you experience any dizziness, nausea or any other physical discomfort while training, cease the training immediately and consult a physician.
- Watch your heart beat during the training and immediately stop training when values are inconsistent.
- We advise you to do warming up and cooling down exercises during five to ten minutes before and after use of the product. This way your heart rate can increase and decrease gradually and you can prevent painful muscles.
1.2 Safety
- Only use this product as described in this instruction manual.
- Before using this product check that the product functions as it should. In case of malfunction or a defect stop training immediately and contact your vendor.
- Do not use the product when there is a malfunction.
- The product is only meant for use in the home and it has to be positioned on a flat surface.
- The product can only be used by one person at the time.
- The product can be used by persons with a body weight of up to 150 kilos.
- Always make sure that there is at least one meter of free space in all directions around the product when you are training.
- Don't stick any objects in any opening of the equipment.
- Keep children and pets away from the product.
- Handicapped persons should get consent from a medical expert and follow their directions for training with the product.
- Do not place hands or feet under the product.
- Never hold your breath during a training session. Your breathing should be at a normal
interval depending on the intensity of the training.
- Start your training schedule slowly and build it up gradually.
- Always wear appropriate clothing during training. Don't wear anything that's too loose and can get caught between moving parts of the equipment.
- When moving the equipment always use the appropriate lifting techniques to prevent back injury.
- Check screws and bolts regularly and fasten them if they are loose.
- The owner of the product is responsible for all users to be aware of the warnings and instructions as mentioned in this instruction manual.
- This product is intended for use in a clean and dry environment. Storage in cold and / or moist areas could lead to problems with the product.
- This product is not suitable for therapeutic supports / or professionally use in physical therapy.
WARNING
Have your physical condition checked by a licensed physician before you start training. This is particularly important for persons over 35 years old or persons who have any problems with their health. Read all instructions before using the equipment. Flow Fitness is not responsible for any personal injury or damage to property caused by the use of this equipment.
This product is not suited for rental or use in a commercial or professional environment.
2. Introduction
Thank you for purchasing the Runner DTM2000i Treadmill.
This manual contains all information necessary for the use and operation of the treadmill.
This guide also contains tips and advice on how to train.
Flow Fitness wishes you successful and enjoyable training sessions.
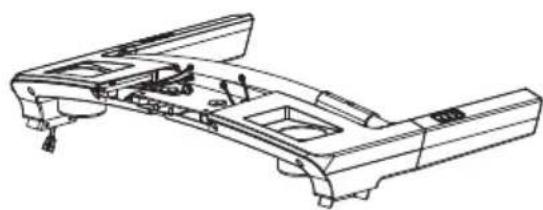
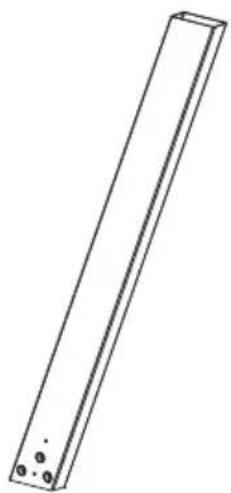
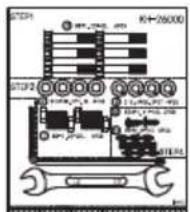
2.1 Contents of package
①

④

x1
②

③

52L

x1
52R

x1
x1
x1
88

x1
x1
80
x1
78

x1
2.2 Important parts
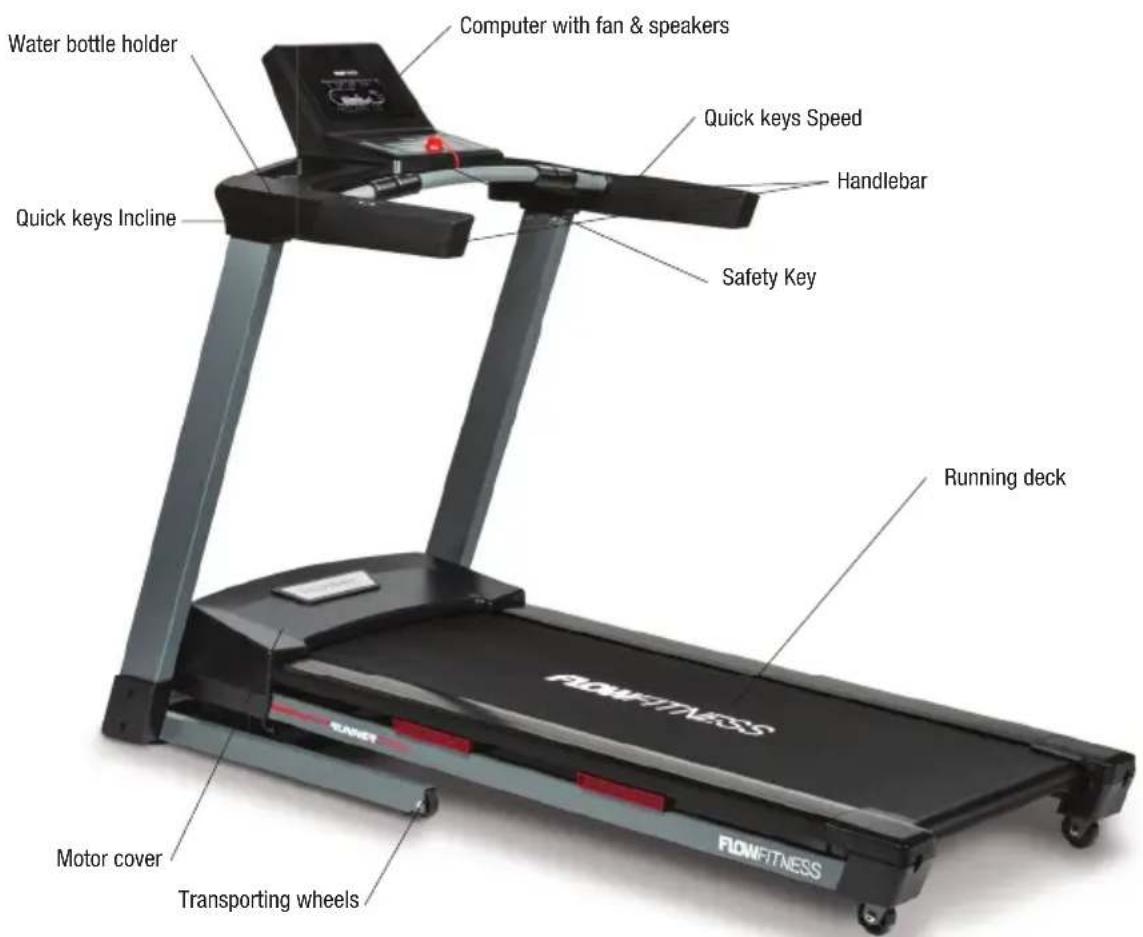
2.3 Specifications
Computer
- 34 programs
- 1 Manual program
- 24 Preset programs
- 2 heart rate controlled programs
- 1 target heart rate controlled program
- 4 user programs
- 1 Training program
- Body Fat test
- Bluetooth, trainen met Apps
Heart rate reception
- Bluetooth heart rate receiver
- Hand pulse sensors
- Bluetooth Chest Belt (optional)
Size
Length: 183.5 cm
Height: 131 cm
Width: 84 cm
Weight: 80 kg
Size folded
Length: 109 cm
Height: 159 cm
Width: 84 cm
Technical
- Motor 2.0 HP
- Incline 0 - 12% (0-12 levels)
- Speed 1-18 KPH
- Quick keys for speed and incline
- Running Deck (LxW) 140 x 50 cm
- 150 kg max user weight
Extra
- Audio connection
- USB charger
- Fan
What is fitness? In general a fitness exercise can be described as an activity that makes your heart pump more oxygen from your lungs to your muscles by means of circulating the blood. The more strenuous the training, the more fuel (oxygen) the muscles need and the more work the heart has to do to pump oxygen rich blood to the muscles. If you are in good physical shape your heart can pump more blood to the muscle with each contraction. This means the heart doesn't have to contract as many times to transport the necessary oxygen to your muscles. Your resting heart beat and heart beat when exercising will therefore decrease.
3.1 Training by heart rate
While training it is important to monitor your heart rate. The heart rate is essential for the result of your training. Your best training heart rate depends firstly on your age. Your maximum heart beat can be determined by this. Secondly the most effective heart rate depends on your training goals. If your training goal is to lose weight, then the most effective training is at 60% of your maximum heart rate. If your training goal is to improve your stamina, then you should train at 80% of your maximum heart rate.
The body stores energy in two forms: carbohydrates and fat. When we exercise we use a combination of these two energy supplies. If the training intensity is at a high level the body will mostly choose the energy that burns fast: carbohydrates. Since there is a limited supply of these carbohydrates you can't continue this for a long period of time. When training at a low intensity the body will mostly choose to use a long lasting source of energy: fat. Since this is stored in large quantities in the body, you can continue this kind of training for a longer time.
Below you will find a schedule allowing you to calculate the best heart rate for your training. In this schedule each age category has a range that your heart rate should be in during your training. The middle column has the values you should try to maintain if you want to lose weight. If you want to improve your stamina you should try to maintain the rates in the right column.
| Age | Weight lost(beats per minute)60% | Improve stamina(beats per minute)85% |
| 20 -24 120 - 118 170 | -167 | |
| 25 - 29 117 - 115 166 | - 163 | |
| 30 - 34 114 - 112 162 | - 158 | |
| 35 - 39 111 - 109 157 | - 154 | |
| 40 - 44 108 - 106 153 | - 150 | |
| 45 - 49 105 - 103 149 | - 145 | |
| 50 - 54 102 - 100 144 | - 141 | |
| 55 - 59 99 - 97 140 | - 137 | |
| 60 and older 96 - 94 136 | - 133 |
For each individual the best way to start training is different. If you have not exercised in some time or are overweight, you should start your training schedule slowly and gradually increase the level of activity.
In the last chapter of this instruction manual you will find several different training schedules (chapter 5. general information). You can use these schedules to reach your training goals. The schedules are divided in two phases. The first phase can be used for beginners or persons who start training after a long period of inactivity. During this phase the level of intensity is built up gradually. After six weeks the second phase begins. You can then choose a training schedule to lose weight or improve your stamina.
3.2 Warming up and cooling down
A good training schedule starts with a good warming up and ends with a cooling down of the muscles. This will prevent painful muscles and injury. Below you will find some suitable exercises.
Head Roll
Tilt your head to the right. Hold this for one second, so that you feel a little pull in the muscles on the left side of your neck. Do the same for the other side, front and back. Repeat two or three times.
Toe Touch
Slowly bend forward with your back and arms relaxed. Bend as far as you can and hold the position for ten seconds. Repeat this two or three times.
Side Stretch
Extend both your arms up in the air and reach as high as you can with your right arm. Lean a bit to the left so that the muscles in the right side of your torso are stretched. Hold this position for one second. Relax and make the same motion on the other side of your body. Repeat this three or four times.
Knee bend
Set your feet shoulder-width apart and your stretched your hands out. Lower yourself no more than 10cm by bending your knees. Come back up again and repeat several times.
Lower back stretch
Begin on all fours. Stretch your arms out in front of you, allowing your face to lower to a position near the floor. Gently sit back. Rest your glutes just above your heels. Ease back and feel the gentle stretch in your lower back.
Hamstring Stretch
Sit down on the floor with your right leg extended in front of you and place the sole of your left foot on the inside of your right upper leg. Bend forward in the direction of your right foot and hold this position for ten seconds. Relax and then do the same with your other leg. Repeat two or three times.

3.3 Assembly
Step 1: Assembling the computer posts
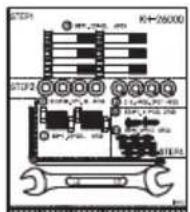
This chapter describes how to assemble the DTM2000i treadmill. Before assembling remove all parts from the box and make sure there is enough space available for the assembly. Due to safety reasons and to prevent damaging, we advise you to assemble the treadmill with two persons.
- Place the main frame in an area where you have enough room to assemble the product.
- Place the left computer post (2) against the main frame and fasten the three M8 bolts (10) as displayed in the illustration below.
- Before assembling the right computer post (3) join the connectors (83) to connector (82) as shown within the illustration below. Then place the right computer post (3) against the main frame and fasten the computer post into place with three M8 bolts (10). Please pay attention that the connection cable will not get stuck between the post and the main frame.
Do not fully tighten the bolts to make the next step of assembly easier.

Step 2: Assembling the computer frame
Flow Fitness advises to assemble this step with two persons.
- Before placing the computer frame (4) onto the computer posts connect connector (81) with connector (82) as shown within the illustration below.
- Now place the computer carefully onto the computer post. Pay attention to the right post (3) and check if the cables are not getting stuck between the post and the computer frame. Hold the computer frame while fastening bolt (7) with spring washer (8) and flat washer (9). When all bolts are completely fastened you can release the computer frame.
Now fasten all bolts including the bolts for step 1 firmly.
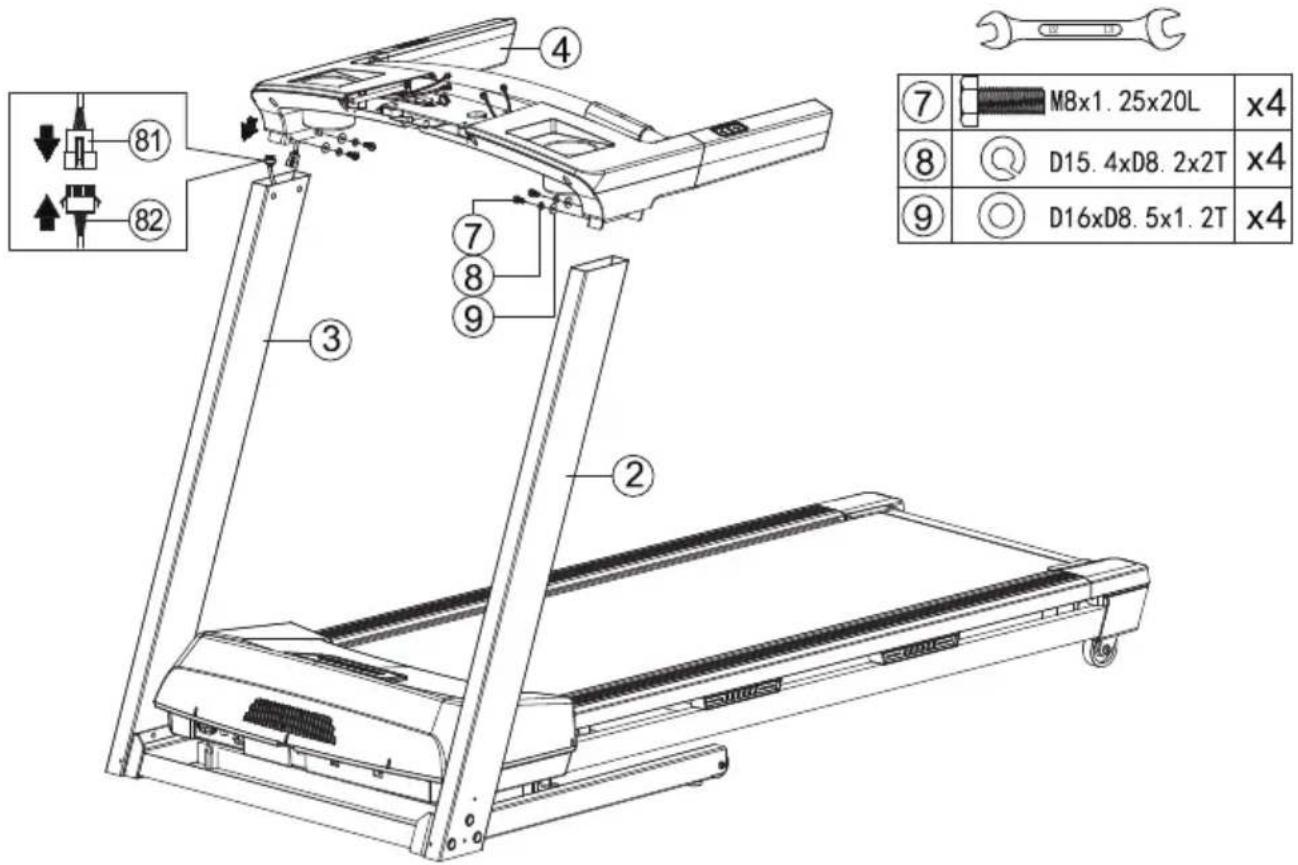
Step 3: Assembling the computer
- Before placing the computer (78) onto the computer frame (4) connect connectors (81), (63), (62a) and (62b) as shown within the illustration below.
- Now place the computer onto the computer frame and fasten 4x M5 bolts (56).

Step 4: Assembling the computer post covers
- Firstly fasten the final two computer screws (20) at the back of the computer.
- Assemble the computer post covers (52R) and (52L) by fastening 4x bolt (56).

3.4 Storage / Prepare for use
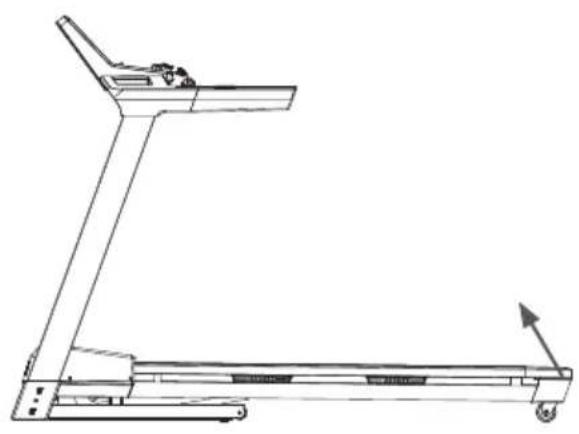


Folding
After training you can store the treadmill. Lift the running deck (at the back) until you feel the deck lock into place. Make sure the running deck is locked before releasing.
Attention! Please check if the power cord is disconnected before moving the treadmill.
Unfolding
To unfold the treadmill:
- Push the running deck upwards with your hands.
- Release the running deck as illustrated with arrow 2 in the drawing.
- Release the deck and move aside while the running deck automatically comes down due to the gas spring.
Adjust horizontally
You can level the treadmill with the adjusting screws, so that the treadmill can stand stable onto the floor. The two adjusting screws are located at the front beneath the frame.
Power connection
Before you start exercising, you must turn on the treadmill. Make sure the power cord is plugged in and the on / off switch is switched to "I". The on / off button is located near the front of the main frame.
For your own safety it is important that the power cord is plugged into a grounded outlet!
Safety cord
The safety key must be connected to the holder on the console. Without this safety key the treadmill cannot be turned on. When the safety key is removed during your exercise, the treadmill will immediately shutdown. You will be advised for safety reasons to always wear the safety key during exercise. The safety key can be clipped on your clothes.

3.5 Use of the computer
Control panel
Cool Down
Press this key during a training session to activate the cool down program.
Program
Use this key to toggle between the programs.
Enter
With this key you can enter a program or confirm the selected value.
Fan / Ventilator
Press to toggle the fan speeds;
1x Fan low
2x Fan high
3x Turn fan off
Speed / Pace
With this key you can toggle display value between speed in KP/H and pace in MIN/KM.
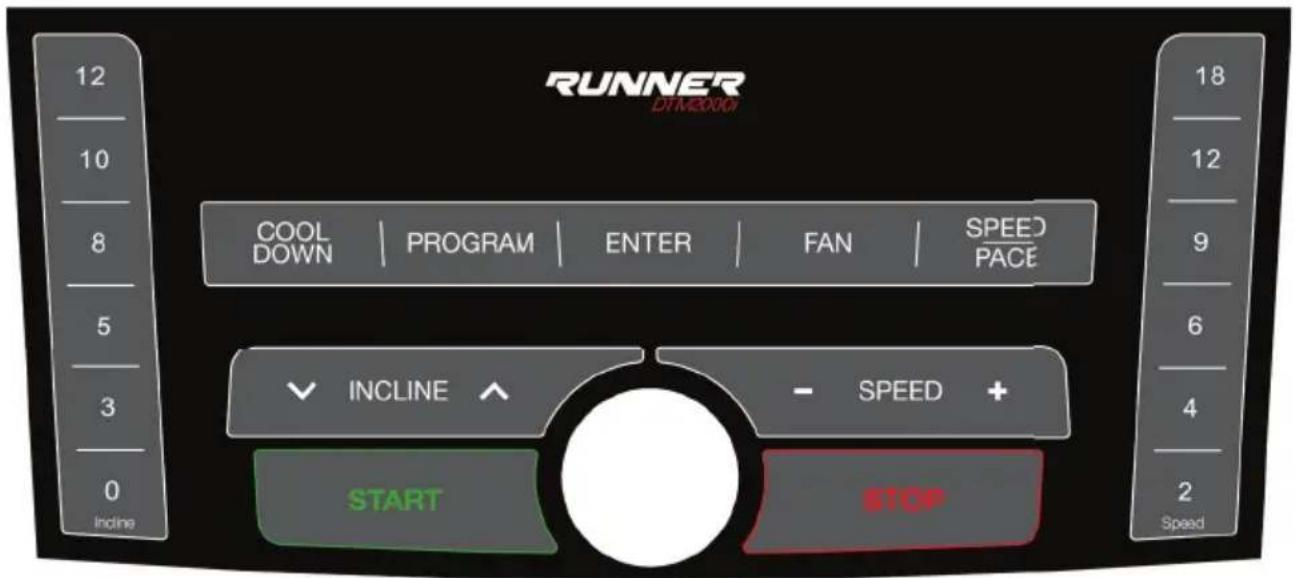
Quick incline keys
Press one of these keys to directly set the incline level.
Incline
Use these keys to adjust the incline during a training session.
Within the menu you are able to use these keys to set a program or training values.
Start
Start or resume a trainings session.
Stop
Stop or pause a training session Press and hold for three seconds to reset the treadmills computer.
Speed
Use these keys to adjust the speed during a training session.
Within the menu you are able to use these keys to set a program or training values.
Quick speed keys
Press one of these keys to directly set the speed level.
Quick keys
With the quick keys in the right handlebar you are able to quickly and safely change the speed op the treadmill. With the quick keys in the left handlebar you can set the incline level.
Display

Incline The current incline level.
Distance The elapsed or remaining distance.
Time The elapsed or remaining time.
Pulse You heart rate in Beats Per Minute (BPM) measured by the hand pulse sensors or by an optional Flow Fitness Bleutooth
Chest Belt.
Calories An indication of the burned calories.
Speed Current speed in KPH.
In the middle of the display a 400 meter / 0.25 mile running track is displayed. According to your distance, segments around the track will light up visualising your position on this track.
First use
Set the on / off switch on the back of the treadmills motor cover to "I". Then place the safety key into the provided slot at the front of the computer and attach the clip on the other end to your clothes.
Now you are able to setup you user profile by entering personal information; gender, age, weight and height. These settings are used for calculating your maximum heart rate needed for the heart rate controlled programs and for the body fat test.
-
Set your gender (Male or Female) by pressing the INCLINE ▲▼ or SPEED - + keys. Confirm with the ENTER key.
-
Set your age by pressing the INCLINE ▲▼ or SPEED - + keys. Confirm with the ENTER key.
-
Set your weight by pressing the INCLINE ▲▼ or SPEED - + keys. Confirm with the ENTER key.
-
Set your height by pressing the INCLINE ▲▼ or SPEED - + keys. Confirm with the ENTER key.
You are now ready to start you training exercise.
Standby
After five minutes of inactivity the computer will go in standby mode automatically. Press one of the keys to wake the computer from standby.
Pause or Stop a training session
During a training session you can pause the session by pressing the STOP key on the control panel. To resume the training press the START key, to quit the training press the STOP button again.
Cool Down
By pressing the COOL DOWN key during a training session the cool down program will start directly. The speed of the belt will slowly decrease to a full stand still within 2 or 3 minutes.
MANUAL
With the manual program you can set the preferred speed and incline level during the entire workout. Select the manual program by pressing the PROGRAM key until MANUAL is displayed on screen. Then press the ENTER key to confirm.
- Set the desired training duration by pressing the INCLINE ▲▼ or SPEED - + keys.
Press the START key to start the training session. If you want to set an target distance or burned calories press the ENTER key. - Set the desired distance by pressing the INCLINE ▲▼ or SPEED - + keys. Press the START key to start the training session. If you want to set a targed for burned calories press the ENTER key.
- Set the a burned calorie target by pressing the INCLINE ▲▼ or SPEED - + keys.
- Press the START key to start the training session.
The training will start at the lowest incline level en speed. During the training session the speed and incline can be changed with the INCLINE ▲▼ and SPEED - + keys or by the quick keys in the hand rail. The training session is finished when one of set target values is reached. The computer will now automatically go into cool down program. Press STOP if you want to cancel the cool down program.
PROGRAM
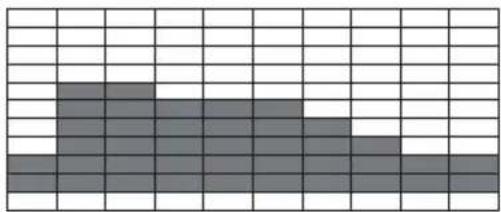
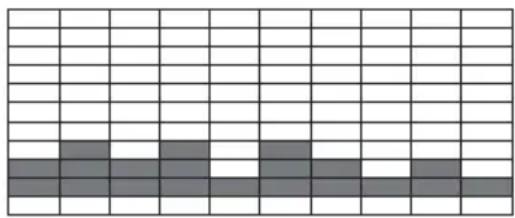
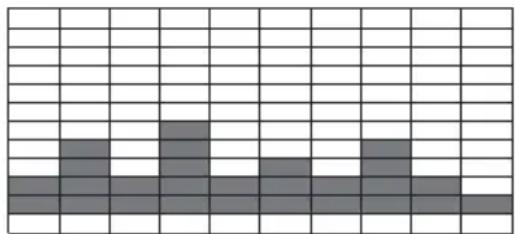
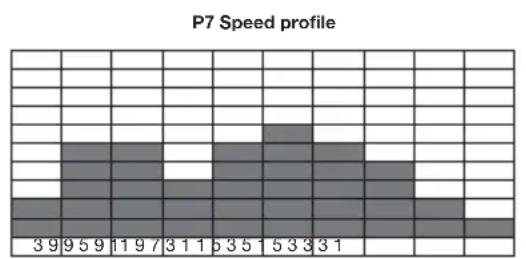
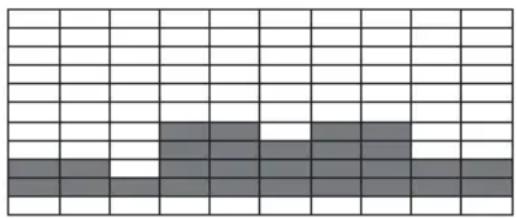
There are 24 preset program. For programs 1 to 12, the speed and incline will be automatically adjusted according to the selected program. For programs 13 to 18 the computer will only change the speed, you are able to manually set your incline level. For programs 19 to 24 only the incline level will be changed automatically and you can set your preferred speed during the training session. On the next pages there is an overview of speed and incline levels for all the 24 programs. Select the program by pressing the PROGRAM key until PROGRAM is displayed on screen. Then press the ENTER key to confirm.
- Select the desired program by pressing the INCLINE ▲▼ or SPEED - + keys. Confirm with the ENTER key.
- Set the desired training duration by pressing the INCLINE ▲▼ or SPEED - + keys. Press the START key to start the training session. If you want to set an target distance or burned calories press the ENTER key.
- Set the desired distance by pressing the INCLINE ▲▼ or SPEED - + keys. Press the START key to start the training session. If you want to set a targed for burned calories press the ENTER key.
- Set the a burned calorie target by pressing the INCLINE ▲▼ or SPEED - + keys.
- Press the START key to start the training session.
During the training session the speed and incline level can be changed for the current segment or the whole speed or incline profile according to the select program. Set the speed or incline level with the INCLINE ▲▼ and SPEED - + keys or by the quick keys in the hand rail. The training session is finished when one of set target values is reached. The computer will now automatically go into cool down program. Press STOP if you want to cancel the cool down program.
P1 Speed profile

P2 Speed profile

P3 Speed profile

P4 Speed profile

P5 Speed profile

P6 Speed profile

P1 Incline profile

P2 Incline profile
P3 Incline profile

P4 Incline profile
P5 Incline profile

P6 Incline profile

P8 Speed profile

P8 Incline profile

P9 Speed profile
P9 Incline profile
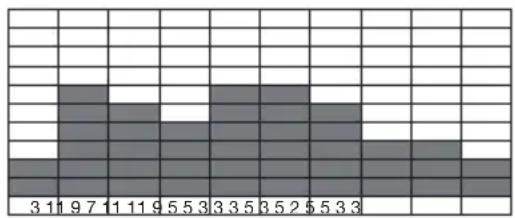
P10 Speed profile

P10 Incline profile

P11 Speed profile
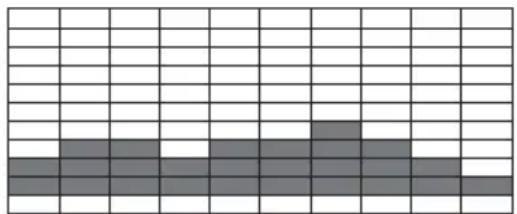
P11 Incline profile

P12 Speed profile

P12 Incline profile
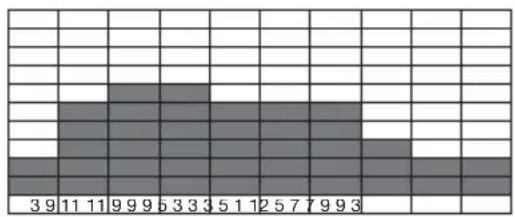

P13 Speed profile - Incline can be set manually

P15 Speed profile - Incline can be set manually
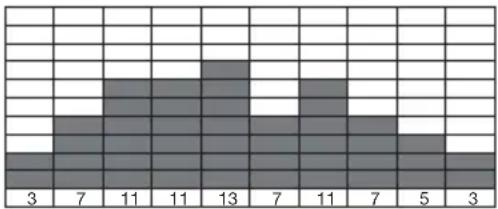
P17 Speed profile - Incline can be set manually

P19 Incline profile - Speed can be set manually

P21 Incline profile - Speed can be set manually

P23 Incline profile - Speed can be set manually

P14 Speed profile - Incline can be set manually

P16 Speed profile - Incline can be set manually

P18 Speed profile - Incline can be set manually

P20 Incline profile - Speed can be set manually
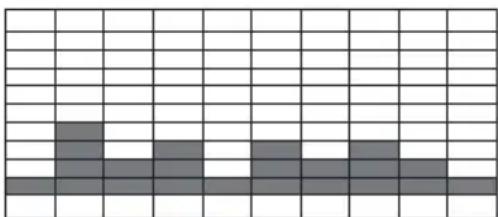
P22 Incline profile - Speed can be set manually

P24 Incline profile - Speed can be set manually
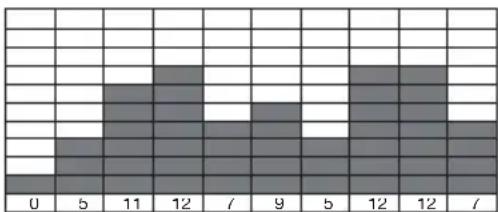
USER PROGRAM
You are able to create and save four (U1-U4) programs. Each program is divided into 10 segments. For each segment the Speed and Incline level can be set. Select the user program by pressing the PROGRAM key until USER PROGRAM is displayed on screen. Then press the ENTER key to confirm.
Create or modify an user program:
- Select one of the four (U1-U4) users by pressing the INCLINE ▲▼ or SPEED - + keys. Confirm with the ENTER key.
-
Set the desired training duration by pressing the INCLINE ▲▼ or SPEED - + keys. Confirm with the ENTER key.
-
Now you are able to set the speed and incline level for each segment. Press the INCLINE ▲▼ or incline keys in the handlebar to set the desired incline level for the current segment. Do the same for speed with SPEED - + keys or the quick keys in the handlebar. When your preferred speed and incline level for this segment is set press the ENTER key to confirm.
-
Repeat the previous step for the next 9 segments.
-
Press the START key to start the training session. The user program will be saved automatically.
Start a saved user program:
- Select one of the four (U1-U4) users by pressing the INCLINE ▲▼ or SPEED - + keys. Confirm with the ENTER key.
- Set the desired training duration by pressing the INCLINE ▲▼ or SPEED - + keys. Confirm with the ENTER key.
- Press the START key to directly start the training session.
During the training session the speed and incline can be changed for the current segment by pressing the INCLINE ▲▼ and SPEED - + keys or by the quick keys in the hand rail. The training session is finished when the set distance has elapsed. The computer will now automatically go into cool down program. Press STOP if you want to cancel the cool down program.
HRC - THR Heart Rate Controlled program
With heart rate controlled program you can exercise using your hear rate. The treadmill computer will automatically and gradually change the incline and speed to maintain the set heart rate. The heart rate can be set at 60% or 80% of your calculated maximum heart rate (HRC). You are also able to set your own target heart rate (THR). Select the HRC program by pressing the PROGRAM key until HRC is displayed on screen. Then press the ENTER key to confirm.
Train on 60% or 80% of your maximum heart rate:
- Select 60% or 80% by pressing the INCLINE ▲▼ or SPEED - + keys. Confirm with the ENTER key.
- The computer screen show the chosen program. Press the ENTER key to setup the training duration.
- Set the desired training duration by pressing the INCLINE ▲▼ or SPEED - + keys. Confirm with the ENTER key.
- Press the START key to start the training session.
Set your own target heart rate:
- Select THR by pressing the INCLINE ▲▼ or SPEED - + keys. Confirm with the ENTER key.
- Set the desired heart rate in Beats Per Minute (default = 133 BPM) by pressing the INCLINE ▲▼ or SPEED - + keys. Confirm with the ENTER key.
- Set the desired training duration by pressing the INCLINE ▲▼ or SPEED - + keys. Confirm with the ENTER key.
- Press the START key to start the training session.
The heart rate can be measured by wearing an optional Flow Fitness chest belt or by holding the hand pulse sensor during the complete training exercise. De computer will calculate the your maximum heart rate according to the settings entered in your user profile.
The training session is finished when one of set target values is reached. The computer will now automatically go into cool down program. Press STOP if you want to cancel the cool down program.
Body Fat test
With the body fat test you can measure your body fat percentage. Select the fat program by pressing the PROGRAM key until FAT is displayed on screen. Then press the ENTER key to confirm.
- Press the ENTER key start the body fat test.
- Place both hands on the hand pulse sensors. The computer will start its measurement.
- After a 10 seconds your result will appear on the screen:
< 19 : UNDER WEIGHT
12 - 25 : NORMAL WEIGHT
26 - 39 : OVER WEIGHT
30 > : OBESITY
For a correct measurement the personal data in the user profile needs to be entered correctly. The measured fat percentage is an indication of your fat percentage. For an exact value please consult a specialist.
Training
With the training program you can set your target time at a set distance and try to finish before set time has elapsed. The computer will constantly update the estimated finishing time depending on you current speed. Select the manual program by pressing the PROGRAM key until TRAINING is displayed on screen. Then press the ENTER key to confirm.
- Set your target time by pressing the INCLINE ▲▼ or SPEED - + keys. Confirm with the ENTER key.
- Set the desired running distance by pressing the INCLINE ▲▼ or SPEED - + keys. Confirm with the ENTER key.
- Press the START key to start the training session.
During the training session the speed and incline can be changed with the INCLINE ▲▼ and SPEED - + keys or with the quick keys within the handlebar. The training session is finished when the set distance is reached. The computer will now show your result: Better than target pace, achieved the target pace or slower than the target pace.
Train with your smartphone or Tablet.
With the DTM2000i treadmill your able to train by using your smartphone or tablet connected trough a wireless bluetooth signal with the treadmill. This treadmill is compatible with the following devices:
iOS Operating system:
Apple products with a bluetooth version of 4.0 or higher
Android Operating system:
- Android tablet OS 4.3 or above
- Android phone OS 2.2 or above
- Android tablet resolution; 1280X800 pixels
- Android phone resolution; 1920x1080 pixels 1280x800 pixels 1280x760 pixels 800X480 pixels
Follow the steps below to connect your mobile device with the DTM2000i using a bluetooth conneciton.
- Go to the settings on your mobile device and turn bluetooth on.
- Follow the instructions of the supported apps.
For training with smartphone or tablet you need to download one of the apps. The apps compatible with the Runner DTM2000i treadmill are listed below. If new apps will become available they will be listed on our website; www.flowfitness.com.

iConsole+ Training
The iC+ training app lets you control the DTM2000i with your smartphone or tablet. You can also log your training results or train virtually anywhere in the world using the google maps and street view Download the iC+ training app in the app or play store by searching for 'iC+ training' in the app store / 'iConsole+ training' in the play store or follow one of the links below.
Apple iOS App store
https://itunes.apple.com/us/app/ic-training/id1347028353?mt=8
Google Android Play Store
https://play.google.com/store/apps/details?id=com.changyow.icp4th
For further support please visit:
https://www.flowfitness.com/manual/iconsole.html

Kinomap
Choose a geotagged video on Kinomap and go! Your position is shown in the video and icon on the map and in the altitude graph: your goal is to keep pace with the original video. A multiplayer mode is also available up to 10 players can train on the same video. Download the Kinomap app in the app or play store by searching for 'Kinomap Fitness' or follow one of the links below.
For further support please visit:
https://www.flowfitness.com/manual/kinomap.html

Zwift
Zwift blends the fun of video games with the intensity of serious training, helping you get faster. Level up in the virtual worlds of Zwift with a community that motivates you every minute. Choose from training plans, group rides, races, and more. You'll get fitter and stronger. Download the Zwift app in the app or play store by searching for 'Zwift' or follow one of the links below.
Apple iOS App store
https://apps.apple.com/us/app/zwift-ride-and-run/id1134655040
Google Android Play Store
https://play.google.com/store/apps/details?id=com.zwift.zwiftgame&hl=en
For further support please visit:
https://www.flowfitness.com/manual/zwift.html
3.6 Maintenance
Centring and tensioning the belt
Within the first weeks of using the treadmill, it is possible that you need to centre the belt. For example this can happen when applying more pressure to the left foot over your right.
Make sure the treadmills is running with a speed between 3 and 5 KPH. At the back of the frame there are two adjustment bolts. These bolts allow you to adjust the rear roller. When the treadmill is running to the left, you need to turn the left adjusting bolt clockwise on the and the right adjustment bolt counter clockwise. In the event that the treadmill is right, you have to turn the left adjustment bolt counter-clockwise and the right adjustment screw clockwise. Make sure the belt stays well tensioned and is not waving.

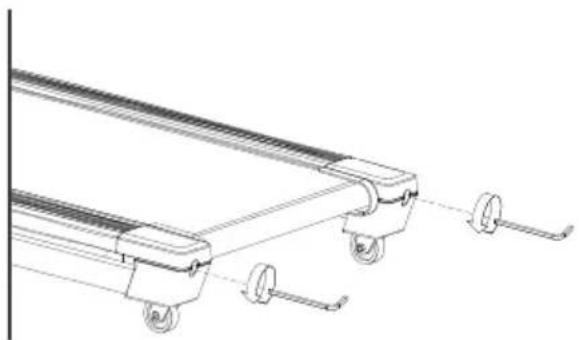
Increase tension Decrease tension
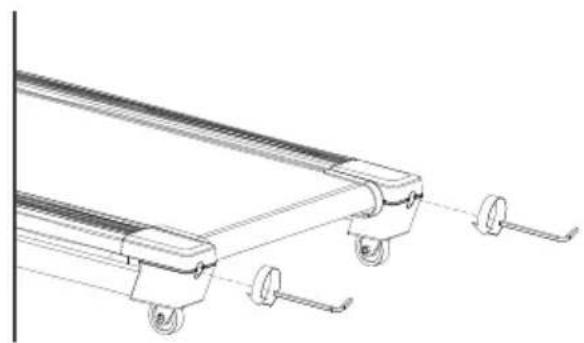
Maintaining the sliding surface
Every 1 or 2 months (even if the treadmill is not in use) or every 50 hours of use, the sliding surface under the running deck needs to be lubricated with the silicone lubricant. We advise using Flow Fitness Treadmill lotion. Due to it Smart Straw the lubricant can be directly sprayed on the running deck underneath the running belt without loosening the belt.
Lubricating the deck without Flow Fitness Treadmill Lotion
Make sure that the power is disconnected and loosen the adjusting bolts of the rear roller. Lubricate the surface, distribute the silicone lubricant evenly. When you are finished fastening the adjustment bolts of the rear roller. Center the treadmill again as described below.

Cleaning
The metal and plastic parts of the product can be cleaned by using standard cleaning products. However, make sure that all parts are completely dry before they are used again.
Flow Fitness advises to fasten nuts and bolts, check and fasten pivot points once every six weeks. For fastening use the tool supplied with the product. To prevent unnecessary wear, the product can only be used indoors and in a dry environment.
4.1 Training schedule
Introduction schedule
Schedule week 1 and 2
Train at 60% of your maximum heart rate. Max. 3 times a week.
Warming up 5 - 10 minutes.
Train 4 minutes.
Rest 1 minute.
Train 2 minutes.
Calmly train 1 minute.
Cooling down 5 minutes.
Schedule week 3 and 4
Train at 60% of your maximum heart rate. Max. 4 times a week.
Warming up 5 - 10 minutes.
Train 5 minutes.
Rest 1 minute.
Train 3 minutes.
Calmly train 1 minute.
Cooling down 5 minutes.
Schedule week 5 and 6
Train at 60% of your maximum heart rate. Max. 5 times a week.
Warming up 5 - 10 minutes.
Train 6 minutes.
Rest 1 minute.
Train 4 minutes.
Calmly train 3 minutes.
Cooling down 5 minutes.
After completing the introduction training schedule for six weeks, you can choose the follow-up training schedule that is best suited to your needs. You can choose a schedule that will maximize your weight loss, or one that will improve your stamina. Both training schedules are on the next pages.
Training schedule to improve stamina
(follow-up to introduction training schedule)
Schedule week 7 and 8
Train at 80% of your maximum heart rate. Max. 6 times a week.
Warming up 5 - 10 minutes.
Train 7 minutes.
Rest 1 minute.
Train 5 minutes.
Calmly train 1 minute.
Cooling down 5 minutes.
Schedule week 9 and beyond
Train at 80% of your maximum heart rate. Max. 6 times a week.
Warming up 5 - 10 minutes.
Train 10 minutes.
Rest 1 minute.
Train 10 minutes.
Repeat training 2 or 3 times.
Calmly train 1 minute.
Cooling down 5 minutes.
Training schedule to lose weight
(follow-up to introduction training schedule)
Schedule week 7 and 8
Train at 60% of your maximum heart rate.
Max. 6 times a week.
Warming up 5 - 10 minutes.
Train 7 minutes.
Rest 1 minute.
Train 5 minutes.
Calmly train 1 minute.
Cooling down 5 minutes.
Schedule week 9 and beyond
Train at 60% of your maximum heart rate.
Max. 6 times a week.
Warming up 5 - 10 minutes.
Train 10 minutes.
Rest 1 minute.
Train 10 minutes.
Repeat training 2 or 3 times.
Calmly train 1 minute.
Cooling down 5 minutes.
5. General information
4.2 Exploded view

| Nr. | Onderdeel | |
| 1 | Main frame | 1 |
| 2 | Left handlebar post | 1 |
| 3 | Right handlebar post | 1 |
| 4 | Handlebar | 1 |
| 5 | Base tube | 1 |
| 6 | Connecting tube | 1 |
| 7 | Hex bolt M8x1.25x20L 4 | |
| 8 | Spring washer D15.4xD8.2x2T 6 | |
| 9 | Flat washer D16*D8.5*1.2T 14 | |
| 10 | Allen screw M8*1.25*40L 6 | |
| 11 | Buffer pad | 4 |
| 12 | Running belt | 1 |
| 13 | Wooden board | 1 |
| 14 | Side plate | 2 |
| 15 | CSK inner hexagon bolt M8*1.25*35L | 2 |
| 16 | CSK inner hexagon bolt M8*1.25*25L | 6 |
| 17 | Buffer 1(Blue) D20*32L*M8 4 | |
| 18 | Buffer 2(Orange) D20*32L*M8 | 2 |
| 19 | Buffer | |
| 20 | Screw ST4*1.41*12L 39 | |
| 21 | Wheel | |
| 22 | Buffer | |
| 23 | Nylon nut M8*1.25*8T 12 | |
| 24 | Metal clip D27*D4.3*2T 8 | |
| 25 | Screw ST4.2*15L 39 | |
| 26 | Motor cover fixing plate 4 | |
| 27 | cable tie base | 2 |
| 28 | Screw ST4*1.41*15L 2 | |
| 29 | Screw ST4*1.41*20L 2 | |
| 30 | Motor DC-2.0HP 1 | |
| 31 | Flat washer D15*D5.2*1.0T 4 | |
| 32 | Screw ST2.9x9.5L 4 | |
| 33 | Screw M8*1.25*16L 2 | |
| 34 | Allen bolt M8*1.25*40 2 | |
| 35 | Front roller | 1 |
| 36 | Rear roller | 1 |
| 37 | Elastic belt | 1 |
| 38 | Allen screw M8*1.25*75L 3 | |
| 39L | Upper cover(left) 1 | |
| 39R | Upper cover(right) 1 | |
| 40L | Lower cover(left) 1 | |
| 40R | Lower cover(right) 1 | |
| 41 | Lower handle pulse sensor 2 | |
| 42 | Bolt M5*0.8*15L 6 | |
| 43L | Left handlebar grips 1 | |
| 43R | Right handlebar grips 1 | |
| 44 | Upper handle pulse sensor 2 | |
| 45 | Screw ST3.5*25L 4 | |
| 46L | Quick button on left bar | 1 |
| 46R | Quick button on right bar 1 | |
| 47 | Adjustable feet 2 | |
| 48 | Flat washer D25*D10*2T | 2 |
| 49 | Screw M6*1.0*40L 2 | |
| 50 | Transporting wheel 2 | |
Aantal
| Nr. | Onderdeel | Aantal |
| 51 | Buffer | |
| 52L | Left cover for end of handlebar post 1 | |
| 52R | Right cover for end of handlebar post 1 | |
| 53 | Flat washer D13*D6.5*1.0T 4 | |
| 54 | Nylon nut M6*1*6T 2 | |
| 55 | Bushing D10*D6.1*4T 4 | |
| 56 | Bolt M5*0.8*10L 15 | |
| 57 | Flat washer D18*D8.5*1.0T 4 | |
| 58 | Allen bolt M8*1.25*30 1 | |
| 59 | Allen bolt M8*1.25*50L 1 | |
| 60 | Gas spring set 1 | |
| 61L | Sticker for quick button on left bar 1 | |
| 61R | Sticker for quick button on right bar 1 | |
| 62 | Upper cable for quick button 2 | |
| 63 | Handle pulse cable 2 | |
| 64 | Upper motor cover 1 | |
| 65L | Bottom motor cover(left) 1 | |
| 65R | Bottom motor cover(right) 1 | |
| 66 | Flow Fitness batch 1 | |
| 67 | Allen bolt M10*35L 4 | |
| 68 | Bushing D28*D10*9.2 4 | |
| 69 | Plastic washer D10*D24*0.4T 4 | |
| 70 | Incline JS11-B 1 | |
| 71 | Flat washer D20xD11x2T 4 | |
| 72 | Spring washer D17.8*D10.2*3.0T 4 | |
| 73 | Nylon nut M10x1.5x10T 6 | |
| 74 | Allen bolt M10*1.5*65L 1 | |
| 75 | Allen bolt M10*1.5*50L 1 | |
| 76 | Flat washer D30*D10*3.0T 2 | |
| 77L | Rear cover(left) 1 | |
| 77R | Rear cover(right) 1 | |
| 78 | Computer | |
| 79 | Audio cable 1 | |
| 80 | Safety clip 1 | |
| 81 | Upper computer cable 1 | |
| 82 | Middle computer cable 1 | |
| 83 | Lower computer cable 1 | |
| 84 | Sensor cable 1 | |
| 85 | MCB 1 | |
| 86 | Filter 10A | |
| 87 | Coil | |
| 88 | Electric cable 1 | |
| 89 | Switching mode power supplier 1 | |
| 90 | overcurrent protector 1 | |
| 91 | Socket | |
| 92 | Grounding wire 2 1 | |
| 93 | live wire 1 1 | |
| 94 | live wire 2 2 | |
| 95 | neutral wire 1 2 | |
| 96 | neutral wire 2 1 | |
| 97 | Magnet ring 1 |
4.3 Troubleshooting
Problem:
The computer of the treadmill is not switching on.
Solution:
- Check if the plug is connected to a grounded outlet
- Check if the switch near the adapter cable is set to ON or I.
- Check if the fuse near the switch . If the fuse is broken contact your reseller
Problem:
The screen shows "Please install safety key".
Solution:
The safety key is not placed (correctly). Place the safety key into the designated area of the treadmill.
Problem
De computer doesn't or badly reads your heart rate.
Solution
Receipt of the heart rate with use of the handle bar sensors is not consistent. Sweat, movement or even hand creme can have a negative effect on the connection. We advise you to use a bluetooth chest belt while training a heart rate controlled exercise program. The handle bar sensors are primarily used for occasionally checking the heart rate during a training excises.
When there is no heart rate reception when using a bluetooth chest belt check the following:
- Check if the screen of your Flow Fitness device is still active and your Flow Fitness Device is not connected to a smartphone or tablet.
- Check if you bluetooth chest belt is not connected to any other device like your smartphone or tablet.
- Have you read the chest belt's manual? It is important that the sensors are made moist for a better contact with the skin.
- Is there a full and correctly placed battery?
- Is the chest belt worn tight enough?
In case your problem is not resolved or not described, consult the fitness reseller where you purchased this product.
5.1 Warranty
The warranty is provided by the Flow Fitness distributor of your country and the reseller where you have purchased your product. Please check
https://www.flowfitness.com/en/dealers/
for contact information.
FLOWFITNESS
Runner DTM2000i Treadmill


- 4.1 MONTAGE
- STAP 1: BEVESTIGEN VAN DE COMPUTER BUIZEN
- OPKLAPPEN
- KINOMAP FITNESS
- ONDERHOUD NA TRAINING
- 5.1 TRAINING SCHEMA'S
- TRAININGSSCHEMA WEEK 3 EN 4
- TRAININGSSCHEMA WEEK 5 EN 6
- 5.3 PROBLEEMOPLOSSEN
- PROBLEEM
- IMPORTANT INFORMATION 42
- INTRODUCTION 44
- FITNESS 48
- GENERAL INFORMATION 72
- WARRANTY 77
- 1.1 HEALTH
- IMPORTANT: READ THIS INSTRUCTION MANUAL FIRST AND FOLLOW THE INSTRUCTIONS CAREFULLY BEFORE USING THE PRODUCT
- 1.2 SAFETY
- WARNING
- INTRODUCTION
- 2.1 CONTENTS OF PACKAGE
- 2.2 IMPORTANT PARTS
- 2.3 SPECIFICATIONS
- COMPUTER
- HEART RATE RECEPTION
- SIZE
- SIZE FOLDED
- TECHNICAL
- EXTRA
- 3.1 TRAINING BY HEART RATE
- 3.2 WARMING UP AND COOLING DOWN
- HEAD ROLL
- TOE TOUCH
- SIDE STRETCH
- KNEE BEND
- LOWER BACK STRETCH
- HAMSTRING STRETCH
- 3.3 ASSEMBLY
- STEP 1: ASSEMBLING THE COMPUTER POSTS
- STEP 2: ASSEMBLING THE COMPUTER FRAME
- STEP 3: ASSEMBLING THE COMPUTER
- STEP 4: ASSEMBLING THE COMPUTER POST COVERS
- 3.4 STORAGE / PREPARE FOR USE
- FOLDING
- UNFOLDING
- ADJUST HORIZONTALLY
- POWER CONNECTION
- FOR YOUR OWN SAFETY IT IS IMPORTANT THAT THE POWER CORD IS PLUGGED INTO A GROUNDED OUTLET
- SAFETY CORD
- 3.5 USE OF THE COMPUTER
- CONTROL PANEL
- COOL DOWN
- PROGRAM
- ENTER
- FAN / VENTILATOR
- SPEED / PACE
- QUICK INCLINE KEYS
- INCLINE
- START
- STOP
- SPEED
- QUICK SPEED KEYS
- QUICK KEYS
- FIRST USE
- STANDBY
- PAUSE OR STOP A TRAINING SESSION
- MANUAL
- USER PROGRAM
- HRC - THR HEART RATE CONTROLLED PROGRAM
- BODY FAT TEST
- TRAINING
- TRAIN WITH YOUR SMARTPHONE OR TABLET
- IOS OPERATING SYSTEM
- ANDROID OPERATING SYSTEM
- FOLLOW THE STEPS BELOW TO CONNECT YOUR MOBILE DEVICE WITH THE DTM2000I USING A BLUETOOTH CONNECITON
- ICONSOLE+ TRAINING
- KINOMAP
- ZWIFT
- 3.6 MAINTENANCE
- CENTRING AND TENSIONING THE BELT
- MAINTAINING THE SLIDING SURFACE
- LUBRICATING THE DECK WITHOUT FLOW FITNESS TREADMILL LOTION
- CLEANING
- 4.1 TRAINING SCHEDULE
- INTRODUCTION SCHEDULE
- SCHEDULE WEEK 1 AND 2
- SCHEDULE WEEK 3 AND 4
- SCHEDULE WEEK 5 AND 6
- TRAINING SCHEDULE TO IMPROVE STAMINA
- SCHEDULE WEEK 7 AND 8
- SCHEDULE WEEK 9 AND BEYOND
- TRAINING SCHEDULE TO LOSE WEIGHT
- GENERAL INFORMATION
- 4.2 EXPLODED VIEW
- AANTAL
- 4.3 TROUBLESHOOTING
- PROBLEM
- SOLUTION
- 5.1 WARRANTY
- FLOWFITNESS
Brand : Flow Fitness
Model : Runner DTM2000i
Category : Treadmills