
MISTRAL 2.0 - Remote control toy ROBBE - Free user manual and instructions
Find the device manual for free MISTRAL 2.0 ROBBE in PDF.


| Product Type | Remote Control Toy |
| Brand | Robbe |
| Model | MISTRAL 2.0 |
| Category | Radio-Controlled Toy |
| Dimensions (approx.) | 250 x 150 x 100 mm |
| Weight (approx.) | 500 g |
| Power Supply | Battery operated (4x AA batteries not included) |
| Remote Control Frequency | 2.4 GHz |
| Control Range | Up to 50 meters |
| Functions | Forward, backward, left/right steering |
| Recommended Age | 8 years and up |
| Safety Warnings | Not for children under 3 years. Choking hazard due to small parts. |
| Maintenance | Clean with a dry cloth. Store in a dry place. |
| Spare Parts | Available through Robbe authorized dealers |
| Repairability | Modular design for easy part replacement |
| Battery Life | Approximately 30 minutes of continuous use |
| Charging Time | Not applicable (uses disposable batteries) |
| Remote Control Batteries | 2x AAA batteries (not included) |
Frequently Asked Questions - MISTRAL 2.0 ROBBE
User questions about MISTRAL 2.0 ROBBE
0 question about this device. Answer the ones you know or ask your own.
Ask a new question about this device
Download the instructions for your Remote control toy in PDF format for free! Find your manual MISTRAL 2.0 - ROBBE and take your electronic device back in hand. On this page are published all the documents necessary for the use of your device. MISTRAL 2.0 by ROBBE.
USER MANUAL MISTRAL 2.0 ROBBE
The Ground Truth image displays a single, solid horizontal line. According to Rule 2 (UNDERSCORE & LINE RULES), this is a stylistic or background line, not a placeholder underscore. Therefore, the OCR result must ignore it and output nothing or only meaningful text. The provided OCR content is "____", which consists of four underscores. This is an incorrect interpretation of the line as a placeholder, violating the rule that stylistic lines must be ignored. The OCR has hallucinated underscores where none should exist based on the GT's visual context. Hence, the OCR result is inconsistent with the Ground Truth.

+14
GENERAL INFORMATION
• The model is designed for the components specified by us. Unless otherwise stated, servos and other electronic components are designed for standard supply voltage. Recommended cell count for Lipo batteries also refers to standard Lipos voltage of 3.7V per cell. If you use other servos, a different motor and controller, batteries, or propellers, please make sure they fit first. In the event of deviations, corrections and adjustments must be made by yourself.
- Before starting construction, always put the servos into neutral. To do this, switch on the remote control and move the joysticks and trim buttons (save the one for the throttle) to the middle position. Connect the servos to the corresponding outputs of the receiver and supply them with a suitable power source. Please observe the connection diagram and the operating instructions of the remote control system manufacturer.
- Do not leave your model in the blazing sun or in your vehicle for long periods of time. Too high temperatures can lead to deformation/distortion of plastic parts or blistering of covering foils.
- Before the first flight, check the wing symmetry, tail unit and fuselage. All parts of the model should have the same spacing from the left and right wing or tail plane to the centre of the fuselage or the same angle.
- If necessary, rebalance the propellers if vibrations are noticeable when the motor is running up.
- Bubble formation in the covering foils normal to a certain extent due to temperature and humidity differences and can be easily eliminated with a foil iron or hairdryer.
- For models in shell construction („full GFRP/CFRP“), burrs may occur at the seams due to the production process. Carefully remove them with fine sandpaper or a file.
GENERAL SAFETY INFORMATION
- Be sure to read the safety instructions carefully before operating your model.
• Always follow the procedures and settings recommended in the instructions. - If you are using remote-controlled model aircraft, helicopters, cars or ships for the first time, we recommend that you ask an experienced model pilot for help.
- Remote-controlled models are not toys in the usual sense and may only be used and operated by young people under 14 years of age under the supervision of adults.
- Their construction and operation requires technical understanding, careful craftsmanship and safety-conscious behaviour.
- Mistakes or negligence during construction, flying or driving can result in considerable damage to property or personal injury.
- Since the manufacturer and seller have no influence on the proper construction/assembly and operation of the models, these risks are expressly pointed out and any liability is excluded.
- Propellers on aircraft and all moving parts in general pose a constant risk of injury. Avoid touching such parts at all costs.
- Note that motors and controllers can reach high temperatures during operation. Avoid touching such parts at all costs.
- Never stay in the danger area of rotating parts with electric motors with connected drive battery.
• Overcharging or incorrect charging can cause the batteries to explode. Make sure the polarity is correct. - Protect your equipment and Models from dust, dirt and moisture. Do not expose the equipment to excessive heat, cold or vibration.
- Use only recommended chargers and charge your batteries only up to the specified charging time. Always check your equipment for damage and replace defects with original spare parts.
-
Do not use equipment that has been damaged or got wet due to a fall, even if it is dry again! Either have it checked by your specialist dealer or in the Robbe Service or have it replaced. Hidden faults can occur due to wetness or a crash, which lead to a functional failure after a short operating time.
-
Only the components and accessories recommended by us may be used.
- Do not make any changes to the remote control which are not described in these instructions.
SAFETY INSTRUCTIONS FOR CONTROLLERS
- Observe the technical data of the controller.
- Observe the polarity of all connection cables.
- Avoid short circuits at all costs.
• Install or package the regulator so that it cannot come into contact with grease, oil or water. - Ensure adequate air circulation.
- Never reach into the turning circle of the propeller during start-up Risk of injury
Important information:
The receiver system is powered by the built-in BEC system of the controller. For commissioning, always move the throttle stick to the „Motor off" position and switch on the transmitter. Only then connect the battery. To switch off always disconnect the connection battery motor controller, first then turn off the transmitter. During the functional test, move the servos of the rudders to neutral position with the remote control (stick and trimming lever on the transmitter to the middle position). Please make sure to leave the throttle stick in the lowest position so that the engine does not start. For all work on
to the parts of the remote control, motor or controller, follow the instructions supplied with the units. Also read the instructions of the battery and the charger carefully before commissioning.
Check the engine mounting bolts in the fuselage regularly for tightness.
Attention, danger of injury!
• Always keep a safe distance from your model aircraft.
- Never fly over spectators, other pilots or yourself.
• Always perform flight figures in a direction away from the pilot or spectators.
- Never endanger people or animals.
- Never fly near power lines or residential areas.
- Do not operate your model near locks or public shipping.
- Do not operate your model on public roads, motorways, paths and squares, etc., but only in approved locations.
- Do not operate the model in thunderstorms.
- Before each flight, check your remote control system for sufficient function and range.
• After flying, remove all batteries from the model.
Do not „aim“ the transmitter antenna at the model during operation. In this direction, the transmitter has the lowest radiation. The best position of the antenna is to the side of the model.
Use of devices with image and/or sound recording function:
If you equip your model with a video or image recording device (e.g. FPV cameras, action scams etc.) or the model is already equipped with such a device at the factory, please note that you could violate the privacy of one or more persons by using the recording function. An overflight or driving on private ground without the appropriate permission of the owner or approaching private ground can also be regarded as an invasion of privacy. You, as the operator of the model, are solely and fully responsible for your actions.
In particular, all applicable legal requirements must be observed, which can be found in the roof associations or the relevant authorities. Failure to comply can result in substantial penalties.
INTRODUCTION
Congratulations that you took the choice to purchase this Robbe RC model airplane, a very good choice from our point of view.
We put a lot of attention to the overall quality of the airplane in terms of design, performance and manufacturing quality. We used all of our experience designing and building high quality aircraft in order to present you an exceptional product. We chose high grade material and looked after high end accessories in order to ensure top level outcome in terms of function, performance and durability of the product. We are open and offer all necessary support in case you should find any problem with your airplane.
As you are well aware this is a technical product. Due to its nature it is required if not mandatory to read the instruction manual completely. Please follow the steps to complete your model as described. It will ensure that your model will turn out in the best possible way. Please also take notice and good care about the warning messages at the end of the instruction manual. Knowing about them ensures that you can operate the model in the safest possible manner keeping risk away from you and other persons. Also ensure that you comply with the latest legislation in terms of flight safety. We wish you all the best for building and especially operating your RC airplane. In case you have any questions please contact us. We are driven to offer the best possible support at any time.
SPECIFICATIONS
| Span 2000 mm | |
| Length 1170 mm | |
| Flying weight 1780 g | |
| Wing area 37,95 dm 2 | |
| Airfoil RG-15 mod. |
NEEDED ACCESSORIES
| ARF-Version PNP-Version | ||
| Motor | RO-Power 3522 (1000 kV) | RO-Power 3522 (1000 kV) built-in |
| ESC | RO-Control 6-80A | RO-Control 6-80A |
| Servos 6x FS-155MG | 6x FS-155MG built-in | |
| Servo cables Appr. | 2m | built-in |
| Multilock | ||
| MPX plugs | 2 pair MPX plugs | built-in |
| Battery | 4S LiPo 2000-2500mAh | 4S LiPo 2000-2500mAh |
| Propeller | 11 x 8" | 11 X 8" included |
| Spinner | 38mm | 38mm included |
| TX | min. 5 Channels | min. 5 Channels |
| RX | min. 7 Channels | min. 7 Channels |
| Glues | 5min epoxy resinUHU Por, Velcro tape | 5min epoxy resinUHU Por, Velcro tape |
ASSEMBLY THE FUSELAGE
01
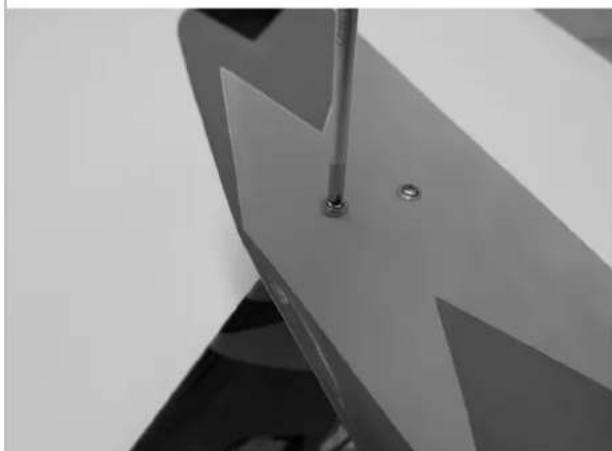
Install the elevator with the enclosed M3x10 screws on the fuselage and insert the elevator linkage into the drillhole of the rudderhorn. Make sure to carefully tighten the screws, without putting too much pressure on the surface.
02

Check the length of the elevator linkage and, if needed, adjust it by adjusting the length of the clevis rods. The rudder should be placed in neutral position during a 90°position of the servohorn.
03
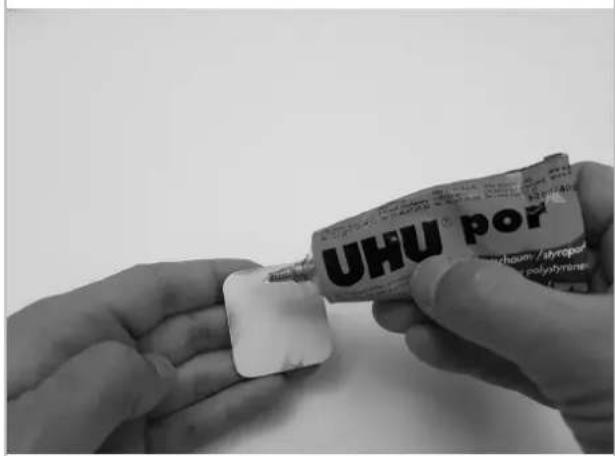
Use the cover to seal the servoshaft. In order to glue the cover to the frame of the shaft use UHU Por or double-sided tape.
04
Twist one clevis onto the thread of the rudder's rod. Again, please make sure that the rudder is placed in neutral position during a 90°position of the servohorn. Correct the length of the clevis rods, if needed.
05
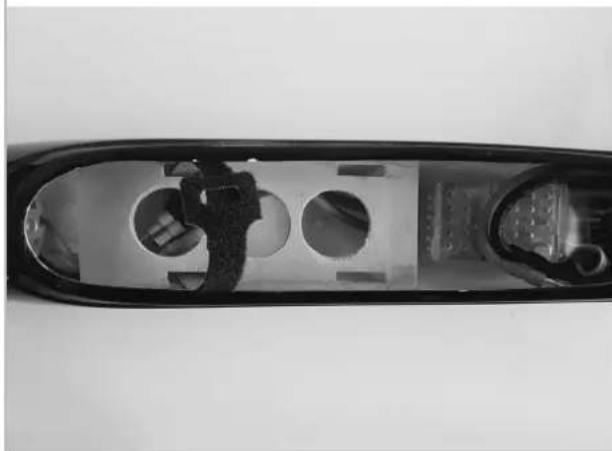
Now connect the ESC (electronic speed controller) to the three motor wires and to the designated output of the receiver. Check the correct running direction of the motor (clockwise rotation in flight direction). If the motor is running in the wrong direction, only change two of the three motor wires. Use velcro tape or fixing foam to mount the ESC on the bottom side of the fuselage behind the battery board. If necessary, secure the wire leads so that they can't get into the motor.
06
Install the enclosed aluminum clamping cone to the motor shaft. Tighten the screw nut carefully because of the aluminum thread. Use 3mm bolts and lock rings to fix the blades on the center part. Install the spinner.
07
Plug all servo cables into the designated outputs of your receiver (dependent on the manufacturer). The servo leads of the aileron are marked with shrinkable tubing. The excessive lengths of the leads can be stashed away in the back of the fuselage.
08
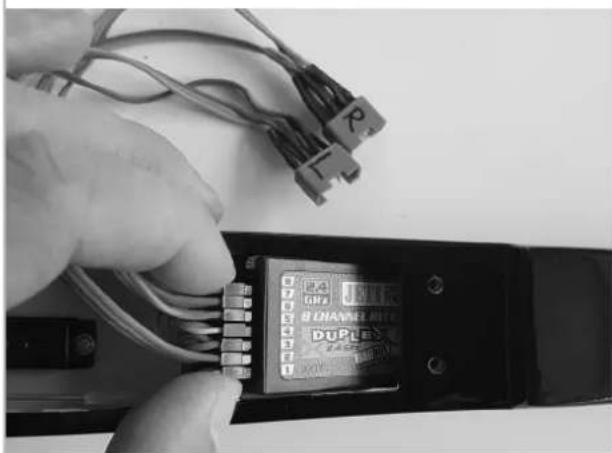
Use velcro tape on the bottom of the fuse-lage or fixing foam to fix the receiver and all wire leads behind the wing screws.
ASSEMBLY THE WING
09
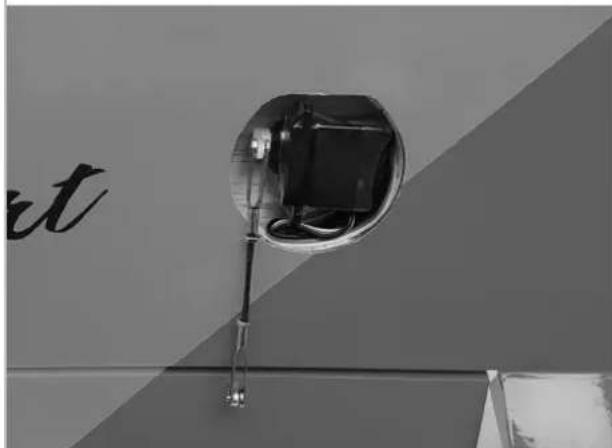
Connect the aileron rods to the rudder- and servo horns (outer servo). Make sure that the rudder is placed in neutral position during right-angled position of the servohorn. If needed, adjust the rods.
ARF: Install the servo in the servo opening. We recommend the use of a designated servo frame. Use a wire to route the servocable through the servo openings. The green 6-pole MPX plugsystem is used to connect the fuselage.
10
The linkage of the flaps is realized by a cross-over connection through the surface of the wing. Therefore the rod must initially be connected to the bottom side of the flap servo and routed through the upper side of the wing in order to be connected with the flap's rudder horn. If the servo horn is positioned in a right-angle (neutral position), the deflection of the flap should read approximately 15mm downwards.
11
ARF: Install the servo in the servo opening. We recommend the use of a designated servo frame. Use a wire to route the servocable through the servo openings. The green 6-pole MPX plugsystem is used to connect the fuselage.
12
Pay attention to a proper cable guide. Stash the excessive length of the leads away in the cable conduits.
13
Hint: A mechanically well adjusted model is quite important. Therefore make sure that you take your time, adjusting your model.
14

Use epoxy to glue the aluminum pressing disk into the drill holes on the upper side of the wing. Remove the plastic sheet beforehand. Then use the wing screws to fix the wing. Glue the 3mm torsional pin into the root rib of the right part of the wing (slightly roughen and degrease the adherend at first).
Hint: The wing connector can also be glued into this part of the wing. This way you can prevent the loss or neglect of the connector even though the pack size increases slightly.
15

Use epoxy to glue both 3mm torsional pins into the front drill holes of the wings (slightly roughen and degrease the adherend at first).
16

After all electrical adjustments are finished and the rods are finely adjusted; use UHU-Por to glue the servo opening covers and rod covers.
INSTALLATION AND TUNING PROCESS
17
Insert both parts of the wing onto the wing connector and connect the plugs of the wing servos. Use M3x20 countersunk screws to connect the wing with the fuselage.
18
Make sure that no wires are stuck between the fuselage and the wing.
20
Turn your transmitter and receiver on. Make sure that the correct model is adjusted on the memory of your transmitter. If possible, try to adjust all rods mechanically.
21
The next step is to check the running direction and ways of the servos. Therefore please note the grid below.
CONTROL THROWS
| Normal Thermal Speed | d Landing Start | /Motor | |||
| Ailerons ▲ 12 mm▼ 6 mm, 20% Expo | |||||
| Elevator ▲ 10 mm▼ 8 mm, 25% Expo | ▼ 2 mm | ▲ 1-2 mm | ▼ 4 mm▼ | 2 mm | |
| Rudder ◀ 20 mm▶ 20 mm | |||||
| Flaps | ▼ 5 mm | ▲ 2 mm | ▼ 15 mm |
CENTER OF GRAVITY
The center of gravity is set at 67-72mm behind the leading edge. It is recommended that beginners set the center of gravity at 67mm. More experienced users can set it further to the back, in order to achieve a more dynamic flight envelope.
FLIGHT RECOMMENDATIONS
Choose a calm day for your first flight and take your time adjusting the model to your needs. Ask a buddy to throw the model horizontally in the air or use a glider dolly. Pull the elevator gently after gaining sufficient speed to climb. We wish you many nice and relaxing flights with your new Mistral 2.0 from Robbe.
CONFORMITY

Robbe Modellsport hereby declares that this device complies with the essential requirements and other relevant regulations of the corresponding CE directives. The original declaration of conformity can be found on the Internet at www.robbe.com, in the detailed product view of the respective device description or on request. This product can be operated in all EU countries.
DISPOSAL

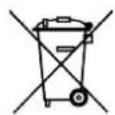
This symbol means that small electrical and electronic devices must be disposed of at the end of their useful life, separated from the household refuse. Dispose of the device at your local municipal collection point or recycling centre. This applies to all countries of the European Union and other European countries with a separate collection system.
WARRANTY
Our articles are equipped with the legally required 24 months warranty. Should you wish to assert a justified warranty claim, always contact your dealer, who is responsible for the warranty and the processing. During this time, any functional defects that may occur, as well as manufacturing or other problems, will be rectified.
Material defects corrected by us free of charge. Further claims, e.g. for consequential damages, are excluded. The transport to us must be free, the return transport to you is also free. Freight collect shipments cannot be accepted. We cannot accept liability for transport damage and loss of your consignment. We recommend appropriate insurance.
To process your warranty claims, the following requirements must be met:
- Attach the proof of purchase (receipt) to your shipment.
- The units have been operated in accordance with the operating instructions.
- Only recommended power sources and original robbe accessories have been used.
- There is no moisture damage, external interference, reverse polarity, overloading or mechanical damage.
- Attach relevant information for finding the fault or defect.
INSURANCE
Ground-based models are usually covered by personal liability insurance. Additional insurance or extension is required for aircraft models. Check your insurance policy (private liability) and take out suitable insurance if necessary.
DISCLAIMER
Robbe Modellsport cannot monitor compliance with the assembly and operating instructions or the conditions and methods for installation, operation, use and maintenance of the model components. Therefore, we accept no liability for losses, damage or costs arising from or in any way connected with incorrect use and operation. To the extent permitted by law, the obligation to pay damages, irrespective of the legal grounds, shall be limited directly to the invoice value of the claims arising from the event causing the damage.
FLIGHT INSTRUCTIONS
- Before the first flight, observe the instructions in the „Safety Instructions“ section.
• To fly in the model, you should choose a day with as little wind as possible - A large, flat meadow without obstacles (trees, fences power lines etc.) is suitable for the first flights.
- Carry out another functional test of the drive and remote control.
- After assembling the model on the airfield, check once again that all model components such as wing, tail units, wing mounts, engine, linkage, etc. are firmly seated.
- For the hand start a helper should be present, who can transport the model with not too little thrust into the air.
• The start usually takes place against the wind - Do not stall the model near the ground
- Do not initiate tight bends in the immediate vicinity of the ground.
- Check the reactions of the model to the rudder deflections. If necessary, the rashes after landing
• to increase or decrease the size accordingly. - The minimum flight speed must be at an adequate safety altitude.
- Initiate the landing with sufficient speed
SAFETY INSTRUCTIONS FOR RECHARGEABLE BATTERIES
- Do not immerse the battery in water or other liquids.
- Do not heat, throw into fire or microwave.
- Do not short-circuit or charge with reversed polarity
- Do not expose, deform or throw the battery to pressure
- Do not solder directly on the battery
- Do not change or open the battery
- Only charge the battery with suitable chargers, never connect it directly to a power supply unit.
- Never charge or discharge the battery or charger on a flammable surface.
- Never leave the battery unattended during charging or discharging processes.
- Never charge or discharge the battery in direct sunlight or near heaters or fire.
- Do not use the battery in places subject to high static discharge.
All this can cause the battery to be damaged, explode or even catch fire!
- Keep the battery away from children
- Do not associate leaked electrolyte with fire, as it is highly flammable and may ignite.
• The electrolyte liquid should not get into the eyes, if it does, rinse immediately with plenty of clear water and then see a doctor.
• The electrolyte liquid can also escape from clothes and other objects with a lot of water or washed off.
- Observe the safety instructions of the battery manufacturer and the charger manufacturer.

Made in China

The Ground Truth image displays a single, solid horizontal line. According to Rule 2 (UNDERSCORE & LINE RULES), this is a stylistic or background line, not a placeholder underscore. Therefore, the OCR result must ignore it and output nothing or only meaningful text. The provided OCR content is "____", which consists of four underscores. This is an incorrect interpretation of the line as a placeholder, violating the rule that stylistic lines must be ignored. The OCR has hallucinated underscores where none should exist based on the GT's visual context. Hence, the OCR result is inconsistent with the Ground Truth.

+14
INFORMATIONS GÉNÉRALES

The Ground Truth image displays a single, solid horizontal line. According to Rule 2 (UNDERSCORE & LINE RULES), this is a stylistic or background line, not a placeholder underscore. Therefore, the OCR result must ignore it and output nothing or only meaningful text. The provided OCR content is "____", which consists of four underscores. This is an incorrect interpretation of the line as a placeholder, violating the rule that stylistic lines must be ignored. The OCR has hallucinated underscores where none should exist based on the GT's visual context. Hence, the OCR result is inconsistent with the Ground Truth.


NOTIZEN / NOTICE / NOTES
NOTIZEN / NOTICE / NOTES
MISE SUR LE MARCHÉ

Robbe Modellsport
Industriestraße 10
Email: info@robbe.com
service@robbe.com, +43 7582-81313
www.robbe.com
INVERKEHRBRINGER
robbe Modellsport
Robbe Modellsport
Industriestraße 10
service@robbe.com +43(0)7582-81313-0
www.robbe.com
DISTRIBUTOR
robbe Modellsport
Robbe Modellsport
Industriestraße 10
Phone: +43(0)7582/81313-0
Mail: info@robbe.com
UID No.: ATU69266037
„robbe Modellsport“ is a registered Trademark.
Errors, misprints and technical changes reserved.
Copyright 2019
Robbe Modellsport 2019
Copy and reprint only with our permission.
Service-Address
Contact your Dealer or:
service@robbe.com, +43(0)7582-81313-0
www.robbe.com


- GENERAL INFORMATION
- GENERAL SAFETY INFORMATION
- SAFETY INSTRUCTIONS FOR CONTROLLERS
- IMPORTANT INFORMATION
- ATTENTION, DANGER OF INJURY
- INTRODUCTION
- ASSEMBLY THE FUSELAGE
- 05
- 06
- 07
- 08
- ASSEMBLY THE WING
- 10
- 11
- 12
- 13
- 14
- 15
- 16
- INSTALLATION AND TUNING PROCESS
- 17
- 18
- 20
- 21
- CENTER OF GRAVITY
- FLIGHT RECOMMENDATIONS
- CONFORMITY
- DISPOSAL
- WARRANTY
- INSURANCE
- DISCLAIMER
- FLIGHT INSTRUCTIONS
- SAFETY INSTRUCTIONS FOR RECHARGEABLE BATTERIES
- INFORMATIONS GÉNÉRALES
- ROBBE MODELLSPORT
- INVERKEHRBRINGER
- DISTRIBUTOR
- COPYRIGHT 2019
- SERVICE-ADDRESS
Brand : ROBBE
Model : MISTRAL 2.0
Category : Remote control toy