USER MANUAL DUPLEX DIRT DEVIL
Operating Manual Double-brush sweeper
GB
Mode d'emploi
Balai electrique
double Brosse
FR
2 Safety instructions 26
2.1 About the operating manual 26
2.2 About certain groups of persons 26
2.3 About the power supply 26
2.4 About the battery pack supplied 27
2.5 About the brush rollers 27
2.6 About appropriate use 27
3 Before first use 28
3.1 Unpacking 28
3.2 Attaching the tube and handle 28
3.3 Inserting the battery pack 29
3.4 Charging the battery pack 30
4 Use 31
4.1 Switching on the appliance 31
4.2 Adjusting the sweeping performance 31
5 After use 32
5.1 Switching off 32
5.2 Transportation and storage 32
5.3 Emptying the dust container 33
5.4 Cleaning the brush rollers 34
6 Troubleshooting 37
6.1 If the appliance does not work as it should 37
6.3 If the appliance is defective 38
6.2 Ordering accessories and spare parts 38
6.4 Disposing of the appliance and battery pack 38
7 Warranty 39
7.1 Warranty conditions 39
7.2 In case of a warranty claim 39
We are pleased that you have chosen the double-brush sweeper Duplex!
Thanks for your purchase and your confidence in us.
Technical data
Type of appliance : Double-brush sweeper
| Model : Duplex |
| Model number : M668 (-0/-1/..-8/-9) |
| Power supply unit : 100...240 V~,
input 50/60 Hz |
| Power supply unit : 10 V DC,
output 200 mA |
| Battery pack : Ni-MH, 6 V DC,
1300 mAh |
| Charging time : approx. 16 h |
| Operating duration: approx. 20...60 minutes
depending on switch
position/type of flooring) |
| Weight (without
accessories) : approx. 2.0 kg |
Labels

: Only for household use

Satisfies the European directives

Protection class II (Protective insulation)
Do not dispose of with household waste
Technical and design specifications may be changed in the course of continuous product improvement. © Royal Appliance International GmbH
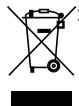
1 Three-position slide switch
- Position '0': switched off
- Position 'I': for hard floors
- Position 'll': for carpets
2 Eyelet for hanging up (optional)
3 Handle
4 Handle
5 Battery pack
6 Battery pack release catches
7 Operating manual
8 Mains adapter
9 Power supply unit
10 Plug
*included in the scope of delivery depending on model and features
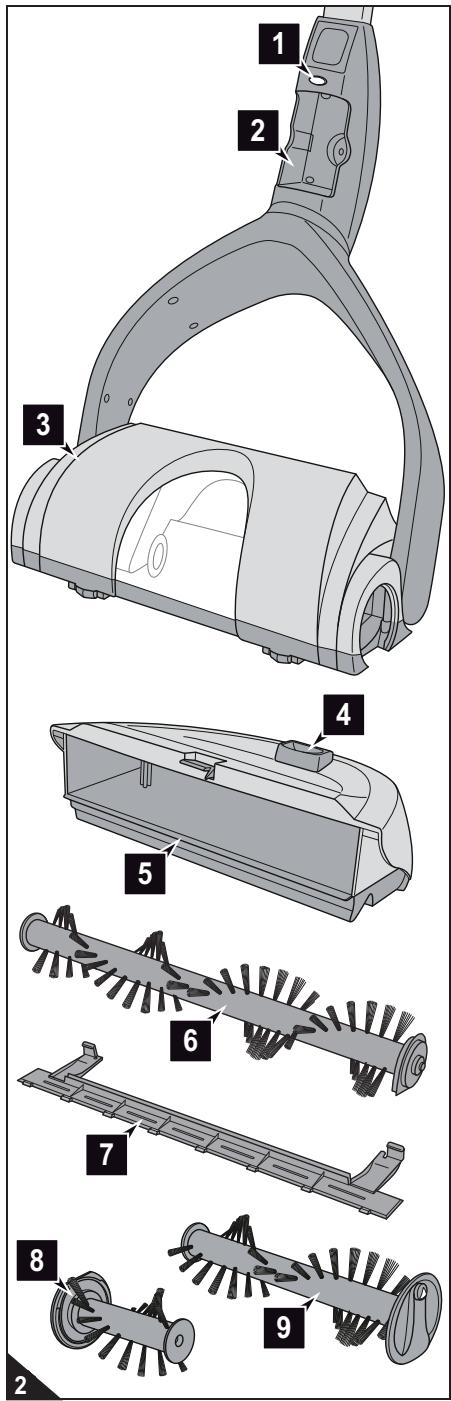
1 Charging indicator light
2 Battery compartment
3 Brush base
4 Dust container release button
5 Dust container
6 Rear brush roller
7 V-belt cover
8 Narrow, front brush roller
9 Wide, front brush roller
2.1 About the operating manual

WARNING:
Warning concerning health hazards
describing possible risks of injury.

ATTENTION:
Warning concerning possible dangers to the appliance or other objects.
NOTE:
Highlights tips and information.
Read this operating manual completely before using the appliance.
Keep the operating manual in a safe place. If you pass the appliance on to someone else, give them the operating manual as well.
Non-compliance with these instructions can lead to serious injuries or damage to the appliance.
We assume no liability for damage that occurs as a result of non-compliance with this operating manual.
2.2 About certain groups of persons
These appliances can be used by children of eight years and upwards and persons with impaired physical, sensory or mental abilities, or insufficient experience or knowledge, providing they are supervised or have been instructed in the proper use of the appliance and understand the risks involved. Keep the appliance out of reach of people of these groups.
Children must not carry out cleaning work or maintenance unless they are supervised.
The appliance is not a toy. Children are not permitted to play with the appliance.
Children must not be allowed to stand or sit on the appliance.
As the manufacturer, we strongly advise against children of any age using the appliance for safety reasons. Children of all ages will not fully recognise or understand the risks this appliance poses.
Packing material must not be used to play with. There is danger of suffocation.
2.3 About the power supply
The battery pack is charged with electricity. There is always a risk of electric shock. So please observe the following in particular:
- Never touch the power supply unit with wet hands. Never immerse the appliance, its power supply unit or the battery pack in water or other liquids and keep it away from all damp.
If you want to pull the power supply unit out of the socket, always pull directly on the plug. Never pull the power supply unit's cord. Do not carry the power supply unit by its cord.
Take care that the power supply unit's cord is not bent, pinched, rolled over and does not come into contact with heat sources.
Only charge the appliance if the voltage indicated on the power supply unit matches the voltage of your socket. Always check the power supply unit's cord for possible damage before using it.
Ensure that the power supply unit has been pulled from the socket before inserting or removing the battery pack, as well as before cleaning or maintaining the appliance.
2.4 About the battery pack supplied
Wrong handling of the batteries can cause injury and explosion.
Only use the power supply unit supplied with the appliance to charge the battery pack. Never charge the battery pack with another power supply unit. Use the power supply unit supplied solely to charge the battery pack of this appliance.
Before removing the battery pack, ensure that the power supply unit has been removed from the socket.
Never take the battery pack apart and never expose it to high temperatures. If not handled correctly, liquid could escape from the battery pack. Avoid any contact with the fluid.
If the battery pack needs replacing, contact a specialist dealer or Royal Appliance Customer Services. Do not replace the battery pack with other batteries.
Only insert the battery pack supplied or an original battery pack that you have subsequently ordered into the appliance. Use this battery pack for this appliance only.
- Do not try to open the battery pack. If the batteries inside the battery pack have reached the end of their life, then the entire battery pack must always be replaced.
Only dispose of the battery pack as described after their operational life, Chapter 6.4, Disposing of the appliance and battery pack'.
2.5 About the brush rollers
The appliance has driven brush rollers. In unfavourable circumstances they could cause injury. So please observe the following in particular:
Ensure that the appliance is switched off, the power supply unit is not connected and the battery pack has been removed before beginning to clean or maintain the appliance.
Ensure that parts of your body can never get under the brush rollers.
Do not brush close to cables, pipes and long fringes. The cable insulation could get damaged. Or these objects could get caught in the brush rollers and damage the appliance.
2.6 About appropriate use
The appliance is only permitted to be used in households to sweep up small quantities of dirt from dry floors. It is not suitable for industrial or commercial use.
Any other use is considered inappropriate and is prohibited.
It is especially forbidden:
To use, store or charge the appliance outdoors.
To alter or repair the appliance yourself.
Also forbidden is use:
- ... on people, animals or plants;
- ... close to hot, smouldering, burning, pointed or sharp objects;
- ... to clean up liquids;
- ... whilst the power supply unit is connected;
- ... to clean up quantities of dirt exceeding the usual accrual of dirt and particles.
3 Before first use
3.1 Unpacking

ATTENTION:
Keep the packaging for storing the appliance, or for it to be transported safely. Always transport or ship the appliance in its original packaging to avoid damage.
- Unpack the appliance and all its accessories.
- Check the contents for completeness and possible damage (Fig. 1).
NOTE:
Contact your dealer if you have found damage resulting from transport.
3.2 Attaching the tube and handle
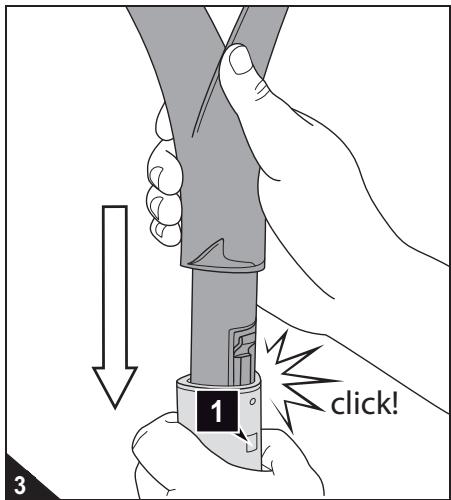
NOTE:
The upper and lower end of the tube are identical in construction.
- Insert the handle into the tube (Fig. 3) and push forcefully until you can hear and feel the handle click into place.
NOTE:
Only then can you be sure that the electric contacts inside the handle engage in the tube.
NOTE:
If you want to take the handle back out, then you have to push the small square on the tube (Fig. 3/1) powerfully with a small blunt object and pull on the handle at the same time.
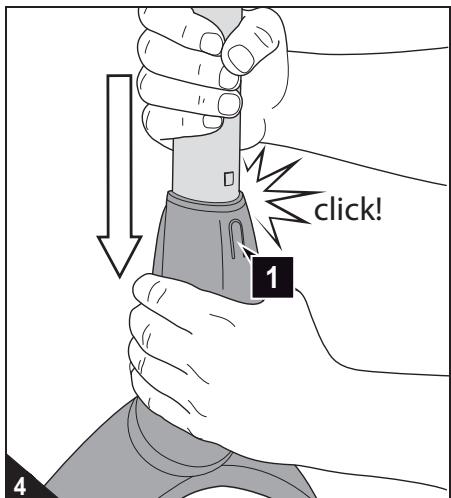
-
Insert the tube into the holder on the brush base (Fig. 4) and push powerfully until
-
the small square on the tube has disappeared; and
- you can feel and hear the tube click into place.
NOTE:
Only then can you be sure that the electric contacts inside the tube engage in the holder.
NOTE:
If you want to pull the tube back out, then you have to push in the release catch on the holder (Fig. 4/1) forcefully and pull on the tube at the same time.
3 Before first use
3.3 Inserting the battery pack
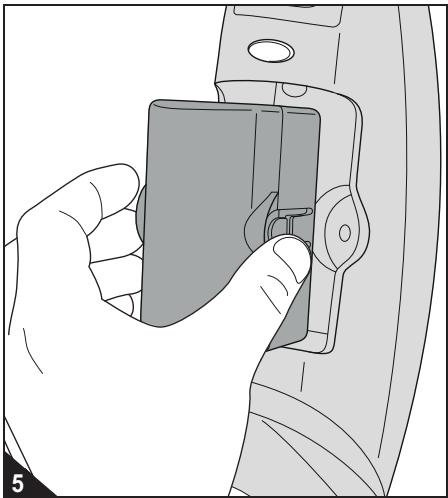
ATTENTION:
Only insert into the appliance the battery pack supplied or an original battery pack that you have subsequently ordered.
NOTE:
As long as you insert the battery pack with the contact first into the appliance, it is not important which way around you insert it.
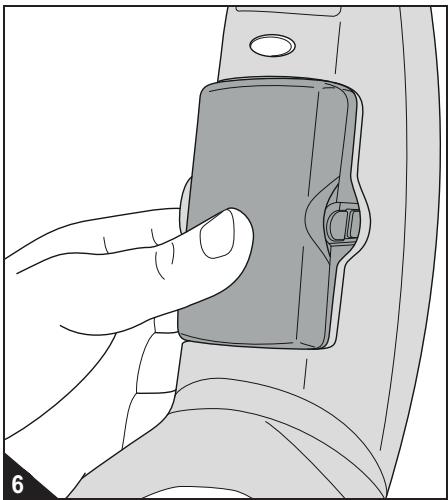
- Insert the battery pack with the contact first into the battery compartment (Fig. 5).
- Push the battery pack into the battery compartment (Fig. 6). You will feel and hear it snap into place.
NOTE:
If you want to remove the battery pack again, you have to push in the two release buttons on the side of the battery pack (Fig. 5) and remove the battery pack from the battery compartment.
3.4 Charging the battery pack
WARNING:
Danger of injury due to incorrect charging! Only use the power supply unit supplied with the appliance for charging.

ATTENTION:
Make sure you charge the batteries fully and then discharge them fully before using for the first time. Otherwise the battery pack's service life would be reduced.
NOTE:
The battery pack is not charged when delivered. The battery pack must be charged before working with the appliance. The first charge takes about 16 hours.
NOTE:
You can only charge the battery pack when it is installed. Make sure that that appliance is switched off. If the appliance is switched on, the battery pack cannot be charged.
- Make sure that that appliance is switched off (position '0').
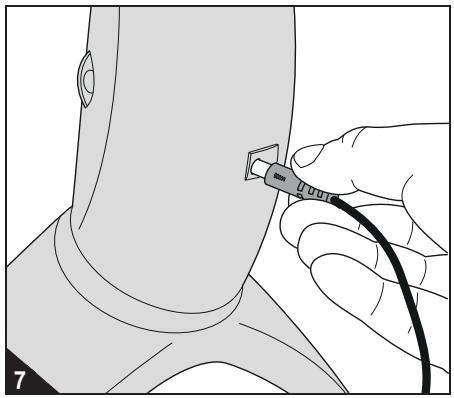
- Insert the power supply unit into the socket on the back of the appliance (Fig. 7).
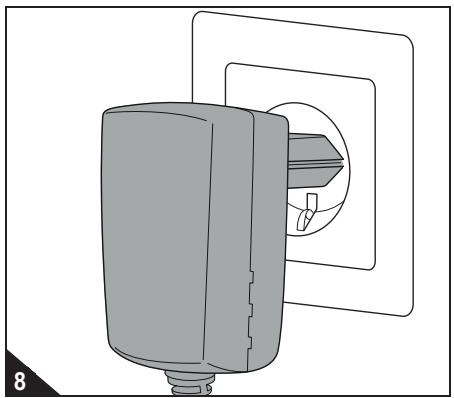
- Connect the power supply unit to a socket (Fig. 8) that carries the same voltage as that indicated on the power supply unit's type plate.
The charging indicator light begins to shine red (Fig. 9).
- Charge the battery pack for approx. 16 hours, until the charging indicator light goes out (Fig. 9).
- If the charging indicator light is no longer illuminated, first pull the power supply unit out of the socket and then out of the appliance or battery pack.
NOTE:
Only recharge the appliance after use if the brush roller will no longer turn even though the battery pack is inserted properly. Subsequent full charging cycles will take approx. 16 hours. Depending on the remaining charge, it could be much shorter.
ATTENTION:
Check with the manufacturer of your flooring to see whether it is suited to being cleaned with an electric brush sweeper.
4.1 Switching on the appliance

- Place the appliance down on the floor.
- Pull the tube towards you, thereby bending down the brush base. The brush base should now be on the floor however you hold the tube.
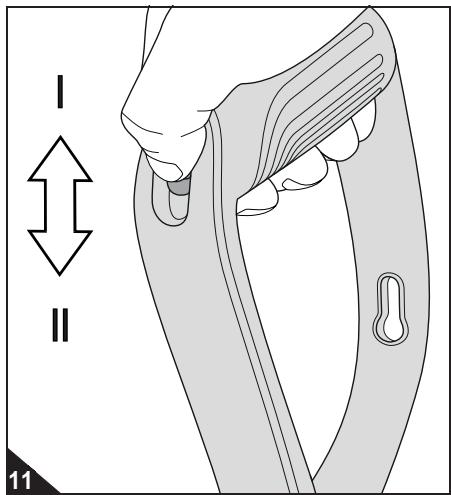
- Switch on the brush sweeper by moving the slider switch to the 'I' position (Fig. 10). - The brush rollers rotate at the medium speed.
NOTE:
This should be sufficient for sweeping hard floors. To sweep short-pile carpets, push the slider switch further down to position 'll'. The appliance is designed to sweep short-pile carpets (e.g. carpet pile no longer than 5mm ) alone. The appliance does not work on longer carpet piles.
NOTE:
When the appliance is running you can switch between switch settings 'I' and 'II' as much as you like (Fig. 11).
NOTE:
We recommend using the medium setting (I) so that you can use a battery charge for as long as possible.
NOTE:
If the battery power has reduced markedly or the brushes will no longer rotate, the battery pack has to be charged Chapter 3.4, 'Charging the battery pack'.
5.1 Switching off
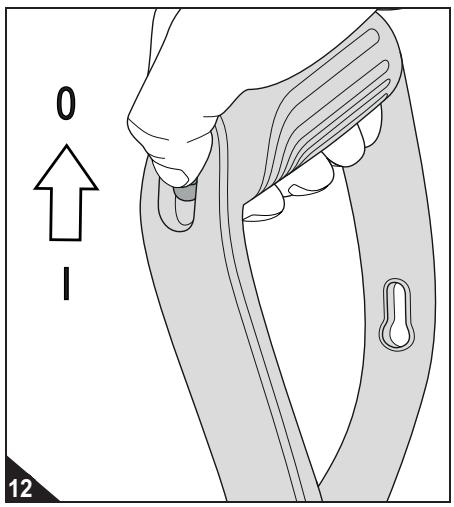
- Put the slide switch to position '0' (Fig. 12).
- Move the tube until it is at right angles with the brush base and clicks into place and the appliance can stand on its own.
- Empty the dust container if required Chapter 5.3, 'Emptying the dust container'.
5.2 Transportation and storage
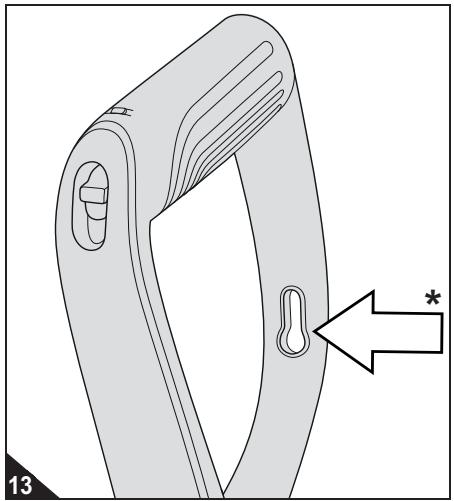
Always carry the brush sweeper by its handle (Fig. 13).
ATTENTION:
Never store the appliance next to heat sources (e.g. stoves or radiators). Avoid exposing it to direct sunlight. Heat can damage the appliance.
Before storage, empty the dust container (Chapter 5.3, 'Emptying the dust container') and remove the battery pack (Chapter 3.3, 'Inserting the battery pack').
Always store the appliance in a cool, dry place and out of reach of children.
If there is one, you can hang the appliance on the eyelet (Fig. 13/*) by a hook (bearing capacity >3kg ).
5.3 Emptying the dust container
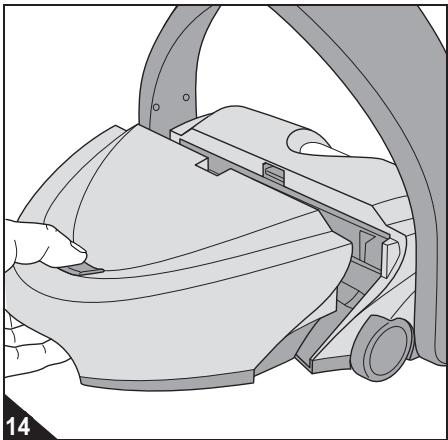
Regularly empty the dust container for the best cleaning results. Even better is after every time you use it.
- Make sure that that appliance is switched off.
- Press the dust container release catch (Fig. 14) and hold it down.
NOTE:
Hold down the release catch until you can empty the dust container into the bottom of a bin. This prevents dirt from falling out prematurely.
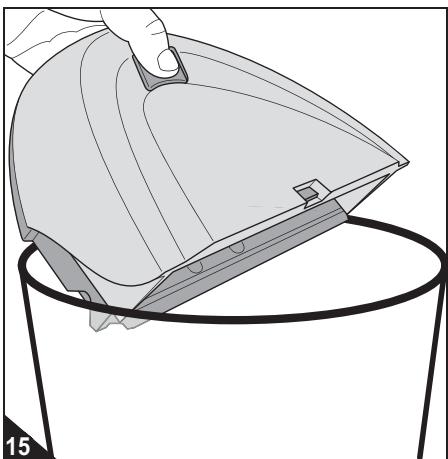
- Lift the dust container up and out of the brush base and continue to hold down the release catch (Fig. 15).
- Hold the dust container at the bottom of a dustbin (Fig. 15).
NOTE:
You can dispose of the content of the dust container with your domestic waste providing it does not contain anything that must be disposed of separately.
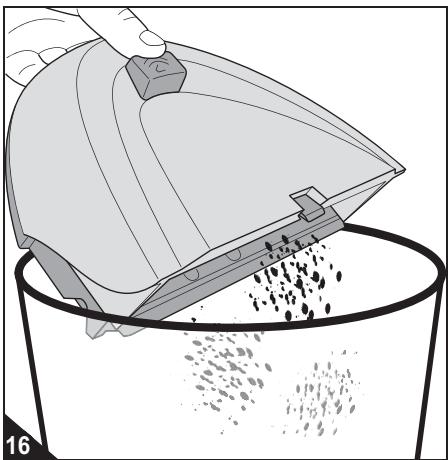
- You can now release the release catch (Fig. 16). The dirt falls into the bin.
- Carefully tap out the remaining dust.
- If this is not enough, wipe out the dust container with a dry cloth.
- Insert the empty and clean dust container back into the brush base. Push the release button (Fig. 14).
- Let go of the release catch and check the dust container is securely in place.
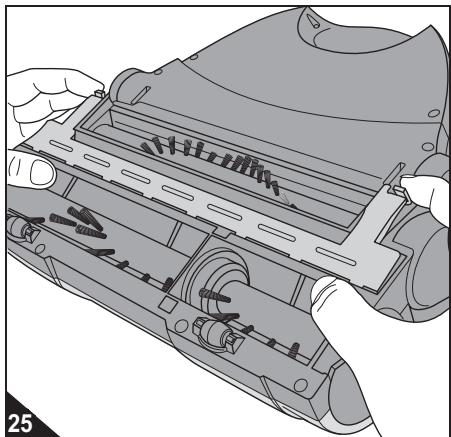
5.4 Cleaning the brush rollers
WARNING:
Danger of injury caused by brush rollers starting up! Before beginning to remove the brush rollers, turn off the appliance and remove the battery pack.
NOTE:
The procedure for cleaning the wide, front brush roller and the narrow front brush roller is identical. We will describe the procedure using the wide brush roller as an example.
- Switch off the appliance, Chapter 5.1, 'Switching off'.
- Remove the battery pack Chapter 3.3, 'Inserting the battery pack'.
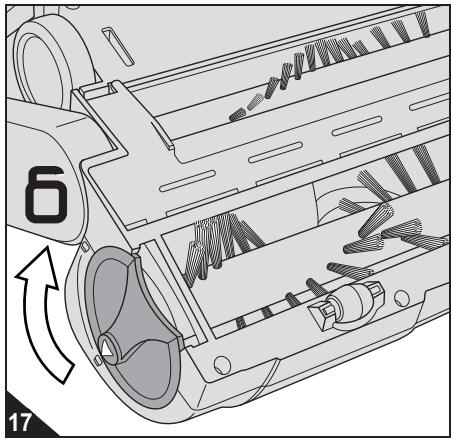
- Put down the appliance so that the bottom of the brush roller is pointing up and the brush rollers are visible (Fig. 17).
- Rotate the release catch of the brush roller powerfully in the (Fig. 17) direction.
-
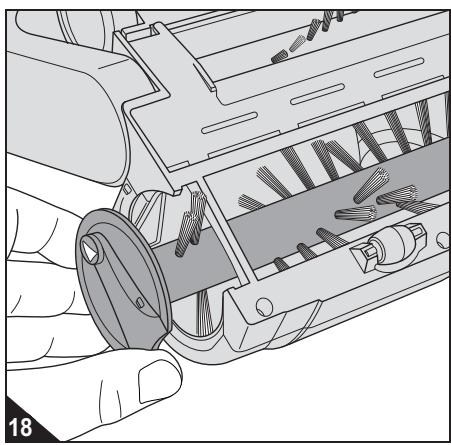
Pull out the brush roller to the side (Fig. 18).
-
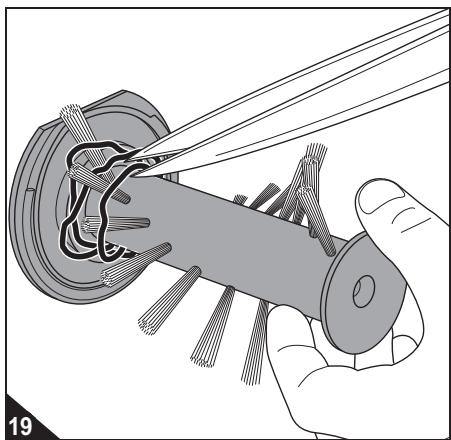
Remove any adhering hair, fluff and the like by hand or carefully with scissors (Fig. 19).
ATTENTION:
If you have to use scissors, ensure that you do not cut off any bristles or damage the brush roller in any other way.
5 After use
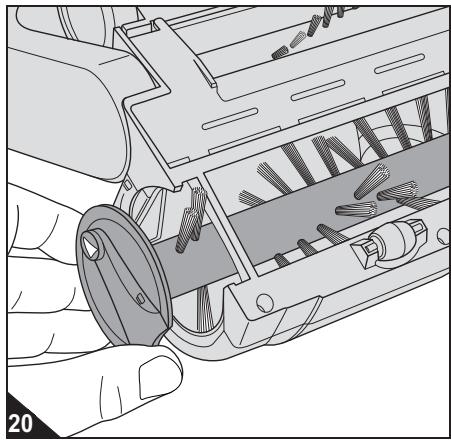
-
Guide the brush roller back into its shaft (Fig. 20).
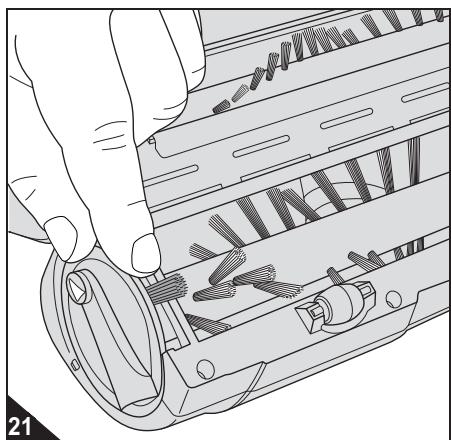
-
After inserting the brush roller, rotate it until the bunch can move freely (Fig. 21).
NOTE:
Otherwise the entire front brush roller would be blocked.
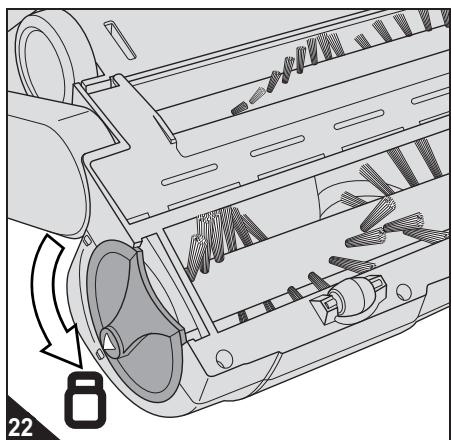
- If the last bunch can move freely (Fig. 21), lock the release catch of the brush roller by rotating it in the (Fig. 22) direction.
NOTE:
If required, proceed in exactly the same way to clean the narrow, front brush roller (steps 1...9).
Proceed as follows to clean the rear brush roller:
-
If you have not done so already:
-
Switch off the appliance Chapter 5.1, 'Switching off'.
- Remove the battery pack Chapter 3.3, 'Inserting the battery pack'.
-
Put down the appliance so that the bottom of the brush roller is pointing up and the brush rollers are visible.
-
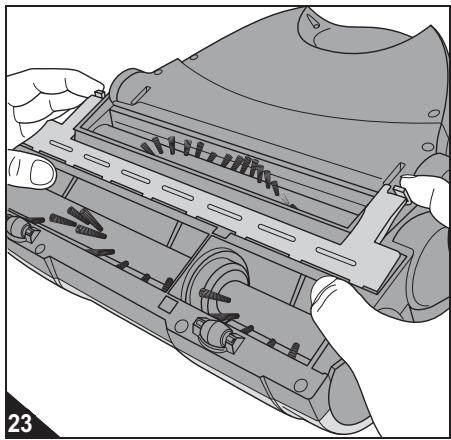
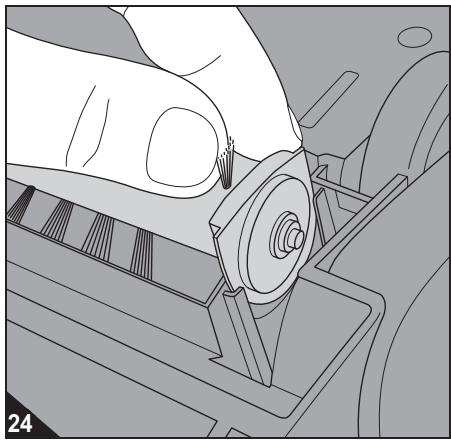
Unlock the V-belt cover (Fig. 23) and take it off.
- Take the back brush roller out of its holder (Fig. 24).
- Remove any adhering hair, fluff and the like by hand or carefully with scissors.
ATTENTION:
If you have to use scissors, ensure that you do not cut off any bristles or damage the brush roller in any other way.
- Guide the rear brush roller back into its holder.
-
Observe the following when doing so:
-
Align the brush roller at an angle so that it is first correctly put onto the drive shaft.
- Then lower the brush roller so that the plate of the brush roller engages perfectly with the holder (Fig. 24).
NOTE:
Otherwise the rear brush roller will not be driven at all or not be driven correctly, thus rendering it ineffective.
- Put on the V-belt cover and push down both locks forcefully until you can feel and hear them click into place.
6.1 If the appliance does not work as it should
See if you can solve the problem yourself by following the steps in the table below.
| Problem | Possible cause / solution |
| The appliance will not switch on. | The tube and/or the handle are not installed correctly.
Push the tube or the handle powerfully into the holder as described ▷Chapter 3.2, 'Attaching the tube and handle'. |
| The battery pack has not been inserted or has been inserted incorrectly.
Insert the battery pack as shown, ▷Chapter 3.3, 'Inserting the battery pack'. |
| The battery pack has been inserted, though is not charged.
Charge the battery pack as described, ▷Chapter 3.4, 'Charging the battery pack'. |
| The appliance will switch on but one or several brush rollers will not turn. | One or several brush rollers are blocked or were not inserted correctly after cleaning.
Clean and mount the brush rollers as described ▷Chapter 5.4, 'Cleaning the brush rollers'. |
| The appliance works perfectly, however, the cleaning result is unsatisfactory. | The sweeping performance set is inappropriate.
Adjust the sweeping performance to the ground to be swept as described ▷Chapter 4.2, 'Adjusting the sweeping performance'. |
| The dust container is full.
Empty the dust container as described ▷Chapter 5.3, 'Emptying the dust container'. |
| The appliance will switch on, but turns itself off just after. | The battery pack has reached the end of its life.
1. Order a new battery pack ▷Chapter 6.2, 'Ordering accessories and spare parts'.
2. Insert the new battery pack ▷Chapter 3.3, 'Inserting the battery pack'.
3. Dispose of the worn out battery pack ▷Chapter 6.4, 'Disposing of the appliance and battery pack'. |
NOTE:
If you cannot solve the problem using this table, contact our customer service department (▶Page 130, 'International Service') and describe the problem to us. Our staff are specially trained for such cases and can help you get to the bottom of the matter in a targeted manner, and solve the problem. In this way, any inconvenience of having to send your appliance to us can be avoided, and you can use it again quicker.
6.2 Ordering accessories and spare parts
You can order the following accessories and spare parts:
| Item no. | Description |
| 0668001 | 2-part brush roller set
(1 narrow, 1 wide, front brush roller) |
| 0668002 | 1 power supply unit |
| 0668003 | 1 battery pack |
| 0668004 | 1 rear brush roller |
Contact us to order accessory and spare parts:
Page 130, 'International Service'
6.3 If the appliance is defective

WARNING:
Danger of injury! Never use a defective appliance or power supply unit! If the power supply unit or its cord is damaged, it must be replaced by the manufacturer, his customer services department or a similarly qualified person to avoid danger.
If the appliance has been dropped or damaged in another way and has obvious signs of damage, give it to an authorised dealer or Royal Appliance Customer Services to be repaired.
Send the defective appliance with the dust container empty to the address on Page 130, 'International Service'.
6.4 Disposing of the appliance and battery pack

ATTENTION:
Danger of pollution! The appliance contains rechargeable batteries that must not end up in the domestic waste. Take the appliance and the removed battery pack separately to be disposed of at the corresponding collection points.
The device and its battery pack are not permitted to be disposed of with domestic waste! Take the appliance and the removed battery pack separately to be disposed of at the corresponding collection points.
7.1 Warranty conditions
We offer a warranty of 24 months from the date of purchase for the appliances we sell. Within this warranty period, we will correct all defects free of charge that are due to material or manufacturing faults, either by repair work or replacing the appliance or accessories, at our discretion (damage to accessory parts does not automatically lead to the entire appliance being replaced). The warranty does not cover damage due to improper use (operating on the wrong power type/voltage, connecting to unsuitable power sources, breakage, etc.), normal wear and defects that only insignificantly affect the value or the serviceability of the appliance.
Intervention by unauthorised parties or the use of parts other than Original Royal Appliance spare parts cause the warranty to become null and void. Consumable parts are not included in the warranty and therefore must be purchased by the customer! The warranty is only valid if the date of purchase has been acknowledged by the dealer's stamp and signature on the warranty card or if a copy of the invoice is included with the appliance that has been sent in. Warranty work does not extend the warranty period nor does it constitute a claim for a new warranty!

7.2 In case of a warranty claim
To make a claim under warranty, send us the appliance with its dust container empty and a short description of the defect in block capitals. Head your accompanying letter with the comment 'warranty claim'.
Send it to the following address, including the warranty card or a copy of the receipt:
Page 130, 'International Service'
- € 0.14 per minute from German landlines, maximum German mobile phone tariff € 0.42 per minute.
The cost of calls from abroad—outside Germany—depend upon the current prices of the respective foreign telephone company.
FR