
LGB-32DST - TV receiver HUMAX - Free user manual and instructions
Find the device manual for free LGB-32DST HUMAX in PDF.
| Product type | LCD TV Receiver |
| Brand | HUMAX |
| Model | LGB-32DST |
| Screen size | 32 inches (81 cm) |
| Display resolution | 1366 x 768 pixels (HD) |
| Viewing angle | 178° horizontal and vertical (CR ≥10) |
| Power supply | AC 230 V, 50 Hz (UK model: AC 240 V, 50 Hz) |
| Power consumption | 133 W (max) / 140 W (UK model) |
| Net weight | 14.0 kg |
| Gross weight | 17.0 kg |
| Video inputs | Antenna (RF), 2x SCART, RCA composite, S-Video, Component (Y/Pb/Pr), 2x HDMI, PC VGA |
| Audio inputs | RCA (L/R), Component (L/R), HDMI, PC Audio |
| Audio outputs | SPDIF optical, speakers 2x 7 W, headphone |
| Data interface | RS-232C (for software update) |
| Tuner | Analog (PAL/SECAM) and digital DVB-T |
| Sound system | AM/FM/NICAM (analog), MPEG1 Layer 1/2 (digital) |
| Main functions | Electronic Program Guide (EPG), parental control, PIP (in PC mode), teletext, subtitles, OTA software update |
| Maintenance and cleaning | Unplug before cleaning; use a soft dry cloth; do not use chemical products |
| Safety | Do not open the cover, risk of electric shock; keep away from heat sources and moisture |
| Spare parts and repairability | Contact a qualified technician for any repairs; no user-serviceable parts |
| General information | Compatible brands: VIACCESS, CryptoWorks, Irdeto, Nagravision, Conax, SRS TruSurround XT |
Frequently Asked Questions - LGB-32DST HUMAX
User questions about LGB-32DST HUMAX
0 question about this device. Answer the ones you know or ask your own.
Ask a new question about this device
Download the instructions for your TV receiver in PDF format for free! Find your manual LGB-32DST - HUMAX and take your electronic device back in hand. On this page are published all the documents necessary for the use of your device. LGB-32DST by HUMAX.
USER MANUAL LGB-32DST HUMAX
Read this manual carefully and make sure you understand the instructions provided. For your safety, check what the result of each action will be.
| CAUTION RISK OF ELECTRIC SHOCK DO NOT OPEN | To reduce the risk of electric shock, do not remove cover (or back). No user serviceable parts inside. Refer servicing to qualified service personnel. Indicates a situation which, if not avoided, could damage the equipment or other apparatus. |
| This symbol indicates dangerous voltage inside the TV that presents a risk of electric shock or personal injury. Indicates a hazardous situation which, if not avoided, could result in serious injury. | |
| This symbol indicates important instructions accompanying the TV. | |
| Instruction about the 'WEEE' Symbol This product should not be disposed with other household wastes at the end of its working life. Please separate this from other types of wastes and recycle it responsibly to promote the sustainable reuse of material resources. This will prevent possible harm to the environment or human health from uncontrolled waste disposal. Domestic users: Please contact either the retailer where you purchased this product or their local government office for details of where and how they can take this item for environmentally safe recycling. Business users: Contact your supplier and check the terms and conditions of the purchase contract. This product should not be mixed with other commercial wastes for disposal. |
Copyright ( © 2007 HUMAX Corporation)
Not to be copied, used or translated in part or whole without HUMAX's prior consent in writing except approval of ownership of copyright and copyright law.
Warranty
The information in this document is subject to change without notice. HUMAX does not have any responsibility for direct, indirect, accidental and other damage caused by the use of the information contained in this manual.
Trademarks
VIACCESS™ is a trademark of France Telecom.
CryptoWorks™ is a trademark of Philips Electronics N.V.
Irdeto is a trademark of Mindport BV.
Nagravision is a registered trademark of KUDELSKI S.A.
Conax is a trademark of Telenor Conax AS.

is a trademark of SRS Labs, Inc.
TruSurround XT technology is incorporated under license from SRS Labs, Inc.
Thank you for purchasing a HUMAX TV. Please read this user manual carefully in order to safely install, use and maintain the TV at maximum performance. Keep this user manual next to your TV to ensure the best performance possible.
General Safety Precautions
Power
Plug the power cord into the correct power outlet. An unstable connection may cause fire.
- Do not use damaged power cords or plugs, or use a loose wall outlet. This may cause electrical shock or fire.
- Do never touch the power cord with wet hands. This may cause electrical shock.
- Do not use multiple devices with one outlet. Overheating the outlet may cause fire.
- Do not bend or pull out the power cord using force, nor place heavy objects over it. This may cause electrical shock or fire.
- Make sure you pull out the power cord holding the plug itself. An internal disconnection may cause fire.
- When removing the product, turn off the power and pull out the plug from the power outlet. Also make sure other devices including the antenna or the connectors are removed from the outlets before relocating the product. Otherwise you may suffer electrical shock or fire due to a damaged power cord.
The mains plug shall remain readily operable.
- Plug as disconnection device shall remain to be readily approached by user.
- Make enough room for inserting and removing the power plug. Place the TV as close to the outlet as possible. The Main power supply for this TV is controlled by inserting or removing the power plug.
- The main power switch on the back of the TV does not fully isolate the TV from the main power supply.
If you do not use this TV for a long period of time, be sure to disconnect the power plug from the AC outlet.
Installation
- Keep the product away from any heating devices. Placing it close to a heating device may cause fire.
- Keep the power cord away from any heating devices. A melted coating may cause fire or electrical shock.
- Place the antenna as far away as possible from any high-voltage cables. Touching the high voltage wiring may cause fire or electrical shock.
- Do not install the product in oily, smoky or humid (or exposed to rain/water) places or automobiles. This may cause fire.
- The connection between the external antenna and the internal wiring should be turned inside to avoid any inflow of rain. Exposing the LCD to water (rain) will cause electrical shock or fire.
- Do not use the product in humid places. Humidity will shorten the life of the product and may cause an electrical shortage or fire.
- Do not use the product in places with low temperatures (below 5^ ).
- Avoid installing the product in poorly ventilated places. Internal overheating may cause an electrical shortage and fire.
- Be sure not to cover the ventilator (with a table-cloth or curtain, etc.). Internal overheating may cause an electrical shortage and fire.
- Do not install the product in an unstable place or on a small stand. The product may cause serious injury, if it falls on somebody (especially children). Install it on an even, stable place as it is front-heavy.
- Do not install the product on the floor. Someone (especially children) may trip over it.
Usage
- Unplug the product from the wall outlet and do not touch the antenna during a thunderstorm. This will prevent damage to the unit due to lightning and power-surges.
- Keep dust or water away from the pins or touching points of the power plug. This will prevent electrical shock or fire.
- Keep children from climbing over the product. The device may cause serious injury or death if it falls on them.
- Do not place anything over the product that children may try to reach. The device may cause serious injury or death if it falls on them.
- When removing the battery from the product, keep it out of children's reach. If a child swallows a battery, consult a doctor immediately.
- Use only specified batteries and do not use an old battery along with a new one. Align the batteries according to the correct polarity (+ or -). Aligning them incorrectly may cause an internal explosion or a leakage of the internal liquid, leading to electrical shock, physical damage or pollution of the surroundings.
- Do not insert any metal or a flammable object or an alien substance into the ventilator, the AV input terminal or the slots for the modules or Smartcards. This may cause damage to the product and reduce its life span.
- Do not disassemble, repair or reconstruct the product at your discretion. This may cause electrical shock or fire. Contact your local customer support.
- Keep the product away from inflammable sprayers or ignitable objects. Exposure to these may cause explosion or fire.
- Do not place water-pots, flower vases, beverage cans, small metals or heavy objects over the product. Contact of these contents with the product may cause electrical shock or fire, while any falling of the product may cause injury.
If the product breaks down, turn off the power and unplug it from the outlet before contacting Customer Support. This will protect you from electrical shock or fire. - When you notice something strange like an odd noise, smell something burning or see smoke, unplug the power cord and contact your local Customer Support. Do this to avoid electrical shock or fire.
- Do not use sharp tools such as a pin or a pencil near the TV, as they may scratch the LCD surface.
- Do not use a solvent, such as benzene, to clean the TV, as it will damage the LCD surface.
- Do not move the product or turn the power off suddenly while the hard disk drive is running.
The company shall not be liable for any corruption of data on the hard disk drive caused by the carelessness or misuse of users. - Do not separate the hard disk drive from the main body. Contact your local Customer Support when you want to change the hard disk drive.
Cleaning
- Unplug the power cord before cleaning the product. This may cause electrical shock or fire.
- Do not sprinkle water on the product. This may cause electrical shock or fire.
- Use only a soft dry cloth as the surface is weak on scratch. Do not use chemicals like wax, benzene, alcohol, thinners, aroma, lubricator or cleanser.
Chapter 1 >> Getting Started 6
Package Contents 6
Front & Top Panel. 7
Rear & Side Panel. 8
Remote Control Buttons 10
Installing on the Wall 12
Chapter 2 >> Connecting Your TV. 13
Connecting to an Aerial or a Cable TV 13
Connecting to the VCR 14
Connecting to the DVD Player 16
Connecting to the Set-Top Box 18
Connecting to the Digital Audio System 19
Connecting to the PC 20
Connecting Headphones 20
Conditional Access System 21
Chapter 3 >> Initial Setup Wizard. 22
Running Initial Setup Wizard 22
Chapter 4 >> Basic Operation 23
Turning on Your TV 23
Selecting the Menu Language 23
Selecting the Main Input Source 24
Viewing Channel List. 24
Displaying Information 25
DigitalProgrammeFeatures 27
Chapter 5 >> Using the Electronic Programme Guide (EPG) 28
Viewing the Electronic Programme Guide(EPG) 28
Viewing Reserved Programme 30
Finding a Programme 31
Chapter 6 >> Setting Channels 32
Scanning Analog Channels Automatically 32
Scanning Analog Channels Manually 33
Editing Analog Channels 34
Scanning Digital Channels Automatically 35
Scanning Digital Channels Manually 36
Scanning Digital Channels Manually 37
Editing Digital Channels 38
Editing Favourite Digital Channels 40
Chapter 7 >> Setting the Picture 42
Selecting a Picture Mode 42
Customizing the Picture Settings 42
Fleshtone 43
Colour Temperature 43
Noise Reduction 44
Adjusting Backlight Brightness 44
Chapter 8 >> Setting the Sound 45
Setting the Sound Effect 45
Adjusting the Sound Balance 45
Adjusting the Volume Automatically 46
Setting the TruSurround XT. 46
Setting up Audio Priority 46
Chapter 9 >> Setting the Feature. 47
Setting the Time Information 47
Parental Control 48
Adjusting OSD Transparency 49
Adjusting Blue Back 49
Picture-in-Picture (PIP) Settings. 50
Common Interface 51
Default Settings 51
Chapter 10 >> DTV Setup. 52
Language Setting 52
Miscellaneous Settings. 53
Software Update 54
Status 58
Signal Detection 58
Chapter 11 >> Setting the Aspect Ratio 59
Chapter 12 >> Using the Teletext. 60
Chapter 13 >> Setting the PC 61
Auto Configure 61
Position 61
Clock 62
Phase 62
Menu Map 63
Troubleshooting 64
Troubleshooting 64
Error Message 65
Specification 66
Service and Support 67
Package Contents
LCD TV

User's manual
Remote control

AAA batteries (X2)

Power cord
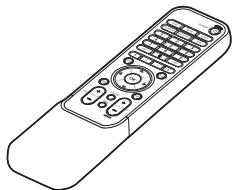
Front & Top Panel
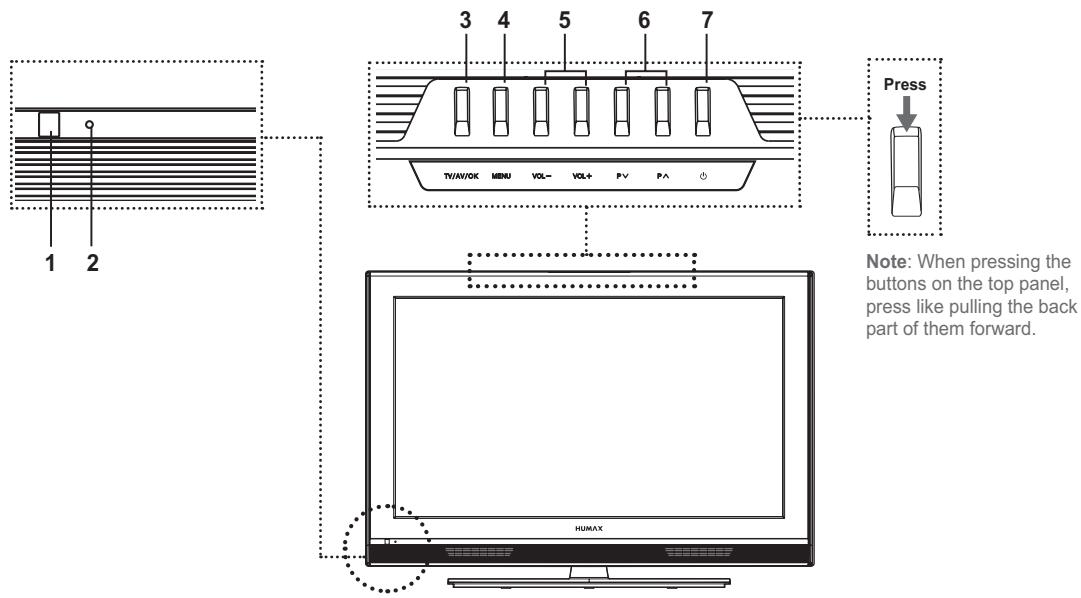
1 Remote control sensor
Receives commands directly from your remote control and passes them on.
2 Standby indicator
Turns on blue during the standby mode.
3 TV/AV/OK button
Displays input source or confirms the selection.
4 MENU button
Displays the on-screen menu.
5 VOL-/VOL+ buttons
Adjusts the volume.
6 PV/P∧ buttons
Selects channels.
7 Standby button
Switches between operation and standby modes.
Note: If the standby indicator lamp is unlit, press the main power switch on the rear of the TV.
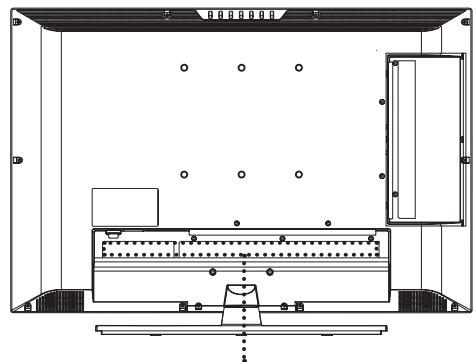
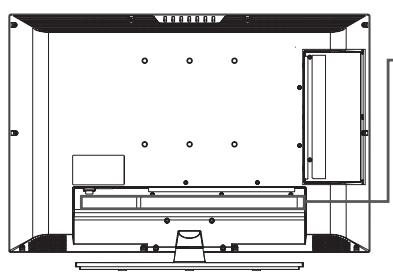
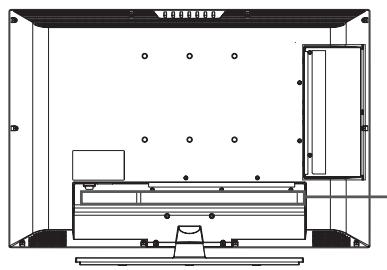
Rear & Side Panel
Side Panel
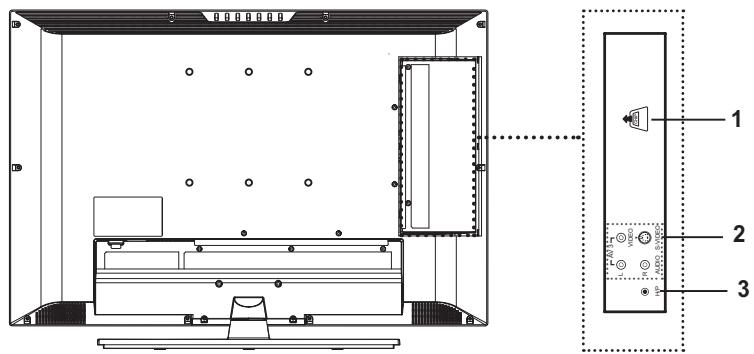
1 CI (Common Interface) SLOT
A slot for a CI Module.
2 AV3 INPUT (Video, S-Video, Audio-L/R)
Connects to the audio and video (or S-Video) output jacks of a camcorder, video game console and similar devices.
3 H/P (Headphones)
Connects to headphones.
Rear Panel
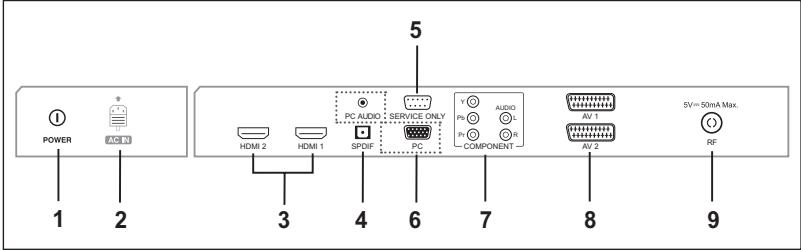
1 MAIN POWER switch
Turns the power on/off.
2 AC INPUT
Connects the power cord.
3HDMI1/HDMI2 INPUT
Receives uncompressed digital audio and video signals from the device that supports High Definition Multi-media Interface (HDMI).
4 SPDIF OUTPUT
Connects to a digital audio component (Digital TV audio output only).
5 SERVICE ONLY (RS232C)
Connects to the PC to update the software of the TV.
6 PC/PC AUDIO INPUT (D-SUB, Audio)
Connect to the video and audio output jacks on your PC.
7 COMPONENT INPUT (Y/Pb/Pr, Audio-L/R)
Connects to video (Y/Pb/Pr) and audio (L/R) components.
8 AV1/AV2 INPUT/OUTPUT (SCART)
Inputs or Outputs for external devices, such as VCR, DVD, video game console or video disc players.
9 RF INPUT
Connects to an antenna or a cable system.
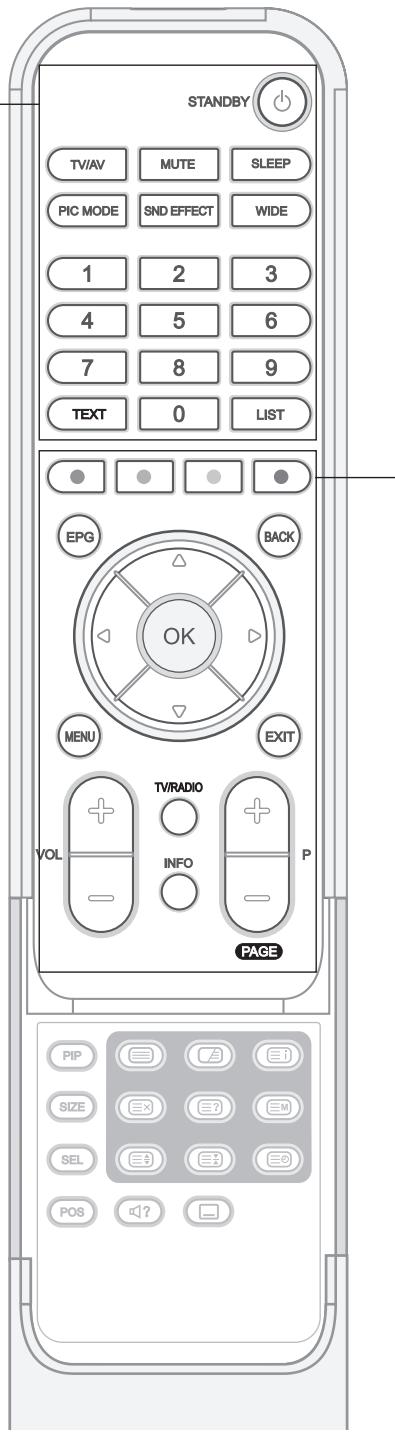
Remote Control Buttons
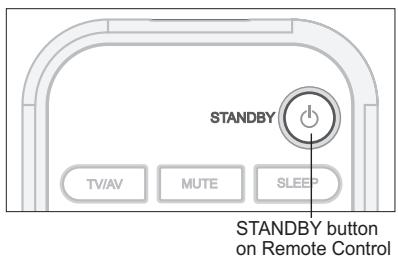
STANDBY
Switches between operation and standby modes.
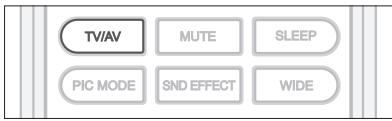
TV/AV
Displays all available input sources. Press the / button to select a required input source.
MUTE
Mutes the sound. To cancel, press the MUTE, VOL+, or VOL- button.
SLEEP
Selects a preset time interval for switching the TV to standby mode automatically.
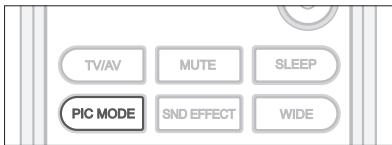
PIC MODE
Selects the picture mode (Standard, Bright, Soft or Manual).
SND EFFECT
Selects the sound effect (Flat, Speech, Movie, Music, or User).
WIDE
Select the aspect ratio (Auto, Regular, Panoramic, 14:9 Zoom, 16:9 Zoom, 16:9 Zoom Subtitle or Full).
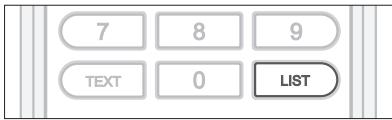
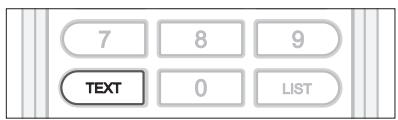
Number (0~9) buttons
Enters the channel number for direct display. Used to enter digit numbers.
TEXT --- (for UK only)
Shows MHEG (digital teletext information)
LIST
Displays the channel list.
Note: If the standby indicator lamp is unlit, press the main power switch on the rear of the TV.
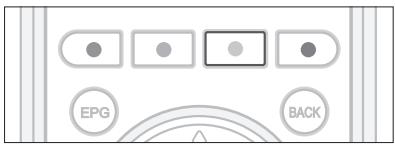
Coloured Buttons
Used for interactive applications in the EPG, Edit Channels and Teletext mode.
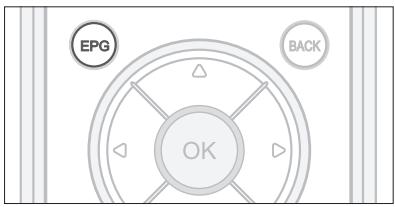
OK
Confirms (save or enter) your choice in the On Screen Display (OSD) menu.
Arrow ( / /) buttons
Controls the selection in the On Screen Display (OSD) menu.
EPG
Displays the Electronic Programme Guide (EPG) in Digital TV input.
BACK
Returns to the previous display.
MENU
Displays the On Screen Display (OSD) menu.
EXIT
Exits from the currently displayed menu.
TV/RADIO
Switches between digital TV and radio modes.
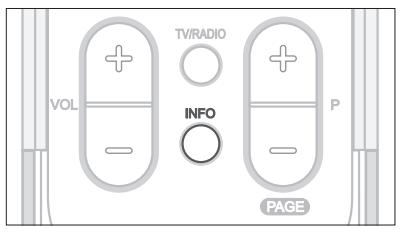
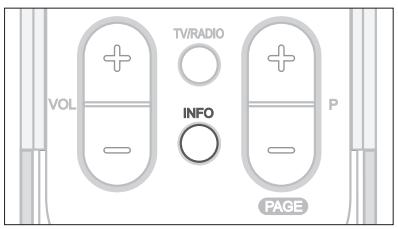
INFO
Displays information on the current channel or input.
VOL+/-
Adjusts the volume.
P+/-
Switches channels.
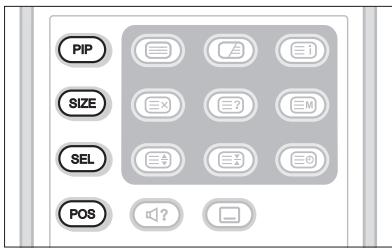
PIP
Turns on and off the PIP mode.
SIZE
Changes the size of the sub screen. (Small or Large)
SEL
Selects the main or sub screen.
POS
Changes the position of the sub screen.
(SOUNDTRACK)
Selects the sound mode (Stereo, Mono, etc.) in Analog TV input or the soundtrack list in Digital TV input.
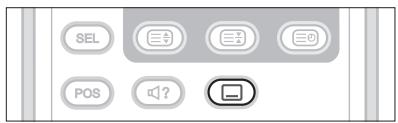
(SUBTITLE)
Displays the subtitle language list in Digital TV input.
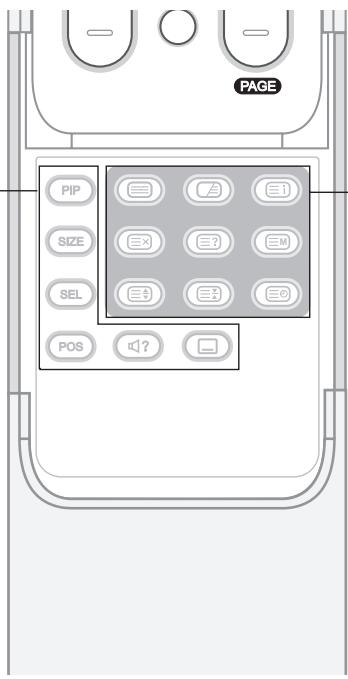
TELETEXT Function Buttons
(Teletext On/Off)
Activates or deactivates the teletext service.
M (Mix)
Overlaps the teletext with the broadcasting screen.
Adjusts the opacity to the background in Teletext mode.
Index
Displays the teletext index page.
(Cancel)
Displays the TV programme when searching for the new teletext page.
(Reveal)
Shows the hidden information.
M (Mode)
Selects the teletext mode (LIST/FLOF)
Size)
Displays the double-size letters.
(Hold)
Holds the current teletext page not updating it.
Time
Display the current time at the top right hand corner of the screen.

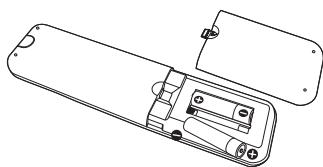
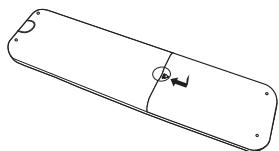
Inserting Batteries into the Remote Control
You must insert or replace the batteries in the remote control when:
- You just purchased TV
- Remote control does not work
1 Remove the cover on the rear of the remote control by pressing the symbol () downwards and then pulling firmly to remove it.
2 Insert two AAA size 1.5V batteries ensuring that the plus (+) and minus(-) signs of the batteries are correctly aligned.
3 Close the cover.
Note: Do not mix different battery types such as alkaline with manganese.
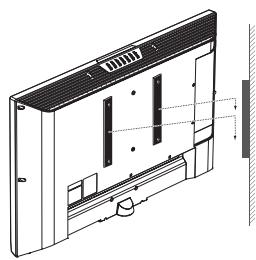
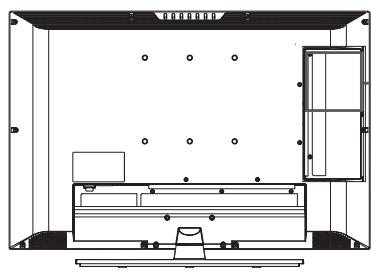
Installing on the Wall
You can install the TV on the wall using a mounting bracket (sold separately).
TIP: This Television is compliant with the VESA wall mounting standard. A variety of Mounts are available through your local retailer. Each may have its unique installation instructions.
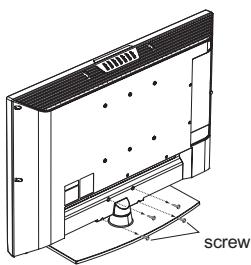
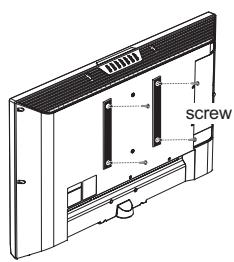
Here the shown illustration are for explanation purpose and may be somewhat different depending on the type of mounts.
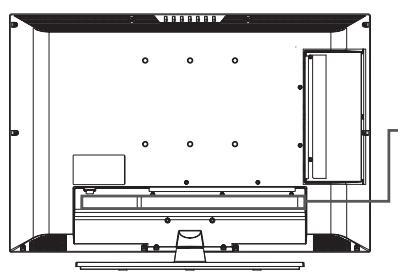
1 Before you install, then separate the TV and stand-base by removing the screws.
2 Attach your main body bracket on the TV and fix using screws firmly.
3 Stick the TV with main body bracket into the wall bracket attached on the wall.
4 Tighten up a safety-screw.
Notes:
- Please ask the installers to install the wall mount bracket.
- Do not install the set on a weak surface such as plaster or foam board.
- Please tightly secure the wall mount bracket to the wall to avoid injury from a falling TV.
Connecting to an Aerial or a Cable TV
To view the television channels correctly, a signal must be received by the broadcasting provider.
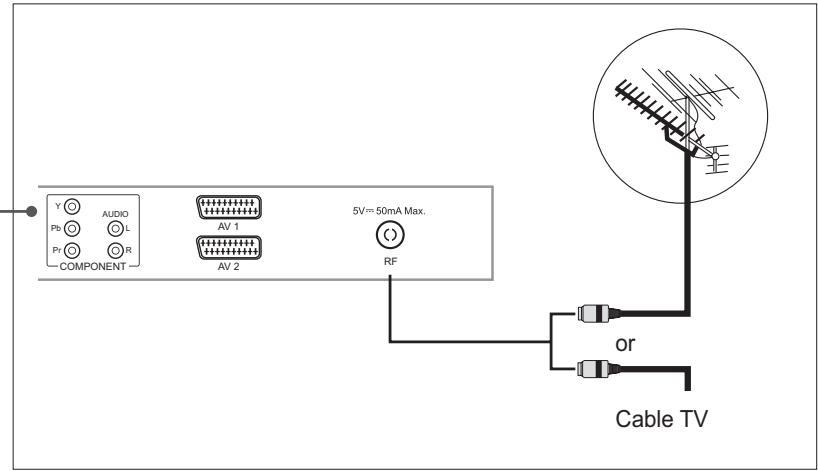
1 Connect the RF coaxial cable from an aerial or a cable TV to the RF jack on the rear of the TV.
2 Turn on the TV, and then press the TV/AV button to select Digital TV or Analog TV.
Notes:
- To receive an optimal signal, it is recommended that you use a 75 ohm IEC-type coaxial cable.
- For proper reception of signals, an external antenna is required. For best reception, an outdoor antenna is recommended.
- To improve the picture quality in a poor signal area, please purchase a signal amplifier and install properly.
Connecting to the VCR
Using the SCART Cable
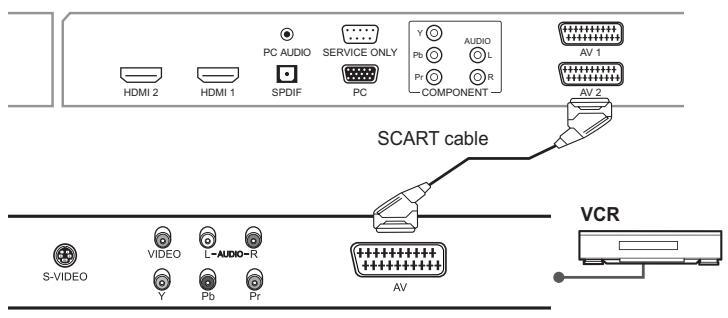
1 Connect the SCART cable between the AV1 (or AV2) jack on TV and the SCART jack on your VCR.
2 Turn on the TV, and then press the TV/AV button to select AV1 (or AV2).
3 Turn on your VCR, then insert a video cassette into the VCR and press the PLAY button on your VCR. (Refer to the VCR owner's manual)
If you want to make a copy from a secondary VCR (or DVD player)
1 Connect your secondary VCR (or DVD player) to the AV1 jack and the target VCR (or DVD player) to the AV2 jack so that the signal transfers from AV1 to AV2.
2 To record a programme, connect the receiver to the AV1 jack and the VCR (or DVD player) to the AV2 jack so that the signal transfers from AV1 to AV2.
Note: For more details about how to record, refer to your required Equipment's instructions.
| Main Input | AV1 (SCART1) Output | AV2 (SCART2) Output | |
| Digital TV | Digital TV | Digital TV | |
| Analog TV | Analog TV | Analog TV | |
| AV1(SCART1) | CVBS | Previous RF(Digital TV/Analog TV) | AV1 (CVBS) |
| RGB | AV1 (CVBS) | ||
| AV2(SCART2) | CVBS | AV2 (CVBS) | |
| RGB | AV2 (CVBS) | ||
| Component | A/V MUTE | ||
| AV3 (CVBS Side) | AV3 (CVBS Side) | ||
| S-VIDEO (Side) | S-VIDEO (Side/Y+C) | ||
| HDMI1 | A/V MUTE | ||
| HDMI2 | A/V MUTE | ||
| PC | A/V MUTE | ||
Note: When changing the main input from Analog TV to HDMI1 or HDMI2, AV1 outputs nothing (A/V are muted).

Using the Audio/Video (Composite) Cable
1 Connect the video cable between the Video (AV3) input jack on TV and the video output jack on your VCR.
2 Connect the audio cable between the Audio-L/R (AV3) input jacks on TV and the audio output jacks on your VCR.
3 Turn on the TV, and then press the TV/AV button to select AV3.
4 Turn on your VCR, then insert a video cassette into the VCR and press the PLAY button on the VCR. (Refer to the VCR owner's manual)
Using the Audio/S-Video Cable
S-Video carries the video data as two separate signals (brightness and colour), unlike composite video which carries the entire set of signals in one package. S-Video does not carry audio. Hence, a separate audio connection is required.

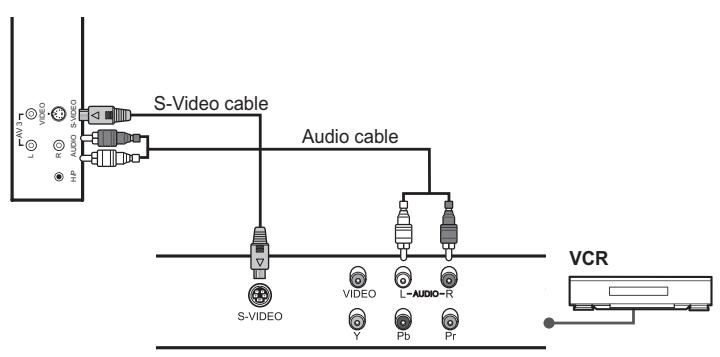
1 Connect the S-Video cable between the S-Video input jack on TV and the S-Video output jack on your VCR.
2 Connect the audio cable between the Audio-L/R (AV3) input jacks on TV and the audio output jacks on your VCR.
3 Turn on the TV, and then press the TV/AV button to select S-Video.
4 Turn on your VCR, then insert a video cassette into the VCR and press the PLAY button on your VCR. (Refer to the VCR owner's manual)
Connecting to the DVD Player
Using the SCART Cable
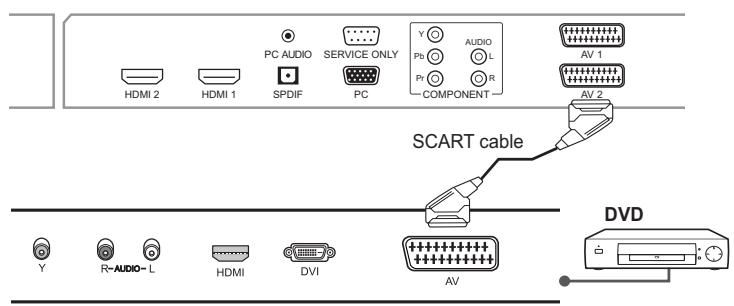
1 Connect the SCART cable between the AV1 (or AV2) jack on TV and the SCART jack on your DVD player.
2 Turn on the TV, and then press the TV/AV button to select AV1 (or AV2).
3 Turn on your DVD player, and then insert a DVD into the DVD player and press the PLAY button on your DVD player. (Refer to the DVD player owner's manual)
Using the Audio/Component Video Cable
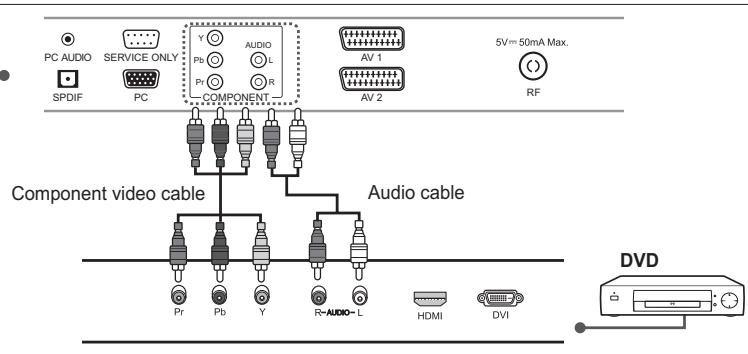
1 Connect the component video cables between the Y/Pb/Pr (COMPONENT) input jacks on TV and the component video output jacks on your DVD player.
2 Connect the audio cable between the Audio-L/R (COMPONENT) input jacks on TV and the audio output jacks on your DVD player.
3 Turn on the TV, and then press the TV/AV button to select Component.
4 Turn on your DVD player, then insert a DVD into the DVD player and press the PLAY button on your DVD player. (Refer to the DVD player owner's manual)
Note: Depending on the manufacturer, the Y/Pb/Pr jacks may be identified as Y / PB / PR , Y/B-Y/R-Y or Y/C₃/C₄.
Using the HDMI Cable
High-Definition Multimedia Interface (HDMI) is the leading new standard for Digital video and audio interconnection.
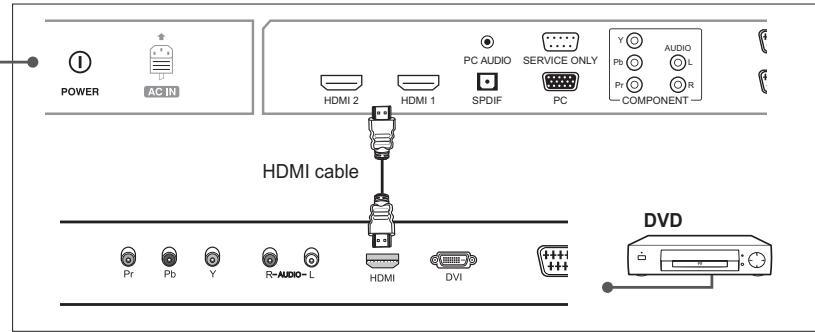
1 Connect the HDMI cable between the HDMI1 (or HDMI2) input jack on TV and the HDMI output jack on your DVD player.
2 Turn on the TV, and then press the TV/AV button to select HDMI1 (or HDMI2).
3 Turn on your DVD player, then insert a DVD into the DVD player and press the PLAY button on your DVD player. (Refer to the DVD player owner's manual)
Connecting to the Set-Top Box
Using the SCART cable
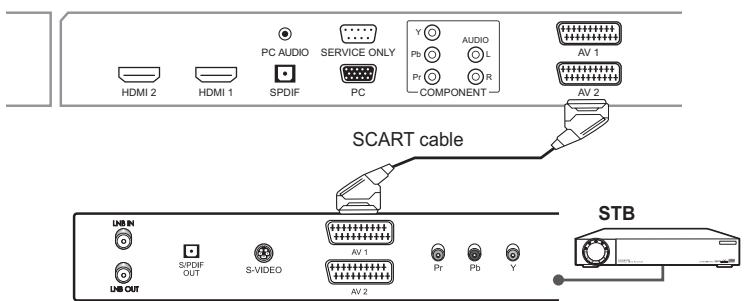
1 Connect the SCART cable between the AV1 (or AV2) jack on TV and the SCART jack on your STB.
2 Turn on the TV, and then press the TV/AV button to select AV1 (or AV2).
3 Turn on your STB. (Refer to the STB owner's manual)
Using the Audio/Component Video Cable
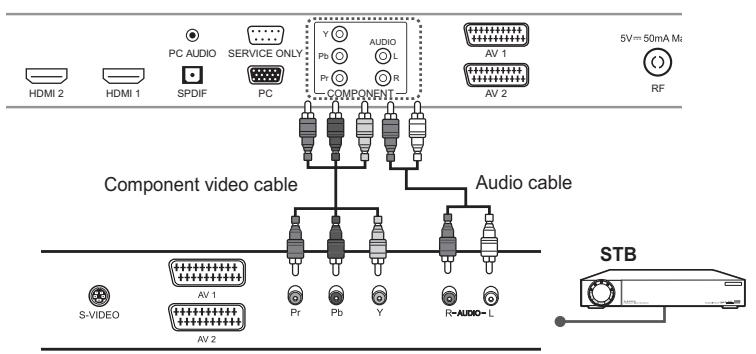
1 Connect the component video cables between the Y/Pb/Pr (COMPONENT) input jacks on TV and the component video output jacks on your STB.
2 Connect the audio cable between the Audio-L/R (COMPONENT) input jacks on TV and the audio output jacks on your STB.
3 Turn on the TV, and then press the TV/AV button to select Component.
4 Turn on your STB. (Refer to the STB owner's manual)
Note: Depending on the manufacturer, the Y/Pb/Pr jacks may be identified as Y / PB / PR , Y/B-Y/R-Y or Y/C₃/C₄.
Using the HDMI Cable
High-Definition Multimedia Interface (HDMI) is the leading new standard for Digital video and audio interconnection.
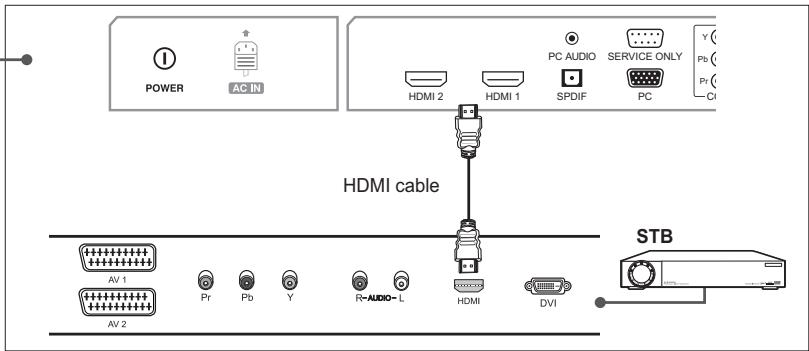
1 Connect the HDMI cable between the HDMI1 (or HDMI2) input jack on TV and the HDMI output jack on your STB.
2 Turn on the TV, and then press the TV/AV button to select HDMI1 (or HDMI2).
3 Turn on your STB. (Refer to the STB owner's manual)
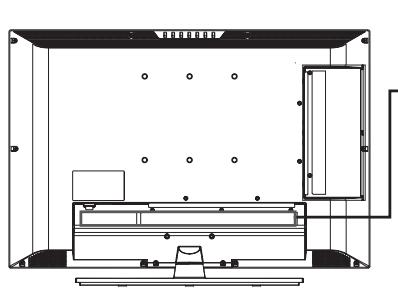
Connecting to the Digital Audio System (Digital TV Input only)
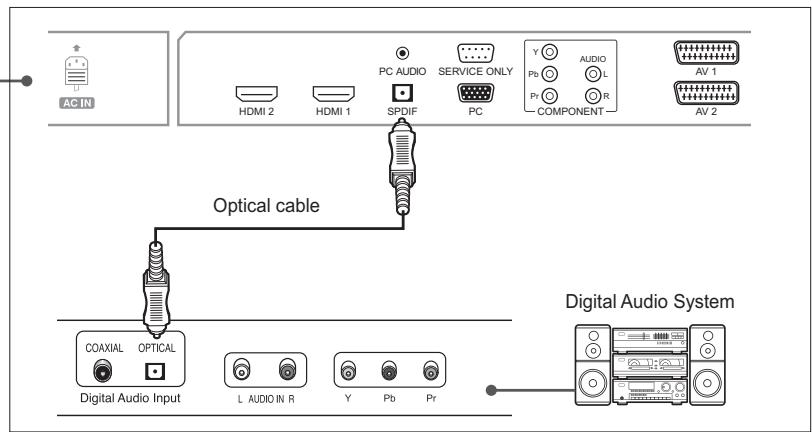
1 Connect the optical cable between the SPDIF output jack on TV and the optical input jack on your digital audio system.
2 Turn on the TV and your Digital Audio System, and then adjust the volume. (Refer to the Digital Audio System owner's manual)
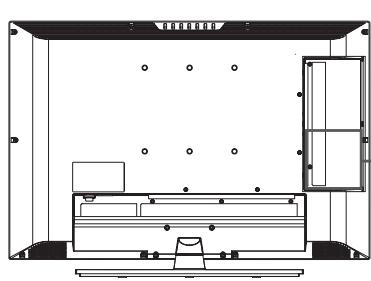
Connecting to the PC
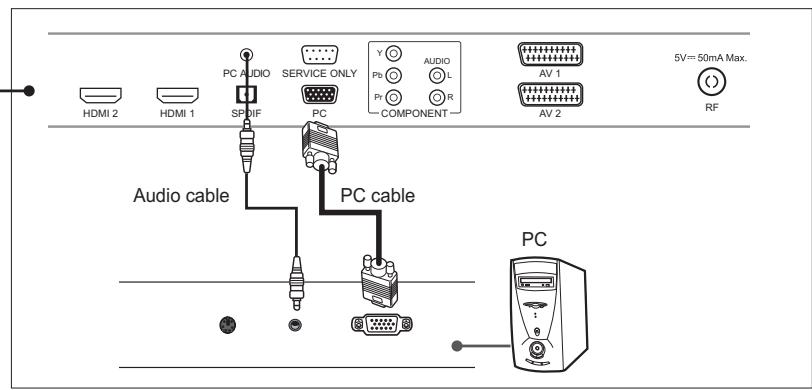
1 Connect the PC cable between the PC jack on TV and the PC output jack on your PC.
2 Connect the audio cable between the PC AUDIO jack on TV and the audio output jack on your PC.
3 Turn on the TV, and then press the TV/AV button to select PC.
Supported Display Resolution (PC)
| No | Resolution PC (Analog) | H-freq (kHz) | V-freq (Hz) |
| 1 | 640 x 480 | 31.5 | 60 |
| 2 | 800 x 600 | 37.9 | 60 |
| 3 | 1024 x 768 | 48.4 | 60 |
| 4 | 1280 x 768 | 47.8 | 60 |
| 5 | 1360 x 768 | 47.7 | 60 |
Connecting Headphones
Connect a set of headphones to H/P jack on TV if you want to watch a television programme without disturbing other people close to you.
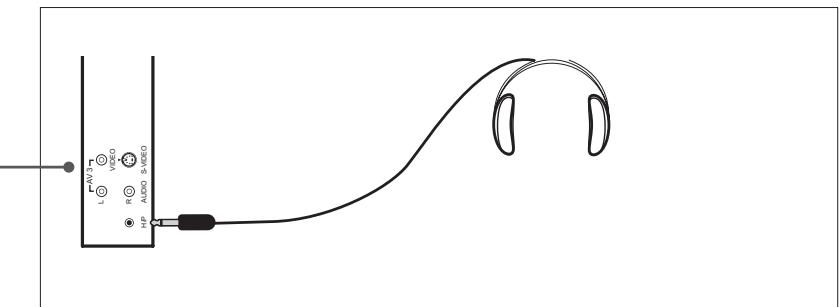
Note: Prolonged use of headphones at a high volume may cause health damage on your ears.
Conditional Access System
(for the digital channels only)
Conditional Access System (CAS) is a technology used to control access to digital television (DTV) services to authorised users by encrypting the transmitted programming.
Inserting a CI Module (with Smartcard)
CI Module looks like a PC Card (called PCMCIA) for laptops. There are different kinds of CI Modules, suitable for different coding systems.
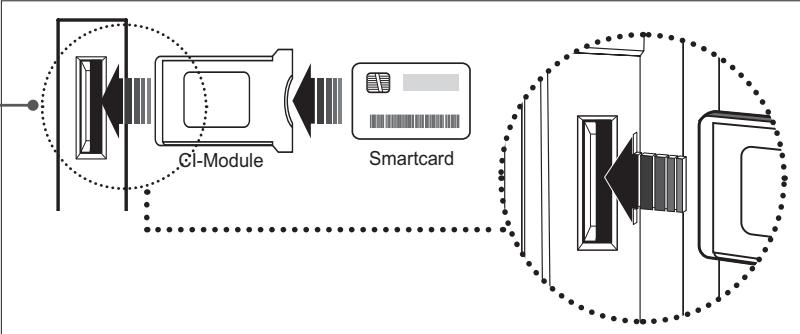
1 Follow the instructions of the module and insert the Smartcard into the Common Interface (CI) module.
2 Keep the CI module(with the Smartcard) vertically.
3 Insert the CI module completely into the slot.
Note: Ensure the Smartcard or CI module is inserted in the right direction. Inserting in the wrong direction may cause damage to the Smartcard or CI module.
Running Initial Setup Wizard

When you turn on your TV for the first time after purchase or perform the default setting, the initial setup wizard(APS) will appear automatically. You can easily setup the available analog and digital channels using the wizard.
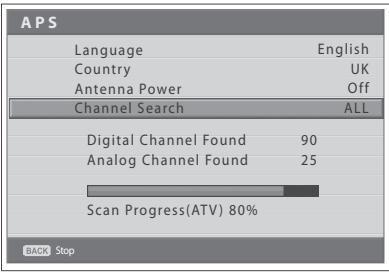
1 Select the language of your choice using the / button. The On Screen Display (OSD) menu will be shown in the selected language.
2 Select Country using the / button.
3 Select the country where you are now located using the / button.
4 Select Channel Search using the / button.
5 Select one option among ALL, DTV, ATV using the / button and press the OK button. It starts to scan channels. First scans analog and then digital channels. The scanned channels are automatically saved in order. To stop scanning channels, press the BACK button.
6 After the channel scanning completes, the Channel list is displayed automatically. The first scanned digital channel, if only, will be automatically displayed.
Notes:
- If you do not want to setup the channels at this time, you can setup it later using the Installation menu.
- If you connect an active antenna to the TV, you have to set the Antenna Power to On to supply the 5V power into antenna. The default value is Off. Active antenna is a portable or indoor antenna which needs power supply from the product because it does not have power cord for itself.
Turning on Your TV

To turn on your TV, do as follows:
1 Connect the power cord on TV to the wall outlet.
2 Press the MAIN POWER switch on the rear of your TV. The standby indicator lights up.
3 Press the STANDBY button on your remote control (or on the top of your TV) to turn on the TV.
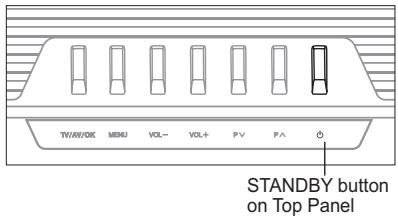
Note: To set your TV in standby mode, press the STANDBY button again on the remote control or (O) on the top of your TV. It saves the electric usage when you want to stop watching TV temporarily (during a meal, for example).
4 To turn off the TV, press the MAIN POWER switch on the rear of your TV.
Note: Do not leave your TV in standby mode for too long (on holiday, for example). Turn off the TV by pressing the MAIN POWER switch on the rear of your TV. It is recommended for you to turn off the power by disconnecting the power cord.
Selecting the Menu Language
You can select the language for displaying menus and indications.
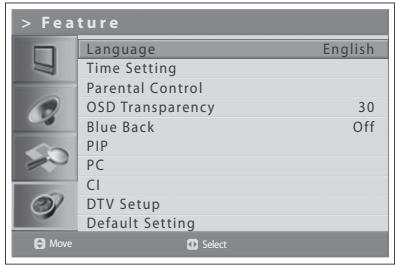
1 Press the MENU button.
2 Select Feature using the / button and press the OK or button.
3 Select the language of your choice using the / button. The On Screen Display (OSD) menu will be shown in the selected language.
4 Press the EXIT button to return to Live TV or press the BACK button to return to the previous menu.
Selecting the Main Input Source
Once you have connected your various audio and video systems, you can view different sources by selecting input sources.
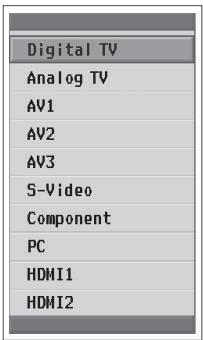
1 Press the TV/AV button.
2 Select the main input among the sources using the or button.
3 Press the OK button.
4 In addition, press the TV/RADIO button to switch to digital TV from different sources or to analog TV from digital TV.
Viewing Channel List
You can view the list of all analog and digital channels using the LIST button and switch to other channels on the channel list.
Analog channel list appears only in Analog TV input mode and digital channel list appears only in Digital TV input mode.
Analog channel list
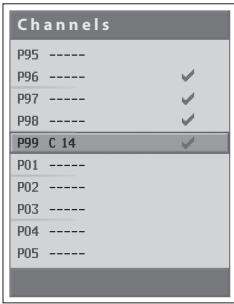
1 Press the LIST button while watching the analog or digital channels.
2 To change the channel in analog or digital channel list, select your desired channel using the / button and press the OK button. The selected channel is displayed. Press the BACK button to exit.
Digital channel list
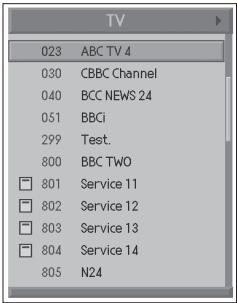
Notes:
- Within the digital channel list, press the P + / - button to move to the next or previous page.
- Within the digital channel list, you can move to your desired channel directly by entering the channel number using NUMBER (0~9) button.
Changing Digital Channel List Group
You can select digital channel list by group.
1 Press the button in digital channel list to view the group list.
2 Select your desired channel group using the / button to display its subgroups and press the OK or button.
3 Select your desired sub-group using the / button and press the OK button.
4 The channel list for the selected sub-group is displayed.
Note: The sub-group of favourite channel list may exist or not depending on your configuration.
Displaying Information
General Information
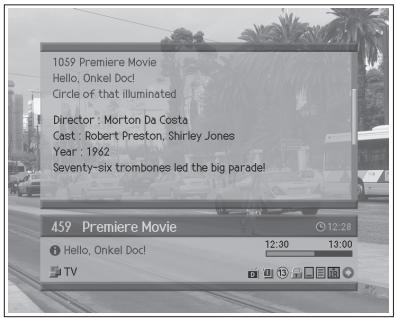
Detailed Information
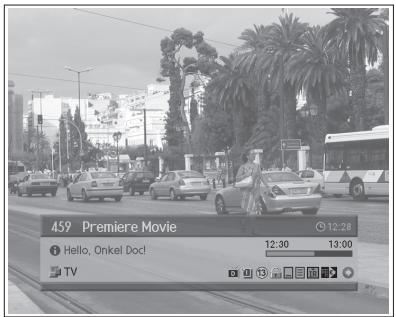
Programme Information (for digital channels only)
Programme information is always displayed for a specific period of time whenever you switch digital channels. You can view the information by pressing the INFO button while watching a digital programme.
Programme information is available only for digital channels.
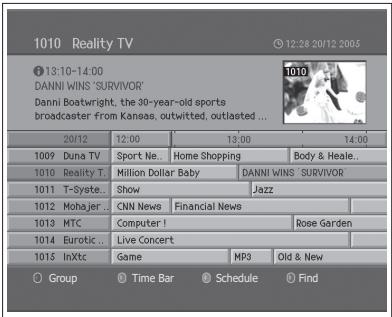
The Programme Information is displayed at the bottom of the screen as followings.

1 Channel number and channel name
2 Current time
3 Detail programme information: displayed if detailed programme information is provided. Press the INFO button again to display the detailed information.
4 Programme name
5 Programme broadcasting time and progress bar
6 Channel list name
7 Icons
| MHEG | Displayed when the channel supports teletext (MHEG). ---- (for UK only) |
| D | Displayed when the channel supports data channel. |
| 1 | Displayed only if this programme is reserved. |
| 13 | Represents the recommended minimum age for the current programme. |
| Displayed only when the channel is a locked channel. | |
| Displayed only when the channel is a scrambled channel. | |
| Displayed only when subtitle information is available. | |
| Displayed only when there is any teletext information. | |
| Displayed only when the compressed bitstream audio signal is broadcasted. |
8 Next programme Information: displayed if next programme information is provided. Press the button to display the next programme information.
Notes:
- If there is no available programme information, programme information is not displayed.
- Press the INFO button again to hide the information box.
- If the detailed programme information is more than one page, use / button to move to the previous or next page.
Simple Information
You can view the information such as the channel number (or input source) and sound mode (or source resolution) by pressing the INFO button while watching an analog TV channel or external input source.

Analog TV Input

External Input (AV1, AV2, AV3, S-Video)

External Input (Component, HDMI1, HDMI2, PC)
Press the INFO button again to view the current time at the top right hand corner of the screen.
Note: Whenever you switch channels, this information is displayed for 5 seconds.
Digital Programme Features
(for digital channels only)
These functions are available only for digital channels.
Displaying Digital Teletext (MHEG) -- (for UK only)
If your chosen channel has teletext (MHEG) features, you can access them. Teletext services often load automatically shortly after the Digital Teletext window is displayed. In which case, simply follow the given instructions (press color buttons).
1 Press the TEXT button to access teletext(MHEG) features.
2 Press the TEXT button again to return to normal viewing.
3 Press the + / - button to exit this service.
Note: You should select Off from the subtitle language to display teletext(MHEG).
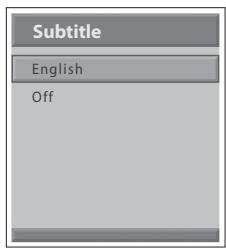
Changing Subtitle Language
If the current programme provides Subtitle information, you can select the language for the Subtitle.
1 Press the SUBTITLE button to display the subtitle language list.
2 Select your desired subtitle language using the / button, and press the OK button. Then the subtitle will be displayed in the selected language at the bottom of the screen.
3 Select Off from the subtitle language list if you do not wish to display subtitles in the screen.
Changing Audio Options
If the current programme is available in multiple audio languages, you can select the language that you wish to listen in.
1 Press the SOUNDTRACK button to display soundtrack list.
2 Select your desired audio language using the / and OK button to change the audio soundtrack.
3 Select Audio preference(left, right, stereo) using the / buttons, and press the OK button.
4 Press the SOUNDTRACK button to exit the soundtrack list.
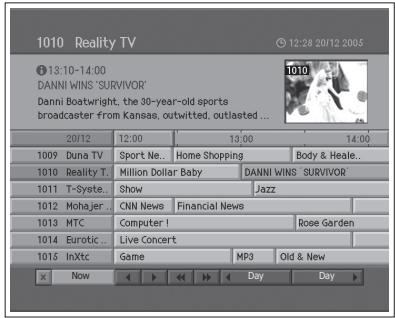
The Electronic Programme Guide (EPG) displays programme information about each digital channel, based on the date and time. You can also schedule your watching using the information given.
Electronic Programme Guide (EPG) is available only for digital channels.
Note: Press the EPG button to exit the EPG screen.
Viewing the Electronic Programme Guide(EPG)
You can view programme information for all digital channels.
1 Press the EPG button.
2 Move to previous or next programme within the same channel using the / button.
3 Move to another channel using the / button. If there are multiple channels, use the P + / - button to move to channels by page. Also, you can enter the channel number using the NUMBER(0-9) buttons on the remote control to move to the channel directly.
4 Select a programme and press the OK button. Then you can watch the programme if it is on air.
5 Press the INFO button in the selected programme to view the detailed information (if available) of the selected programme.
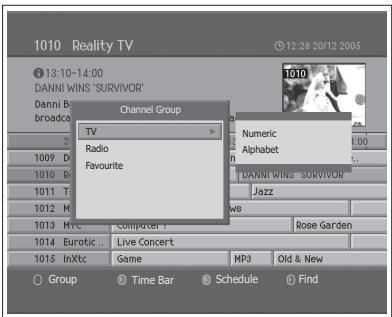
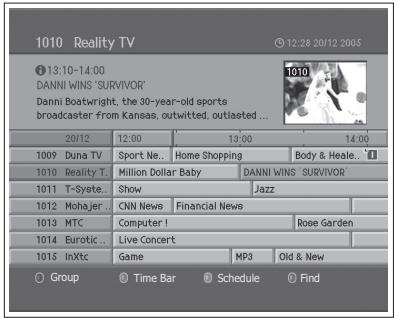
Viewing by Channel List Groups
You can view programme information of the selected channel list by groups.
1 Press the EPG button.
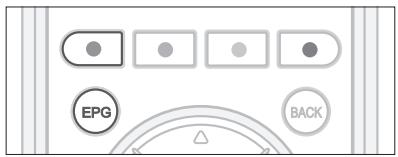
2 Press the RED button to display the channel list group.
3 Select a channel list group using the / button.
4 Move the cursor to the sub-group using the button, select a sub-group using the / button and press the OK button. The programme guide for the selected channel list is displayed.
Viewing Using Time Bar
You can quickly search the time zone using the time bar.
1 Press the EPG button.
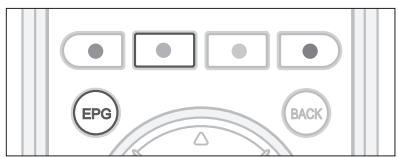
2 Press the GREEN button to display time bar.
3 Select the each button using the button and press the OK button to move the time bar. If you press the button repeatedly, the same operation is repeated.
4 Each button functions as follows.
Now Moves to the current programme where the cursor is located.
Moves back to the previous programme or 30 minutes before.
Moves forwards to the next programme or 30 minutes ahead.
Moves back to 2 hours before.
Moves forwards to 2 hours ahead.
Day Moves back to one day before.
Day Moves forwards to one day ahead.
5 Select × button and press the OK button to exit the time bar.
Reserving a Watching
You can reserve a watching of the future programme in the Electronic Programme Guide (EPG).
1 Press the EPG button.
2 Select the desired programme and press the OK button. The confirm message will be displayed.
3 Select OK and press the OK button to reserve the programme. When a reservation has been completed, the icon ('u') is displayed on the reserved programme. Press the OK button again to cancel reservation.
4 Press the YELLOW button to move to the Schedule screen. The schedule screen displays the reserved programme list and lets you review, edit or delete the reservations.
5 By the reserved time, the programme will be displayed.
Note: If the channel is locked, restricted by watching time, you will be prompted to enter your password to complete the reservation. The default password is 0000. If you have forgotten your password, please contact your local TV distributor.
Viewing Reserved Programme
You can add or edit the reservation using the Schedule screen.
1 Press the EPG button.
2 Press the YELLOW button.
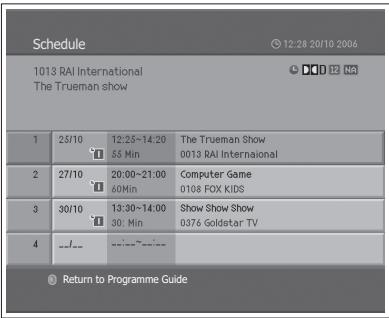
Editing a Reservation

1 Select the scheduled programme and press the OK button to edit the reservation information.
2 Change Channel No. and Time using the NUMBER (0-9) buttons.
3 Change Repeat mode using the / button. The options are Once ('D), Daily ('D) and Weekly ('D).
4 Select Save and press the OK button to complete.
5 Select Cancel and press the OK button to cancel the editing.
6 Select Delete and press the OK button to delete the reserved programme.
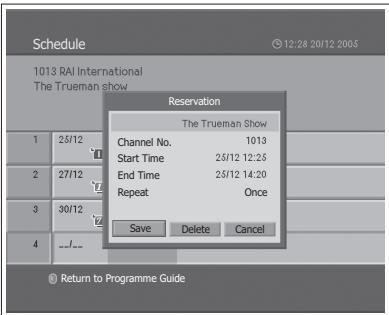
Adding a Reservation
1 Select a blank space and press the OK button to add a new reservation schedule.
2 Change Channel No. and Time using the NUMBER (0-9) buttons.
3 Change Repeat mode using the / button. The options are Once ('D), Daily ('D) and Weekly ('D).
4 Select Save and press the OK button to complete.
5 Select Cancel and press the OK button to cancel the reservation.
Notes:
- If the programme is overlapped with another programme, adjust the reservation appropriately.
- If the channel is locked, restricted by watching time, you will be prompted to enter your password to complete the reservation. The default password is 0000. If you have forgotten your password, please contact your local product distributor.
Finding a Programme
You can sufficiently find the programme you want by programme name or genre.
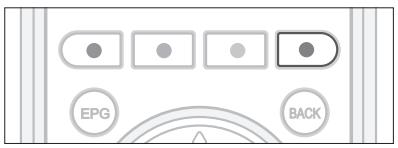
1 Press the EPG button.
2 Press the BLUE button.
3 Enter the programme name directly using the keyboard displayed on the screen.
4 When entering programme name is complete, select Find and press the OK button.
Notes:
- Select the letter using the / / button and press the OK button to enter the programme name on the keyboard screen.
- If you select Previous or Next on the keyboard displayed on the screen and press the OK button, the keyboard layout is switched.
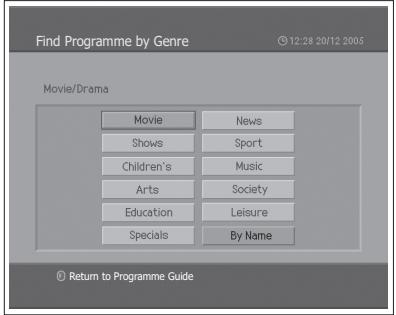
5 Select By Genre and press the OK button to search programme by genre.
6 Select the genre using the / / button and press the OK button.
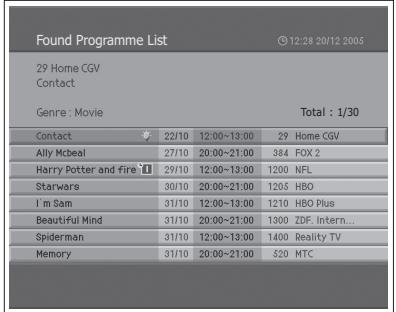
7 If you select a programme from Found Programme List screen and press the OK button, you can watch the programme if it is on air or reserve it if it is the future programme. If you want to find another programmes, press the BACK button to return to the previous menu.
Note: Found Programme List may differ depending on the provided programme information.
Scanning Analog Channels Automatically
You can automatically scan channels for the frequency ranges available (availability depends on your region).
Analog channels can be scanned only in Analog TV input mode. Please make sure the main Input is set to Analog TV using the TV/AV button.
1 Press the MENU button.
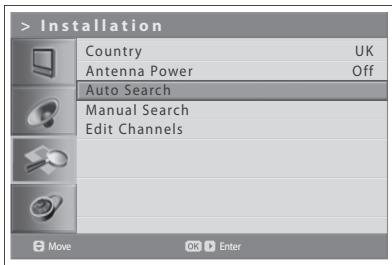
2 Select Installation using the / button and press the OK or button.
3 Select Country using the / button.
4 Select the country where you are now located using the / button.
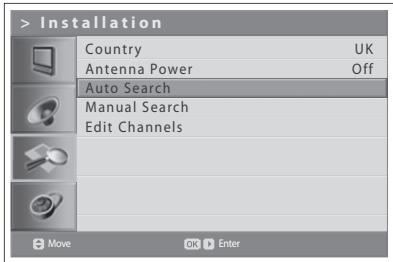
5 Select Auto Search using the / button and press the OK or button. Search is highlighted.
6 Press the OK button to start to scan channels. It starts to scan channels. The scanned channels are automatically saved in order. To stop scanning channels, press the BACK button.
7 After the channel scanning completes, the Edit Channels menu is displayed automatically. The first scanned channel, if only, will be automatically displayed.
Note: If you connect an active antenna to the TV, you have to set the Antenna Power to On to supply the 5V power into antenna. The default value is Off. Active antenna is a portable or indoor antenna which needs power supply from the product because it does not have power cord for itself.
Scanning Analog Channels Manually
You can save each channel as you identify.
Analog channels can be scanned only in Analog TV input mode. Please make sure the main Input is set to Analog TV using TV/AV button.
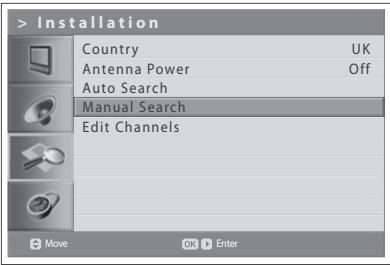
1 Press the MENU button.
2 Select Installation using the / button and press the OK or button.
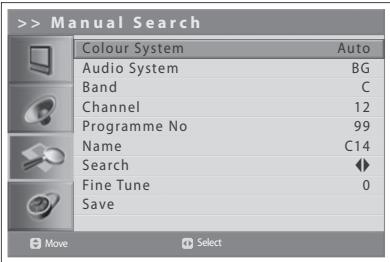
3 Select Manual Search using the / button and press the OK or button. Colour System is highlighted.
4 Select the required broadcasting standard (Auto, PAL, or SECAM) using the / button.
5 Select Audio System using the / button.
6 Select the required audio system (BG, I, DK or L) using the / button.
7 Select Band using the / button.
8 Select the required signal source (C or S) using the / button.
9 Select Channel using the / button and choose the channel number pressing the / or NUMBER (0~9) button.
10 Select Programme No using the / button and select the programme number you would like to assign by pressing the / or NUMBER (0~9) button. To change channel names, select Name using the / button.
11 Enter the new channel name using the / / / buttons and press the OK button.
12 Select Search using the / button and press the / button to start searching channels.
13 Select Fine Tune using the / button and press the / button to obtain a good quality of the picture and sound until you reach the optimal setting.
14 Select Save and press the OK button to save. The Edit Channels menu is displayed automatically.
Channel mode display
C (Air channel mode): You can select channels by entering the assigned number for broadcasting stations on air in this mode.
S (Cable channel mode): You can select a channel by entering the assigned number for cable channels in this mode.
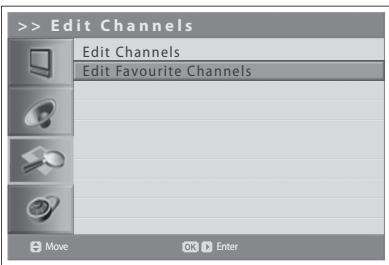
Editing Analog Channels
After channel scanning completes, you can delete, skip, move or add into favorite channel group the saved analog channels.

Analog channels are editable only in Analog TV input mode. Please make sure the main Input is set to Analog TV using TV/AV button.
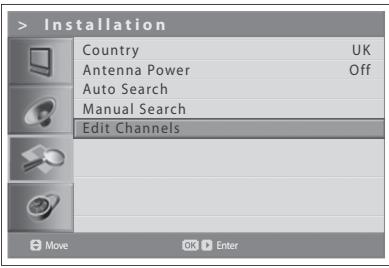
1 Press the MENU button.
2 Select Installation using the / button and press the OK or button.
3 Select Edit Channels using the / button and press the OK or button.
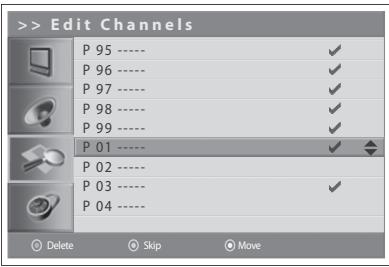
Deleting Channels
You can delete channels from the list.
1 Select a channel you want to delete using the / button and press the RED button. The selected channel is deleted.
■ Skipping Channels
Once channels are selected to skip, you can select the skipped channels using number buttons only. The P + / - buttons will not function for the skipped channels.
1 Select a channel to skip using the / button and press the GREEN button. (✔) mark appears next to the channel name. To clear the skipped channels, select the channel you don't want to skip and press the GREEN button.
Moving Channels
You can change the location of channels.
1 Select a channel to move the location using the / button and press the YELLOW button. ( ) mark appears next to the channel name.
2 Move the selection to a new location using the / button and press the YELLOW button. The selected channel is moved to its new location and all other channels are shifted accordingly.
Scanning Digital Channels Automatically
You can automatically scan digital channels for the frequency ranges available (availability depends on your region).
Digital channels can be scanned only in Digital TV input mode. Please make sure the Main Input is set to Digital TV using the TV/AV button.
1 Press the MENU button
2 Select Installation using the / button and press the OK or button.
3 Select Country using the / button.
4 Select the country where you are now located using the / button.
5 Select Auto Search using the / button and press the OK or button. Search is highlighted.
6 Press the OK button to start searching channels. It starts to scan channels. To stop scanning channels, press the OK button.
7 After the channel scanning completes, select Save using the / button and press the OK button to save the founded channels.
Note: If you connect an active antenna to the TV, you have to set the Antenna Power to On to supply the 5V power into antenna. The default value is Off. Active antenna is a portable or indoor antenna which needs power supply from the product because it does not have power cord for itself.
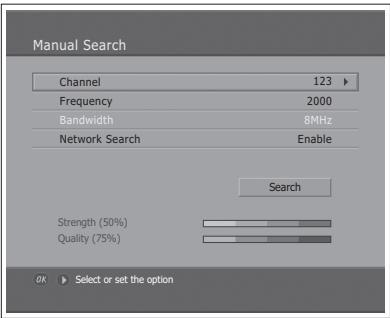
Scanning Digital Channels Manually --- (for UK only)
You can manually select to scan digital channels. The channel numbers are determined by the broadcasting stations.
Digital channels can be scanned only in Digital TV input mode. Please make sure the Main Input is set to Digital TV using the TV/AV button.
1 Press the MENU button.
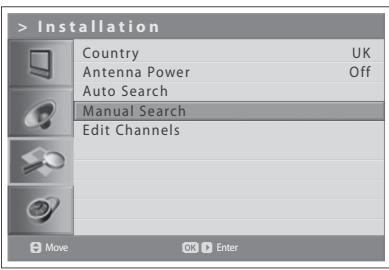
2 Select Installation using the / button and press the OK or button.
3 Select Manual Search using the / button and press the OK or button. Selected Channel is highlighted.
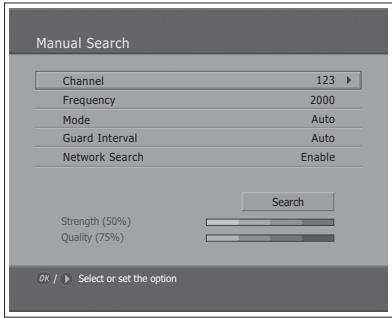
4 Select Channel using the / button and press the OK or button.
5 Select one of channel using the / button and press the OK button. When entering the channel number, the appropriate frequency value is automatically displayed in Frequency.
6 Select Frequency using the / button and press the OK or button.
7 Enter your desired frequency to search directly using the NUMBER (0~9) button and press the OK button. When entering the frequency, the appropriate channel for the entered frequency is automatically displayed in Channel.
8 Select Mode using the / button and press the OK or button.
9 Select among Auto, 2k and 8k using the / button, and press the OK button. If the information is not known, then Auto can be selected.
10 Select Guard Interval using the / button and press the OK or button.
11 Select one option among Auto, 1/4, 1/8, 1/16 and 1/32 using the / button, and press the OK button. If the information is not known, then Auto can be selected.
12 Select Network Search using the / button and press the OK or button.
13 Select one option between Enable and Disable using the OK or button. If specified frequency channel information and other channel information are provided together, the channel, which belongs to other frequency channel, is also searched.
14 When completed, select Search using the / button and press the OK button to start searching channels. It starts to scan channels. To stop scanning channels, press the OK button.
15 After the channel scanning completes, select Save using the / button and press the OK button to save the founded channels.
Scanning Digital Channels Manually - (for other countries)
You can manually select to scan digital channels. The channel numbers are determined by the broadcasting stations.
Digital channels can be scanned only in Digital TV input mode. Please make sure the Main Input is set to Digital TV using the TV/AV button.
1 Press the MENU button.
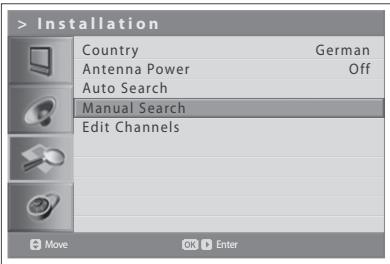
2 Select Installation using the / button and press the OK or button.
3 Select Manual Search using the / button and press the OK or button. Selected Channel is highlighted.
4 Select Channel using the / button and press the OK or button.
5 Select one of channel using the / button and press the OK button. When entering the channel number, the appropriate frequency value is automatically displayed in Frequency.
6 Select Frequency using the / button and press the OK or button.
7 Enter your desired frequency to search directly using the NUMBER (0~9) button and press the OK button. When entering the frequency, the appropriate channel for the entered frequency is automatically displayed in Channel.
8 Select Network Search using the / button and press the OK or button.
9 Select one option between Enable and Disable using the OK or button. If specified frequency channel information and other channel information are provided together, the channel, which belongs to other frequency channel, is also searched.
10 When completed, select Search using the / button and press the OK button to start searching channels. It starts to scan channels. To stop scanning channels, press the OK button.
11 After the channel scanning completes, select Save using the / button and press the OK button to save the founded channels.
Note: You can set the desired Bandwidth among 7 and 8MHz
Editing Digital Channels
After channel scanning completes, you can delete, lock, and rename saved digital channels. If there is no LCN channel, the function of move is activated.
Digital channels can be scanned only in Digital TV input mode. Please make sure the Main Input is set to Digital TV using the TV/AV button.
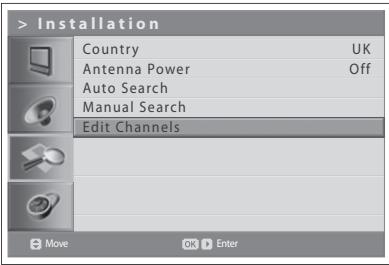
1 Press the MENU button.
2 Select Installation using the / button and press the OK or button.
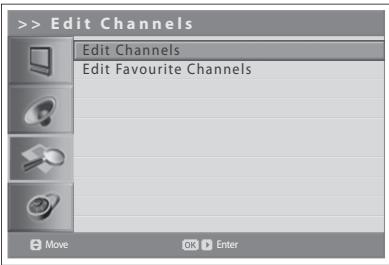
3 Select Edit Channels using the / button and press the OK or button.
4 Enter your password by pressing the NUMBER (0~9) buttons.
5 Select Edit Channels using the / button and press the OK or button.
Note: The default password is 0000. If you have forgotten your password, please contact your local TV distributor.

Selecting Channel Group
You can select the channel list group to edit TV or Radio.
1 Press the OK or button in Group to display channel list group.
2 Select your desired channel list group using the / button, and press the OK button.
- Deleting Channels
You can delete one or more channels.
1 Select a channel you want to delete using the / button and press the OK button. You can select multiple channels.
2 Select Delete in the right using the / / buttons, and press the OK button.
Locking/Unlocking Channels
You can lock or unlock one or more channels.
1 Select a channel you want to lock using the / button and press the OK button. You can select multiple channels.
2 Select Lock in the right using the / / button, and press the OK button. mark appears next to the channel name.
To unlock the locked channels, select the channel you want to unlock and select Unlock in the right, and press the OK button.
Note: To watch the locked channels, you must enter the password using the NUMBER (0-9) buttons.
Renaming Channels
You can change the channel name as you like.
1 Move the cursor to the channel list using the / button.
2 Select your desired channel and press the OK button. You can select only a single channel.
3 Select Rename in the right using the / / button and press the OK button.
4 Enter a channel name directly using the keyboard displayed on the screen.
5 When finishing entering channel name, select OK and press the OK button.
Selecting/Unselecting All Channels
You can select/unselect all channels at a time.
1 Select Select All in the right and press the OK button to select all channels.
2 Select Unselect All in the right and press the OK button to unselect all the selected channels.
Editing Favourite Digital Channels
You can add favourite channels or remove favourite channels from the favourite list.
Digital channels are editable only in Digital TV input mode. Please make sure the Main Input is set to Digital TV using TV/AV button.
1 Press the MENU button.
2 Select Installation using the / button and press the OK or button.
3 Select Edit Channels using the / button and press the OK or button.
4 Enter your password by pressing the NUMBER (0~9) buttons.
5 Select Edit Favourite Channels using the / button and press the OK or button.
Note: The default password is 0000. If you have forgotten your password, please contact your local TV distributor.
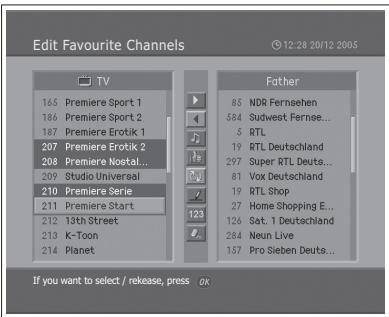
The buttons for editing the Favourite channel list are described in the following table.
| Add | Adds the favourite channel |
| Remove | Removes the channel from the favourite channel list |
| TV/Radio | Switches between TV and Radio channel list |
| Fav.Group | Changes the favourite channel group |
| Move | Moves the order of channel list within the favourite channel list |
| Rename | Renames the favourite channel group |
| Sort | Sorts channels by number or name in all TV/Radio channel list |
| Unselect All | Unselect all the selected channels |
Adding/Removing favourite channels
You can add favourite channel(s) to the favourite channel list or remove the added favourite channel(s) from the list.
1 Select a favourite group using
2 Select your desired channel(s) in all TV/Radio channel list, and press to add in the favourite channel list.
3 Select your desired channel(s) in favourite channel list, and press to remove in the favourite channel list.
Moving favourite channels
You can move favourite channel(s) to your desired location within the favourite channel list.
1 Select a favourite group using
2 Select your desired channel to move within the favourite channel list and press the OK button.
3 Select , and press the OK button.
4 Move the cursor to your desired location using the / button, and press the OK button.
5 The selected channel(s) is moved into the desired location you selected.
Note: You can't move the channels with the LCN (Logical Channel Number).
Renaming favourite groups
You can rename the favourite groups.
1 Select a favourite group to rename using
2 Select , and press the OK button.
3 Enter the new group name using / / button in the keyboard displayed on the screen.
4 When finishing entering the name, select OK and press the OK button.
Additional Features
Additional Features provide many useful functions which are necessary to add favourite channel.
Change between TV and Radio channel list
You can add not only TV channel(s) but also Radio channel(s) to the favourite channel list. Press to switch all channels into TV or Radio channels.
Select a favourite channel group
You can select your desired favourite channel list to edit. Press to display the favourite group list. Then select your desired group using the / button, and press the OK button.
Sort a channel list
You can sort all TV or Radio channel lists by channel number or name for easy channel search. If channel lists are sorted by channel number, abc is displayed. When you press this button, all the channel lists are sorted by name. Or, if channel lists are sorted by channel name, abc is switched into 123. Press this button to order channels by number.
Unselect all the selected channels
Press button to unselect all the selected channels.
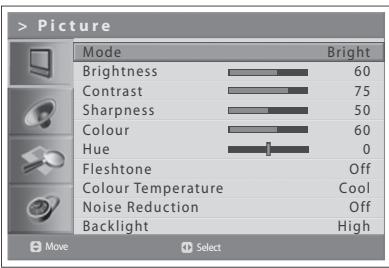
Selecting a Picture Mode
You can select the picture mode which best fits your viewing requirements.
1 Press the MENU button.
2 Select Picture using the / button and press the OK or button.
3 Select the required picture mode using the button.
The following options are available:
Bright > Soft > Manual > Standard
Note: You can select a picture mode by simply pressing the PIC MODE button on the remote control. Press again to switch.
4 Press the EXIT button to return to Live TV or press the BACK button to return to the previous menu.
Customizing the Picture Settings
You can adjust the picture appearance to suit your preference and viewing situations.
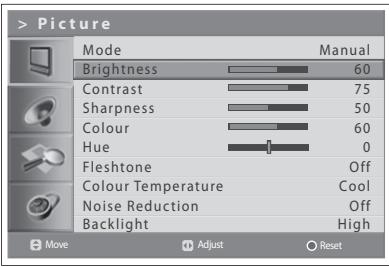
1 Press the MENU button.
2 Select Picture using the / button and press the OK or button.
3 Select the picture mode to Manual using the / buttons.
4 Select the required option using the / button and press the / button. The following options are available: Brightness > Contrast > Sharpness > Colour
5 Press the / button until you reach the optimal setting. Press the BLUE button to reset to the default value. To select other options, repeat the steps from 4 to 5.
6 Press the EXIT button to return to Live TV or press the BACK button to return to the previous menu.
Note: You can adjust the Hue when watching the NTSC signal in AV1, AV2, AV3 or S-Video input mode.
Fleshtone
Use Fleshtone function to improve the picture quality by adjusting colour balance.
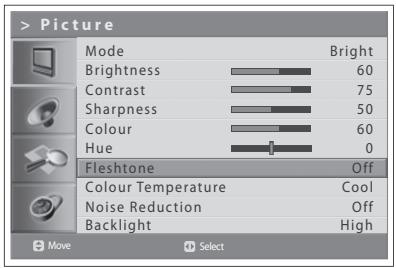
1 Press the MENU button.
2 Select Picture using the / button and press the OK or button.
3 Select Fleshtone using the / button.
4 Select the required fleshtone using the / button. The following options are available.
Off > Low > Medium > High
5 Press the EXIT button to return to Live TV or press the BACK button to return to the previous menu.
Colour Temperature
You can change the colour of the entire screen to fit your needs. Set to Warm for intensifying hot colours such as red, or set to Cool for displaying less intense colours with more blue.

1 Press the MENU button.
2 Select Picture using the / button and press the OK or button.
3 Select Colour Temperature using the / button.
4 Select the required colour temperature using the / button. The following options are available:
Cool > Normal > Warm
5 Press the EXIT button to return to Live TV or press the BACK button to return to the previous menu.
Noise Reduction
If the signal received by your television is weak, you can activate this feature to help reduce noise that may appear on the screen.
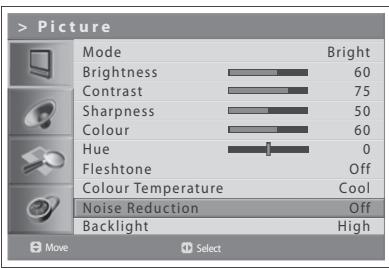
1 Press the MENU button.
2 Select Picture using the / button and press the OK or button.
3 Select Noise Reduction using the / button.
4 Select the required option by pressing the button. The following options are available.
Off > Low > Medium > High
5 Press the EXIT button to return to Live TV or press the BACK button to return to the previous menu.
Adjusting Backlight Brightness
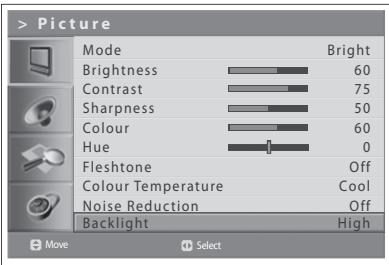
You can adjust the brightness of Liquid Crystal Display (LCD).
1 Press the MENU button.
2 Select Picture using the / button and press the OK or button.
3 Select Backlight using the / button.
4 Select the required option using the / button.
The following options are available:
High > Auto > Low > Medium
5 Press the EXIT button to return to Live TV or press the BACK button to return to the previous menu.
Setting the Sound Effect
You can select the type of special sound effect when watching a broadcast.
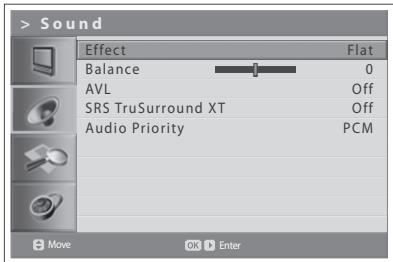
Sound Effect lets you enjoy the best sound without any special adjustment because the TV sets the appropriate sound options based on the programme content.
1 Press the MENU button.
2 Select Sound using the / button and press the OK or button.
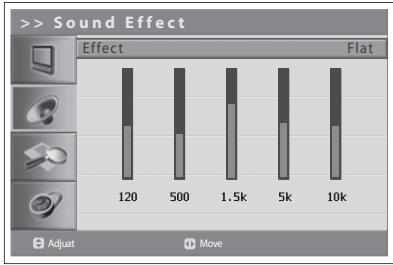
3 Select Effect using the / button and press the OK button.
4 Select the required sound effect using the / button. The following options are available:
User Customise your own sound effect.
Flat Flat and pure sound.
Speech Emphasises clear dialogue.
Movie Emphasises bass tones.
Music Enhances music quility.
5 Press the EXIT button to return to Live TV or press the BACK button to return to the previous menu.
Note: You can select sound effect by simply pressing the SND EFFECT button on the remote control. Press again to switch.
Adjusting the Sound Balance
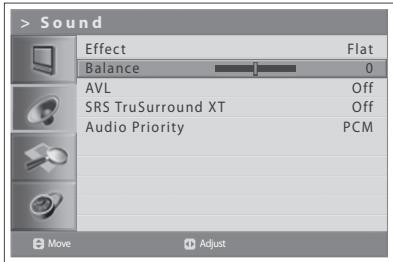
You can adjust the output of the right and left speakers to obtain the best stereo reproduction for your listening position.
1 Press the MENU button.
2 Select Sound using the / button and press the OK or button.
3 Select Balance using the / button.
4 Press the / button to make changes.
5 Press the EXIT button to return to Live TV or press the BACK button to return to the previous menu.
Adjusting the Volume Automatically
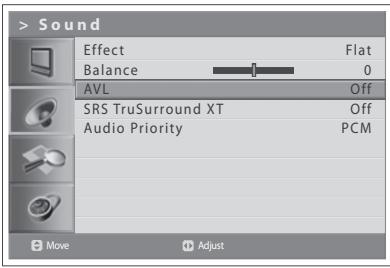
Each broadcasting station has its own signal conditions, volume may not be adjusted each time you switch channels. This feature lets you automatically adjust the volume of the selected channel by adjusting the sound output depending on the signal modulation.
1 Press the MENU button.
2 Select Sound using the / button and press the OK or button.
3 Select AVL(Auto Volume Level) using the / button.
4 Select On/Off using the button.
5 Press the EXIT button to return to Live TV or press the BACK button to return to the previous menu.
Setting the TruSurround XT
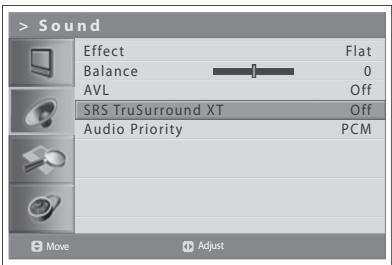
TruSurround XT is a patented SRS technology that solves the problem of playing 5.1multi-channel content over two speakers. TruSurround delivers a compelling, virtual surround sound effect through two-speaker playback system, including built-in television speakers. It is fully compatible with all multi-channel audio formats.
1 Press the MENU button.
2 Select Sound using the / button and press the OK or button.
3 Select SRS TruSurround XT using the / button.
4 Select On/Off using the button.
5 Press the EXIT button to return to Live TV or press the BACK button to return to the previous menu.
Note: (SRS) is a trademark of SRS Labs, Inc. TruSurround XT technology is incorporated under license from SRS Labs, Inc.
Setting up Audio Priority (for the digital channels only)
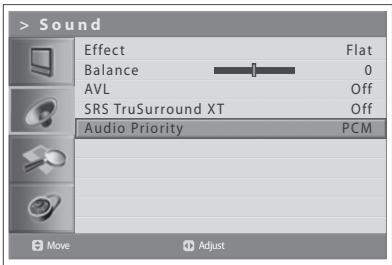
You can fully enjoy the Compressed bitstream sound effect with the optical output connected to an external digital audio decoder.
1 Press the MENU button.
2 Select Sound using the / button and press the button.
3 Select Audio Priority using the / button.
4 Select either PCM or Compressed by pressing the button. PCM
Converts to PCM(2CH) 48kHz audio. Select PCM if your amplifier system is stereo and/or Dolby Pro-logic.
Compressed
Outputs bit streams (original format) such as Dolby or DTS.
Select Compressed if your amplifier system has multi-channel digital audio surround decoding (Dolby Digital and/or DTS).
5 Press the EXIT button to return to Live TV or press the BACK button to return to the previous menu.
Setting the Time Information
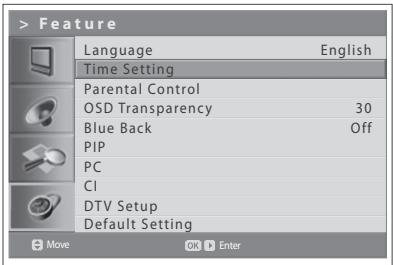
You can set the current time. If you want to set time for automatically turning on/off the power, you must set the local time first.
Setting the Current Time
1 Press the MENU button.
2 Select Feature using the / button and press the OK or button.
3 Select Time Setting using the / button and press the OK or button.
4 Select Date using the / button and enter day/month/year using the NUMBER(0~9) buttons.
5 Select Local Time using the / button and enter hour/minute using the NUMBER(0~9) buttons.
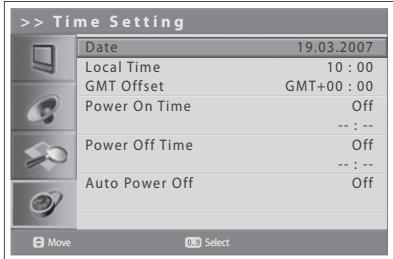
Note: Your TV automatically sets and updates the time over the air when you successfully search digital terrestrial channels. Then Date and Local Time menu will be disabled. You must set the GMT Off set value in Feature > Time Setting > GMT Offset menu.
Using the TV Timer Function
You can schedule time for automatically turning on/off the power so that your TV will automatically be turned on and off at specific time you have scheduled.
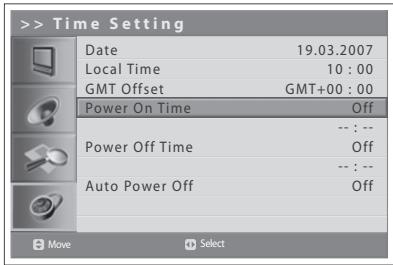
6 To set time for turning on the power, select Power On Time using the / button and press the button to select On.
7 Power On Time is enabled, enter hour/minute using the NUMBER(0~9) buttons. At the preset time, the TV will automatically be tuned on.
8 To set time for turning off the power, select Power Off Time using the / button and press the / button to select On.
9 Power Off Time is enabled, enter hour/minute using the NUMBER(0~9) buttons.
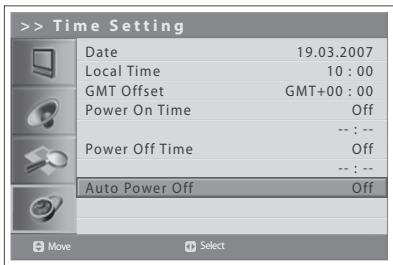
Setting the Auto Power Off
In case there is no signal, it is possible have your TV automatically turned off to reduce power consumption.
10 Select Auto Power Off using the / button and press the / button to select On. The TV will automatically be turned off if there is no signal.
Parental Control
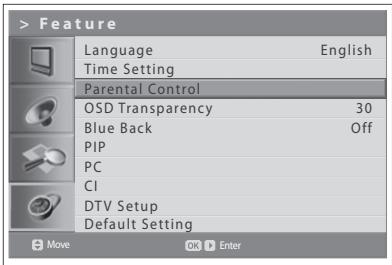

This feature enables you to prevent unauthorised users such as children from watching adult channels or programmes by using a password you have defined.
1 Press the MENU button.
2 Select Feature using the / button and press the OK or button.
3 Select Parental Control using the / button and press the OK or button.
The Enter your Password dialog box is displayed.
4 Enter your password by pressing the NUMBER (0~9) buttons.
Note: The default password is 0000. If you have forgotten your password, please contact your local TV distributor.
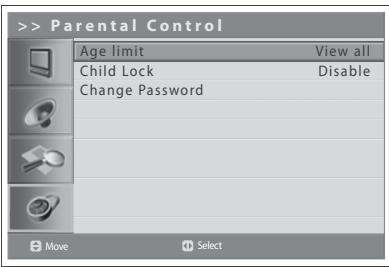
Setting the Age Limit (for digital channels only)
Age Limit enables you to block programmes from unauthorised users according to the age level you have defined.
1 Select Age Limit using the / button.
2 Define ages for unauthorised users not to access to blocked programmes using the / button.
View All : All programmes are not blocked.
4~18 : Programmes is blocked for age groups less than or equal to each age.
Lock All : All programmes are blocked without considering the age level.
Notes:
- If you select a blocked channel "This programme is blocked by age" message appears.
- You have to enter the password to watch the blocked programmes by the age restriction.
- This function is available only for the programmes with the age information.
Setting the Child Lock

Child Lock enables you to lock the buttons on the front panel.
1 Select Child Lock using the / button.
2 Select Enable/Disable using the / button.
Note: To unlock, press the TV/AV/OK and P V buttons on the top panel of the TV together for 3 seconds.
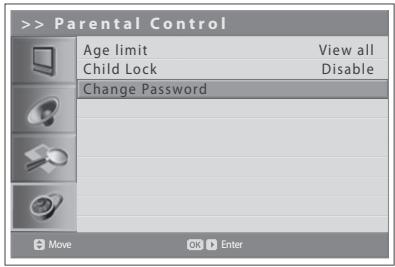

Changing the Password
You can change the current password to a new one.
1 Select Change Password using the / button and press the OK or button.
2 Enter your old password and enter your new password using the NUMBER (0~9) buttons.
3 Enter the new password again to confirm. Then your new password has been memorized.
Note: The default password is 0000. If you have forgotten your password, please contact your local TV distributor.
Adjusting OSD Transparency
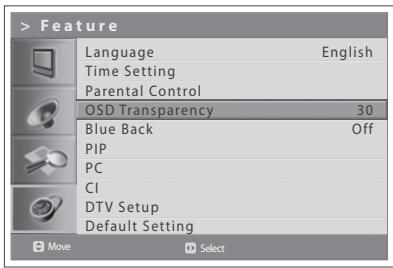
You can set the transparency of On Screen Display.
1 Press the MENU button.
2 Select Feature using the / button and press the OK or button.
3 Select OSD Transparency using the / button.
4 Select the required option using the / button. The following options are available:
$$ 3 0 > 5 0 > 7 0 > 1 0 0 > \text {D i s a b l e} $$
5 Press the EXIT button to return to Live TV or press the BACK button to return to the previous menu.
Adjusting Blue Back
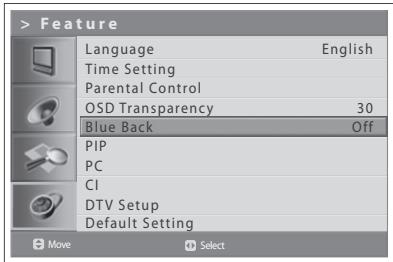
When watching a channel with no or poor reception, or if there is no input from an external device, you can change the screen into a blue.
1 Press the MENU button.
2 Select Feature using the / button and press the OK or button.
3 Select Blue Back using the / button.
4 Select On/Off using the / button.
5 Press the EXIT button to return to Live TV or press the BACK button to return to the previous menu.
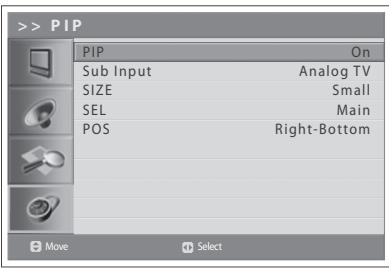
Picture-in-Picture (PIP) Settings
The PIP function allows you to watch two pictures with main and sub screens at the same time using your TV or other external devices.
This function is available in the PC input mode only.
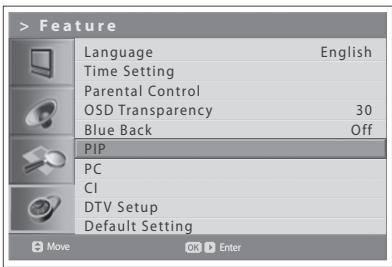
1 Press the MENU button.
2 Select Feature using the / button and press the OK or button.
3 Select PIP using the / button and press the OK or button. PIP is highlighted.
4 Select On/Off using the button.
Notes:
- You can turn on/off the PIP modes by simply pressing the PIP button on the remote control.
- You can not change the aspect ratio when PIP mode.
If you set PIP to Off, the followings are not available:
5 Select Sub Input using the / button.
6 Select your desired input among the available sources using the / button.
| Main Picture Source | Available Sub Picture Source |
| PC | Digital TV, Analog TV, AV1, AV2, AV3, S-Video |
7 Select Size using the / button.
8 Select Small or Large using the / button.
Note: You can select the size of the sub-screen by simply pressing the SIZE button on the remote control.
9 Select SEL using the / button.
10 Select Main or Sub using the / button.
Note: You can select your desired screen by simply pressing the SEL button on the remote control.
11 Select POS using the / button.
12 Select the required position by pressing the / button. Right-Bottom > Left-Bottom > Left-Top > Right-Top
Note: You can select the position by simply pressing the POS button on the remote control.
Common Interface (for digital channels only)
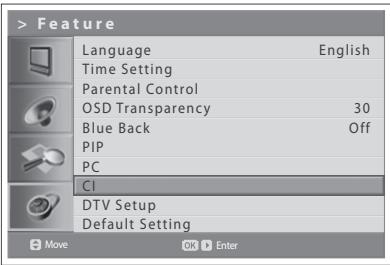
You can view the current status of the CI module. The CI sub menu displays when inserting the CI module to the TV.
1 Press the MENU button.
2 Select Feature using the / button and press the OK or button.
3 Select CI(Common Interface) using the / button and press the OK or button.
4 If Common Interface is available, you can view information about each Slot.
Note: The displayed information about each Common Interface may differ depending on the type of Common Interface.
Default Settings
You can set your TV settings to the default setting values.
Warning: Please note that once you perform the Default Setting, all data such as aerial setting information, channel list, and user configured data are deleted.
To perform Default Setting, do as follows:
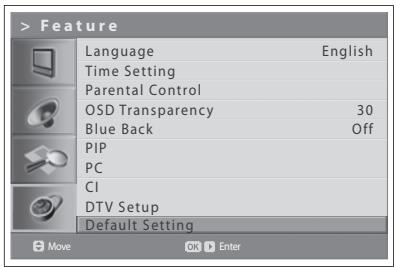
1 Press the MENU button.
2 Select Feature using the / button and press the OK or button.
3 Select Default Setting using the / button and press the OK or button. The Enter Your Password dialog box is displayed.
4 Enter your password using the NUMBER(0~9) buttons to change all settings value to the factory default.
5 Default setting is completed.
Notes :
- The default password is 0000. If you have forgotten your password, please contact your local TV distributor.
- After completing the default setting, the initial setup wizard (APS) will appear automatically in a few seconds.
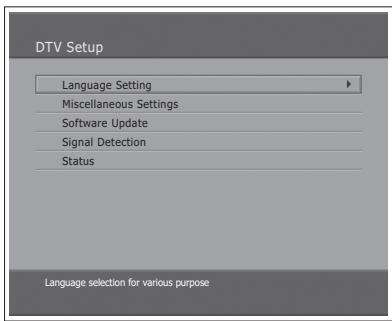
In this chapter, you can set the various options for digital channels such as the subtitle language, i-plate display time and software update.
You can access to the DTV Setup menu only in Digital TV input mode.
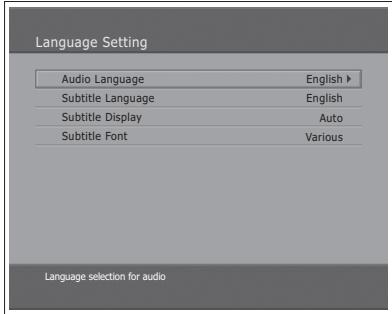
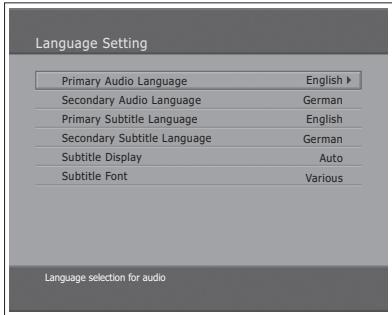
Language Setting
(for UK only)
(for other countries)
1 Press the MENU button.
2 Select Feature using the / button and press the OK or button.
3 Select DTV Setup using the / button and press the button.
4 Select Language Setting using the / button, and press the OK or button.
Audio/Subtitle Language
You can set the language for Audio and Subtitle.
1 Select one among the language menus using the / button.
2 Press the OK or button to display the available language list.
3 Select your desired language using the / button, and press the OK button.
Subtitle Display
You can select whether or not to display the Subtitle automatically if provided.
1 Select Subtitle Display using the / button.
2 Select your desired option using the OK or button.
Auto Subtitles are displayed automatically in the predefined subtitle language.
Manual Subtitles are displayed in the language when you select the subtitle language by pressing the SUBTITLE button at remote control.
Subtitle Font
You can select the Subtitle font.
1 Select Subtitle Font using the / button.
2 Select your desired option using the OK or button. Variable Uses the horizontally variable Subtitle Font. Fixed Uses the fixed Subtitle Font.
Miscellaneous Settings
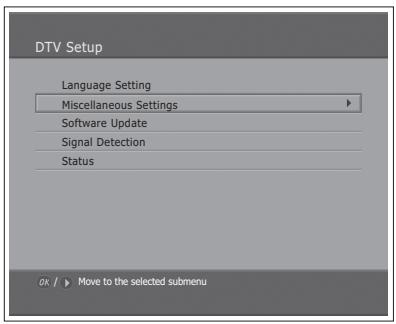
1 Press the MENU button.
2 Select Feature using the / button and press the OK or button.
3 Select DTV Setup using the / button and press the button.
4 Select Miscellaneous Settings using the / button, and press the OK or button.
i-Plate Display Time
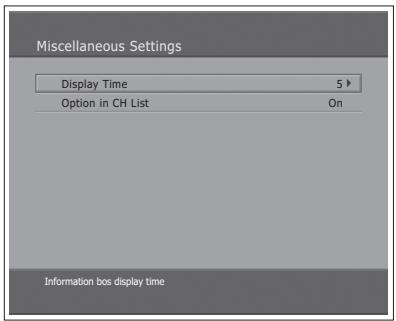
You can set the duration during which the Information box is to be automatically displayed when you switch the channel.
1 Select i-Plate Display Time using the / button, and press the OK or button.
2 Select a value between 1 20 seconds using the / button, and press the OK button.
Note: When it is set to Disable, the i-Plate will not be displayed when you switch the channel.
Option in Channel List
You can set whether or not to display the scrambled icon in channel list.
1 Select the Option in CH List using the / button.
2 Select one option from On/Off using the OK or button.
On Scramble icon display in the channel list.
Off Scramble icon disappear in the channel list.
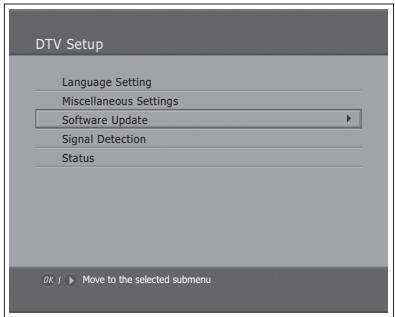
Software Update
In order to maintain proper performance of the TV, it is essential to have the most up-to-date software. The latest news and release of software versions may be found at the HUMAX website – http://www.humxdigital.com. It is recommended that you periodically check for the availability of software update.
OTA (Over the Air)
OTA, an abbreviation of Over-the-Air, means that the software can be downloaded through your aerial. The manufacturer reserves the right to decide when and where to release software by this process. The software update via your aerial will only occur under the following circumstances.
1 The equipment should have appropriate loader software.
Caution: Please note that if you don't have normal loader software, the equipment may not be updated or work after software update.
2 The manufacturer decides to release software downloading via a designated aerial system.
3 The equipment must be tuned properly according to the guidelines within this manual.
4 Update software when the quality of receiving signal strength is high. If the weather is not so good that the quality of receiving signal strength is not recommendable, perform the software update later.
Caution:
- Please be careful to keep the power on and the power cord plugged in during software update. If the power is disconnected during software update, it may cause fatal damage to the TV.
- Please be careful not to pull out the signal line (co-axial Cable) during software update. Update may be interrupted and the TV may not work.
Notes:
- The other functions of TV cannot work at all during software update.
- It may take 5~10 minutes to update software.
- Scheduling operation cannot work during software update.
(for UK only)
(for other countries)
If new software is found when powering on
1 A message will be displayed to notify that new software is found.
2 Select Yes and press the OK button to update the software.
3 Starts downloading new software. Please wait until the updated is completed.
4 When completing the software update, the equipment is automatically powered off and on again.
If updating software from Menu
1 Press the MENU button.
2 Select Feature using the / button and press the OK or button.
3 Select DTV Setup using the / button and press the button.
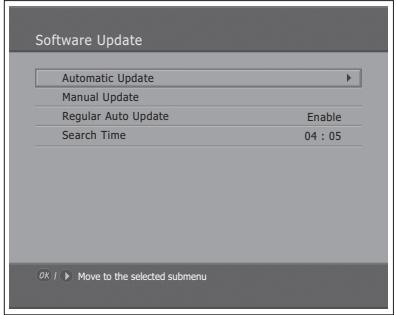
4 Select Software Update using the / button, and press the OK or button.
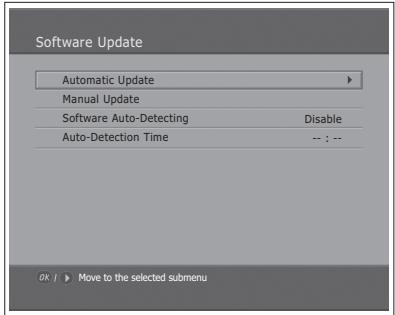
Automatic Update
You can set the TV to find HUMAX software update site and update software automatically.
1 Select Automatic Update using the / button, and press the OK or button. Automatically search for new software.
2 When detecting update software, the following result is displayed. If new software is not found by Automatic Update, use Manual Update.
3 Select Yes and press the OK button to start updating. Select No and press the OK button to return to the previous menu without updating.
4 Perform Software Update. Please wait until it is completed.
5 When completing the software update, the TV is automatically powered off and on again.
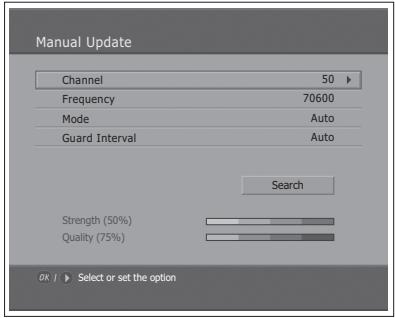
(for UK only)
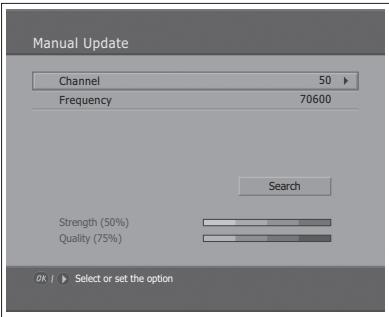
(for other countries)
Manual Update
You can perform Manual Update only if you know MUX information of software update correctly.
1 Select Manual Update using the / button, and press the OK or button.
2 Select the channel number which provides update software. You can also enter the frequency instead of channel number in which updated software is provided.
3 Select Mode and Guard Interval using the / button and select your desired value. ---- (for UK only)
Note: How to setting parameters in Manual Update is the same as how to set parameters in Manual Search. Refer to "Scanning Digital Channels Manually" in Chapter 6.
4 Select Search and press the OK button to search software.
5 It is displayed whether or not New Software exist. If new software does not exist, press the OK button to return to the Manual Update menu.
6 Select Yes and press the OK button to start updating. Select No and press the OK button to return to the previous menu.
7 Perform Software Update. Please wait until it is completed.
8 When completing the software update, the TV is automatically powered off and on again.
Software Auto-Detecting and Time -- (for UK only)
You can specify the software detecting time. If the TV powers on during software auto-detecting, Detecting will stop.
1 Select Software Auto-Detecting using the / button.
2 Select Enable or Disable using the OK or button.
3 When you select Enable, you can set the detecting time in Auto-Detecting Time.
Regular Auto Update and Search Time
-- (for other countries)
You can specify the Regular Auto Update and Search Time. Your TV starts the Regular Auto Update in the standby mode.
1 Select Regular Auto Update using the / button.
2 Select Enable or Disable using the OK or button.
3 When you select Enable, you can set the searching time in Search Time.
S/W Update from PC
You can connect your TV to the PC directly and update your software by transferring the new software from the PC. Follow these steps to download new software from PC to this TV.
1 Download new software file (HDF files) equivalent for this TV model from our website into your computer (http://www.humaxdigital.com).
2 Download and install download tool file from our website into your computer.
3 Connect your PC to this TV with RS-232C serial cable(not supplied).
4 Execute installed download tool, and then follow the instructions contained the download tool.
5 Reconnect the power cable of the TV and press the STANDBY button to make this TV operating.
Signal Detection
(for UK only)
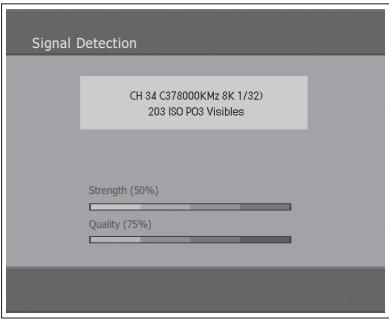
(for other countries)
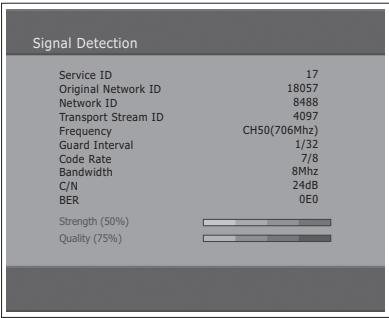
You can view the signal strength and signal quality reception for the channel that is currently being viewed.
1 Press the MENU button.
2 Select Feature using the / button and press the OK or button.
3 Select DTV Setup using the / button and press the button.
4 Select Signal Detection using the / button, and press the OK or button.
5 Display information about the aerial and multiplex, which current channel belongs to and the graphs and percentage of Signal Strength and Quality of the channel.
Status
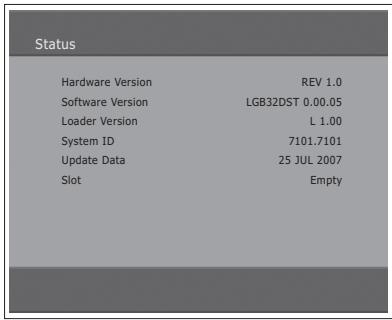
You can view System information.
1 Press the MENU button.
2 Select Feature using the / button and press the OK or button.
3 Select DTV Setup using the / button and press the button.
4 Select Status using the / button, and press the OK or button.
5 Confirm the information about Hardware version, Software version, Loader version, System ID and Update Date.
Setting the Aspect Ratio
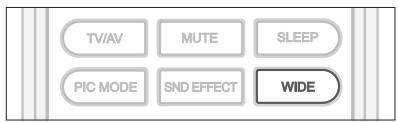
You can select an aspect ratio mode by pressing the WIDE button repeatedly on the remote control.
Auto > Regular > Panoramic > 14:9 Zoom > 16:9 Zoom > 16:9 Zoom Subtitle > Full
Notes:
- When the Component, HDMI1 or HDMI2 input mode, you can select only the Auto, Regular, 14:9 or Full.
- It is not available in the PC input mode.

Regular
Use to view a normal picture (4:3 aspect ratio) unchanged.

Panoramic
Stretches the left and right sides of a normal picture to fill the screen, in a way that does not appear unnatural.
Note: In Panoramic mode, the top, bottom, left and right of the picture are slightly cut off.

14:9 Zoom
Use to expand a picture with a 14:9 aspect ratio.

16:9 Zoom
Use to expand a wide picture (16:9 aspect ratio).
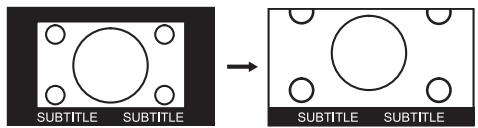
16:9 Zoom Subtitle
Use to expand a picture with a 16:9 aspect ratio having subtitles at the bottom of the screen.

Full
Uniformly stretches the left and right sides of a normal picture (4:3 aspect ratio) to fill the wide TV screen.
Note: For pictures with a 16:9 aspect ratio that have been squeezed into a normal picture (4:3 aspect ratio), select Full mode to restore their original dimensions.
To mode the picture vertically:
If you cannot see subtitles at the bottom of the screen, or if the top or bottom is cut off, move the picture vertically using the / button before the display disappears.
Note: If you change the aspect ratio mode, the picture returns to its default position.
Displaying Teletext information
You can display teletext information at any time on your TV.
Most TV broadcasting stations provide text information services via teletext.
The index page of the teletext service gives you information on how to use the service. You can also select various options to fit your needs using the remote control buttons.
Note: To properly display teletext information, channel reception must be stable.
Otherwise, information may be missing or some pages may not be displayed.
TELETEXT function buttons are as follows:
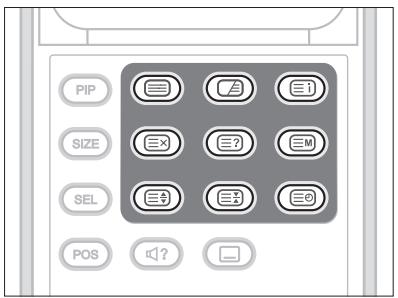
TELETEXT ON/OFF
Activates or deactivates the teletext service.
MIX
Overlaps the teletext with the broadcasting screen.
Adjusts the opacity to the background in Teletext mode.
(INDEX)
Displays the teletext index page.
(CANCEL)
Displays TV programme when waiting for the new teletext page.
(REVEAL)
Shows the hidden information. (answers to quiz games, for example)
Press it again to return to normal display.
EM (MODE)
Selects the teletext mode (LIST/FLOF)
SIZE)
Displays the double-size letters for lower half of the screen, press it again to return to normal display.
(HOLD)
Holds the display on a given page if the selected page is linked with several secondary pages that automatically follow. To resume, press it again.
(SUBPAGE)
Displays the available sub-page.
Numeric buttons (0~9)
Press to enter the three-digit page number given in the content.
Coloured buttons (Red/Green/Yellow/Blue)
If the FASTEXT system is used by a broadcasting company, the different topics covered on a teletext page are colour-coded and can be selected by pressing the coloured buttons. Press one of them corresponding to your needs. The page is displayed with other coloured information that can be selected in the same way. To display the previous or next page, press the corresponding coloured button.
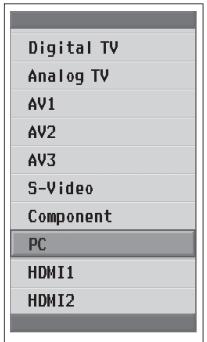
The PC menu is available only when there is a PC input signal.
1 Press the TV/AV button to switch to PC mode.
2 Select PC using the / button and press the OK button.
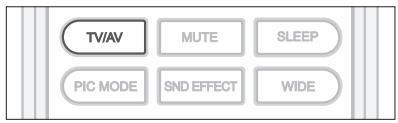
Auto Configure
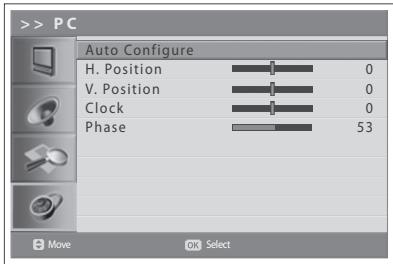
Automatically optimizes the display. This is recommended for the first time connecting to a PC.
3 Press the MENU button.
4 Select Feature using the / button and press the OK or button.
5 Select PC using the / button and press the OK or button.
6 Select Auto Configure using the / button and press the OK button.
Position
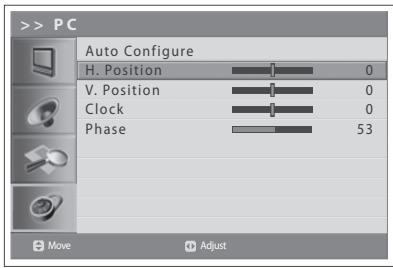
Adjusts the display position to PC if it does not fit the TV screen.
6 Select H. Position/V. Position using the / button.
7 Adjust the optimal position using the button.
Clock
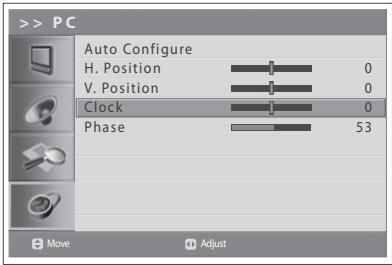
Adjusts the horizontal feature of screen by increasing or decreasing the number of pixels.
6 Select Clock using the / button.
7 Adjust the optimal horizontal feature using the / button.
Phase
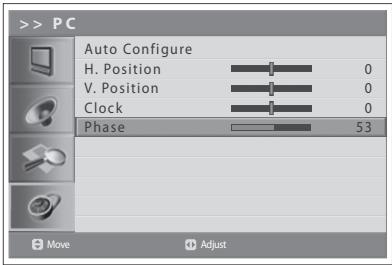
Sets the focus of screen.
6 Select Phase using the / button.
7 Adjust the optimal focus using the button.
Note: If noise is present, change the PC mode to another resolution, change the refresh rate to another rate until the picture is clear. If the refresh rate of the PC graphic card can not be changed, change the PC graphic card or consult the manufacturer of the PC graphic card.
Menu Map
| Picture | - Mode - Brightness - Contrast - Sharpness - Colour - Hue (NTSC signal only) - Fleshtone - Colour Temperature - Noise Reduction - Backlight |
| Sound | - Effect - Balance - AVL - SRS TruSurround XT - Audio Priority (Digital TV Input only) |
| Installation | - Country - Antenna Power - Auto Search - Manual Search - Edit Channels |
| Feature | - Language - Time Setting - Parental Control - OSD Transparency - Blue Back - PIP - PC (PC Input only) - CI (Digital TV Input only) - DTV Setup (Digital TV Input only) - Default Setting |
Troubleshooting
Before contacting your local service dealer, please make sure you refer to the following guide.
(1) No message is displayed on the front panel or the TV has no power.
- Check the main power cable and make sure it is plugged into a suitable power outlet.
- Check that the Main Power switch is switched on.
(2) No picture
- Make sure that the TV is power on and in operation mode (press STANDBY button).
- Make sure that the AV cable is firmly connected to the TV. You may need to remove the cable from both ends and reconnect.
- Make sure that the antenna line is properly connected to the TV.
- Check the brightness level of the TV.
- Check if the channel is currently on air. Contact the broadcaster to ensure that the channel is running.
(3) Poor picture & sound quality
Install the antenna in an obstacle-free place.
- Make sure there is no mobile phone or microwave oven near the TV.
- Use 75 coaxial cable when connecting TV and antenna.
(4) No or poor sound
- Check that your AV cable is connected correctly.
- Check the volume levels of your TV.
- Check if the TV is on mute.
- Check audio type or soundtrack option.
(5) Remote Control does not operate.
- To control the TV, the top end of the remote control should point directly towards the receiving part of the TV.
- Remove and reinsert the batteries in the remote control.
- Replace the batteries in the remote control for a new set.
(6) Cannot watch scrambled channel.
- Check that you have the appropriate Smartcard or CAM. Reinsert the Smartcard or CAM and make sure it initializes correctly.
- Check in the menu that the TV is detecting the Smartcard or CAM.
- Check in the menu that you have a valid and working subscription to the channels you wish to view.
- Ensure that the Smartcard or CAM is not damaged.
(7) Cannot make reservations.
- Check that no previous reservations are conflicting with the new reservation.
- Check that the TV is in operation mode or in standby mode at the time of the reservation. If the power switch or power outlet is off, the TV will not be able to switch on at the time of the reservation.
If the TV does not work normally, remove and insert the power plug. If this does not work, please contact your local TV distributor or service centre.
Error Message
| Error message | Possible causes | What to do |
| No signal | - The aerial is not pointing properly. - The AV device is not connected properly. | - Adjust aerial. - Check the cable from the aerial. If you cannot resolve the problem you may need to have your aerial and installation tested by a professional. - Set the AV device correctly. - Check the cable from the AV device. |
| Will not accept | - The key(button) is not supported for this product. | |
| Invalid Mode | - The resolution of connected PC is not set properly. | - Check the optimal resolution settings. You may need to download a new video driver. |
| No Subtitle Data | - The channel has not the subtitle data. | - Confirm if the channel is provided the subtitle data. |
| The channel is scrambled or not available. | - The channel has signal, but no audio or video. - CI module is not plugged in. - CI module is not plugged in properly. - Wrong CI module is in use. | - Confirm if the channel is currently on air. - Insert CI module. - Reinsert CI module; ensure that it is inserted in the correct way. - Insert the appropriate CI module for the channel(s) you wish to view. - Contact your CI module retailer or channel broadcaster for a CI module replacement. |
| The channel is scrambled. | - This digital terrestrial receiver does not support the service that enables to descramble the scrambled channels. | |
| The audio is not available. | - The channel has a video signal, but no audio is provided. | - Press the audio buttons on your remote control to confirm that the channel has audio options. |
Specification
| Item | Specification | ||
| LCD Panel | Type | Colour active matrix TFT-LCD | |
| Display Area | 32.0" | ||
| Max. Resolution | 1366 x 768 pixels | ||
| Viewing Angle | R/L:178, U/D:178 (CR≥10) | ||
| PC Monitor | Sync | Separate | |
| Horizontal Frequency | 31.469~48.363kHz | ||
| Vertical Frequency | 56~75Hz | ||
| MAX. Resolution | 1360 x 768 pixels@60Hz | ||
| Input/Output | Video Input | Analog + Digital Tuner(1), SCART(2), RCA, S-Video, Component, HDMI(2), PC | |
| Audio Input | RCA(R/L), Component (R/L), HDMI, PC Audio, | ||
| Audio Output | S/PDIF, Speaker, Headphone | ||
| Data Interface | RS-232C(for SW update) | ||
| TV Signal | Analog | Digital | |
| Area | EU | EU(MHEG) | |
| Antenna Input | IEC 169-2 Female | IEC 169-2 Female | |
| Tuning System | FS | OFDM DVB-T | |
| Colour System | PAL, B/G, D/K, I SECAM, B/G, D/K, L | B/G, I, D/K | |
| Sound System | AM / FM / Nicam | MPEG 1 Layer 1/2 | |
| VHF Low | 48.25 ~ 144.00 MHz | 48.25 ~ 144.00 MHz | |
| VHF High | 145.00 ~ 424.00 MHz | 145.00 ~ 424.00 MHz | |
| UHF | 425.00 ~ 863.25 MHz | 425.00 ~ 863.25 MHz | |
| Teletext | Yes | Yes | |
| Regulation | Safety | CE | |
| EMI | CE | ||
| Others | Power | 133 W (Max.) [UK model: 140 W] | |
| Speaker Output | 7W x 2EA | ||
| Plug & Play Level | DDC 1/2 B | ||
| Weight | NET 14.0kg / Gross 17.0kg | ||
| Power Supply | AC 230V, 50 Hz [UK model: AC 240V, 50 Hz] | ||
| Operating Temperature | 5°C ~ 35°C | ||
| Operating Humidity | 30 ~ 80% RH | ||
Service and Support
You can get information such as a troubleshooting guide, software upgrades and product support guide from the following web sites and call center (Hotline). Please try to contact to your local dealers first when facing a problem.
Web site and e-mail
Homepage
http://www.humaxdigital.com
English
http://www.humaxdigital.com/Deutsch/
Deutsch
http://www.humaxarabia.com
Arabic
HCSA (Humax Customer Service Area)
Software Download, Information and Technical Q&A
English
http://www.humaxdigital.com/hcsa/
Deutsch
http://www.humaxdigital.com/Deutsch/hcsa/
E-mail (Technical Q&A)
tech-info@humax-digital.co.uk
Europe & North Africa
techinfo@humax-digital.de
Germany
callcenterME@humaxdigital.com
Middle East
Webmaster@humaxdigital.com
Asia & Other area
Call Center
Humax Customer Helpline (UK)
Tel: 0870 247 8800
E-mail: uksupport@humax-digital.co.uk
Open: Local Time in UK (GMT+0), 09:00 - 18:00 (Monday -Friday)
Support Language: English
Humax Middle East Call Center (Dubai, UAE)
Tel: +971 (0)4 359 2323 (Open: 09:00 - 20:00 / close on Friday)
E-mail: callcenterME@humaxdigital.com
Open: Local Time in Dubai (GMT+4), 09:00 - 20:00 (Saturday - Thursday, close on Friday)
Support Language: English/Arabic
Humax Hotline (Germany)
Germany: 01805 778 900 (€ 0,12/Min)
Other Countries: + 49 1805 778 870 (€ 0,12/Min+ International Call Charge)
E-mail: support@humax-digital.de
Open: Local Time in Germany (GMT+1), 08:00 - 23:00 (Monday - Sunday)
Support Language: Deutsch/English
Humax Customer Helpline (Spain)
Tel: 902 105 116
Fax: 932980446
Support Language: Spanish
HUMAX Hotline (Italy)
Tel:899100080
E-mail: info@mediasat.com
Open : Local Time in Italy (GMT+1), 08:00-18:00 (Monday - Friday)
Support Language : Italian
HUMAX Hotline (Austria)
Tel: 0820 400675 (€ 0,12/min.)
HUMAX Hotline (Sweden)
Tel: +46 (0)550 85527
Open:08:00\~16:30(Monday-Friday)
Support Language: Swedish/English
HUMAX Hotline (Finland)
Tel:0956186366
Open:08:00\~16:00(Monday-Friday)
Support Language : Finnish/English
For hardware repair, please refer to website. (Homepage or HCSA)
