
Giggle 4 - Stroller COSATTO - Free user manual and instructions
Find the device manual for free Giggle 4 COSATTO in PDF.


| Brand | Cosatto |
| Model | Giggle 4 |
| Product type | Stroller |
| Category | Compact stroller |
| Unfolded dimensions (L x W x H) | 80 x 50 x 105 cm |
| Folded dimensions (L x W x H) | 30 x 50 x 75 cm |
| Net weight | 9.5 kg |
| Maximum child weight | 22 kg |
| Recommended age | From birth to 4 years |
| Power supply | None (manual stroller) |
| Main features | One-hand fold, multi-position backrest adjustment, 5-point harness, storage basket, hood with ventilation window |
| Wheels | Swiveling and lockable front wheels, rear wheels with brake |
| Covering | Machine washable fabric at 30°C |
| Care and cleaning | Hand wash for foam parts, clean plastic parts with a damp cloth |
| Safety | Parking brake, 5-point harness, removable bumper bar |
| Spare parts and repairability | Wheels, hood, harness and seat cover available as spare parts |
| Standards | Compliant with standard EN 1888 |
| Warranty | 2 years |
| Included accessories | Hood, basket, bumper bar |
Frequently Asked Questions - Giggle 4 COSATTO
User questions about Giggle 4 COSATTO
0 question about this device. Answer the ones you know or ask your own.
Ask a new question about this device
Download the instructions for your Stroller in PDF format for free! Find your manual Giggle 4 - COSATTO and take your electronic device back in hand. On this page are published all the documents necessary for the use of your device. Giggle 4 by COSATTO.
USER MANUAL Giggle 4 COSATTO
clever stuff for happy babies
The ABCs
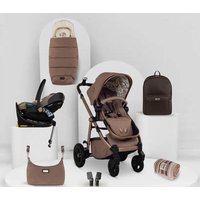
Giggle 4 Special Edition
Travel System
(EN) Instruction 1 - 53
(FR) Instruction, (DE) Gebrauchsanleitung, (IT) Istruzioni, (PT) Instrução, (RU) Инструкция, (ZH) 说明, (ES) Instrucciones
(EN) Part list diagram
54
(FR) Schéma de nomenclature, (DE) Teilelisteabbildung, (IT) Diagramma della lista delle parti, (PT) Diagrama de lista de peças, (RU) Схема к спецификации деталей, (ZH) 零件清单图, (ES) Diagrama de lista de piezas
(EN) Spare part list diagram
55
(EN) Instruction diagram
56 - 68
(FR) Schéma d'instructions, (DE) Anleitungsdiagramm, (IT) Diagramma di istruzioni,
(PT) Diagrama de instruções, (RU) Схема к инструкции, (ZH) 说明图, (ES) Diagrama de instrucciones
IMPORTANT! READ CAREFULLY BEFORE USE AND KEEP FOR FUTURE REFERENCE Important safety Information.
General:
• This vehicle is intended for children from birth up to a maximum of 25kg or 4 years whichever comes first.
- WARNING: Never leave your child unattended.
- WARNING: Ensure that all the locking devices are engaged before use.
- WARNING: To avoid injury ensure that your child is kept away when unfolding and folding this product.
- WARNING: Do not let your child play with this product.
- WARNING: This product is not suitable for running or skating.
- WARNING: Check that the seat unit, carrycot or child car seat attachment devices are correctly engaged before use.
- Remove all packaging & protective materials on the product before using.
- Do not use replacement parts or accessories other than those approved by Cosatto.
- A basket is provided for the carriage of 8 kg of goods, evenly distributed.
- Any additional load attached to the handle or on the back of the backrest or on the sides of the vehicle will affect the stability and safety of the vehicle.
- Do not use a platform with this product as it may render the product unsafe.
• Always apply the brake when placing or removing a child from vehicle.
- Never carry a second child on the product.
• This product complies with BS EN 1888-2:2018 + A1:2022.
Carrycot:
- This product is suitable only for a child who cannot sit up unaided, roll over and cannot push itself up on its hands and knees. Maximum weight of the child: 9 kg.
- Must only be used in lie flat position.
- WARNING: This product is only suitable for a child who cannot sit up unaided.
- WARNING: Only use on a firm, horizontal level, flat and dry surface.
- WARNING: Do not let other children play unattended near the carrycot.
- WARNING: Do not use if any part is broken, torn or missing.
- WARNING: Never use this carrycot on a stand.
- Do not place the carrycot near an open fire or other source of strong heat.
- Carry handle and the base of the carrycot should be inspected regularly for signs of damage and wear.
- Prior to carrying or lifting, make sure that the carrycot carry handle is locked into position.
- The head of the child should never be lower than the body of the child.
- Be careful not to hit the baby, e.g. when putting on floor, going through doors.
- Mattress included. This product is only intended for use with the mattress provided. Replacement mattresses must be purchased from COSATTO.
- Regularly inspect the mattress for damage or wear. Do not use if any part is broken, torn or missing.
- No additional mattress shall be added.
-
Do not leave anything in the carrycot that could pose a risk of suffocation, e.g. non-rigid toys, pillows.
-
Do not place the carrycot close to another product, which could present a danger of strangulation, e.g. strings, blind/ curtain cords.
- Overheating can endanger the life of your child! Take into account the ambient temperature and the child's clothing and ensure that the child is not too cold or too warm.
- Mesh ventilation windows in hoods and carrycots are intended for use in warm conditions only. Always keep your baby away from sources of heat and drafts.
- In order to provide the best sun protection it is recommended that mesh ventilation widows in hoods and carrycots are kept closed when in strong and direct sunlight. Always note the position of the sun and keep your baby in the shade.
- Ask a health professional for advice on safe sleeping
• This carrycot complies to BS EN 1466:2023.
Pram mode:
- The pram mode is achieved by attaching the carrycot to the chassis.
Pushchair mode:
- Pushchair mode is achieved using the seat unit attached to the chassis. In this mode: This product is suitable for children from birth up to a maximum user weight of 25 kg.
- WARNING: Always use the restraint system.
- WARNING: Always use the crotch strap in combination with the waist belt.
- Use the seat in the most reclined position for new born babies until they can sit up unaided.
- Ensure your child wears a correctly fitted and adjusted harness at all times. D-rings are provided on the existing harness for the attachment of a separate safety harness approved to BS EN 13210 should this be required.
Car seat mode:
- This combination is suitable for children from birth up to a maximum user weight of 13kg.
- For use as a travel system, the chassis is only compatible with the "Tote i-Size" car seat. In this mode: This product does not replace a cot or a bed. Should your child need to sleep, then it should be placed in suitable cot, bed or carrycot.
Changing bag:
- The maximum recommended loading for this bag is 3kg. The bag attachment straps are for use with the "Giggle 4" only. Attachment to other pushchairs is not recommended.
- WARNING: To avoid risk of strangulation from loops, keep the bag straps out of reach of children.

Visual language Key:

| !XX | Refer to warning XX |
| Correct action | |
| Incorrect action | |
| CLICK! | Audible sound |
| Repeat action x times | |
| General action arrow | |
| Lock | |
| Unlock |
| Press and hold | |
| Check | |
| Cont.XX | Continue to step XX |
| Repeat on other side |
Part List:
P1: Chassis P10: Seat unit hood sun visor
P2: Rear wheel (x2) P11: Bumper bar
P3: Front wheel (x2) P12:
P4: Carrycot mattress P13: Raincover
P5: Carrycot P14: Car seat adaptor
P6: Carrycot hood sun visor P15: Changing bag
P7: Carrycot apron P16: Footmuff
P8: Seat unit P17: Head hugger
P9: Seat unit hood
Bumper bar cap
Replacement Parts:
The replacement parts shown below are available for your product. For UK & Ireland customers, order through our website: http://www.cosatto.com/service-centre/spares
For customer outside UK & Ireland, contact information for your local distributor can be found on http://www.cosatto.com/stockists
If you require any further assistance, please contact us at cuddle@cosatto.com
S1: Seat unit S11: Carrycot mattress cover
S2: Seat unit hood S12: Carrycot mattress
S3: Chest pads (Set) S13: Carrycot liner
S4: Bumper bar S14: Carrycot
S5: Bumper bar cap
S6: Harness
S7: Crotch pad
S8: Front wheel S18: Changing bag
S9: Basket
S10: Rear wheel
S15: Carrycot apron
S16: Raincover
S17: Car seat adaptor (set)
S19: Footmuff
S20: Head hugger
Fitting & Operation Information:
Please refer to the instruction diagrams (P. 56 - 68):
Chassis 1- Opening:
Lift the chassis by its handle (a) to allow front wheel assembly to unfold (b) and lock into place (c).
Check the chassis has locked in place.
2- Adjusting handle position:
Front wheel 3- Fitting:
4- Removing:
Rear wheel 5- Fitting:
6- Removing:
Brake 7- Applying:
8- Releasing:
Front wheel swivel lock
9- Applying:
10- Releasing:
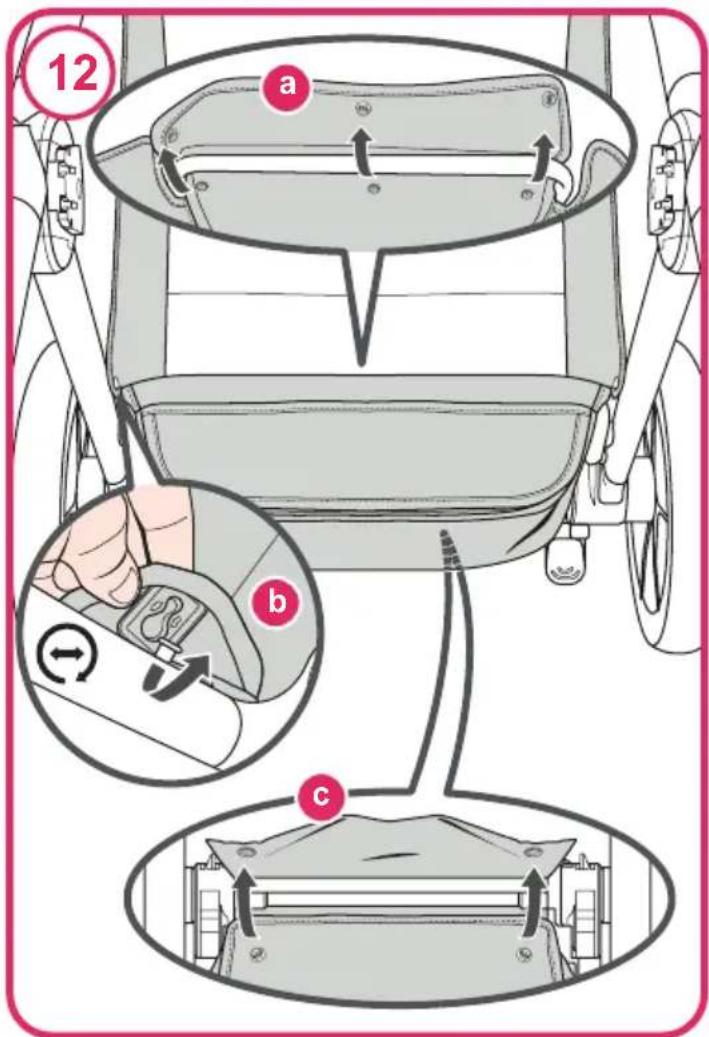
Basket Removing: 1 & 12-
Refitting is a reversal of this procedure.
13- Accessing the rear compartment:
Chassis 14- Closing:
NOTE: The chassis cannot be closed in pram mode or car seat mode.
Apply the brake (refer to step 7) (a).
While pressing the primary release button (b), pull both secondary levers (c) back and press down on the handle until it is folded behind the rear wheel (d).
Fold the chassis until it is in the folded position (e).
Adjust the handle to the lowest position (See Step 2) for the most compact fold.
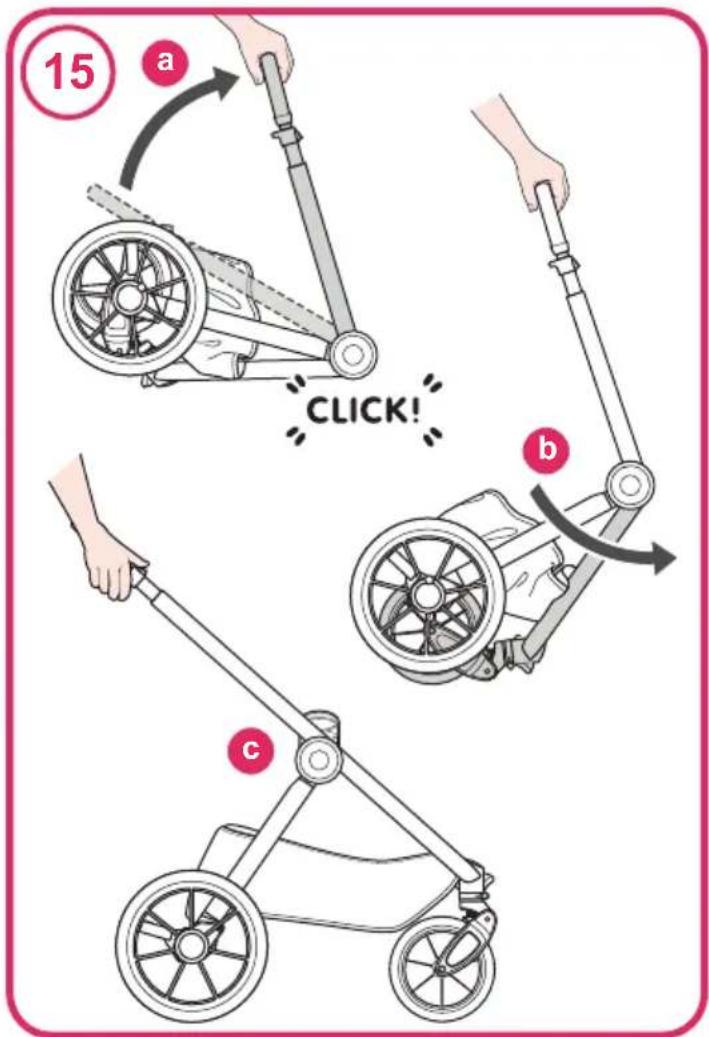
15- Opening:
Lift the chassis by its handle (a) to allow front wheel assembly to unfold (b) and lock into place (c).
Check the chassis has locked in place.
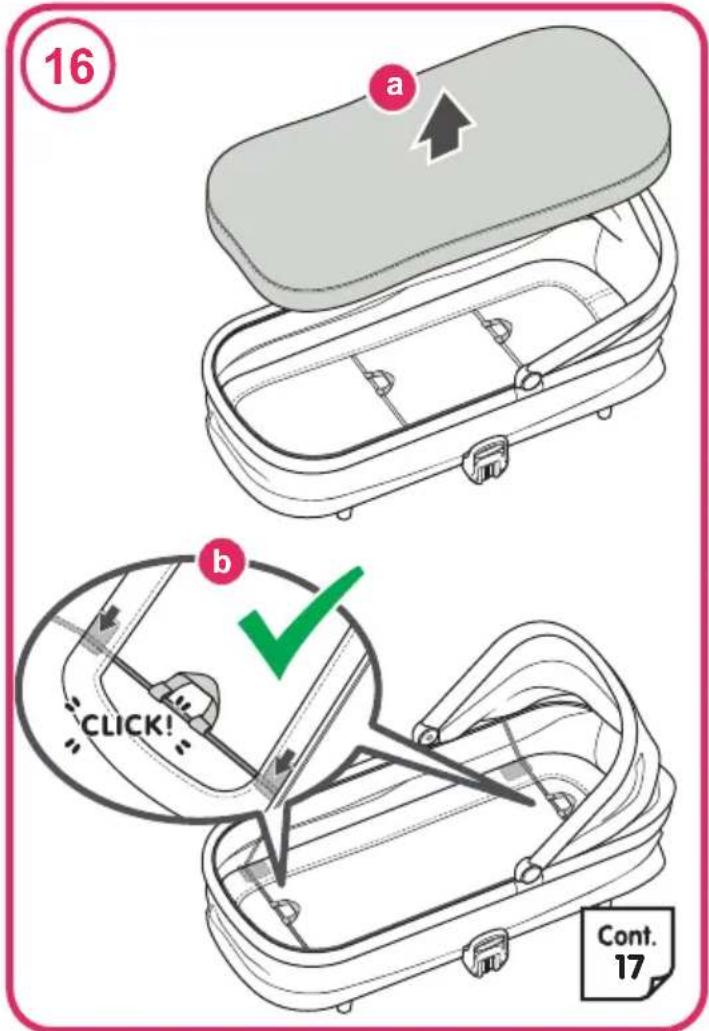
Carrycot 16- Preparation:
Remove mattress from carrycot (a).
Unfold both frame bars until they locked into positions (b).
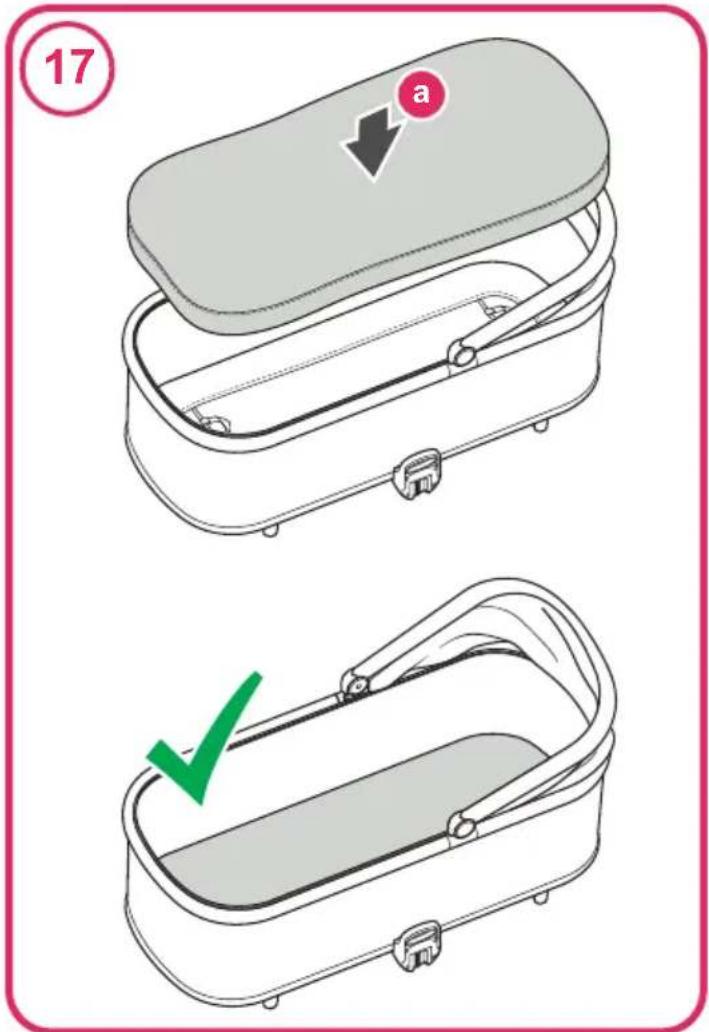
17- Refit the mattress over the liner in the carrycot (a).
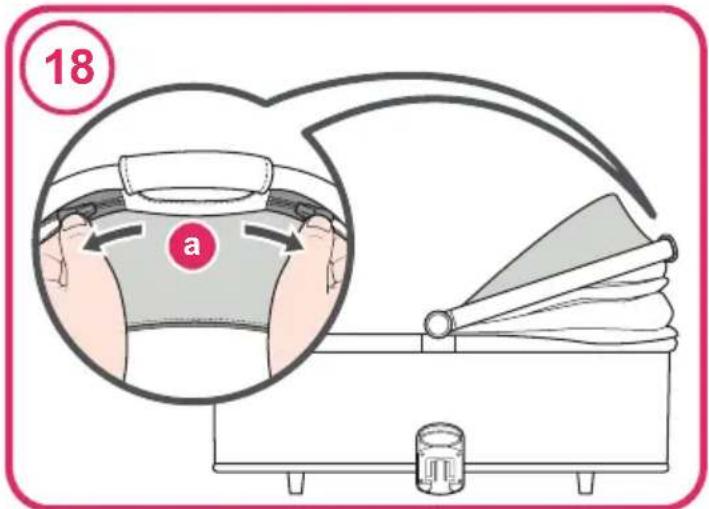
Carrycot hood 18- Fitting the hood sun visor:
19- Opening:
20- Closing:
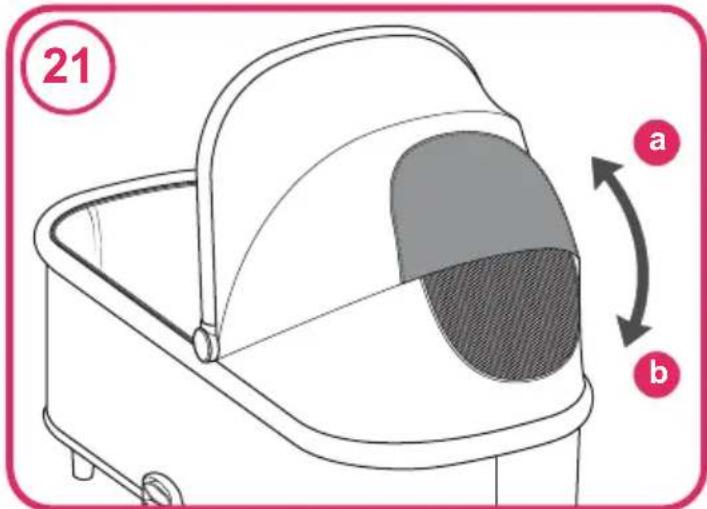
21- Using the hood viewing window:
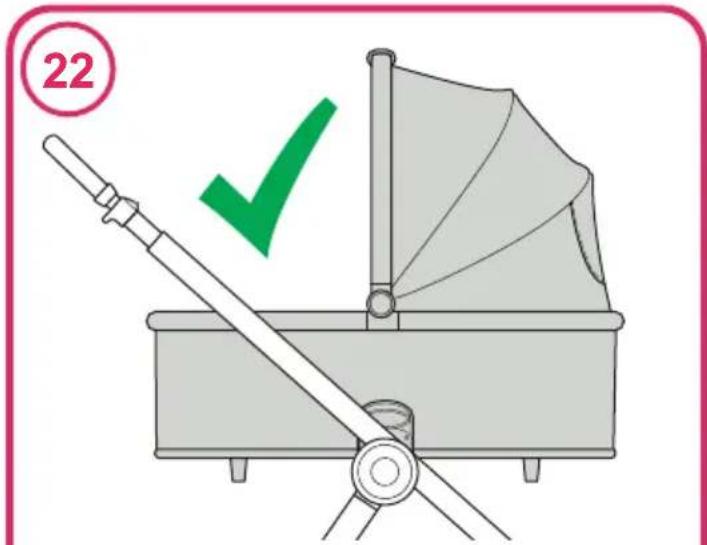
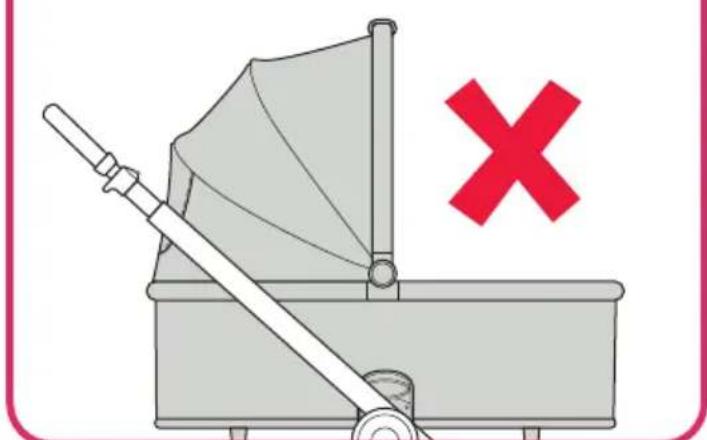
22- Note: The carrycot can only be fitted rearward facing as shown in illustration.
23- Fitting:
Dots are marked on the chassis mounts and carrycot mounts (a). These should be on the same side and aligned if fitted correctly.
24- Removing:
Lift the release levers on both side of the carrycot (a & b) then lift the carrycot off the chassis using its carry handle (c).
Carrycot apron 25- Fitting:
Removing is a reversal of this procedure.
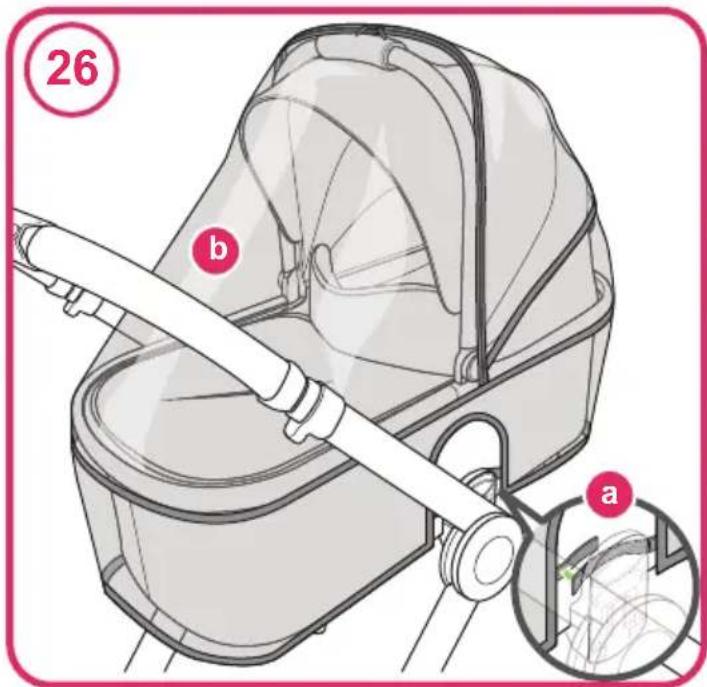
Carrycot raincover 26- Fitting:
Removing is a reversal of this procedure.
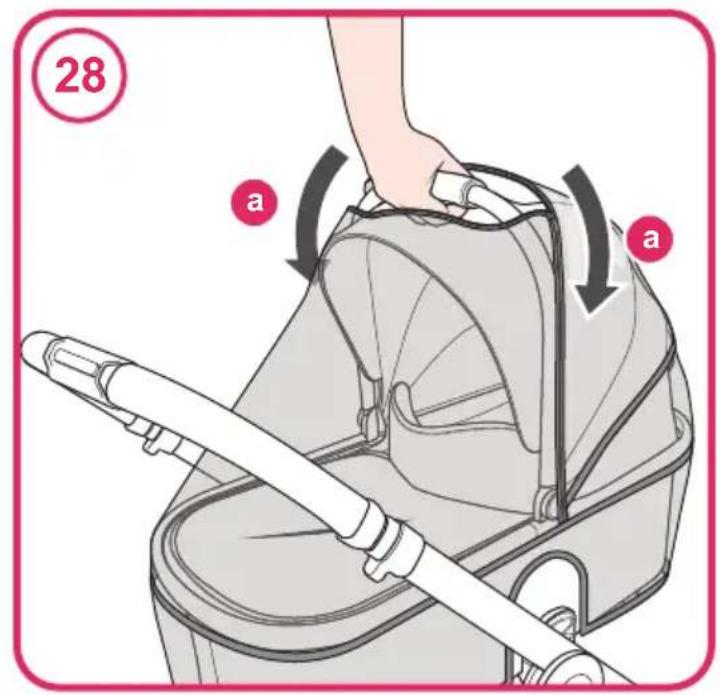
27- Using the access zip:
28- Accessing the handle:
Seat unit
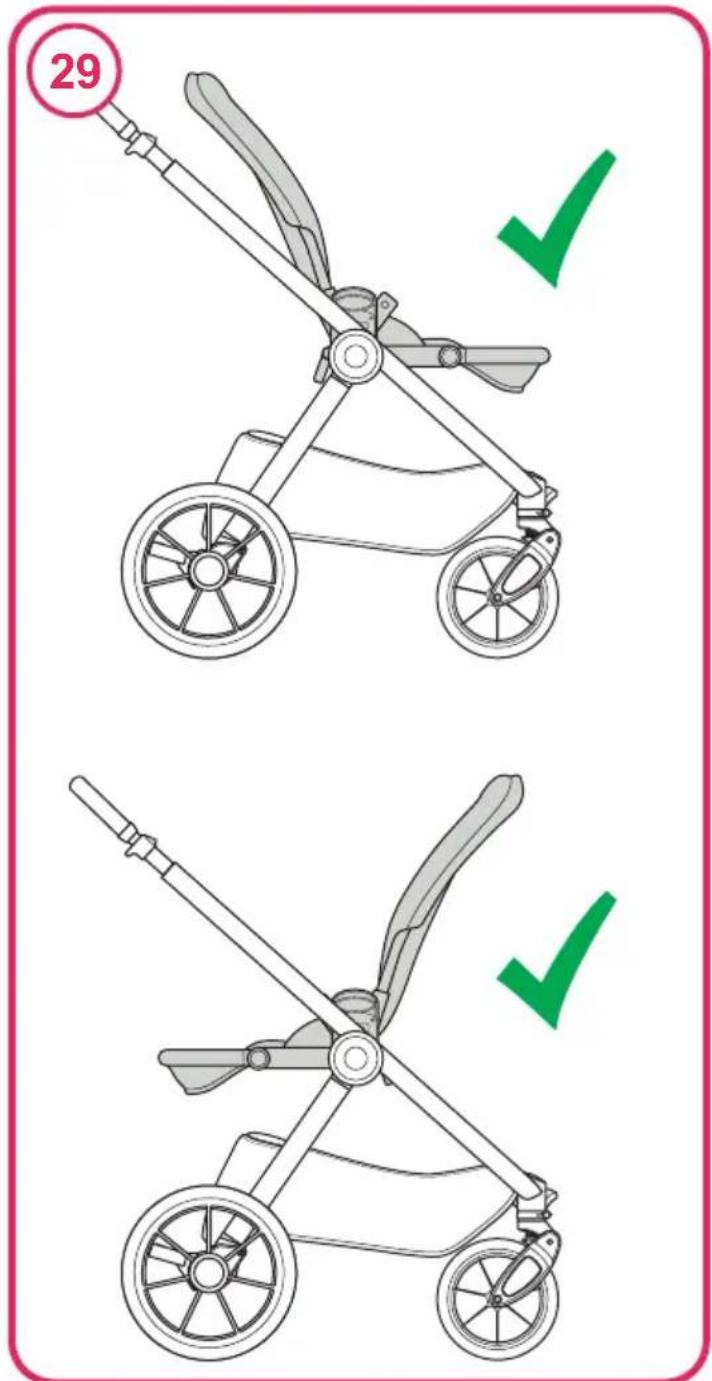
29- Note: The seat unit can be fitted forward or rearward facing.
30- Fitting:
Lift the bumper bar mounts up until they lock into position before using the seat unit.
31- Removing:
32- Adjusting the seat unit recline angle:
WARNING: Never adjust the seat unit with your child in the seat.
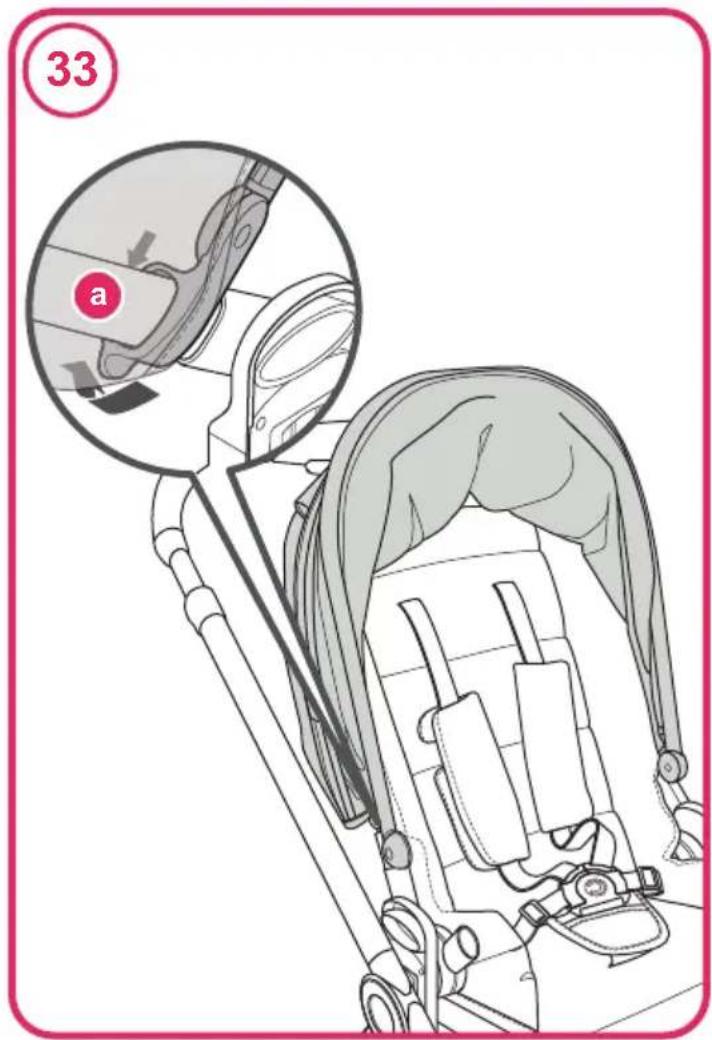
Seat unit hood 33- Fitting:
Removing is a reversal of this procedure.
34- Opening:
35- Fitting the hood sun visor:
36- Using the hood sun visor:
37- Using the hood extension:
38- Using the hood viewing window:
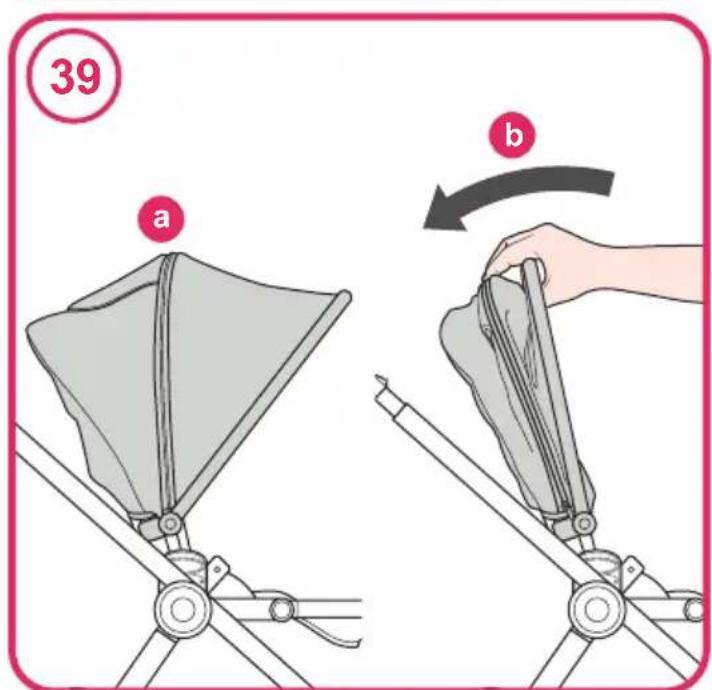
39- Closing:
Changing bag 40- Attaching to the chassis handle:
Removing is a reversal of this procedure.
41- Detaching from attachment straps:
Refitting is a reversal of this procedure.
Chassis 42- Closing with the seat unit (forward facing):
Apply the brake (refer to step 7) (a).
If applicable, close the hood fully (refer to step 39) (b) and store the raincover in the rear compartment (refer to step 13).
Press and hold the seat unit folding button (c) then lift up the recline lever fully (d). Push the backrest forward until it is in a closed position (e).
While pressing the primary release button (f), pull both secondary levers (g) back.
Press down on the handle until it is folded behind the rear wheel (h).
Lift the chassis up using seat unit carry handle (i) and allow chassis to fold (j).
Adjust the handle to the lowest position (See Step 2) for the most compact fold.
43- Closing with the seat unit (rearward facing):
Apply the brake (refer to step 7) (a).
If applicable, close the hood fully (refer to step 39) (b) and store the raincover in the rear compartment (refer to step 13).
Press and hold the seat unit folding button (c) then lift up the recline lever fully (d). Pull the backrest backward until it is in a closed position (e).
While pressing the primary release button (f), pull both secondary levers (g) back.
Press down on the handle until it is folded behind the rear wheel (h).
Lift the chassis up using seat unit carry handle (i) and allow chassis to fold (j).
Adjust the handle to the lowest position (See Step 2) for the most compact fold.
Harness 44- Opening:
45- Closing:
46- Adjusting the shoulder strap position:
47- Satisfactory shoulder strap position:
48- Adjusting the strap length:
Slide the strap adjustor to suitable length (a, b & c).
49- Harness tension:
Always make sure that the harness is correctly tensioned to ensure maximum protection for your child.

You should only be able to insert 2 fingers between the shoulder strap and waist strap.
NOTE: Winter/ Summer clothing can make a difference to the size of your child.
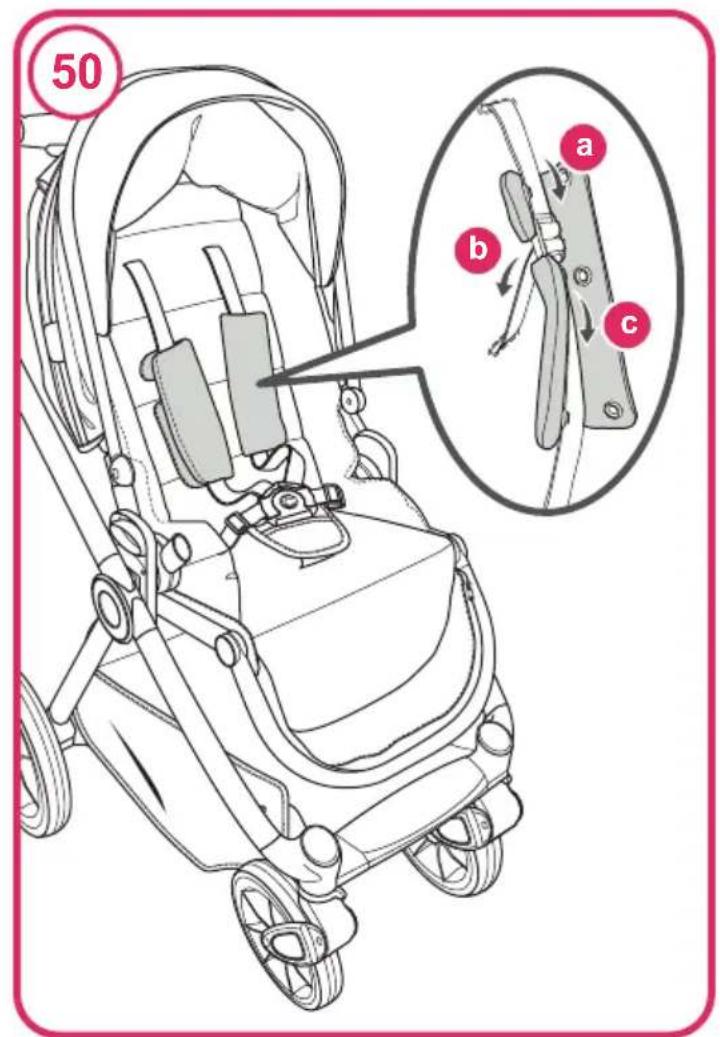
50- Refitting the chest pad:
Removing is a reversal of this procedure.
Bumper bar 51- Fitting:
52- Opening:
53- Removing:
Bumper bar cap 54- Fitting:
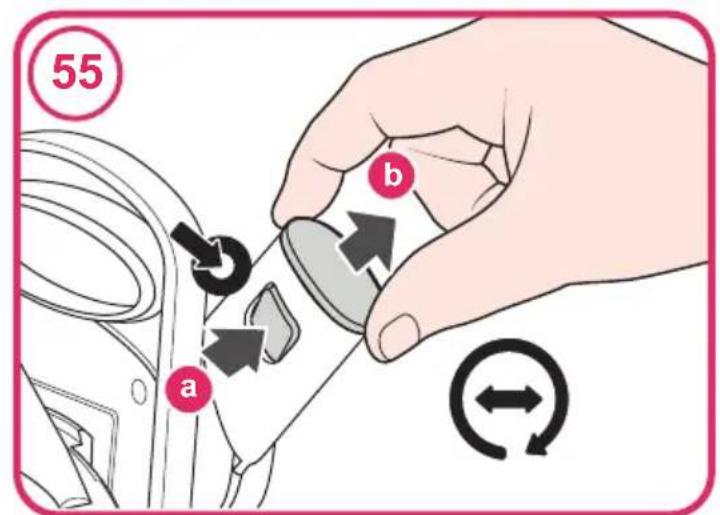
Always fit the bumper bar caps on the mount when the bumper bar is not in use.
55- Removing:
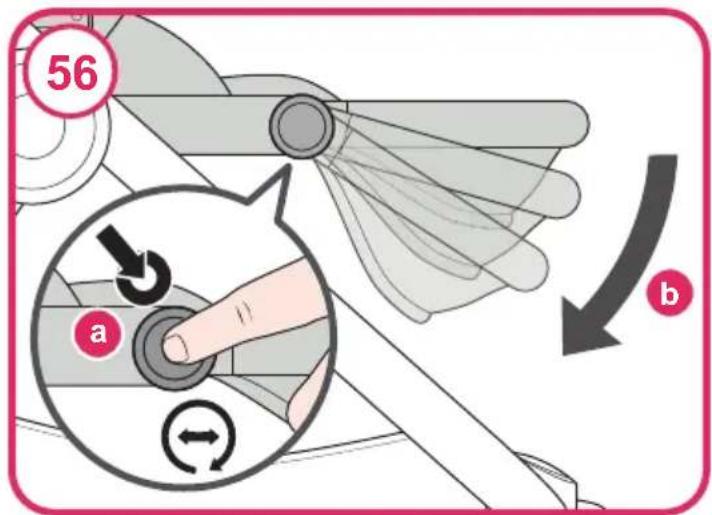
Calf support 56- Lowering:
57- Raising:
Footmuff 58- Fitting:
Open the harness (See Step 44) and remove the crotch pad.
Push the harness straps through the footmuff (a).
Refit the crotch pad (b) and fit the head hugger (c) then close the harness (See Step 45).
59- Using the hood section:
Raincover 60- Fitting:
Removing is a reversal of this procedure.
61- Using access zip:
Child car seat adaptor
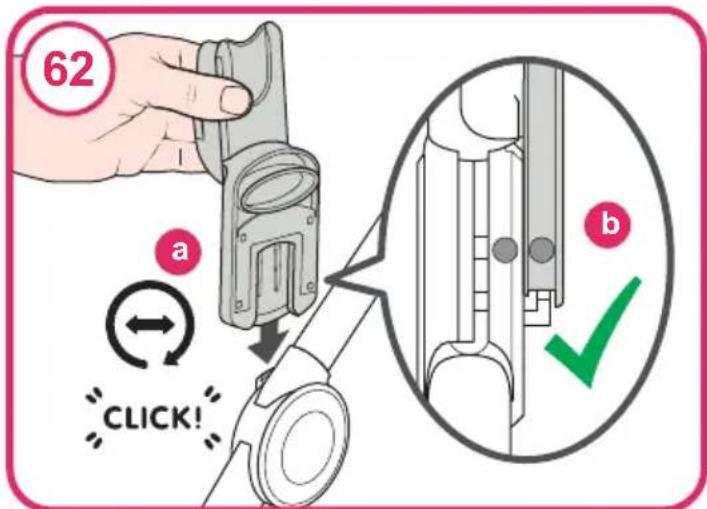
62- Fitting:
The adaptors are handed. Dots are marked on the seat mounts and the adaptors (a). These should be on the same side if fitted correctly.
63- Removing:
Car seat mode
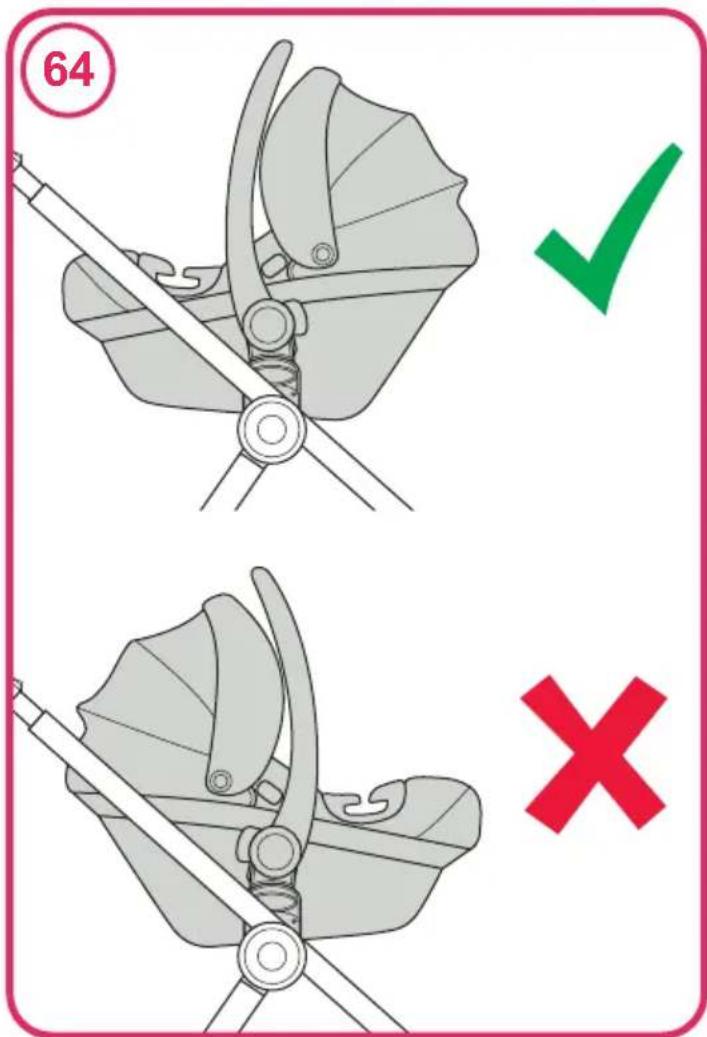
64- Note: The child car seat should only be fitted rearward facing.
65- Fitting:
66- Removing:
Care & Maintenance:
- Your travel system has been designed to meet comprehensive safety standards, and with correct use and maintenance will give many years of trouble free performance.
- Storage - Always store your travel system dry. Storing a damp travel system will encourage mildew to form, so always wipe away any moisture with a soft cloth and allow to dry thoroughly before storing. Never leave in sunlight for prolonged periods - some fabrics may fade.
- Cleaning - Refer to wash care labels on soft goods for cleaning instructions. Plastic and metal parts may be sponged clean with warm water and a mild detergent. Never clean with abrasive, ammonia based, bleach based or spirit type cleaner.
- Wear & Tear - Continual impact can cause damage. The chassis is strong but will weaken should the back wheels be bumped down stairs or kerbs. Tyres will wear with use and wheel units should be replaced if necessary. If your child wears hard shoes these might damage the soft fabric.
- Maintenance - Regularly inspect the locking devices, brakes, wheels, harness assembly, catches, seat adjusters, joints and fixtures to ensure they are secure and in full working order. They should move freely at all times and minimum maintenance should be required. However a regular light application of a spray lubricant e.g. silicone (do not use oil or grease) will extend the life of your travel system and make opening and folding easier. Your travel system should be serviced and reconditioned before using it for a second baby, or after 18 months, whichever is the sooner.

IMPORTANT ! LIRE ATTENTIVEMENT AVANT UTILISATION ET CONSERVER POUR CONSULTATION ULTÉRIEURE Informations importantes de sécurité
FR
Généralités:
Freins 7- Application:
8- Libération:
Loquet de rotation
9- Application:
des roues avant
10- Libération:
Panier Retrait: 11 & 12-
Repose mollets 56- Abaisser:
57- Relever:
Chancelière 58- Installation:
http://www.cosatto.com/service-centre/spares
http://www.cosatto.com/stockists
http://www.cosatto.com/service-centre/spares

![graph TD A["Start"] --> B["Step a: Hand presser to lift a bicycle"] B --> C["Step b: Close hand presser to lift a bicycle"] C --> D["Step c: Close hand presser to lift a bicycle"] D --> E["Step d: Close hand presser to lift a bicycle"] E --> F["Step a: Lock inside a stroller"] F --> G["Step e: Close…](/content/2026/07/1416855/images/40ca57c2a0dc9c93c7c6ae25eee533078f586b3ac042c04c8646f88a6697b848.jpg)










![graph TD A["Initial State: Handwashing"] --> B["Step 1: Hand Cutting with Lock"] B --> C["Step 2: Hand Stopping with Bagasse"] C --> D["Step 3: Hand Stopping with Shoulder"] D --> E["Step 4: Hand Stopping with Shoulder"] E --> F["Step 5: Hand Stopping with Shoulder"] F --> G["Step 6: Hand Stopping w…](/content/2026/07/1416855/images/b056fcd8a1817c491d7b1e5b40365b994880c00ac1a1566668a03a68f101839e.jpg)
![graph TD A["Step 43: Stroller with handle, hand, lock, and seatbelt"] --> B["Step 5: Hand holding seatbelt, hand adjusting seatbelt"] B --> C["Step 6: Hand adjusting seatbelt, hand adjusting seatbelt"] C --> D["Step 7: Hand adjusting seatbelt, hand adjusting seatbelt"] D --> E["Step 8: Hand adjustin…](/content/2026/07/1416855/images/55800a3312098513704f7102ebfd9def45bf6cc7eea0f6d37967205b475979d9.jpg)












max 25 kg
max 4 years
Right by your Side
Telephone: +44 1822 668 353*
Email: cuddle@cosatto.com
Letter: Cosatto Limited, Bentinck Mill, Bentinck Street, Farnworth, Bolton, Lancs, BL4 7EP, England.
*This is a local rate chargeable number, prices may vary. Please check with your provider.
All the design and trademarks contained herein are the property of Cosatto Limited. No part of this document may be reproduced without the permission of Cosatto Limited.
www.cosatto.com


- THE ABCS
- GIGGLE 4 SPECIAL EDITION
- TRAVEL SYSTEM
- (EN) INSTRUCTION 1 - 53
- (EN) PART LIST DIAGRAM
- (EN) SPARE PART LIST DIAGRAM
- (EN) INSTRUCTION DIAGRAM
- IMPORTANT! READ CAREFULLY BEFORE USE AND KEEP FOR FUTURE REFERENCE IMPORTANT SAFETY INFORMATION
- GENERAL
- CARRYCOT
- PRAM MODE
- PUSHCHAIR MODE
- CAR SEAT MODE
- CHANGING BAG
- VISUAL LANGUAGE KEY
- PART LIST
- REPLACEMENT PARTS
- FITTING & OPERATION INFORMATION
- CHASSIS 1- OPENING
- ADJUSTING HANDLE POSITION
- FRONT WHEEL 3- FITTING
- REAR WHEEL 5- FITTING
- BRAKE 7- APPLYING
- FRONT WHEEL SWIVEL LOCK
- BASKET REMOVING: 1 & 12
- ACCESSING THE REAR COMPARTMENT
- CHASSIS 14- CLOSING
- OPENING
- CARRYCOT 16- PREPARATION
- CARRYCOT HOOD 18- FITTING THE HOOD SUN VISOR
- CARRYCOT APRON 25- FITTING
- CARRYCOT RAINCOVER 26- FITTING
- SEAT UNIT
- SEAT UNIT HOOD 33- FITTING
- CHANGING BAG 40- ATTACHING TO THE CHASSIS HANDLE
- CHASSIS 42- CLOSING WITH THE SEAT UNIT (FORWARD FACING)
- HARNESS 44- OPENING
- REFITTING THE CHEST PAD
- BUMPER BAR 51- FITTING
- REMOVING
- BUMPER BAR CAP 54- FITTING
- CALF SUPPORT 56- LOWERING
- RAISING
- FOOTMUFF 58- FITTING
- USING THE HOOD SECTION
- RAINCOVER 60- FITTING
- USING ACCESS ZIP
- CHILD CAR SEAT ADAPTOR
- FITTING
- CARE & MAINTENANCE
- IMPORTANT ! LIRE ATTENTIVEMENT AVANT UTILISATION ET CONSERVER POUR CONSULTATION ULTÉRIEURE INFORMATIONS IMPORTANTES DE SÉCURITÉ
- FR
- GÉNÉRALITÉS
- FREINS 7- APPLICATION
- LOQUET DE ROTATION
- DES ROUES AVANT
- PANIER RETRAIT: 11 & 12
- REPOSE MOLLETS 56- ABAISSER
- RELEVER
- CHANCELIÈRE 58- INSTALLATION
- RIGHT BY YOUR SIDE
Brand : COSATTO
Model : Giggle 4
Category : Stroller