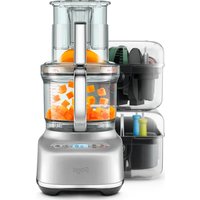
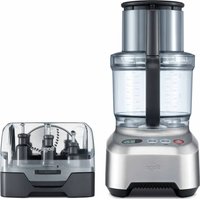
the Paradice 16 SFP838 - Food Processor SAGE - Free user manual and instructions
Find the device manual for free the Paradice 16 SFP838 SAGE in PDF.


| Product type | Food processor (kitchen robot) |
| Model | the Paradice 16 SFP838 |
| Brand | Sage |
| Bowl capacity | 16 cups (3.8 L) |
| Power | 1200 W |
| Speeds | Variable with pulse |
| Dimensions (L x D x H) | 40 x 25 x 30 cm |
| Weight | 7.5 kg |
| Power supply | 220-240 V ~ 50/60 Hz |
| Bowl material | BPA-free plastic |
| Blades | Stainless steel (chopping, kneading, slicing, grating) |
| Main functions | Chopping, mixing, kneading, slicing, grating, emulsifying |
| Included accessories | Chopping blade, slicing/grating discs, dough hook, pusher |
| Care and cleaning | Bowl and accessories are dishwasher safe; wipe the base with a damp cloth |
| Safety | Arm lock, automatic shut-off in case of overload, non-slip feet |
| Spare parts and repairability | Available through Sage customer service |
| General information | Household use only. 2-year warranty. |
Frequently Asked Questions - the Paradice 16 SFP838 SAGE
User questions about the Paradice 16 SFP838 SAGE
0 question about this device. Answer the ones you know or ask your own.
Ask a new question about this device
Download the instructions for your Food Processor in PDF format for free! Find your manual the Paradice 16 SFP838 - SAGE and take your electronic device back in hand. On this page are published all the documents necessary for the use of your device. the Paradice 16 SFP838 by SAGE.
USER MANUAL the Paradice 16 SFP838 SAGE
ENUSER GUIDE
FRGUIDE UTILISATEUR
ITMANUALE UTENTE
PTMANUAL DO UTILIZADOR
DEHANDBUCH
NLHANDLEIDING
ESGUÍA DEL USUARIO
PLINSTRUKCJA OBSŁUGI

Contents
2 Sage® Recommends Safety First
7 Components
10 Assembly
15 Functions
17 Tips
19 Care & Cleaning
20 Troubleshooting
22 Guarantee
SAGE® RECOMMENDS SAFETY FIRST
At Sage ® we are very safety conscious. We design and manufacture consumer products with the safety of you, our valued customer, foremost in mind. In addition we ask that you exercise a degree of care when using any electrical appliance and adhere to the following precautions.
IMPORTANT SAFEGUARDS
READ ALL INSTRUCTIONS BEFORE USE AND SAVE FOR FUTURE REFERENCE
- A downloadable version of this document is also available at sageappliances.com
- Before using the appliance, ensure your electricity supply is the same as shown on the label on the underside of the appliance.
- Remove and safely discard any packaging materials and promotional labels before using the appliance for the first time.
- To eliminate a choking hazard for young children, remove and safely discard the protective cover fitted to the power plug of this appliance.
- Do not place the appliance near the edge of a benchtop or table during operation. Ensure the surface is level, clean and free of water.
• Vibration during operation may cause the appliance to move during use. -
Do not use the appliance on slippery, unstable or uneven surfaces such as a sink drain board.
-
Do not place the appliance on or near a hot gas or electric burner, or where it could touch any other source of heat.
• Always make sure the food processor is completely assembled before operating. The appliance will not operate unless properly assembled. - Ensure the appliance ⏻ is switched OFF, and unplugged from the power outlet before attaching any accessories, including any blades or discs.
- Handle the food processor and attachments with care. Blades, cutting disc, and dicing grids are razor sharp and should be kept out of reach from children.
• Always secure the processing bowl onto the motor base before attaching the blades or discs. - Do not allow the power cord to hang over the edge of a table or counter, touch hot surfaces or become knotted. Unwind the power cord fully before use.
-
Keep hands, hair, clothing, spatulas and other utensils away from moving blades or discs while processing food, to prevent the possibility of severe personal injury or damage to the food processor. A plastic spatula may be used, but only when the food processor is stopped.
-
Ensure the appliance motor is off and unplug the power cord from the outlet before removing the lid from the processing bowl.
- Avoid contact with moving parts. Never push food down by hand when slicing or shredding. Always use the food pusher to push the food down the feed chute.
- Do not fill the processing bowl above the marked maximum fill line for each type of ingredient. Always add drier or thicker ingredients to the processing bowl prior to adding fluids. Failing to follow this instruction may cause product malfunction, product damage or personal injury due to damage to the cover or bowl.
- Never store any blade or disc on motor shaft. To reduce the risk of injury, never place cutting blade or discs on the shaft without first putting bowl properly in place. Store blades and discs, as you would sharp knives, out of reach of children in the storage box provided.
- Be sure the lid is securely locked in place before operating the food processor. Never try to override or tamper with lid interlock mechanism.
• Always remove the plug from the power outlet if the
appliance is not in use, before attempting to move the appliance, before cleaning, disassembling, assembling and when storing the appliance.
- Some stiff mixtures, such as dough, may cause the processing blade to rotate more slowly than normal. If this happens, do not process for longer than 1 minute.
- Do not process hot or boiling liquids; allow to cool to room temperature before placing into the processing bowl. Hot liquid can be ejected to cause injury due to sudden steaming.
- Do not move the appliance while in operation.
- Do not place any part of the food processor in a microwave oven.
- Never remove the lid while the appliance is operating.
• Always use the POWER or PAUSE buttons to stop the machine before lid removal. - Care should be taken when removing the food from the processing bowl by ensuring the motor and blade / disc has completely stopped before disassembling. Ensure the POWER button has been pressed to switch the motor off and unplug the power cord from the power outlet
before removing the lid from the processing bowl. The processing bowl should then be unlocked from the motor body and the blade / disc should be carefully removed before attempting to remove the processed food.
- Do not use harsh abrasive, caustic cleaners when cleaning the appliance.
- Keep the appliance clean. Strictly follow the care and cleaning instructions described in this book. To avoid possible malfunction of bowl switch, never store the food processor with pusher assembly in locked position.
- Do not use your fingers or a knife to clean the dicing grid or dicing blade. Please use the cleaning tool or brush provided to clean the dicing grid or blade.
- Do not attempt to use the Dicing Kit in any other manner than described in this user manual.
- Do not attempt to use the Dicing Kit with any other food processor than the models specified on the Dicing Kit packaging.
- This appliance is for household use only. Do not use this appliance for anything other than its intended use. Do not use in moving vehicles or
boats. Do not use outdoors. Misuse may cause injury.
- The use of attachments not sold or recommended by Sage may cause fire, electric shock or injury.
- Do not leave the appliance unattended when in use.
- The appliance can be used by children aged 8 or older and persons with reduced physical, sensory or mental capabilities or a lack of experience and knowledge, only if they have been given supervision or instruction concerning use of the appliance in a safe way and understand the hazards involved.
• Children should not play with the appliance. - Cleaning and user maintenance of the appliance should not be carried out by children unless they are 8 years or older and under adult supervision.
• The appliance and its cord should be kept out of reach of children aged 8 years and younger. - Any maintenance other than cleaning should be performed at an authorised Sage Service Centre.
- For safety reasons it is recommended you plug your
appliance directly into its own electrical outlet on a dedicated circuit separate from other appliances. If the electric circuit is overloaded with other appliances, your appliance may not function properly.
- It is recommended to regularly inspect the appliance. Do not use the appliance if power supply cord, plug or appliance becomes damaged in any way. Return the entire appliance to the nearest authorised Sage Service Centre for examination and / or repair.
- In order to avoid a hazard due to inadvertent resetting of the thermal cut-out, this appliance must not be supplied through an external switching device, such as a timer, or connected to a circuit that is regularly switched on and off by the utility.
- The installation of a residual current device (safety switch) is recommended to provide additional safety protection when using electrical appliances. It is advisable that a safety switch with a rated residual operating current not exceeding 30mA be installed in the electrical circuit supplying the appliance. See your electrician for professional advice.

WARNING
To avoid possible malfunction of the processing bowl's auto switch, do not place the processing lid in the locked position when the appliance is not in use.

The symbol shown indicates that this appliance should not be disposed of in normal household waste. It should be taken to a local authority waste collection centre designated for this purpose or to a dealer providing this service. For more information, please contact your local council office.

To protect against electric shock, do not immerse the power plug, cord or appliance in water or any liquid.
FOR HOUSEHOLD USE ONLY SAVE THESE INSTRUCTIONS

Components
A. Small food pusher
For improved processing control of smaller ingredients. It also doubles as a measuring cup. The food processor will run continually whether the small pusher is in or out.
B. Medium pusher
The food processor will run continually whether the medium pusher is in or out.
C. Large food pusher
For pushing food down the feed chute. The food processor will not start unless the large pusher is correctly in place.
D. Extra wide 14cm chute
For larger ingredients.
E. Feed chute safety system
Prevents the motor from operating unless the bowl and lid are correctly locked in position, and large feed pusher is inserted.
F. Processing Lid with silicone seal
Locks onto the processing bowl.
G. Mini bowl with silicone seal
H. Main bowl with handle
The bowl locks onto the motor base.
I. PLAY | PAUSE button
Press to start and pause operation of the motor.
J. PULSE button
Press down and hold briefly for short bursts of power. The motor will automatically stop after the PULSE button has been released.
K. Screen display
Displays the timer.
L. POWER button
M. Count up & count down timer
Used to set desired time required for processing. Can count up or down, stopping the processor once the time is reached in count down mode.
N. Powerful induction motor base
Induction motor with safety braking system.
O. Non-skid rubber feet
For added safety and stability.

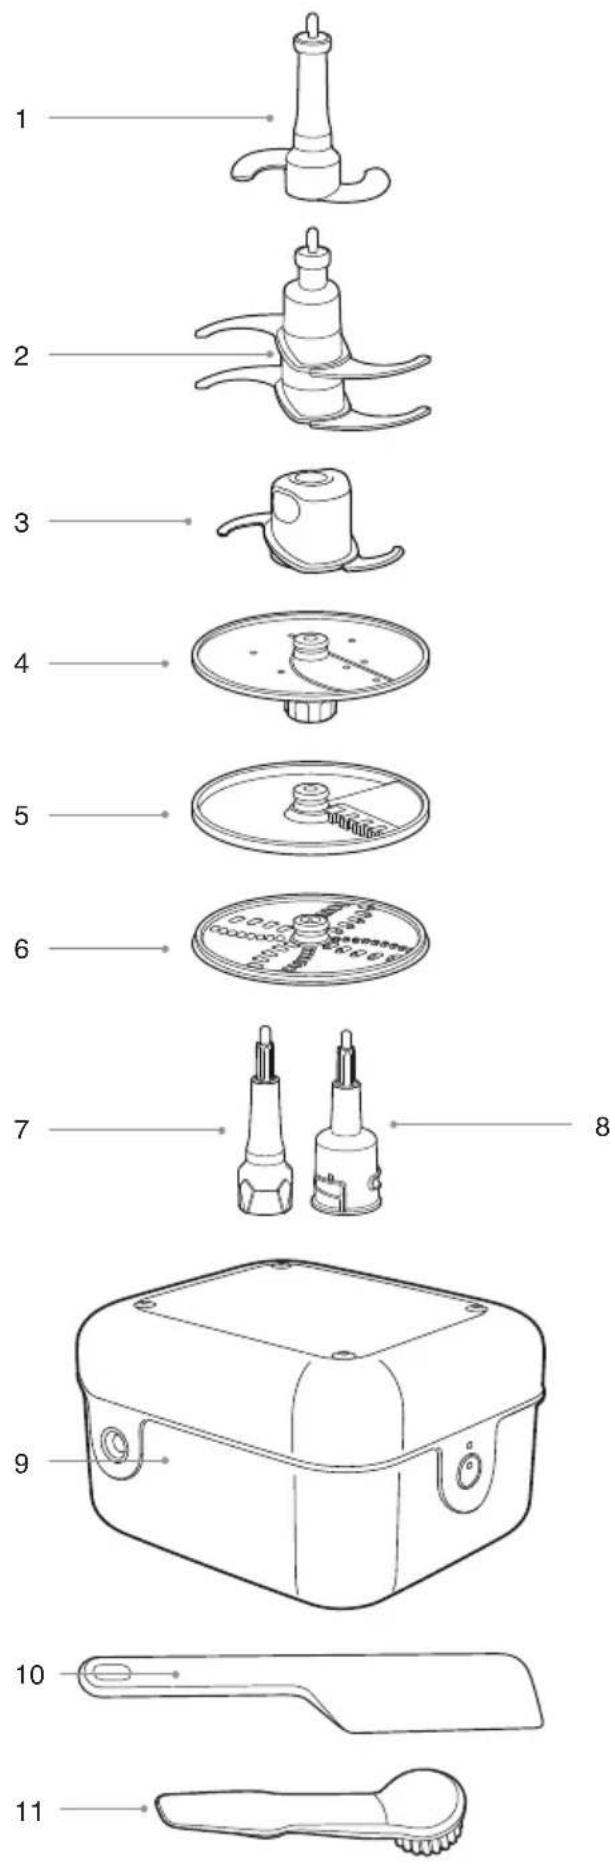
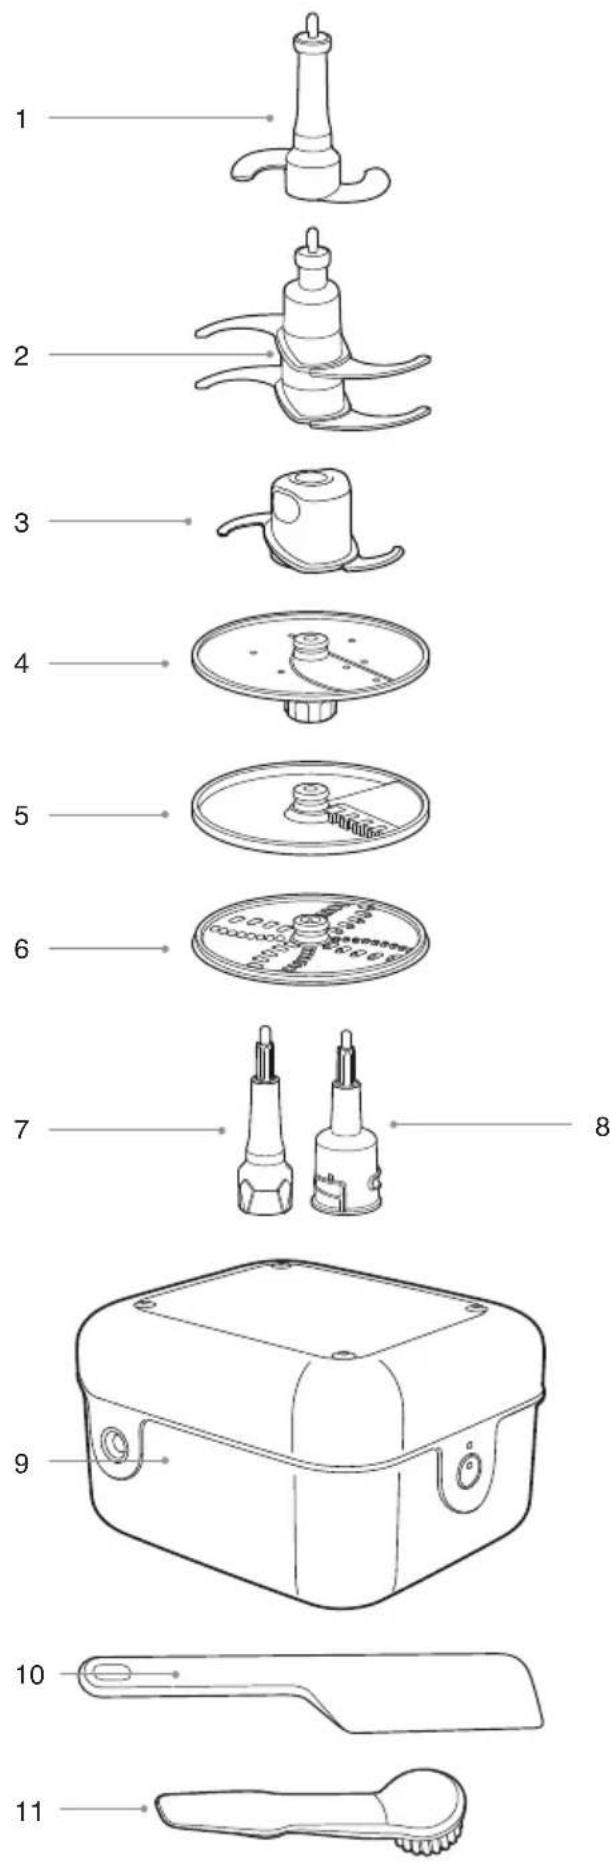
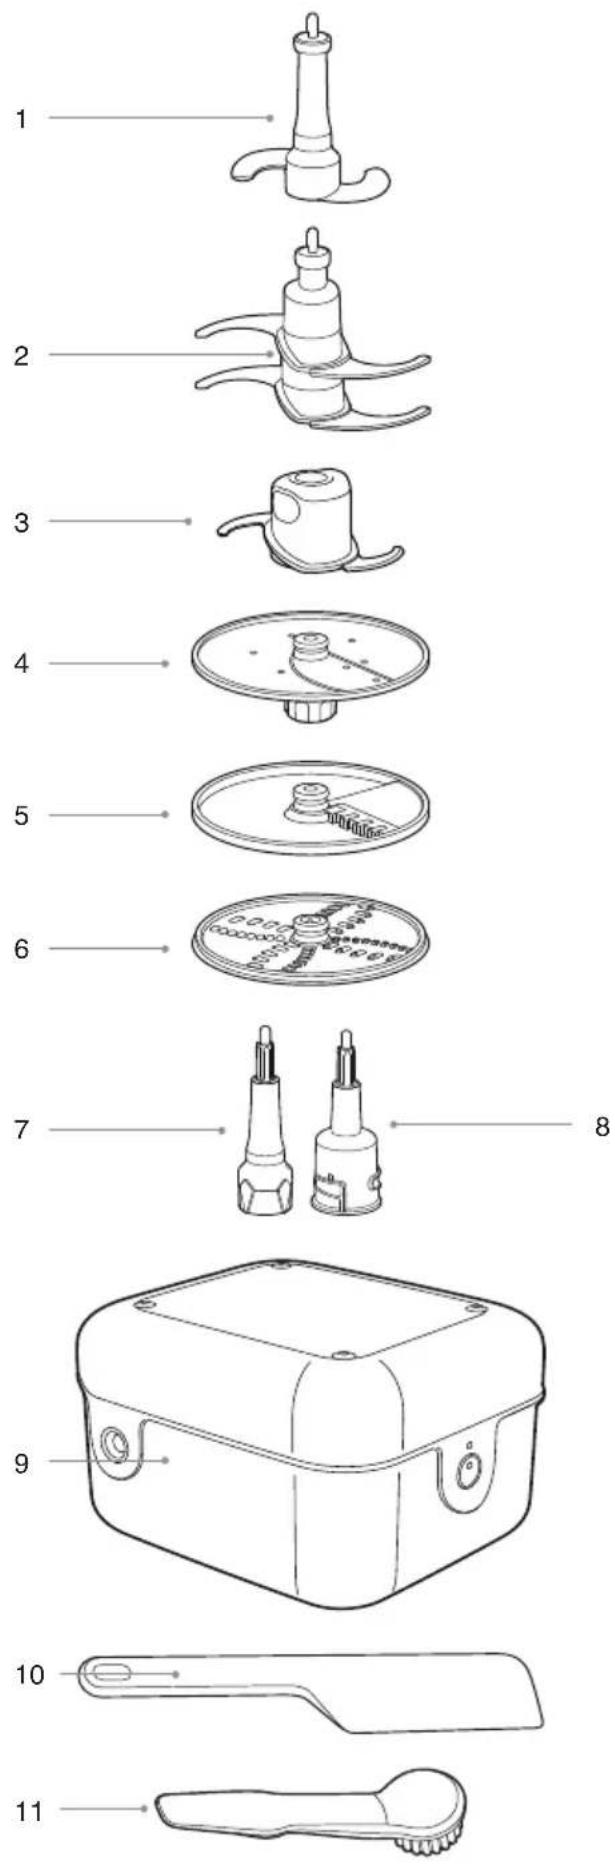
BOX 1
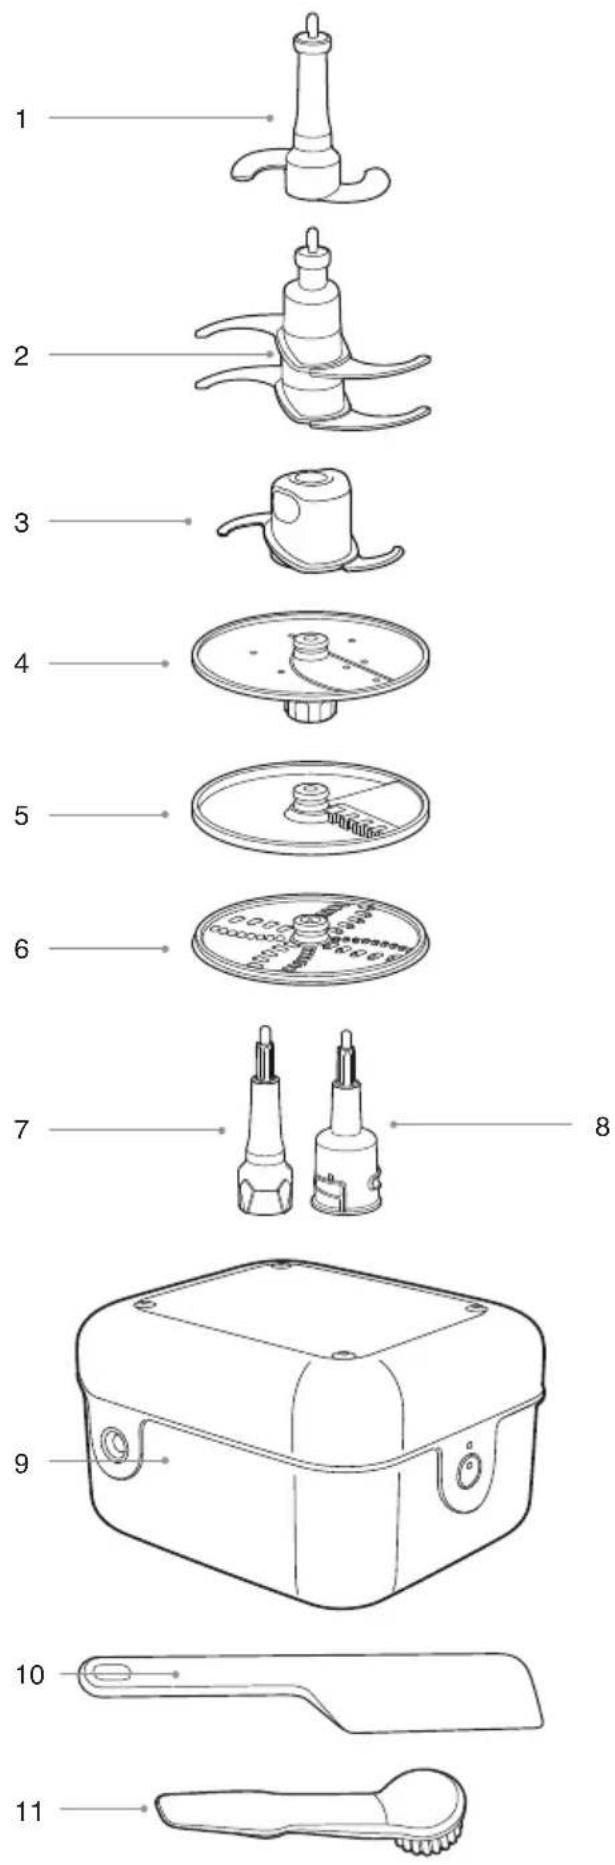
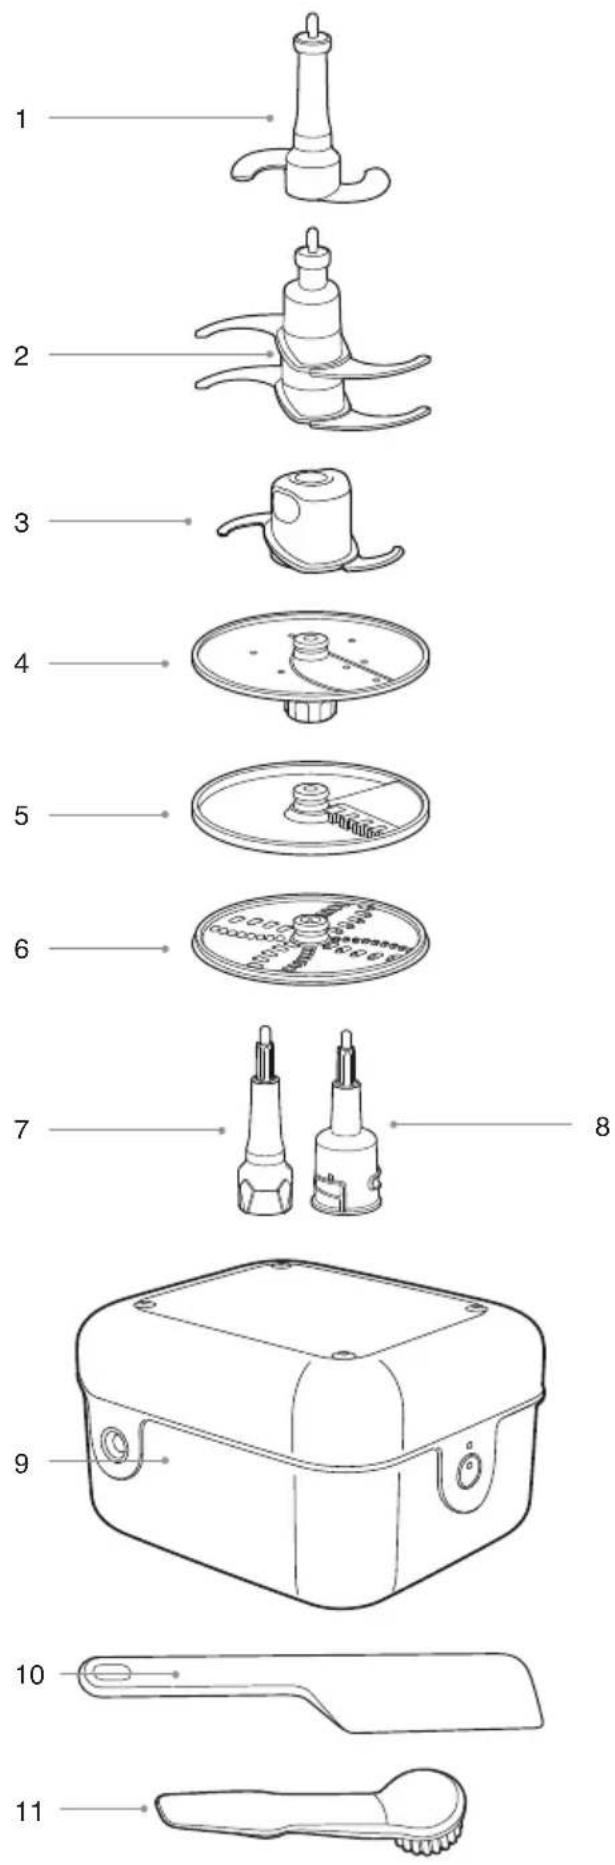
1. Dough Blade
Soft material blade for kneading dough.
2. Quad™ Blade
Swift action for even chopping, mixing, whipping and processing a variety of ingredients.
3. Mini Processing Blade
Attach to the mini spindle and use this blade for small quantities with the mini bowl for chopping, mixing and blending a variety of ingredients.
4. Adjustable Slicer
Use this disc for slicing ingredients. Able to slice from 1 / 8in - 5 / 16in (0.3mm - 8.0mm) thick.
5. French Fries Cutter
Use this disc to cut ingredients into French fry shape.
6. Reversible Shredder
Use one side of this disc for fine shredding and the other side for coarse shredding.
7. Main Spindle
Attaches to the main bowl and drives the Reversible shredder, the French fries cutter or Adjustable slicer.
8. Mini Spindle
Drives the same accessories as the Main spindle but it is used with the Mini bowl to process fewer quantities.
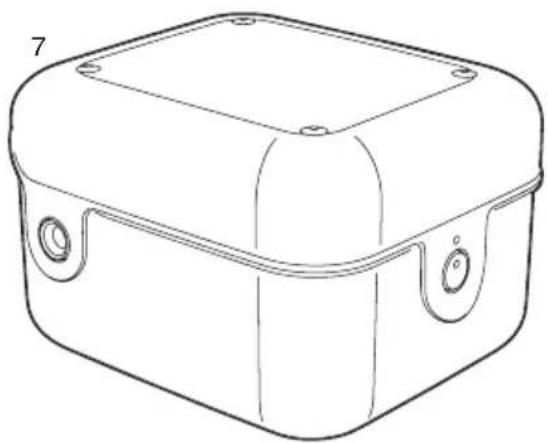
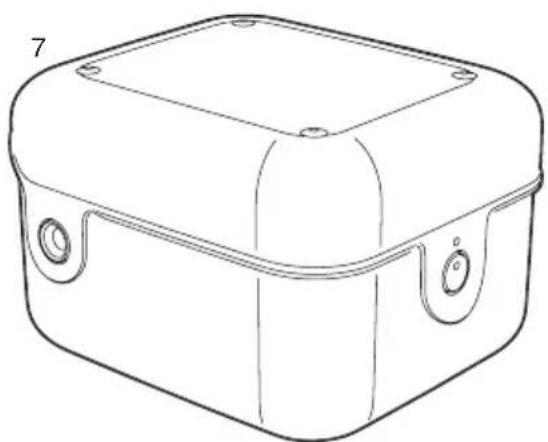
9. Storage Box
To store all accessories.
10. Plastic Spatula
To scrape ingredients from the sides of bowls (both the main and mini bowls).
11. Cleaning Brush
To aid with cleaning bowls, blades, discs and other attachments.

BOX 2 - THE DICING KIT:
- Peeler
Peels potatoes and other round, firm produce. - 8mm Dicing Disc and Dicing Grid
- 16mm Dicing Disc and Dicing Grid
- 2 cleanings caps –
8mm, and 16mm to be attached to large pusher - Dicing Distributor
- Dicing gearbox
- Storage Box


Assembly
BEFORE FIRST USE
- Before using your food processor for the first time, remove any packaging material and promotional labels. Ensure food processor is unplugged.

WARNING
Be careful when handling the blades, grids, and discs as they are extremely sharp.

- Wash the processing bowl, processing lid and all attachments in warm soapy water with a soft cloth. Rinse and dry thoroughly. All attachments except the dicing gearbox may be washed in the dishwasher.
- When first using your food processor, you may notice an odor coming from the motor. This is normal and will dissipate with use.
• Always use the food processor on a dry, level work surface.
ASSEMBLY
Motor Base and Bowl
- Position the processing bowl onto the motor base with the handle in line with the ALIGN HANDLE graphic on the motor base.

- Turn the bowl clockwise until the handle locks to the front. The processing bowl should now be securely locked into position. The food processor will not operate unless the bowl is locked into position correctly.

Spindles and Discs
- Before placing the lid onto the Main bowl, choose the spindle suited for either the Main bowl or Mini bowl.
- Insert the spindle onto the center of the bowl.
- Then, carefully attach the disc accessory onto the metal tip of the spindle. The disc should sit flat on the spindle. Adjustable slicer, french fries & reversible shredder disc will work on both main and mini spindles. The peeler only works on the main spindle.

Adjustable slicer

French fries cutter

Reversible shredder
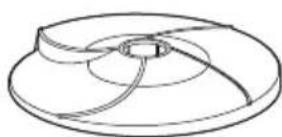
Peeler

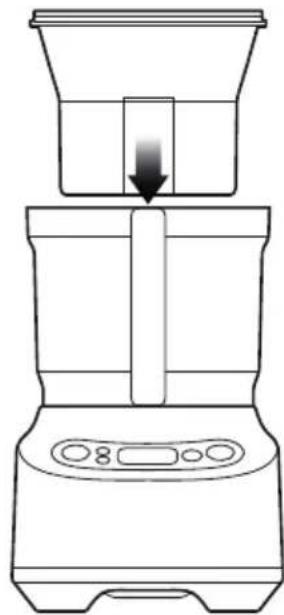
Mini Processing Bowl

The mini processing bowl fits inside the main bowl.

Use the mini-spindle with the mini-bowl. The mini-blade and disc accessories can be used with the mini-spindle. Please note that the mini blade cannot be used in the main processing bowl and the S-Blade cannot be used in the mini-bowl.
Lid
Place lid onto the processing bowl so that the ALIGN I LOCK graphics on the lid and handle align. To LOCK the lid, hold the chute and turn clockwise so that the handle parts align. Locking the lid correctly will engage the interlocking safety catch on the handle, and when the large pusher is in position, it will allow the motor to run.


DICING KIT
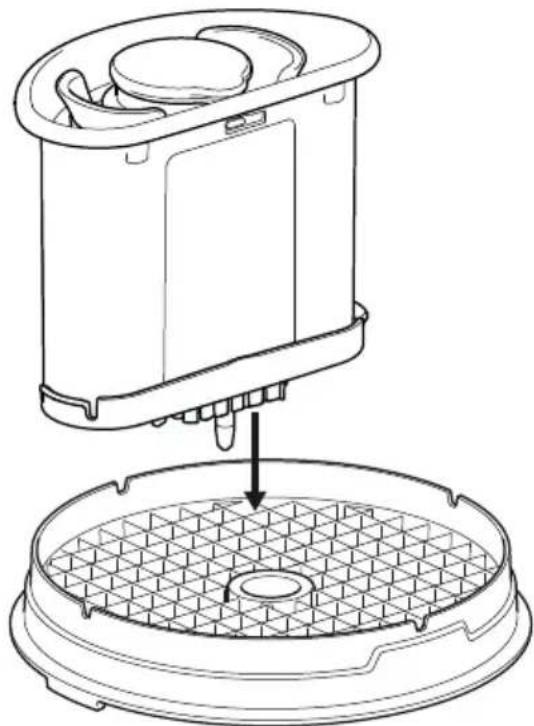
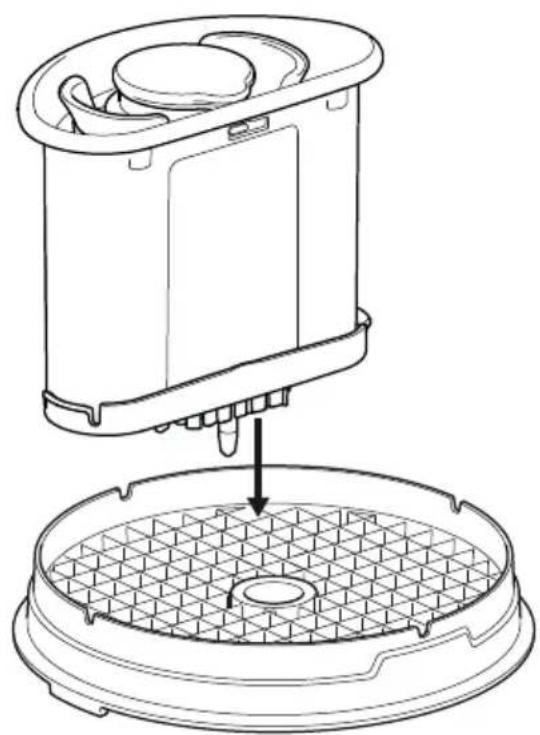
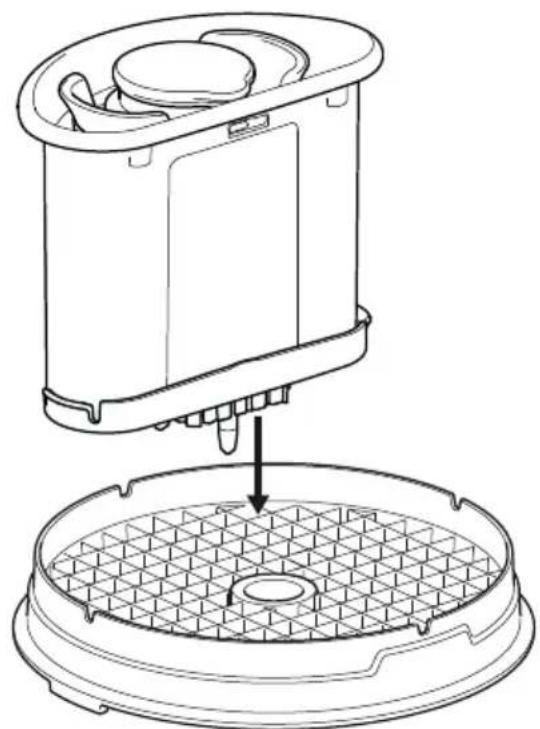
The dicing kit comes with 2 corresponding Disc and Grids
- 8mm
- 16mm
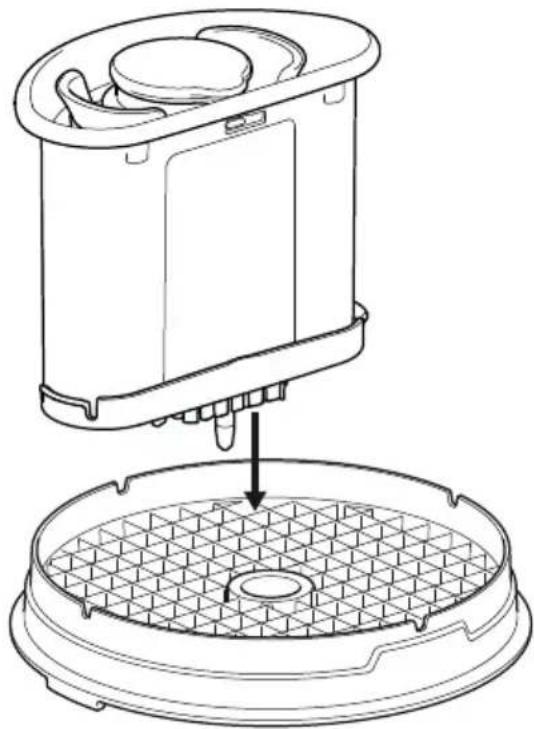
Assemble in the order shown in the diagram on the right.
- Place dicing gearbox into the main processing bowl.
- Place dicing distributor on to the dicing gearbox.
- Carefully align and place the dicing grid into the top of the Bowl and rotate the grid until it drops into place in the bowl and prevents further rotation.
- Dicing Disc can now be located onto the top of the dicing gearbox protruding from the centre of the grid.
- Align the lid and ensure it is properly closed and ready for use. The dicing kit also comes with a peeler which can be used with the main spindle and bowl.
IMPORTANT: Always remember to place the dicing gearbox with dicing distributor, dicing grid and dicing disc into the food processor before adding the food.
Do not dice more than the indicated MAX level at any one time. Exceeding this capacity will lead to the produce jamming in the disc. It will also make the cleaning process of the dicing grid challenging, and may cause damage to the accessories in use.

TO ASSEMBLE THE CLEANING DEVICE:
- Align the Cleaning Cap with the Grid and then push down the pusher to clear out the food. Use a rocking motion to help clear out harder ingredients.
- Repeat at four marked locations until the grid is clear.
- When finished dicing, use the brush to help with clearing the remnants of food on the Dicer grid.

TIPS
- You can remove the bowl from the base to help the cleaning process.
- If it is still difficult to push from the top – then the grid can be inverted onto the bench and the cleaner used on the underside.


Functions
OPERATION
Getting started
The food processor will only operate when the processing bowl, lid and large pusher are correctly assembled. This engages the safety interlock, and allows the motor to run.
The chute has a CHUTE FILL MAX graphic to indicate the maximum volume of food that can be placed in the chute for the pusher to activate the feed chute safety system.
Control Panel





When the machine is connected to the power, and the POWER button is pressed; the buttons and screen will illuminate and the food processor will be ready to operate. Pressing the POWER button at this stage will turn the unit off.
Pressing the PLAY | PAUSE button will start the motor to run continuously, and the timer will count up to show processing time.

Press PLAY | PAUSE again while processing and the motor will stop. The timer will stop and both the pause icon and PLAY | PAUSE button will flash. Press PLAY | PAUSE to continue processing or press POWER to return to standby.
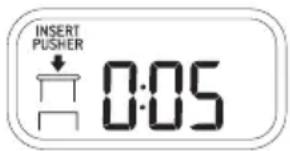
Removing the large pusher during processing will stop the motor. The timer will stop, the INSERT PUSHER icon will be displayed and the PLAY | PAUSE button will flash. Ingredients can be added into the lid chute, and when the large pusher is re-inserted, the unit will continue to process.
Pressing the PULSE button will cause the motor to operate only while the button is held down. Sequential presses will cause the timer to count up the collective processing time. This momentary operation is ideal for foods that need sudden bursts of power to encourage ingredients to move or be integrated, or with food types that only require processing for short periods.
Use a combination of the PULSE and PLAY | PAUSE buttons for more control when processing ingredients.
Timer
During operation the timer will count-up from zero to display the accumulated processing time. Continuous operation will stop if the timer reaches 20 minutes (19:59) and the unit will return to standby mode.
To control the processing duration – press the up or down arrows to set the timer for any recipe that requires a specific length of time the ingredients should be processed. Each single press will adjust by 5 seconds, holding the button will adjust in 10 second or higher increments. The TIMER icon will be displayed on the screen.

Press PLAY I PAUSE to initiate processing and the unit will operate as the displayed time counts down. The motor will run continuously until the timer reaches zero. Removing the large pusher or using the pause function will not affect the set time during processing. Pressing POWER or PULSE buttons during operation will clear the timer and return to standby. After
Processing
Wait until the blades or discs have stopped moving before unlocking the lid. Ensure that the unit has been turned off using the POWER button and unplug at the power outlet before handling the blades or discs.
When removing the blades or discs, lift the part by carefully gripping the plastic hub area in the center.
Overload Protection System
The food processor has an overload protection system to prevent damage to the motor – this will cause the food processor to go into standby mode and the OVERLOAD PROTECTION icon will flash.
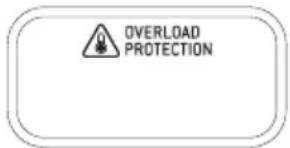
Unplug the food processor and allow to cool for 30 minutes.
If the blades or discs stall while processing, immediately stop the machine, then unplug from the power outlet before clearing the wedged ingredients. If this happens more than once, the bowl may be overloaded. Try processing in smaller batches.
PEELING WITH THE PEELER
Potato peeling made easy
Take the hard work out of peeling potatoes. The Sage peeler will peel potatoes in batches of 6–7, depending on the size. Peeling is very fast, and may finish quicker than expected. Keep your eye on progress, and it should be done in 25–30 seconds.
Size matters
The best size potatoes to use are around 70mm x 70mm. Choose potatoes that are round, rather than elongated. Use whole potatoes, as cutting potatoes into half or quarters creates square edges that won't peel efficiently. Using rounder potatoes will reduce the amount of waste.
Loading the potatoes
Position 6–7 potatoes evenly on top of the peeler. Potatoes should have enough room to freely roll and rumble. If potatoes are too tightly packed, the peeling won't be as effective. Keep in mind that the peeling works best with a complete batch, and peeling just a couple of potatoes won't be as efficient. Lock lid in place before starting, and never insert potatoes through the chute.

TIP
The best size potato for the peeling disc is around 70mm x 70mm. Choose potatoes that are round, rather than elongated.
Tips listed below are suggestions only. For more detailed instructions, refer to specific recipes provided online at www.breville.com
| ACCESSORY ACTION TYPES OF INGREDIENTS / DISHES | TIPS | ||
| Quad BladeTM | Chop | Raw fruits and vegetablesRaw or cooked meats and fishFresh herbsBreadcrumbsNutsDried fruits | Trim and cut food into 2.5cm (1-inch) cubes before processing. WARNINGMotor should run for no more than 30 seconds at a time. WARNINGMotor should run for no more than 30 seconds at a time. |
| Mince / Ground Meat | Raw and cooked proteins | Trim and cut food into 2.5cm (1-inch) cubes before processing.For best results, freeze proteins for 30 minutes.Trim excess fats and sinew. | |
| Puree / Blend | Cooked fruit and vegetables | Allow food to cool before pureeing or blending. | |
| Mix | SaucesBattersPestoCompound butters | For batters, use PULSE button until mixed evenly. Do not over process. | |
| Dough Blade | Knead | Bread and pizza doughs | Add liquid through small feed chute whilst the motor is running to incorporate.Recommended maximum flour capacities: - 750 g / 1.6 lb |
| Adjustable Slicer Disc | Slice | Raw foods and vegetablesSalamis and deli meats | Place ingredients vertically on the left side of appropriate sized feed chute to minimize tilting.For deli meats like salami or pepperoni, trim one end and process one at a time. |
| Reversible Shredding Disc | Coarse & Fine Shred | CheesesFruits and vegetables such as apples, potatoes, and cabbage | For best results, freeze softer cheeses for 45 minutes before grating.NOTEGrating soft white cheeses such as fresh mozzarella is not recommended.Remove the rind from hard cheeses before grating. |
| French FriesDisc | French Fry Cut | PotatoesSweet PotatoCarrots | Lay ingredients horizontally in large feed chute to maximize length.For potatoes and softer produce, use the large feed chute to maximize length; however, for best results on harder, fibrous produce, use the medium chute for more control. |
| Dicing kit(8, 16mm) | Dicing | Raw and cooked vegetables and fruits | Use small or medium feed chutes for harder ingredients such as carrot or pumpkin. To further improve results you can also pre cook.When dicing tomatoes, avocados firmer fruit will give a better resultAlways use the Dicing Distributor assembled to the dicing gearbox. This will keep the area underneath the chute clear and prevent blockages. |
| Potato Peeler | Peeling | Raw potatoes | For best results, use consistent shaped potatoes. |
| IMPORTANT NOTEDue to the harder and more fibrous nature;DO NOT DICE the following: | CheeseRaw sweet potato / kumara.Meat including hard deli meats.Fruit and vegetables with tough skin such as pineapple and watermelon. These should be peeled first. | ||

IMPORTANT NOTES
For optimal results, position food in the chute and use the pusher to push food with light downward force prior to starting the food processor.
Always use the small or medium size feed chute for processing hard produce like pumpkin and sweet potato. Feeding hard produce through the large feed chute could cause damage to the discs.
Smaller Ingredients
For long thin foods such as carrots, cucumbers, zucchini, etc., use the small or medium feed chute. This will avoid the ingredient from tipping over, during slicing.
Larger Ingredients
The wide feed chute is 14cm wide and can fit ingredients up to this size. The food should fit snugly so it is supported in an upright position in the chute, but not so tight that it could prevent the food from moving down the chute. Ensure not to overfill the chute, as the pusher will not activate the interlock safety catch if the chute is too full. Do not fill over the MAX indicator.
Pressure
When processing, never force the food down the chute as this can damage the discs. Apply light, even pressure for soft foods such as tomatoes and bananas. Apply medium, even pressure for firmer foods such as potatoes, cheese, deli meats and apples.
Mini Bowl
The mini processing bowl is used inside the main processing bowl. It is for better control when processing small quantities of food, or herbs. Use the mini-spindle with the mini bowl and then add the mini-blade for chopping, mixing and blending a variety of ingredients. Alternatively, the 'Adjustable Slicing', Shredding or French Fries discs can be used on the mini-spindle to process smaller quantities into the mini bowl.
Dicing kit
Do not dice raw sweet potato / kumara. Its dry, hard and fibrous nature may cause damage to the bowl and lid due to heavy load.
Do not fill the Bowl with ingredients above the MAX level on the side of the Bowl.
Do not assemble the cutting disc onto the gearbox without the grid in place.
Always use the Dicing Distributor on the gearbox.

Care & Cleaning
Remove the power cord from the power outlet after use for safety reasons.
Processing bowl and lid
Due to the interlock components, we do not recommend immersing the bowl in water for long periods.
To keep your bowl and lid clean, and to avoid food drying on, follow these steps as soon as possible after use:
- Rinse most of the ingredients off the bowl and lid.
- Hand wash in clean warm, soapy water using a mild liquid detergent and non-abrasive sponge.
- The processing bowl and lid may occasionally be washed in the dishwasher (top shelf only), however washing in the dishwasher is not recommended on a regular basis, as prolonged exposure to harsh detergents, hot water and pressure will damage and shorten the life of the plastic and the interlock components.

WARNING
Oils in citrus rind can damage the material of your food processor bowl if being exposed to it for a longer period. Always clean your processing bowl immediately after processing citrus rind.
Blades and discs
- Blades and discs are razor sharp, do not touch. Always use a spatula or brush to remove food or when cleaning blades.
- Spindle, blades and discs can be washed in the dishwasher.
Food Pushers
All parts in the pusher stack can be placed in the dishwasher (top rack).
Motor base
To clean the motor base, wipe with a soft, damp cloth then dry thoroughly. Wipe any excess food particles from the power cord.
Dicing Accessories
Follow the assembly instructions for dicing cleaner. After dicing use the dicing accessory to clean out residual food.
Dicing accessories can be washed in the dishwasher excluding the dicing gearbox.
Cleaning agents
Do not use abrasive scouring pads or cleansers on either the motor base or the jug, as they may scratch the surface. Use only warm soapy water with a soft cloth.
Stubborn food stains and odors
Strong smelling foods such as garlic, fish and some vegetables such as carrots may leave an odor or stain the bowl or lid.
To remove, pour warm soapy water and fill to the MAX LIQUID mark. Set aside to soak for 5 minutes, without immersing the whole bowl. Then wash with a mild detergent and warm water, rinse and dry thoroughly. Store the bowl with the lid off.
Storage
Place the large food pusher (with medium and small pushers inserted) into the feed chute for storage.
Store your food processor upright, with the bowl and lid resting in position, but not locked. Locking the bowl and lid can put unnecessary strain on the safety interlock.
All accessories should be kept in the storage container and out of the reach of children to avoid accidental cuts. It is not recommended to store the discs in a drawer with other utensils.
Do not place anything else on top of your food processor during storage.
PROBLEM EASY SOLUTION
| Food is unevenly processed | Ingredients should be cut evenly into 2.5cm pieces before processing.Ingredients should be processed in batches to avoid overloading. |
| Slices are slanted or uneven | Place evenly cut food into the feed chute.Apply pressure, then start the machine. |
| Food falls over in the feed chute | The large feed chute must be packed full for best results. If processing smaller quantities, place items to the far left in the feed chute, or use a smaller feed chute, depending on the food size. |
| Unevenly cut french fries | Always clear any blocked potato before processing more potatoes. |
| Some food remains on top of the disc after processing | It is normal for small pieces to remain after processing. |
| Motor slows down when kneading dough | Amount of dough must not exceed maximum recommended quantity on the recipe. Remove half and process in two batches.Dough may be too dry. If motor speeds up, continue processing. If not, add more water, 1 tablespoon at a time until the motor speeds up. Process until dough cleans the side of the processing bowl. |
| Dough doesn't clear inside of the processing bowl | Amount of dough may exceed food processor maximum capacity.Remove half and process in two batches.Dough may be too dry. |
| Dough nub forms on top of dough blade and dough does not become uniformly kneaded | Stop machine, carefully remove dough, divide it into 3 pieces and redistribute them evenly in the processing bowl. |
| Dough feels tough after kneading | Divide dough into 2 or 3 pieces and redistribute evenly in processing bowl. Process 10 seconds or until uniformly soft and pliable. Allowing dough to rest allows the gluten strands to relax and become more pliable. |
| Dough is too dry | While machine is running, add water through the small feed chute, 1 tablespoon at a time until dough clears the inside of the processing bowl. |
| Dough is too wet | While machine is running, add flour through the small feed chute, 1 tablespoon at a time until dough clears the inside of the processing bowl. |
| The motor does not start | There is a safety interlock switch to prevent the motor from starting if it is not properly assembled. Make sure the processing bowl and lid are securely locked into position. Make sure the Main bowl is positioned such that its handle is pointing towards the user.The food content in the feed chute should be below the maximum fill line.If the motor still will not start, check the power cord and power outlet. |
| The food processor shuts off during operation | Check whether the message “insert pusher” is displayed on the screen. If so, make sure the big pusher, the lid and the bowl are correctly locked in place.If the motor overloads, the ‘OVERLOAD PROTECTION’ icon in the screen will start to flash. Switch off by pressing the POWER button and unplug the power cord. Allow the food processor to cool for 30 minutes before resuming. |
| The motor slowed down during operation | This is normal as some heavier loads (e.g. slicing / shredding cheese) may require the motor to work harder. Reposition the food in the feed chute and cut the food into smaller sizes and process using a smaller pusher and continue processing.The maximum load capacity may have been exceeded. Remove some of the ingredients and continue processing. |
| The food processor vibrates / moves during processing | Make sure the rubber feet at the bottom of the unit are clean and dry. Also make sure that the maximum load capacity is not being exceeded.This is normal as some heavier loads may require the motor to work harder.Turn the unit off and clear any ingredients that may be caught on the disc, before continuing.If this occurs while mixing dough – then turn unit off and redistribute the dough mixture more evenly around the bowl before continuing.Process hard and fibrous foods such as carrots, through the medium or small chute. |
| INSERT PUSHER flashing | Make sure that food does not exceed the max line in the food chute.If pusher is fully inserted and this warning flashes on the screen, check that the bowl and lid are assembled correctly. Bowl handle should be facing the front of the unit. |
| The dicing accessory is not working | Ensure the accessory kit is inserted as per assembly instructions.Ensure dicing grid is clear from food on top and that it sits locked into the bowl, flat and stable.Make sure dicing disc is free from wedged ingredients. If this happened use spatula to clear wedged ingredients.Make sure all dicing parts belong to the same size, i.e. 8mm discs with 8mm grid, etc. |
2 YEAR LIMITED GUARANTEE AND 30 YEAR LIMITED MOTOR GUARANTEE
Sage Appliances guarantees this product for domestic use in specified territories for 2 years for all parts of the product and 30 years for the product's motor from the date of purchase against defects caused by faulty workmanship and materials. During this guarantee period Sage Appliances will repair, replace, or refund any defective product (at the sole discretion of Sage Appliances).
All legal warranty rights under applicable national legislation will be respected and will not be impaired by our guarantee. For full terms and conditions on the guarantee, as well as instructions on how to make a claim, please visit sageappliances.com
the Paradice™ 16
BFP838 / SFP838

DE
IANDBUCH
Sage®

Inhalt
BOX 1
1. Teigkneter


Zusammenbau
VOR DEM ERSTEN GEBRAUCH
Verstellbarer Hobel
WÜRFELSET


Funktionen
BEDIENUNG
Erste Schritte
FRGUIDE UTILISATEUR
Sage®

Table des matières
CE Informations sur la tension nominale 220 V - 230 V \~ 50 Hz 900 Watts
CARTON N°1
1. Lame à pétrir


Assemblage
AVANT LA PREMIÈRE UTILISATION
Axes et disques


Fonctions
FONCTIONNEMENT
Commencer
NLHANDLEIDING
Sage®

Inhoud

DOOS 1
1. Deegmes

Montage
Assen en schijven
Grote as en kleine as
Mini-bereidingskom
BLOKJESKIT


Functions
BEDIENING
Aan de slag
ITMANUALE UTENTE
Sage®

Sommario
CONFEZIONE 1
1. Lama impastatrice


Montaggio
PREPARAZIONE AL PRIMO UTILIZZO
Alberini e dischi

SUGGERIMENTI

Funzioni
FUNZIONAMENTO
Guida introduttiva
ES
GUÍA DEL USUARIO
Sage®

Índice
CAJA 1
1. Cuchilla amasadora


Montaje
Ejes y discos
Rebanador ajustable

Funciones
FUNCIONAMIENTO
Cómo empezar
PTMANUAL DO UTILIZADOR
Sage®

Índice
2 A Sage ® recomenda a segurança como máxima prioridade
7 Componentes
10 Montagem
15 Funções
17 Sugestões
H. Taça principal com pega

CAIXA 1
1. Lâmina de massa

Montagem
Eixos e discos
KIT DE CORTE EM CUBOS

Funções
FUNCIONAMENTO
Introdução
PLINSTRUKCJA OBSŁUGI
Sage®

Spis treści

PUDEŁKO 1


Montaž
PRZED PIERWSZYM UŻYCIEM
ZESTAW DO KROJENIA W KOSTKĘ

Funkcje
OBSŁUGA
Pierwsze kroki
BRG Appliances Limited
86–90 Paul Street, London, EC2A 4NE, United Kingdom
Freephone (UK Landline): 0808 178 1650
Mobile Calls (National Rate): 0333 0142 970
DEU
Sage Appliances France SAS
www.sageappliances.com
Registered in England & Wales No. 8223512
Registered in Germany No. HRB 81309 (AG Düsseldorf)
Registered in France No. 879 449 866 RCS
EN Due to continued product improvement, the products illustrated or photographed in this document may vary slightly from the actual product.


- CONTENTS
- SAGE® RECOMMENDS SAFETY FIRST
- IMPORTANT SAFEGUARDS
- READ ALL INSTRUCTIONS BEFORE USE AND SAVE FOR FUTURE REFERENCE
- BOATS. DO NOT USE OUTDOORS. MISUSE MAY CAUSE INJURY
- WARNING
- FOR HOUSEHOLD USE ONLY SAVE THESE INSTRUCTIONS
- COMPONENTS
- SMALL FOOD PUSHER
- MEDIUM PUSHER
- LARGE FOOD PUSHER
- EXTRA WIDE 14CM CHUTE
- FEED CHUTE SAFETY SYSTEM
- PROCESSING LID WITH SILICONE SEAL
- MINI BOWL WITH SILICONE SEAL
- MAIN BOWL WITH HANDLE
- PLAY | PAUSE BUTTON
- PULSE BUTTON
- SCREEN DISPLAY
- POWER BUTTON
- COUNT UP & COUNT DOWN TIMER
- POWERFUL INDUCTION MOTOR BASE
- NON-SKID RUBBER FEET
- BOX 1
- DOUGH BLADE
- QUAD™ BLADE
- MINI PROCESSING BLADE
- ADJUSTABLE SLICER
- FRENCH FRIES CUTTER
- REVERSIBLE SHREDDER
- MAIN SPINDLE
- MINI SPINDLE
- STORAGE BOX
- PLASTIC SPATULA
- CLEANING BRUSH
- BOX 2 - THE DICING KIT
- ASSEMBLY
- BEFORE FIRST USE
- MOTOR BASE AND BOWL
- SPINDLES AND DISCS
- LID
- DICING KIT
- TO ASSEMBLE THE CLEANING DEVICE
- TIPS
- FUNCTIONS
- OPERATION
- GETTING STARTED
- CONTROL PANEL
- TIMER
- PROCESSING
- OVERLOAD PROTECTION SYSTEM
- PEELING WITH THE PEELER
- POTATO PEELING MADE EASY
- SIZE MATTERS
- LOADING THE POTATOES
- TIP
- IMPORTANT NOTES
- SMALLER INGREDIENTS
- LARGER INGREDIENTS
- PRESSURE
- MINI BOWL
- CARE & CLEANING
- PROCESSING BOWL AND LID
- BLADES AND DISCS
- FOOD PUSHERS
- MOTOR BASE
- DICING ACCESSORIES
- CLEANING AGENTS
- STUBBORN FOOD STAINS AND ODORS
- STORAGE
- 2 YEAR LIMITED GUARANTEE AND 30 YEAR LIMITED MOTOR GUARANTEE
- THE PARADICE™ 16
- INHALT
- TEIGKNETER
- ZUSAMMENBAU
- VOR DEM ERSTEN GEBRAUCH
- WÜRFELSET
- FUNKTIONEN
- BEDIENUNG
- ERSTE SCHRITTE
- TABLE DES MATIÈRES
- CARTON N°1
- LAME À PÉTRIR
- ASSEMBLAGE
- AVANT LA PREMIÈRE UTILISATION
- AXES ET DISQUES
- FONCTIONS
- FONCTIONNEMENT
- COMMENCER
- INHOUD
- DOOS 1
- DEEGMES
- MONTAGE
- ASSEN EN SCHIJVEN
- MINI-BEREIDINGSKOM
- BLOKJESKIT
- BEDIENING
- AAN DE SLAG
- SOMMARIO
- CONFEZIONE 1
- LAMA IMPASTATRICE
- MONTAGGIO
- PREPARAZIONE AL PRIMO UTILIZZO
- ALBERINI E DISCHI
- SUGGERIMENTI
- FUNZIONI
- FUNZIONAMENTO
- GUIDA INTRODUTTIVA
- ÍNDICE
- CAJA 1
- CUCHILLA AMASADORA
- MONTAJE
- EJES Y DISCOS
- FUNCIONES
- FUNCIONAMIENTO
- CÓMO EMPEZAR
- CAIXA 1
- LÂMINA DE MASSA
- MONTAGEM
- EIXOS E DISCOS
- KIT DE CORTE EM CUBOS
- FUNÇÕES
- FUNCIONAMENTO
- INTRODUÇÃO
- SPIS TREŚCI
- PUDEŁKO 1
- MONTAŽ
- PRZED PIERWSZYM UŻYCIEM
- ZESTAW DO KROJENIA W KOSTKĘ
- FUNKCJE
- OBSŁUGA
- PIERWSZE KROKI
- DEU
Brand : SAGE
Model : the Paradice 16 SFP838
Category : Food Processor