
SILK EPIL 7 7891 VENUS W&D DUAL EPILATOR - Epilator BRAUN - Free user manual and instructions
Find the device manual for free SILK EPIL 7 7891 VENUS W&D DUAL EPILATOR BRAUN in PDF.

| Brand | BRAUN |
| Model | SILK EPIL 7 7891 VENUS W&D DUAL EPILATOR |
| Product type | Epilator with shaver and trimmer head |
| Power supply | Cordless rechargeable, special cord with low-voltage power supply |
| Charging time | Approximately 1 hour |
| Battery life | Up to 40 minutes of cordless use |
| Charging indicators | Green indicator (charging) and red indicator (low battery) |
| Main functions | Root epilation, shaving, trimming, pre-cutting |
| Speed levels | 2 speeds: normal (position 2) and gentle (position 1) |
| Epilation head | 40 tweezers, pivoting head, SoftLift pins |
| Included accessories | Massage system, EfficiencyPro accessory, special underarm accessory, precision head, shaver head with OptiTrim comb |
| Root epilation | Removes hair at the root for smooth skin for weeks |
| Smartlight | Integrated light to reveal the finest hairs |
| SoftLift technology | Pins that lift short hairs for precise epilation |
| Massage accessory | Stimulates and relaxes the skin to reduce pain |
| EfficiencyPro accessory | Maximum contact surface for fast epilation |
| Precision head | For face and sensitive areas, narrow raised head |
| Special underarm accessory | Specially designed for armpits and bikini line |
| Shaver head | Flexible foil and trimmer for a close shave |
| OptiTrim comb | To pre-cut hair to ideal length (2-5 mm) before epilation |
| Maintenance and cleaning | Cleaning brush or rinse under running water |
| Water cleaning | The appliance and heads can be rinsed with water (unplugged) |
| Lubrication | Lubricate the shaver head every 3 months with oil or petroleum jelly |
| Warranty | 2 years, subject to Braun warranty conditions |
| Compliance | European Directives 2004/108/EC and 2006/95/EC |
| Spare parts | Foil and cutter block available at Braun retailers |
Frequently Asked Questions - SILK EPIL 7 7891 VENUS W&D DUAL EPILATOR BRAUN
User questions about SILK EPIL 7 7891 VENUS W&D DUAL EPILATOR BRAUN
0 question about this device. Answer the ones you know or ask your own.
Ask a new question about this device
Download the instructions for your Epilator in PDF format for free! Find your manual SILK EPIL 7 7891 VENUS W&D DUAL EPILATOR - BRAUN and take your electronic device back in hand. On this page are published all the documents necessary for the use of your device. SILK EPIL 7 7891 VENUS W&D DUAL EPILATOR by BRAUN.
USER MANUAL SILK EPIL 7 7891 VENUS W&D DUAL EPILATOR BRAUN
(Audio Supplies Company Ltd.)
Internet:
www.braun.com
www.service.braun.com
Braun GmbH
Frankfurter StraBe 145
61476 Kronberg/Germany
98759904/VII-08
GB/F/TR/Arab/Farsi
A
B

English
Our products are engineered to meet the highest standards of quality, functionality and design. We hope you thoroughly enjoy using your Braun Silk-epil Xpressive.
Please read the use instructions carefully before using the appliance and keep them for future reference.
Braun Silk-epil Xpressive has been designed to make the removal of unwanted hair as efficient, gentle and easy as possible. Its proven epilation system removes hair at the root, leaving your skin smooth for weeks. As the hair that re-grows is fine and soft, there will be no more stubble.
The epilation head features a unique arrangement of 40 tweezers and SoftLift® tips for unprecedented efficiency. Thanks to its pivoting feature, it ideally adapts to the body contours, for better short hair removal and thoroughness. The massage system (1a) stimulates the skin before and soothes it after the hair is pulled out to significantly reduce the pain sensation.
The Efficiency cap (1b) for fast epilation ensures maximum skin contact, always taking care of the optimum usage position thanks to its pivoting feature.
The underarm cap (8) has been designed for usage in delicate body areas such as under the arms and in the bikini area.
The precision head (9) provides utmost precision and control in removing unwanted hair from face and other sensitive areas. Its unique narrow and elevated tip allows for better visibility of the area to be epilated.
The shaver head (10) is specially designed for a fast and close shave of underarms and bikini line/area.
Important
- For hygienic reasons, do not share this appliance with other persons.
- This appliance is provided with a special cord set with an integrated Safety Extra Low Voltage power supply. Do not exchange or manipulate any part of it. Otherwise there is risk of electric shock.
This appliance is suitable for cleaning under running tap water. Warning: Detach the appliance from the power supply before cleaning any of the heads with water. - This appliance is not intended for use by children or persons with reduced physical or mental capabilities, unless they are given supervision by a person responsible for their safety. In general, we recommend that you keep the appliance out of reach of children.
- When switched on, the appliance must never come in contact with the hair on your head, eyelashes, ribbons, etc. to prevent any danger of injury as well as to prevent blockage or damage to the appliance.
- Never use the epilation head without cap.
General information on epilation
All methods of hair removal at the root can lead to in-growing hair and irritation (e.g. itching, discomfort and reddening of the skin) depending on the condition of the skin and hair. This is a normal reaction and should quickly disappear, but may be stronger when you are removing hair at the root for the first few times or if you have sensitive skin. Using the pre-epilation wipes can help to prevent irritation.
If, after 36 hours, the skin still shows irritation, we recommend that you contact
your physician. In general, the skin reaction and the sensation of pain tend to diminish considerably with the repeated use of Silk-épil.
In some cases inflammation of the skin could occur when bacteria penetrate the skin (e.g. when sliding the appliance over the skin). Thorough cleaning of the epilation head before each use will minimise the risk of infection.
If you have any doubts about using this appliance, please consult your physician. In the following cases, this appliance should only be used after prior consultation with a physician:
- eczema, wounds, inflamed skin reactions such as folliculitis (purulent hair follicles) and varicose veins
around moles, - reduced immunity of the skin, e.g. diabetes mellitus, during pregnancy, Raynaud's disease, haemophilia, candida or immune deficiency.
Some useful tips
If you have not used an epilator before, or if you have not epilated for a longer period of time, it may take a short time for your skin to adapt to epilation. The discomfort experienced in the beginning will decrease considerably with repeated use as the skin adapts to the process.
Epilation is easier and more comfortable when the hair is at the optimum length of 2-5 mm. If hairs are longer, we recommend that you either shave first and epilate the shorter, re-growing hairs after 1 or 2 weeks.
When epilating for the first time, it is advisable to epilate in the evening, so that
any possible reddening can disappear overnight. To relax the skin we recommend applying a moisture cream after epilation.
Fine hair which re-grows might not grow up to the skin surface. The regular use of massage sponges (e.g. after showering) or exfoliation peelings helps to prevent ingrowing hair as the gentle scrubbing action removes the upper skin layer and fine hair can get through to the skin surface.
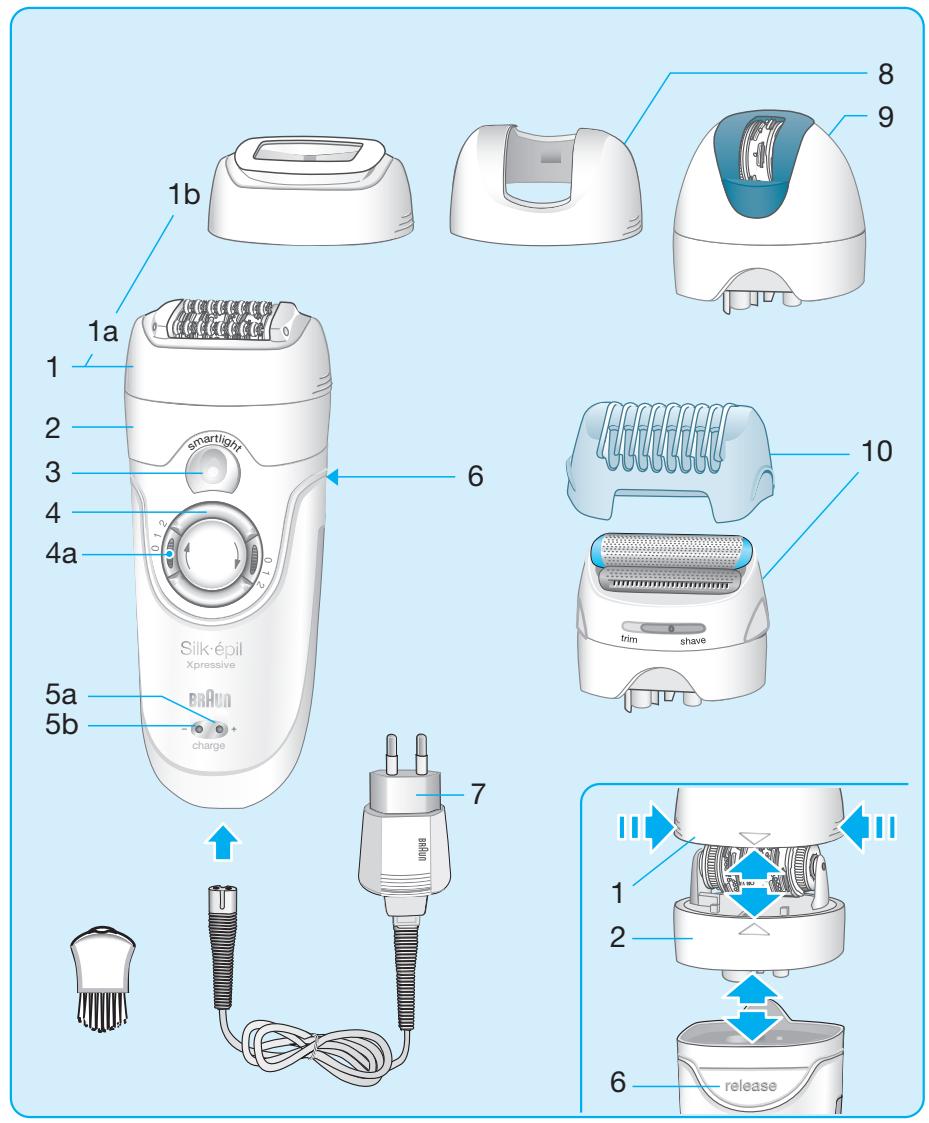
Description
1a Massage system
1b Efficiency cap (not with all models)
2 Epilation head
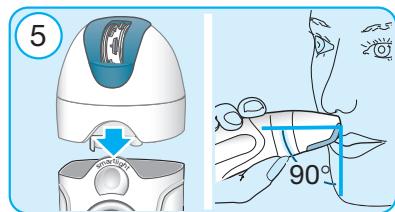
3 «smartlight»
4 Switch with lock keys
5a Charging light
5b Low charge light
6 Release button
7 Special cord set
8 Underarm cap
9 Precision head
10 Shaver head attachment with OptiTrim comb
Charging
- Before use, charge the appliance. For best performance, we recommend that you always use a fully charged appliance. Using the special cord set, connect the appliance to an electrical outlet with the motor switched off. Charging time is approximately 1 hour.
-
The green charging light (5a) flashes to show that the epilator is being charged. When the battery is fully charged, the charging light shines permanently. Once fully charged, use the appliance without cord.
-
When the red low-charge light (5b) comes on, connect the appliance to an electrical outlet via the special cord set to recharge.
As a safety feature, it may happen that in a low-charge mode, the appliance turns off. Then both charging lights flash (green/ red). In this case, simply turn back the switch to «0» and recharge the appliance as required.
- A full charge provides up to 40 minutes of cordless operation time. Maximum battery capacity will only be reached after several charging/discharging cycles.
- The best environmental temperature for charging is between 5^ and 35^ .
Preparing for use
- Your skin must be dry and free from grease or cream.
- Before use, always make sure that epilation head is clean.
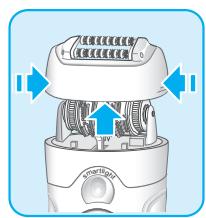
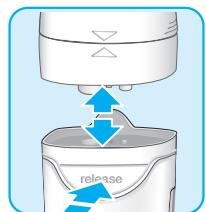
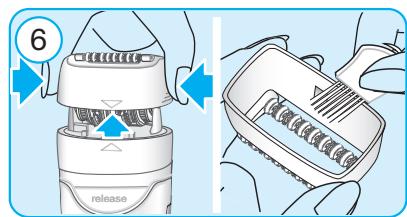
Always make sure that the epilation head (2) is provided with a cap. - To change caps, press their lateral ribs and pull off.
- To change heads, press the release button (6).
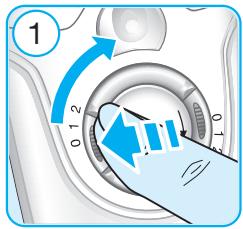
A How to epilate
1 Turning on
- Press one of the lock keys and turn the switch clockwise to setting 2 (optimum setting). For reduced speed, choose setting 1 (soft setting).
- The «smartlight» comes on instantly and shines as long as the appliance is switched on. It reproduces an almost daylight condition, thus revealing even the finest hair and giving you a better control for improved epilation efficiency.
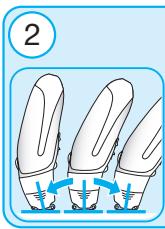
2 How to guide the appliance
Always stretch your skin when epilating.
Always make sure that the epilation area between the massaging rollers is in contact with your skin.
- The pivoting caps automatically adapt to the contour of your skin.
- Guide the appliance in a slow, continuous movement without pressure against the hair growth, in the direction of the switch. As hair can grow in different directions, it may also be helpful to guide the appliance in different directions to achieve optimum results. The pulsating movement of the massaging rollers stimulate and relax the skin for a gentler epilation.
- If you are used to the sensation of epilation and prefer a faster way of removing hair, attach the Efficiency cap (1b) replacing the massage system (1a).
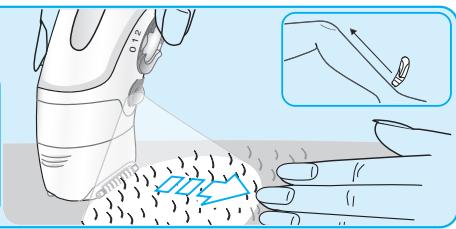
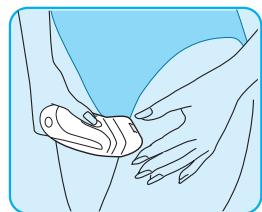
3 Leg epilation
Epilate your legs from the lower leg in an upward direction. When epilating behind the knee, keep the leg stretched out straight.
4 Underarm and bikini line epilation
For this specific application, the underarm cap (8) has been developed.
Placed on the epilation head (2), it perfectly follows the contours of these areas, providing a gentle and thorough epilation. Please be aware that especially at the beginning, these areas are particularly sensitive to pain. With repeated usage the pain sensation will diminish. For more comfort, ensure that the hair is at the optimum length of 2-5 mm.
Before epilating, thoroughly clean the respective area to remove residues (like
deodorant). Then carefully dab dry with a towel. When epilating the underarm, keep your arm raised up so that the skin is stretched and guide the appliance in different directions. As skin may be more sensitive directly after epilation, avoid using irritating substances such as deodorants with alcohol.
5 Facial epilation
With the precision head (9) attached, your Silk-épil is perfectly suited for conveniently removing any unwanted hair from the face or other sensitive areas.
Prior to epilation, we recommend cleaning the skin with alcohol to promote good hygiene.
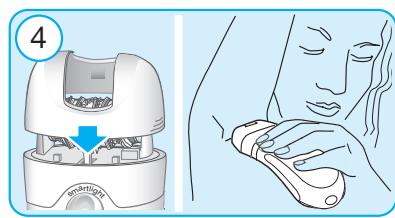
When epilating the face, stretch the skin with one hand and slowly guide the epilator with your other hand the direction of the switch.
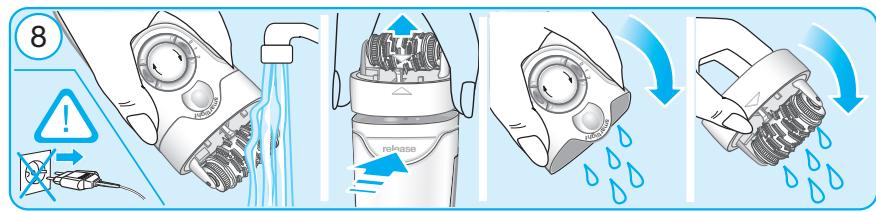
Cleaning the epilation head
Before cleaning, unplug the appliance. Regular cleaning ensures better performance.
Brush cleaning:
6 Remove the cap and brush it out.
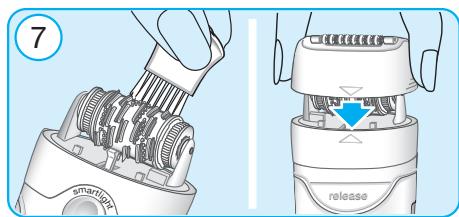
7 Thoroughly clean the tweezers from the rear side of the epilator head with the brush dipped into alcohol. While doing so, turn the tweezer element manually. This cleaning method ensures best hygienic conditions for the epilation head.
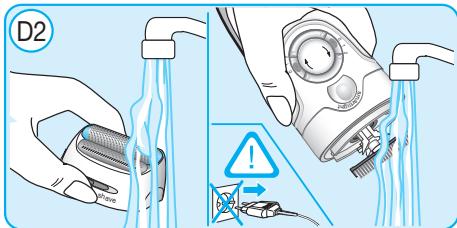
Cleaning under running water:
8 Remove the cap. Hold the appliance with the epilation head under running water. Then press the release button (6) to remove the epilation head (2). Thoroughly shake both, the epilation head and the appliance to make sure that
remaining water can drip out. Leave both parts to dry. Before reattaching, make sure that they are completely dry.
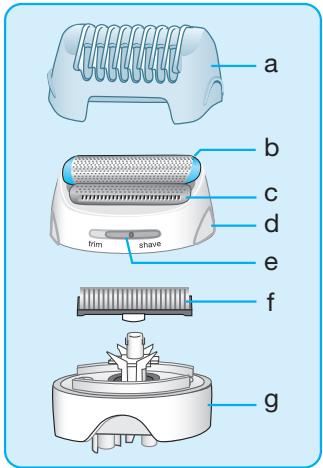
B Using the shaver head attachment
a OptiTrim comb
b Shaver foil
c Trimmer
d Release buttons
e Trim/shave selector
f Cutter block
g Shaver head base
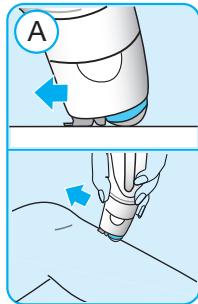
Shaving
- Put on the shaver head attachment (10) by clicking it in.
- Pressing one of the lock keys, turn the switch clockwise to setting 2.
- Make sure the trim/shave selector is in the «shave» position.
- For best results, always make sure that both, the shaver foil (b) and the trimmer (c) are in contact with the skin (A). Keeping your skin stretched (B), slowly move the appliance against the direction of hair growth. The trimmer first raises all long hairs and cuts them off. Then the flexible foil follows to smooth away any stubble.
- When shaving or trimming in sensitive areas, make sure that you always keep your skin stretched to avoid injuries.
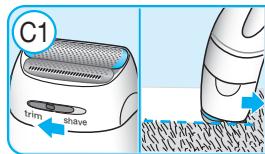
Contour trimming
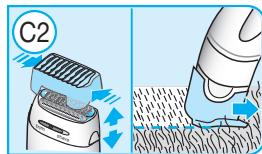
For trimming precise line and contours, lock the long hair trimmer by sliding the trim/ shave selector (e) to the position «trim» (C1).
Pre-cutting hair for epilation
If you choose to pre-cut your hair to the ideal length for epilation, place the OptiTrim comb
(a) onto the shaver head. Slide the trim/shave selector to the «trim» position.
Hold the appliance with the OptiTrim comb lying flat on the skin. Guide it with the comb tips against the hair growth as shown in illustration C2.
N.B. As hair does not always grow in the same direction, also guide the appliance slightly diagonally or in different directions in order to achieve best results.
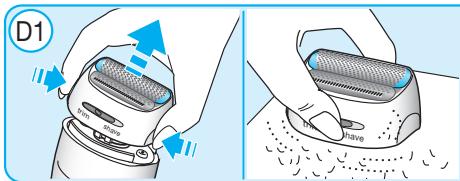
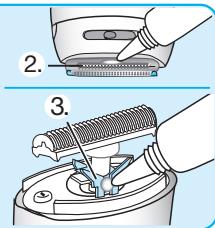
Cleaning the shaver head
After each use, unplug the appliance.
Brush cleaning
- Press the release buttons (d) to remove the shaver head (D1). Tap the bottom of the shaver head gently on a flat surface (not on the foil).
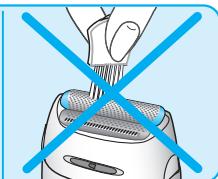
- Brush out the cutter block and the inside of the shaver head. However, do not clean the shaver foil with the brush as this may damage the foil.
Cleaning with water
Press the release buttons (d) to remove the shaver head. Rinse the shaver head and the cutter block separately under running water (D2). Leave the cutter block and the foil frame to dry separately before reattaching them.
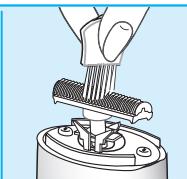
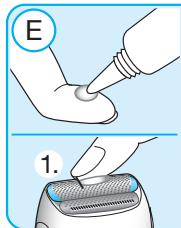
Keeping your shaver head attachment in top shape
- The shaving parts need to be lubricated regularly every 3 months (E). If you clean the shaver head under running water, please lubricate it after every cleaning.
-
Apply some light machine oil or vaseline to the shaver foil and the metal parts of the long hair trimmer. Then remove the shaver head and also apply a tiny amount of vaseline as shown in picture section (E).
-
The shaver foil and the cutter block are precision parts that wear out with time. To maintain optimum shaving performance, replace your foil and cutter block when you notice a reduced shaving performance.
- Do not shave with a damaged foil or cord.
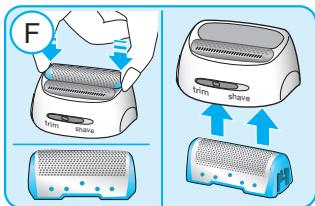
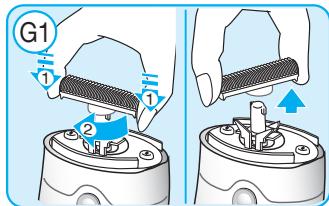
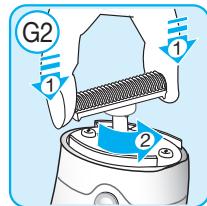
How to replace the shaving parts
Shaver foil: Press the release buttons to remove the shaver head. To remove the shaver foil, press the foil frame (F). To mount a new one, insert it from inside the shaver head.
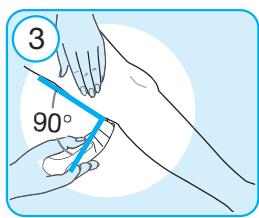
Cutter block: To remove the cutter block, press and turn it 90^ (G1), then take it off. To put on a new cutter block, press it onto the cutter block holder and turn 90^ (G2).
Replacements parts (shaver foil, cutter block) can be obtained from your retailer or Braun Customer Service Centres.
Environmental notice
This product contains rechargeable batteries. In the interest of protecting the environment, please do not dispose of the product in the
household waste at the end of its useful life. Disposal can take place at a Braun Service Centre or at appropriate collection points provided in your country.
For electric specifications, please see printing on the special cord set. The special cord set automatically adapts to any worldwide AC voltage.
Subject to change without notice.
This product conforms to the European Directives EMC 2004/108/EC and Low Voltage 2006/95/EC.

Guarantee
We grant 2 years guarantee on the product commencing on the date of purchase. Within the guarantee period we will eliminate, free of charge, any defects in the appliance resulting from faults in materials or workmanship, either by repairing or replacing the complete appliance as we may choose.
This guarantee extends to every country where this appliance is supplied by Braun or its appointed distributor.
This guarantee does not cover: damage due to improper use, normal wear or use as well as defects that have a negligible effect on the value or operation of the appliance.
The guarantee becomes void if repairs are undertaken by unauthorised persons and if original Braun parts are not used.
To obtain service within the guarantee period, hand in or send the complete appliance with your sales receipt to an authorised Braun Customer Service Centre.
For UK only:
This guarantee in no way affects your rights under statutory law.
François
trconsumers@custhelp.com
Country of origin: Germany
Year of manufacture
To determine the year of manufacture, refer to the 3-digit production code located in the socket.
The first digit of the production code refers to the last digit of the year of manufacture. The next two digits refer to the calendar week in the year of manufacture.
Example: "745" - The product was manufactured in week 45 of 2007.
L
zhi
glgolbal yll alba lo gnilal aiin ai jai
.
palej jai jia jia jia jia jia jia jia jia jia
12000000000000000000000000000000000000000000
Cull
llll lglgbsbll s jilai aii yjySlllalall .slll alil g i 15i0i0i0i0i0i0i0i0i0i0i0i0i0i0i0i0i0i0i0i0i0i0i0i0i0i0i0i0i0i0i0i0i0i0i0i0i0i0i0i0i0i0i0i0i0i0i0i0i0i0i
四边形 AOBC 为正方形

1dololol wai gao [aio] jaoi gaojia 2: iia
g a 1 g b d alal a 121 1
glulal jn aaii
a
JusaiiUs 15 20 24 30
sally jolly aabii
aal (d)
J 1.
(1)
(雅典)
aJ 1 aJ 1 aJ 1 aJ 1
aai jai 1 sly. aljell aaiy
a 1
oolyol
dall j (d) dall j
i j 1jaiia aai oaiy aai i
aill j. (D2 k)
oic! jai jai aia liq gai dai jai jai jai
logii
g aal j uuiuuljuaa
.(Shave)
55 1 taiy g sxti jilil jie jia
(c) 与(b)a
aJy.(AJll)Lai Jy jia
(1) an = 1 - bn
e 2
aaiy
a aal
aocci j
Jslal jaiil 1 aLao
iijii jiiil iie [a]
jz jz jz jz jz jz jz jz
yolall yll
8
gaiiiaai iai jaiaiaiaiaiaiaiai
(6)
1 1
Jzj j 1
Lagii i 1i logilai pai jg S
galal aal
B
a
S OBC = S COD + S BOC - S BOC
C
Jill jrrj d
aal 1
(Trim/Shave)
aillj
aalw y sclg g
a
.(10)
y
2.aiee aiee eae aee aee
a 1 1 1 1 1 1 1 1 1 1 1 1 1 1 1 1 1 1 1 1 1 1 1 1 1 1 1 1 1 1 1 1 1 1 1 1 1 1 1 1 1
4gj 5
aJn jS (9) qall jzll gj zI r 1
yge yll all jy Lolai aWlaio Jlal ll
aWulll nSloA,4g AGL
.5j
1230000000000000000000000000000000000000000000000000000000000000000000000000000000000
J 1 J 1 J 1 J 1 J 1 J 1 J 1 J 1
jol jll 6
jol jll
jol jll
jol jll
jol jll
j 1234567890123456789012345678901234567890123456789012345678901234567890123456789012345678901234567890123456789
13 3
aJy jai Jai jai jai jai jai jai jai jai jai jai jai jai jai jai jai jai jai jai jai jai jai jai jai jai jai jai jai jai jai jai jai jai jai jai jai jai jai jai jai jai jai jai jai jai jai jai jai jai jai jai jai
auiuulll abllll g yj 4
auiuull lslal jn jz cjl p
. jz jil (8)
(2) jz jz r g yj
gaiy fai jz jy g ay slal
. jz jay fai jz jy
gji yiae ay baiy gaiy gl
pduuauus uyns qbiall oj n j yaiy
Jiiaaiy Jaiialdaiy yag .jki
Jgabj yaiy ai yj yajy
5-2 2yj yaiy
E ji yj yaiy abiall gaiy e ji yj
jiai yaiy all yj ydi yiai yaiy
abw yj yaiy liqni . (g jell ay jy jia
jill 2j
1
()
2 aee glll aeell lglc alil yall
jialaiee
(1) a : a ≤ b a : a ≤ b.
Laljraaay
aaiiiaai i 1
j 15s s jLs
Jus
2
jE jie daiy
Cilldly ailll
jllg jjw w jywrjwll
y
baa 1yaa aas
i 1
a 1
b_c = 1
jell eji jil Jaiinu
a a a a a a a a a a a a a a a
.
sli, jj jj jj jj jjj
-
-
-
-
-
-
-
-
-
-
-
-
-
-
-
-
-
-
-
-
-
-
-
- 4.
-
-
-
-
-
-
-
-
-
-
-
-
-
-
-
-
-
-
-
-
-
-
glcbiai jci j ci bc
Jall jg gaiiaj. jai j
.(6)
3
Jaa Joo 4
5a
5b
6
7
aolalil jslal jorjell 8
9
"10
#
J.
juaa g a jaeal p 1
J 1
aalalalalalalalalalalalalalalalalalalal
Jusac Jusac Jusac Jusac Jusac
1yj 1yj jyj yj yj
(5a)
jilll iae plaiie . jilll iae jair
jSaaie lae aagll jzgss
a 1000
.
(5b)
J 1
A
glll llll 100000000000000000000000
Eji aLac oJalld Jia yaiyaiy
.
jLaiie 1al jSjSjSjSj
jlll 151, plo 5-2 jn jil
jlaal glaal laa alall
e 1
J 1
y 12
Laa aalal alalal alalal alalal
.0jllcbwgljpeiill j
j_4 = a_1 + 2
sill j 1a
ai a ai 分母最小值为 k .
2
yI yI yI yI yI yI yI yI yI yI yI yI yI yI yI yI yI yI yI yI yI yI yI yI yI yI yI yI yI yI yI yI yI yI yI yI yI yI yI yI yI yI yI yI yI yI yI yI yI yI yI
J 1
J 1
J 1
J 1
J 1
J 1
J 1
J 1
J 1
J 1
J 1
J 1
J 1
J 1
J 1
J 1
J 1
J 1
J 1
J 1
J 1
J 1
J 1
J 1
J 1
J 1
J 100000000000000000000000000000000000000000000000000000000000000000000000000000
36 15
(8) aIaIaI JSLJI JJIeJIbIeJauuIaIaI JSLJgJgJUJIaJIaJIu
J 9) J 8
J 10
J 11
J 12
J 13
J 14
aill aall laiaa (10) aall w j
bi y jybl i laabio g ylll ylll
.
#
y all j 11
. . 11
a 11
j 11
g y 11
. 11
. 11
. 11
. 11
. 11
. 11
. 11
y 1
a j 1000000000000000000000000000000000000000000000000000000000000000000
.(Braun Silk-épil Xpressive)
aJyI piai Jia 1234567890101101234567890101234567890101234567890101234567890101234567890101234567890101234567890101234567890101234567890101
jLjLjLjLjLjLjLjLjLjLjLjLjLjLjLjLjLjLjLjLjLjLjLjLjLjLjLjLjLjLjLjLjLjLjLjLjLjLjLjLjLjLj
1
J (F)
J 1
a a a a a a a a a a a a a
(G1)
j 1
90 90
1J (jg a jgsa gao) S 12
S OBC = S COD + S BOC - S BOC
1 1
1
j 1
o 1
0
0
0
0
0
0
0
0
0
0
0
0
0
0
0
0
0
0
0
0
0
0
0
0
0
0
0
0
0
0
0
0
0
0
0
0
0
0
0
0
0
J 1 J 1 J 1 J 1 J 1 J 1 J 1 J 1 J 1 J 1 J 1 J 1 J 1 J 1 J 1 J 1 J 1 J 1 J 1 J 1 J 1 J 1 J 1 J 1 J 1 J 1 J 1 J 1 J 1 J 1 J 1 J 1 J 1 J 1 J
1 1
11
1
1
y
- S_ ACD = 12 · CD · AC = 12 × AC × 5
j j j j j j j j j j j j j j j j j j j j j j j j j j j j j j j j j j j j j j j j
000000000000000000000000000000000000000
aai aalba 1 Jlaia Jn
1
y 150
i j l a g o j j i jia jia jia jia jia jai jai
i 1
j(g)
40 j 1j 2j 4j 6j 8j 10j 12j
J 1
Sotlift SoftLift
2g 2g 2g 2g 2g 2g 2g
1 (1a)
Aa
Lai (1b)
yj 100
4yj j 1
15