CRUZER FACE - Electric mower BRAUN - Free user manual and instructions
Find the device manual for free CRUZER FACE BRAUN in PDF.
| Brand | BRAUN |
| Model | CRUZER FACE |
| Category | Electric Trimmer / Beard Shaver |
| Power source | Rechargeable battery, mains adapter included |
| Cordless run time | Approximately 30 minutes of shaving |
| Initial charge time | 4 hours |
| Normal charge time | 1 hour |
| Quick charge | 5 minutes for one shave |
| Shaving head | Flexible foil and cutter block |
| Rotary trimmer | Wide (28 mm) and narrow (14 mm) |
| Adjustable comb | 4 cutting lengths: 1.2 / 2.8 / 4.4 / 6 mm |
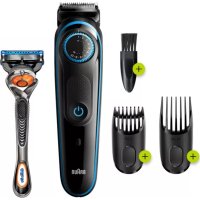
| Included accessories | 3-day stubble comb, adjustable comb, wide trimmer, narrow trimmer, cleaning brush |
| Cleaning | Shaving head washable under running hot water |
| Maintenance | Oil the trimmers once a week |
| Replacement parts | Foil and cutter block (ref. 10B) |
| Parts replacement | Every 18 months for optimal performance |
| Warranty | 2 years |
| Safety | Do not modify the adapter; keep out of reach of children |
Frequently Asked Questions - CRUZER FACE BRAUN
User questions about CRUZER FACE BRAUN
0 question about this device. Answer the ones you know or ask your own.
Ask a new question about this device
Download the instructions for your Electric mower in PDF format for free! Find your manual CRUZER FACE - BRAUN and take your electronic device back in hand. On this page are published all the documents necessary for the use of your device. CRUZER FACE by BRAUN.
USER MANUAL CRUZER FACE BRAUN
Our products are designed to meet the highest standards of quality, functionality and design. We hope you entirely enjoy your new Braun shaver.
Warning
Your shaver is provided with a special cord set with an integrated Safety Extra Low Voltage power supply. Do not exchange or manipulate any part of it. Otherwise there is risk of electric shock.
This appliance is not intended for use by children or persons with reduced physical, sensory or mental capabilities, unless they are given supervision by a person responsible for their safety. In general, we recommend that you keep the appliance out of reach of children. Children should be supervised to ensure that they do not play with the appliance.
For usage in other body areas, please make sure that the skin is stretched. For hygienic reasons, do not share this appliance with other persons.
Oil bottle
Keep out of reach of children. Do not swallow. Dispose of properly when empty.
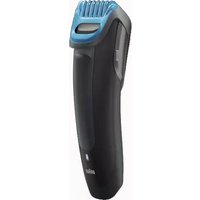
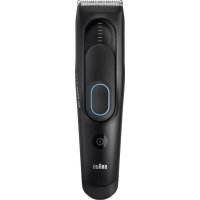
Description
1 3-day beard comb & protective cap
2 Shaver foil
3 Cutter block
4 Twistable trimmer
4a Wide trimmer (28 mm)
4b Narrow trimmer (14 mm)
5 Charging light
6 On/off switch
7 Adjustable comb
8 Beard length selector
9 Special cord set
Charging
The best environmental temperature for charging is between 15^ and 35^ . Do not expose the shaver to temperatures higher than 50^ for extended periods of time.
-
Using the special cord set, connect the shaver to an electrical outlet with the motor switched off.
-
When charging for the first time or when the shaver is not used for a few months, leave the shaver to charge continuously for 4 hours.
- The charging light (5) shows that the appliance is being charged. When the battery is fully charged, the charging light turns off. Intermittent blinking after a while indicates that the battery maintains its full capacity. This can also happen short term when charging after the battery was completely discharged.
- A full charge provides 30 minutes of cordless shaving time depending on your beard growth.
- Once the shaver is completely charged, discharge the shaver through normal use. Then recharge to full capacity. Subsequent charges will take about 1 hour.
- Maximum battery capacity will only be reached after several charging/ discharging cycles.
- 5-minute quick charge is sufficient for a shave.
Shaving
First, remove the adjustable comb (7): Using your thumbs, press against the side clips of the adjustable comb so that they swing off in the direction of the arrows (a). Activate the on/off switch (6). The floating foil frame automatically adapts to your skin surface for a close, smooth shave.
For best results:
Always shave before washing your face.
- At all times, hold the shaver at right angles (90^) to the skin (b).
- Stretch the skin and shave against the direction of beard growth.
- For pre-shaving after a few days of not having shaved, use the wide trimmer (4a) to pre-cut long hairs. For a close, smooth shave, finish with the foil.
- To maintain 100% shaving performance, replace your foil and cutter block at least every 18 months or when worn.
Style
Using the twistable trimmer
The wide trimmer (4a) evenly cuts and trims large areas (c). It is ideal for shaping sideburns, moustaches and partial short beards. The wide trimmer is provided with safety rips and a gliding strip for less irritation and easy gliding. Press the blue stripes to push up the twistable trimmer (4). While
stretching the skin, guide the wide trimmer against the direction of hair growth.
The narrow trimmer (4b) precisely defines lines and edges (d), being ideal for precise contouring.
To use the narrow trimmer, push up the twistable trimmer and turn it 180^ .
Frequent use of the twistable trimmer will reduce the battery capacity.
Trim
Using the trimming attachments (1) and (7)
Place the respective trimming attachment onto the shaver foil (2) alternatively on the twistable trimmer (4) and press it against the shaver housing until it snaps into place with a click (e).
3-day beard comb & protective cap (1): This attachment is perfectly suited for creating a stubble look and maintaining it.
- Place the attachment onto the foil (2) and push up the twistable trimmer (4). Turn on the shaver and use the appliance as shown in the illustration (e). The attachment ensures an optimum usage angle.
Adjustable comb (7): This attachment is ideal for beard trimming and keeping it at a constant length.
- Place the attachment onto the shaver foil (2) and set desired beard length. Press beard length selector (8) and slide it up (f) (possible length settings from top to bottom: 1.2 mm / 2.8 mm / 4.4 mm / 6 mm ). Push up the twistable trimmer (4).
- Press the on/off switch and trim against hair growth by guiding the transparent comb part over the skin (f).
Cleaning

The shaver head is suitable for cleaning under running tap water. Warning: Detach the shaver from the power supply before cleaning the shaver head in water.
Regular cleaning ensures better shaving performance. Rinsing the shaving head after each shave under running water is an easy and fast way to keep it clean:
-
Switch the shaver on (cordless) and rinse the shaving head under hot running water (g). You may use liquid soap without abrasive substances. Rinse off all foam and let the shaver run for a few more seconds.
-
Next, switch off the shaver, remove the shaver foil and the cutter block. Then leave the disassembled shaving parts to dry.
- If you regularly clean the shaver under water, then once a week apply a drop of light machine oil onto the trimmers (4a, 4b) and shaver foil (h).
Alternatively, you may clean the shaver using the brush provided (i):
- Switch off the shaver. Remove the shaver foil.
- Using the brush, clean the cutter block and the inner area of the shaver head. However, do not clean the shaver foil with the brush as this may damage the foil.
Keeping your shaver in top shape
Replacing the shaving parts
To maintain 100% shaving performance, replace your foil and cutter block at least every 18 months or when worn. Change both parts at the same time for a closer shave with less skin irritation. (Shaver foil and cutter block: 10B)
Preserving the batteries
In order to maintain the optimum capacity of the rechargeable batteries, the shaver has to be fully discharged (by shaving) every 6 months approximately. Then recharge the shaver to full capacity.
Environmental notice
This product contains rechargeable batteries. In the interest of protecting the environment, please do not dispose of the product in the household waste at the end of its useful life. Disposal can take place at a Braun Service Centre or at appropriate collection points provided in your country.
Subject to change without notice.
For electric specifications, see printing on the special cord set.

Guarantee
We grant a 2 year guarantee on the product commencing on the date of purchase. Within the guarantee period we will eliminate any defects in the appliance resulting from faults in materials or workmanship, free of charge either by repairing or replacing the complete appliance at our discretion. This guarantee extends to every country where this appliance is supplied by Braun or its appointed distributor.
This guarantee does not cover: damage due to improper use, normal wear or use as well as defects that have a negligible effect on the value or operation of the appliance.
The guarantee becomes void if repairs are undertaken by unauthorised persons and if original Braun parts are not used.
To obtain service within the guarantee period, hand in or send the complete appliance with your sales receipt to an authorised Braun Customer Service Centre (address information available online at www.service.braun.com).
For UK only:
This guarantee in no way affects your rights under statutory law.
For Australia only:
Warranty
We grant a 24 Month Replacement Warranty on this appliance commencing on the date of purchase.
This warranty applies in all States and Territories of Australia and in New Zealand and is in addition to any mandatory statutory obligations imposed on Procter & Gamble Australia Pty. Ltd., its distributors and its manufacturer. This express warranty does not purport to exclude, restrict or modify any such mandatory statutory obligations.
This warranty only covers defects in the appliance resulting from faults in workmanship or materials. Therefore, if your appliance becomes faulty as a result of faults in workmanship or materials, it will be exchanged by your retailer, on presentation of proof of purchase.
This warranty only applies to domestic or household use of this appliance and the warranty will only apply if the correct operating instructions included with this product have been followed. The warranty on any appliance replaced under this warranty ends on the expiry of the warranty period that applied to the original appliance.
This warranty does not cover:
A. Damage arising from improper use or operation on incorrect voltages.
B. Breakages to shaver foils, glass jars, etc.
C. Normal wear due to moving parts.
D. Repairs undertaken by unauthorised service personnel or use of non genuine parts.
E. Appliances that are outside the warranty period or are not faulty.
This appliance is not intended for use by young children or infirm persons without supervision. Young children should be supervised to ensure that they do not play with the appliance.
If the appliance is powered by a cord extension set or electrical portable outlet device these should be positioned so they are not subject to splashing or ingress of moisture.
To the extent permitted by the laws of the Commonwealth of Australia and New Zealand and applicable laws of a State or Territory of Australia, and subject to the second paragraph of this warranty above, this warranty is given in exchange for any other rights you may have against Procter & Gamble Australia Pty. Ltd. or its distributors or manufacturer, whether at law, in tort (including negligence), in equity or under statute.
Please retain proof of purchase of this appliance. If you have any questions in relation to this warranty, please call our Consumer Service line (see below for numbers).
Repairs and service
If you are sending your appliance for repair, please pack the appliance adequately and send it to your nearest Service Agent. For service or replacement parts refer to the authorised Service Agents listed overleaf. Local Service Agents may change from time to time – in that event please contact the Consumer Service free call number below for updated local service agent details.
Australian Consumer Service (free call): 1800641820
New Zealand Consumer Service (free call): 0 800 108 909

N2820
Australian & New Zealand Service Agents
VICTORIA & TASMANIA
Statewide Services Pty Ltd
trading as J A Appliances
17-19 Hossack Avenue
Coburg North, VIC 3058
Tel. (03) 8371 9100
Fax. (03) 9355 8644
Email: jaappliances@
statewideservices.com.au
QUEENSLAND
Walters Import trading as
Brisbane Appliance Service Centre
449 Beaudesert Road
Moorooka
QLD 4105
Tel. (07) 3277 0360
Fax. (07) 3274 2909
Email: basc@waltersimport.com.au
WESTERN AUSTRALIA
Mark 1 Appliances
Unit 1, 46 Abernethy Road
Belmont, WA 6104
Tel. (08) 9475 0911
Fax. (08) 9475 0922
Email: mark1app@iinet.net.au
NEW SOUTH WALES & ACT
Faulder Appliance Services Pty Ltd
Shop 4, 9 Evans Road,
Rooty Hill, NSW 2766
Tel. (02) 9625 3064
Fax. (02) 9625 3037
Email: fas16@bigpond.com
SOUTH AUSTRALIA & NT
Adelaide Service Centre
Shop B2,
Parkholme Shopping Centre
319 Oaklands Road, Parkholme
Adelaide, SA 5043
Tel. (08) 8357 5800
Fax. (08) 8357 5833
Email: ascpkh@adam.com.au
NEW ZEALAND
Key Service Ltd
7D Echelon Place
East Tamaki
Manukau City
Auckland
New Zealand
(PO Box 38569, Howick, Auckland, New Zealand)
Tel. (09) 916 0960
Fax. (09) 916 0970
Email: key-service-ltd@xtra.co.nz
François
trconsumers@custhelp.com


Eλληνικά
Ta npoiovta mac kataokvauocovtai eto wote va npouv tic uynlntepec npodiaypapec noiotmtac, aleitoupikotntac kalxiediaouou. Eanizoue va oac ikavonoioei anoluta n kaivoupi oc xupiotikn unxavn Braun.
Ppoox
H Eupiotikn oac mnxavn diathetai eiko kaawioe v npoxn peuatox qanlnc taon yia aopalvia. th npetie va npobetae tntv alayn n troponoin on ooiouhnoite mepoc tou. dapoxkivduoc nektponlneiaoc
Autn n ouokeuñ δev npoopiζεtai yia xρησn ano naiδiá n atouma μe μειωévec ωμatikεç n diavontikεc iakovotntεc, ektoc av επιβλεπovtai ano atopo uτeúθuvo yi tny aφαλεiá touc. Γεviá, ouviοτouμε va kpatáte tvv ouokeuñ μakpiá ano naiδiá. Ta naiδiá πpêπεi va εποπteúovtai yia va εξαφαλiζεtai oti δev naiζouv μe tn ouokeuñ.
Tia n xpnon oe alaee c npioxec ouataw, npakaaw oiyoupute ot to depa a Tevtowetai.
Iia loyouc uyivnc, mnu oipacote autn tm ouokueun e alaa atoia.
Aaδi
KpatnoTe to paKpia ano naiDi. Mny to kataniVe. Anoppiye To oWoTa otav aElaeI.