
SBS-TWB-100 - Bain-marie STEINBERG - Free user manual and instructions
Find the device manual for free SBS-TWB-100 STEINBERG in PDF.


| Product Type | Soundbar |
| Model | SBS-TWB-100 |
| Brand | Steinberg |
| Dimensions (W x H x D) | 800 x 60 x 100 mm |
| Weight | 2.5 kg |
| Power Supply | AC 100-240 V, 50/60 Hz |
| Output Power | 100 W RMS |
| Connectivity | Bluetooth 5.0, USB, 3.5 mm auxiliary input |
| Main Functions | Bluetooth playback, USB MP3, FM radio, remote control |
| Maintenance and Cleaning | Clean with a soft dry cloth. Do not use abrasive products. |
| Safety | Unplug the device before cleaning. Do not expose to moisture. |
| Spare Parts and Repairability | Contact Steinberg after-sales service for replacement parts. |
| General Information | Indoor use only. Operating temperature: 5°C to 35°C. |
Frequently Asked Questions - SBS-TWB-100 STEINBERG
User questions about SBS-TWB-100 STEINBERG
0 question about this device. Answer the ones you know or ask your own.
Ask a new question about this device
Download the instructions for your Bain-marie in PDF format for free! Find your manual SBS-TWB-100 - STEINBERG and take your electronic device back in hand. On this page are published all the documents necessary for the use of your device. SBS-TWB-100 by STEINBERG.
USER MANUAL SBS-TWB-100 STEINBERG

This User Manual has been translated for your convenience using machine translation. Reasonable efforts have been made to provide an accurate translation; however, no automated translation is perfect nor is it intended to replace human translators. The official User Manual is the English version. Any discrepancies or differences created in the translation are not binding and have no legal effect for compliance or enforcement purposes. If any questions arise related to the accuracy of the information contained in the User Manual, please refer to the English version of those contents which is the official version.
Technical data
| Parameter description | Parameter value |
| Product name | Water bath |
| Model | SBS-TWB-100 |
| Rated voltage [V~] / frequency [Hz] | 230 / 50 |
| Rated power [W] | 800 |
| Protection class | I |
| Dimensions [width x depth x height; mm] | 400 x 280 x 200 |
| Weight [kg] | 3.9 |
| Temperature range [°C] | 5-100 |
| Capacity [L] | 9 |
| Inside chamber dimensions [width x depth x height; mm] | 280 x 220 x 150 |
Working conditions
- Ambient temperature ranges between 5~40°C. • Relative humidity less than 85%.
- Place it on a stable, flat and heatproof surface • No violent vibration and corrosive gases near the equipment.
Starting
- Plug the power cord to a suitable mains that meets the power requirements.
- Before use, add 50 mm water until it reaches the level above the clapboard, then turn on the power switch (it lights on) and set the desired working parameters. It is not allowed to heat-up with insufficient water!
- During use, do not touch the heating pipe by your hands to avoid being scalded.
- After use, immediately discharge the water from the product, dry it and keep it clean in order to extend product service life.
Control panel description

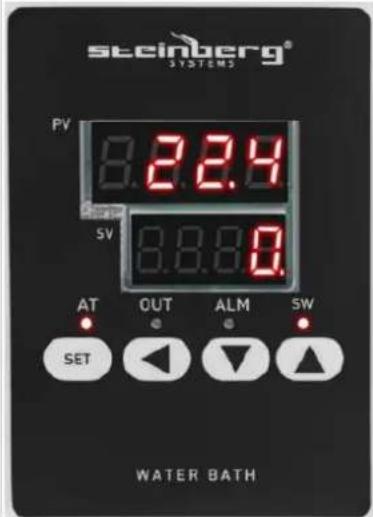
• "PV" – temperature display - "SV" – timer display - "RUN/AT" – working status light indicator (when working the indicator is lighting; during auto tuning, the light indicator is flashing) - "OUT" – heating light indicator (it is lighting when the device is heating) - "ALM" – overtemperature alarm indicator (it lights when the temperature is too high) - "SW" – low water warning level indicator (it lights when the water level is low)
Operation
1) When the device is being switched on, display shows the version number and the temperature range value for 3 seconds, then it starts running. 2) “◀” button: In the setting state, click this button to shift the set value. 3) “▼” button: In the setting state, click the button to decrease the set value. If this button is pressed and hold, the value will decrease continuously. 4) "▲" button: In the setting status, click the button to increase the set value. If this button is pressed and hold, the value will increase continuously. 5) In setting mode, If no button is being pressed within 60 seconds, than the device will automatically return to normal operation state. 6) Temperature and time setting
a) Timer function off:
- Press the "SET" button in the non-set state, the display shows the prompt "SP" and the set temperature value.
- Using the "SHIFT", "DEC" and "INC" buttons, the user can modify the settings to the desired value, then pressing the "SET" button again will return the device to the normal display - the set value will be saved automatically.
b) Timer function on:
- Press the "SET" button in the non-set state, the display shows the prompt "SP" and the set temperature value. Pressing the "SET" button again, the display shows the prompt "ST" and the set time value.
- Press the "SET" button again and the device will return to the normal display, the setting value will be saved automatically.
c) When the set time is "0", it means that the timer is deactivated and the device will run continuously. If the time is set, the lower display will show the set temperature value or the running time. When displaying the running time, the unit decimal point is lit – it starts counting down when the measured temperature reaches the set value. When the runtime is over, the lower display shows "End" and the buzzer will sound for 60 seconds (it can be muted by pressing any button). Press the "RST" button for 3 seconds at this time and the device will restart.
d) When over-temperature alarm triggers, the buzzer beeps continuously and the "ALM" warning indicator light is lit. When the buzzer sounds, press any key to mute.
e) If the upper display shows "----", the temperature sensor has a failure and the device needs to be checked by a service technician.
7) Auto-tuning
In the non-set state, press the "AT" button for 6 seconds and the device will run the auto-tuning program, the "AT" indicator light flashes. After the auto-tuning is set, the indicator light stops flashing and the parameter value is saved automatically. In the auto-tuning process, pressing the "AT" button for an additional 6 seconds will stop the auto-tuning program. In the auto-tuning process, the "SET" button is invalid and the lower display shows the set temperature value.
Troubleshooting
| Problem | Possible cause | Solution |
| No power supply | 1. Bad contact between plug and socket.2. Burnt fuse. | 1. Replace the plug or socket tube.2. Replace the fuse with a new one in the same specification. |
| No temp. rise | 1. The temp. Controller is broken2. The sensor is broken3. The set temperature is lower than water temperature4. The heating pipe is burnt | 1. Replace the instrument2. Replace the sensor3. Reset the temperature4. Replace the heating pipe |
| The big difference between display temp. and actual temp. | 1. The temp. controller2. The temp. sensor is broken. | 1. Replace the temp. controller2. Replace the temp. sensor. |


• "PV" - temperature display - "SV" - timer display - "RUN/AT" - indicator light for working status (when working, the indicator lights up; during auto-tuning, the indicator light blinks) - "OUT" - indicator for heating lamp (it lights up when the device is heating) - "ALM" - alarm indicator for over-temperature (it lights up when the temperature is too high) - "SW" - warning indicator for low water level (it lights up when the water level is low)
Handling


• "PV" – temperature display - "SV" – timer display - "RUN/AT" – indicator light for working status (when working, the indicator lights up; during auto-tuning, the indicator light blinks) - "OUT" – heating lamp indicator (it lights up when the device is heating) - "ALM" – alarm indicator for over-temperature (it lights up when the temperature is too high) - "SW" - indicator for low water level (it lights up when the water level is low)
Use
1) When the device is turned on, the display shows the version number and the temperature range value for 3 seconds, then it starts operating. 2) "◀" button: In the setting state, click this button to change the set value. 3) "▼" button: In the setting state, click the button to decrease the set value. If this button is pressed and held, the value will decrease continuously. 4) "▲" button: In the setting state, click the button to increase the set value. If this button is pressed and held, the value will increase continuously. 5) In setting mode, if no button is pressed within 60 seconds, the device will automatically return to normal operating state. 6) Temperature and time setting


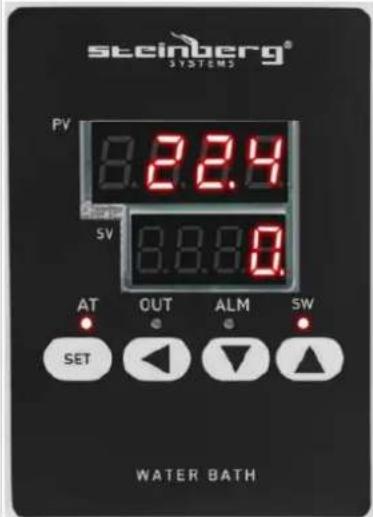


• "PV" – temperature display
For the disposal of the device please consider and act according to the national and local rules and regulations.
CONTACT
expondo Polska sp. z o.o. sp. k.

Brand : STEINBERG
Model : SBS-TWB-100
Category : Bain-marie