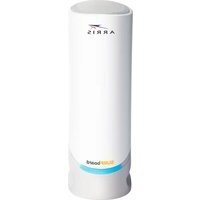
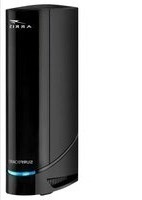
SURFboard S34 - Router Arris - Free user manual and instructions
Find the device manual for free SURFboard S34 Arris in PDF.


| Product Type | Cable Modem/Router (DOCSIS 3.1) |
| Brand | Arris |
| Model | SURFboard S34 |
| Dimensions (W x D x H) | 6.5 x 4.5 x 1.5 inches (16.5 x 11.4 x 3.8 cm) |
| Weight | 1.0 lb (0.45 kg) |
| Power Supply | 12V DC, 2.0A |
| Ethernet Ports | 1 x Gigabit Ethernet (RJ-45) |
| Coaxial Connector | 1 x F-type female |
| DOCSIS Version | 3.1 (backward compatible with 3.0) |
| Maximum Downstream Data Rate | Up to 1 Gbps |
| Maximum Upstream Data Rate | Up to 50 Mbps (3.0) or up to 100 Mbps (3.1 OFDMA) |
| Channel Bonding | 32x8 (DOCSIS 3.0), 2x2 OFDM (DOCSIS 3.1) |
| IPv6 Support | Yes |
| LED Indicators | Power, Downstream, Upstream, Online, Link |
| Operating Temperature | 32°F to 104°F (0°C to 40°C) |
| Humidity | 10% to 90% non-condensing |
| Compliance | FCC, IC, CE |
| Maintenance | Keep clean and dry; avoid dust and liquids |
| Safety | Use only the provided power adapter; disconnect during lightning storms |
| Spare Parts | Power adapter and Ethernet cable available separately |
| Repairability | Not user-serviceable; contact your service provider |
| Warranty | 1 year limited warranty |
Frequently Asked Questions - SURFboard S34 Arris
User questions about SURFboard S34 Arris
0 question about this device. Answer the ones you know or ask your own.
Ask a new question about this device
Download the instructions for your Router in PDF format for free! Find your manual SURFboard S34 - Arris and take your electronic device back in hand. On this page are published all the documents necessary for the use of your device. SURFboard S34 by Arris.
USER MANUAL SURFboard S34 Arris
BEFORE RETURNING THIS PRODUCT TO THE STORE for any reason, please visit www.arris.com/selfhelp for assistance.
Place the Product specific label here

Quick Start Card
© 2024 Vantiva USA, LLC. SURFboard and SURFboard logo are registered trademarks of Vantiva USA LLC. ARRIS and the ARRIS logo are registered trademarks of CommScope and used under license by Vantiva USA LLC. All rights reserved. Android, Google Play and the Google Play logo are trademarks of Google LLC. App Store and the Apple logo are trademarks of Apple Inc., registered in the U.S. and other countries.
SURFBOARD® Cable Modem

ARSVD01823-b
www.arris.com/selfhelp
1
Unbox the device; plug in the power cable (included) and a coax cable (not included).
SURFboard
cable modem

Use the first Ethernet port to connect your device. Note: If you have a second Ethernet port, contact your Internet Service Provider to activate.
From your Internet Service Provider
2
Download and install the SURFboard Central mobile app to set up and manage your device.


Scan to download the SURFboard Central mobile app
With the mobile app, you get:
- Step-by-step installation instructions
• Activation support for your specific service provider
• Automatic device registration for warranty
• Product documentation, Tech Support, and FAQs - Software License and Warranty information

SURFboard® Central
Need help? For product activation support, contact your Internet Service Provider directly.
Using Web Interface: After product activation, access your device by connecting an Ethernet cable between your desktop/laptop and your cable modem and then navigating to 192.168.100.1 in a Web browser.
Username: admin (case-sensitive)
Password: Last 8 digits of the Serial Number on your modem label
SURFBOARD®

natural_image
White and blue cylindrical device labeled 'ARRIS SURFBOARD' with a blue accent stripe (no additional text or symbols visible)Table of contents
Chapter 1: Safety and regulatory information.... 3
Important safety instructions....3
FCC statements....5
FCC interference statement....5
Caring for the environment by recycling your ARRIS equipment....6
Chapter 2: Introduction......7
In the box....7
Additional items needed (not included)....8
System requirements....8
Contact information....8
Chapter 3: Product overview....9
Front panel....9
Rear panel....10
Cable modem label.... 11
Chapter 4: Getting started....12
Setting up your cable modem using your client device (computer/laptop)....12
Chapter 5: Using your Web Manager.... 15
Start your Web Manager....15
S34 web manager screen options....18
Get help....19
Exit the S34 web manager....19
Chapter 6: Monitoring your cable modem and connected network...... 20
View the Downstream bonded channels....20
Restart your S34....21
Reset the S34 configuration settings....21
Chapter 7: Troubleshooting tips....23
Solutions....23
Safety and regulatory information
Read all safety and regulatory information before installing your cable modem and setting up your home network connection.
Important safety instructions
Read this before you begin — When using your equipment, basic safety precautions should always be followed to reduce the risk of fire, electric shock, and injury to persons, including the following:
- Read all of the instructions listed here and/or in the user manual before you operate this device. Give particular attention to all safety precautions. Retain the instructions for future reference.
This device must be installed and used in strict accordance with manufacturer's instructions, as described in the user documentation that is included with the device.
■ Comply with all warning and caution statements in the instructions. Observe all warning and caution symbols that are affixed to this device.
■ To prevent fire or shock hazard, do not expose this device to rain or moisture. The device must not be exposed to dripping or splashing. Do not place objects filled with liquids, such as vases, on the device.
This device was qualified under test conditions that included the use of the supplied cables between system components. To ensure regulatory and safety compliance, use only the provided power and interface cables and install them properly.
■ Different types of cord sets may be used for connections to the main POWER supply circuit. Use only a main line cord that complies with all applicable device safety requirements of the country of use.
■ Installation of this device must be in accordance with national wiring codes and conform to local regulations. - Operate this device only from the type of power source indicated on the device's marking label. If you are not sure of the type of power supplied to your home, consult your dealer or local power company.
- Do not overload outlets or extension cords, as this can result in a risk of fire or electric shock. Overloaded electrical outlets, extension cords, frayed power cords, damaged or cracked wire insulation, and broken plugs are dangerous. They may result in a shock or fire hazard.
■ Route power supply cords so that they are not likely to be walked on or pinched by items placed upon or against them. Pay particular attention to cords where they are attached
to plugs and convenience receptacles and examine the point where they exit from the device.
- Place this device in a location that is close enough to an electrical outlet to accommodate the length of the power cord.
■ Place the device to allow for easy access when disconnecting the power cord of the device from the electrical wall outlet. - Do not connect the plug into an extension cord, receptacle, or other outlet unless the plug can be fully inserted with no part of the blades exposed.
■ Place this device on a stable surface. - Avoid damaging the device with static by touching the coaxial cable when it is attached to the earth-grounded coaxial cable-TV wall outlet.
■ Always first touch the coaxial cable connector on the device when disconnecting or reconnecting the Ethernet cable from the device or user's PC.
It is recommended that the customer install an electrical surge protector in the electrical outlet to which this device is connected. This is to avoid damaging the device by local lightning strikes and other electrical surges.
■ Postpone installation until there is no risk of thunderstorm or lightning activity in the area.
■ Do not use this product near water: for example, near a bathtub, washbowl, kitchen sink or laundry tub, in a wet basement, or near a swimming pool.
■ Do not cover the device or block the airflow to the device with any other objects. Keep the device away from excessive heat and humidity and keep the device free from vibration and dust.
■ Wipe the device with a clean, dry cloth. Never use cleaning fluid or similar chemicals. Do not spray cleaners directly on the device or use forced air to remove dust.
■ For added protection, unplug the device from the wall outlet and disconnect the cables to avoid damage to this device during lightning activity or power surges.
■ Upon completion of any service or repairs to this device, ask the service technician to perform safety checks to determine that the device is in safe operating condition.
■ Do not open the device. Do not perform any servicing other than that contained in the installation and troubleshooting instructions. Refer all servicing to qualified service personnel.
■ This device should not be used in an environment that exceeds 104^ F ( 40^ C)
SAVE THE ABOVE INSTRUCTIONS
Note to CATV System Installer — This reminder is provided to call the CATV system installer's attention to Article 820.93 and 820.100 of the National Electric Code, which provides guidelines for proper grounding and specifies that the Coaxial cable shield shall be connected to the grounding system of the building, as close to the point of cable entry as practical.
FCC statements
FCC interference statement
This equipment has been tested and found to comply with the limits for a Class B digital device, pursuant to part 15 of the FCC Rules. These limits are designed to provide reasonable protection against harmful interference in a residential environment. This equipment generates, uses, and can radiate radio frequency energy and, if not installed and used in accordance with the instructions, may cause harmful interference to radio communications. However, there is no guarantee that interference will not occur in a particular installation. If this equipment does cause harmful interference to radio or television reception, which can be determined by turning the device off and on, the user is encouraged to try to correct the interference by one or more of the following measures:
■ Reorient or relocate the receiving antenna.
■ Increase the separation between the device and receiver.
■ Connect the equipment into an outlet on a circuit different from that to which the receiver is connected.
- Consult the dealer or an experienced radio/TV technician for help.
This device complies with Part 15 of the FCC Rules. Operation is subject to the following two conditions: (1) This device may not cause harmful interference, and (2) This device must accept any interference received, including interference that may cause undesired operation.
FCC Caution: Any changes or modifications not expressly approved by ARRIS for compliance could void the user's authority to operate the equipment.
FCC radiation exposure statement
This equipment complies with FCC radiation exposure limits set forth for an uncontrolled environment. To comply with the FCC RF exposure compliance requirements, the separation distance between the antenna and any person's body (including hands, wrists, feet and ankles) must be at least 8 inches (20.3 centimeters).
This transmitter must not be co-located or operating in conjunction with any other antenna or transmitter except those already approved in this filing.
The availability of some specific channels and/or operational frequency bands are country dependent and are firmware programmed at the factory to match the intended destinations. The firmware setting is not accessible by the end user.
Caring for the environment by recycling your ARRIS equipment
Please do not dispose of this product with your residential or commercial waste. Some countries or regions, such as the European Union, have set up systems to collect and recycle electrical and electronic waste items.
Contact your local authorities for information about practices established for your region. For additional information, please visit the ARRIS Support website: www.arris.com/selfhelp.
Introduction
The ARRIS SURFboard ^® S34 DOCSIS 3.1 cable modem provides ultra high-speed internet access over the broadband connection on your home or small business network. You use your S34 to directly connect a computer or router to your LAN through an Ethernet connection.
This guide provides instructions for installing and setting up your S34 to get it connected on your home or small business network; as well as viewing and monitoring the S34 operational status and network configuration settings.
In the box
Before installing your S34, check that the following items are included in the box. If any items are missing, please visit the ARRIS Support website: http://www.arris.com/selfhelp.
S34 package contents
Item Description
S34 cable modem DOCSIS 3.1 cable modem

Power supply Power adapter for an electrical wall outlet connection.
Quick start guide

Provides instructions for installing the cable modem and setting up your home network connection.
Additional items needed (not included)
The following items are not included in the box and must be purchased separately, if needed.
■ Coaxial (coax) cable - if one is not already connected to a cable wall outlet
■ RF splitter – for additional coaxial cable connections, such as a set-top box or Smart TV
- Ethernet cable – for any wired connected device(s)
System requirements
■ High-speed internet access account
■ Web browser access – Microsoft Edge, Google Chrome, Firefox, or Safari
■ Compatible operating systems:
- Windows ^® 10
- Windows 8
- Windows 7 Service Pack 1 (SP1)

Note: Although older versions of Microsoft Windows operating systems are no longer specifically supported, they should still function with your S34.
- Macintosh ^® 10.4 or higher
- UNIX ^®
- Linux ^®
Contact information
For customer service, technical support, and additional ARRIS product information:
■ Visit the ARRIS Support website: www.arris.com/selfhelp
Product overview
Front panel
There is only one LED bar on the S34 front panel. It is located beneath the SURFboard logo on the front of the S34.

natural_image
White cylindrical device labeled 'ARRIS SURFBOARD' with a blue accent, no visible text or symbols beyond brandingS34 front view
S34 front panel LED status indicator
| LED color Description | |
| Amber (solid) Power on/off status | |
| Amber (flash) Firmware download is in progress | |
| Green (blink) Downstream/upstream channel search (unlock status) | |
| Green (solid) Online status in DOCSIS 3.0 mode | |
| Blue (solid) Online status in DOCSIS 3.1 mode | |
| Blue & Green (alternating flash) | Error mode |
Rear panel

S34 rear view
S34 rear panel ports & connectors
| Port name | Description |
 ETHERNET ETHERNET | 1 GE and 2.5 GE Ethernet ports for RJ-45 network cable connections:Green: LED indicates a GigE data connection is madeAmber: LED indicates a 10/100 Mbps data connection is made |
 CABLE CABLE | Coaxial cable connector |
 POWER POWER | +12 VDC Power connectorWarning: To avoid any damage to your S34, only use the power supply provided in the box. |
| Reset button | Reset button located on the bottom of your S34 can be used to either restart your S34 or reset the S34 configuration settings. See the following for more information.Restart your S34 (page 21)Reset the S34 configuration settings (page 21) |
Cable modem label
The cable modem label is located on the bottom of your S34. It contains the cable modem information that you may need when contacting your service provider or ARRIS Technical Support.
To receive internet service, contact your service provider for assistance. You may have to provide the following information listed on the label. Please include the entire Model Name value to the service provider.
■ Cable modem Model Name
■ Cable modem Serial Number
■ Cable modem MAC Address (HFC MAC ID)
Getting started

CAUTION: This product is for indoor use only. Do not route the Ethernet cable(s) outside of the building. Exposure of the cables to lightning could create a safety hazard and damage the product.
Some screenshots throughout this chapter may contain images of a model different that your own, these are simply examples and the app on your mobile device should represent the model you are configuring.
You can set up your cable modem in one of the following ways.
■ Using the Surfboard Central app (SBC app): It is recommended that you install and set up your cable modem using the SBC app. For details on how to set up, refer to the SURFboard Central User Guide for Cable Modems available on the http://www.arris.com/selfhelp.
■ Using client device (laptop/desktop): If you are using your client device (laptop/Desktop) with a wired Ethernet connection, then see Setting up your cable modem using your client device (computer/laptop) (page 12).
Setting up your cable modem using your client device (computer/laptop)
To set up your cable modem using your client device (laptop/computer):
■ Contact your service provider or a local cable company to make sure broadband cable service is available in your area.

Note: When contacting your service provider, you will need the information listed on the label on the bottom of your cable modem. For more information, see Cable modem label (page 11).
- Choose a location in your home where your cable modem and computer will be near existing cable and electrical wall outlets.
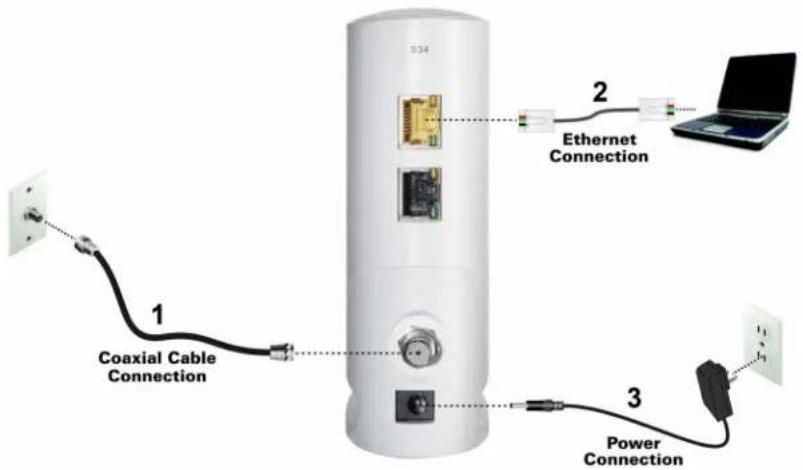
S34 connection diagram
-
Check that a coaxial cable is already connected to a cable wall outlet or RF splitter (not included).
-
Connect the other end of the coaxial cable to the Cable connector on the rear of your S34.
Use your hand to tighten the connectors to avoid damaging them.
-
Connect an Ethernet cable to the 2.5 GE Ethernet port on the rear of your cable modem.
-
Connect the other end of the Ethernet cable to an available Ethernet port on your computer, laptop, or router.
Optional: Repeat steps 3 and 4 for an additional client device or other network-enabled device that you want to install as a wired connection on your home network.

Note: Your service provider may not support activation of the second Ethernet port or may require an additional fee for use. Contact your service provider for more information.
-
Connect the power supply to the Power port on the rear of your cable modem.
-
Plug the other end of the power supply into an electrical wall outlet that is not controlled by a wall switch.

Note: Your cable modem automatically powers ON. The LED on the front panel may take up to 15 seconds to light up after the power is connected.
# To establish Internet connection:

Note:
Although your computer or laptop may be configured to automatically access the internet, you should still perform the following cable modem connectivity test to check that your cable modem and computer or laptop are connected on your home network.
-
Power ON your computer or laptop connected to your cable modem, if it is turned off; then log on.
-
Check that the front panel LED on your cable modem lights up.
-
Contact your service provider to activate your cable modem.
You may have to provide the HFC MAC ID listed on your cable modem label.

Note: Your service provider may allow for automatic activation which will automatically launch their special website on your computer or laptop when you open a web browser.
- To activate your internet service, select your service provider's activation web site:
Comcast/Xfinity: https://xfinity.com/activate
Cox: https://www.cox.com/activate
Spectrum: https://spectrum.net/selfinstall
- After your cable modem is provisioned (or activated), open a web browser (such as Internet Explorer, Google Chrome, Firefox, or Safari) on your connected laptop or computer.
- Type a valid URL (such as www.surfboard.com) in the Address bar and then press Enter.
The ARRIS SURFboard website should open. If the website fails to open, please contact your service provider for assistance to either reactivate your cable modem or check for possible signal issues.
- Check that your cable modem's front panel LED lights up to confirm that your cable modem is connected to the Internet.

Note: If the website fails to open, then contact your service provider or visit the ARRIS Support website at www.arris.com/selfhelp.
Using your Web Manager
You can use the S34 Web Manager to view and monitor the device operational status and network configuration settings. You can also use the Web Manager to reset or reboot your device.

Note: If you did not purchase your S34 from a retail store, you may notice that some of the S34 web manager configuration settings may be blocked ad cannot be modified. This may be due to some restrictions that were set up by your service provider to prevent unauthorized modifications to certain cable modem configuration parameters.
Start your Web Manager
If this is your first time logging on to the S34 Web Manager, you must use admin for the username.
For network security, you are required to change the user password after logging on for the first time.
- Open any web browser on the computer connected to your S34.
- Type the default LAN IP address, 192.168.100.1, in the address bar.
- Press Enter to open the Login screen.
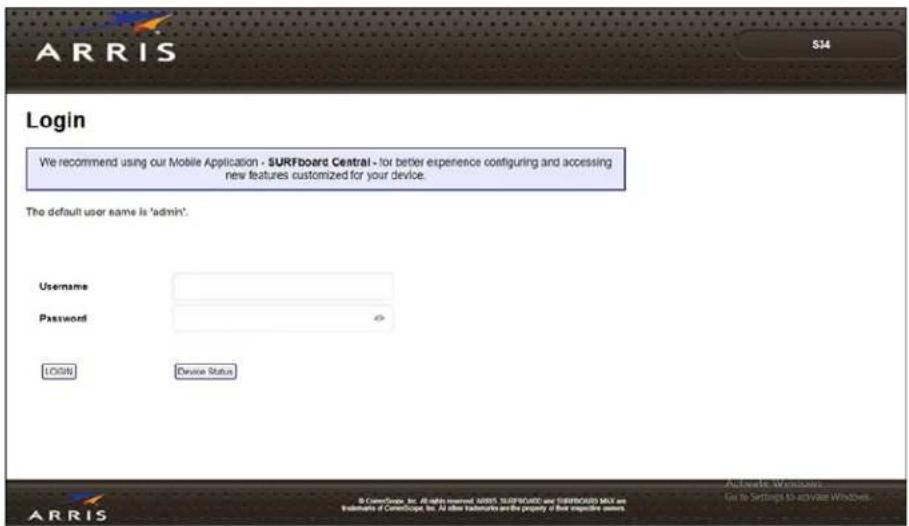
S34 Login screen
- Enter admin in the Username field.
-
Enter password in the Password field.
-
Click Apply to open the Web Manager.
-
On the Login Settings screen, on first use, you will be prompted for a new password. Enter password in the Old Password field and then the new password in the New Password field. Enter the new password in the Repeat New Password field to confirm.
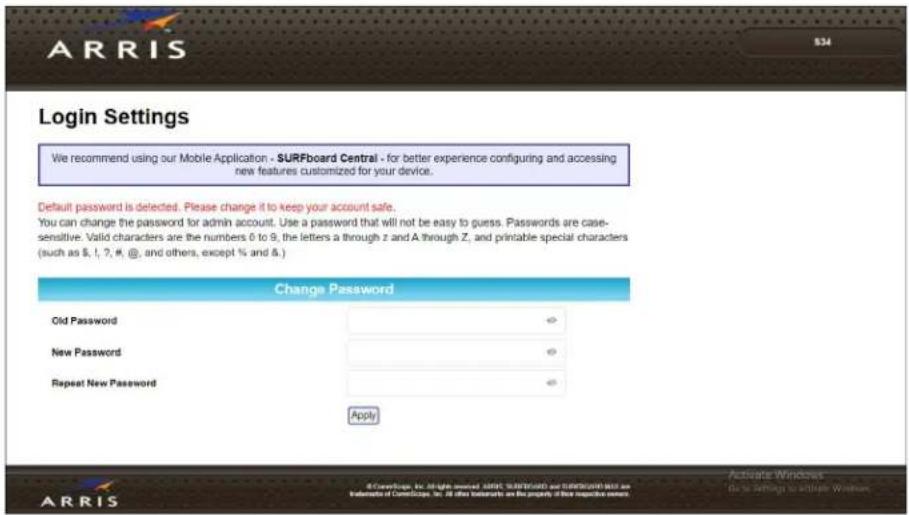
- Click Apply.
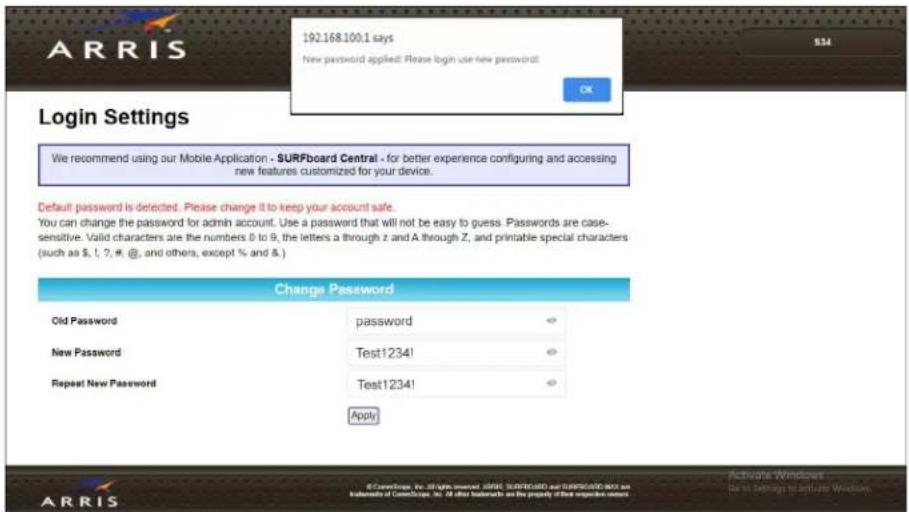
- The S34 Web Manager displays the Product Registration window. Click one of the following to open the S34 Connection screen:
Register
Ask me later
Stop asking

S34 opening screen
The S34 Web Manger screen appears.
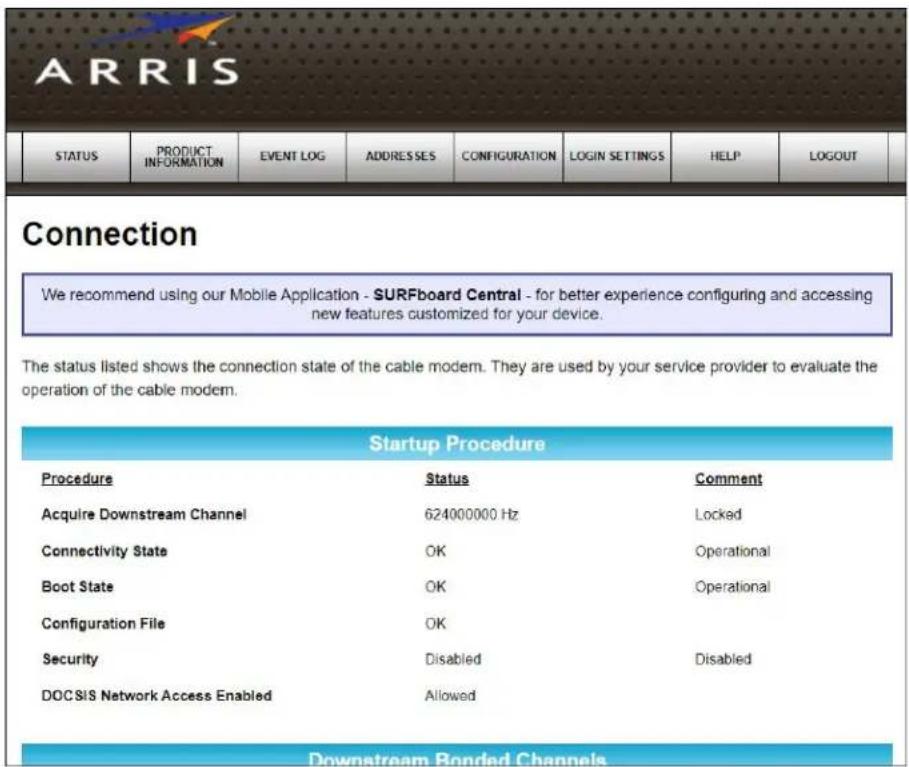
S34 Connection screen
S34 web manager screen options
Menu buttons
You can use the web manager buttons to view the status and network configuration screens for your S34.
■ The S34 menu buttons are displayed along the top of the S34 web manager screen. To display a specific web manager screen, click the menu button.
| STATUS | PRODUCT INFORMATION | EVENT LOG | ADDRESSES | CONFIGURATION | LOGIN SETTINGS | HELP | LOGOUT |
S34 web manager menu buttons
S34 web manager screen options
| Screen Option Function | |
| Status Provides the current operational status of the cable modem. | |
| Product information | Provides the current hardware and software-related information for the cable modem. |
| Event log | Displays a listing of the time and actual events as they occur and are detected by the cable modem.This information may be useful to help diagnose and correct any problems that may occur with the cable modem. |
| Addresses | Provides the serial number and MAC addresses for the cable modem and computers connected on your home network. |
| Configuration | Provides the network connection frequency and channel ID information for the cable modem. |
| Login Settings | Provides the option to change your login password. Note: The username cannot be changed. |
| Help Provides a brief description for each screen option and general troubleshooting tips. | |
| Logout Closes the web manager. | |
Get help
The Help pages screen provides a brief description for each S34 Web Manager screen.
- Click the Help menu button or link on the S34 Web Manager screen to open the S34 Help Pages screen.
Help
We recommend using our Mobile Application - SURFboard Central - for better experience configuring and accessing new features customized for your device.
Help Pages
Status
Product
Information
Event Log
Addresses
Configuration
Login Settings
The Status page is the first page in the display. This page shows diagnostic information about the startup procedure, the downstream bonded channels, and the upstream bonded channels.
The Product Information page displays information about the hardware version, software version, MAC address, serial number and system "up" time.
The Event Log page provides a list of all the events that have occurred on the cable modem. Each event shows the time that it occurred, the priority of the event, and an event description.
The Address page displays Serial Number and MAC Address information that may be required when contacting ARRIS SURFboard or your ISP Help Desks.
The Configuration page lists information about the upstream and downstream connection to the service provider
The Login Settings page provides an option to change the password of the Web UI.
For information regarding software licenses, acknowledgments and copyright notices for certain software packages and/or components that are used in this S34, please see the Open Source Software Information
Exit the S34 web manager
To exit the S34 web manager:
Click ✗ (Close button) in the upper right corner of the web browser window.
Monitoring your cable modem and connected network

Note: You may notice that some of the S34 web manager configuration settings may be blocked and cannot be modified. This may be due to some restrictions set up by your service provider for security reasons and also to prevent unauthorized modifications to certain cable modem configuration parameters. Contact your service provider to obtain special authorization to change the cable modem frequencies or other configuration settings.
View the Downstream bonded channels
The S34 generates a running log of the time and events or activities that it detects during the cable modem operation.

Note:
This information may be useful to help diagnose and correct any problems that may occur with your cable modem. You may want to provide this information if you have to contact ARRIS Technical Support or your service provider for assistance.
To open the Downstream bonded channels screen:
- Open the S34 Web Manager, see Start your Web Manager (page 15) for more information.
- Click the Downstream bonded channels menu button or link on the S34 Web Manager screen.
| Downstream Bonded Channels | |||||||
| Channel ID | Lock Status | Modulation | Frequency | Power | SNR/MER | Corrected | Uncorrectables |
| 33 | Locked | OFDM PLC | 748000000 Hz | -4 dBmV | 44 dB | 47607 | 0 |
| 1 | Locked | QAM256 | 501000000 Hz | -2 dBmV | 47 dB | 0 | 0 |
| 2 | Locked | QAM256 | 507000000 Hz | -2 dBmV | 46 dB | 0 | 0 |
| 3 | Locked | QAM256 | 513000000 Hz | -2 dBmV | 46 dB | 0 | 0 |
| 4 | Locked | QAM256 | 519000000 Hz | -3 dBmV | 46 dB | 0 | 0 |
| 5 | Locked | QAM256 | 525000000 Hz | -3 dBmV | 46 dB | 0 | 0 |
| 6 | Locked | QAM256 | 531000000 Hz | -3 dBmV | 46 dB | 0 | 0 |
| 7 | Locked | QAM256 | 537000000 Hz | -3 dBmV | 46 dB | 0 | 0 |
| 8 | Locked | QAM256 | 543000000 Hz | -3 dBmV | 46 dB | 0 | 0 |
| 9 | Locked | QAM256 | 549000000 Hz | -3 dBmV | 46 dB | 0 | 0 |
| 10 | Locked | QAM256 | 555000000 Hz | -3 dBmV | 46 dB | 0 | 0 |
| 11 | Locked | QAM256 | 561000000 Hz | -3 dBmV | 46 dB | 0 | 0 |
| 12 | Locked | QAM256 | 567000000 Hz | -3 dBmV | 46 dB | 0 | 0 |
S34 downstream bonded channels screen
- Press F5 to refresh or update the information on the screen.
Restart your S34
To restart your S34:
-
Insert the end of a paper clip or other small object with a narrow tip into the Reset opening on the back of your S34.
-
Press and hold the indented Reset button for three to four seconds only, and then release.

Warning:
If you press the Reset button for more than ten seconds, the cable modem configuration settings will be reset to the factory default settings.
Reset the S34 configuration settings
You can reset the factory default configuration settings on your S34. This process will delete the current S34 configuration settings and take approximately five to 30 minutes to complete. Your network connection will remain disabled until after the S34 configuration settings are restored.

Warning:
Resetting the S34 configuration settings to the factory defaults also deletes any custom cable modem configurations, including your login password, and other configuration settings.
To reset the cable modem configuration back to the factory default settings:
- Insert the end of a paper clip or other small object with a narrow tip into the Reset opening on the back of your S34.
- Press and hold the indented Reset button for 10 seconds or until the front panel LED flashes.
- Remove the paper clip or small object from the opening.
Troubleshooting tips
If the solutions listed in the Troubleshooting solutions table below do not resolve your problem, please contact your service provider for assistance. Your service provider may ask for the status of the S34 front panel LED for more information.
You may have to reset the S34 configuration to the default factory settings if your S34 is not functioning properly. See Reset the S34 configuration settings (page 21) for more information.
Solutions
Troubleshooting solutions
| Modem problem Possible solution | |
| Cannot send or receive data | Check each end of the coaxial cable connection on the cable modem and cable wall outlet.Use your hand to tighten each connector, if necessary.Check the Ethernet cable to make sure it is properly connected to the cable modem and computer.If you have cable television service, check your television to ensure your cable service is operating properly.If none of the above solutions resolves the problem, visit the ARRIS Support website at www.arris.com/selfhelp for assistance. |
| Cannot access the internet | Check that all cable and power connections on your cable modem and computer are properly connected.Check that the front panel LED icon on the front panel is lit up solid.Contact your service provider for assistance. |
Vantiva USA LLC
4855 Peachtree Industrial Blvd., Suite 200
Norcross, GA 30093
SURFboard and SURFboard logo are registered trademarks of Vantiva USA LLC. ARRIS and the ARRIS logo are registered trademarks of CommScope and used under license by Vantiva USA LLC. All rights reserved.
COMMSCOPE®

natural_image
Three people collaborating around a laptop in an office setting (no visible text or symbols)SURFboard® Central Mobile App DOCSIS® Cable Modems
Release x.1
User Guide, Revision
P/N 365-095-36671
CommScope copyrights and trademarks
© 2021 CommScope, Inc. All rights reserved.
No part of this content may be reproduced in any form or by any means or used to make any derivative work (such as translation, transformation, or adaptation) without written permission from CommScope, Inc. and/or its affiliates (“CommScope”). CommScope reserves the right to revise or change this content from time to time without obligation on the part of CommScope to provide notification of such revision or change. ARRIS and the ARRIS Logo are trademarks of CommScope, Inc. and/or its affiliates. All other trademarks are the property of their respective owners.
Wi-Fi Alliance ^® , Wi-Fi ^® , the Wi-Fi logo, the Wi-Fi CERTIFIED logo, Wi-Fi protected access ^® (WPA), the Wi-Fi Protected Setup logo, and WMM ^® are registered trademarks of Wi-Fi Alliance. Wi-Fi Protected Setup ^™ , Wi-Fi Multimedia ^™ , and WPA2 ^™ are trademarks of Wi-Fi Alliance.
CommScope provides this guide without warranty of any kind, implied or expressed, including, but not limited to, the implied warranties of merchantability and fitness for a particular purpose. ARRIS may make improvements or changes in the product(s) described in this manual at any time.
The capabilities, system requirements and/or compatibility with third-party products described herein are subject to change without notice.
Safety and regulatory information
Read all safety and regulatory information before installing your device and setting up your home network connection.
Important safety instructions
Read this before you begin — When using your equipment, basic safety precautions should always be followed to reduce the risk of fire, electric shock, and injury to persons, including the following:
- Read all the instructions listed here and/or in the user manual before you operate this device. Give attention to all safety precautions. Retain the instructions for future reference.
This device must be installed and used in strict accordance with manufacturer's instructions, as described in the user documentation that is included with the device.
■ Comply with all warning and caution statements in the instructions. Observe all warning and caution symbols that are affixed to this device.
■ To prevent fire or shock hazard, do not expose this device to rain or moisture. The device must not be exposed to dripping or splashing. Do not place objects filled with liquids, such as vases, on the device.
This device was qualified under test conditions that included the use of the supplied cables between system components. To ensure regulatory and safety compliance, use only the provided power and interface cables and install them properly.
■ Different types of cord sets may be used for connections to the main POWER supply circuit. Use only a main line cord that complies with all applicable device safety requirements of the country of use.
■ Installation of this device must be in accordance with national wiring codes and conform to local regulations. - Operate this device only from the type of power source indicated on the device's marking label. If you are not sure of the type of power supplied to your home, consult your dealer or local power company.
- Do not overload outlets or extension cords, as this can result in a risk of fire or electric shock. Overloaded AC outlets, extension cords, frayed power cords, damaged or cracked wire insulation, and broken plugs are dangerous. They may result in a shock or fire hazard.
-
Route power supply cords so that they are not likely to be walked on or pinched by items placed upon or against them. Pay attention to cords where they are attached to plugs and convenience receptacles; and examine the point where they exit from the device.
■ Place this device in a location that is close enough to an electrical outlet to accommodate the length of the power cord.
■ Place the device to allow for easy access when disconnecting the power cord of the device from the AC wall outlet. -
Do not connect the plug into an extension cord, receptacle, or other outlet unless the plug can be fully inserted with no part of the blades exposed.
■ Place this device on a stable surface.
■ Avoid damaging the device with static by touching the coaxial cable when it is attached to the earth-grounded coaxial cable-TV wall outlet.
■ Always first touch the coaxial cable connector on the device when disconnecting or reconnecting the Ethernet cable from the device or user's PC.
■ Installation of an AC surge protector in the AC outlet to which this device is connected is recommended. This is to avoid damaging the device by local lightning strikes and other electrical surges.
■ Postpone installation until there is no risk of thunderstorm or lightning activity in the area. - Avoid using a telephone (other than a cordless type) during an electrical storm. There is a remote risk of electric shock from lightning. For added protection, unplug the device from the wall outlet and disconnect the cables to avoid damage to this device from lightning and power surges.
- Do not use this product near water. For example, near a bathtub, washbowl, kitchen sink, laundry tub, swimming pool, or in a wet basement.
■ Do not use the telephone to report a gas leak located near the leak. - Do not cover the device or block the airflow to the device with any other objects. Keep the device away from excessive heat and humidity and keep the device free from vibration and dust.
■ Wipe the device with a clean, dry cloth. Never use cleaning fluid or similar chemicals. Do not spray cleaners directly on the device or use forced air to remove dust.
■ For added protection, unplug the device from the wall outlet and disconnect the cables to avoid damage to this device during lightning activity or power surges.
CAUTION: To reduce the risk of fire, use only No. 26 AWG or larger (e.g., 24 AWG) UL Listed or CSA Certified Telecommunication Line Cord, or national equivalent.
Upon completion of any service or repairs to this device, ask the service technician to perform safety checks to determine that the device is in safe operating condition. - Do not open the device. Do not perform any servicing other than that contained in the installation and troubleshooting instructions. Refer all servicing to qualified service personnel.
■ This device should not be used in an environment that exceeds 104^ F ( 40^ C).

SAVE THESE INSTRUCTIONS

Note: To CATV system installer — This reminder is provided to call the CATV system installer's attention to Section 820.93 of the National electric code, which provides guidelines for proper grounding and, in particular, specifies that the coaxial cable shield must be connected to the grounding system of the building, as close to the point of cable entry as practical.
FCC Interference statement
This equipment has been tested and found to comply with the limits for a Class B digital device, pursuant to part 15 of the FCC Rules. These limits are designed to provide reasonable protection against harmful interference in a residential environment. This equipment generates, uses, and can radiate radio frequency energy and, if not installed and used in accordance with the instructions, may cause harmful interference to radio communications. However, there is no guarantee that interference will not occur in a particular installation. If this equipment does cause harmful interference to radio or television reception, which can be determined by turning the device off and on, the user is encouraged to try to correct the interference by one or more of the following measures:
■ Increase the separation between the device and receiver.
■ Connect the equipment into an outlet on a circuit different from that to which the receiver is connected.
■ Consult the dealer or an experienced radio/TV technician for help.
This device complies with Part 15 of the FCC Rules. Operation is subject to the following two conditions: (1) This device may not cause harmful interference, and (2) This device must accept any interference received, including interference that may cause undesired operation.

CAUTION: Any changes or modifications not expressly approved by CommScope for compliance could void the user's authority to operate the equipment.
FCC Declaration of Conformity
CommScope, Inc, 3871 Lakefield Drive, Suwanee, GA 30024, declares that the SURFboard device complies with 47 CFR Parts 2 and 15 of the FCC rules as a Class B digital device.
FCC Radiation Exposure statement
This equipment complies with FCC radiation exposure limits set forth for an uncontrolled environment. To comply with the FCC RF exposure compliance requirements, the separation distance between the antenna and any person's body (including hands, wrists, feet and ankles) must be at least 8 inches (20.3 centimeters).
This transmitter must not be co-located or operating in conjunction with any other antenna or transmitter except those already approved in this filing.
The availability of some specific channels and/or operational frequency bands are country dependent and are firmware programmed at the factory to match the intended destinations. The firmware setting is not accessible by the end user.
Caring for the environment by recycling your ARRIS equipment

Please do not dispose of this product with your residential or commercial waste. Contact your local authorities for information about practices established for your region. If collection systems are not available, call ARRIS Technical Support at 1-877-466-8646 for assistance.
Table of contents
Chapter 1: Introduction......8
Supported devices....8
Contact information....8
Mobile app help....9
Chapter 2: Getting started....10
Get the ARRIS SURFboard Central mobile app.... 10
Launch the ARRIS SURFboard Central mobile app....11
Create your SURFboard account.... 11
Set up your cable modem using Surfboard Central mobile app.... 12
Chapter 3: SURFboard Central mobile app features....19
Home.... 19
Device details.... 21
Device specifications.... 21
Side menu....22
Add or remove devices....23
Support Details....23
Visit SURFboard site.... 23
Account Details....24
About....24
Introduction
The ARRIS SURFboard® Central mobile application steps you with the product setup and functions as you interface into your SURFboard cable modem products (see Supported devices (page 8)) using your iOS or Android mobile device (smartphone, tablet). With this mobile app, you can add a device to extend the Wi-Fi coverage, view and monitor the status and network configuration settings of your cable modem. The mobile app is available online as a free download for your mobile device (see Get the ARRIS SURFboard Central mobile app (page 10)):
■ Apple App Store (for iOS devices)
■ Google Play (for Android devices)
Supported devices
The retail SURFboard devices listed below support all firmware versions of the ARRIS SURFboard Central mobile app. Please note that the full features and functionality of the mobile app may be dependent on the firmware version of your managed SURFboard device.
■ SB devices (SURFboard DOCSIS cable modems)
S33
- SB6121
- SB6141
SB6183
SB6190
SB8200
- SBV2402
- SBV3202
T25
Contact information
For technical support and additional ARRIS product information:
■ Visit the ARRIS Support website: www.arris.com/selfhelp
■ Call ARRIS Technical Support: 1-877-466-8646
Mobile app help
Some of the SURFboard Central mobile app screens offer textual help. Tap the ? if you require more information or assistance with something on that screen.
FAQ is also available on the Side menu, accessed from the Collapsed menu icon ☐ on the mobile app Home screen. Here, you can read our Frequently Asked Questions, get contact information for ARRIS support, tap to navigate to our self-help site, or get answers quickly with our Live chat feature.
If you require more assistance, call ARRIS Technical Support: 1-877-466-8646.
Getting started
This product is for indoor use only. Do not route the Ethernet cable(s) outside of the building. Exposure of the cables to lightning could create a safety hazard and damage the product.
Before installing your cable modem, check with your service provider (or local cable company) to ensure broadband cable service is available in your area.
Some screenshots throughout this chapter may contain images of a model different that your own, these are simply examples and the app on your mobile device should represent the model you are configuring.
To set up your cable modem using the SURFboard Central app:
- Get the ARRIS SURFboard Central mobile app (page 10)
- Launch the ARRIS SURFboard Central mobile app (page 11)
- Set up your cable modem using Surfboard Central mobile app (page 12)
Get the ARRIS SURFboard Central mobile app
The ARRIS SURFboard Central mobile app is a quick and easy-to-use option to set up and activate your modem with your cable service provider and register for warranty using your iOS or Android mobile device.
- Ensure that you have Internet connection on your mobile device and scan the QR code available on your cable modem label (you may refer to the Quick Start Card or see the bottom of your modem for label details).
The SURFboard Central mobile app screen displays.

Figure 6: SURFboard Central mobile app download screen
- Download the SURFboard Central mobile app on your mobile device.

Note: After the download is finished, the ARRIS SURFboard Central mobile app shortcut will be added to your mobile device Home or Apps screen.
Launch the ARRIS SURFboard Central mobile app
■ Once you have the SURFboard Central mobile app installed, tap the shortcut on your mobile device to launch it.

Create your SURFboard account
- On the LET'S GET YOU STARTED WITH YOUR NEW SURFBOARD DEVICE! screen, tap GET STARTED to begin the setup process.
- Tap CONTINUE after granting the required permissions. The app may need to request permissions to improve the app experience during setup.
- On the SELECT YOUR DEVICE BELOW screen, select the SURFboard Modem device group and tap NEXT.
- On the second SELECT YOUR DEVICE BELOW screen, select your SURFboard model and tap NEXT.
- In the WELCOME screen, provide an email for your account and tap to SIGN UP (if you do not yet have a registered account) or SIGN IN to your registered account. You will receive a verification code at this email address to activate your account. This will be the account that manages your home network. If you have an existing account, it will be recognized, and you will not be prompted for additional information.
- If this is a new account, you will be prompted for account information. Complete the information requested on the LET'S CREATE YOUR ACCOUNT screen. Tap the check box to agree to the Terms and Conditions and SIGN UP to continue.
- Shortly, you will receive a verification code at the email address you provided. This code is only valid for 24 hours. Enter the code on the ENTER VERIFICATION CODE screen.
- When verification is complete, the ACCOUNT VERIFIED screen will display. Tap NEXT.

Set up your cable modem using Surfboard Central mobile app
- On the STEPS FOR ACTIVATION screen, tap LET'S START and follow on the on-screen instructions until you reach CHOOSE YOUR INTERNET SERVICE PROVIDER screen.


Note: If your Internet service provider is not listed, then tap Others and then tap to select your service provider and tap NEXT.
- On the ACTIVATE YOUR DEVICE WITH SERVICE PROVIDER screen, tap to choose one of the methods to register your modem.

■ CONTACT SERVICE PROVIDER: If you are not sure how to activate your modem with service provider, then tap ISP's CUSTOMER SUPPORT to call the customer support and then tap CONTINUE.
SELF-ACTIVATE: If you prefer to self-activate your modem, then perform the following actions.
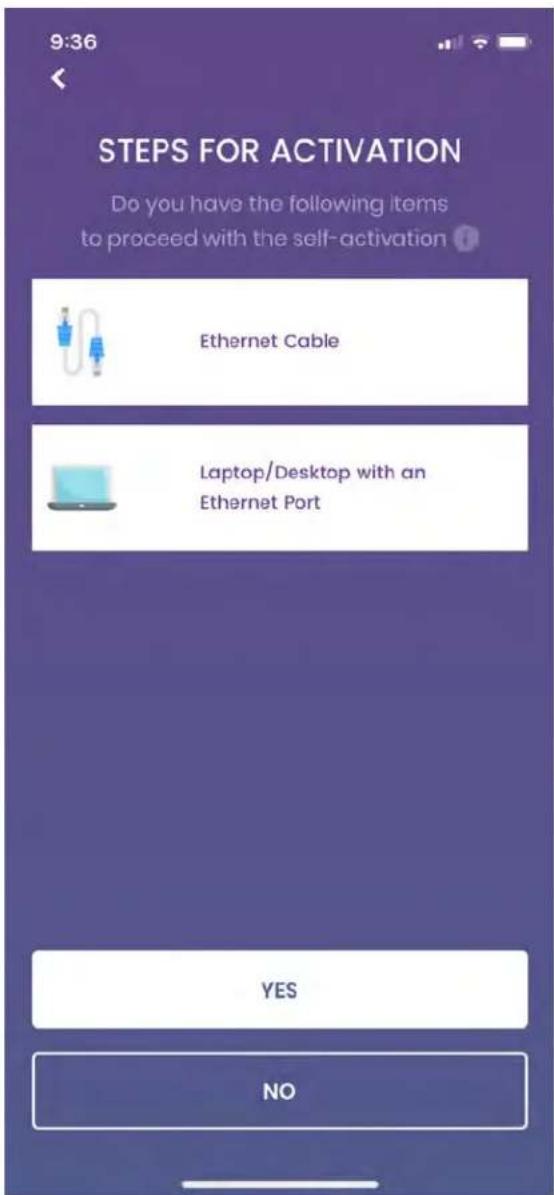
a. Tap YES.
b. Connect an Ethernet cable from your modem to your laptop/desktop.
c. Enter your service provider's web browser URL:
- Comcast/Xfinity:http://www.xfinity.com/activate
• Cox: http://www.cox.com/activate -
Spectrum: http://spectrum.net/selfinstall
-
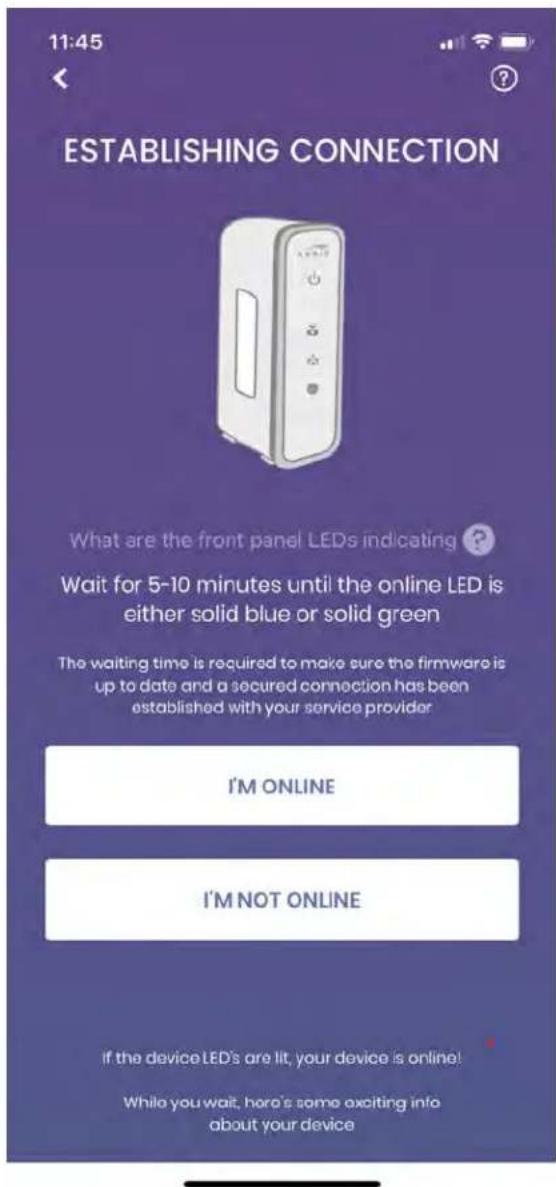
On the ESTABLISHING CONNECTION screen, wait for 5-10 minutes until the LED is solid blue or solid green and tap I'M ONLINE.
- On the SUCCESS screen, tap NEXT.
- On SCAN LABEL TO CONTINUE screen, you can choose to perform one of the following:

■ Tap SCAN to scan the QR code (available on the label located on the base of your modem or the Quick Start Card).
■ Tap SET UP MANUALLY to enter the serial number and MAC address details located on the label and tap SUBMIT.
Once your cable modem (device) has been registered successfully, the following screen appears indicating that you now connect your cable modem to a Wi-Fi router using an Ethernet cable and get access to Internet.

SURFboard Central mobile app features
The main navigational features of the SURFboard Central mobile app are the Home, User Guide, and FAQ screens - all accessible by tapping the corresponding icon at the bottom of the SURFboard Central mobile app - and a Side menu, accessed by tapping the Collapsed menu icon at the top, left-hand corner of the Home screen.
The Home screen gives you device details and specifications.
The User Guide screen gives you access to view the Cable Modem User Guide.
The FAQ allows you to browse the list of topics that range from simple to complex.
The Side menu, accessed by tapping the Collapsed menu icon at the top, left-hand corner of the Home screen, has eight buttons from which you can perform a Add Device, Remove Device, get Support Details, visit www.Surfboard.com, view Account Details, learn more About your modem versions and the licensing and access the User Guide.

Note: Some screenshots throughout this chapter may contain images of a model different that your own, these are simply examples and the app on your mobile device should represent the model you are configuring.
Home
Tap the Home icon at the bottom of the SURFboard Central mobile app to return to the Home screen from anywhere in the SURFboard Central mobile app.
These are the main features on the Home screen.

1 Collapsed menu icon. Tap to access the Side menu.
2 Notifications: Tap the Notification bell to display firmware updates, incidents of new devices connecting to your network, unsuccessful modem responses, and more.
3 Device Details: Tap to view details about your modem that you are connected to.
4 Specifications: Displays the technical specifications about your modem.
5 User Guide: Displays the User Guide of your modem.
6 FAQ: Tap to read the Frequently Asked Questions.
Device details
To access information about your modem, on the Home page, at tap Device Details to display the details about it.
The details window of your modem such as your modem model number, name of the service provider, hardware specification and Ethernet ports.

Device specifications
To access device specifications about your modem, on the Home page, at tap Specifications to display the specifications about it.
You can view the technical specifications of your modem such as technology features and overview of your product.
Side menu
Access the Side menu by tapping the Collapsed menu icon at the top, left-hand corner of the Home screen.

Add Device, Remove Device, get Support Details, visit www.Surfboard.com, view Account Details, learn more About your modem versions and the licensing, access the User Guide and go through the FAQ.

Add or remove devices
■ You can add a new device such as SURFboard Max or remove an existing connected SURFboard Max device, you can do so by referring to their respective SURFboard Quick Start Guide or the SURFboard User Guide.
Support Details
We are here to help! Choose your preferred method to contact us for assistance from the options below. You can access this information from the Side menu > Support Details.
■ Browse ARRIS Consumer Support by tapping www.arris.com/selfhelp.
■ Tap Chat with us to connect with one of our helpful, live tech support people.
■ Service Provider Contact Details: Tap the link to connect with your service provider.
Visit SURFboard site
You can visit the SURFboard site to view information about various SURFboard products and shop them.
You can access information from the Side menu > Visit www.Surfboard.com
Account Details
The Account Details screen shows you the account information associated with your SURFboard account including your Name and Email address. If this account information is not accurate or you want to switch to another account, simply tap SIGN OUT and you will be brought back to the Welcome screen where you can either switch accounts or sign up for a new one.
About
The About screen displays the following information on your cable modem:
■ Model Number: This is the model number of your cable modem.
■ App Version: This is the current version of the SURFboard Central app you are using.
■ Serial Number: This is the serial number of your cable modem.
■ MAC Address: This is the MAC address of your cable modem.
■ VIEW EULA button provides relevant safety and regulatory information of your cable modem.
CommScope, Inc. ("ARRIS")
Retail Purchasers
If you purchased this Product directly from ARRIS or from an authorized ARRIS retail reseller, ARRIS warrants to you, the original end user customer, that (A) the Product, excluding Software, will be free from defects in materials and workmanship under normal use, and (B) with respect to Software, (i) the media on which the Software is provided will be free from defects in material and workmanship under normal use, and (ii) the Software will perform substantially as described in its documentation. This Limited Warranty to you, the original end user customer, continues (A) for Software and the media upon which it is provided, for a period of ninety (90) days from the date of purchase from ARRIS or an authorized ARRIS reseller, and (B) for the Product (excluding Software), for a period of two (2) years from the date of purchase from ARRIS or from an authorized ARRIS reseller. To take advantage of this Limited Warranty or to obtain technical support, you must call the ARRIS toll-free phone number: 1-877-466-8646. ARRIS' sole and exclusive obligation under this Limited Warranty for retail sales shall be to repair or replace any Product or Software that does not meet this Limited Warranty. All warranty claims must be made within the applicable Warranty Period.
Cable Operator or Service Provider Arrangements
If you did not purchase this Product directly from ARRIS or from a ARRIS authorized retail reseller, ARRIS does not warrant this Product to you, the end-user. A limited warranty for this Product (including Software) may have been provided to your cable operator or Internet Service Provider ("Service Provider") from whom you obtained the Product. Please contact your Service Provider if you experience problems with this Product.
General Information
The warranties described in this Section shall not apply: (i) to any Product subjected to accident, misuse, neglect, alteration, Acts of God, improper handling, improper transport, improper storage, improper use or application, improper installation, improper testing, or unauthorized repair; or (ii) to cosmetic problems or defects which result from normal wear and tear under ordinary use, and do not affect the performance or use of the Product. ARRIS' warranties apply only to a Product that is manufactured by ARRIS and identified by ARRIS owned trademark, trade name or product identification logos affixed to the Product. ARRIS does not warrant to you, the end user, or to anyone else that the Software will perform error free or without bugs.
ARRIS IS NOT RESPONSIBLE FOR, AND PROVIDES "AS IS" ANY SOFTWARE SUPPLIED BY 3RD PARTIES. EXCEPT AS EXPRESSLY STATED IN THIS SECTION ("WARRANTY INFORMATION"), THERE ARE NO WARRANTIES OF ANY KIND RELATING TO THE PRODUCT, EXPRESS, IMPLIED OR STATUTORY, INCLUDING BUT NOT LIMITED TO IMPLIED WARRANTIES OF MERCHANTABILITY, FITNESS FOR A PARTICULAR PURPOSE, OR THE WARRANTY AGAINST
INFRINGEMENT PROVIDED IN THE UNIFORM COMMERCIAL CODE. Some states do not allow for the exclusion of implied warranties, so the above exclusion may not apply to you.
What additional provisions should I be aware of? Because it is impossible for ARRIS to know the purposes for which you acquired this Product or the uses to which you will put this Product, you assume full responsibility for the selection of the Product for its installation and use. While every reasonable effort has been made to ensure that you will receive a Product that you can use and enjoy, ARRIS does not warrant that the functions of the Product will meet your requirements or that the operation of the Product will be uninterrupted or error-free.
ARRIS IS NOT RESPONSIBLE FOR PROBLEMS OR DAMAGE CAUSED BY THE INTERACTION OF THE PRODUCT WITH ANY OTHER SOFTWARE OR HARDWARE. ALL WARRANTIES ARE VOID IF THE PRODUCT IS OPENED, ALTERED, AND/OR DAMAGED.
THESE ARE YOUR SOLE AND EXCLUSIVE REMEDIES for any and all claims that you may have arising out of or in connection with this Product, whether made or suffered by you or another person and whether based in contract or tort.
IN NO EVENT SHALL ARRIS BE LIABLE TO YOU OR ANY OTHER PARTY FOR ANY DIRECT, INDIRECT, GENERAL, SPECIAL, INCIDENTAL, CONSEQUENTIAL, EXEMPLARY OR OTHER DAMAGES ARISING OUT OF THE USE OR INABILITY TO USE THE PRODUCT (INCLUDING, WITHOUT LIMITATION, DAMAGES FOR LOSS OF BUSINESS PROFITS, BUSINESS INTERRUPTION, LOSS OF INFORMATION OR ANY OTHER PECUNIARY LOSS), OR FROM ANY BREACH OF WARRANTY, EVEN IF ARRIS HAS BEEN ADVISED OF THE POSSIBILITY OF SUCH DAMAGES. IN NO CASE SHALL ARRIS' LIABILITY EXCEED THE AMOUNT YOU PAID FOR THE PRODUCT.
These matters are governed by the laws of the Commonwealth of Pennsylvania, without regard to conflict of laws principles and excluding the provisions of the United Nations Convention on Contracts for the International Sale of Goods.
Retail Purchasers Only
If you purchased this Product directly from ARRIS or from an ARRIS authorized retail reseller, please call the ARRIS toll-free phone number, 1-877-466-8646, for warranty service or technical support.
Cable Operator or Service Provider Arrangements
If you did not purchase this Product directly from ARRIS or from an ARRIS authorized retail reseller, please contact your Service Provider for technical support.
Corporate Headquarters
CommScope · Hickory · North Carolina · 28602 · USA
T: 1-828-324-2200
www.commscope.com
S34 - DOCSIS 3.1 Cable Modem
DOCSIS 3.1
Switchable Diplexer US 5-42MHz/5-85MHz; DS 108-1002MHz
1x 2.5Gbps Ethernet Port
1x 1Gbps Ethernet Port
Next Generation Upload Speed Optimized
PRODUCT OVERVIEW
The SURFboard S34 will future-proof your home with the latest DOCSIS technology, supporting multi-gigabit Internet plans. Featuring support for Next Generation Upload Speed service Tiers with switchable low to mid support. The SURFboard S34 includes a 2.5 Gbps Ethernet port, and a 1 Gbps LAN port.
FEATURES
• DOCSIS 3.1 supporting multi-gig cable internet plans
- Switchable upstream filters to support Optimized upload speed service tiers
- 2x2 OFDM/OFDMA DOCSIS® 3.1 channels and/or 32x8 SCQAM DOCSIS® 3.0
• 2.5Gbps Ethernet port for Multi-Gig network connection
• 1Gbps port for wired client connection
- Multi Processor Technology with ARM-based application processor

natural_image
Exterior view of a white and gray surface-mounted device with 'ARRIS' and 'SURFboard' branding (no additional text or symbols visible)Next Generation DOCSIS 3.1 Modem – Future Proof your home
• Ready for next generation DOCSIS service plans from your Service Provider
- Multi Gig download and optimized upload speed tier certified
• Additional Wi-Fi router needed to connect your wireless client devices
Specifications
| Physical RF Upstream | |||
| Operating Temperature °C | 0 to 40 Bonded Channels Up to 8 SCQAM and 2 OFDMA | ||
| Operating Relative Humidity 5-85% (Non condensing) Frequency Rand (MHz) | (Configurable Diplex Filter) | 5 MHz – 42 MHz or 5MHz – 85 MHz | |
| Storage Temperature °C | -40 to 70 Data Rate (Mbps Max.) Up to 3.5 Gbps | ||
| Dimensions (H x W x D) in. | 5.24 x 5.24 x 1.65 | RF Output Level (dBmV) | +65 dBmV (64 QAM, single upstream)+57 dBmV (64 QAM, -8 upstream)+65 dBmV (16 QAM, single upstream) |
| Weight in Lbs. (with packaging) | 1.52 lbs. | ||
| Diagnostic LEDs (Front) | Power, US/DS, Online | ||
| Diagnostic LEDs (Rear) | Ethernet Link/Speed | ||
| Interfaces | Compliance | ||
| RF Interface | 3 External “F” type connectors | Certification | Compliant Class B Digital De Ice – Part 15 of the Federal Communications Commission (FCC) DOCSIS 3.1 |
| Data Interfaces | 1 x 10/100/1000 and 1 x 10/100/1000/2500Base-T Ethernet (RJ-45 connector) | Environmental | RoHS, Energy Efficient Ethernet, Pb-Free, Compliant with SNE Voluntary Environmental Agreement |
| Input Voltage (nominal) | 115 VAC, 60 Hz. | ||
| RF Downstream | |||
| Bonded Channels | Up to 32 SCQAM and 2 OFDM | ||
| Tuner Configuration | Full capture tuning range | ||
| Frequency Range (MHz) | 108 MHz – 1002 MHz DOCSIS | ||
| DOCSIS Data Rate (Gbps Max.) | Up to 10 Gbps | ||
| RF Input Sensitivity Level (dBmV) | -15 to +15 (DOCSIS) | ||
For additional information visit www.SURFboard.com
For product support visit www.arris.com/selfhelp
SURFboard and SURFboard logo are registered trademarks of Vantiva USA LLC. ARRIS and the ARRIS logo are registered trademarks of CommScope and used under license by Vantiva USA LLC. All rights reserved.

natural_image
White cylindrical device with internal components and a metallic connector (no visible text or symbols)

- SURFBOARD®
- Table of contents
- Chapter 1: Safety and regulatory information.... 3
- Chapter 2: Introduction......7
- Chapter 3: Product overview....9
- Chapter 4: Getting started....12
- Chapter 5: Using your Web Manager.... 15
- Chapter 6: Monitoring your cable modem and connected network...... 20
- Chapter 7: Troubleshooting tips....23
- Safety and regulatory information
- Important safety instructions
- FCC statements
- FCC interference statement
- Caring for the environment by recycling your ARRIS equipment
- Introduction
- In the box
- S34 package contents
- Item Description
- Additional items needed (not included)
- System requirements
- Contact information
- Product overview
- Front panel
- S34 front view
- Rear panel
- Cable modem label
- Getting started
- Setting up your cable modem using your client device (computer/laptop)
- S34 connection diagram
- Using your Web Manager
- Start your Web Manager
- S34 Login screen
- S34 opening screen
- S34 web manager screen options
- Menu buttons
- S34 web manager menu buttons
- Get help
- Help
- Help Pages
- Status
- Product
- Information
- Event Log
- Addresses
- Configuration
- Login Settings
- Exit the S34 web manager
- Monitoring your cable modem and connected network
- View the Downstream bonded channels
- Note:
- S34 downstream bonded channels screen
- Restart your S34
- Warning:
- Reset the S34 configuration settings
- Troubleshooting tips
- Solutions
- COMMSCOPE®
- SURFboard® Central Mobile App DOCSIS® Cable Modems
- CommScope copyrights and trademarks
- SAVE THESE INSTRUCTIONS
- FCC Declaration of Conformity
- FCC Radiation Exposure statement
- Chapter 1: Introduction......8
- Chapter 2: Getting started....10
- Chapter 3: SURFboard Central mobile app features....19
- Supported devices
- Mobile app help
- Get the ARRIS SURFboard Central mobile app
- Launch the ARRIS SURFboard Central mobile app
- Create your SURFboard account
- Set up your cable modem using Surfboard Central mobile app
- SURFboard Central mobile app features
- Home
- Device details
- Device specifications
- Side menu
- Add or remove devices
- Support Details
- Visit SURFboard site
- Account Details
- About
- Retail Purchasers
- Cable Operator or Service Provider Arrangements
- General Information
- Retail Purchasers Only
- S34 - DOCSIS 3.1 Cable Modem
- FEATURES
Brand : Arris
Model : SURFboard S34
Category : Router