
SURFboard SBG7600AC2 - Router Arris - Free user manual and instructions
Find the device manual for free SURFboard SBG7600AC2 Arris in PDF.


| Product Type | Cable Modem Router Combo |
| Model | SURFboard SBG7600AC2 |
| Brand | Arris |
| Dimensions | 8.3 x 6.3 x 2.0 inches (21.1 x 16.0 x 5.1 cm) |
| Weight | 1.4 lbs (0.64 kg) |
| Power Supply | 12V DC, 2.5A |
| Wireless Standard | 802.11ac (Wi-Fi 5) Dual Band |
| Maximum Speed | Up to 1750 Mbps (450 Mbps @2.4GHz + 1300 Mbps @5GHz) |
| Cable Standard | DOCSIS 3.0 |
| Number of Ethernet Ports | 4 Gigabit LAN + 1 Gigabit WAN |
| USB Ports | 1x USB 2.0 |
| VoIP Support | No (no telephone ports) |
| LED Indicators | Power, Downstream, Upstream, Online, Wi-Fi, WPS, Ethernet |
| Antenna Type | Internal |
| Security | WPA/WPA2, WPA-Enterprise, SPI Firewall, DMZ, DoS Protection |
| Advanced Features | Parental Controls, Guest Network, VLAN Tagging |
| Maintenance | Restart via web interface or power cycle; firmware upgrade via web GUI |
| Cleaning | Wipe with dry cloth, avoid liquids |
| Spare Parts & Repairability | Power adapter available; no user-serviceable parts; contact ISP for replacements |
| General Information | Compatible with major cable ISPs; requires active cable internet subscription |
Frequently Asked Questions - SURFboard SBG7600AC2 Arris
User questions about SURFboard SBG7600AC2 Arris
0 question about this device. Answer the ones you know or ask your own.
Ask a new question about this device
Download the instructions for your Router in PDF format for free! Find your manual SURFboard SBG7600AC2 - Arris and take your electronic device back in hand. On this page are published all the documents necessary for the use of your device. SURFboard SBG7600AC2 by Arris.
USER MANUAL SURFboard SBG7600AC2 Arris
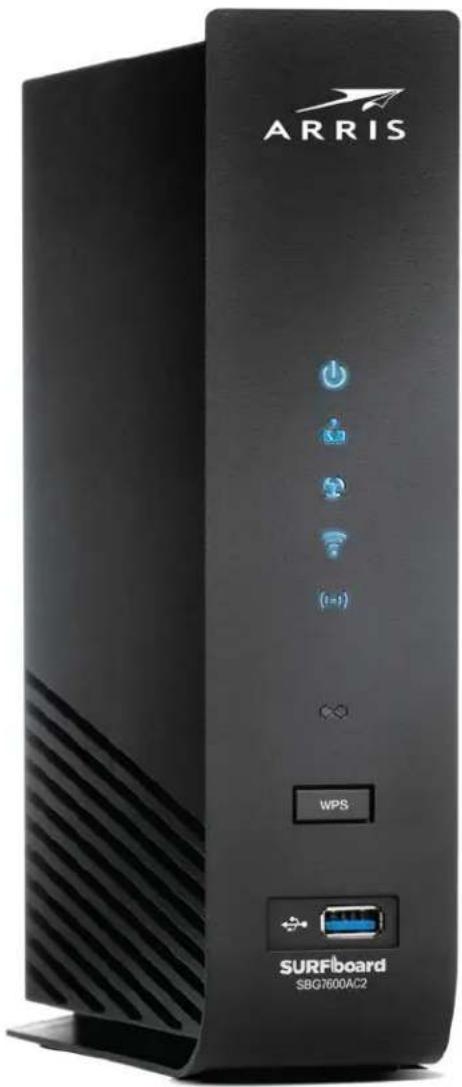
SURFboard® DOCSIS 3.0 Wi-Fi cable modems SBG6950AC2, SBG7400AC2, & SBG7600AC2
User Guide, STANDARD Revision x.4
P/N 365-095-31684
CommScope copyrights and trademarks
© 2020 CommScope, Inc. All rights reserved.
No part of this content may be reproduced in any form or by any means or used to make any derivative work (such as translation, transformation, or adaptation) without written permission from CommScope, Inc. and/or its affiliates ("CommScope"). CommScope reserves the right to revise or change this content from time to time without obligation on the part of CommScope to provide notification of such revision or change. ARRIS and the ARRIS Logo are trademarks of CommScope, Inc. and/or its affiliates. All other trademarks are the property of their respective owners.
Wi-Fi Alliance ^® , Wi-Fi ^® , the Wi-Fi logo, the Wi-Fi CERTIFIED logo, Wi-Fi protected access ^® (WPA), the Wi-Fi Protected Setup logo, and WMM ^® are registered trademarks of Wi-Fi Alliance. Wi-Fi Protected Setup ^™ , Wi-Fi Multimedia ^™ , and WPA2 ^™ are trademarks of Wi-Fi Alliance.
CommScope provides this guide without warranty of any kind, implied or expressed, including, but not limited to, the implied warranties of merchantability and fitness for a particular purpose. ARRIS may make improvements or changes in the product(s) described in this manual at any time.
The capabilities, system requirements and/or compatibility with third-party products described herein are subject to change without notice.
Safety and regulatory information
Read all safety and regulatory information before installing your device and setting up your home network connection.
Important safety instructions
Read this before you begin — When using your equipment, basic safety precautions should always be followed to reduce the risk of fire, electric shock, and injury to persons, including the following:
- Read all the instructions listed here and/or in the user manual before you operate this device. Give attention to all safety precautions. Retain the instructions for future reference.
This device must be installed and used in strict accordance with manufacturer's instructions, as described in the user documentation that is included with the device.
■ Comply with all warning and caution statements in the instructions. Observe all warning and caution symbols that are affixed to this device.
■ To prevent fire or shock hazard, do not expose this device to rain or moisture. The device must not be exposed to dripping or splashing. Do not place objects filled with liquids, such as vases, on the device.
This device was qualified under test conditions that included the use of the supplied cables between system components. To ensure regulatory and safety compliance, use only the provided power and interface cables and install them properly.
■ Different types of cord sets may be used for connections to the main POWER supply circuit. Use only a main line cord that complies with all applicable device safety requirements of the country of use.
■ Installation of this device must be in accordance with national wiring codes and conform to local regulations.
- Operate this device only from the type of power source indicated on the device's marking label. If you are not sure of the type of power supplied to your home, consult your dealer or local power company.
- Do not overload outlets or extension cords, as this can result in a risk of fire or electric shock. Overloaded AC outlets, extension cords, frayed power cords, damaged or cracked wire insulation, and broken plugs are dangerous. They may result in a shock or fire hazard.
Route power supply cords so that they are not likely to be walked on or pinched by items placed upon or against them. Pay attention to cords where they are attached to plugs and convenience receptacles; and examine the point where they exit from the device.
■ Place this device in a location that is close enough to an electrical outlet to accommodate the length of the power cord.
Place the device to allow for easy access when disconnecting the power cord of the device from the AC wall outlet.
- Do not connect the plug into an extension cord, receptacle, or other outlet unless the plug can be fully inserted with no part of the blades exposed.
■ Place this device on a stable surface.
- Avoid damaging the device with static by touching the coaxial cable when it is attached to the earth-grounded coaxial cable-TV wall outlet.
■ Always first touch the coaxial cable connector on the device when disconnecting or reconnecting the Ethernet cable from the device or user's PC.
■ Installation of an AC surge protector in the AC outlet to which this device is connected is recommended. This is to avoid damaging the device by local lightning strikes and other electrical surges.
■ Postpone installation until there is no risk of thunderstorm or lightning activity in the area.
- Avoid using a telephone (other than a cordless type) during an electrical storm. There is a remote risk of electric shock from lightning. For added protection, unplug the device from the wall outlet and disconnect the cables to avoid damage to this device from lightning and power surges.
- Do not use this product near water. For example, near a bathtub, washbowl, kitchen sink, laundry tub, swimming pool, or in a wet basement.
■ Do not use the telephone to report a gas leak located near the leak.
■ Do not cover the device or block the airflow to the device with any other objects. Keep the device away from excessive heat and humidity and keep the device free from vibration and dust.
■ Wipe the device with a clean, dry cloth. Never use cleaning fluid or similar chemicals. Do not spray cleaners directly on the device or use forced air to remove dust.
■ For added protection, unplug the device from the wall outlet and disconnect the cables to avoid damage to this device during lightning activity or power surges.

CAUTION: To reduce the risk of fire, use only No. 26 AWG or larger (e.g., 24 AWG) UL Listed or CSA Certified Telecommunication Line Cord, or national equivalent.
Upon completion of any service or repairs to this device, ask the service technician to perform safety checks to determine that the device is in safe operating condition.
■ Do not open the device. Do not perform any servicing other than that contained in the installation and troubleshooting instructions. Refer all servicing to qualified service personnel.
This device should not be used in an environment that exceeds 104^ F ( 40^ C).
SAVE THESE INSTRUCTIONS

Note: To CATV system installer — This reminder is provided to call the CATV system installer's attention to Section 820.93 of the National electric code, which provides guidelines for proper grounding and, in particular, specifies that the coaxial cable shield must be connected to the grounding system of the building, as close to the point of cable entry as practical.
FCC statements
FCC Interference statement
This equipment has been tested and found to comply with the limits for a Class B digital device, pursuant to part 15 of the FCC Rules. These limits are designed to provide reasonable protection against harmful interference in a residential environment. This equipment generates, uses, and can radiate radio frequency energy and, if not installed and used in accordance with the instructions, may cause harmful interference to radio communications. However, there is no guarantee that interference will not occur in a particular installation. If this equipment does cause harmful interference to radio or television reception, which can be determined by turning the device off and on, the user is encouraged to try to correct the interference by one or more of the following measures:
■ Increase the separation between the device and receiver.
■ Connect the equipment into an outlet on a circuit different from that to which the receiver is connected.
■ Consult the dealer or an experienced radio/TV technician for help.
This device complies with Part 15 of the FCC Rules. Operation is subject to the following two conditions: (1) This device may not cause harmful interference, and (2) This device
must accept any interference received, including interference that may cause undesired operation.

CAUTION: Any changes or modifications not expressly approved by CommScope for compliance could void the user's authority to operate the equipment.
FCC Declaration of Conformity
CommScope, Inc, 3871 Lakefield Drive, Suwanee, GA 30024, declares that the SURFboard device complies with 47 CFR Parts 2 and 15 of the FCC rules as a Class B digital device.
FCC Radiation Exposure statement
This equipment complies with FCC radiation exposure limits set forth for an uncontrolled environment. To comply with the FCC RF exposure compliance requirements, the separation distance between the antenna and any person's body (including hands, wrists, feet and ankles) must be at least 8 inches (20.3 centimeters).
This transmitter must not be co-located or operating in conjunction with any other antenna or transmitter except those already approved in this filing.
The availability of some specific channels and/or operational frequency bands are country dependent and are firmware programmed at the factory to match the intended destinations. The firmware setting is not accessible by the end user.
Wireless LAN information

Note: This applies to devices that provide Wi-Fi capability.
This device is a wireless network product that uses Direct Sequence Spread Spectrum (DSSS) and Orthogonal Frequency-Division Multiple Access (OFDMA) radio technologies. The device is designed to be interoperable with any other wireless DSSS and OFDMA products that comply with:
The IEEE 802.11 Standard on Wireless LANs (Revision AC, Revision B, Revision G, and Revision N), as defined and approved by the Institute of electrical electronics engineers.
■ The wireless fidelity (Wi-Fi) certification as defined by the Wireless Ethernet Compatibility Alliance (WECA).


Restrictions on the use of wireless devices
In some situations, or environments, the use of wireless devices may be restricted by the proprietor of the building or responsible representatives of the organization. For example,
using wireless equipment in any environment where the risk of interference to other devices or services is perceived or identified as harmful.
If you are uncertain of the applicable policy for the use of wireless equipment in a specific organization or environment, you are encouraged to ask for authorization to use the device prior to turning on the equipment.
The manufacturer is not responsible for any radio or television interference caused by unauthorized modification of the devices included with this product, or the substitution or attachment of connecting cables and equipment other than specified by the manufacturer. Correction of the interference caused by such unauthorized modification, substitution, or attachment is the responsibility of the user.
The manufacturer and its authorized resellers or distributors are not liable for any damage or violation of government regulations that may arise from failing to comply with these guidelines.

Note: The use of the 5150-5250 MHz frequency band is restricted to indoor use only.

Warning: This device allows you to create a wireless network. Wireless network connections may be accessible by unauthorized users. For more information on how to protect your network, refer to the relevant chapters in this document or visit our Consumer Support website at http://www.commscope.com/support/consumers.
Caring for the environment by recycling your ARRIS equipment
natural_image
Symbol of a trash bin crossed with no text or labels, representing waste sorting or disposal (no text present)Please do not dispose of this product with your residential or commercial waste. Contact your local authorities for information about practices established for your region. If collection systems are not available, call ARRIS Technical Support at 1-877-466-8646 for assistance.
Table of contents
Chapter 1: Getting started.... 10
In the box....10
Additional items needed (not included).... 11
System requirements....11
Contact information.... 12
Chapter 2: Product overview.... 13
Front panel.... 13
Wi-Fi Protected Setup ^TM (WPS)....14
Rear panel....15
Wi-Fi cable modem label.... 17
Chapter 3: Installing the Wi-Fi cable modem.... 18
Connect your Wi-Fi cable modem to your client device....18
Establish an Internet connection....19
Chapter 4: Setting up a Wi-Fi network connection.... 21
Set up a Wi-Fi network connection using your mobile device....21
Set up a Wi-Fi network connection using your client device.... 23
Personal Computer (PC)......23
Connect using the Windows control panel....26
Android device.... 28
Apple computer....28
Apple mobile device....29
Test your Wi-Fi network connection.... 29
Connect your WPS-enabled device.... 29
Chapter 5: Using the Wi-Fi Cable Modem Web Manager....31
Start the Wi-Fi Cable Modem Web Manager.... 31
Wi-Fi Cable Modem Web Manager menu bar....33
Wi-Fi Cable Modem Web Manager-available languages....34
Get help....35
Exit the Wi-Fi Cable Modem Web Manager.... 36
Chapter 6: Configuring your Wi-Fi network....37
Set up your Wi-Fi network.... 37
Change your Wi-Fi network name (SSID)....40
Chapter 7: Protecting and monitoring your Wi-Fi network.... 43
Prevent unauthorized access....43
Change the default user password.... 43
Set up firewall protection....45
Set up Parental Control....47
Set up IP filtering....48
Set up MAC address filtering.... 50
Set up Port Triggers....51
Set up the DMZ host....52
Chapter 8: Managing your Wi-Fi cable modem and connected networks....54
View the Wi-Fi cable modem status and network connection.... 54
View the Wi-Fi cable modem product and status information.... 55
Back up your Wi-Fi cable modem configuration....57
Restore the Wi-Fi cable modem configuration settings....57
Reset the Wi-Fi cable modem configuration settings.... 58
Exit the Wi-Fi Cable Modem Web Manager.... 59
Chapter 9: Troubleshooting tips....60
Solutions....60
Front panel LED icons and error conditions....61
Getting started
Welcome to the next generation of ultra high-speed ARRIS SURFboard® DOCSIS® 3.0 Wi-Fi cable modems (SBG6950AC2, SBG7400AC2, and SBG7600AC2). This mobile app provides security, Internet access, and Parental Control management for the connected devices (e.g., smartphones, tablets, computers, smart TVs, gaming consoles, etc.) on your Wi-Fi home network. It is available online as a free download for your mobile devices using the App store (for Apple devices) or Google Play (for Android devices).
Your SURFboard device is a combination DOCSIS 3.0 cable modem and four-port Ethernet router with Wi-Fi. It uses DOCSIS 3.0 technology to provide ultra high-speed Internet access in your home or small business network. Using the connection capabilities of the Wi-Fi cable modem, you can connect your computer and other network-enabled devices via the four Ethernet ports or the 2.4 GHz and 5 GHz Wireless connections. Your Wi-Fi cable modems connects to the existing coaxial cable connection in your home. It also includes a Wi-Fi® Pairing (WPS) button option for quick and easy connections for your WPS-enabled devices.
This guide provides instructions for installing and configuring your Wi-Fi cable modems, setting up secure Wi-Fi network connections, and managing your Wi-Fi cable modem and network configurations.
In the box
Before installing your Wi-Fi cable modem, check that the following items are included in the product box. If any items are missing, please call ARRIS Technical Support at 1-877-466-8646 for assistance.
Wi-Fi cable modem package contents
Item Description
SBG6950AC2
SBG7400AC2
SBG7600AC2


High-speed DOCSIS 3.0 cable modem, wireless access point, and four-port Ethernet router.
Item Description
Power adapter Power adapter for an electrical wall outlet
connection.
Software License and Warranty card

Contains safety and regulatory information, software license, and warranty information for your Wi-Fi cable modem.
Wi-Fi Cable Modem Quick Start Guide

Provides information for installing your Wi-Fi cable modem and setting up a secure Wi-Fi network connection on your home or small business network.
Additional items needed (not included)
The following items are not included in the box and must be purchased separately, if needed:
■ Coaxial (coax) cable - if one is not already connected to a cable wall outlet
■ RF splitter - for additional coaxial cable connections, such as a set-top box or Smart TV
- Ethernet cable - for each Ethernet connected device
System requirements
■ High-speed Internet access account
■ Web browser access – Internet Explorer, Google Chrome, Firefox, or Safari
■ Compatible operating systems:
- Windows ^® 10
- Windows 8
- Windows 8.1
- Windows 7 Service Pack 1 (SP1)

Note: Although older versions of Microsoft Windows operating systems are no longer specifically supported, they should still function with this model.
- Mac ^® 10.4 or higher
- UNIX ®
- Linux ®
Contact information
For technical support and additional ARRIS product information:
■ Visit the ARRIS Support website: http://www.commscope.com/support/consumers
■ Call ARRIS Technical Support: 1-877-466-8646
Product overview
Front panel

Wi-Fi cable modem front panel LED icons
Led icon Blinking On (Solid)

POWER

SEND
RECEIVE

ONLINE
Not applicable – icon does not blink. Power is properly connected.
Scanning for upstream (send)
Upstream (send) and downstream
and downstream (receive)
(receive) channels are connected.
channel connections.
Scanning for an Internet connection. Wi-Fi cable modem is connected to the
network.
| Led icon Blinking On (Solid) | ||
| WIRELESS | Wi-Fi enabled with encrypted or unencrypted wireless data activity. | Any of the following applies:2.4 GHz wireless connection is made between your Wi-Fi cable modem and a Wi-Fi enabled device on your home network; for example, Wi-Fi telephone, tablet, or laptop.The WPS pairing process between your Wi-Fi cable modem and the WPS enabled device was successful.The WPS pairing process either failed or did not complete after two minutes. |
| WIRELESS | Wi-Fi enabled with encrypted or unencrypted wireless data activity. | Any of the following applies:5 GHz wireless connection is made between your Wi-Fi cable modem and a Wi-Fi-enabled device on your home network; for example, Wi-Fi telephone, tablet, or laptop.The WPS pairing process between your Wi-Fi cable modem and the WPS enabled device was successful.The WPS pairing process either failed or did not complete after two minutes. |
| WPS Button | WPS pairing process is underway between your Wi-Fi cable modem and a WPS-enabled device. | WPS-enabled device is connected. |
| USB | Not applicable – no LED on port. Not applicable – no LED on port. | |
Wi-Fi Protected Setup ^TM (WPS)
Wi-Fi Protected Setup (WPS) is a Wi-Fi network setup option that provides a quick and easy solution for setting up a secure Wi-Fi network connection for any WPS-enabled device; such as a computer, tablet, gaming device, or printer. WPS automatically configures your Wi-Fi network connections and sets up Wi-Fi security. See Connect your WPS-enabled device (page 29) for more information.
Rear panel

Figure 2: Wi-Fi cable modem rear view
Wi-Fi cable modem rear panel ports & connectors
Port name Description
| Reset button Recessed button located on the rear panel of yourWi-Fi cable modemcan be used to either reboot your Wi-Fi cable modem or reset your Wi-Fi cable modem configuration settings.To reboot (or restart) your Wi-Fi cable modem:1. Insert the end of a paper clip or other small object with a narrow tip into theResetopening on the rear panel of your Wi-Fi cable modem.2. Press and hold theResetindented button for three to four seconds only.3. Remove the paper clip or small object from theResetopening.To reset yourWi-Ficable modemconfiguration back to the factory default settings:4. Insert the end of a paper clip or other small object with a narrow tip into theResetopening on the rear panel of yourWi-Fi cable modem.5. Press and hold theResetbutton for 10 seconds.6. Remove the paper clip or small object from theResetopening.SeeReset the Wi-Fi cable modem configuration settings(page 58) for more information on resetting your Wi-Fi cable modem configuration settings using theWi-Fi Cable ModemWeb Manager.Warning: Resetting the Wi-Fi cable modem configuration settings to the factory defaults will also delete your custom Wi-Fi cable modem configuration, including your user password, Wi-Fi network name (SSID), and other configuration settings. You should first back up your Wi-Fi cable modem configuration files before resetting your Wi-Fi cable modem. SeeBack up your Wi-Fi cable modem configuration(page 57) for more information. | |
| ETHERNET10/100/1000 | Four one-gigabit Ethernet ports for RJ-45 network cable connections:■ Green: LED is ON - Indicates a data transfer rate of one gigabit per second■ Green: LED is Blinking - Indicates data traffic is in progress■ Amber: LED is ON - Indicates a data transfer rate of less than one gigabit per second■ Amber: LED is Blinking - Indicates data traffic is in progress |
| CABLE | Coaxial cable connector |
| Power port 100 - | 240 VAC Power connectorWarning: To avoid any damage to your Wi-Fi cable modem, only use the power cord provided in the box. |
Wi-Fi cable modem label


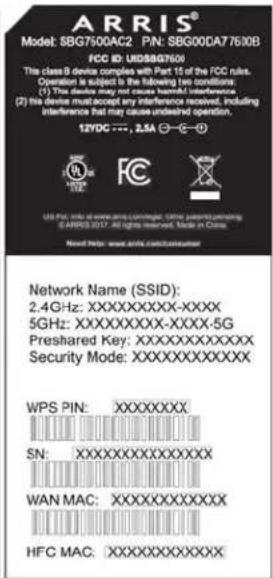
Figure 3: Sample SBG6950AC2, SBG7400AC2, & SBG7600AC2 labels
The Wi-Fi cable modem label is located on the bottom of your Wi-Fi cable modem. It contains the Wi-Fi cable modem information that you may need when contacting your service provider or ARRIS technical support (page 12).
To receive Internet service, contact your service provider for assistance. You may have to provide the following information listed on the Wi-Fi cable modem label:
■ Wi-Fi cable modem model name (SBG6950AC2, SBG7400AC2, or SBG7600AC2)
■ Wi-Fi cable modem MAC address (HFC MAC)
■ Wi-Fi cable modem serial number (SN)
Installing the Wi-Fi cable modem

CAUTION: This product is for indoor use only. Do not route the Ethernet cable(s) outside of the building. Exposure of the cables to lightning could create a safety hazard and damage the product.
Connect your Wi-Fi cable modem to your client device
Before installing your Wi-Fi cable modem:
- Check with your service provider (or local cable company) to ensure broadband cable service is available in your area.
To set up a Wi-Fi network, you will need a high-speed Internet connection provided by an Internet service provider.

Note: When contacting your service provider, you may need your Wi-Fi cable modem information listed on the Wi-Fi cable modem label on the bottom of your Wi-Fi cable modem see (Wi-Fi cable modem label (page 17)).
- Choose a location in your home where your computer and Wi-Fi cable modem are preferably near existing cable and electrical wall outlets.
For the best Wi-Fi coverage, a central location in your home or building is recommended.

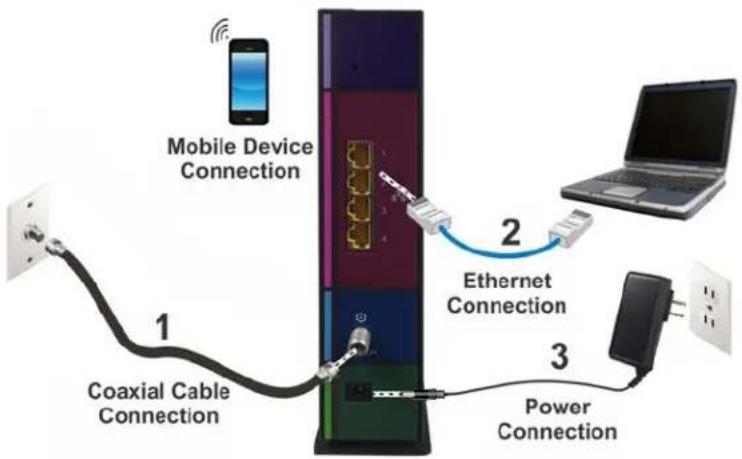
Note: The following installation procedure covers the wired Ethernet connection process so that you can confirm that your Wi-Fi cable modem was properly installed and can connect to the Internet.
flowchart
graph TD
    A["Mobile Device Connection"] -->|1| B["Coaxial Cable Connection"]
    B --> C["Ethernet Connection"]
    C -->|2| D["Laptop"]
    C -->|3| E["Power Connection"]
Figure 4: Wi-Fi cable modem connection diagram
-
Check that a coaxial cable is already connected to a cable wall outlet or RF splitter (not included).
-
Connect the other end of the coaxial cable to the Cable connector on the rear of your Wi-Fi cable modem.
Use your hand to tighten the connectors to avoid damaging them.
-
Connect the Ethernet cable to an available Ethernet port on the rear of your Wi-Fi cable modem.
-
Connect the other end of the Ethernet cable to the Ethernet port on your computer.
Optional: Repeat steps 3 and 4 for an additional computer or other network device that you want to install as a wired connection on your home network.
-
Connect the power cord to the Power port on the rear of your Wi-Fi cable modem.
-
Plug the other end of the power cord into an electrical wall outlet that is not controlled by a wall switch.

Note: This automatically powers ON your Wi-Fi cable modem. There may be up to a 15 second delay for the Power LED on the Wi-Fi cable modem front panel to light up after the power is connected.
Establish an Internet connection
Although your computer may already be configured to automatically connect to the Internet, you should still perform the following Wi-Fi cable modem connectivity test to check that your devices were installed properly and are successfully connected to your Wi-Fi home network.
-
Power ON your Wi-Fi enabled device (e.g., laptop, computer, smartphone) connected to your Wi-Fi cable modem if it is turned off, and then log in.
-
Contact your service provider to activate (provision) your Wi-Fi cable modem.
You may have to provide the HFC MAC ID listed on the Wi-Fi cable modem label.
- Enter your service provider's web browser URL:
■ Comcast/Xfinity: www.xfinity.com/activate
■ Cox: http://www.cox.com/activate
■ Spectrum: http://spectrum.net/selfinstall
Your service provider may allow for automatic activation, which automatically launches the service provider's special website on your computer when you open a web browser.
-
After your Wi-Fi cable modem is activated (or provisioned), open a web browser (such as Internet Explorer, Google Chrome, Firefox, or Safari) on your computer.
-
Type a valid URL (such as www.surfboard.com) in the address bar and then press Enter. The ARRIS website should open. If the website did not open, please contact your service provider for assistance.
-
Check that the Power, Send/Receive, and Online front panel LEDs on your Wi-Fi cable modem light up in sequential order. See Front panel (page 13) for additional LED status information.
If all three LEDs did not light up solid and you also do not have an Internet connection, you may have to contact your service provider to reactivate your Wi-Fi cable modem or check for signal issues.
If you still cannot connect to the Internet, please call ARRIS Technical Support at 1-877-466-8646 for assistance.
Setting up a Wi-Fi network connection

Note: Your home network connection must be up and running on the Internet before you can set up your Wi-Fi network connections. Before proceeding, check that your Wi-Fi cable modem and computer or other client device can connect to the Internet using a wired Ethernet cable connection, see Connect your Wi-Fi cable modem to your client device (page 18) for more information. Please note that If your Internet service is not yet set up, contact a broadband service provider of your choice for assistance.
There are two Wi-Fi network connection options available to configure your Wi-Fi network connection on your home network. Select one of the following:
■ Set up a Wi-Fi network connection using your mobile device (page 21)(recommended)
■ Set up a Wi-Fi network connection using your client device (page 23)
After setting up your Wi-Fi home network connection, check that your Wi-Fi network connection was set up properly, see Test your Wi-Fi network connection (page 29).
Set up a Wi-Fi network connection using your mobile device
The ARRIS SURFboard Manager mobile app is a quick and easy-to-use option to set up your Wi-Fi home network connection(s) using your iOS or Android mobile device.
- Check that your Wi-Fi cable modem is powered ON and connected to your home network.
- Scan the QR code to download the ARRIS SURFboard Manager mobile app from the App Store or Google Play on your iOS or Android mobile device.

Figure 5: ARRIS SURFboard Manager mobile app download QR code
The following ARRIS SURFboard Manager mobile app screen displays.

Figure 6: ARRIS SURFboard Manager mobile app download screen
- Tap INSTALL to download the SURFboard Manager mobile app on your mobile device.
The ARRIS SURFboard® Manager will be installed on your device soon message displays.
- Tap OK.
The following ARRIS SURFboard Manager window displays.

Figure 7: ARRIS SURFboard Manager mobile app open screen

Note: After the download is finished, the ARRIS SURFboard Manager mobile app shortcut will be added to your mobile device Home or Apps screen.
- Tap OPEN to launch the SURFboard Manager mobile app.
The ARRIS SURFboard Manager mobile app opening screens display.

Figure 8: ARRIS SURFboard Manager mobile app opening screens
- Continue to follow the mobile app prompts to configure your Wi-Fi home network connection(s).
For additional information or instructions for using the mobile app, see the ARRIS SURFboard Manager Mobile App User Guide available online at ARRIS SURFboard Manager.
Set up a Wi-Fi network connection using your client device

Note: You will need the Wi-Fi Network Name (SSID) and Wi-Fi Security Key (Network Password) to connect your client devices to your home network. The default network name and network password are listed on the Wi-Fi cable modem label.
Select one of the following network connection options for the client device you are using to set up a Wi-Fi network connection on your home network. Repeat for each additional client device:
■ Personal computer (PC) (page 23)
■ Android device (page 28)
■ Apple computer
■ Apple mobile device (page 29)
Personal Computer (PC)
Select one of the following:
■ Quick connect using the Windows taskbar (page 23)
■ Connect using the Windows control panel (page 26)
The steps for setting up your Wi-Fi network connection may differ slightly depending on the version of Microsoft Windows running on your client device. The steps used in this section apply to Windows 7.
Quick connect using the Windows taskbar
- From the Windows taskbar on your computer, click the Wi-Fi Link icon (see Figure 9) to open the list of available Wi-Fi networks (see Figure 10).

Figure 9: Sample windows taskbar icons

Note: If the Wi-Fi Link icon is not visible, left-click on the Show hidden icons button (see Figure 9) on the Windows taskbar to open the list of additional icons.

Figure 10: Sample available Wi-Fi networks window
- Locate and left-click on the Wi-Fi cable modem Wi-Fi network name or SSID (for example, ARRIS-####) for your Wi-Fi cable modem from the list of available Wi-Fi networks.
The default SSID is located on the device label on the bottom of your Wi-Fi cable modem.

Note: You must use the default SSID listed on the Wi-Fi cable modem label when installing the Wi-Fi cable modem and setting up your first Wi-Fi network connection on your home network. You can change the SSID after your network connections are up and running. See Change your Wi-Fi network name (SSID) (page 40) for more information.

Figure 11: Sample Wi-Fi network connection window
-
Select Connect automatically to set up your Wi-Fi devices to automatically connect to your Wi-Fi network without having to log on using a user password.
-
Click Connect to open the Connect to a Network window and set up your new network password.

Figure 12: Connect to a Network window
- Enter the Network Security Key (your Wi-Fi network password) in the Security key field.

Note: You can use the default Wi-Fi Security Key code listed on the Wi-Fi cable modem label or enter your own personal Wi-Fi network password. See Prevent unauthorized access (page 43) for more information on creating login passwords.
If you changed your Wi-Fi network password using the Wi-Fi cable modem Web Manager, enter that password in the Security key field.

Figure 13: Connect to a Network-create network password window
- Select Hide characters and then click OK to encrypt your network password.
Connect using the Windows control panel
- From the Windows taskbar on your computer, click Start button and then click Control Panel.
- Click Network and Sharing Center to open the Network and Sharing Center window.


Figure 14: Control panel-network and sharing center window
- Click Manage wireless networks under Control Panel Home side panel to open the Manage Wireless Networks window.
- Click Add to open the Manually Connect to a Wireless Network window.

Figure 15: Manually connect to a wireless network window
- Click Manually create a network profile to open another Manually Connect to a Wireless Network window.
![Manually connect to a wireless network Enter information for the wireless network you want to add Network name: Security type: [Choose an option] Encryption type: Security Key: Hide characters Start this connection automatically Connect even if the network is not broadcasting Warning: If you select this option, your computer's privacy might be at risk.](/content/2026/06/1401312/images/1d236365f9f5c1db5367a17855b6e43903e1dd484f8d9ff6d9439a92f4bed1f6.jpg)
Figure 16: Manually connect to a wireless network window
- Enter the Wi-Fi cable modem Wi-Fi network name or SSID (ARRIS-####) for your Wi-Fi cable modem in the Network name field.
The default SSID is listed on the Wi-Fi cable modem label on the bottom of your Wi-Fi cable modem.

Note: You have the option to change your Wi-Fi network name or SSID after setting up your Wi-Fi network connection. However, you must use the default SSID listed on the Wi-Fi cable modem label after installing your Wi-Fi cable modem. See Change your Wi-Fi network name (SSID) (page 40) for more information.
- Select the wireless security level for your Wi-Fi network from the Security type dropdown list.

Note: WPA2-Personal is the default security level for your Wi-Fi cable modem. It is the highest network security level available and is the recommended wireless security level for your home network.
- Select the password encryption type from the Encryption type drop-down list.
This is used to secure your Wi-Fi network.
■ TKIP – Temporal Key Integrity Protocol
■ AES – Advanced Encryption Standard (recommended). AES is the default encryption type for your Wi-Fi cable modem.
- Enter a security code (passphrase) for your Wi-Fi network password in the Security Key field.
You can use the default WI-FI SECURITY KEY listed on the Wi-Fi cable modem label or create your own personal network password.

Note: Remember to use a unique combination of letters, numbers, and special characters to create a more secure password. See Prevent unauthorized access (page 43) for more information.
- Select Hide characters checkbox to prevent your Security Key (network password) from displaying in the field.
- Select Start this connection automatically so that your Wi-Fi devices will automatically connect to your Wi-Fi network when they are powered on.
- Click Next to complete the Wi-Fi network setup.
The Successfully addedmessage for your new Wi-Fi network should appear. - Click Close to exit.
Android device
▶ From any screen on your client device:
- Select to open the Settings screen.
- Select Wi-Fi to turn it ON.
Your device will automatically search and display a list of available Wi-Fi networks. - Select your Wi-Fi network name (SSID) from the list.
-
If prompted, type your Wi-Fi Security Key (network password).
Please note that your network password may be case-sensitive. -
Select Connect.
If your Wi-Fi network connection is successful, Connected will display under your network name.
Apple computer
▶ From any screen on your client device:
- Click (Wi-Fi icon) to display a list of available Wi-Fi networks.
- Select the Wi-Fi network name (SSID) for your home network from the list.
- If prompted, enter your network password in the Password field.
- If prompted, type your Wi-Fi Security Key (network password).

Note: Checkmark Remember this network if you want your Mac computer/client device to automatically connect to your home network when you log on. Your computer must be within range of your Wi-Fi network to connect to it.
Apple mobile device
From the Home screen on your client device:
- Select Settings to open the Wi-Fi screen.
- Select Wi-Fi to turn it ON.
Your device will automatically start searching and then list the available Wi-Fi networks. - Select the Wi-Fi network name (SSID) for your home network from the list to connect it. If your Wi-Fi connection is successful, √ will display next to the Wi-Fi network name.

Note: For more information on setting up your Wi-Fi network connections, refer to the user documentation for your specific client device.
Test your Wi-Fi network connection
Perform the following connectivity test to check that Wi-Fi connections were established for your Wi-Fi cable modem and the other Wi-Fi devices on your home network:
- Check if your Wi-Fi devices successfully connected to your Wi-Fi network, then disconnect the Ethernet cable, if connected, from your computer and Wi-Fi cable modem.
- Check that the Wireless LED on your Wi-Fi cable modem front panel is lit SOLID green.
- Open a web browser on your computer, such as Internet Explorer, Google Chrome, Firefox, or Safari.
- Type a valid URL (such as www.surfboard.com) in the address bar and then press Enter. If the website failed to open, please contact your service provider or call ARRIS Technical Support at 1-877-466-8646 for assistance.
Connect your WPS-enabled device
You can use the Wi-Fi Protected Setup (WPS) Pairing button on your Wi-Fi cable modem to connect your WPS-enabled devices. WPS automatically assigns a random Wi-Fi network name (SSID) and Wi-Fi Security Key (network password) to your Wi-Fi cable modem and your other WPS-enabled devices to connect them to your Wi-Fi network.

Note: To use the WPS Pairing button option, your computer hardware must support WPS and have WPA security compatibility.
-
Power ON your Wi-Fi cable modem and your other WPS-enabled devices that you want to connect to your Wi-Fi network.
-
Press and hold the WPS button located on your Wi-Fi cable modem front panel for five to 10 seconds and then release. See Front panel (page 13) for the Wi-Fi cable modem front view.
- If applicable, press the WPS button on your WPS-enabled computer or other WPS-enabled device.
- Repeat step 3 for each additional WPS-enabled device that you want to connect to your Wi-Fi network.
Using the Wi-Fi Cable Modem Web Manager
Use the Wi-Fi Cable Modem Web Manager to view and monitor the network configuration settings and operational status of your Wi-Fi cable modem. You can also configure your network connections and Wi-Fi security settings. See Protecting and monitoring your Wi-Fi network (page 43) for more information.

Note: If you did not purchase your Wi-Fi cable modem from a retail store, you may notice a few blocked configuration settings in Wi-Fi Cable Modem Web Manager that cannot be modified. This may be due to some restrictions set up by your service provider to prevent unauthorized changes to certain configuration parameters.
Start the Wi-Fi Cable Modem Web Manager

Note: You must use the default user name and password (see step 3) if you are logging on to the Wi-Fi Cable Modem Web Manager for the first time. For network security purposes, ARRIS recommends that you change the default user name and password after setting up your Wi-Fi network. See Change the default user password (page 43) for more information.
- Open a web browser (such as Internet Explorer, Google Chrome, Firefox, or Safari) on the computer connected to your Wi-Fi cable modem.
- Type the default LAN IP address, 192.168.0.1, in the Address bar and then press Enter to log on to your Wi-Fi cable modem and open the Wi-Fi Cable Modem Login screen.

Figure 17: Wi-Fi cable modem login screen
- Type the following default username and password. Both entries are case-sensitive.
■ Username: admin
■ Password: password
This is the default user password (case-sensitive) to access the Wi-Fi Cable Modem Web Manager.

Note: You must enter the default user password if you are accessing the Wi-Fi Cable Modem Web Manager for the first time. To change the user password, continue the following steps in this procedure.

Figure 18: Wi-Fi cable modem login screen
- Click Apply to open the Wi-Fi Cable Modem Web Manager.
The Alerts!! message box displays.

Figure 19: Wi-Fi Cable Modem opening alerts screen

Note: ARRIS recommends that you change the default password for network security purposes. To change the password now, continue with step 5 below.
To change the password later, see Change the default user password (page 43) for more information.
- Click the Click Here link in the Alerts!! message box.
A new Login Settings screen displays.
Login Settings
You can change the password for admin account. Use a password that will not be easy to guess. Passwords are case-sensitive. Valid characters are the numbers 0 to 9, the letters a through z and A through Z, and printable special characters (such as \$, I, ?, &, #, @, and others.)
Change Password
| Old Password | ? | |
| New Password | ? | |
| Repeat New Password | ? |
Other Settings
| Login Timeout | 900 | ? |
Apply
Figure 20: Wi-Fi Cable Modem change password screen
-
Enter your current password in the Old Password field.
-
Enter your new password in the New Password field.

Note:
Remember that passwords are case-sensitive and that you can use any combination of the following letters, numbers and special characters:
■ Letters: A through Z (uppercase and lowercase)
Numbers: 0 to 9
■ Special characters: ! @ # \$ % & *
-
Enter your new password again in the Repeat New Password field.
-
Click Apply to update your password.
-
Find a secure place to write down and keep your new password for future reference, if needed.
Wi-Fi Cable Modem Web Manager menu bar
The Wi-Fi Cable Modem menu buttons are displayed along the top of the Wi-Fi Cable Modem Web Manager screen. To view a submenu screen (see Figure 21), click the related menu button on the menu bar.

Figure 21: Wi-Fi Cable Modem Web Manager menu bar
Wi-Fi Cable Modem Web Manager menu bar
Menu option Function
Wireless
Basic Setup Displays the default configuration settings for the Wi-Fi cable modem and allows you to change your user password.
WAN Setup Displays the network configuration settings for the network connections outside your home.
LAN Setup Displays the network configuration settings for your home network.
Wireless 2.4 GHz Sets up your 2.4 GHz wireless network.
Wireless 5 GHz Sets up your 5 GHz wireless network.
Firewall Configures the Wi-Fi cable modem firewall to protect your home network from possible attacks from hackers or viruses.
USB Displays the current storage status of your USB device.
Utilities Provides general information to help you set up your home network.
Extender Configures your wireless SURFboard network extenders.
HSD Displays the Wi-Fi cable modem product information including network connection status, hardware and software versions, and event log.
Logout Closes the Wi-Fi Cable Modem Web Manager
Wi-Fi Cable Modem Web Manager-available languages
The Wi-Fi Cable Modem Web Manager is available in the following languages:
English
■ Spanish
French
Dutch
Brazilian Portuguese
To change the language:
-
Open a web browser (such as Internet Explorer, Google Chrome, Firefox, or Safari) on the computer connected to your Wi-Fi cable modem.
-
Type the default LAN IP address, 192.168.0.1, in the Address bar and then press Enter to log onto your Wi-Fi cable modem.
The Wi-Fi cable modem login screen displays.
- Type the following default user name and password or your new password. Both entries are case-sensitive.
■ User Name: admin
■ Password: password
-
Click Apply to open the Wi-Fi Cable Modem Web Manager.
-
Click the Utilities menu button on the Wi-Fi Cable Modem Web Manager menu bar.
-
Click Language from the Utilities submenu options.

Figure 22: Wi-Fi cable modem language screen
- Select the language from the Language drop-down list.
- Click Apply.
Get help
Field-level help is available for all screen entries in the Wi-Fi Cable Modem Web Manager.
Click on or move the cursor over the icon located to the right of the applicable field.

Figure 23: Wi-Fi cable modem field level help screen
Exit the Wi-Fi Cable Modem Web Manager
To log out and close the Wi-Fi Cable Modem Web Manager:
■ Click Logout button located on the Wi-Fi Cable Modem Web Manager menu bar.

Figure 24: Wi-Fi Cable Modem Web Manager logout button
Configuring your Wi-Fi network
Set up your Wi-Fi network
- Open a web browser and log onto your Wi-Fi cable modem to open the Wi-Fi Cable Modem Web Manager.
See Start the Wi-Fi Cable Modem Web Manager (page 31) for more information, if necessary.
- Click the Wireless 2.4 GHz or Wireless 5 GHz main menu button on the Wi-Fi Cable Modem Web Manager menu bar.
Choose the Wi-Fi frequency range that you want to set up for your Wi-Fi network.
- Click BASIC from the Wireless submenu option you are setting up.
System Basic Setup
While your system has many configuration options, the options on this Basic Setup page are those required by most users. Click the tabs to access the other configuration pages to set advanced options. Hover the mouse pointer over the question mark icon next to an option to view a description of that option. For changes to take effect, you must click the Apply button.
Basic Setup

Figure 25: Wi-Fi cable modem 2.4 GHz wireless screen
System Basic Setup
While your system has many configuration options, the options on this Basic Setup page are those required by most users. Click the tabs to access the other configuration pages to set advanced options. Hover the mouse pointer over the question mark icon next to an option to view a description of that option. For changes to take effect, you must click the Apply button.
Basic Setup
Enable Wireless

Wireless Network Name (SSID)

Broadcast Network Name (SSID)

Tx Power Level

Channel

AP Isolation

Enable WMM

WMM Power Save mode

Enable 5G MU-MIMO

Security Mode

Pre-Shared Key

Apply
Figure 26: Wi-Fi cable modem 5 GHz wireless network screen
- Select the Enable Wireless checkbox to turn ON Wi-Fi networking on your home network.
- or -
Deselect the Enable Wireless checkbox to turn OFF Wi-Fi networking on your home network.
-
Do one of the following to set the network name or SSID (Service Set Identifier) for your Wi-Fi network in the Wi-Fi Network Name (SSID) field:
-
Keep the default network name listed in the network name field (also listed on the Wi-Fi cable modem label).
■ Enter a new network name for your Wi-Fi network.
The Wi-Fi network name cannot be the same name as any other SSID on your home network. You can use any combination of letters (lowercase and uppercase), numbers, and/or special characters (symbols) up to a maximum of 32 characters.
- Select the Broadcast Network Name (SSID) checkbox to turn ON displaying your SSID as an available Wi-Fi network to outside users.
- or -
Deselect the Broadcast Network Name (SSID) checkbox to turn OFF displaying your SSID as an available Wi-Fi network to outside users.

Note: When Broadcast Network Name (SSID) is enabled, your SSID is visible and also available to unauthorized Wi-Fi clients that are within range to connect to your home network.
-
Select High, Medium, or Low for the Tx (Transmit) Power level of the Wi-Fi radio.
-
Select a channel number (Auto, 1 thru 11) from the Channel drop-down list to set the Communications channel for your Wi-Fi cable modem.

Note: For 2.4 GHz Wi-Fi networks, it is recommended to use Channel 1, 6, or 11, if it is not listed as the Current Channel. In the Wi-Fi spectrum, there are multiple channels that overlap and thus degrade Wi-Fi network performance. Channels 1, 6, and 11 are used for better network performance and stability because they do not overlap.
- Select the AP Isolation checkbox to enable separate virtual networks for your Wi-Fi clients.
- or -
Deselect the AP Isolation checkbox to disable separate virtual networks for your Wi-Fi clients.

Note: When AP Isolation is enabled, each of your Wi-Fi clients will be in its own virtual network and will not be able to communicate with the other Wi-Fi clients. This may be useful if several guests are using your Wi-Fi network.
- Select the Enable WMM checkbox to turn ON Wi-Fi Multi-media functionality.
Enabling WMM can help control latency and jitter when transmitting multi-media content over a Wi-Fi connection. This quality of service mechanism uses four access categories:
Voice
Video
■ Best effort
■ Background
WMM ensures that applications with low tolerance for latency and jitter are treated with higher priority than less sensitive data applications. WMM sets different wait times for the four categories to provide priority network access for applications that are less tolerant of packet delays.
- Select the WMM Power Save mode checkbox to set the more efficient power management method.
- or-
Deselect the WMM Power Save mode checkbox to turn OFF the WMM Power Save mode.
- Select one of the following Wi-Fi network security options for your Wi-Fi cable modem from the Security Mode drop-down list:
■ Open (not secure): Network security is not set for your Wi-Fi network. This network security option allows access to your Wi-Fi network without a Wi-Fi Security Key (network password)
■ WEP (64/128) (poor security): Wired Equivalent Privacy
■ WPA/WPA2-PSK (TKIP/AES) (most compatible): Wi-Fi Protected Access version 2 with Pre-Shared Key
■ WPA2-PSK (AES) (recommended): Wi-Fi Protected Access version 2 with Pre-Shared Key
- Enter a string of either ASCII characters or hexadecimal numbers (0 through 9, A thru F) in the Pre-Shared Key field to create your WPA Pre-Shared key.
The Pre-Shared key is used to generate a unique password for WPS-enabled devices to connect to your Wi-Fi network.
- Click Apply, when you are finished.
Change your Wi-Fi network name (SSID)
The SSID (Service Set Identification) is the Wi-Fi network name assigned to your Wi-Fi cable modem Wi-Fi network. The default SSID (listed on the Wi-Fi cable modem label) is automatically populated in the network configuration screens. A list of available Wi-Fi networks (SSIDs) in close proximity of your home (for example, neighbors or local businesses) will display when you or someone else in your home attempt to establish a Wi-Fi network connection. For security purposes and quick recognition of your Wi-Fi network, ARRIS recommends that you change the default SSID.

Note: When you change the SSID, any Wi-Fi devices that are already connected to your Wi-Fi network will be disconnected from the network. The Wi-Fi devices will have to be reconnected to the Wi-Fi network using the new SSID.
Do the following to change your Wi-Fi network name (SSID):
- Open a web browser and log onto your Wi-Fi cable modem to open the Wi-Fi Cable Modem Web Manager.
See Start the Wi-Fi Cable Modem Web Manager (page 31) for more information, if necessary.
- Click the Wireless 2.4 GHz or Wireless 5 GHz main menu button on the Wi-Fi Cable Modem Web Manager menu bar.
Choose the Wi-Fi frequency range that you want to set up for your Wi-Fi network.
- Click BASIC from the Wireless submenu option you are setting up.

Figure 27: Wi-Fi cable modem 2.4 GHz wireless screen

Figure 28: Wi-Fi cable modem 5 GHz wireless screen
- Check that the Enable Wireless checkbox is selected.
This turns ON Wi-Fi networking on your home network.
- Delete the current network name in the Network Name (SSID) field.
- Enter a new name of your choice for your Wi-Fi network.
The network name can contain any combination of up to 32 alphanumeric characters.
- Check that the Broadcast Network Name (SSID) checkbox is selected.
- Click Apply at the bottom of the screen when you are finished.
The new Wi-Fi network name should appear in the list of available Wi-Fi networks when you reconnect your Wi-Fi devices.
Protecting and monitoring your Wi-Fi network
After you have successfully connected your Wi-Fi cable modem and other Wi-Fi devices, you should configure your Wi-Fi cable modem to protect your Wi-Fi network from unwanted and unauthorized access by any Wi-Fi network devices that are within range of your Wi-Fi network. Although network security for your Wi-Fi cable modem is already configured, you can use the Wi-Fi Cable Modem Web Manager to set the level of security and access that you want to allow on your Wi-Fi home network.
Prevent unauthorized access

CAUTION: To prevent unauthorized access and configuration to your Wi-Fi home network, ARRIS recommends that you immediately change the default password after connecting to the Internet and logging on to your Wi-Fi cable modem for the first time.
One of the most important recommendations for securing your Wi-Fi home network is to change the default user password on your Wi-Fi cable modem and other Wi-Fi devices as well. Default passwords are commonly used and shared on the Internet.
To ensure that your Wi-Fi home network is secure, ARRIS recommends that you follow these best practices for user passwords:
■ Always create a secure password or pass phrase that is not easily guessed.
■ Use phrases instead of names so that it may be easier for you to remember.
■ Use a combination of upper and lowercase letters, numbers, and symbols.
■ Continue to change your administrator password on a regular basis.

Note: If your service provider supplied your Wi-Fi cable modem, you may not have the necessary user privileges to change the log in user name.
Change the default user password
To change the default user password:
- From any web manager screen, click the Basic Setup main menu button on the Wi-Fi Cable Modem Web Manager menu bar.
- Click LOGIN SETTINGS from the Basic Setup submenu options list.
The Login Settings screen displays.
Login Settings
You can change the password for admin account. Use a password that will not be easy to guess. Passwords are case-sensitive. Valid characters are the numbers 0 to 9, the letters a through z and A through Z, and printable special characters (such as \$, I, ?, &, #, @, and others.)
Change Password
Old Password
New Password
Repeat New Password ?
Other Settings
Login Timeout 900 ?
Apply
Figure 29: Wi-Fi cable modem login settings screen
-
Enter your current password in the Old Password field.
-
Enter your new password in the New Password field.

Note:
Remember that passwords are case-sensitive and that you can use any combination of the following letters, numbers and special characters:
■ Letters: A through (uppercase and lowercase) Z
Numbers: 0 to 9
■ Special characters: ! @ # \$ % & *
-
Enter your new password again in the Repeat New Password field.
-
Click Apply to update your password.
The Applying Changes... message displays.

Note: The Login Timeout setting under the Other Settings section applies to the amount of inactivity time (in seconds) allowed before the Wi-Fi Cable Modem Web Manager automatically logs out. The Login Timeout range is between 30 and 900 seconds.
- Find a secure place to write down and keep your new password for future reference, if needed.
The System Basic Setup screen displays.

Figure 30: Wi-Fi cable modem system basic setup screen
Set up firewall protection
You can set up firewall filters to protect your computer and other network devices on your home network from hackers, viruses, and other attacks from the Internet.
To set the firewall protection level:
-
From any Wi-Fi Cable Modem Web Manager screen, click the Firewall main menu button on the Wi-Fi Cable Modem Web Manager menu bar.
-
Click FIREWALL SETTINGS from the Firewall submenu options list to display the Firewall Settings screen (see Figure 30).
-
Select the Enable Firewall > checkbox to turn ON firewall protection on your home network.
- or -
Deselect the Enable Firewall > checkbox to turn OFF firewall protection on your home network.

Note: Turning OFF firewall protection on your home network could put your computer(s) and other Ethernet-enabled devices connected on your network at risk for possible attacks from viruses and hackers.

Figure 31: Firewall Protection Level Screen
- Select or deselect any of the following to set up firewall protection on your home network:
■ Firewall Enable/Disable
■ DoS Attack Protection
■ Block Pings
■ IPSec Pass Through
■ PPTP Pass Through
■ L2TP Pass Through
■ Block Fragmented IP Packets
- Click Apply, when you are finished.
Set up Parental Control
You can set up the following parental controls to manage and limit the usage and activity for specific users and client devices on your home network:
■ Allow or block access to specific Internet sites.
■ Allow or block access to specific MAC addresses.
■ Allow or block access based on specific keywords.
■ Set time limitations for computer usage or Internet access.

Note: Any Parental Control filters that do not include assigned ports, will apply to all ports. This also applies to MAC addresses.
You can also link each user or client device on your home network to specific rules for login, time-access, and content filtering.
To set up Parental Control on your home network:
-
From any Web Manager screen, click the Firewall menu button on the Wi-Fi Cable Modem Web Manager main menu bar.
-
Click PARENTAL CONTROLS from the Firewall submenu options list to display the Parental Controls screen.

Figure 41: Parental Controls screen
-
Click Enable Parental Controls checkbox to enable trusted MAC addresses, website blocking and keyword blocking.
-
To enable the trusted MAC address, enter the MAC addresses in the Trusted MAC Addresses field.
These MAC addresses will not be affected by the Parental Control settings.
5. To filter websites:
a. Click ADD button in the Web Site Filtering section to open the AddWebSiteFiltering screen.
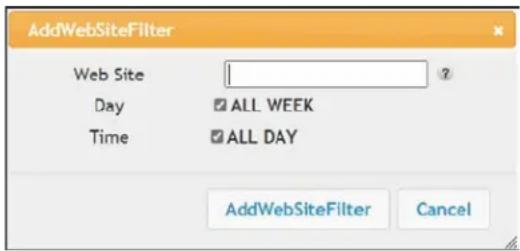
Figure 42: Add WebSite Filter screen
b. To block a website, enter the website address in the Web Site field.
c. To fully block a website, select Day and Timecheckboxes.
d. To block a website for specific days and times, deselect Day and Time fields.
e. Click AddWebSiteFilter to save the changes.
f. Repeat steps a through e for each website that you want to block.
6. To filter by keywords:
a. Click ADD button in the Keyword Filtering section to open the AddKeywordFiltering screen.

Figure 42: Add Keyword Filter screen
b. To block a keyword, enter the keyword in the Keyword field.
c. To fully block a keyword, select Day and Timecheckboxes.
d. To block a keyword for specific days and times, deselect Day and Time fields.
e. Click AddKeywordFilter to save the changes.
f. Repeat steps a through e for each keyword that you want to block.
Set up IP filtering
You can use IP filtering to set up Internet access restrictions on specific network devices on your home network using their IP addresses. You will have to create IP address filters that contain the starting and ending IP address range of each device for which you want to block Internet access.
To configure IP filters:
-
From any web manager screen, click the Firewall menu button on the Wi-Fi Cable Modem Web Manager main menu bar.
-
Click CLIENT IP FILTERS from the Firewall submenu options list to display the Client IP Filters Configuration screen.

Figure 32: Set up client IP filters screen
- Click Add button to open the Add Client IP Filter dialog.

Figure 33: Add client IP filter screen
-
Enter the starting and ending Client IP addresses for the range you are setting up in the Client IP Address field.
-
Enter the range of port numbers for the Port Filter range in the Port fields.
-
Select UDP, TCP, or UDP for the Port Filter type in the Type drop-down list.
-
Select ALL WEEK in the Day field to set the same access restrictions for every day of the week.
- or -
Deselect ALL WEEK to set access restrictions for specific days of the week.
- Select ALL DAY in the Time field to set 24-hour access restrictions for the selected days of the week.
- or -
Deselect ALL DAY to set up a specific range of time for the selected days of the week.
-
Click Add Client IP Filter to create the IP filter.
-
Repeat steps 3 through 9 for each additional range of IP addresses that you want to block from accessing the Internet.
Set up MAC address filtering
MAC filtering allows you to define up to twenty Media Access Control (MAC) address filters to prevent computers from sending outgoing TCP/UDP traffic to the WAN via their MAC addresses. This is useful because the MAC address of a specific NIC card never changes, unlike its IP address, which can be assigned via the DHCP server or hard-coded to various addresses over time.
To configure MAC Address filters:
-
From any Wi-Fi Cable Modem Web Manager screen, click the Wireless 2.4 GHz or Wireless 5 GHz main menu button on the Wi-Fi Cable Modem Web Manager menu bar.
-
Click MAC ADDRESS CONTROL from the Wireless submenu options list to display the MAC Address Control screen.

Figure 34: MAC Address filter screen
- Select the MAC Address Filter Type from the drop-down list:
■ None: Allows all Wi-Fi devices to connect.
■ Whitelist: Allows only listed Wi-Fi devices to connect.
■ Blacklist: Allows only Wi-Fi devices that are not listed to connect.
- Click Add to enter the MAC Address of the client device that you want to block access to your home network.

Figure 35: Add MAC Address screen
- Enter the least significant byte of the starting IP address in the MAC Address field.
- Click Add MAC Address.
- Repeat steps 3 through 6 for each MAC address that you want to add.
- Click Apply, when done.
Set up Port Triggers
You can configure dynamic (port) triggers to specific devices on your LAN. This allows special applications that require specific port numbers with bi-directional traffic to function properly. Applications such as video conferencing, voice, gaming, and some messaging program features may require these special settings.

Note: If you enable the firewall and set up custom port triggers, then you must configure the firewall to allow traffic through those custom ports. See (page Set up firewall protection (page 45)) for more information.
To configure Port Triggers:
- From any Wi-Fi Cable Modem Web Manager screen, click the Firewall main menu button on the Wi-Fi Cable Modem Web Manager menu bar.
- Click PORT TRIGGERS from the Firewall submenu options list to display the Port Triggers Configuration screen.
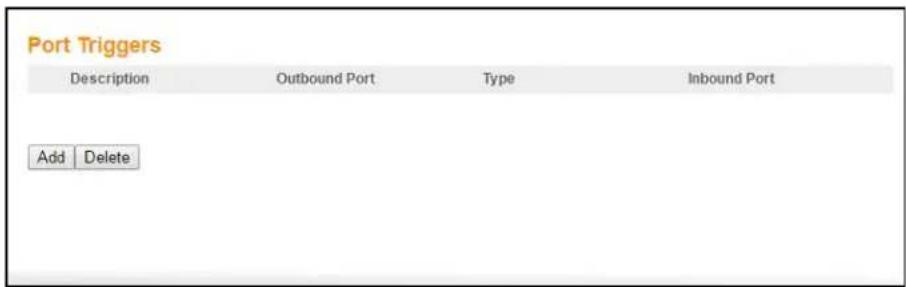
Figure 36: Advanced port triggers screen
- Click Add button to open the Add Port Trigger screen.
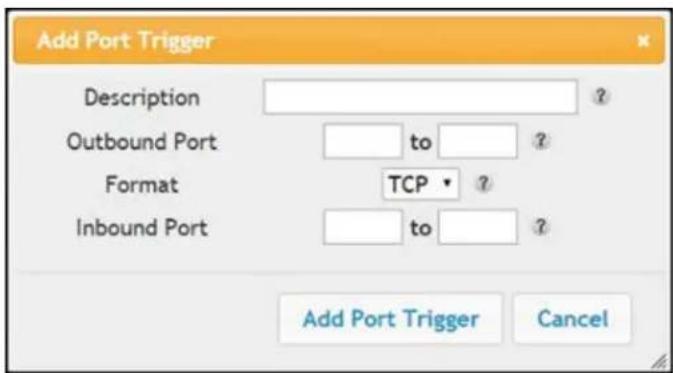
Figure 37: Add port triggers screen
- Enter a name or description for the Port Trigger in the Description field.
- Enter the starting and ending port numbers of the Port Trigger range in the Outbound Port fields.
- Select TCP, UDP, or BOTH for the Port Trigger from the Format drop-down list.
- Enter the starting and ending port numbers of the Port Trigger range in the Inbound Port fields.
- Click Add Port Trigger to create your port triggers.
- Repeat steps 3 through 8 to create additional port triggers.
Set up the DMZ host

Warning: The gaming DMZ host is not protected by the Wi-Fi cable modem firewall. It is exposed to the Internet and thus vulnerable to attacks or hacking from any computer on the Internet. Consider carefully before configuring a device to be in the DMZ.
You can configure one computer on your home network to be the DMZ Host. That computer will operate outside of the Wi-Fi cable modem firewall and allow remote access from the Internet to your computer, gaming device, or other IP-enabled device. The DMZ Host feature will only allow outside users to have direct access to the designated DMZ Host device and not your home network.
To create the DMZ Host:
- From any Wi-Fi Cable Modem Web Manager screen, click the Firewall main menu button.
- Click DMZ from the Firewall submenu options list to display the DMZ settings screen.
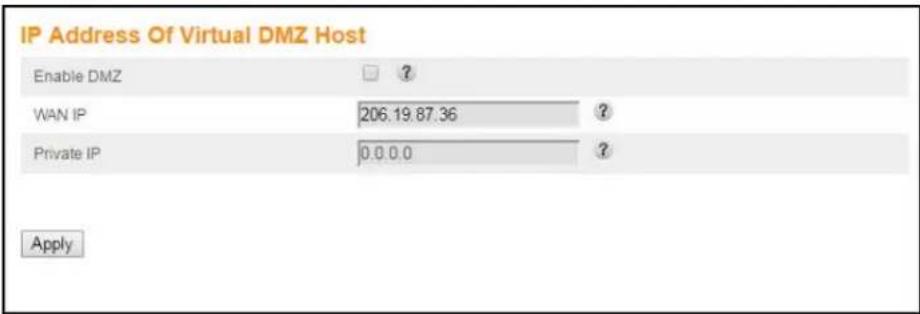
Figure 38: Advanced DMZ host screen
-
Select the Enable DMZ check box to set up the DMZ Host on your home network.
-
Enter the IP address of the computer or gaming device that you are setting up as the DMZ host in the Private IP field.
-
Click Apply, when you are finished.

Note: Remember to reset the IP address back to 0 (zero) to close all the ports when you are finished with the needed application. If you do not reset the IP address, that computer will be exposed to the public Internet.

Note: To disable the DMZ Host, deselect (uncheck) the Enable DMZ checkbox and then click Apply.
Managing your Wi-Fi cable modem and connected networks
Use the Wi-Fi Cable Modem Web Manager to view and monitor the network configuration settings and operational status of your Wi-Fi cable modem. You can also configure your network connections and wireless security settings. See Protecting and monitoring your Wi-Fi network (page 43) for more information.
View the Wi-Fi cable modem status and network connection
You can use the Device Status button on the Wi-Fi cable modem login screen to view the current Wi-Fi cable modem configuration and network connection status of your Wi-Fi cable modem without having to login to the Wi-Fi Cable Modem Web Manager.
- Open any web browser on the computer connected to your Wi-Fi cable modem.
- Type the default LAN IP address, 192.168.0.1, in the address bar and then press Enter.
The Wi-Fi cable modem login screen displays.
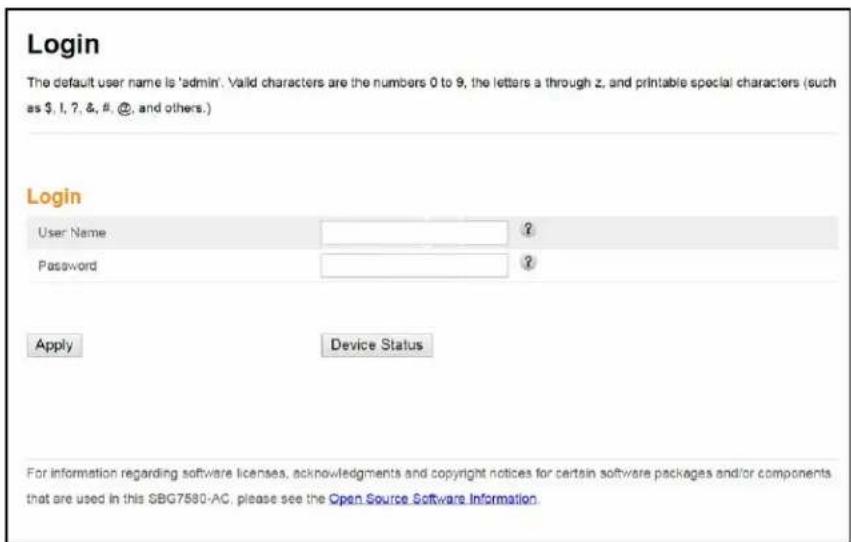
Figure 39: Wi-Fi cable modem login screen
- Click Device Status button to open the Wi-Fi cable modem device status screen.
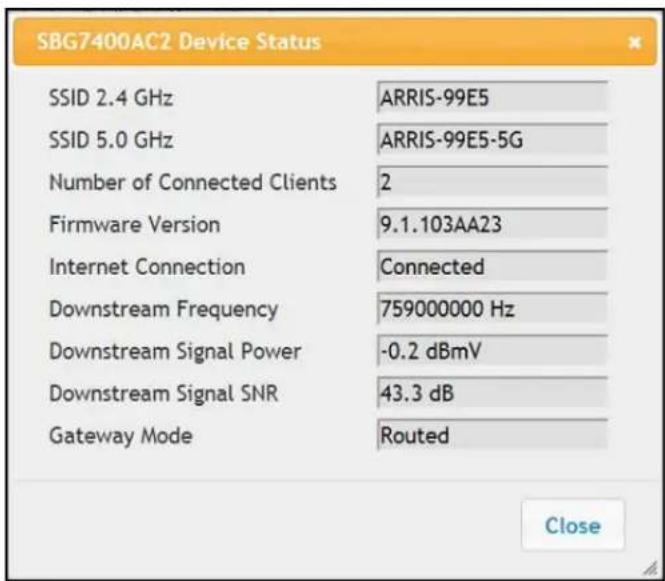
Figure 40: Wi-Fi cable modem device status screen
View the Wi-Fi cable modem product and status information
The System Information screen displays general product information, including the Wi-Fi network name, firmware version, and the network connection status of the Wi-Fi cable modem.
To open the System Information page:
- From any Wi-Fi Cable Modem Web Manager screen, click the Utilities main menu button on the Wi-Fi Cable Modem Web Manager menu bar.
- Click SYSTEM INFORMATION from the Utilities submenu options list to display the System Information screen.
- Click the Refresh button (F5) in your web browser to reload the information on the screen.
| Hardware Software Version | ||
| Serial Number | 75C332333302257 | ? |
| Bootcode Version | 2.2.0.45 | ? |
| Hardware Version | 3 | ? |
| Firmware Version | 9.1.103AA23 | ? |
| WAN Status Summary | ||
| WAN MAC Address | D4 0A A9 0D 99 E6 | ? |
| Connection Setup | dynamic / dynamic | ? |
| IP Address | 206.19.87.34 / : : | ? |
| Subnet Mask | 255.255.255.224 | ? |
| Domain Name | surfboard.com | ? |
| Primary DNS | 8.8.8.8 / : : | ? |
| Secondary DNS | 8.8.4.4 / : : | ? |
| Tertiary DNS | 0.0.0.0 / : : | ? |
| Gateway | 206.19.87.33 / FE80:2301 | ? |
Figure 41: Wi-Fi cable modem status – system information screen (1 of 2)
| Wireless 2.4GHz Status Summary | ||
| Wireless SSID | ARRIS-99E5 | ? |
| Wireless Channel | Auto | ? |
| Wireless Mode | Mixed GN | ? |
| SSID Broadcast | Enabled | ? |
| WMM | Enabled | ? |
| MAC Address | 90.9D:7D:6B:1A:AE | ? |
| Number of Wi-Fi Clients | 1 | ? |
| Radio Status | Enabled | ? |
| WPS Status | Enabled | ? |
| Wireless 5GHz Status Summary | ||
| Wireless SSID | ARRIS-99E5-5G | ? |
| Channel | Auto | ? |
| Wireless Mode | Mixed ANAC | ? |
| SSID Broadcast | Enabled | ? |
| WMM | Enabled | ? |
| MAC Address | 90.9D:7D:6B:1A:AF | ? |
| Number of Wi-Fi Clients | 0 | ? |
| Radio Status | Enabled | ? |
| WPS Status | Enabled | ? |
| LAN Status Summary | ||
| IP Address | 192.168.0.1 / : : | ? |
| DHCP Server | Enabled | ? |
| Subset Mask | 255.255.255.0 | ? |
| UPnP | Enabled | ? |
| Number of LAN Clients | 1 | ? |
Figure 42: Wi-Fi cable modem status – system information screen (2 of 2)
Back up your Wi-Fi cable modem configuration
You can save a backup copy of the current Wi-Fi cable modem configuration settings to your local computer. You can use the backup file to restore your custom Wi-Fi cable modem settings if you made changes that you no longer want.

CAUTION: ARRIS recommends that you perform the Wi-Fi cable modem configuration backup using the Wi-Fi cable modem default login user name and password.
To create a backup copy of your Wi-Fi cable modem configuration settings:
- From any Wi-Fi Cable Modem Web Manager screen, click the Utilities main menu button on the Wi-Fi cable modem Web Manager menu bar.
- Click SAVE/BACKUP SETTINGS from the Utilities submenu options list to display the Save/Backup screen.
- Click Save.
- Click OK at the This may take a few minutes. Continue? prompt to save your Wi-Fi cable modem configuration settings.
Restore the Wi-Fi cable modem configuration settings

Warning: This action deletes your current Wi-Fi cable modem configuration settings and allows you to restore a previously saved Wi-Fi cable modem configuration.

Note: After the configuration settings are restored, your Wi-Fi cable modem will automatically reboot. You will have to log on using the default user name (admin) and password (password).
To open the System Information page:
- From any Wi-Fi Cable Modem Web Manager screen, click the Utilities main menu button on the Wi-Fi Cable Modem Web Manager menu bar.
- Click RESTORE SETTINGS from the Utilities submenu options list to display the System Information screen.
- Click Backup and Restore from the Basic submenu options.
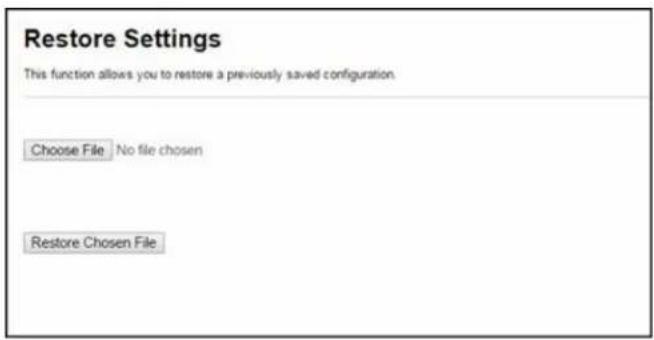
Figure 43: Wi-Fi cable modem restore settings screen
-
Click Choose File to search for a saved configuration file (GatewaySettings.bin) in the Downloads folder on your computer.
-
Select the Wi-Fi cable modem configuration file from the list that you want to restore.
-
Click Open.
The selected configuration file will appear in the Choose File field.

Figure 44: Sample selected Wi-Fi cable modem config file screen
- Click Restore Chosen File.
Your Wi-Fi cable modem will automatically reboot.
Reset the Wi-Fi cable modem configuration settings

Warning: This process also deletes any custom Wi-Fi cable modem configurations you may have already created. ARRIS recommends that you create a backup copy of your configuration before resetting your Wi-Fi cable modem. See (page Back up your Wi-Fi cable modem configuration (page 57)) for more information.
Do the following to open the Status Security screen:
-
From any Wi-Fi Cable Modem Web Manager screen, click the Utilities main menu button on the Wi-Fi Cable Modem Web Manager menu bar.
-
Click FACTORY DEFAULTS from the Utilities submenu options list to display the Factory Defaults screen.

Figure 45: Reset Wi-Fi cable modem configuration to factory defaults screen
- Click Factory Defaults button.
The following message displays:

Figure 46: Reset Wi-Fi cable modem configuration warning message
- Click OK to reset your current Wi-Fi Cable Modem configuration to the factory default configuration.
or
Click Cancel to close the message box.
Exit the Wi-Fi Cable Modem Web Manager
To log out and close the Wi-Fi Cable Modem Web Manager:
■ Click Logout button located on the Wi-Fi Cable Modem Web Manager menu bar.

Wi-Fi Cable Modem Web Manager logout button
Troubleshooting tips
If the solutions listed in the Troubleshooting Solutions table below do not solve your problem, please contact your service provider for assistance. Your service provider may ask for the status of the Wi-Fi cable modem front panel LEDs, see Front panel LED icons and error conditions (page 61) for more information.
You may have to reset the Wi-Fi cable modem configuration to its original factory settings if the Wi-Fi cable modem is not functioning properly. See Reset the Wi-Fi cable modem configuration settings (page 58) for more information.
Solutions
Troubleshooting solutions
| Wi-Fi cable modem problem Possible solution | |
| Power LED icon is OFF | Check the power connection on the Wi-Fi cable modem and to the electrical outlet.Check that the electrical outlet is working. Is the outlet controlled by a light switch?If so, unplug the Wi-Fi cable modem power adapter and connect it to another electrical outlet that is not controlled by a wall switch. |
| Cannot send or receive Data | Check each end of the coaxial cable connection on the Wi-Fi cable modem and cable wall outlet. Use your hand to tighten each connector, if necessary.Check the Ethernet cable to make sure it is properly connected to the Wi-Fi cable modem and computer.On the front panel, check the status of the LED icons and refer to Front panel LED icons and error conditions (page 61) to identify the problem.If you have cable television service, check your television to ensure your cable service is operating properly.If none of the above solutions resolves the problem, contact your service provider or call ARRIS Technical Support at 1-877-466-8646 for assistance. |
| Cannot access the Internet | Check that all cable and power connections on your Wi-Fi cable modem and computer are properly connected. |
Wi-Fi cable modem problem Possible solution
| Wi-Fi devices cannot send or receive data | Check that the Power, Online, and Wireless LED icons on the front panel are lit up solid.Contact your service provider for assistance.If the problem continues after checking the coaxial cable and Ethernet connections and your IP address, check the wireless Security Mode setting on the Wireless screen.If you enabled WPA and configured a passphrase on the Wi-Fi cable modem, be sure each affected Wi-Fi client has the identical passphrase. If this does not solve the problem, check if the Wi-Fi client supports WPA.If you enabled WEP and configured a key on the Wi-Fi cable modem, be sure each affected Wi-Fi client has the identical WEP key. If this does not solve the problem, check if the client’s wireless adapter supports the type of WEP key configured on the Wi-Fi cable modem. |
Front panel LED icons and error conditions
The Wi-Fi cable modem front panel LED icons provide status information for the following error conditions:
Front panel LED icons and error conditions
| Led icon Status If, during startup: If, during normal operation | ||
| (K7W8)POWER | OFF Wi-Fi cable modem is notproperly plugged into theelectrical wall outlet | Wi-Fi cable modem is unplugged |
| (46CT)SENDRECEIVE | BLINKING Upstream (send) channel orDownstream (receive) channelcannot be acquired | Upstream channel is lostDownstream channel is lost |
| [XXXW]ONLINE | BLINKING IP registration is unsuccessful IP registration is lost | |
| (HZZZ)WIRELESS | OFF LED is disabled LED is disabled | |
| (SXD2)WIRELESS | OFF LED is disabled LED is disabled | |
CommScope, Inc. ("ARRIS")
Retail Purchasers
If you purchased this Product directly from ARRIS or from an authorized ARRIS retail reseller, ARRIS warrants to you, the original end user customer, that (A) the Product, excluding Software, will be free from defects in materials and workmanship under normal use, and (B) with respect to Software, (i) the media on which the Software is provided will be free from defects in material and workmanship under normal use, and (ii) the Software will perform substantially as described in its documentation. This Limited Warranty to you, the original end user customer, continues (A) for Software and the media upon which it is provided, for a period of ninety (90) days from the date of purchase from ARRIS or an authorized ARRIS reseller, and (B) for the Product (excluding Software), for a period of two (2) years from the date of purchase from ARRIS or from an authorized ARRIS reseller. To take advantage of this Limited Warranty or to obtain technical support, you must call the ARRIS toll-free phone number: 1-877-466-8646. ARRIS' sole and exclusive obligation under this Limited Warranty for retail sales shall be to repair or replace any Product or Software that does not meet this Limited Warranty. All warranty claims must be made within the applicable Warranty Period.
Cable Operator or Service Provider Arrangements
If you did not purchase this Product directly from ARRIS or from a ARRIS authorized retail reseller, ARRIS does not warrant this Product to you, the end-user. A limited warranty for this Product (including Software) may have been provided to your cable operator or Internet Service Provider ("Service Provider") from whom you obtained the Product. Please contact your Service Provider if you experience problems with this Product.
General Information
The warranties described in this Section shall not apply: (i) to any Product subjected to accident, misuse, neglect, alteration, Acts of God, improper handling, improper transport, improper storage, improper use or application, improper installation, improper testing or unauthorized repair; or (ii) to cosmetic problems or defects which result from normal wear and tear under ordinary use, and do not affect the performance or use of the Product. ARRIS' warranties apply only to a Product that is manufactured by ARRIS and identified by ARRIS owned trademark, trade name or product identification logos affixed to the Product. ARRIS does not warrant to you, the end user, or to anyone else that the Software will perform error free or without bugs.
ARRIS IS NOT RESPONSIBLE FOR, AND PROVIDES "AS IS" ANY SOFTWARE SUPPLIED BY 3RD PARTIES. EXCEPT AS EXPRESSLY STATED IN THIS SECTION ("WARRANTY INFORMATION"), THERE ARE NO WARRANTIES OF ANY KIND RELATING TO THE PRODUCT, EXPRESS, IMPLIED OR STATUTORY, INCLUDING BUT NOT LIMITED TO IMPLIED WARRANTIES OF MERCHANTABILITY, FITNESS FOR A PARTICULAR PURPOSE, OR THE WARRANTY AGAINST
INFRINGEMENT PROVIDED IN THE UNIFORM COMMERCIAL CODE. Some states do not allow for the exclusion of implied warranties, so the above exclusion may not apply to you.
What additional provisions should I be aware of? Because it is impossible for ARRIS to know the purposes for which you acquired this Product or the uses to which you will put this Product, you assume full responsibility for the selection of the Product for its installation and use. While every reasonable effort has been made to insure that you will receive a Product that you can use and enjoy, ARRIS does not warrant that the functions of the Product will meet your requirements or that the operation of the Product will be uninterrupted or error-free.
ARRIS IS NOT RESPONSIBLE FOR PROBLEMS OR DAMAGE CAUSED BY THE INTERACTION OF THE PRODUCT WITH ANY OTHER SOFTWARE OR HARDWARE. ALL WARRANTIES ARE VOID IF THE PRODUCT IS OPENED, ALTERED, AND/OR DAMAGED.
THESE ARE YOUR SOLE AND EXCLUSIVE REMEDIES for any and all claims that you may have arising out of or in connection with this Product, whether made or suffered by you or another person and whether based in contract or tort.
IN NO EVENT SHALL ARRIS BE LIABLE TO YOU OR ANY OTHER PARTY FOR ANY DIRECT, INDIRECT, GENERAL, SPECIAL, INCIDENTAL, CONSEQUENTIAL, EXEMPLARY OR OTHER DAMAGES ARISING OUT OF THE USE OR INABILITY TO USE THE PRODUCT (INCLUDING, WITHOUT LIMITATION, DAMAGES FOR LOSS OF BUSINESS PROFITS, BUSINESS INTERRUPTION, LOSS OF INFORMATION OR ANY OTHER PECUNIARY LOSS), OR FROM ANY BREACH OF WARRANTY, EVEN IF ARRIS HAS BEEN ADVISED OF THE POSSIBILITY OF SUCH DAMAGES. IN NO CASE SHALL ARRIS' LIABILITY EXCEED THE AMOUNT YOU PAID FOR THE PRODUCT.
These matters are governed by the laws of the Commonwealth of Pennsylvania, without regard to conflict of laws principles and excluding the provisions of the United Nations Convention on Contracts for the International Sale of Goods.
Retail Purchasers Only
If you purchased this Product directly from ARRIS or from an ARRIS authorized retail reseller, please call the ARRIS toll-free phone number, 1-877-466-8646, for warranty service or technical support.
Cable Operator or Service Provider Arrangements
If you did not purchase this Product directly from ARRIS or from an ARRIS authorized retail reseller, please contact your Service Provider for technical support.
Corporate Headquarters
CommScope · Hickory · North Carolina · 28602 · USA
www.commscope.com

- CommScope copyrights and trademarks
- Safety and regulatory information
- Important safety instructions
- SAVE THESE INSTRUCTIONS
- FCC statements
- FCC Interference statement
- FCC Declaration of Conformity
- FCC Radiation Exposure statement
- Wireless LAN information
- Restrictions on the use of wireless devices
- Caring for the environment by recycling your ARRIS equipment
- Table of contents
- Chapter 1: Getting started.... 10
- Chapter 2: Product overview.... 13
- Chapter 3: Installing the Wi-Fi cable modem.... 18
- Chapter 4: Setting up a Wi-Fi network connection.... 21
- Chapter 5: Using the Wi-Fi Cable Modem Web Manager....31
- Chapter 6: Configuring your Wi-Fi network....37
- Chapter 7: Protecting and monitoring your Wi-Fi network.... 43
- Chapter 8: Managing your Wi-Fi cable modem and connected networks....54
- Chapter 9: Troubleshooting tips....60
- Getting started
- In the box
- Wi-Fi cable modem package contents
- Item Description
- Additional items needed (not included)
- System requirements
- Contact information
- Product overview
- Front panel
- Wi-Fi cable modem front panel LED icons
- Led icon Blinking On (Solid)
- Wi-Fi Protected Setup TM (WPS)
- Rear panel
- Wi-Fi cable modem rear panel ports & connectors
- Port name Description
- Wi-Fi cable modem label
- Installing the Wi-Fi cable modem
- Connect your Wi-Fi cable modem to your client device
- Establish an Internet connection
- Setting up a Wi-Fi network connection
- Set up a Wi-Fi network connection using your mobile device
- Set up a Wi-Fi network connection using your client device
- Personal Computer (PC)
- Quick connect using the Windows taskbar
- Connect using the Windows control panel
- Android device
- Apple computer
- Apple mobile device
- Test your Wi-Fi network connection
- Connect your WPS-enabled device
- Using the Wi-Fi Cable Modem Web Manager
- Start the Wi-Fi Cable Modem Web Manager
- Login Settings
- Change Password
- Other Settings
- Figure 20: Wi-Fi Cable Modem change password screen
- Note:
- Wi-Fi Cable Modem Web Manager menu bar
- Menu option Function
- Wi-Fi Cable Modem Web Manager-available languages
- Get help
- Exit the Wi-Fi Cable Modem Web Manager
- Configuring your Wi-Fi network
- Set up your Wi-Fi network
- System Basic Setup
- Basic Setup
- Change your Wi-Fi network name (SSID)
- Protecting and monitoring your Wi-Fi network
- Prevent unauthorized access
- Change the default user password
- Figure 29: Wi-Fi cable modem login settings screen
- Set up firewall protection
- Set up Parental Control
- To filter websites:
- To filter by keywords:
- Set up IP filtering
- Set up MAC address filtering
- Set up Port Triggers
- Set up the DMZ host
- Managing your Wi-Fi cable modem and connected networks
- View the Wi-Fi cable modem status and network connection
- View the Wi-Fi cable modem product and status information
- Back up your Wi-Fi cable modem configuration
- Restore the Wi-Fi cable modem configuration settings
- Reset the Wi-Fi cable modem configuration settings
- Troubleshooting tips
- Solutions
- Front panel LED icons and error conditions
- Retail Purchasers
- Cable Operator or Service Provider Arrangements
- General Information
- Retail Purchasers Only
Brand : Arris
Model : SURFboard SBG7600AC2
Category : Router