Valo - Keyboard ROCCAT - Free user manual and instructions
Find the device manual for free Valo ROCCAT in PDF.


| Product Type | Gaming Keyboard |
| Brand | ROCCAT |
| Model | Valo |
| Layout | Full-size (104 keys) |
| Switch Type | Mechanical (ROCCAT Titan Switches) |
| Backlighting | RGB per-key lighting |
| Connectivity | USB 2.0 Wired |
| Key Rollover | Full N-Key Rollover |
| Polling Rate | 1000 Hz |
| Dimensions (W x D x H) | 440 x 135 x 35 mm |
| Weight | 900 g |
| Cable Length | 1.8 m |
| Software Support | ROCCAT Swarm |
| Onboard Memory | 5 user profiles |
| Multimedia Keys | Yes (FN shortcuts) |
| Wrist Rest | Detachable magnetic |
| Power Source | USB bus powered |
| Cleaning Instructions | Unplug, use compressed air; damp cloth for exterior |
| Safety Certifications | CE, FCC, RoHS |
| Repairability | Not user-serviceable; contact support |
| Warranty | 2 years limited |
Frequently Asked Questions - Valo ROCCAT
User questions about Valo ROCCAT
0 question about this device. Answer the ones you know or ask your own.
Ask a new question about this device
Download the instructions for your Keyboard in PDF format for free! Find your manual Valo - ROCCAT and take your electronic device back in hand. On this page are published all the documents necessary for the use of your device. Valo by ROCCAT.
USER MANUAL Valo ROCCAT
Limitation of Liability 3
Safety Instructions 3
Introduction 4
What's Included 5
System Requirements 5
Connecting 6
Installation under Windows ® 6
Swapping Keys 7
Manual Configuration 7
• In-game Macro Recording (Mrec key) 8
Configuration Menu 9
Main Control 9
- Standard keyboard layout 10
- Changing key functions 10
- Macro Manager 12
Game Profiles/Profile-2-Go 16
Brightness Control 17
Advanced Settings 17
- LCD Display Output 18
- Restore Defaults 19
- Enable/Disable Keys 19
- Windows Keys 19
- On-Screen Display 19
Update 20
Warranty and Support 20
Troubleshooting 20
LIMITATION OF LIABILITY
ROCCAT GmbH shall not be liable for damages such as damages to or loss of property, profit or turnover losses, costs for spare parts, expenses for inconveniences arising from the interruption of a service or any other damages. Claims which exceed the purchasing price of the product may not be asserted under any circumstances.
SAFETY INSTRUCTIONS
Troubleshooting/repairs
Do not attempt to service or repair the product yourself; leave any maintenance to qualified experts. Do not attempt to modify the product in any way as doing so will invalidate the warranty.
Moisture/heat
Only use the keyboard in dry, interior rooms. Do not operate the device near water and keep it away from damp areas and areas where liquids are likely to drip or be sprayed in order to prevent damage occurring.
Physical harm
Some experts are of the opinion that the using a keyboard may lead to health problems with the hands, wrists, arms, neck and/or back. Please seek specialist medical advice if you notice any pain, numbness or weakness in any of these areas.
Disposal
The markings on the product and on the associated literature show that this product must not be disposed of together with normal household waste at the end of its useful life. Please dispose of this device separately from other waste in order not to cause harm to the environment or human health through uncontrolled refuse disposal. Recycle the device to facilitate the sustainable recycling of material resources. Private users should contact the dealer from whom the product was bought, or the authorities responsible for recycling, to find out how to recycle the device in an environmentally friendly way. Commercial users should ask their suppliers and consult the sales contract terms. This product must not be disposed of together with other commercial waste.
INTRODUCTION
Welcome to the ROCCAT™ Valo
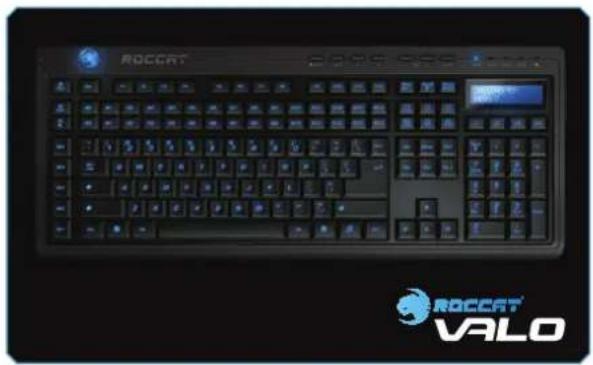
Congratulations! You're now the proud owner of the ROCCAT™ Valo – the versatile gaming keyboard with a clever design. It has an unparalleled range of features that'll help you improve your performance and become an outstanding pro.
The keyboard can be fully customized to suit both your game play as well as individual games, delivering a level of flexibility that is unmatched.
The 41 macro keys can be assigned macros quickly and easily. Program your own command sequences to suit your own needs and those of the game. At the same time, you'll never need to leave the game once. Even during the game, you can record and save macros – and even assign them to keys. As a result, you'll no longer need to think about which macros might be useful in a particular situation before playing a game. Just use them and record them directly during the game.
You can even store a complete profile, comprising four layers, on the keyboard itself. This Profile-2-Go allows you to take your macros and configs with you wherever you go – without needing to take your computer with you. Just plug the keyboard into any computer and you can call up and use your Profile-2-Go.
You'll never lose track of your macros, despite the unbelievable number that can be programmed: using the on-screen display and LCD, you can see which layer of the five profiles you're currently in at any time. In addition, you've got 45 interchangeable keys in three colors at your disposal. These allow you to split the various functions of your macros into three categories. To ensure the keyboard doesn't suffer any damage when you're swapping keys, a practical Key Releaser is included allowing you to swap keys in no time at all.
natural_image
Black RoCCAT 2016 SPC keyboard with blue control buttons and a 'VALO' logo (no readable text on main body)
natural_image
Black retro computer keyboard with blue illuminated keys and a digital display (no readable text or symbols)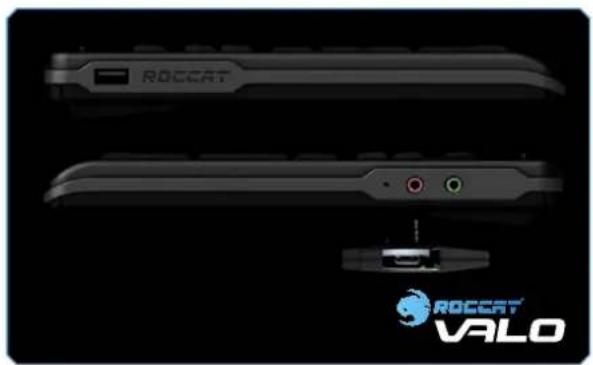
natural_image
Exterior view of a modern ROCCAT device with visible ports and branding (no text or symbols on main body)WHAT'S INCLUDED
- ROCCAT™ Valo – Maximum Customization Gaming Keyboard
• ROCCAT™ Gaming Mikrofon
• 45 additional colored keys - ROCCAT™ Key Releaser
- Inari Case Mission Book with ROCCAT™ ID Card
- Valo driver CD including user manual (pdf)
- Quick Install Guide
SYSTEM REQUIREMENTS
- Windows® XP/Windows Vista®
- 1 free USB 1.1 port
- CD-ROM drive
Note: The software for the ROCCAT™ Valo Maximum Customization Gaming Keyboard comprises the driver and firmware. Regularly check via the 'Update' tab to see if a new driver or new firmware is available.
Optional:
• Soundcard with headphone and microphone jacks
• 1 additional free USB 1.1 port
CONNECTING
Fold out the keyboard feet and place the keyboard on a level surface.
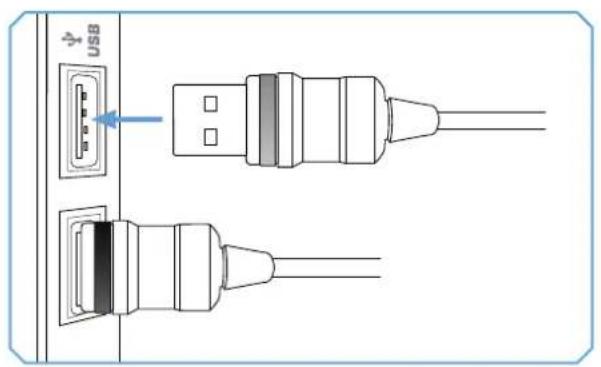
Connect the keyboard to two free USB ports on your computer. The black connector supplies the keyboard with power; the gray connector is used for transferring data between the keyboard and the computer.
Plug the green headphone connector into your soundcard's headphone output, and the pink microphone connector into your soundcard's microphone input.

natural_image
Diagram of two connected audio/video connectors with circular ports and connection icons (no text or labels)To use the Gaming Microphone, plug it into the microphone jack (pink) on the right-hand side of the keyboard. To avoid any loose connections, be sure to push the microphone connector and guide pin fully into the intended sockets.
Alternatively you can plug a headset into the keyboard. To do that, plug the green headphone connector into the headphone output socket, and the pink microphone connector into the pink microphone input socket on the keyboard.

natural_image
Technical line drawing of a mobile phone panel with a close-up view showing the internal structure (no text or symbols)
natural_image
Line drawing of a keyboard layout with headphones and audio jack (no text or symbols)INSTALL ATION UNDER WINDOWS® XP/ WINDOWS VISTA®
Insert the supplied CD into your CD-ROM drive and double click the file 'setup.exe'. Follow the on-screen instructions. Click 'Continue Anyway' if Windows logo testing is not passed.
Note: The driver will automatically uninstall older ROCCAT driver versions. It may take a while until the driver is installed and ready for use.
Once the installation process is completed, restart your computer.
The ROCCAT symbol will now appear on the right-hand side in the taskbar. You can access the ROCCAT™ Valo configuration menu by right clicking it.
SWAPPING KEYS
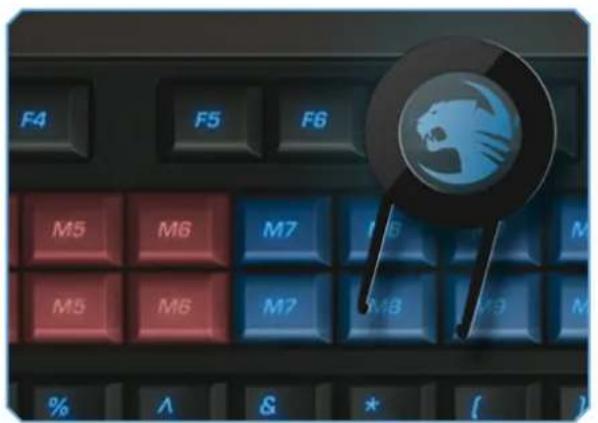
Place the Key Releaser vertically above the key you want to swap and press down until it clicks onto both sides. Pull the key out in a vertical movement. You can simply place the new key in the hole and press it down into place.
natural_image
Close-up of a keyboard with blue and red keys, featuring a magnifying glass highlighting the mouse icon (no text or symbols visible)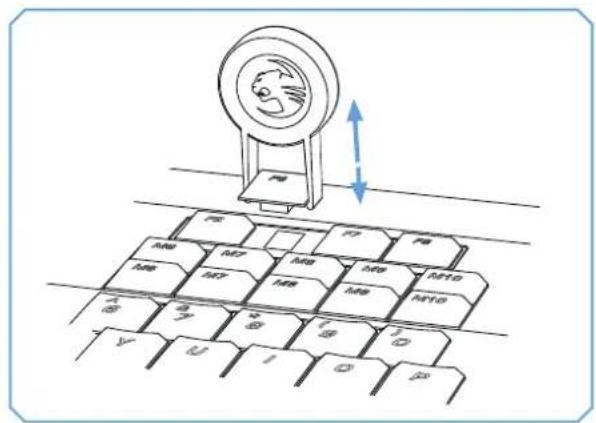
MANUAL CONFIGURATION
You can adjust various settings directly on the keyboard without needing to call up the configuration menu.

The KEYS button allows you to deactivate/activate the Windows keys. For instance, you can avoid accidentally calling up the Windows Start menu when gaming. When deactivated, the LED on the far right above the Windows flag will go out.
The LIGHT button is used to adjust the keyboard illumination settings. By pressing the button, you cycle between the ROCCAT logo, to LCD brightness to LCD contrast through to key illumination. If you'd like to change these brightness/contrast settings, use the '-' button to reduce the brightness/contrast level or the '+' to increase it.
You can only adjust the brightness of the ROCCAT logo, the LCD and the keys via the configuration menu.
You can adjust the master volume of your computer using VOL - and +. Press the MUTE button when you want to completely mute the sound.
MANUAL CONFIGURATION
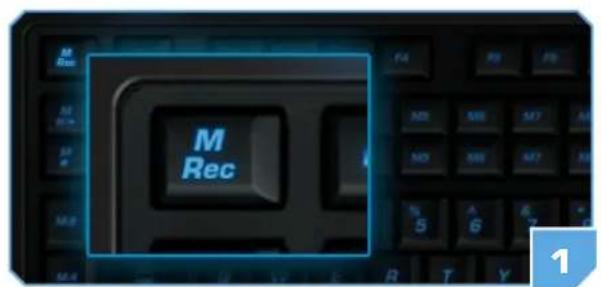
In-game Macro Recording (Mrec key)
The LEDs above the LCD indicate which functions are currently activated. Along with the standard LEDs for Num, Caps and Scroll Lock, there is also a PROG LED. This illuminates when you press the Mrec key and the keyboard is ready to record a macro.

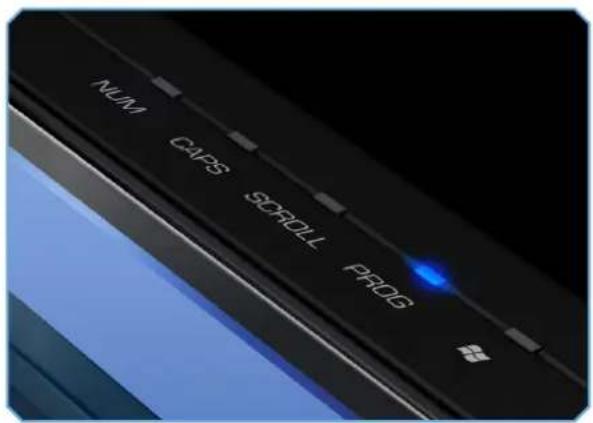
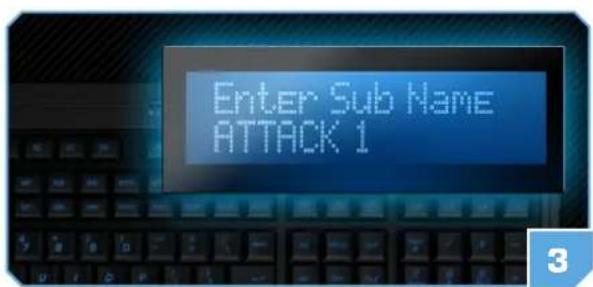
The LCD guides you through the process of recording a macro. First of all, enter a name for your macro (Enter set name) and confirm this by pressing 'Enter'. Then enter a sub name (Enter sub name) and press 'Enter' again. Now choose a macro key (Choose macro key) and enter the key combination (Macro key input) which the macro should contain. To confirm, press the relevant macro key again. The macro is now saved to the key. To cancel macro recording, press the Esc key.



CONFIGURATION MENU
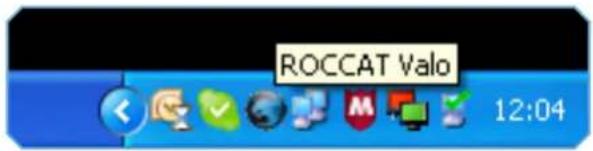
You can either launch the configuration menu for the Valo keyboard by clicking Start > Programs > ROCCAT > Valo Keyboard > Valo Driver or by double clicking the ROCCAT symbol on the right in the taskbar. Please note that each ROCCAT product you've installed will have its own ROCCAT logo in the taskbar. Hover the mouse over the symbols to display the name of each product – this
will allow you to differentiate between the drivers.
MAIN CONTROL
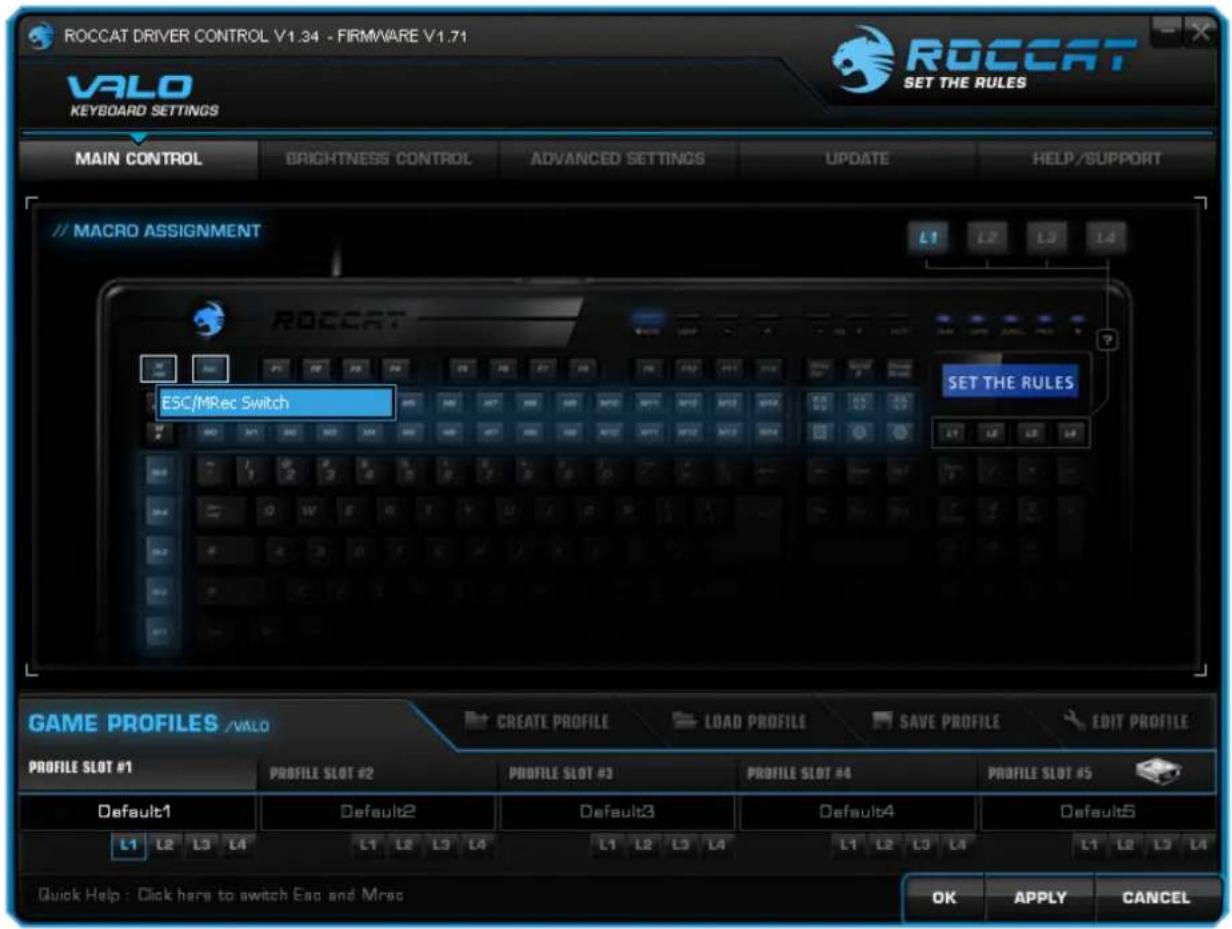
The 'Main Control' tab in the configuration menu provides you with information on the functions of the macro and additional keys and allows you to reassign functions to macro keys.
For instance, you can switch the functions of the Mrec and Esc keys so that you don't accidentally press the Mrec key instead of the Esc key out of habit.
Note: As soon as you've configured a setting you can assign the function to the keyboard by clicking the 'Apply' button without having to exit the ROCCAT menu. It may take a few seconds until the information is transferred to the keyboard. Once you're done configuring the keyboard settings, click 'Ok'. You can exit the configuration menu by clicking 'Cancel'.
Standard keyboard layout
Located beneath the Mrec button is the macro pause button, which you use to pause and continue a macro during playback, and the macro kill button which stops a macro.
Directly beneath those are the profile keys M-1 to M-5 for profiles 1-5.
Layer keys L1 to L4 are located on the right beneath the LCD. These allow you to switch between the layers within a profile.
By default, the upper row of the 30-key macro block is assigned with Shift + characters and numbers from the top-most row of a standard keyboard, and the lower row with Ctrl + characters and numbers of the top-most row of keys.
Located next to those are the hotkeys for launching the calculator (M13), My Computer (M14), the email program (M13) and the internet browser (M14) as well as six multimedia keys for opening and controlling the multimedia player.

Changing key functions
It is also possible to assign different functions and macros to these 41 keys. In the configuration menu, simply click on the key which you want to reassign, search for the function you want from the dropdown menu and confirm the assignment by clicking 'Apply'.
Available functions:
For Internet Explorer
- Search
• Home - Back
- Forward
- Stop
- Refresh
- Favorites
For multimedia functions
- Open player
- Pre track
- Next track
- Play/Pause
- Stop
- Select player
MAIN CONTROL
Profiles
You can also assign profiles 1 to 5 to one of the macro keys.
Assign a shortcut
You can assign a shortcut to the selected key using the 'Assign a shortcut' option. You can combine the Ctrl, Shift, Alt and Windows keys with any other key and assign it to a single key.
'Assign a shortcut' also gives you the opportunity to remap keys. To do that, select 'None' and press the key whose function you'd like to remap. For instance, you can remap motion keys which you need during the game, such as Y for run and spacebar for jump, next to the macro keys for your riding or flying mounts, and so arrange all the functions that are important to you into clear categories.
Standard
Sets the key function back to its default setting.
Deactivate
Selecting the 'Deactivate' option for a key disables its function.
Assigning the 'Email' function to a key allows you to open your email program at a single press.
Calculator
The 'Calculator' function launches the Calculator program on your computer.
My Computer
You can open My Computer by assigning 'My Computer' to a key.
Assign Macro
You can of course assign a macro you have programmed yourself to any key using 'Assign Macro'. To do that, either use the in-game macro recording function described above or the Macro Manager.


MAIN CONTROL
Macro Manager
To access the Macro Manager, select the 'Main Control' tab. Then click on the key you want to assign a macro to and select the 'Assign Macro' option. The 'Create New Macro' option in the dropdown menu that appears will take you straight to the Macro Manager.
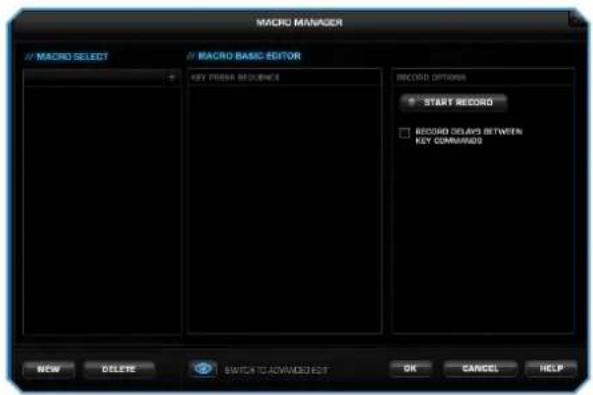
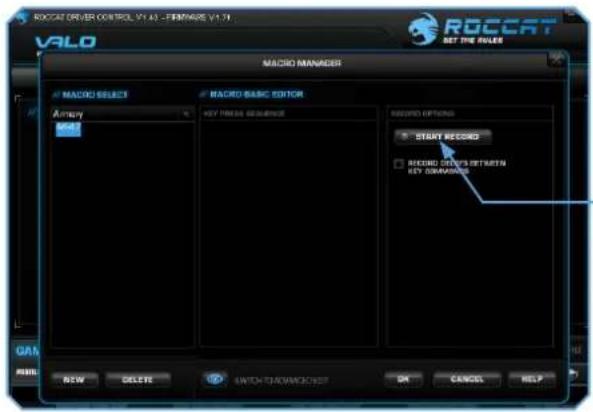
The Macro Manager consists of three areas: on the far left you can select, add or delete a macro set or an individual macro (Macro Select); in the middle area the 'Macro Basic Editor' displays the key combination; and finally, the start and stop buttons (Start Record) are located in the right-hand area.
To record a macro, you first need to create a macro set. A macro set is a group which comprises multiple individual macros. The macro set only serves to give a better overview of the individual macros. You can only assign a single macro to a key, not an entire set.
As soon as macros have been saved using Game Profiles, it doesn't matter which computer the keyboard is connected to; the macros can be called up at any time.
Note: Two actions are performed when pressing a key: pressing and releasing. For example, the key combination Alt+Ctrl+t comprises 6 actions.

Creating a macro (Basic Editor)
Step 1:
Click the upper line in the left-hand window. In the following dropdown menu you can add a macro set (Add Macro Set) or delete one (Delete Macro Set). Click 'Add Macro Set'.
Step 2:
Name your macro set. To make things clearer, use a general name for the actions in the game you're playing. For example, you can name the set 'Magic buffs' or 'Weapons arsenal'.
Step 3:
When you click 'New', which is located beneath the left-hand window, you can assign a name to the individual macro, such as 'Arcane rotation' or 'Sniper rifle'. Confirm the name by pressing the return key.
![VALO MACRO SELECT MACRO BASE Field Macro Set [ ] Previous Macro Set Create Macro Set Please enter the name for new Macro Set 1 Ammony YES NO](/content/2026/06/1397665/images/180a9c7a38cb730f8ebfc3f95be6e4d2ca6f41f87a8b0f25fab180d8a5a76cee.jpg)

MAIN CONTROL
Step 4:
Now you can enter a macro. To do that, click the 'Start Record' button in the right-hand window. Enter the key combination which you need for a special action in the game.
The 'Record delays between key commands' option is located under the record button. This option allows you to specify how long a certain key should be pressed for. For instance, this allows you to create a macro which makes a character in the game perform a specific action only after a predetermined time.
Step 5:
Click 'Stop Record' when you've finished entering your key combination via the keyboard. You can now either record an additional macro in the macro set you've created or create a new macro set.
Click 'OK' when you're done. The macro will now be available for each of the 41 keys. You can assign the macro to a key by going to the 'Button Assignment' window, clicking next to the key you want to execute the macro with and selecting the 'Assign Macro' option from the dropdown menu. All the macro sets you have created will now be displayed from which you can search for the individual macro you want to use.
Note: If you've edited a macro that's already been assigned, you have to reassign it to the desired key.
Step 6:
You can assign the function to the keyboard by pressing the 'Apply' button without having to exit the ROCCAT menu. It may take a few seconds until the information is transferred to the keyboard.
You can now store and save these settings under one of the five profiles that can be stored on the keyboard. Profiles will be easier to manage if you name them after the game, gamer or program.
Note: A macro that is currently running can be stopped at any time by pressing the key again.


MAIN CONTROL
Integrated mouse clicks
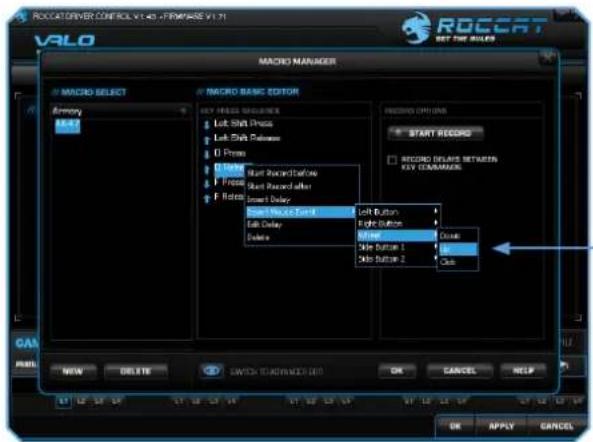
Another special feature of the ROCCAT driver is that it allows you to include mouse clicks in a macro along with keyboard commands. You can program a mouse action to be executed after, before or between a key sequence.
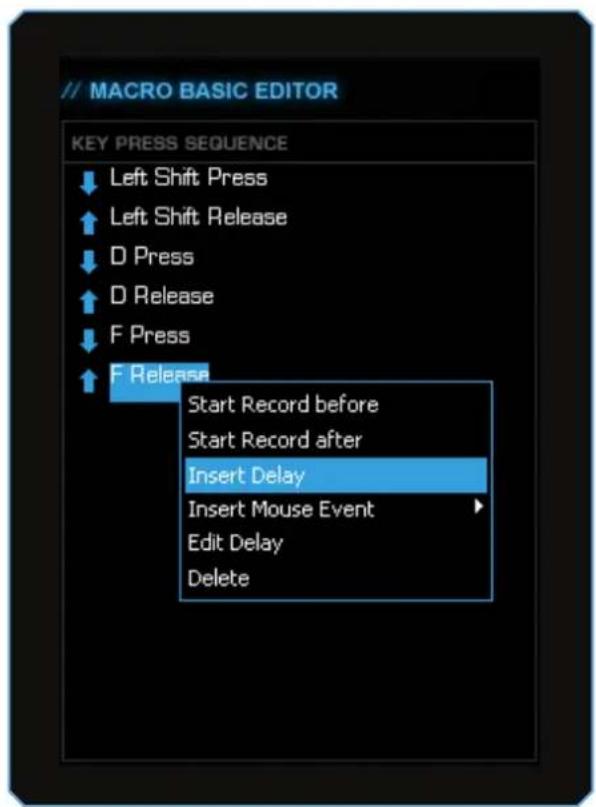
To do that, in 'Macro Basic Manager' select the key command before or after which you want to insert a new action. A window with various options will open when you click the right mouse button:
Start Record before: starts macro recording before the selected action.
Start Record after: starts macro recording after the selected action.
Insert Delay: manually lengthen or shorten the delay between two commands.
Insert Mouse Event: Specify here which mouse action is to be executed. The following options are available:
Left Button
Right Button
Wheel
Side Button 1
Side Button 2
Note: Three actions are always available for selection: 'Down', 'Up' and 'Click'.
Down: keeps the button pressed
Up: releases the button
Click: executes the commands 'Down' and 'Up' in succession.
Edit Delay: you can manually lengthen or shorten the delay here. You don't need to enter the time designation of 'ms' (milliseconds), just the desired time.
Note: Some games are unable to detect short delays.
Delete: delete the selected step from the macro's key sequence.
MAIN CONTROL
Switch to advanced editor
In the center window you can manually change the time intervals between the individual key presses for a particular macro. Individual blue bars indicate how long the respective key is pressed for. Along with the duration, you can also change the position of the pressed key here. The default timeline is in milliseconds: (0.05 / 0.10 / 0.15 ... seconds).
You can change the time scale of the display for increased accuracy. You can zoom into the scale to configure the time values really precisely using the plus button on the right-hand side above the window. It is also possible to delete or add individual macros. To do that, click the point in the macro list where you want to insert an additional macro and then click 'Add'. If you want to delete a key, click the key and then click 'Del'. Confirm the process by clicking 'Ok'.
It is also possible to delete entire macro sets. To do that, you need to select 'Delete Macro Set' in the dropdown menu. Here too, you need to confirm final deletion of the set, and all the macros assigned to it, by clicking 'Ok'.


GAME PROFILES/PROFILE-2-GO
Creating/saving a profile

You can create one of five profiles using 'Create a profile'. Here you can link four layers with the *.exe file of the particular game. This allows you to save all the key assignments, macros or LCD settings that you've adapted to a game to a single layer. This is worth doing for instance when you want to create a profile for World of Warcraft ^® with 4 different characters. Give the four layers a name, such as Priest, Rogue, Hunter and Witchmaster, link them to launcher.exe and save the macros you need for the character in each layer. You can now switch between layers in the game and have all the macros ready to hand which you have assigned to the relevant character.
Profile Slot #5
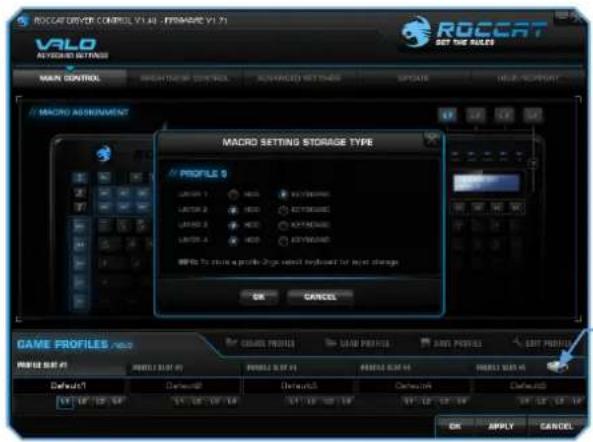
Along with the four profiles that can be saved on the hard drive, you can also save another profile, the Profile-2-Go, on the keyboard itself. By doing this, you always have a complete profile with you if you need to take your keyboard anywhere.
Simply click on the hard drive symbol next to Profile Slot #5 and select 'Keyboard' as the 'Storage Type' for the layer you want to save. It usually takes a little while for your settings to be transferred and stored on the keyboard.
If the drivers haven't been installed, such as on someone else's computer, the keyboard will automatically switch to the Profile-2-Go. Consequently, it isn't possible to switch to one of the other 4 profiles; to do that, the driver first needs to be installed and then additional profiles created or loaded.
Load Profile
You can load the profiles stored on the hard drive, and also the Profile-2-Go stored on the keyboard, at any time either using this option in the configuration menu, or via the M-1 to M-5 keys. Use the layers to switch between executable files. It isn't possible to switch between profiles within a running application.
You can also save more than 5 profiles on your hard drive and load five of these in the driver as profiles 1-5 as you wish. For example, this allows you to retain older profiles or your friends can give you profiles which you can then use on your keyboard. It is only possible to switch between the five profiles currently loaded in the driver.

Edit Profile
Here you can edit the names and the links of the selected profile and your layers. Use the correct links so that the keyboard automatically detects the program you have programmed specific keyboard settings or macros for.
BRIGHTNESS CONTROL
You can adjust the brightness of the ROCCAT logo, the LCD and the keys in five stages under this tab. Slide the controller to the right to increase brightness, and to the left to decrease brightness.
In addition, you can also save energy by using the 'Key Light Energy Saving' and 'Key Light Time Out' options. With 'Key Light Energy Saving' you can set the illumination to dim by 50% after 5 to 15 minutes. With 'Key Light Time Out', the illumination will switch off completely after the defined time.
Note: Don't forget to confirm changes by clicking 'Apply'.

ADVANCED SETTINGS
The Advanced Settings tab offers you numerous additional configuration options.

ADVANCED SETTINGS
LCD Display Output - Row 1/Row 2
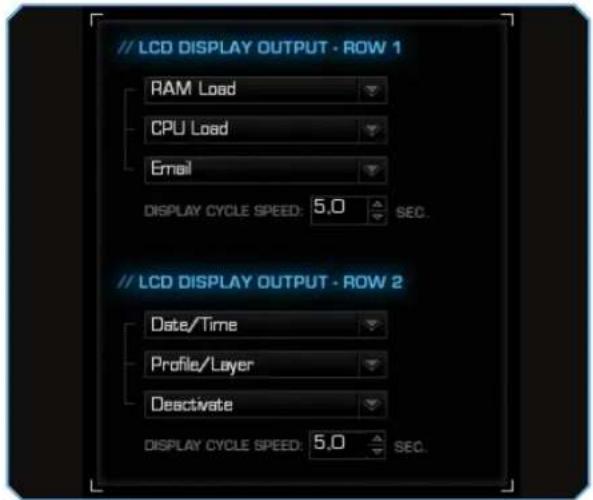
Here you can select what should be displayed on the Valo's LCD. 6 items of information are available for each row. You can select 3 of these for each row and specify down to the second under 'Display Cycle Speed' how long an item of information should be displayed for until the display switches to the next item.
The following information can be displayed on the LCD:
Date/ Time
Under 'Date Format Settings', you can decide what format the date is displayed in. Select whether you want it displayed as Year/Month/Day or Day/Month/Year, with or without hyphens.
You can also set the following under 'Time Format Setting':
HH:MM
HH:MM (AM/PM) (12 hour clock)
CPU/RAM Load
Furthermore, you can also choose to have the LCD display the 'CPU Load' as well as the 'RAM Load'.
Profile/Layer
So that you never lose your overview, select 'Profile/Layer' as one of the items to be displayed. This shows you what profile and which layer you're currently in.
You can display the number of emails you have in your inbox under the 'Email' option. For this, you need to enter your email account's POP3 settings. If you don't know them, ask your email provider for the relevant POP3 settings and your customer number/user name.
'Check Interval' allows you to define how often the Valo checks and updates the LCD if new emails have been received.
Skype®
Select this option if you want to see if someone has sent you a Skype ^® message. When you first select this option, you will be notified that the Valo is attempting to access your Skype ^® account. Allow access if you want to display Skype ^® information on your LCD.
Deactivate
Select 'Deactivate' when you don't want to receive any notifications; the rows will then remain blank for the defined period.


ADVANCED SETTINGS
Restore Defaults
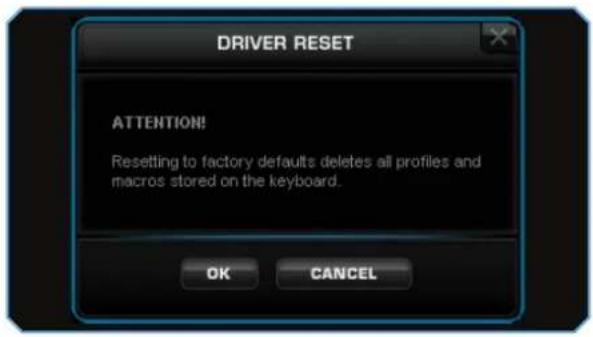
This option resets the keyboard back to its default settings. Every single profile, macro and setting saved on the keyboard will be deleted.
Enable/Disable Keys
This option allows you to deactivate the keys that you like to press accidentally while gaming. Uncheck the relevant box to disable the key's function. You can select from the following:
Left Windows Key
Right Windows Key
Context Key
Caps Lock Key
Tab Key
Windows Keys
The Windows keys aren't just able to execute their standard function or be deactivated; you can also use them to open the Valo driver. Select 'Open Driver Menu' and confirm your selection by clicking 'Apply'. Now, the Valo configuration menu will open when you click one of the Windows keys.
On-screen display
If you check 'Enable On-Screen Display', the profile and layer you're currently in, and which macro you're currently executing, will always be displayed directly on the bottom right-hand side of the monitor whenever your press one of the profile keys M-1 to M-5, the layer keys L1 to L4 or one of the macro keys.
Profile and layer information will also be displayed on the LCD at the same time, as many games block on-screen displays.


natural_image
Dramatic action scene with multiple muscular characters in dynamic poses, no visible text or symbolsUPDATE
You can update your ROCCAT™ Valo Maximum Customization Gaming Keyboard at any time. By clicking 'Check for Updates', you can check whether new software is available for your keyboard.
Note: All keyboard settings will be reset if you install new firmware on your computer. However, macros stored in the Profile-2-Go will be kept.

WARRANTY/SUPPORT
We warrant the ROCCAT™ Valo Maximum Customization Gaming Keyboard to be free of defects in material and workmanship from the original date of purchase for a period of two (2) years. If you need additional help, just send us an e-mail. Our Support Team will be pleased to help you with any technical questions you might have. Send the e-mail to: support@roccat.org
Note: A ROCCAT™ ID Card is included with every ROCCAT™ hardware product. The number on this card grants you access to our online ROCCAT™ World insider zone – and with that access to a whole world of valuable pro-gamer info, fantastic server discounts and exclusive competitions.
TROUBLESHOOTING
I'm unable to open the configuration menu.
If the configuration menu doesn't open via the taskbar or Start menu, open the folder where you installed the driver and click on ValoOption.exe.
My keyboard is not detected.
Plug the keyboard into the same USB port it was connected to when you first installed the driver. This ensures the computer can detect the keyboard.
I can't switch between profiles within an application/game.
You can't switch from one profile to another while inside a running application. You can, however, define four layers in each profile. It's possible to switch between these when in a game.
My on-screen display is no longer displayed in games.
Many games block the on-screen display. However, the same information provided by the OSD is also displayed on the LCD.
The changes I've made have not been saved.
Be sure to confirm every change in the configuration menu by clicking 'Apply'.


- Limitation of Liability 3
- Safety Instructions 3
- Introduction 4
- What's Included 5
- System Requirements 5
- Connecting 6
- Installation under Windows ® 6
- Swapping Keys 7
- Manual Configuration 7
- Configuration Menu 9
- Main Control 9
- Game Profiles/Profile-2-Go 16
- Brightness Control 17
- Advanced Settings 17
- Update 20
- Warranty and Support 20
- Troubleshooting 20
- LIMITATION OF LIABILITY
- SAFETY INSTRUCTIONS
- Troubleshooting/repairs
- Moisture/heat
- Physical harm
- Disposal
- INTRODUCTION
- Welcome to the ROCCAT™ Valo
- WHAT'S INCLUDED
- SYSTEM REQUIREMENTS
- Optional:
- CONNECTING
- INSTALL ATION UNDER WINDOWS® XP/ WINDOWS VISTA®
- SWAPPING KEYS
- MANUAL CONFIGURATION
- In-game Macro Recording (Mrec key)
- CONFIGURATION MENU
- MAIN CONTROL
- Standard keyboard layout
- Changing key functions
- Available functions:
- For Internet Explorer
- For multimedia functions
- Profiles
- Assign a shortcut
- Standard
- Deactivate
- Calculator
- My Computer
- Assign Macro
- Macro Manager
- Creating a macro (Basic Editor)
- Step 1:
- Step 2:
- Step 3:
- Step 4:
- Step 5:
- Step 6:
- Integrated mouse clicks
- Switch to advanced editor
- GAME PROFILES/PROFILE-2-GO
- Creating/saving a profile
- Profile Slot #5
- Load Profile
- Edit Profile
- BRIGHTNESS CONTROL
- ADVANCED SETTINGS
- LCD Display Output - Row 1/Row 2
- Date/ Time
- CPU/RAM Load
- Profile/Layer
- Skype®
- Restore Defaults
- Enable/Disable Keys
- Windows Keys
- On-screen display
- UPDATE
- CHECK FOR DRIVER & FRAMEUATE UPDATES
- WARRANTY/SUPPORT
- TROUBLESHOOTING
- I'm unable to open the configuration menu.
- My keyboard is not detected.
- I can't switch between profiles within an application/game.
- My on-screen display is no longer displayed in games.
- The changes I've made have not been saved.
Brand : ROCCAT
Model : Valo
Category : Keyboard