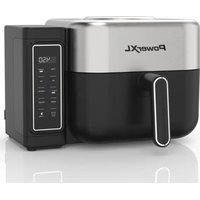
AIRMAX AF4042 - Deep fryer PowerXL - Free user manual and instructions
Find the device manual for free AIRMAX AF4042 PowerXL in PDF.


| Product type | Hot air fryer (Airfryer) |
| Brand | PowerXL |
| Model | AIRMAX AF4042 |
| Capacity | 4 liters (about 1.5 kg of fries) |
| Power | 1500 W |
| Temperature range | 80 °C to 200 °C |
| Timer | 0 to 60 minutes |
| Automatic programs | 8 presets (fries, chicken, steak, fish, etc.) |
| Screen | Touch digital |
| Basket material | Stainless steel with non-stick coating |
| Dimensions (L x W x H) | 30 cm x 28 cm x 32 cm |
| Weight | 5 kg |
| Power supply | 220-240 V ~ 50/60 Hz |
| Power cord | Removable, length 0.8 m |
| Automatic shut-off | Yes, at end of timer |
| Overheat protection | Yes |
| Cool-touch handle | Yes |
| Cleaning | Removable basket and pot, dishwasher safe |
| Spare parts available | Basket, pot, cooking rack |
| Repairability | Repairability score of 8.2/10 (estimated) |
Frequently Asked Questions - AIRMAX AF4042 PowerXL
User questions about AIRMAX AF4042 PowerXL
0 question about this device. Answer the ones you know or ask your own.
Ask a new question about this device
Download the instructions for your Deep fryer in PDF format for free! Find your manual AIRMAX AF4042 - PowerXL and take your electronic device back in hand. On this page are published all the documents necessary for the use of your device. AIRMAX AF4042 by PowerXL.
USER MANUAL AIRMAX AF4042 PowerXL
natural_image
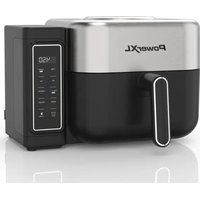
Black powerXL air fryer with digital display showing temperature, airway, baking pan, and control buttons (no readable text beyond branding)AF4042-OBP
AF4062-0BP
AF4062-0BPLA
AF4062-1BPLA
AF4062-0WPLA
AF4062-OBPAR
AF4062-0BPCL
AF4082-0BP
AF4082-1BP
AF4082-0BPLA
AF4082-1BPLA
AF4082-0BPAR
AF4082-0BPCL
Use & Care Manual Manual de uso y cuidado Guide d'utilisation et d'entretien
Table of Contents
IMPORTANT SAFEGUARDS 3
Parts & Accessories 6
Using the Control Panel 8
Instructions For Use 10
General Cooking Guidelines 13
Cleaning & Storage 15
Troubleshooting 16
Frequently Asked Questions 17
Recipes 18
Prevent Injuries! – Carefully Read All Instructions Before Use!
IMPORTANT SAFEGUARDS.
When using electrical appliances, basic safety precautions should be followed, including the following:
- READ ALL INSTRUCTIONS.
- This appliance is not intended for use by persons (including children) with reduced physical, sensory, or mental capabilities or lack of experience and knowledge unless they are given supervision or instruction concerning use of the appliance by a person responsible for their safety.
- Close supervision is necessary when any appliance is used by or near children.
- DO NOT place on or near a hot gas or electric burner or in a heated oven.
- DO NOT place your appliance on a cooktop, even if the cooktop is cool, because you could accidentally turn the cooktop on, causing a fire, damaging the appliance, your cooktop, and your home.

- DO NOT place or use this appliance near water.
- When cooking, DO NOT place the appliance against a wall or within 5 inches of other appliances.
- DO NOT place anything on top of the appliance.
- A fire may occur if this appliance is covered by or touching flammable material, including curtains, draperies, walls, and the like, when in operation.
- DO NOT use outdoors.
- DO NOT place the appliance in any container or small confined space while the appliance is heated or in operation.
- ALWAYS operate the appliance on a horizontal surface that is level, stable, and noncombustible with adequate space for airflow.
- Before using your appliance on any countertop surface or other fragile surface, such as a glass tabletop, CHECK WITH YOUR COUNTERTOP MANUFACTURER OR INSTALLER for recommendations about using appliances on your surfaces. Some manufacturers and installers may recommend protecting your surface by placing a hot pad or trivet under the appliance for heat protection. Your manufacturer or installer may recommend that hot pans, pots, or electrical appliances should not be used directly on top of the countertop. If you are unsure, place a trivet or hot pad under the appliance before using it.
- DO NOT operate any appliance if it has a damaged cord or plug, if it is not working properly, or if it has been damaged or dropped. Return the appliance to an authorized service facility for examination, repair, or adjustment.
- This appliance should be serviced ONLY by qualified service technicians. Contact Customer Service using the information located on the back of this manual.
- NEVER immerse the main unit housing in water. If the appliance falls or accidentally becomes immersed in water, unplug from electrical outlet immediately. Do not reach into liquid if the appliance is plugged in and immersed.
- To protect against electrical shock, DO NOT immerse the cord or plugs, or expose the electrical components to water or other liquid.
- DO NOT plug in the power cord or operate the appliance controls with wet hands.
- To disconnect, press the STOP/OFF button to turn the appliance off and then remove the plug from the electrical outlet.
- MAKE SURE the appliance is properly plugged into a dedicated electrical outlet without any other appliances on the same outlet.
- KEEP the appliance and its power cord out of the reach of children when it is in operation or in the cooling down process.
- NEVER plug the appliance into an outlet below the surface where the appliance is placed.
- DO NOT let the power cord hang over the edge of a table or counter or touch hot surfaces.
- DO NOT clean with metal scouring pads. Pieces can break off the pad and touch electrical parts, creating risks of electric shock.
- Be sure that handle is assembled and fastened properly.
- Should the appliance emit smoke, UNPLUG IMMEDIATELY and wait for smoking to stop before handling the appliance. Allow the appliance to cool and wipe excess oil and grease from the appliance.
- Cooking appliances should be positioned in a stable location with the handles (if any) positioned to avoid the spillage of hot liquids.
• NEVER operate the appliance unattended. - The use of accessory attachments not recommended by the appliance manufacturer may cause injuries.
- Avoid touching moving parts.
- UNPLUG the appliance from outlet when not in use and before cleaning. ALLOW 30 minutes to cool before handling, putting on or taking off parts, cleaning, or storing.
- DO NOT cover the Air Intake Vent or Hot Air Outlet Vent while the appliance is operating. Doing so will prevent even cooking and may overheat or damage the appliance.
- When in operation, hot air and steam are released through the Hot Air Outlet Vent. KEEP YOUR HANDS AND FACE at a safe distance from the Hot Air Outlet Vent and KEEP the Vent clear of obstructions.
- While cooking, the internal temperature of the appliance reaches several hundred degrees Fahrenheit. To avoid personal injury, NEVER place hands inside the appliance unless it is thoroughly cooled.
- The appliance's outer surfaces and accessories may become hot during use. WEAR OVEN MITTS when handling the appliance during and after use and to protect against hot steam and air released when opening the appliance.
- DO NOT touch hot surfaces. Use handles or knobs.
- EXTREME CAUTION MUST BE USED when moving an appliance containing hot oil or other hot liquids or when removing accessories or disposing of hot grease. DO NOT deep fry foods in this appliance.
- Oversized foods, metal foil packages, or utensils MUST NOT be inserted in the appliance as they may involve a risk of fire or electric shock. DO NOT overfill the appliance.
-
DO NOT store any materials, other than manufacturer-recommended accessories, in this appliance when not in use.
-
DO NOT place any of the following materials in the appliance: paper, cardboard, plastic.
- NEVER pour oil into the appliance or accessories. Fire and personal injury could result.
- DO NOT use aerosol cooking sprays. These sprays will build up on cookware and become difficult to remove while reducing the nonstick cooking performance.
- DO NOT expose the appliance to corrosive chemicals or vapors.
- DO NOT use sharp utensils with the appliance. These implements can damage the appliance's protective non-stick coating.
- This appliance is for home use only. If the appliance is used improperly or for professional or semi-professional purposes or if it is not used according to the instructions in the user manual, the guarantee becomes invalid and Empower Brands, LLC will not be held liable for damages.
- DO NOT use this appliance for anything other than its intended use.
- NEVER connect this appliance to an external timer switch or separate remote-control system.
- When ready to start, plug the hardwired cord into a electrical outlet. To disconnect, press the STOP/OFF button to turn the appliance off and then remove the plug from the electrical outlet.
- NEVER rest anything on the basket while it is open.
- DO NOT leave the basket open for an extended period.
- ALWAYS ensure that nothing is protruding out of the appliance before closing the basket.
- ALWAYS close the basket gently; NEVER slam the basket closed. ALWAYS use the handle when opening and closing the basket.
- NEVER operate the appliance with the basket open.
- When the cooking time has completed, cooking will stop and the fan will continue to run for 10–20 seconds to cool down the appliance.
- The appliance is equipped with an internal microswitch that automatically shuts down the fan and heating element when the basket is removed.
SAVE THESE INSTRUCTIONS.
This product is for household use only.
POLARIZED PLUG
This appliance has a polarized plug (one blade is wider than the other). To reduce the risk of electric shock, this plug is intended to fit into a polarized outlet only one way. If the plug does not fit fully into the outlet, reverse the plug. If it still does not fit, contact a qualified electrician. Do not attempt to modify the plug in any way.
- A short power-supply cord is provided to reduce the risk resulting from becoming entangled in or tripping over a longer cord.
- Longer detachable power-supply cords or extension cords are available and may be used if care is exercised in their use.
- If a longer detachable power-supply cord or extension cord is used:
a. The marked electrical rating of the cord set or extension cord should be at least as great as the electrical rating of the appliance;
b. The cord should be arranged so that it will not drape over the countertop or tabletop where it can be pulled on by children or tripped over unintentionally.
ELECTRIC POWER
This appliance should be operated on a dedicated electrical outlet. If the electrical outlet is overloaded with other appliances, your new appliance may not operate properly.
AUTOMATIC SHUT-OFF
The appliance has a built-in shut-off device that will automatically shut off the appliance when the cooking time has completed. You can manually switch off the appliance by pressing the STOP/OFF button. The fan will continue running for 10-20 seconds to cool down the appliance.
OVERHEATING PROTECTION
Should the inner temperature control system fail, the overheating protection system will be activated and the appliance will not function. Should this happen, unplug the appliance. Allow time for the appliance to cool completely before restarting or storing.
Parts & Accessories
- FRY TRAY
- SILICONE BUMPERS*
- BASKET
- HANDLE
- CONTROL PANEL
- AIR INLET VENT
- MAIN UNIT HOUSING
- HOT AIR OUTLET VENT
- POWER CABLE
- WIRE RACK**
NOTE: Unpack all listed contents from the packaging. Contents vary by model. Please remove any clear or blue protective film on the components before use.
* Removing the bumpers is not recommended.
** Not included with all models.
IMPORTANT: Please make sure that your appliance has been shipped with the components that you ordered (some accessories may be sold separately). Check everything carefully before use. If any part is missing or damaged, do not use this product. Contact Empower Brands, LLC using the customer service number located on the back of this manual.

Attaching the Basket Handle
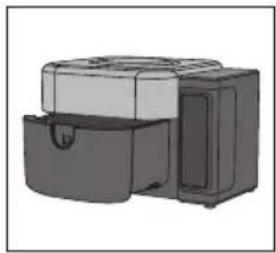
Your Basket Handle might come disassembled in your appliance's packaging. To attach the Basket Handle:
- Pull the Basket out of the appliance.
- Slide the attachment point on the handle downward until it clicks into place.
- The Basket Handle should lock into place and should not detach once it is locked into place.
Scan this QR code to see a video on attaching the basket handle:


natural_image
Illustration of a two-tiered printer or scanner device with a handle and front panel (no text or symbols visible)
natural_image
Illustration of a mechanical device with a lever and handle, showing a downward arrow indicating motion (no text or symbols)
natural_image
3D rendering of a black air fryer with a handle and internal components, showing no text or symbolsUsing The Control Panel
TO START: Plug the Power Cord into the electrical outlet. The Digital LED Display will illuminate and a series of dashes will display.

NOTE: Some functions are not available on all models.
1. Time and Temperature Display:
This display will keep track of the temperature and remaining cook time.
-
Timer Control Button: The Timer Control Button and the and symbols enable you to increase or decrease cooking time 1 minute at a time. Keeping the Button held down will rapidly change the time. Time control range: 1-60 minutes.
-
Temperature Control Button: The Temperature Control Button and the and symbols enable you to increase or decrease cooking temperature 5°F at a time. Keeping a button held down will rapidly change the temperature. Temperature control range: 150°F - 450°F. To change between Fahrenheit and Celsius, hold down the and symbols for 5 seconds. After 5 seconds, the display will show the newly selected temperature with "F" or "C".
4. Increase/Decrease Arrows
-
Cooking Presets*: Press the cooking preset buttons to choose from up to 8 cooking presets (presets vary by model). See the Preset Chart for the cooking times and temperatures associated with each preset. The running lights on the Control Panel will illuminate when the cooking cycle begins and will stay illuminated for up to 20 seconds after the cooking cycle is complete. Note: During modes with preheat required, the display will show "PrE".
-
Stop/Off Button: Pressing the Stop/Off Button during a cooking cycle will stop the cooking process. Pressing the Stop/Off Button when the appliance is not cooking will turn the appliance off.
-
Play/QuickStart +5 MIN Button: The appliance is equipped with a QuickStart function that enables you to start cooking with one button press. If the oven is off, simply press the PLAY/+5 MIN button to start cooking on AIR FRY with 5 minutes on the timer at 425° F / 220° C. You can continue pressing the PLAY/+5 MIN button to add 5 more minutes to the cooking cycle at any time. Note: If a preset has been selected, pressing the PLAY button will begin the cooking cycle and count down from the selected time. If the user tries to press PLAY and the basket is not inserted, the display show "Out" until the user inserts the basket.
Preset Chart
Once you are familiar with the appliance, you may want to experiment with your own recipes. Simply choose the time and temperature that suits your personal taste.
The AIRMAX ™ function lets you skip preheating, cooks faster, and provides crispier results with maximum temperature of 450irc F / 230irc C.
Preset Temperature Time Preheat
| Default | 410°F/210°C 15 mins. | ||
| AIRMAX 450°F/230°C 15 mins. No | |||
| AIRFRY 425°F/220°C 20 mins. No | |||
| BAKE 350°F/175°C 15 mins. Yes | |||
| ROAST | 375°F/190°C | 15 mins. | Yes |
| BROIL 450°F/230°C 10 mins. No | |||
| REHEAT 400°F/205°C 10 mins. No | |||
| CHICKEN 400°F/205°C 10 mins. No | |||
| STEAK 400°F/205°C 15 mins. No | |||
| PLAY/+5 MIN 425°F/220°C 5 mins. | |||
NOTE: Some functions are not available on all models.
Halfway through the cooking cycle, the appliance will beep twice and show FLIP on the display, indicating that food can be shaken or flipped over. Cook times less than 10 minutes will not have this reminder.
Instructions for Use
Before First Use
- Read all material, warning stickers, and labels.
- Remove all packing materials, stickers, and labels from the appliance.
- Visit www.prodprotect.com/powerxl to register your warranty.
- Before initial use, wipe the inside and outside of the appliance with a warm, moist cloth and mild detergent. Handwash all cooking accessories.
- Place appliance on a heat-resistant surface or use heat protection. Do not place the appliance on a surface that is not heat resistant. Ensure that the appliance is used in an area with adequate air circulation. Do not place on the stove top.
- Before cooking food, preheat the appliance for a few minutes to allow the appliance to burn off the manufacturer's protective coating of oil. Wipe the appliance with warm, soapy water and a dishcloth after this burn-in cycle.
natural_image
Interior view of a black air fryer with visible fan blades and ventilation slots (no text or symbols)Fig. i

natural_image
Top-down view of a black plastic appliance with six circular vented fans (no text or symbols visible)Fig. j
Inserting the Fry Tray
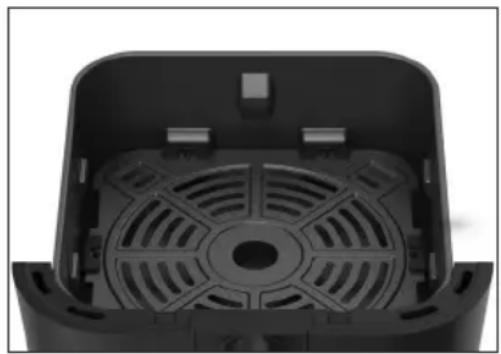
The Fry Tray has two positions - lower and upper. The lower position is recommended for normal use. The upper position can be used to place food closer to the heating elements for broiling.
- Place the Fry Tray in the Basket.
- To use the Fry Tray on the bottom of the Basket, rotate the Fry Tray so that the Fry Tray's edges
slide past the Fry Tray Holders, and push the Fry Tray to the bottom of the Basket (see Fig i). To raise the Fry Tray closer to the heating element (see Fig. j), position the edges of the Fry Tray on the Fry Tray Holders (see Fig. k).

natural_image
Top-down view of a black plastic enclosure with directional arrows indicating flow or movement (no text or symbols)Fig. k
- Slide the Basket into the appliance. If the Basket is placed properly, it will click into place.
NOTE: This appliance cooks using hot air. Do not fill the Basket with oil or frying fat.
Two Tier Cooking
When cooking two levels of food, place food in the bottom of the basket and then place the fry tray in the upper position (see Fig. j). Next place food on the fry tray. When there are a few minutes left on the cooking cycle, open the basket and remove the food from the fry tray and allow the lower food to cook for a few minutes to crisp.

natural_image
Exterior view of a PowerXL microwave oven with two food items inside (no visible text or symbols on the main subject)Using the Appliance
- Plug the appliance into a dedicated electrical outlet.
- Pull the Basket out of the appliance and place the ingredients inside. Do not touch the Basket directly because the Basket becomes very hot during operation. Only hold the Basket by its handle. Insert the Basket into the appliance.
NOTE: Always use the Fry Tray with the Basket unless cooking two levels of food. - Select your desired cooking preset. Adjust the time and temperature as desired. Press the PLAY button.
- When the appliance beeps 4 times, the set cooking time has elapsed. Pull the Basket out of the appliance and place it on a heat-resistant surface.
- When removing food from the basket, avoid contact with hot excess oil or the hot drip tray. To avoid being burned, use silicone-tipped tongs or tip out the basket contents carefully. The Fry Tray is not secured and can fall out. Hot oil can be inside the basket.
- If the food is not fully cooked, simply slide the Basket back into the appliance and add a few minutes to the cooking time.
- The appliance is instantly ready for preparing another batch.
NOTE: Do not place anything on top of the unit at anytime. Do not block the air vents.
+5 minute Quick Start Function
- The appliance is equipped with a QuickStart function that enables you to start cooking with one button press. If the oven is off, simply press the PLAY/+5 MIN button to start cooking on AIR FRY with 5 minutes on the timer at 425°F / 220°C. You can continue pressing the +5 min button to add 5 more minutes to the cooking cycle at anytime.
- If there is already a preset selected, pressing the PLAY/+5 MIN button will start the cooking cycle at the preset time shown on the display. To add time to the active timer, press the PLAY/+5 MIN button again.
- If the cooking cycle has ended and you would like to continue cooking, press the PLAY/+5 MIN button to start a 5 minute cooking cycle.
Shaking
To ensure even cooking, some foods require shaking or flipping during the cooking process. Halfway through the cooking timer, the appliance will beep twice and show FLIP on the display. Carefully use oven mitts to remove the hot Basket from the appliance. Gently shake.
NOTE: The cooking timer will be paused when the basket is removed for shaking food. The timer will resume once the basket is re-inserted. If you do not remove the basket and shake the food, the FLIP reminder will go away after 20 seconds.
Tips
- Foods that are smaller in size usually require a slightly shorter cooking time than larger foods.
● Shaking smaller-sized foods halfway through the cooking process ensures that all the pieces are fried evenly. - Adding a bit of vegetable oil to breaded items is suggested for a crispier result. When adding oil, do so just before cooking and add only a small amount onto the breaded items.
- Snacks normally cooked in an oven can also be cooked in the appliance.
- Use premade dough to prepare filled snacks quickly and easily. Premade dough also requires a shorter cooking time than homemade dough.
- You can use the appliance to reheat foods. Simply set the temperature and time to however warm you want your food.
General Cooking Guidelines
NOTE: Keep in mind that these settings are guidelines. Since ingredients differ in origin, size, shape, and brand, we cannot guarantee the best settings for your ingredients.
| Food item | Size | Temp. | Time | Function | Preheat | Shake or Flip | Tray position |
| FROZEN FOOD | |||||||
| French fries 1 lb | 425°F220°C | 17 min Air Fly | √ | lower | |||
| Sweet potato fries 1 lb | 425°F220°C | 16 min Air Fly | √ | lower | |||
| Chicken nuggets 1 lb | 400°F205°C | 14 min Air Fly | √ | lower | |||
| CHICKEN | |||||||
| Breaded cutlets | 1 lb | 425°F220°C | 14 min Roast | √ | √ | lower | |
| Wings 6 wings | 425°F220°C | 25 min Roast | √ | √ | lower | ||
| Chicken breast 1 lb | 400°F205°C | 10 min Roast | √ | lower | |||
| BEEF | |||||||
| Burgers | 4 patties | 450°F230°C | 14 min AirMax | √ | lower | ||
| Hot dogs | 8 pc | 375°F190°C | 6 min | Roast | √ | √ | upper |
| NY strip steaks 8 oz | 450°F230°C | 14 min AirMax | √ | upper | |||
| Meatballs, 1 inch | 1.5 lb | 375°F190°C | 10 min Air Fly | √ | lower | ||
| PORK | |||||||
| Pork chops | 1 lb | 450°F232°C | 12 min AirMax | √ | upper | ||
| Sausages | 1 lb | 350°F175°C | 15 min | Bake | √ | √ | lower |
| FISH | |||||||
| Salmon filets | 12 oz | 390°F200°C | 12 min | Bake | √ | lower | |
| Shrimp (16-20 size) | 12 oz | 390°F200°C | 10 min | Bake | √ | √ | lower |
| VEGETABLES | |||||||
| Asparagus | 1 lb | 380°F195°C | 10 min Air Fry | √ | lower | ||
| Broccoli 8 oz | 300°F150°C | 10 min Roast | √ | √ | lower | ||
| Corn on the cob 2 pc | 380°F195°C | 8 min Air Fry | √ | lower | |||
| PREPARED FOOD | |||||||
| Hard boiled eggs, shell on | 4 | 250°F120°C | 14 min Air Fry lower | ||||
| Cake 1 box | 320°F160°C | 34 min Bake | √ | lower | |||
| Grilled cheese sandwich | 1 pc | 375°F190°C | 6 min | Bake | √ | √ | lower |
Internal Temperature Meat Chart
Use this chart and a food thermometer to ensure that meat, poultry, seafood, and other cooked foods reach a safe minimum internal temperature.
*For maximum food safety, the U.S. Department of Agriculture recommends 74°C for all poultry; 71°C for ground beef, lamb, and pork; and 63°C, with a 3-minute resting period, for all other types of beef, lamb, and pork. Also review the USDA Food Safety Standards.
| Food | Type | Internal Temp.* |
| Beef & Veal | Ground | 71°C |
| Steaks, roasts: medium | 63°C | |
| Steaks, roasts: rare | 52°C | |
| Chicken & Turkey | Breasts | 74°C |
| Ground, stuffed | 74°C | |
| Whole bird, legs, thighs, wings | 74°C | |
| Fish & Shellfish | Any type | 63°C |
| Lamb | Ground | 71°C |
| Steaks, roasts: medium | 60°C | |
| Steaks, roasts: rare | 54°C | |
| Pork | Chops, ground, ribs, roasts | 71°C |
| Fully cooked ham 60°C | ||
Cleaning & Storage
Clean the appliance after each use. The Basket and Fry Tray are coated with a special nonstick surface. Never use abrasive cleaning materials or utensils on these surfaces.
- Remove the Power Cable from the electrical outlet and be certain the appliance is thoroughly cooled before cleaning.
- Wipe the outside of the appliance with a warm, moist cloth and mild detergent.
- Clean the Basket and Fry Tray, with hot water, a mild detergent, and a nonabrasive sponge. The Fry Tray is dishwasher safe, but hand-washing is recommended. For difficult-to-remove food, soak in hot, soapy water for 10 minutes.
NOTE: If the Silicone Bumpers on the Fry Tray need to be cleaned, they can be removed and reattached.
- Clean the inside of the appliance with hot water, a mild detergent, and a nonabrasive sponge.
- If necessary, remove unwanted food residue from the heating element with a soft cleaning brush.
- Rinse the appliance with a clean, damp cloth. Use a clean, dry cloth to dry the appliance interior. Do not leave standing water in the appliance.
- If any other service needs to be performed, contact Customer Service using the contact information on the back of this manual.
Storage
Place the cooled, dry appliance in a clean, dry place. Do not stack objects on top of the appliance.
Troubleshooting
Symptom Possible Cause Solution
| The appliance does not work. | The appliance is not plugged in. Plug the Power Cable into an electrical outlet. | |
| The appliance is plugged into an outlet that is shared with other devices. | Plug the appliance into a dedicated electrical outlet. | |
| The appliance has not been turned on by setting the preparation time and temperature. | Press a cooking preset. Press the PLAY button and cooking will begin. | |
| The basket is not inserted into the appliance and "Out" is shown on the display. | Insert the basket fully. If properly inserted, the display will show the selected time or temperature. | |
| Food is not cooked. | The Basket is overloaded. Use smaller batches for more even frying. | |
| The temperature is set too low. Raise temperature and continue cooking. | ||
| Food is not fried evenly. | Some foods need to be shaken during the cooking process. | See "Shaking" section in "Instructions for Use". |
| Basket will not slide into appliance properly. | The Basket is overloaded. | Do not fill the Basket above the top of the basket. |
| The Fry Tray is not placed in the Basket correctly. | Gently push the Fry Tray into the Basket until it sits on the fry tray holders in either the upper or lower position. | |
| Smoke coming from appliance. | Too much oil is being used. Wipe down to remove excess oil. | |
| The Basket has grease residue from the previous operation. | Clean the Basket after each use. | |
| French fries are not fried evenly. | Potatoes are not prepped properly. Consult a recipe for potato type and prep. | |
| Fries are not cut evenly. Cut fries thinner or reshape fries. | ||
| Fries are too crowded. Spread fries out or cook a smaller batch. | ||
| Potatoes are not rinsed properly during preparation. Pat dry to remove excess starch. | ||
Frequently Asked Questions
- Can I prepare foods other than fried dishes with my appliance?
You can prepare a variety of dishes, including steaks, chops, burgers, and baked goods. See the PowerXL™ Vortex Pro Air Fryer Recipe Guide.
- Is the appliance good for making or reheating soups and sauces?
Never cook or reheat liquids in the appliance.
- Is it possible to shut off the appliance at any time?
Press the STOP/OFF button once or remove the Basket.
- What do I do if the appliance shuts off while cooking?
As a safety feature, the appliance has an Auto Shut-Off device that prevents damage from overheating. Remove the Basket and set it on a heat-resistant surface. Remove the Power Cable from the outlet. Allow the appliance to cool down. Once cool, plug the Power Cable into the outlet. Restart by pressing the Power Button.
- Does the appliance need time to heat up?
Most recipes do not require preheating. If you are cooking from a cold start and your recipe requires preheating, add 3 minutes to the cooking time to compensate.
- Can I check the food during the cooking process?
You can remove the Basket at any time while cooking is in progress. During this time, you can shake the contents in the Basket if needed to ensure even cooking.
- Is the appliance dishwasher safe?
Only the Fry Tray is dishwasher safe. The appliance itself, which contains the heating coil and electronics, should never be submerged in liquid of any kind or cleaned with anything more than a warm, moist cloth or nonabrasive sponge with a small amount of mild detergent.
- What happens if the appliance still does not work after I have tried all the troubleshooting suggestions?
Never attempt a home repair. Contact customer service and follow the procedures set forth by the guarantee. Failure to do so could render your guarantee null and void.
Sweet and Spicy Pork Tenderloin with Roasted Brussels Sprouts and Potatoes
Prep Time: 15 minutes
Cook Time: 25 minutes
Total Time: 40 minutes (Marinating overnight is best for extra flavor)
Serves: 2
Ingredients:
1 pork tenderloin (1 lb), trimmed
Marinade:
1 tbsp soy sauce
1 tbsp molasses
3 tbsp brown sugar
2 tbsp ginger, grated
2 clove garlic, minced
2 tbsp rice wine vinegar
1 tbsp sriracha
Brussels Sprouts and Red Potatoes:
1 ½ cup brussels sprouts, halved
1 cup baby red potatoes
1 small onion, large dice
2 tbsp olive oil
1 tsp sea salt
12 tsp ground black pepper
1 tsp garlic powder
Directions:
-
First, make the pork tenderloin. In a bowl, mix the marinade ingredients together and marinate the pork tenderloin in the refrigerator overnight.
-
Preheat the Airmax™ Air Fryer on the ROAST function.
-
Second, make the Brussels sprouts and red potatoes. Toss Brussels sprouts, potatoes, mini sweet peppers, and onions with olive oil, garlic powder, salt and pepper in a bowl.
-
When the Airmax™ Air Fryer is preheated, place the pork tenderloin, Brussels sprouts, and red potatoes into the basket on the tray and onto the lower level of the Airmax™ Air Fryer. Increase the time to 25 minutes.
-
When done, let the pork tenderloin rest 10 minutes before slicing.
Breaded Chicken Cutlets
Prep Time: 15 minutes
Cook Time: 10 minutes
Total Time: 25 minutes
Serves: 2
Ingredients:
2 chicken breast (6 oz each), sliced thin and slightly pounded
1 cup seasoned breadcrumbs
12 cup parmesan cheese, grated
Egg Mixture:
2 large eggs, beaten
2 tbsp milk
Directions:
- Make the egg mixture: place the egg and milk in a shallow dish and beat well. Add the chicken.
- Place the breadcrumbs and grated cheese in a shallow pan and take the chicken from the egg mixture and coat it well in the breadcrumbs.
- Place the tray on the upper level and place the chicken into the basket.
- Select the AIRFRY Function for 10 minutes. Flip after 5 minutes.
- When fully cooked, serve over greens with lemons.
BBQ Chicken Drumsticks
Prep Time: 10 minutes
Cook Time: 25 minutes
Total Time: 35 minutes
(Marinating for a couple of hours is best for extra flavor.)
Serves: 4
Ingredients:
6 chicken drumsticks
12 cup BBQ sauce
14 cup orange juice
1 tsp garlic powder
1 tsp onion powder
Directions:
- Toss the chicken with the BBQ sauce, orange juice, and seasonings. Marinate for a couple hours in the refrigerator.
- Preheat the Airmax™ Air Fryer on the ROAST function and increase the time to 25 minutes.
- Place the tray into the basket on the lower level.
- Once the oven is preheated, place the chicken drumsticks on the tray and into the Airmax™ Air Fryer.
- Flip them after 10-12 minutes.
- When the drumsticks are fully cooked, serve.
Smashed Baby Red Potatoes
Prep Time: 10 minutes
Cook Time: 22 minutes
Total Time: 32 minutes
Serves: 4
Ingredients:
1 tsp onion powder
8 baby red potatoes
8 tsp salted butter
4 tsp grated parmesan cheese
2 tsp granulated garlic
12 tsp sea salt
Directions:
- Select the ROAST function to let the Airmax™ Air Fryer preheat.
- Place the tray on the lower level, add the baby potatoes, and cook 15 minutes.
- In a bowl, mix the parmesan, garlic, salt, and pepper.
- When the potatoes have finished cooking, using a spatula or potato masher, press the potatoes in the basket.
- Top the smashed potatoes with the parmesan garlic mix and butter.
- Place the basket back into the Airmax™ Air Fryer and cook on the AIRFRY function for 8 minutes.
- When the potatoes are golden, serve.
Steak Frites
Prep Time: 10 minutes
Cook Time: 20 minutes
Total Time: 30 minutes
Serves: 2
Ingredients:
2 New York Strip steaks (14 oz each)
12 tsp salt
12 tsp ground black pepper
1 lb frozen French fries
1/2 stick salted butter, softened
1/2 shallot, minced
1 sprig tarragon
14 tsp fresh ground black pepper
Directions:
-
Place the fries into the basket on the bottom and select the AIRMAX function. Increase the time to 20 minutes.
-
Place the steaks on a plate or cutting board and season with salt and pepper.
-
Halfway through the cooking process, add the fry tray to the upper level and place the steaks on the fry tray and back into the Airmax™ Air Fryer.
-
In a small bowl, mix the butter with the tarragon, shallots, and pepper.
-
Flip the steaks after 5 minutes. Cook to desired temperature.
-
When done, top the steak with the butter. Allow the steaks to rest for 5-10 minutes.
-
Serve the steaks with the fries.
Crab Cakes and Roasted Corn Salsa
Prep Time: 30 minutes
Cook Time: 25 minutes
Total Time: 55 minutes
Serves: 4 - 6
Ingredients:
Crab Cakes:
1 lb lump crab meat, drained
1/2 red pepper, diced small
3 scallions, chopped
1 tbsp Dijon mustard
1 tsp seafood seasoning
14 tsp cayenne pepper
1 tbsp lemon juice
14 cup mayonnaise
2 large eggs
2 oz crackers, crushed
1 ½ cups panko
Roasted Corn Salsa:
4 ears of corn
1 red pepper
12 cup diced red onion
1 lime, juiced
2 tbsp cilantro, chopped
1/2 small jalapeno, minced
1 / 4 tsp. salt
1 tsp sriracha
Directions:
-
First, make the roasted corn salsa. Place corn and red pepper (whole) into the basket on the tray on the lower level.
-
Select AIRMAX function for 10 minutes. Flip halfway through the cooking.
-
Second, make the crab cakes. In a bowl, mix the crab cake ingredients and form into crab cakes about 1/3 of a cup each. Place on a cookie sheet and into the refrigerator until you're ready to cook.
-
In a medium bowl, add all of the roasted corn salsa ingredients except for the corn and red pepper. When the corn and pepper are finished cooking, cool and peel the red pepper and remove the corn from the cob. Add the corn to the bowl.
-
Dice the red pepper and add to the bowl. Toss and set aside.
-
Remove the crab cakes from the refrigerator. Coat each crab cake lightly with panko. Place the crab cake onto the fry tray in the lower level. Slide the basket into the Airmax™ Air Fryer.
-
Select AIRFRY function for 15 minutes.
-
When the crabcakes are finished cooking, serve with roasted corn salsa.
Hot Apple Turnovers with Vanilla Ice Cream and Caramel Sauce
Prep Time: 30 minutes
Cook Time: 30 minutes
Total Time: 60 minutes
Serves: 8
Ingredients:
2 sheets of puff pastry, cut into 4 equal squares per sheet
3 apples, cored, cut into crescent slices
13 cup sugar
1 tbsp flour
2 tsp butter
1 tsp cinnamon
14 tsp nutmeg
12 lemon, juiced
8 scoops vanilla ice cream
12 cup caramel sauce
Egg Wash:
1 egg
2 tbsp milk
Directions:
- In a large sauté pan, add the apples with the sugar, flour, butter, cinnamon, nutmeg, and lemon juice and cook over medium high heat. Sauté until the liquid thickens, about 7-10 minutes. Set aside and let cool.
- Make the egg wash by beating the milk with egg.
- Place 4 squares of puff pastry on the counter. Place about 14 cup of the apples in the middle of the square. Brush the edges of the puff pastry with the egg wash and fold over to make a triangle. Press the edge with a fork to seal.
- Select the BAKE function and preheat.
- Place 4 apple turnovers at a time on the rack in the lower level. Bake until they are slightly golden. Repeat for the next 4 apple turnovers.
- When they are done, serve with vanilla ice cream and caramel sauce.
Tabla de contenidos
natural_image
Illustration of a two-tiered printer or scanner device with a handle and front panel (no text or symbols visible)
natural_image
3D illustration of a mechanical device with a lever and base, showing a downward arrow (no text or symbols)
natural_image
3D rendering of a black electric fan or blender device with a handle and internal components, showing no text or symbols.natural_image
Top-down view of a black air fryer with visible fan blades and ventilation slots (no text or symbols)Fig. i

natural_image
Top-down view of a black plastic appliance with six circular vented fans (no text or symbols visible)Fig. j
natural_image
Top-down view of a black plastic enclosure with directional arrows indicating flow or movement (no text or symbols)Fig. k

natural_image
Top-down view of a black plastic enclosure with directional arrows indicating flow or movement (no text or symbols)natural_image
Exterior view of a PowerXL microwave oven with two food items inside (no visible text or symbols on the main body)Uso del aparato
MISES EN GARDE IMPORTANTES.
natural_image
Black plastic container with a handle, labeled with numbers 3 and 4 (no text or symbols on the object itself)natural_image
Exterior view of a PowerXL air fryer with digital display and control panel (no readable text or symbols)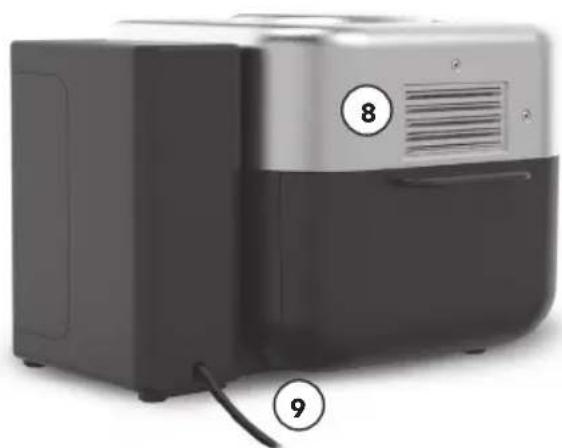
natural_image
Exterior view of a modern kitchen air fryer with labeled parts (8 and 9), no visible text or symbols beyond labels
natural_image
Illustration of a two-tiered mechanical device with a handle and internal components (no text or symbols)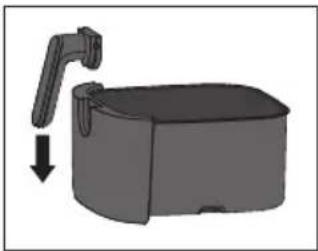
natural_image
3D illustration of a mechanical device with a lever and base, showing a downward arrow indicating motion (no text or symbols)
natural_image
3D rendering of a black industrial fan or blender with a handle and internal components, showing no text or symbols.natural_image
Interior view of a black air fryer with visible fan blades and ventilation slots (no text or symbols)Fig. i

natural_image
Top-down view of a black plastic appliance with six circular vented fans (no text or symbols visible)Fig. j

natural_image
Top-down view of a black plastic enclosure with directional arrows indicating flow or movement (no text or symbols)Fig. k
natural_image
Exterior view of a PowerXL microwave oven with two fish inside, showing food arrangement and control panel (no readable text or symbols)Dist. by : Empower Brands, LLC, Middleton, WI 53562
Dist. by : Empower Brands Canada, Inc.,
1460 The Queensway, Etobicoke, Ontario, M8Z 1S4, Suite 223
®registered trademark and™ trademark of Empower Brands, LLC.
© 2025 Empower Brands, LLC. All rights reserved /
Empower Brands, LLC, Middleton, WI 53562. 05/2025
Made in Indonesia.
- Use & Care Manual Manual de uso y cuidado Guide d'utilisation et d'entretien
- Table of Contents
- IMPORTANT SAFEGUARDS 3
- Prevent Injuries! – Carefully Read All Instructions Before Use!
- IMPORTANT SAFEGUARDS.
- When using electrical appliances, basic safety precautions should be followed, including the following:
- SAVE THESE INSTRUCTIONS.
- POLARIZED PLUG
- ELECTRIC POWER
- AUTOMATIC SHUT-OFF
- OVERHEATING PROTECTION
- Parts & Accessories
- Attaching the Basket Handle
- Using The Control Panel
- Time and Temperature Display:
- Increase/Decrease Arrows
- Preset Chart
- Instructions for Use
- Before First Use
- Inserting the Fry Tray
- Two Tier Cooking
- Using the Appliance
- +5 minute Quick Start Function
- Shaking
- Tips
- General Cooking Guidelines
- Internal Temperature Meat Chart
- Cleaning & Storage
- Storage
- Troubleshooting
- Frequently Asked Questions
- Sweet and Spicy Pork Tenderloin with Roasted Brussels Sprouts and Potatoes
- Ingredients:
- Marinade:
- Brussels Sprouts and Red Potatoes:
- Directions:
- Breaded Chicken Cutlets
- Egg Mixture:
- BBQ Chicken Drumsticks
- Smashed Baby Red Potatoes
- Steak Frites
- Crab Cakes and Roasted Corn Salsa
- Crab Cakes:
- Roasted Corn Salsa:
- Hot Apple Turnovers with Vanilla Ice Cream and Caramel Sauce
- Egg Wash:
- Tabla de contenidos
- Uso del aparato
- MISES EN GARDE IMPORTANTES.
Brand : PowerXL
Model : AIRMAX AF4042
Category : Deep fryer