
HNT61310X - Range hood BEKO - Free user manual and instructions
Find the device manual for free HNT61310X BEKO in PDF.


| Product Type | Cooker Hood |
| Brand | Beko |
| Model | HNT61310X |
| Installation Type | Built-in |
| Color | Stainless Steel |
| Dimensions (WxDxH) | 60 x 50 x 13 cm |
| Weight | 8 kg |
| Power Supply | 220-240 V, 50 Hz |
| Motor Power | 220 W |
| Max. Suction Capacity | 650 m³/h |
| Number of Speeds | 3 |
| Lighting | 2 x 40 W halogen bulbs |
| Grease Filter Type | Aluminum |
| Carbon Filter | Optional, not included |
| Noise Level (max speed) | 65 dB |
| Control Type | Electronic buttons |
| Duct Diameter | 150 mm |
| Motor Thermal Protection | Yes |
| Filter Cleaning Indicator | No |
| Energy Efficiency Class | A (estimated) |
Frequently Asked Questions - HNT61310X BEKO
User questions about HNT61310X BEKO
0 question about this device. Answer the ones you know or ask your own.
Ask a new question about this device
Download the instructions for your Range hood in PDF format for free! Find your manual HNT61310X - BEKO and take your electronic device back in hand. On this page are published all the documents necessary for the use of your device. HNT61310X by BEKO.
USER MANUAL HNT61310X BEKO
HNT61310X
EN - ES - BS - MK - PL - PT - RO - SQ - SR - UA
CONTENTS
| ENGLISH | 03-15 |
| ESPAÑOL | 16-30 |
| BOSANSKI | 31-43 |
| MAKEDOHСКИ | 44-59 |
| POLSKI | 60-75 |
| PORTUGUÊS | 76-90 |
| ROMÂNĂ | 91-105 |
| SHQIPTARE | 106-118 |
| СРПСКИ | 119-134 |
| УКРАЇНСЬКА | 135-155 |
Please read this user manual first!
Dear Valued Customer,
Thank you for preferring this Beko appliance. We hope that you get the best results from your appliance which has been manufactured with high quality and state-of-the-art technology. For this reason, please read this entire user manual and all other accompanying documents carefully before using the appliance and keep it as a reference for future use. If you handover the appliance to someone else, give the user manual as well. Follow the instructions by paying attention to all the information and warnings in the user manual.
Remember that this user manual may also apply to other models. Differences between models are explicitly described in the manual.
Meanings of the Symbols
Following symbols are used in various sections of this user manual:

Important information and useful hints about usage.

WARNING: Warnings against dangerous situations concerning the security of life and property.

WARNING: Warning for danger of fire.

WARNING: Warning for electric shock.
1 Important safety and environmental instructions
1.1 General safety
Important Safety Instructions Read Carefully And Keep For Future Reference This section contains safety instructions that will help protect from risk of fire, electric shock, exposure to leak microwave energy, personal injury or property damage. Failure to follow these instructions shall void any warranty.
- Beko products comply with the applicable safety standards; therefore, in case of any damage on the appliance or power cable, it should be repaired or replaced by the dealer, service center or a specialist and authorized service alike to avoid any danger. Faulty or unqualified repair work may be dangerous and cause risk to the user.
- This appliance is intended to be used in household and similar applications such as:
- Staff kitchen areas in shops, offices and other working environments;
- Farm houses
- By clients in hotels, and other residential type environments;
- Bed and Breakfast type environments.
- Operate the appliance for its intended purpose only as described in this manual.
- The manufacturer cannot be held liable for damages resulting from improper installation or misuse of the product.
- This appliance can be used by children aged from 8 years and above and persons with reduced physical, sensory or mental capabilities or lack of experience and knowledge if they have been given supervision or instruction concerning use of the appliance in a safe way and understand the hazards involved.
• Children shall not be allowed play with the appliance. Cleaning and user maintenance shall not be made by children without supervision.
1 Important safety and environmental instructions
- The minimum distance between the supporting surface for the cooking vessels on the hob and the lowest part of your product must be at least 65 cm.
- If the instructions for installation for the gas hob specify a greater distance, this has to be taken into account.
- Make sure that your mains power supply complies with the information supplied on the rating plate of the appliance.
- Never use the appliance if the power cable or the appliance itself is damaged.
- Prevent damage to the power cable by not squeezing, bending, or rubbing it on sharp edges. Keep the power cable away from hot surfaces and naked flame.
- Use the appliance with a grounded outlet only.
WARNING: Do not connect the appliance to the mains until the installation is fully complete.
- Place the appliance in a way so that the plug is always accessible.
- Do not touch the lamps if they have operated for a long time. They can burn your hands since they will be hot.
- Follow the regulations set out by competent authorities on discharge of the exhaust air (this warning is not applicable for use without flue).
- Operate your appliance after putting a pot, pan etc. on the hob. Otherwise, high heat may cause deformation in some parts of your product.
- Turn off the hob before taking the pot, pan etc. from it. - Do not leave hot oil on the hob. Pans with hot oil may cause self combustion.
- Pay attention to your curtains and covers since oil may catch fire while cooking food such as fries.
- Grease filter must be cleaned at least monthly. Carbon filter must be replaced at least every 3 months.
1 Important safety and environmental instructions
- Product shall be cleaned accordance with user manual. If cleaning was not carried out in accordance with user manual, there may be fire risk.
- Do not use non-fire-resistant filtering materials instead of the current filter.
- Only use the original parts or parts recommended by the manufacturer.
- Do not operate the product without the filter and do not remove the filters while the product is running.
- In the event of be started any flame, de-energize your product and cooking appliances.
- In the event of be started any flame, cover the flame and never use water to extinguish.
- Unplug the appliance before each cleaning and when the appliance is not in use.
- The negative pressure in the environment should not exceed 4 Pa (4x10 bar) while the hood for electric hob and appliances running on another type of energy but electri-
city operate simultaneously.
- In the environment where the appliance is being used, the exhaust of devices running on fuel oil or gas, such as room heater must be absolutely isolated or device must be hermetical type.
- When connecting the flue, use pipes with a diameter of 120 or 150 mm . Pipe connection must be as short as possible and have as few elbows as possible.
- Danger of choking! Keep all the packaging materials away from children.
CAUTION: Accessible parts may become hot when used with coo-king appliances.
- The product outlet must not be connected to air channels that include other smoke.
- The ventilation in the room may be insufficient when the hood for electric hob is used simultaneously with the devices operating on gas or other fuels (this may not apply to appliances that only discharge the air back into the room).
1 Important safety and environmental instructions
- Objects placed on the product may fall. Do not place any objects on the product.
- Do not flambe under the your product.
WARNING: Before installing the Hood, remove the protective films.
- Never leave high naked flames under the hood when it is in operation
- Deep fat fryers must be continuously monitored during use: overheated oil can burst into flames.
1.2 Compliance with the WEEE Directive and Disposing of the Waste Product:
This product complies with EU WEEE Directive (2012/19/EU). This product bears a classification symbol for waste electrical and electronic equipment (WEEE).

This symbol indicates that this product shall not be disposed with other household wastes at the end of its service life. Used device must be returned to official collection point for recycling of electrical and electronic devices. To find these collection systems please contact to your local authorities or retailer where the product was purchased. Each household performs important role in recovering and recycling of old appliance. Appropriate disposal of used appliance helps prevent potential negative consequences for the environment and human health.
1.3 Compliance with RoHS Directive
The product you have purchased complies with EU RoHS Directive (2011/65/EU). It does not contain harmful and prohibited materials specified in the Directive.
1.4 Package Information

Packaging materials of the product are manufactured from recyclable materials in accordance with our National Environment Regulations. Do not dispose of the packaging materials together with the domestic or other wastes. Take them to the packaging material collection points designated by the local authorities.
2 General appearance
2.1 Overview

- Slinder panel
- Control panel
- Grease filter
- Lighting
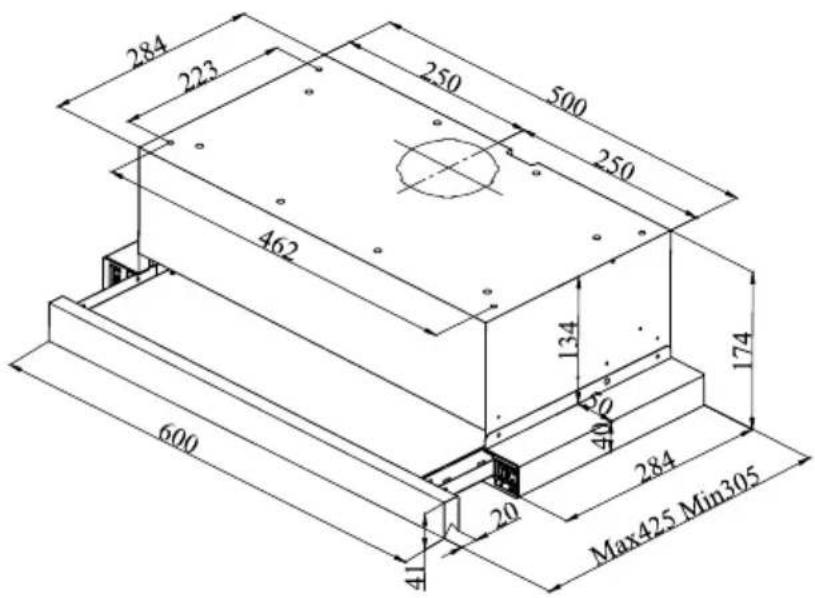
2.2 Technical data
| Model HNT61310X | |
| Supply Voltage and Frequency 220-240V ~ 50 Hz | |
| Lamp Power 2 x 3 W | |
| Motor Power 250 W | |
| Flow rate – 3. Level 483 m3/h | |
| Insulation Class of Motor Class F | |
| Insulation Class Class I | |
3 Using the appliance
3.1 Controlling the appliance

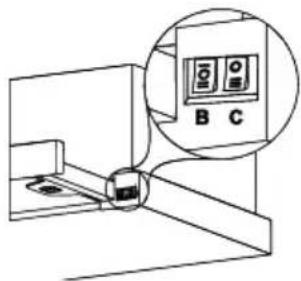
| KEY FUNCTION | |
| A : Light On / Off | Pull the sliding plate to the front. Press the button downwards to turn on the lamp or upwards to turn off the lamp. |
| B : 1 and 2 Speed Button | Pull the sliding plate to the front. Press the button upwards to operate the hood at speed level 1, and downwards to operate the hood at speed level 2. |
| C : 3rd Speed Button | Pull the sliding plate to the front. Press the button downwards to operate the hood at speed level 3. |
3.2 Energy efficient usage
- When using your appliance, adjust the speed settings according to vapour and odour intensity, in order to save energy.
- Use low speeds (1-2) under normal conditions, and high speed (3) for intense odour and vapour.
- The lamps on the hood are placed for illuminating the cooking area.
- Using them for environmental lighting shall cause unnecessary energy expenditure and insufficient lighting.
3.3 Operating the hood
- Your appliance contains a motor that has various speeds.
- For better performance, we recommend using low speeds under normal conditions and high speeds in cases of strong odours and intense vapour.
- You can start your appliance by pressing on the desired speed setting button. (B, C)
- You may illuminate the cooking area by pressing the lamp (A).
3.4 Replacement of lamp

CAUTION: Disconnect the electrical supply of the hood. Leave the lamps to cool down first because they could burn your hands when they are hot.

Remove the aluminium cartridge filter. Remove the defective bulb and replace with a new one with the same rating.
| Bulb |  |
| Bulb Power 3 W | |
| Holder / Socket E | 14 |
| Bulb Voltage 220 | 240 V |
| Size 35 x 100 mm | |
| ILCOS Code D R B | B / F - 3 - 2 2 0 - 240-E14-35/100 |
| Luminous flux 220 lm | |
| Correlated colour temperature | 2700 K |
This product contains a light source of energy efficiency class "E".
3 Using the appliance
3.5 Operation with chimney connection

tracted through the
flue duct, which is fastened to the connection head on the hood.
- The diameter of the flue duct must be the same as the connection ring. In horizontal settings, the pipe has to have a slight upward slope (around 10° ) so that the air can exit the room easily.
3.6 Operation without chimney connection

through the carbon
filter and recirculated in the room. Carbon filter is used when it is impossible to use a flue in the house.
- In flueless use, remove the flaps inside the flue adapter.
- Remove the aluminum grease filter. To install the carbon filter, fit the filter to the tabs by centring it on the plastic piece on both sides of the fan body. tighten it by turning right or left.
- Replace aluminum grease filter.
4 Cleaning and Maintenance

Before cleaning and maintenance, unplug the product or turn off the switch.
4.1 Cleaning of grease filter
Grease filter is used to retain the oil particles in the air. Grease filter may change colour after repeated cleaning. This is normal, and you do not have to replace your filters.

- External grease filter
- Internal grease filter
- pull the sliding plate out by holding the front panel. Remove the external grease filter first, and then the internal grease filter.
- Push the grease filter lock forward.
- Then pull it slightly down and pull it out. Otherwise, you may bend the filter. Wash and rinse grease filter with liquid detergent and replace grease filter to their seats by carrying out the steps specified above in reverse order. These grease filter are used to retain the oil particles in the air.

You may also wash the grease filter in the dishwasher.

CAUTION: In case of normal use, clean your grease filter once in a month.
4.2 Replacement of carbon filters
Odour removing filters contain charcoal (Active carbon). Grease filter must be installed in the product, regardless of whether or not carbon filters are used.

- Remove the grease filter.
- To remove the carbon filter, remove the carbon filter from its housing by rotating it counter-clockwise from the tab.
• Install the new carbon filter.
• Install the grease filter.

CAUTION
- Carbon filter shall never be washed.
- Replace carbon filters once every 3 months.
- You can obtain the carbon filter from the authorized services.
5 Installation of appliance

WARNING: Before starting the installation, read the safety information on user manual.
WARNING: Failure to install with screws and stabilizers in accordance with these instructions may result in electric shock.
For the installation of the hood, please contact the nearest Authorized Service.
It is the customer's responsibility to prepare the location and electrical installation of the hood.
5.1 Position of the appliance
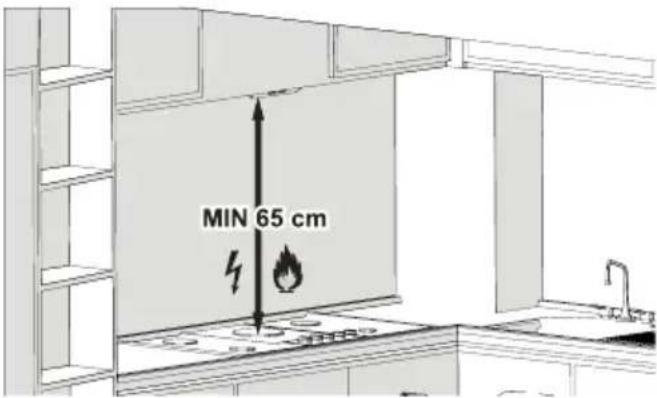
- Distance between the cooker and the cooker hood must be considered prior to assembly. This distance should be 65 cm.
- Distance must be measured from the surface of grate for gas cookers,
• from surface of glass for electric cookers.
5.2 Installation accessories
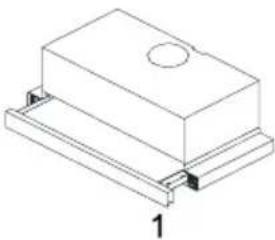

3

4

5
- Hood
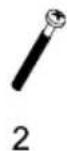
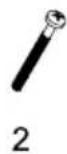
- 4x 4 x 40 Screws
- User manual
- Mounting Template
- ∅120mm Plastic Flue Flap
The information required to make the location suitable for the installation of the hood is given below.
5.3 Installation of the Hood

CAUTION: Use protective gloves and goggles for drilling and cutting operations.
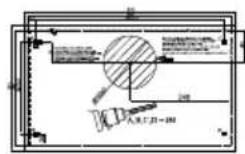
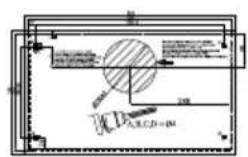
- Paste the installing template provided with the hood on the surface where the hood is to be mounted.
- Make holes with ∅4 mm diameter on the points marked as A, B, C, D on the installation template.
- Drill the flue outlet hole specified in the installing template in the sizes given.
Remove the appliance from its packaging. Install the plastic flue flaps provided in the accessories to the air outlet flue of the appliance as shown below.
5 Installation of appliance

(Figure 1)
- Flap Pin Socket
- Flap Pin
Insert the plastic pin (Figure 1/area no. 2) on the pin socket on the motor exhaust (Figure 1/area no.1). Then bend the flap lightly to insert the other pin on the flap and insert the other pin to its socket (Figure 1).

(Figure 2)
By using the 4 x 40 screws provided with the hood, install the appliance to the cabinet from the points A, B, C and D. When the slider set moves, the front panel shall not rub on the cabinet door (Figure 2)
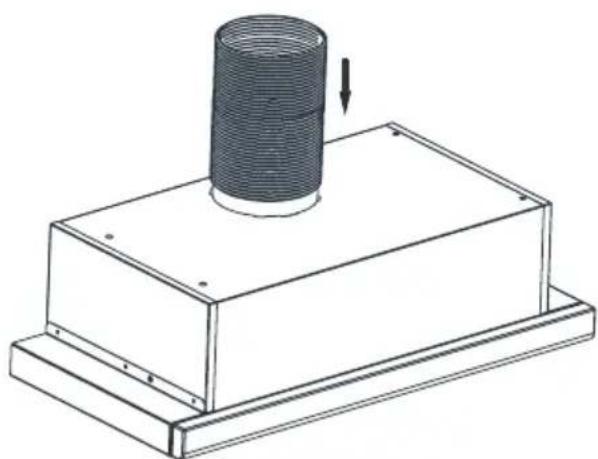
(Figure 3)
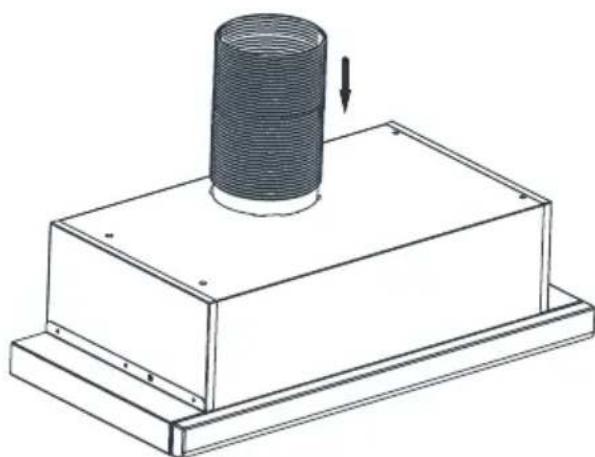
Install flexible aluminium pipe to plastic flue outlet. Install the other end of the pipe to the flue hole on the wall (Figure 3).
5.4 Connecting to flue
If you are going to use the ∅ 120/150 mm plastic flue adapter, connect one end of the pipe to this adapter, if you are not going to use it, to the direct output on the product. Connect the other end of the pipe to your flue. Check that these two connections are tight enough so they will not come out when the appliance runs on full power. Ensure that the flaps inside the flue work when tightened with clamp. Connect the flue connection duct outside the adapter. If the connection duct is fitted inside the adapter, the covers that prevent air return shall remain closed and air won't be sucked in. The length of the pipe connection as well as the number of elbows must be as minimum as possible.
5 Installation of appliance

A : Flue exit pipe
B : Non return flaps
C: Plastic Flue
The valves are closed then the appliance is not operating and prevent possible outside odour and dust from entering inside.
5.5 Storage
- If you do not intend to use the appliance for a long time, please store it carefully.
- Please make sure that the appliance is unplugged, cooled down and totally dry.
- Store the appliance in a cool and dry place.
- Keep the appliance out of the reach of children
5.6 Handling and transportation
- During handling and transportation, carry the appliance in its original packaging. The packaging of the appliance protects it against physical damages.
- Do not place heavy loads on the appliance or the packaging. The appliance may be damaged.
- Dropping the appliance will render it non-operational or cause permanent damage.
6 Troubleshooting
| Troubleshooting Root cause Help | ||
| Appliance is not working. | Check your fuses. Fuse may be blown, inspect and restore it. | |
| Appliance is not working. | Check the electrical connection. | Mains voltage shall be between 220 and 240 V. |
| Appliance is not working. | Check the electrical connection. | Check if other appliance in your kitchen operate. |
| Illumination light does not operate. | Check the electrical connection. | Mains voltage shall be between 220 and 240 V. |
| Illumination light does not operate. | Inspect the lamp switch. Lamp switch shall be at “on” position. | |
| Illumination light does not operate. | Inspect the lamps. The lamps of the appliance shall illuminate. | |
| Air inlet of the appliance is inadequate. | Inspect the grease filter. Under normal operating conditions, grease filter shall be cleaned at least once in a month. | |
| Air inlet of the appliance is inadequate. | Check the air discharge chimney. | The air discharge chimney shall be at “on” position. |
| Air inlet of the appliance is inadequate. | Inspect the carbon filter. The filters of the appliances with carbon filters shall be replaced once in every 3 months under normal conditions. | |
(Imagen 1)
- Conector de Clavija
- Clavija
(Imagen 3)
Uklonite aluminijumski uložak za filtar. Uklonite neispravnu žarulju i zamijenite novom s istom ocjenom.
| Sijalica | |
| Snaga sijalice 3 W | |
| Držač/utičnica E 14 | |
| Napon sijalice 220 - 240 V | |
| Veličina 35 x 100 mm | |
| ILCOS kod D R B B / F - 3 - 2 2 0 - 240-E14-35/100 | |
| Svjetlosni tok 220 lm | |
| Odgovarajuća temperatura boje | 2700 K |
Ovaj proizvod sadrži izvor svjetla klase energetske efikasnosti "E".
- Vanjski aluminijumski filtar za masnoću
-
Unutarnji aluminijski filtar za masnoću
-
Izvucite kliznu ploču držeći prednju ploču. Prvo uklonite vanjski aluminijumski filtar za masnoću, a zatim unutarnji aluminijski filtar za masnoću.
- Gurnite bravu aluminijskog filtra za masnoću prema naprijed.
- Zatim ga lagano povucite prema dolje i izvucite (Slika 5). U suprotnom možete saviti filtar. Operite i isperite aluminijski filter za masnoće tečnim deterdžentom i vratite aluminijski filter za masnoće na njegovo mjesto izvodeći gore navedene korake obrnutim redoslijedom. Ovaj filtar sakuplja čestice masnoće u vazduhu.

- Uklonite aluminijski filtar za masnoću.
- Da biste uklonili karbonski filtar, izvadite ga iz njegovog kućišta tako da ćete ga okrenuti u smjeru suprotnom od kazaljke na satu.
• Ugradite novi karbonski filtar. - Ugradite aluminijske filtre za masnoću.

OPREZ
• Karbonski filtar nikada se ne pere.
- Zamijenite karbonske filtre jednom svaka 3 mjeseca.
- Karbonski filtar možete nabaviti od ovlaštenih servisa.
5 Ugradnja uređaja

UPOZORENJE: Prije započinjanja ugradnje pročitajte sigurnosne informacije u korisničkom priručniku.

UPOZORENJE: Ako ugradnju ne izvršite s vijcima i uređajima za pričvršćivanje u skladu s ovim uputama, može doći do opasnosti od električnog udara.
- Prije montiranja mora se uzeti u obzir udaljenost između šporeta i nape. Ova udaljenost treba biti 50 cm za električne ploče i 65 cm za plinske ploče.
- Udaljenost se mora mjeriti od površine rešetke za plinske šporete,
- od površine stakla za električne šporete.
5.2 Pribor za ugradnju


3

4
5
- Napa
- vijci 4x 4 x 40
- Uputstvo za upotrebu i ostali dokumenti
- Predložak za montažu
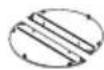
- Plastična klapna dimovoda ∅120mm
Informacije potrebne za pripremu lokacije prikladne za postavljanje nape date su u nastavku.
5.3 Funkcije nape

OPREZ: Za bušenje i sečenje koristi- te zaštitne rukavice i naočale.
(Slika 1)
- Fasung zaklopke
- Zaklopka
Umetnite plastičnu iglu (Slika 1/područje br. 2) u fasung zaklopke na izduvu motora (Slika 1/ područje br. 1). Zatim lagano savijte zaklopku da biste umetnuli drugu iglu na zaklopku i umetnite drugu iglu u njen fasung (Slika 1).

(Slika 2)
Korištenjem vijaka 4 x 40 isporučenih s napom postavite uređaj u kućište s točaka A, B, C i D. Kad se klizač pomakne, prednja ploča ne bi trebalo da kači za vrata kućišta (Slika 2).
(Slika 3)
Instalirajte fleksibilnu aluminijumsku cijev na plastični izlaz dimovoda. Ugradite drugi kraj cijevi u dimovodnu rupu na zidu (Slika 3).
5.4 Priključak na dimovod

2

3
4

5
(Слика 1)
(Слика 3)
(Rys. 1)
(Rys. 3)

(Figura 1)
- Encaixe do pino da aba
- Pino da aba
(Figura 3)


3

4
5
(Figura 1)
(Figura 3)

(Figura 1)
(Figura 2)
(Figura 3)

3

4

5
(Слика 1)
(Слика 3)
3
4

5
(Рис. 1)
(Рис. 2)
(Рис. 3)
- CONTENTS
- PLEASE READ THIS USER MANUAL FIRST
- MEANINGS OF THE SYMBOLS
- IMPORTANT SAFETY AND ENVIRONMENTAL INSTRUCTIONS
- GENERAL SAFETY
- WARNING: DO NOT CONNECT THE APPLIANCE TO THE MAINS UNTIL THE INSTALLATION IS FULLY COMPLETE
- CAUTION: ACCESSIBLE PARTS MAY BECOME HOT WHEN USED WITH COO-KING APPLIANCES
- WARNING: BEFORE INSTALLING THE HOOD, REMOVE THE PROTECTIVE FILMS
- COMPLIANCE WITH THE WEEE DIRECTIVE AND DISPOSING OF THE WASTE PRODUCT
- COMPLIANCE WITH ROHS DIRECTIVE
- PACKAGE INFORMATION
- GENERAL APPEARANCE
- OVERVIEW
- TECHNICAL DATA
- USING THE APPLIANCE
- CONTROLLING THE APPLIANCE
- ENERGY EFFICIENT USAGE
- OPERATING THE HOOD
- REPLACEMENT OF LAMP
- OPERATION WITH CHIMNEY CONNECTION
- OPERATION WITHOUT CHIMNEY CONNECTION
- CLEANING AND MAINTENANCE
- CLEANING OF GREASE FILTER
- REPLACEMENT OF CARBON FILTERS
- CAUTION
- INSTALLATION OF APPLIANCE
- POSITION OF THE APPLIANCE
- INSTALLATION ACCESSORIES
- INSTALLATION OF THE HOOD
- CONNECTING TO FLUE
- STORAGE
- HANDLING AND TRANSPORTATION
- TROUBLESHOOTING
- (IMAGEN 1)
- (IMAGEN 3)
- OPREZ
- UGRADNJA UREĐAJA
- PRIBOR ZA UGRADNJU
- FUNKCIJE NAPE
- (SLIKA 1)
- (SLIKA 2)
- (SLIKA 3)
- PRIKLJUČAK NA DIMOVOD
- (СЛИКА 1)
- (СЛИКА 3)
- (RYS. 1)
- (RYS. 3)
- (РИС. 1)
- (РИС. 2)
- (РИС. 3)
Brand : BEKO
Model : HNT61310X
Category : Range hood