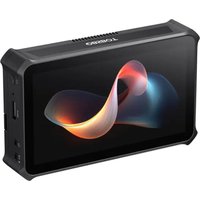
Talent - Camera OBSBOT - Free user manual and instructions
Find the device manual for free Talent OBSBOT in PDF.


| Product Type | AI-Powered PTZ Camera |
| Brand | OBSBOT |
| Model | Talent |
| Video Resolution | 4K at 30fps, 1080p at 60fps |
| Optical Zoom | 12x |
| AI Tracking | Yes, with gesture control and auto framing |
| Pan/Tilt Range | Pan: ±170°, Tilt: -30° to +90° |
| Microphone | Dual omnidirectional microphones |
| Connectivity | USB-C, HDMI, 3.5mm audio, Wi-Fi, Bluetooth |
| Power Supply | DC 12V, 2A (included adapter) |
| Power Consumption | 15W typical |
| Dimensions (W x H x D) | 150 x 120 x 100 mm |
| Weight | 1.2 kg |
| Mounting | 1/4-20 tripod mount, optional ceiling mount |
| Supported Storage | MicroSD up to 512 GB (not included) |
| Compatible Software | OBS, Zoom, Teams, Google Meet, etc. |
| Cleaning Instructions | Wipe with dry soft cloth; avoid liquids |
| Safety Precautions | Do not expose to moisture or extreme temperatures |
| Spare Parts | Available via OBSBOT official service |
| Repair Service | Contact OBSBOT support or authorized centers |
Frequently Asked Questions - Talent OBSBOT
User questions about Talent OBSBOT
0 question about this device. Answer the ones you know or ask your own.
Ask a new question about this device
Download the instructions for your Camera in PDF format for free! Find your manual Talent - OBSBOT and take your electronic device back in hand. On this page are published all the documents necessary for the use of your device. Talent by OBSBOT.
USER MANUAL Talent OBSBOT
natural_image
Abstract 3D flowing ribbon design in warm tones against a black background (no text or symbols)TABLE OF CONTENTS
03 Introduction
06 Owners Guide
26 Produce Your Show
| Create and Manage Shows | 26 |
| Create and Manage Scenes | 29 |
| Edit Scenes | 36 |
| Background Music | 78 |
80 Present Your Show
| Control Scenes | 80 |
| Control Volume | 84 |
| Use GFX | 91 |
| Use Pen | 119 |
| PTZ Control | 120 |
| Control Webpage | 125 |
| Control BGM | 126 |
| Replay | 127 |
131 Start Streaming and Recording
| Live Streaming | 131 |
| Record and Screenshot | 147 |
| Album | 153 |
155 Settings
| Network | 155 |
| Bluetooth | 158 |
| Display | 159 |
| Audio | 160 |
| Storage | 161 |
| Encode | 162 |
| Switch | 163 |
| Replay | 168 |
| OSC Remote Control | 170 |
| Shortcuts | 172 |
| System | 175 |
182 Battery
186 Shortcuts for OBSBOT Talent
200 FAQs
216 Support
218 Notice
219 Glossary and Abbreviations
Introduction Introduction
OBSBOT Talent – Your All-in-One Video CompanionOBSBOT Talent – Your All-in-One Video Compar
Meet the OBSBOT Talent: OBSBOT Talent is equipped with an all-in-one production and streaming system, supporting simultaneous input of multiple signals to meet various video needs. Through its intuitive user interface, you can easily accomplish multi-camera live production and streaming recording. Meanwhile, with its flexible scene layout and powerful production tools, it can make the program content more diverse and exciting.
Benefits
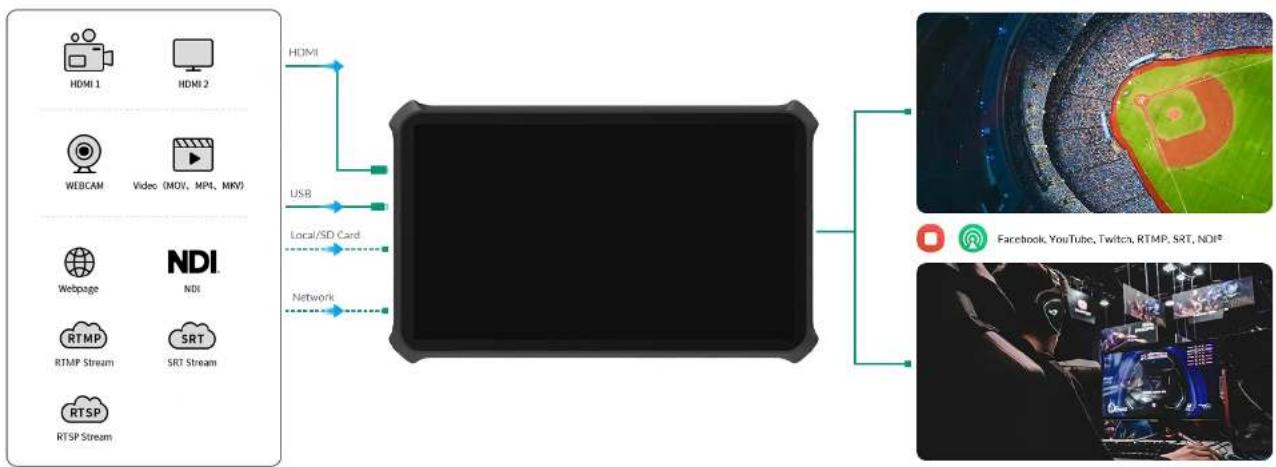
Diverse Video Inputs: From HDMI and webcams to NDI ^® streams, RTMP/SRT/RTSP streams, and even video clips, you can effortlessly bring multiple perspectives into your content.
Always Catch the Action: With the ability to use multiple cameras, you're guaranteed not to miss a moment. The result? A richer and more engaging viewing experience.
Enhance Your Streaming: Show off your brand, keep score, or add any overlay you like with GFX support. Real-time control ensures your content stays fresh and professional-looking.
Portability and Versatility: Its compact design, dual hot-swappable battery support, and multi-network compatibility mean you can take OBSBOT Talent to diverse events. From sports games and weddings to outdoor live broadcasts, you're set to record and stream whenever inspiration strikes.
Embrace the freedom and flexibility of the OBSBOT Talent, and let your creativity shine anywhere, anytime.
flowchart
graph TD
    A["Hardware Interface"] --> B["Central Device"]
    B --> C["USB"]
    B --> D["Local/SD Card"]
    B --> E["Network"]
    C --> F["Video Stream"]
    D --> G["RTMP Stream"]
    E --> H["RTSP Stream"]
    I["Home Media"] --> J["Internet"]
    K["Website"] --> L["Internet"]
    M["Mobile"] --> N["Internet"]
    O["Desktop"] --> P["Play Area"]
    Q["Radio Station"] --> R["Radio Station"]
    S["Satellite"] --> T["Satellite"]
    U["Video Stream"] --> V["Radio Stream"]
    W["RTM"] --> X["Radio Stream"]
    Y["RTSP"] --> Z["Radio Stream"]
Key Features of OBSBOT TalentKey Features of OBSBOT Talent
• Supports multiple input sources, including 2x HDMI input, 2x USB 3.0 input, SRT stream, RTMP stream, RTSP stream, NDI®stream, video clips, and pictures
• Produces shows consisting of scenes with compositions of various sources, which can be edited with diverse powerful tools, such as keyer, flip and crop
- Natively supports streaming to YouTube, Twitch and Facebook Live, supports streaming via SRT and RTMP, and supports two NDI®HX3 outputs
- Supports streaming to two destinations simultaneously, up to 1080p60 30Mbps
• Supports sending live comments as overlay when streaming to social media platforms
- Supports GFX function with rich templates, supports real-time control of scoreboard, timer and stopwatch, and supports using webpages as GFXs
- Supports the ability to switch scenes directly, or preview first and then program
• Supports Replay to capture and record highlights
- Supports more interactive functions such as background music, annotation and FTB
• Supports PTZ control for HDMI, WEBCAM (UVC Camera), SRT, RTMP, RTSP and NDI PTZ cameras
• Supports landscape and portrait modes of device screen and external screen
• Device has one USB-C output to connect the external screen for monitor, or connect to a computer to import and export files, and it also supports UAC/UVC output.
- Records and takes screenshots to local storage or SD card, and exports to USB flash diver, SD card and computer
• Supports wired and wireless networks as well as Bluetooth 5.0
• Supports two hot-swappable NP-F battery packs
- The Web UI is supported to enable more configurations, please refer to the OBSBOT Talent Web UI User Guide for details.
Owners GuideOwners Guide

Getting StartedGetting Started
Make sure OBSBOT Talent is mounted safely before using it.
- Place the device on a flat and stable surface. OBSBOT Talent provides two detachable foldable stands for better heat dissipation and convenient operation. You can use the stands as needed.
• Install: press the lock button first and put the stand into the slots until it is locked in the correct position. - Remove: press the lock button first and remove the stand.
- Mount the device with a tripod or camera through the 1/4" mount hole. The screw should be less than 5.5 mm (7/32 inches) long. Otherwise, you cannot firmly secure the device, and damage may occur.
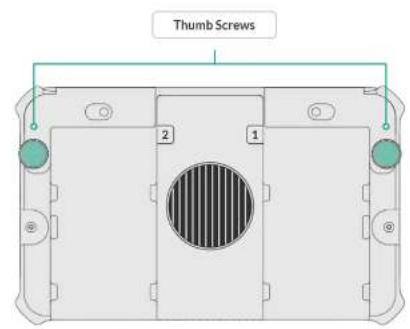
- When using outdoors, you can use the sunhood to prevent glare on the screen by blocking out ambient light.
- Slide down the sunhood till the mounting holes line up with the mounting holds on the back of the device.
- Tighten the two thumb screws.


Connect to Power and Turn on the DeviceConnect to Power and
Use the supplied power adapter to connect the power port.
OBSBOT Talent also supports optional two hot-swappable NP-F battery packs. For more information, refer to Battery.
Power Button Actions Power Button Actions
Power on
Long-press the power button for 3 seconds to power on.
Power off
Long press the power button till a menu bar pops up, and lap Power off.
Restart
Long-press the power button till a menu bar pops up, and tap Restart.
Screenshot
Long-press the power button till a menu bar pops up, and lap Screenshot, so that you take a screenshot which saves all the information on the screen and is stored in "\OBSBOT Talent\Internal shared storage\Pictures\Screenshots".
Turn off the screen
Short-press the power button to turn off the screen, and press it again to turn on the screen.
Complete Initial Settings Complete Initial Settings
The first time you power on your OBSBOT Talent device or after you reset the device, you will be prompted to select your language, set your device name and read End User License Agreement (EULA). Please follow the guide step by step to complete the initial settings.
Next, you can select to load a show in landscape or portrait mode.
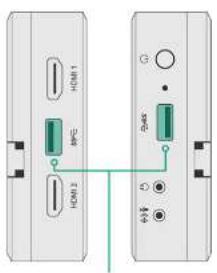
USB 3.0
Connect to a webcam, USB flash driver or USB modem
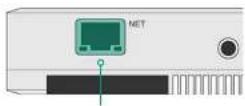
Ethernet Port
Connect to an Ethernet cable
Then, you can follow the on-screen guide to know the functions of buttons on the screen. After that, you enters the default show, which consists of 5 scenes, a default picture; HDMI 1, HDMI 2, webcam.
Then, you can connect HDMI and webcam sources.
Connect to NetworkConnect to Network
OBSBOT Talent supports wired and Wi-Fi networks. These networks can be connected at the same time. The priority order for the device selecting network connection is Ethernet > Wi-Fi > Cellular.
- Connect to Ethernet
Use an Ethernet cable to connect the Ethernet port.
- Connect to Wi-Fi
Tap Ⓥ > Settings > Network to connect Wi-Fi. For details, please refer to Network.
- Connect to Cellular
- Insert a USB modem to the USB port.
- Connect your mobile phone with Director Mini through a USB cable, and enable Personal Hotspot on your phone. (Tips: This function may not be available on all mobile phones due to hardware or system limitations.)
LoginLogin
OBSBOT Talent supports two login methods: phone number login and email login. Please complete the login process to access the device's main interface.

Connect to Input DevicesConnect to Input Devices
OBSBOT Talent supports various sources, including HDMI sources, webcam, stream, video clips and pictures. You can connect one or more sources to OBSBOT Talent according to the following introductions.

For how to connect to stream, webpage and Phone Camera source, please refer to Add Source.
- Connect to HDMI source
Connect one or two HDMI devices, such as HD camera, computer and game console, to the HDMI ports of OBSEOT Talent. It supports to capture signals from the two HDMI ports at the same time. The thumbnail of the corresponding input signal appears in the scene list of default show. Supported typical HDMI inputs include:
4096x2160p/3840x2160p 23.98/24/25/29.97/30/59.94/60
1920x1080p 23.98/24/25/29.97/30/50/59.94/60
1920x1080i 25/29.97/30
1280x720p 23.98/24/25/29.97/30/50/59.94/60
720x576p 50/100
720x576i 25/50
720x180p 59.94/60
720x480129.97/30
When you connect a PC as the HDMI source, you need to select OBSBOT Talent as the audio output device on the PC. For example, on Windows 10, click 📄 > System > Sound. In
the Output section, choose OBSBOT Talent (***** from the drop-down list box of Choose your output device, such as OBSBOT Talent (Intel(R) Display Audio).
- Connect to WEBCAM
Connect webcams to the USB ports of OBSBOT Talent.
Supported webcam specifications include:
- Formats: YUYV, MJPG, NV12, UYUV
- Resolution: up to 1920x1080
• Frame rate: up to 60 fps
Refer to webcam frame rate information for decide how to connect your webcams.
- Connect to media source
Insert a SD card or USB flash drive to import picture, video and audio files. The supported file system types include: FAT32 (The maximum file size is 4GB.), cxFAT, and NTFS.
OBSBOT Talent also supports transferring files through the computer. For more details, refer to How to import/export files.
For more information about the devices supported by USB 3.0 ports, please refer to How to use the USB 3.0 ports.
The USB-C port is a multifunctional port. You can refer to what can the USB-C OUT port be used for?
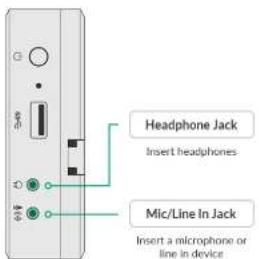
Connect to Audio DevicesConnect to Audio Devices
- Connect microphone or line in device
Connect an active microphone or line in device to the Mic/Line In jack on OBSBOT Talent, and select the device type according to the prompt. For MIC device, the system will automatically provide 20dB gain. It also supports HDMI microphone or USB microphone.
- Connect headphones
Connect your headphones to the Headphone jack on OBSBOT Talent to monitor the audio. It also supports USB audio playback device.
You can also use a Bluetooth device for audio output or input, and please refer to Bluetooth.
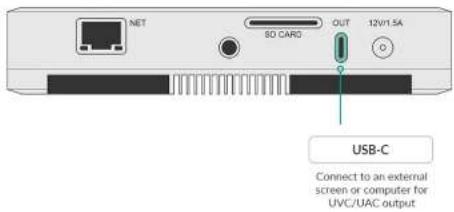
(Optional) Connect to External Screen(Optional) Connect to Exter
OBSBOT Talent can be connected to an external screen through the USB-C OUT port, supporting 1920x1080@60Hz or 1920x1080@50Hz according to the show's frame rate. For the details, please refer to
Mapping between the show's frame rate and each output frame rate.
Besides, when OBSBOT Talent is connected to an external touchscreen and set to "Duplicate Screen", you can use the external touchscreen to control the device, so as to enlarge your canvas for better scene editing, annotation, etc.
- Use a Type-C to HDMI / VGA / DP adapter to connect a monitor, HDTV or other devices to the USB-C OUT port of OBSBOT Talent. The external screen setting page will pop up on the device.
-
Select the content to be displayed on the external screen.
-
Clean Program: output a clean program signal.
- Preview: output preview signal
- Multi-view: display 8 video boxes showing scene thumbnails at the bottom, and two larger boxes at the top, with the left one showing Preview view and the right one showing Program view. You can change the Multi-view appearance, referring to USB Type-C.
- Duplicate Screen: duplicate all the elements on the device screen of OBSBOT Talent.
- Loop HDMI 1: loop out the signal from HDMI 1.
-
Loop HDMI 2: loop out the signal from HDMI 2.
-
Select the rotation angle to fit for the external screen: rotate 90^ to left, or rotate 90^ to right.
-
Tap the device screen to go back.
-
To change the settings of the external screen, swipe down from the top of the device screen, and then tap ☐ the Control Center to open the external screen setting window.
Notice for using the external touchscreen to control OBSBOT Talent:
- The external touchscreen must support HID multi-touch function (no need of driver).
- Connect the touchscreen and OBSBOT Talent with a Typc-C to Typc-C cable. If you use a Type-C adapter, please connect the Touch Function port of the touchscreen to the device. For details, please refer to your touchscreen's user manual.
- Select Duplicate Screen as the displayed content.
- The external touchscreen should keeps the full screen mode and the same orientation as the OBSBOT Talent device.
The USB-C port also supports to connect a computer for UVC/UAC output, connect a USB-C hub for more A/V input, etc. For details, refer to What can the USB-C OUT port be used for?
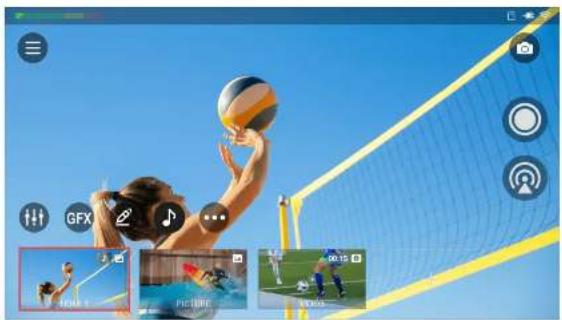
Main ScreenMain Screen
OBSBOT Talent provides lots of easy-to-use buttons on the main screen, and supports landscape mode and portrait mode. You can produce and stream your show very easily.
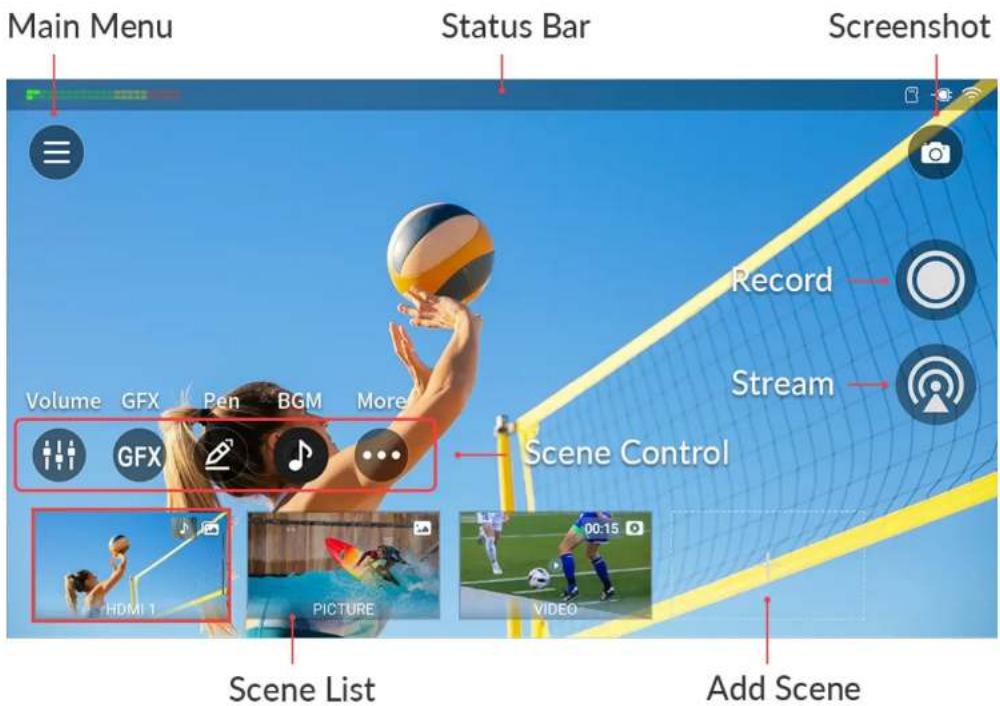
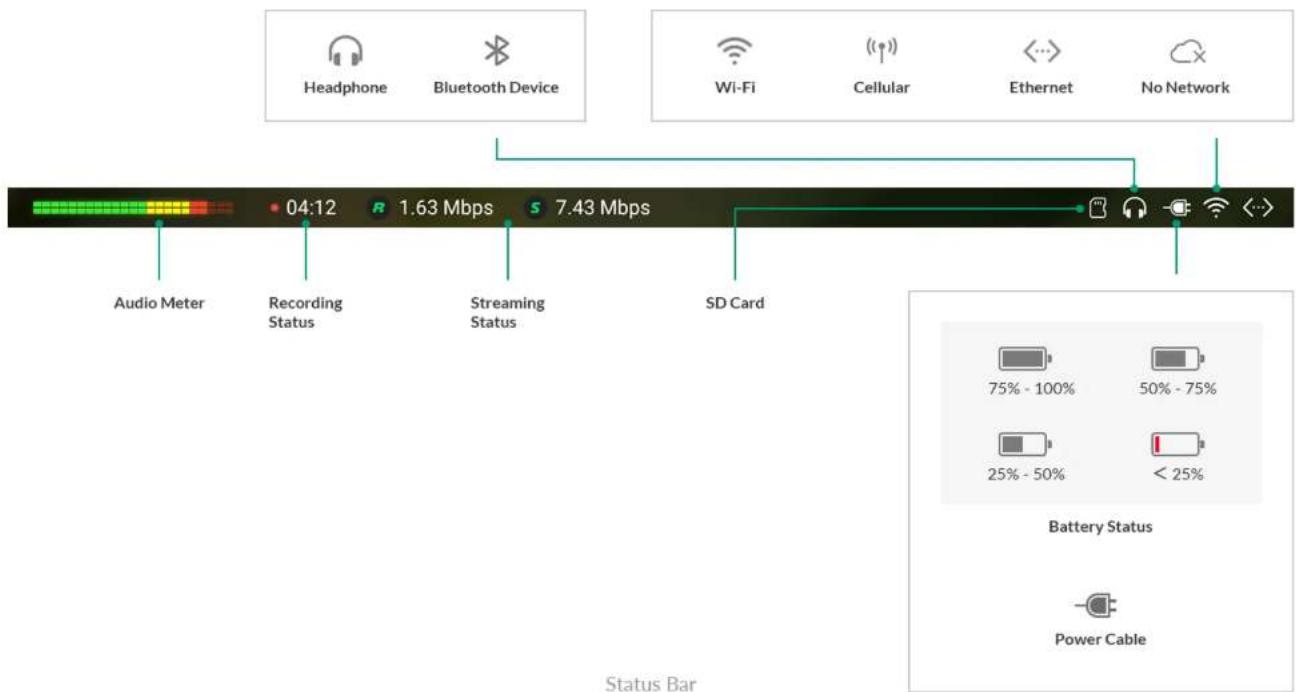
Status BarStatus Bar
The status bar helps you know the working status of the device.
Control CenterControl Center
The control center provides more information of the device and enables quick settings.
Swipe down the status bar to open the control center. To close the control center, swipe up on the screen.
The control center provides the following functions and information.

Input Information
04:20 PM 02-04 Sunday


HDMI 1

HDMI 2

WEBCAM 1
OBSBOT Meet

WEBCAM 2
OBSBOT Meet
104.44
Disconnected
- 本次股东大会的决议
Disconnected
MJPG, 9.98fps
1920×1080p60
MJPG, 9.98fps
1920×1080p60
NDI
AIL_AIR_0009BD (OBSB)
192.168.198.127:5961
1.264, 22.97fps, 8.2 Mbp
1920×1080p30
Input Information Input Information
You can scroll down the control center to view the information of the input sources of current show, in which HDMI and WEBCAM are always displayed.
- HDMI 1: the input status of the HDMI 1 port
- Format: the color format of HDMI input, such as YUV and RGB
• Real-time frame rate: the real-time frame rate of HDMI input - Resolution/frame rate: the original resolution and frame rate of HDMI input, such as 1920x1080p60
- Disconnected: no input source connected.
- HDMI 2: the input status of the HDMI 2 port
- Format: the color format of HDMI input, such as YUV and RGB
• Real-time frame rate: the real-time frame rate of HDMI input - Resolution/frame rate: the original resolution and frame rate of HDMI input, such as 1920x1080p60
• Disconnected: no input source connected
• WEBCAM 1: the input status of WEBCAM 1
• Device name: the device name of WEBCAM 1
- Format: the video format of WEBCAM input, such as YUYV, NV12 and MJPEG
• Real-time frame rate: the real-time frame rate of WEBCAM 1
- Resolution/frame rate: the resolution and frame rate of WEBCAM 1 which is set when you add the source in a scene, such as 1920x1080p60
- Disconnected: no input source connected or added to a scene
• WEBCAM 2: the input status of WEBCAM 2
• Device name: the device name of WEBCAM 2
- Format: the video format of WEBCAM input, such as YUYV, NV12 and MJPEG
• Real-time frame rate: the real-time frame rate of WEBCAM 2
- Resolution/frame rate: the resolution and frame rate of WEBCAM 2 which is set when you add the source in a scene, such as 1920x1080p60
- Disconnected: no input source connected or added to a scene
- NDI®: the input status of NDI stream
Stream name: the name of NDI stream
- URL: the URL of NDI stream
- Codec: the codec information of NDI stream, such as H.264 and H.265
• Real-time frame rate: the real-time frame rate of NDI stream
- Bitrate: the real-time bitrate of NDI stream
- Resolution/frame rate: the original resolution and frame rate of NDI stream
• Disconnected: no NDI input signal
• RTMP: the input status of RTMP stream
- Stream name: the name of RTMP stream
- URL: the URL of RTMP stream
- Codec: the codec information of RTMP stream, such as H.264 and H.265
• Real-time frame rate: the real-time frame rate of RTMP stream
- Bitrate: the real-time bitrate of RTMP stream
- Resolution/frame rate: the original resolution and frame rate of RTMP stream
- Disconnected: no RTMP input signal
- SRT: the input status of SRT stream
Stream name: the name of SRT stream
- URL: the URL of SRT stream
- Codec: the codec information of SRT stream, such as H.264 and H.265
• Real-time frame rate: the real-time frame rate of SRT stream
- Bitrate: the real-time bitrate of SRT stream
- Resolution/frame rate: the original resolution and frame rate of SRT stream
- Disconnected: no SRT input signal
• RTSP: the input status of RTSP stream
Stream name: the name of RTSP stream
- URL: the URL of RTSP stream
- Codec: the codec information of RTSP stream, such as H.264
• Real-time frame rate: the real-time frame rate of RTSP stream
- Bitrate: the real-time bitrate of RTSP stream
• Resolution/frame rate: the original resolution and frame rate of RTSP stream
• Disconnected: no RTSP input signal
Tutorials Tutorials
The following tutorials will enable you to produce your first show and start to stream and record quickly.

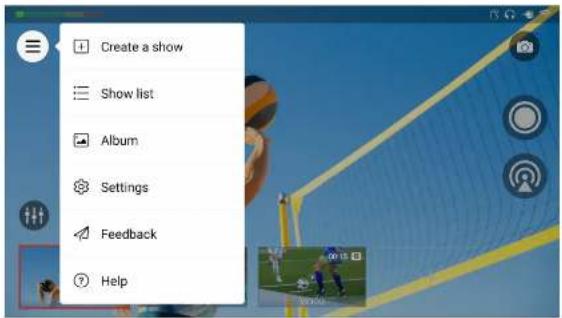
Create ShowCreate Show
- Tap > Create a show.
- Specify the Show name and Frame rate, and select the Orientation (16:9 or 9:16).
- Tap Create. You will enter the new show.

Create ScenesCreate Scenes
- Tap on the screen.
- In the Create New Scene window, select a source that you want to put into the new scene, and follow the popup to go on operating.
- Edit the scene in the Scene Editor.
- Save the changes you have made, and then the thumbnail of the new scene will be added to the end of the scene list.
- Tap to create more scenes.
natural_image
Beach volleyball game action photo showing player shooting and close-ups of ball (no text or symbols visible)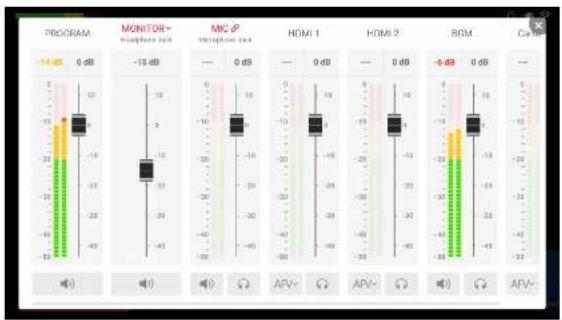
bar
| Category | Program | 14 dB | 0 dB | | :--- | :--- | :--- | :--- | | MUNITOR | -10 dB | -15 dB | -10 dB | | MIC | -3 dB | -4 dB | -10 dB | | HDMI 1 | -20 dB | -30 dB | -10 dB | | HDMI 2 | -30 dB | -40 dB | -10 dB | | SGM | -35 dB | -45 dB | -6 dB | | Curr | -35 dB | -45 dB | -6 dB |Switch ScenesSwitch Scenes
- Swipe the scene list to left or right to browse scenes, and lap thumbnails to switch scenes.
- Tap any empty area of the screen to view the scene in full-screen mode, and tap any empty area again to exit the full-screen mode.
- If a scene contains a video clip source, you can tap the the play and pause buttons to control the video.
- Swipe the scene list down to the bottom hide it, and then you can tap or swipe up from bottom to expand it.
Adjust VolumeAdjust Volume
Tap 📁 open the audio mixer.
- Swipe left and right to view the connected audio sources and external audio sources. When the current scene contains video or BGM, they will also be displayed.
- Move the fader to adjust the audio level, and set the audio mixing mode by tapping the icon under the audio meter (in portrait mode, on the right).
- Tap to only monitor this audio, and tap to cancel.
- Tap MONITOR to select a monitor device, and set whether to monitor microphone input.


GFX
- Tap a then tap to open the Create New GFX window.
- Select a GFX type to create a GFX.
- Tap to create more GFXs.
- Select one or more GFXs in the GFX list to display in the show.
- If scoreboard, timer so stopwatch is applied, you can tap the icon or long press the GFX thumbnail and select Control to open the control panel for controlling. (For portrait mode, you may need to tap and then tap the icon.)
- Tap to go back to the scene list.
Annotate on Screen Annotate on Screen
- Tap to enter the annotation mode.
- Draw or write on the screen to annolate.
-
Tap to expand the toolbar.
-
Tap Color 1 or Color 2 to switch the pen color, and tap Color 1 or Color 2 again to set color for each.
- Tap to clear the annotations.
- Tap to set pen thickness and auto clear time.
- Tap ☒ exit the annotation mode.


Background MusicBackground Music
Add BGMAdd BGM
- Long-press a scene thumbnail, and tap Edit.
- In the Scene Editor, tap to select a song from a storage path.
- On the Background Music page, add more music and set playback policy and more actions by tapping the two buttons on the upper right corner.
Control BGMControl BGM
- On the main screen, tap to reveal the BGM playback bar.
- Tap the buttons on the playback bar to control the BGM playback. You can:
- Start or stop BGM playback.
- Play the previous or next song.
- Drag the playhead to a desired time point.
- Change the playback policies.
- : Repeat the playlist. (default policy)
• 📊: Repeat the selected song.
• ✗ : Shuffle the playlist.


Live Stream, Record and ScreenshotLive Stream, Record and Scre
- Tap and select a target platform to configure, such as RTMP, and then
tap to go back.
- Tap to start streaming, tap to start recording, and tap to
take screenshots.
-
Tap target and show live comments when streaming to YouTube, Twitch or Facebook. Long-press one comment to send it as an overlay.
-
Tap to stop streaming, and tap to stop recording.
Produce Your Show Produce Your Show
OBSBOT Talent enables simple video production by allowing you to build a run of shows which contain a series of scenes, while each scene consists of live sources, video clips, images, text, etc.
Create and Manage ShowsCreate and Manage Shows
You can create and manage multiple shows in OBSBOT Talent.
Create ShowCreate Show
- Tap > Create a show.
- Enter your show name, and then tap Save.
- Select the frame rate. Options include 60/59.94/50/30/29.97/25/24/23.98 fps.
- Choose the screen orientation: 16:9 (landscape), 9:16 (portrait).
- Tap Create.
After you create a show, the show is opened as the current show.

Show ListShow List
The show list displays the name and frame rate of each show, through which you can switch and manages shows.
Switch ShowSwitch Show
- Tap

ow list.
- Tap a show name to switch to the show.
Rename ShowRename Show
- Tap

ow list.
- Swipe a show to the left.
- Tap Rename.
- Enter a new name, and tap Save.
Copy ShowCopy Show
- Tap

ow list.
- Swipe a show to the left.
- Tap Copy.
- Enter a new name, and tap Copy.
The new show you created inherits everything from the original show.
Delete Show Delete Show
- Tap

ow list.
-
Swipe a show to the left.
-
Tap Delete, and confirm to delete on the popup.
The current presenting show cannot be deleted.
Export ShowExport Show
- Tap

ow list.
- Swipe a show to the left.
- Tap Export.
- Select USB flash drive or SD card to export. The show is exported as a .zip file.
Import Show Import Show
- Tap

ow list.
- Tap Import at the upper right corner.
- Select a show file (.zip) from the storage.
Create and Manage ScenesCreate and Manage Scenes
A show consists of one or more scenes, while a scene contains various sources, including HDMI input signal, webcam input signal, video clips, pictures, RTMP/SRT/RTSP streaming signal, webpages, NDI®input signal, etc.

Create Scene Create Scene
- Tap on the main screen.
- Select a source in the Create New Scene window to add, and then it enters the Scene Editor page. For details about how to add different sources, see Add Source.
- To create a multiview scene quickly, you can tap Multi-View option in the Create New Scene window to use the prebuilt layouts. For details, see Add Multi-View Scene.
- Edit the scene in the Scene Editor. Many tools are available for you to edit your scene, such as position, size, crop, transition. For details, see Edit Scenes.
- Tap in the Scene Editor to set audio. For details, see Volume Control.
- Tap in the Scene Editor to add background music (BGM). For details, see Background Music
- Tap Save at the upper right corner. The scene thumbnail appears in the scene list.
- Repeat the above steps to create more scenes.

natural_image
Beach volleyball game action photo showing player hitting the ball and close-ups of three video frames (no text or symbols visible)ScenesScenes
The scene list is displayed at the bottom of the main screen, and each scene has a corresponding thumbnail in the scene list.
The following information will be displayed on the thumbnail.
- A red box indicates which scene is in Program view.
- The scene name is displayed at the bottom.
- The layer type icon is displayed at the upper right corner; when there is only one layer in the scene, the type icon of the current layer is displayed; when there are multiple layers in the scene, an icon stack is displayed, and the icon at the front represents the uppermost layer.
- When the background music icon is displayed, it means that the scene has added background music.
- When the duration information is displayed, it means that the scene contains video. You can tap the play/pause button to control the video. Then, the progress bar of the video will appear on the top of the scene thumbnail.
With the scene list, you can browse, switch, view the scene, and even edit and manage the scenes.
- Swipe the scene list left and right to browse the scenes.
- Swipe the scene list to the far right, and tap to create a scene.
- Tap a thumbnail in the scene list to switch scenes. It supports quick mode and manual mode, please refer to Switch Scenes.
- Tap any blank area to enter full-screen, and tap anywhere to exit. If no operation for three minutes, it will automatically enter the full-screen mode. You can go to Settings > Display to set the duration of Auto Full Screen.
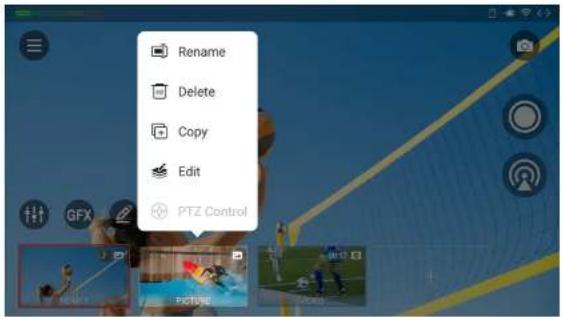
Rename SceneRename Scene
- Long press a scene thumbnail.
- Tap Rename on the popup menu.
- Enter new scene name, and tap Save.
Delete Scene Delete Scene
You can delete a scene through the following ways. Method 1
- Long press a scene thumbnail.
- Tap Delete on the popup menu.
- Confirm to delete on the popup.
Method 2
- Tap on the main screen.
- Select Rearrange/Size on the popup menu.
-
Tap the button on a thumbnail, and then tap Delete.
-
Tap Done at the upper right corner.
A scene that is in Program view cannot be deleted. Switch to a different scene and then you can delete the desired scene.
Copy SceneCopy Scene
You can also copy an existing scene to create a new scene by the following two ways.
Method 1:
- Long press a scene thumbnail.
- Tap Copy on the popup menu.
- Enter new scene name, and tap Copy.
Method 2:
- Tap on the main screen.
- Select Rearrange/Size on the popup menu.
- Tap on the thumbnail of the scene you want to copy. The new scene will appear next to the copied scene, name as "The original scene name + (No.)", such as Video (1).
- Tap Done at the upper right corner to go back to the main screen.
Edit SceneEdit Scene
- Long press a scene thumbnail.
- Tap Edit on the popup menu.
- Edit the scene in the scene editor.

Zoom Scene List Zoom Scene List
- Tap on the main screen.
- Select Rearrange/Size on the popup menu.
- Tap of button on the right to change the size of thumbnails. It supports three sizes: small, middle and large. By default, the Scene List uses middle thumbnails.
- Tap Done at the upper right corner.

natural_image
Beach volleyball game action photo showing a player shooting and ball rebounding against a clear blue sky (no text or symbols visible)Rearrange Scene Order Rearrange Scene Order
- Tap on the main screen.
- Select Rearrange/Size on the popup menu.
- Long press a thumbnail and then drag it to a desired position in the scene list.
- Tap Done at the upper right corner.

natural_image
Beach volleyball player reaching for a ball against a clear blue sky (no text or symbols visible)
Show or Hide the Scene ListShow or Hide the Scene List
- When the Scene List is visible, swipe down to the bottom of the screen to hide IL.
- When the Scene List is hidden, tap or swipe up from bottom to expand it.
You can show or hide the GFX list through the same way.
Customize Buttons Customize Buttons
To focus on the task at hand, you may customize buttons appearing on the screen for each show.
- Tap on the main screen.
- Tap Custom. Then it lists the displayed buttons and hidden buttons.
-
Tap added a button to the displayed buttons list. It supports displaying up to 6 buttons, including the More button which is always displayed.
-
Press and hold, and drag up and down to change a button's display order.
-
To hide a button, tap or swipe the button to left and then tap Remove.
-
Tap the blank space to exit.
Edit ScenesEdit Scenes
Sources are the building blocks of scenes. You can fill a scene with a combination of various sources such as HDMI, WEBCAM, RTMP pull, RTMP push, SRT Caller, SRT Listener, RTSP stream, NDI®stream, Video, Picture and Text. With the rich sources on hand, creativity is unlimited. You will use the Scene Editor to plan out your scene and add eye-catching effects to your sources.
The following picture illustrates the elements on the Scene Editor. This picture is in landscape mode, and some buttons will change positions in portrait mode.


Add SourceAdd Source
You can add multiple sources in one scene, and then you can arrange the layout to look the way that you want.
- Long press a scene thumbnail and then tap Edit to open the Scene Editor.
- Tap in the Scene Editor.
- Tap a source in the Add Source window:
HDMI
A high-quality external signal from a professional camera, computer, game console, etc. Up to 4K signal input is supported.
WEBCAM
A high-quality external signal from a USB device, such as webcam. Up to 1080p60 signal input is supported. For details, refer to Add WEBCAM.
- Video Clip
A video file selected from the internal storage, SD card or USB flash drive, which can be up to 4K, encoded in H.264, and in MOV, MP4, or MKV format.
To select files from the internal storage, you should import files to OBSBOT Talent device at first. Please refer to How to import/export files.
Picture
A picture file selected from the internal storage, SD card or USB flash drive, which can be JPG, PNG or BMP.
To select files from the internal storage, you should import files to OBSBOT Talent device at first. Please refer to How to import/export files.
- RTMP Pull
A streaming source pulled via RTMP from a third-party server. Please refer to Add RTMP Pull.
- RTMP Push
A streaming source pushed to OBSBOT Talent via RTMP. Please refer to Add RTMP Push.
- SRT Caller/Listener
A streaming source supporting SRT protocol. Please refer to Add SRT Caller/Listener.
- RTSP
A streaming source pulled via RTSP. Please refer to Add RTSP Stream.
- NDI ^ Stream
A streaming source pulled via NDI® IX2 or NDI® IX3. Please refer to Add NDI Stream. It supports H.264 and H.265 codec.
- Webpage
The content of a webpage. Please refer to Add Webpage.
- Text
Static annotations and crawling messages.
Tap the text frame to enter content, and tap Save to return to the Scene Editor.
A maximum of 1024 characters are supported. The more text, the smaller the font appears. The font size also changes automatically with the text box size.
- Color
A solid color source. It is white by default.
Notice:
- In the same scene, you can add a maximum of three sources, including HDMI, WEBCAM, RTMP/SRT/RTSP stream, NDI Stream, webpage and video clips, in which:
• Each HDMI source and the WEBCAM can only be added once. - You can only add one video clip.
- In the same scene, you can only add one webpage.
- In the same show, you can create up to 3 streams, including RTMP/SRT /RTSP/NDI. One NDI stream cannot be use by a scene and a GFX at the same time.
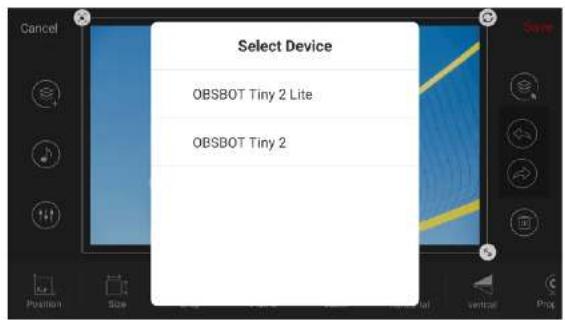
Add WEBCAMAdd WEBCAM
- Tap in the scene editor.
- Select WEBCAM 1 or WEBCAM 2.
- Bind a webcam device to WEBCAM 1 or WEBCAM 2 according to the following situations.
- If one USB device is connected, choose WEBCAM 1, then the device will be bound with WEBCAM 1 automatically. When you add WEBCAM 2, no-signal screen will be displayed, vice versa.
- If two or more USB devices are connected, when adding WEBCAM 1 or WEBCAM 2, please select a device on the popup to bind.
You can refer to Changing WEBCAM's Properties to select or change the USB device bound to WEBCAM 1 or WEBCAM 2 as well set the WEBCAM's property.

Add RAMP Pull Pull
- Tap in the Scene Editor.
- Tap RTMP Pull.
-
Enter the following information.
-
Name: Specify an alias name for your convenience of multi-item management.
-
URL: Enter the RTMP URL of the RTMP server. To add a video stream from a live platform, you can get the RTMP URL from the platform.
• Key: Enter the key set on the RTMP server. -
(Optional) Tap Advanced to set the following parameters.
-
Buffer duration: It ranges from 20ms to 8000ms, and the default value is 60ms. You can set a short duration when low latency matters.
-
Authentication: If the RTMP sender requires authentication, toggle on Authentication and enter Username and Password provided by the RTMP sender.
-
Tap Create.
- To add more RTMP streams, repeat step 1 and 2, tap Create Stream, and operate as step 3 to 5 to finish creation.
- After a stream is added, its information is recorded in the show. You can select an existing stream when you create a new scene or add a source to a scene.
- To edit a stream, you can use the URL tool in the scene editor. For details, please refer to URL.
- To delete a stream, you can delete all the scenes containing this stream, or

delete the stream source in all the relative scenes.
Add ADMP Push Push
As is to send RTMP streams to OBSBOT Talent, the IP address of OBSBOT Talent is the destination.
- Tap in the Scene Editor.
- Tap RTMP Push.
-
Enter the following information.
-
Name: Specify an alias name for your convenience of multi-item management.
• Key: Specify a stream key. - Buffer duration: It ranges from 20ms to 8000ms, and the default value is 60ms. You can set a short duration when low latency matters.
A stream address is automatically generated at the bottom of the window, including an Ethernet address and/or a wireless network address. The sender should use this address as the destination address.
- Tap Create.
- To add more RTMP streams, repeat step 1 and 2, tap Create Stream, and operate as step 3 to 4 to finish creation.
- After a stream is added, its information is recorded in the show. You can select an existing RTMP stream when you create a new scene or add a

source to a scene.
- To edit the stream, you can use the URL tool in the scene editor. For details, please refer to URL.
- To delete a stream, you can delete all the scenes containing this stream, or delete the stream source in all the relative scenes.
Add Caller/Listener Caller/Listener
- Tap in the Scene Editor.
- Tap SRT Stream.
-
Enter the following information.
-
Name: Specify an alias name for your convenience of multi-item management.
- Address: Available for SRT Caller. If the SRT listener and caller are on the same LAN, enter the private IP address of the SRT listener on the LAN. If the SRT listener and caller are in different network environments, enter the public IP address of the SRT listener.
- Port: Enter the port of the source. It ranges from 1 to 65535.
-
Stream ID: Available for SRT Caller. Enter the stream ID of the listener, which can contain 0 to 256 characters. You can leave it empty if the listener has no stream ID.
-
(Optional) Tap Advanced to set the following parameters.
- Latency: Enter a number between 20 to 8000. The default value is 120. It is recommended that the latency is configured the same as that of the
sender.
- Buffer duration: The value ranges from 20ms to 8000ms. The default value is 60ms. You can set a short duration when low latency matters.
-
Encrypted: If the stream from the sender is encrypted, toggle on Encrypted, select the encryption mode, which can be AES 128, AES 192 or AES 256, and then enter the Passphrase.
-
Tap Create.
- To add more SRT streams, repeat step 1 and 2, tap Create Stream, and operate as step 3 to 5 to finish creation.
- After a stream is added, its information is recorded in the show. You can select an existing stream when you create a new scene or add a source to a scene.
- To edit a stream, you can use the URL tool in the scene editor. For details, please refer to URL.
- To delete a stream, you can delete all the scenes containing this stream, or delete the stream source in all the relative scenes.
flowchart
graph TD
    A["Preset"] --> B["NDI Search"]
    B --> C["TAIL_AIR_000960 (CBS80*) 152.146.137.091"]
    B --> D["TAIL_AIR_000166 (CBS80*) 152.146.050.891"]
    C --> E["+ Deote NDI stream"]
    D --> E
    E --> F["Create NDI Stream"]
    F --> G["After: NDI"]
    G --> H["NDI stream: OM (123)"]
    H --> I["Buffer duration: 60 ms"]
    I --> J["Transport mode: UDP (Unicast)"]
    J --> K["Transport"]
    K --> L["Cancel"]
    L --> M["Create"]
    M --> N["Create NDI Stream"]
    N --> O["NDI stream: OM (123)"]
    O --> P["Buffer duration: 60 ms"]
    P --> Q["Transport mode: UDP (Unicast)"]
    Q --> R["Ignore video PTS: Low bandwidth"]
    R --> S["Cancel"]
    S --> T["Create"]
Add NDI StreamAdd NDI Stream
Add NDI Stream Manually Add NDI Stream Manually
- Tap in the Scene Editor.
- Tap NDI Stream.
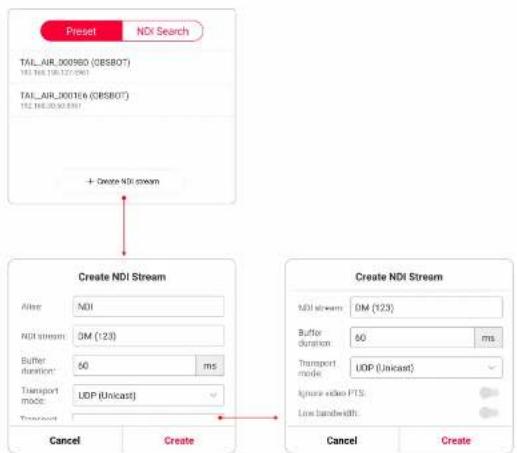
- Tap the Preset tab, and then tap Create NDI stream.
-
Enter the following information.
-
Alias: Specify an alias name for your convenience of multi-item management.
- NDI stream: Enter the stream name of NDI source, which is case, insensitive, or enter IP:Port.
- Buffer duration: The value ranges from 20ms to 8000ms. The default value is 60ms. You can set a short duration when low latency matters.
- Transport mode: Options include UDP (Unicast), UDP (Multicast), RUDP (Unicast), TCP (Uni connection) and TCP (Multi connection).
- Ignore video PTS: For some video streams with wrong timestamps, toggle on this function to ensure smooth video output.
-
Low bandwidth: It is recommended to enable this function when the connected network speed is too low to output smooth video. When toggled on, the video stream drops to medium quality and uses significantly less bandwidth.
-
Tap Create to add the stream to the scene.
- Repeat the steps above to create more NDI streams.
When multiple NDI streams are created, you can select one to add to a scene.
-
To edit an existing NDI stream, swipe the stream to the left, and tap Edit.
-
To delete an existing NDI stream, swipe the stream to the left, an tap
Delete.
If a NDI stream is in one or more scenes, it cannot be deleted. Please delete the source in relative scenes at first, and then delete it.

Search NDI Stream AutomaticallySearch NDI Stream Automatically
- Tap in the Scene Editor.
- Tap NDI Stream.
- Tap NDI Search, and it starts searching NDI sources in the same LAN. By default, it searches NDI sources of the public group.
- Tap Advanced, enter Group name, and tap Confirm. Then it starts searching sources in corresponding group(s). Group name is case-insensitive, and should contain A to Z, a to Z, 0 to 9 and special characters like _. The group name entry can contain comma separated values, allowing the device search all the groups listed here.
- If you toggle on Discovery server, it can auto-detect a source sender in different network segment but be able to ping. And the Server IP should be the IP address of the server running discovery server software.
- Select a detected NDI source in the list to add to the scene. And it is added to the Preset list at the same time.
- Tap Refresh to refresh the NDI source list if needed, for example, when the network of OBSBOT Talent changes.
![Cancel Add URL Confirm Enter a URL to browse web page and use it's content as a source. Enter a URL GO History: OBSBOT - Co.,ture [Official] OBSBOT Store](/content/2026/06/1396040/images/2986deaf0cdc1a2b9df25d6ebef0c888cd114a5b23635996eab90da314f0a49a.jpg)
Add WebpageAdd Webpage
- Tap in the Scene Editor.
- Tap Webpage.
- Enter a URL, and tap Go or Confirm.
The webpage appears in the canvas, and it is also recorded in the webpage history. You can select one from the history when you try to create a new scene.
- You can only add one webpage for one scene.
- You can add up to 3 webpages as scene sources in a show.
- It is not recommended to add a video URL as it will consume a lot of system resources.

natural_image
Beach volleyball action photo with player mid-air and close-up of water dam structure (no text or symbols)Select SourceSelect Source
You can tap a source to select it, and the selected source will have a white frame surrounded.
If multiple sources overlap with each other, and you can select the covered layer by the following way.
-
Tap .
-
Select the source you want to edit in the pop-up window.
-
Tap the lock icon to lock or unlock the position and size of a source layer. When the layer is locked, a red lock button appears on the white frame. You can tap it to unlock the layer.
-
Tap to go back.
For layers completely covered by a larger layer, you cannot move their position by dragging.
Change Z-OrderChange Z-Order
Z-order is an ordering of overlapping sources. You can change the z-order to have a source appearing in front of other sources.
-
Tap .
-
Press and hold, and drag up and down to change a source's display order.
-
Tap to go back.
Delete a SourceDelete a Source
-
In the Scene Editor, select a source.
-
Tap to delete the selected source.
Editing ToolsEditing Tools
When a source is selected, editing tools for that source appear in the bottom toolbar. The table below lists all the editing tools for each type of source.
| Tool HDMI WEBCAM | SRT/RTMP/RTSP Stream | NDI Stream Webpage Video Clip Picture Text Color | |||||
| Move, Resize & Rotate | |||||||
| Position | |||||||
| Size | |||||||
| Frame | |||||||
| Crop | |||||||
| Label | |||||||
| Transition | |||||||
| Formal | |||||||
| Text | |||||||
| Background | |||||||
| Flip | |||||||
| Chromekey | |||||||
| Play Range | |||||||
| Action | |||||||
| Property | |||||||
| URL | |||||||
| Browse | |||||||
| Color | |||||||
| Transparency | |||||||
| PT7 Control |

natural_image
Camera interface showing a basketball shot with a player in action, displayed within a media player control panel (no text or symbols on the main image area)Move, Resize & RotateMove, Resize & Rotate
All kinds of sources can be moved, resized and rotated.
To move a source:
Drag and move the selected source to a new position.
When dragging a source around, guidelines will appear for you to align the source with other sources and the Scene Editor.
To control the position more precisely, see Position.
To resize a source:
- (Optional) Tap on the selected source's frame to unlock/lock the aspect ratio of the selected source.
This operation is not available for a Text source.
- Drag (for locked aspect ratio) or (for unlocked aspect ratio) on the source's frame to scale it up and down.
After you lap 🔍 unlock the aspect ratio and drag to freely resize a source, you can lap 🔍 restore to the original aspect ratio.
When resizing a source, smart guides will appear for you to scale the source in reference to other sources and the Scene Editor.
To control the size more precisely, see Size.
Undo or redo:
Tap or to undo or redo the movement or resizing.

To rotate a source:
Press and rotate ⑤ the selected source's frame.
To control the rotation more precisely:
- Tap Position or Size at the bottom bar.
- Tap the X or Y number (on the Position control), or the W or H number (on the Size control).
- On the page displayed, set Angle.
- Tap Save.
PositionPosition
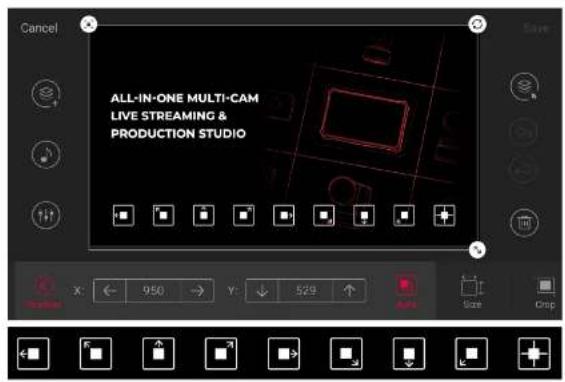
Apart from dragging and moving a source to change position, you can also tap Position to set position more precisely.
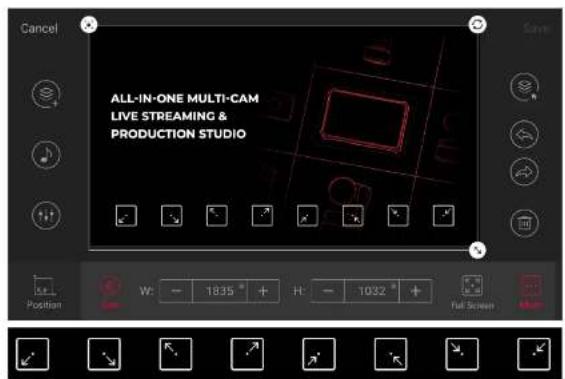
- X, Y: Tap the number to specify the X and Y coordinates of the source's center. Or tap or long press an arrow button to move the source horizontally/vertically.
- Auto: Automatically move a source to a specified position. Nine positions are available, as shown in the image on the left.
SizeSize
Apart from dragging Ⓜa source's frame to scale it up and down, you can also use the Size control to set size more precisely.
- W, H: Tap the W or H number to specify the width and height in pixels of the source. Or tap +/- to scale up/down the source.
The value ranges for W and H are as follows:
When the aspect ratio is locked (indicated by the icon on the source frame):
- W: 0 to 1280 or 1920 pixels, depending on the resolution of your show
- H: 0 to 720 or 1080 pixels, depending on the resolution of your show
- When the value of W changes, the value of H changes accordingly, or vice versa.
When the aspect ratio is unlocked (indicated by the source frame):

- W: 0 to 1280 or 1920 pixels, depending on the resolution of your show
• H: 0 to 1280 or 1920 pixels, depending on the resolution of your show
- Full Screen: Tap this button to expand the source to full screen.
- When you lock the aspect ratio, a source is expanded to full screen when either its width or height reaches that of the canvas.
- When you do not lock the aspect ratio, a source is stretched to fill the whole canvas, in which case the source can be distorted.
- More: You can tap or long-press one of the buttons to scale up/down the source towards the corresponding direction. Tapping changes the size by one pixel while long-pressing changes the size continuously.
- Scales up a source to a specified direction, as indicated by the arrow in the icon.
The buttons are unavailable when your source is already at the largest size.
- Scales down a source to a specified direction, as indicated by the arrow in the icon.
The buttons are unavailable when your source is already at the smallest size.


CropCrop
Cropping allows only part of the source to be rendered in the scene. All sources except text and color can be cropped.
- Tap Crop in the toolbar.
- Select a cropping ratio.
- Drag the corner handles to specify the crop boundaries.
Tap Reset to revert to the original size and aspect ratio of the source.
- Tap Save to save changes and go back to Scene Editor.
ColorColor
This function works with the color source. It is also a sub-function of other tools, such as text and background.
- Tap Color.
- Swipe the color bar to the left or right to choose a color.
-
If the color provided by the system cannot meet the needs, swipe the color bar to the far right, tap to open the color selector.
-
Tap to select a color in the color wheel.
- Or select a color model which can be IEX, RGB or HSL, and the code or value.

TransparencyTransparency
This feature works with the color and picture source. It is also a sub-function of other tools, such as text and background.
Tap Transparency and move the slider to adjust the transparency. It ranges from 0 (solid) to 100 (completely invisible).

FrameFrame
You can decorate a source with a Frame.
A frame is defined by the following properties:
- Weight: Sets the frame's border weight. It ranges from 0 to 50 pixels, with 0 indicating no frame.
• Color: Sets the frame's color, with white as the default. - Corners: Sets the frame's corner radius, which can range from 0 to 100. When the Round value is zero, all corners are squared; otherwise, all corners are rounded accordingly.
- Position: Sets the frame's position to be inside or outside the source. It is inside the source by default, which means that the frame overlaps the source.
- Reset: Erases the frame.
When you Lap Frame, a basic white frame is instantly added on the source.

LabelLabel
When you tap Label, the source is instantly labeled by its type name or file name. You can change the text and its properties to make a special mark. This tool is available for all sources except text and color.
- Tap the text area and then change the text.
A maximum of 1024 characters are supported in total. The more text that is input, the smaller the font will appear. The font size also changes automatically with the label size.
-
Set properties of label.
-
Theme: Sets the label's theme color, with white as the default. If the theme provided by the system cannot meet your needs, swipe the theme bar to the far right, tap Custom, and then tap Text and Background to set the color of text and background.
- Dock: Sets the label's direction (bottom, top, left, or right).
- Position: Sets the label's position (inside or outside the source). The default position is inside the source, which means that the label and source are overlapped.
- Size: Sets the label's height, ranging from 0 to 45, which indicates the proportion of the label height to the source height. The default value is 30.
- Font: Sets the label text's font.
- Alignment: Sets the alignment (left, center or right) of the label text.
- Reset: Removes the label.

TransitionTransition
Tap Transition to add dynamic effects to your sources.
This tool is available for all sources.
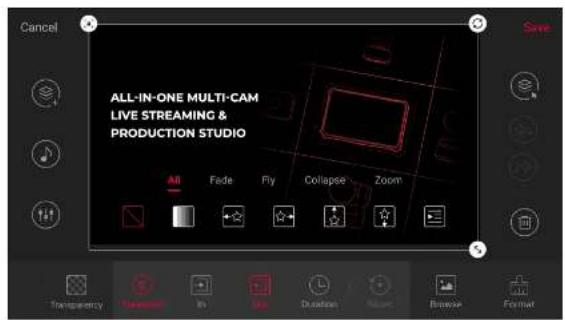
Add entrance transition:
Tap In and select an entrance effect from the All Lab or any other category lab.
.
None: No entrance transition (default).
-
Fade: Fade in.
- → ☆ → ☆ → ☆
Fly: Fly in from 4 directions, as indicated by the arrows.
- → ← |↓ | ↑ | ↓ |
Expand: Expand in from 6 directions, as indicated by the arrows.
-
Zoom: Zoom in from 9 directions, as indicated by the arrows.
After you select an entrance transition for the first time, OBSBOT Talent automatically sets the corresponding exit transition for you. For example, when you set the entrance transition as the exit transition is set to . You can change the exit transition effect.
Add exit transition:
Tap Out and select an exit effect from the All tab or any other category tab.
■
None: No exit transition (default)
.
Fade: Fade out.
-
Fly: Fly out to 4 directions, as indicated by the arrows.
-
Collapse: Collapse out to 6 directions, as indicated by the arrows.
-
Zoom: Zoom out to 9 directions, as indicated by the arrows.
After you manually change the exit transition, the entrance transition will not change accordingly. The exit transition will not change along with the entrance transition thereafter.
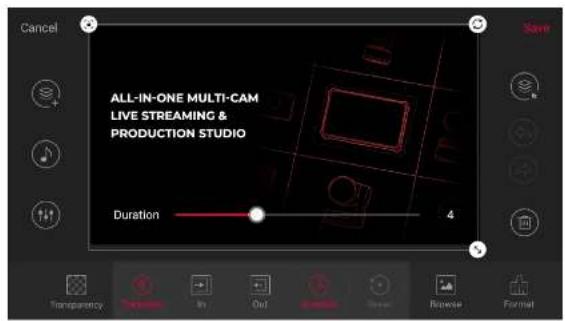
Change transition speed:
Tap Duration and move the slider.
It applies to both the entrance transition and exit transition. A longer duration means a slower transition.
Erase transition:
Tap Reset to erase transition effects.
You can check the transition effect on second screen, recording video or streaming target.
TextText
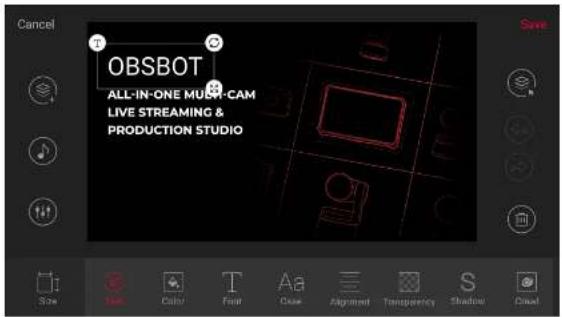
This tool applies to the Text source.
Tap Text at the toolbar to define the following properties:
• Color: Sets text color.
- Font: Sets text font.
- Case: Sets text to all uppercase or lowercase.
- Alignment: Sets text alignment (left, center or right).
- Transparency: Sets text transparency.
• Shadow: Applies a shadow to the text. 0 indicates no shadow.
- Crawl: Makes the text crawling on the screen by specifying the crawling speed and direction. Speed 0 means no crawling.
- Reset: Reverts to the original properties.

BackgroundBackground
This function applies to the Text source.
Tap Background to define the following properties:
• Color: Specifies a solid color as the text background.
- Gradient: Specifies a gradient color as the text background.
- Picture: Specifies a picture as the text background. The picture format can be JPG or PNG.
- Transparency: Sets the transparency of text background.
- Reset: Clears the background.
Color, Gradient and Picture are mutually exclusive. Applying one will overwrite the other.
natural_image
Beach volleyball player reaching for a shot, displayed within a camera interface (no text or symbols on the photo itself)

natural_image
Action photo of a basketball player mid-air during a game, captured in a video editing interface (no text or symbols on the image itself)
FlipFlip
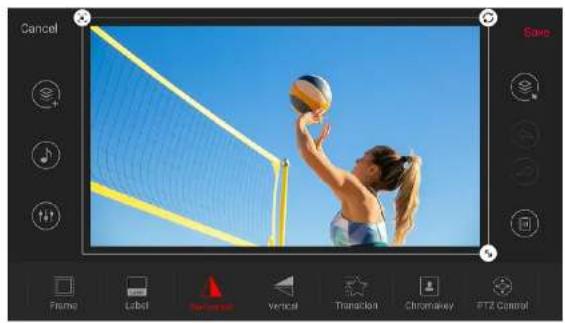
This tool applies to HDMI and webcam sources.
- Tap Horizontal to flip the source from left to right.
Tap Vertical to flip the source from top to bottom.
Chromakey Chromakey
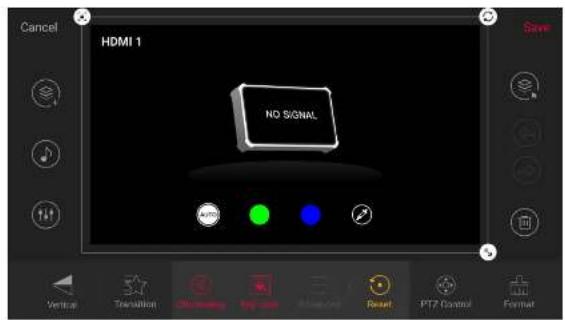
Chromakey can remove the background of HDMI, WEBCAM, SRT/RTMP/RTSP stream, NDI®stream and Video sources.
- Tap Chromakey, and the system implements keying with an auto algorithm.
- Tap Key color, and select a color to key.
- If you want to key other color, tap to open the color setting page, tap on the preview image to select a color, or enter RGB value at the bottom, and then tap Save:
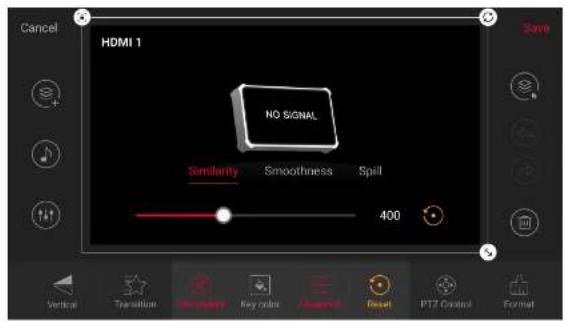
- With selected, you can tap Advanced to adjust Similarity, Smoothness and Spill.
- To cancel keying, tap Reset.
To get a good effect, you can build the background as follows.
- Use a bright green or blue screen. The contrast in colors makes it easier to distinguish you in the foreground from the bright background. Professional physical green screens are recommended.
- Make sure the background is flat without any wrinkles or seams, avoiding shadows and uneven lighting.
- Use higher quality cameras.
- Ensure that your background color does not match your shirt, hair, or eye color.
- Adjust your distance from background to avoid color spill.
- Use uniform lighting to make the background receive light evenly, and avoid your shadow falling on the background. It is recommended to use a 3-point lighting setup.

ActionAction
This function applies to the Video Clip source.
Action define how a video source is played.
- Start action: Defines how video playback is started.
• Auto start: Starts to play the video automatically. - Manual start: Starts to play or pause the video by tapping the Play/Pause button on the scene thumbnail.
- End action: Defines the action to take when the video playback is over.
- Go to black: Video area turns black.
- Repeat video: Plays the video repeatedly.
• Show last frame: Stops the video and displays the last frame.
• Show first frame: Stops the video and displays the first frame. - Hide video: Hides the video, which makes the video disappear from the screen.
- Switch to scene xx: Switches to scene xx automatically. When the video is playing back, the scene to switch to will be highlighted with a flashing yellow frame, a LIVE SOON mark and a countdown clock during the last 10s of the current video.
- Transition: Defines the transition effect of the video when it is set to switch to scene xx.
- Always Cut: an instant cut always applies when the video is switched out automatically.
- Always Fade: a fade effect always applies when the video is switched out automatically.
- Scene Switch Settings: follow the scene switch settings when the video is switched out automatically.
- Switch action: Defines how the video is continued if the scene is switched out to another scene and then back before the video playback ends.
- Rewind to start: Replays the video from the beginning.
- Pause video: Pauses the video when the scene is switched out, and resumes when the scene is switched back.
Play RangePlay Range
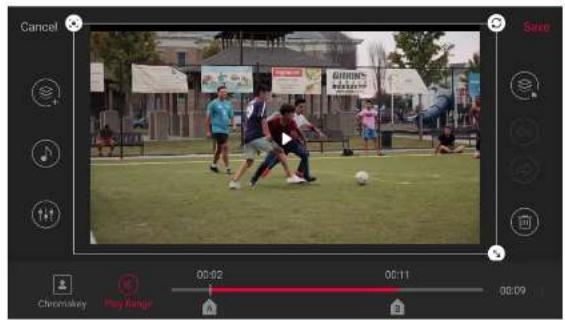
This function applies to the Video Clip source.
An entire video will be played by default, but you can specify a start and end point if you wish to only play part of a video.
As shown in the figure on the left, you can drag and move the video's progress bar to define start and end points.


BrowseBrowse
This function applies to the Video Clip and Picture sources.
Tap Browse to open the storage, where you can select an image or a video clip to replace the current image or video.
The replacement will not change the configured properties of the Video or Picture source except its size and position.

PropertyProperty
This tool applies to the WEBCAM.
Change WEBCAM's Properties Change WEBCAM's Properties
- Ensure that a WEBCAM is connected to the device.
- Select the WEBCAM source.
- Tap to open the WEBCAM Properties window.
-
View and select properties of the WEBCAM.
-
Device: the information of current WEBCAM. Tap Device, and it lists all the connected WEBCAM devices. You can select one to switch. If one device is bound with the other WEBCAM, you need to confirm the selection after you tap Save.
- Format: the current format. Tap Format, and it lists all the available format options. You can select one to switch. Supported formats: YUYV, MJPG, NV12, UYUV
- Resolution: the current resolution. Tap Resolution, and it lists all the available resolution options. You can select one to switch. Supported resolution: up to 1920x1080
- Frame rate: the current frame rate. Tap Frame rate, and it lists all the available frame rate options and uses the frame rate matching the show by default. You can select one to switch. Supported frame rate: up to 60fps
The changeable properties and parameters of different WEBCAM devices may differ.

- Tap Save after you change properties.
URLURL
This tool applies to stream and webpage sources.
Stream
- Tap UP to open the stream's property window.
- Change properties as needed.
- Tap Save.
Webpage
- Tap UP to open the Edit Webpage window.
- Enter a new URL to change the webpage.
- To delete a webpage, long-press a thumbnail in the History, tap, a confirm to delete in the popup.
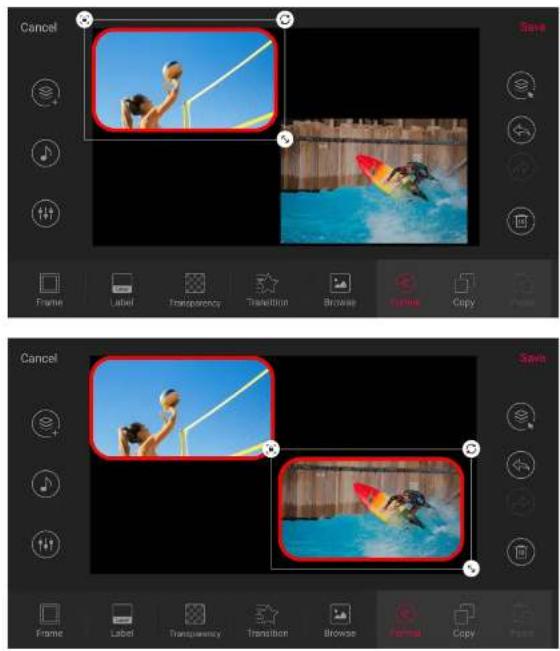
FormatFormat
This function can copy the format of one source and past to another source. This tool is available for all sources. The format function of text source takes effect independently, that is, the format of a text source can only be pasted to another text source.
- Select a source, tap Format, and then tap Copy. The format of current source is copied.
- Select another source, tap Format, and then tap Paste. The copies format is pasted to the current source.


PTZ ControlPTZ Control
When a source is connected with a PTZ camera supporting Visca UDP, you can enable this function to control the PTZ camera through the network. The PTZ camera and OBSBOT Talent device must be able to ping each other. Supported sources include HDMI, WEBCAM, SRT, RTSP and RTMP.
When the NDI source is connected with a PTZ camera, you can also setting relative properties.
- Enable PTZ: Toggle on to enable PTZ control. (Not available for NDI)
- IP Address: The IP address of your camera. (Not available for NDI)
- Port: Your camera's Visca protocol network port (Check the user manual of the camera or contact the manufacturer to get it). (Not available for NDI)
- Visca UDP message header: Toggle on this option if your camera's (e.g. SONY camera) communication protocol contains the Visca UDP header. Or else, the OBSBOT Talent device may not be able to control the PTZ camera. (Not available for NDI)
- Invert pan direction: Toggle on to reverse the pan-direction movement. You can enable this option to make control more intuitive when the camera is not installed in the normal position.
- Invert tilt direction: Toggle on to reverse the tilt-direction movement. You can enable this option to make control more intuitive when the camera is not installed in the normal position.
- Auto call presets: Toggle on and select a preset. When the scene is switched to program, the camera moves to the selected preset position automatically. For how to set presets, please refer to PTZ Control.

Add Multi-View SceneAdd Multi-View Scene
The prebuilt Multi-View layouts can help you create multi-view scenes more easily.
- Tap in the scene list on the main screen.
- Select Multi-View in the Create New Scene window.
- Select one layout template.
- Tap each box and select source thumbnails, and you can tap to add a source if needed.
- The source fills the box and remains centered by default. You can move the source within a box to change the displayed portion, and double-click to return the source to its original centered display.
- For some layout templates, you can drag the split lines to change their position.
- Tap Continue to enter the scene editor.
- Tap to reselect sources.
- Edit basic properties with tools, referring Multi-View Layouts and Tools. You can also move the source within a box to change the displayed portion, and double-click to return the source to its original centered display.
- Tap Advanced to edit other properties like normal scenes, and tap Multi-View to go back.
- Tap at the left to change layout if needed.
- Tap to add private BGM. For details, see Background Music.
- Tap to set audio. For details, see Volume Control.

natural_image
Baseball pitcher in action on a field, captured with UI controls for color, position, size, frame, and margin (no text or symbols on the player or background)
natural_image
Two baseball pitcher shots in action, one blue and one red, on a field with no visible text or symbols.- Tap Save at the upper right corner.
Multi-View Layouts and ToolsMulti-View Layouts and Tools
Layout 1Layout 1

- Position: change the position of the small box.
- Size: drag the slider to change the size of the small box.
- Frame: create a frame for the small box by setting thickness and color. If the thickness is set to zero, the frame is invisible.
- Margin: drag the slider the change the margin of the small box, which does not work when the small box is in the center.
Layout 2Layout 2

- Background: use a color, gradient or picture as the background.
- Size: drag the slider the change the size of the two boxes.
- Frame: create frames for the two boxes by setting thickness and color. If the thickness is set to zero, the frame is invisible.

natural_image
Two baseball players in action on a field, one bending forward and the other leaning forward (no visible text or symbols)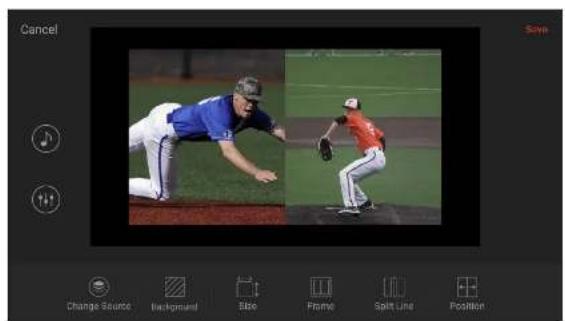
natural_image
Two baseball players in action on a field, one sweeping and the other leaning forward (no text or symbols visible)Layout 3Layout 3

- Split Line: show a split line between the two boxes by setting thickness and color. If the thickness is set to zero, the split line is invisible.
- Position: drag the slider to change the position of the split line.
Layout 4Layout 4

The two boxes are combined as one layer.
- Background: use a color, gradient or picture as the background.
- Size: drag the slider the change the size of the whole layer.
- Frame: create a frame for the whole layer by setting thickness and color. If the thickness is set to zero, the frame is invisible.
- Split Line: show a split line between the two boxes by setting thickness and color. If the thickness is set to zero, the split line is invisible.
- Position: drag the slider to change the position of the split line.
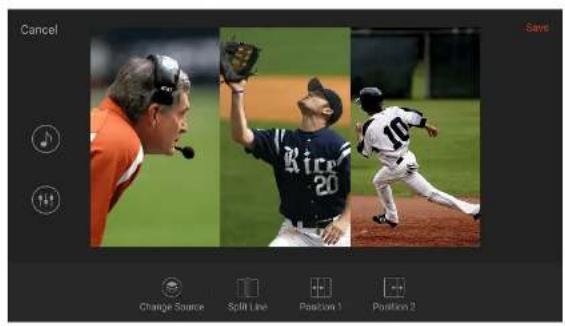
natural_image
Three action shots of baseball players on a field: pitcher, pitcher in NFL jersey (20), and pitcher in baseball running (10), displayed within a photo editing interface.
natural_image
Three-panel photo collage showing baseball pitcher in action, with UI controls for color, shift line, and position indicators (no readable text or symbols)Layout 5Layout 5
| 1 | 2 | 3 |
- Split Line: show split lines among the three boxes by setting thickness and color. If the thickness is set to zero, the split line is invisible.
- Position 1/2: drag the slider to change the position of the split lines.
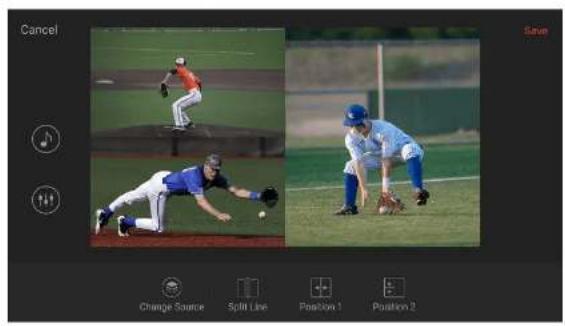
Layout 6Layout 6
| 1 | 2 |
| 3 |
- Split Line: show split lines among the three boxes by setting thickness and color. If the thickness is set to zero, the split line is invisible.
- Position 1/2: drag the slider to change the position of the split lines.
natural_image
Two side-by-side photos showing baseball pitcher in action, one rolling and the other defending (no text or symbols visible)
natural_image
Four-panel photo collage showing baseball pitcher in action, with no visible text or symbolsLayout 7Layout 7
| 1 | 3 |
| 2 |
- Split Line: show split lines among the three boxes by setting thickness and color. If the thickness is set to zero, the split line is invisible.
- Position 1/2: drag the slider to change the position of the split lines.
Layout 8Layout 8
| 1 | 2 |
| 3 | 4 |
- Split Line: show split lines among the four boxes by setting thickness and color. If the thickness is set to zero, the split line is invisible.
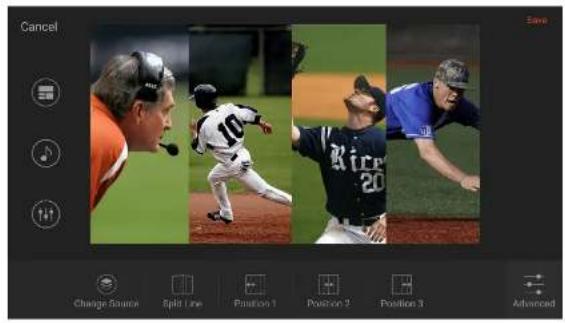
Layout 9Layout 9
| 1 | 2 | 3 | 4 |
- Split Line: show split lines among the four boxes by setting thickness and color. If the thickness is set to zero, the split line is invisible.
- Position 1/2/3: drag the slider to change the position of the split lines.
Background MusicBackground Music
You can add background music to a scene to enrich your scene. Such music is considered as the scene's private BGM. You can also go to Web UI to add global background music to play with the whole show.

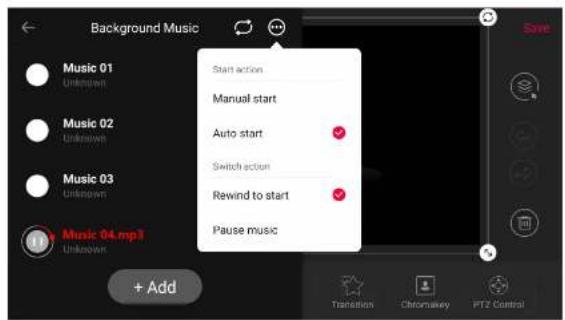
- On the main screen, long press a scene thumbnail and lap Edit to open the Scene Editor.
- Tap, Select a storage path, and then select an audio file to add. Then, the Background Music page pops out. Supported formats are MP3, M4A, WAV files.
- Tap + Add to add more songs.
- Tap on a song to start or pause.
-
Set the music playback policy at the upper right corner.
-
📋: Repeat the playlist. (default policy)
-
Repeat the selected song.
。 ✗: Shuffle the playlist. -
Tap to set start action and switch action.
- Start action:
- Manual start: you need to start playing music manually.
• Auto start: music starts playing automatically.
- Switch action:
- Rewind to start: Replays the song from the beginning.
-
Pause music: Pauses the song when the scene is switched out, and resumes when the scene is switched back.
-
To delete a song, swipe the song to the left and tap

Present Your Show Present Your Show
OBSBOT Talent provides lots of tools for conveniently presenting your show and adding eye-catching effects, making your show more professional and attractive.

Control ScenesControl Scenes
OBSBOT Talent supports switching scenes with quick mode or manual mode.
Set Switch ModeSet Switch Mode
-
Tap, and select Switch Settings.
-
In the Scene switch area, set scene switch mode and transition effect.
-
Quick switch: Toggle off the switch, it goes to the manual switch mode. To enable the quick switch mode, toggle on the switch.
• Transition: Select the transition effect. -
Cut: Scenes switch directly. (Default)
- Fade: Scenes switch with the fade effect.
- DIP: Scenes switch with a two-step transition with a color flash in the middle of the transition. Tap 8 more settings.
- Wipe: One scene is replaced by another gradually sweeping across the screen. Tap 🌐 more settings.
- DVE: One scene is replaced by another according to a 2D Digital Video Effect (DVE) pattern. Tap Select a DVE effect.
- Stinger: A stinger with chroma key enabled is played over the top to
cover the transition. Tap select a stinger, and tap it again to replace the default stinger with your own one, which should be an MP4 file within 2 to 5 seconds.
- 3D: One scene is replaced by another according to a 3D pattern. Tap to select a 3D pattern.
- Duration: Drag the slider to set the transition duration for effects, ranging from 50ms to 1000ms.
- In the FTB switch area, drag the slider of Duration to set the transition duration for FTB, ranging from 200ms to 2000ms.
- Tap X to exit.
DIP SettingsDIP Settings
- Onset: Duration from the current scene to the color flash.
- Offset: Duration from the color flash to the next scene.
- Hold: Duration that the color flash is held. This value is the residual of the total transition duration minus the onset and offset.
• Color: Select a preferred color.
Wipe SettingsWipe Settings
- Angle: Set the angle of linear wipe.
- Line 1/2/3: By default, the line is invisible. Toggle on the switch to display the line and tap set thickness, color and transparency.
You can also change switch settings in the Settings. For details, see Switch.

Switch ScenesSwitch Scenes
Quick SwitchQuick Switch
When Quick switch is toggled on, you can tap thumbnails in the scene list to switch scenes directly.
Manual Switch Manual Switch
When Quick switch is toggled off, it goes to manual switch mode. You can set and preview the content to program. After you confirm everything is OK, you can program the scene.
- Tap the thumbnail of next scene to program in the scene list. The main screen displays the preview content. The program scene thumbnail has a red frame, while the preview scene thumbnail has a white frame and displays Cut and AUTO buttons.
The output image is the scene in Program view.
- Adjust the audio volume, select elements to go with the preview scene to program, such as a GFX, and check everything is OK.
If a video clip is contained in the preview view, it will execute the configured start action and end action. Here are two actions differing from that in the program view.
- If it is set to "Manual start", you can tap the Play button in the center of the video clip to start to play while tap the center again to pause.
-
If it is set to "Switch to scene x", it does not switch when the video clip ends, but displays the last frame.
-
Tap the Cut or AUTO button on the preview scene thumbnail, and the scene goes to program directly or with the fade effect.
If a video clip is contained in the scene, after going to program, it re executes the configured actions. The play progress in the preview view will not take effect.
FTB
The FTB (Fade to Black) function allows your show to fade into black or fade to image during streaming or recording, with no video nor audio output. This function is most often used at the end of a scene or show.
You can set fading to black or image on the Web UI.
- Tap and select
FTB.
Your audio/video output will be stopped.
• To continue your show, tap

FTB.
Your show will go back to the screen and continue.
Freeze Scene Freeze Scene
You can freeze dynamic images while streaming or recording.
• To freeze the scene, tap and select Freeze.
• To unfreeze the scene, tap and select Unfreeze.
Control VolumeControl Volume
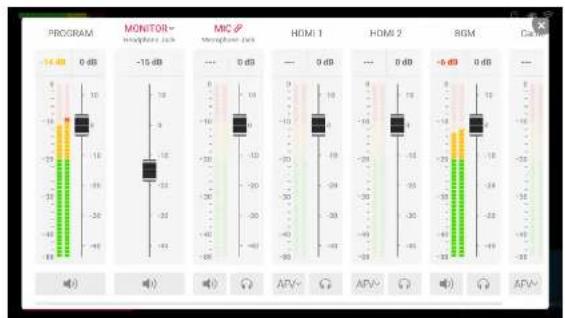
The audio mixer is used to mix connected audio sources, external audio sources and built-in audio from BGM and video clips. You can access the audio mixer by the following ways.
- Tap 📊 the main screen to open the main audio mixer, which displays all the audio inputs and outputs of the current show.
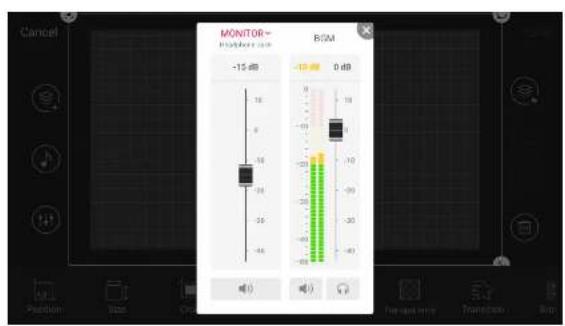
- Long-press a thumbnail on the scene list, select Edit on the popup to enter the scene editor, and then tap 📄open the scene's audio mixer, which displays the monitor and audio input sources of the current scene.
Audio TypeAudio Type
Scroll the audio mixer to view all the audio sources.
• PROGRAM: Output audio of the program scene, for streaming or recording.
- PREVIEW: Output audio of current previewing scene, only displayed during manual switch.
• MONITOR: Audio output for monitoring.
- Audio Input Sources:
- MIC: Audio of global microphone.
- Bluetooth: Audio from a Bluetooth device, which is displayed when the device is connected with OBSBOT Talent. (You need to select Bluetooth Audio Input mode in the Settings.)
- USB AUDIO: Audio from a USB device, which is displayed when the device is connected with OBSBOT Talent.
• HDMI: Audio from an HDMI source, which is displayed on the main audio
mixer by default.
- RTMP Stream: Audio from the RTMP stream source, displayed with the self-defined name.
- SRT Stream: Audio from the SRT stream source, displayed with the self-defined name.
- RTSP Stream: Audio from the RTSP stream source, displayed with the self-defined name.
- NDI Stream: Audio from the NDI stream source, displayed with the self-defined alias.
- VIDEO CLIP: Audio embedded in the video clip source, which appears when the current scene containing a video clip. It displays the file name under VIDEO CLIP to distinguish different files.
- BGM: Audio of the background music, which appears when the current scene contains BGM.
- GFX: Audio from a webpage GFX, which appears when a webpage GFX is displayed in the show.
Except monitor, each audio has its audio meter showing the real-time level. An audio meter of program is also displayed at the upper left corner of the home screen.
The range of the Audio Meter is -88 dB to 0 dB. It displays the peak value at the top of the audio meter (in portrait mode, on the right). Colored blocks and scales indicate the danger of clipping, as shown in the table below.
| Color Scale Range Description |
| Green -88 ~ -40 Audio device is connected. |
| Green -40 ~ -20 Audio volume is low. |
| Yellow -20 ~ -10 Audio is at normal levels. |
| Red -10 ~ 0 Audio is in danger of clipping. |
Adjust Audio Level Adjust Audio Level
Each audio has a fader for adjusting the maximum level.
- Move the fader to set the gain on the audio level. The range is from -40dB to 10dB.
- The current adjusted value is displayed at the top of the fader. Double lap the value to restore the fader to 0dB.
Set Program AudioSet Program Audio
Use the button at the bottom of PROGRAM (in portrait mode, on the right) to turn on or turn off the program output audio.
• : indicating the program output audio is turned on.
• : indicating the program output audio is turned off.
Set MonitorSet Monitor
The monitor has an independent audio level with the default gain of -15 dB. You can set monitor audio without effecting the program output audio.
Set Monitor Properties Set Monitor Properties
Tap MONITOR to set the following properties.
- Select Device: select a device as the monitor.
- Headphone Jack: device connected to the headphone jack.
- Bluetooth Device: device connected through BT. (You need to select Bluetooth Audio Output mode in the Settings.)
- USB device: USB device(s) connected to OBSBOT Talent. The system automatically lists device name(s).
- Monitor Option:
Toggle on/off the switch of MIC Input to set whether to monitor the microphone. It is toggled on by default.
Enable/Disable Monitor Enable/Disable Monitor
Tap the button at the bottom of MONITOR (in portrait mode, on the right) to enable or disable audio monitoring.
• : indicating audio monitoring is enabled.
• : indicating audio monitoring is disabled.
Solo Monitor Solo Monitor
- Tap to only monitor this audio input.
- Tap to cancel.
Set Audio Input Sources Set Audio Input Sources
Audio Association StateAudio Association State
- When an audio input source is added to multiple scenes, its name is displayed in Red on the audio mixer, and you can tap the name to change its association state. It also applies to global input including MIC, Bluetooth and USB audio.
• : indicating the audio input is associated with multiple scenes. The settings to this audio input will take effect to all the scenes.
- 23: indicating the audio input is not associated with other scenes. You can customize the audio mixing mode and adjust audio level for each scene.
- When the state changes from 22, the settings to this audio input will take effect to the whole show.
- When an audio input source is only contained in one scene, its name is displayed in black on the audio mixer and cannot be tapped. The settings to this audio input will take effect to all the scenes.
Set Audio Mixing Mode Set Audio Mixing Mode
Tap the icon to set the audio mixing mode of each audio input source.
- When the audio input source is in state, or is only added in one scene.
- AFV\~: Audio-follow-video. The audio will only be sent to the program output when the input is in program view.
- Always ON. An audio input will be permanently mixed into the program output.
• Always OFF. An audio input will be permanently not mixed into the
program output.
- When it is private BGM, Video Clip, or other audio input source in state,
- ON. When the current scene is in program view, the audio will be sent to the program output.
• OFF. When the current scene is in program view, the audio will not be sent to the program output.
- When it is global BGM,
• : Always ON. It will be mixed into the program output.
• : Always OFF. It will be not mixed into the program output.
- When it is webpage GFX audio,
- ON. When the CFX is applied, the audio will be sent to the program output.
• OFF. When the GFX is applied, the audio will not be sent to the program output.
If the current scene is in Preview view, the PROGRAM audio changes to PREVIEW.
All the audio settings in the Preview view will take effect after the scene goes to Program.
- Embedded audio from the input signal: support setting end state. Please refer to Set Audio Input Sources.
- Microphone/Line In audio:
- ON. The audio input will be permanently mixed into the program output.
• OFF. The audio input will be permanently not mixed into the program output
You can set more audio properties through "Settings > Audio". For details, see Audio.

Use GFXUse GFX
Graphic Overlay (GFX) enables a predefined logo, picture and text combination to show on the scene during recording and streaming. It is useful when you want to add lower thirds or a company logo to your show. It adds a professional touch to your show, making it more interactive. Rich GFX templates help you create GFX quickly and easily, and you can also create GFX from scratch. Besides, you can even add a webpage as a GFX.
Create Gfxt with Template with Template
- Tap to open the GFX list.
- Tap to open the Create New GFX interface.
- Select a GFX type.
- Select a template to enter the editor.
- Edit the GFX by referring to GFX Templates.
- Adjust the GFX size, rotation and position. For details, refer to editing tools.
- Tap the bottom left button to change the background, aiding in positioning the GFX.
- Tap a the left to change template if needed.
Whether the template is changeable depends on the GFX type.
- (Optional) Set timing, which makes the GFX disappearing automatically.
a. Tap on the left.
b. Toggle on Timing.
c. Scroll time options to set the duration.
d. Tap Confirm.
- Tap Save, and the GFX thumbnail appears in the GFX list.


GFX Templates Templates
OBSBOT Talent provides various CFX templates helping you display more information during program.
TitleTitle
A title shows the theme of your show, and a good title will make your show more engaging.
General
-
Tap text boxes and enter content.
-
Set text format, background and transition effect. See Editing Tools for details.
Animation
Tap Title (X) to enter text and set size, color, font and case. Different templates contain different editable elements.
You can add a total of three animated titles and animated lower thirds.
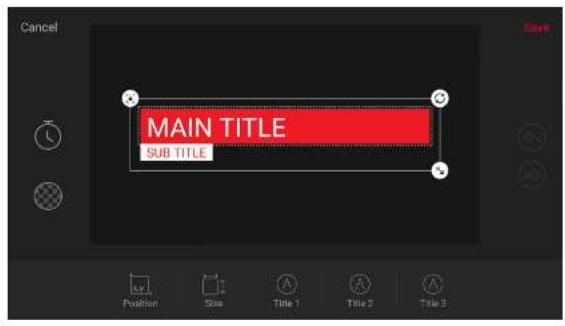

Lower ThirdLower Third
Lower third is often used show the name of who is talking or to give vital information about an event. It provides general and animated lower third templates.
General
- Tap text boxes and enter content.
- Set text format, background and transition effect. See Editing Tools for details.
Animation
Tap Title (X) to enter text and set size, color, font and case. Different templates contain different editable elements.
You can add a total of three animated titles and animated lower thirds.

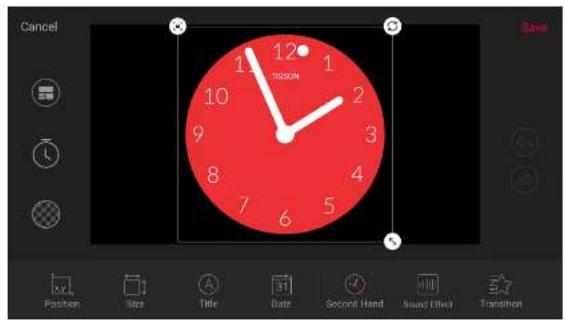
Animated TextAnimated Text
Animated text crawls horizontally for displaying sports news, breaking news, weather report, etc.
-
Tap the text box, and then enter content, or tap Import at the upper right corner to import from a txt or rtf file. It supports up to 1024 characters. If the imported text has line breaks, you can select to import the first paragraph or import all paragraphs with line breaks being deleted automatically.
-
Set text format, background and transition effect. See Editing Tools for details.
Analog ClockAnalog Clock
Analog Clock displays a clock, which can be embedded with date and other information.
- Title: Set whether to show the title, and edits the title's name, font, size, and transparency.
- Date: Sel whether to show date and selects date format.
- Second Hand: Set the second hand mode. Options include No second, Sweeping second and Jumping second.
• Transition: Set transition effect.
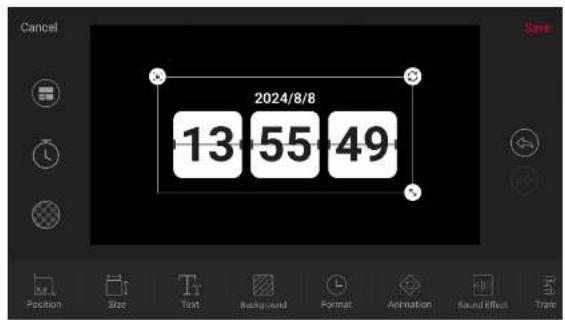
Digital ClockDigital Clock
Digital Clock displays digital date and time, which are synchronized with the system.
- Text: Set the number's color, size, font and transparency.
- Background: Specify a solid color, gradient color or picture as the clock's background, and sets the transparency.
- Format: Toggle on/off the switches to enable or disable the following properties, and then tap Save.
- 24 hour clock
- Show seconds
- Show colon
- Animation: Set the clock's animation effect. Options include Classic, Flip, Gradient, Drop and Swivel.
- Sound Effect: Set the clock's sound effect. Options include: None (default). Modern, Old, Crisp, Ticktock and Tradition.
• Transition: Set transition effect.
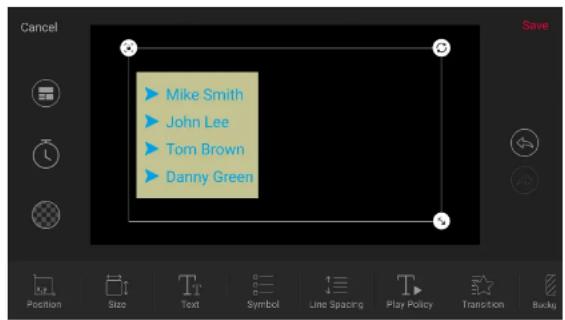
Bullet ListBullet List
Bullet List can list important information clearly.
- Tap the text box, enter your content, and tap Enter to add a new item. To delete one list item, delete all the content of this item.
-
Set properties of the bullet list.
-
Text: Set the text's format, including font, size, color, case, transparency and shadow.
- Symbol: Set the symbol's style, size and color.
- Line Spacing: Set the vertical space between the lines.
-
Play Policy: Set how to play list items when the list is displayed.
-
Play policy: You can set to play "All at once", that is, all list items appear together; or play "By paragraph", that is, list items appear one by one.
- Play mode: When playing by paragraph, you can choose "Auto Play", that is, the list items will be played automatically according to the set "Play speed"; or choose "Manual Play", that is, after the list is applied, you can tap the screen to display list items one by one.
- Play speed: Set the play speed for auto play. Options include very slow, slow, medium, fast and very fast.
- Play effect: Set the play effect of list items appearing by paragraph. Options include none, fade, fly in, expand, zoom in, and typewriter.
• Transition: Set transition effect.
- Background: Specify a solid color, gradient color or picture as the bullet list's background, and set the transparency.
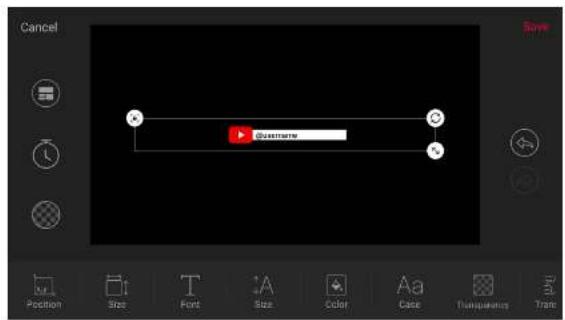

Social Media Social Media
Social Media displays your account to attract more followers.
- Tap text box and enter content.
- Set text format and transition effect. See Editing Tools for details.
The logo cannot be changed. You can switch by changing the template.
LogoLogo
Logo supports to import one picture, such as a company logo and brand logo. The supported formats include JPG, PNG and BMP.
- Select a picture from the storage.
- Set the picture's frame, transparency and transition effect. See Editing Tools for details.

ScoreboardScoreboard
Scoreboard displays the scores of a game. It currently provides general, baseball and soccer scoreboard templates.
General and Soccer Scoreboards General and Soccer Scoreboards
Basic Settings
- Game Name
- Toggle on/off the switch of Show Name to set whether to show the game name.
- Set game name's content, font, size, color, transparency, and background.
- Home: Set the home team's name, text font, size, color, transparency and background.
- Guest: Set the guest team's name, text font, size, color, transparency and background.
- Team Logo
- Toggle on/off the switch of Show Logo to set whether to show team logos.
- Set the home logo and guest logo, and adjust their size.
- Set the background color of home and guest logos. (Only available for soccer scoreboards)
- Home Score: Sel font, size, color, transparency and background for the home team's score. Whether the score background can be set is determined by the template.
- Guest Score: Set font, size, color, transparency and background for the guest team's score. Whether the score background can be set is determined by the
template.
- Game Time: Set font, size, color, transparency and background for the game time. (Only available for soccer scoreboards)
- Transition: Set transition effect.
Advanced Settings
Tap Advanced to further customize the scoreboard. (Not available for soccer scoreboards)
- Show game name: Toggle on/off the switch to set whether to show game name.
-
Show game time: Toggle on/off the switch to set whether to show game time. When it is toggled on, the Countdown option appears, and you can make the following settings.
-
Toggle on/off the switch to set whether to enable countdown.
- Tap the number and scroll time options to set the duration.
- Game time format: Select a preferred format.
- Show period: Toggle on/off the switch to set whether to show period. When the switch is toggled on, the Period name option appears, tap to open the period list and make the following settings.
- Add period: Tap "+ Add", enter the period name, and tap "Save".
- Select period: Tap any period as the current period. The default periods include 1st, 2nd and 3rd.
- Delete period: Swipe a period to the left, and then tap "Delete".
- Score step: Tap "+" or "-" to set the score to add each time. The default value
is 1.
- Allow negative score: Tap on/off the switch to set whether to allow the score being lower than 0.

Baseball Scoreboard Baseball Scoreboard
The baseball scoreboard can show lots of elements for easy control.
Select a baseball scoreboard from scoreboard template library, and then start customizing your own layout.
Basic Settings
- Game Name
- Toggle on/off the switch of Show Name to set whether to show the game name.
-
Set game name's content, font, size, color, transparency, and background.
-
Home: Set the home team's name, text font, size, color, transparency and background.
- Guest: Set the guest team's name, text font, size, color, transparency and background.
-
Team Logo: Whether the team logo can be set is determined by the template.
-
Toggle on/off the switch of Show Logo to set whether to show team logos.
-
Set the home logo and guest logo, and adjust their size.
-
Home Score: Set font, size, color, transparency and background for the home team's score.
- Guest Score: Set font, size, color, transparency and background for the guest team's score.
- Inning: Set font, size, color, transparency and background for innings.
-
Out: Set font, size, color, transparency and background for outs.
-
Ball-Strike: Set font, size, color, transparency and background for balls and strikes.
- On Base Runners: Set color, transparency and background for on-base runner indicators.
- Background: Set background for the baseball scoreboard. Whether the background can be set and the extent to which it takes effect is determined by the template.
• Transition: Set transition effect.
Advanced Settings
Tap Advanced to further customize the scoreboard.
- Show game name: Toggle on/off the switch to set whether to show game name.
-
Show game time: Toggle on/off the switch to set whether to show game time. When it is toggled on, the Countdown option appears, and you can make the following settings.
-
Toggle on/off the switch to set whether to enable countdown.
- Tap the number and scroll time options to set the duration.
• Game time format: Select a preferred format.
• Show Inning: Toggle on/off the switch to set whether to show Inning.
• Show Outs: Toggle on/off the switch to set whether to show Outs.
- Show Ball-Strike: Toggle on/off the switch to set whether to show Ball-Strike.
- Show On-Base Runners: Toggle on/off the switch to set whether to show On-Base Runners.

TimerTimer
You can use a Timer to countdown.
- Duration: Scroll hour, minute and second options to set the duration.
- Text: Set the font, size, color, and transparency of numbers.
- Progress Bar: Set the color of progress bar.
- Background: Set the color and transparency of background.
-
Tips: add some custom tips under the numbers.
-
Toggle on/off the switch of Show to set whether to show tips.
- Set the content, font, size, color and transparency of tips.
- Sound Effect: Set the timer's sound effect. Options include: None (default), Modern, Old, Crisp, Ticklock and Tradition.
-
Policies: Set the policies of timer.
-
When the timer is displayed, you can set "Manual start" or "Auto start".
-
When the timer is hidden, you can select one policy.
-
Auto pause: If the timer is counting, it pauses.
- Ignore: If the timer is counting, it continues counting; if the timer is not counting, it does not count.
- Reset: The timer is restored to the set duration.
- When the timer reaches zero, you can set to hide the timer.
- When the timer reaches zero, you can also set to switch to another scene. After toggling on the switch, tap "Switch to", and select a scene. When the timer counts down to the last 10s, the scene to switch to will be highlighted with a flashing yellow frame, a LIVE SOON mark and a countdown clock.
- Alert: You can set different color for the last a few minutes or seconds to alert the coming event.
- Toggle on/off the switch of Enable to set whether to enable the alert.
- Set the duration, text color, progress bar color and background color.
- Transition: Set transition effect.
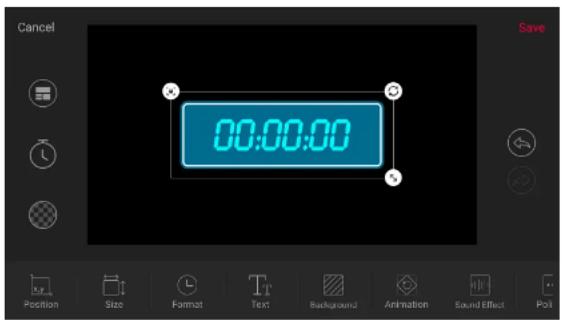
StopwatchStopwatch
You can use Stopwatch to count up.
- Format: Select one stopwatch format. Options include H:M and H:M:S.
- Text: Set the font, size, color, and transparency of numbers.
- Background: Specify a solid color, gradient color or picture as the background, and sets the transparency.
- Animation: Select an animation effect for the numbers. Options include classic, flip, gradient, drop, and swivel. After you select an effect, the stopwatch will count three seconds to show the effect for preview.
- Sound Effect: Set the stopwatch's sound effect. Options include: None (default), Modern, Old, Crisp, Ticktock and Tradition.
-
Policies: Set the policies of stopwatch.
-
When the stopwatch is displayed, you can set "Manual start" or "Auto start".
-
When the stopwatch is hidden, you can select one policy.
-
Auto pause: If the stopwatch is counting, it pauses.
- Ignore: If the stopwatch is counting, it continues counting; if the stopwatch is not counting, it does not count.
- Reset: The stopwatch is restored to zero.
• Transition: Set transition effect.

Create Webpage Create Webpage
- Tap

en the
GFX list.
- Tap

en the Create New
GFX interface.
-
Choose Webpage.
-
Enter a URL, and tap Go or Confirm.
-
Tap the bottom left button to change the background, aiding in positioning the CFX.

: Transparent

: Program scene

: Gridlines
-
Edit the webpage in the GFX editor.
-
Adjust the GFX size, rotation and position. For details, refer to editing tools.
- Transparency: adjust the webpage's transparency.
- Crop: crop the webpage, referring to Crop.
- URL: change the URL and tap Save.
-
CSS: select a CSS option to set the background of webpage.
-
Default CSS: Use the default background of the webpage.
- Transparent CSS: Change the background to transparent.
- Custom CSS: Enter your own CSS, or Lap Import to import a CSS file from the storage, and then tap Save.
- Reset: clear all the changes.
-
Tap to adjust the GFX's volume, referring to Control Volume.
-
(Optional) Set timing, which makes the GFX disappearing automatically.
a. Tap on the left.
b. Toggle on Timing.
c. Scroll time options to set the duration.
d. Tap Confirm.
-
Tap Save, and the webpage thumbnail appears in the GFX list.
-
To edit a webpage, tap, select Webpage, and tap a thumbnail in the History to enter the GFX editor. Or, you can refer to Edit GFX.
-
To delete a webpage, tap, select Webpage, long-press a thumbnail in the History, tap and confirm to delete in the popup.
It is not recommended to add a video URL as it will consume a lot of system resources.
You can add up to create webpage GFXs. When it reaches 7, you cannot delete webpage history by tapping.
Create Custom Create Custom
-
Tap to open the GFX list.
-
Tap to open the Create New GFX interface.
-
Choose Custom to enter the GFX editor.
-
Tap, choose Picture or Text to add picture or text.
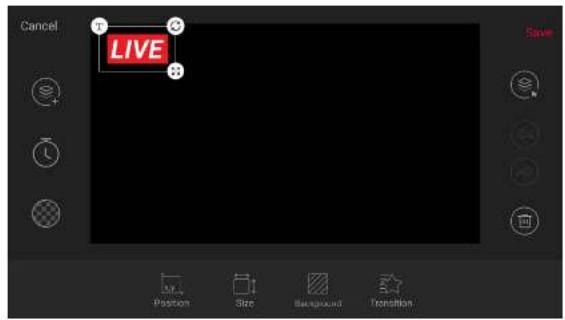
- Tap the bottom left button to change the background, aiding in positioning the CFX.
- Edit the picture and text. See editing tools for details.
- (Optional) Set timing, which makes the GFX disappearing automatically.
a. Tap on the left.
b. Toggle on Timing.
c. Scroll time options to set the duration.
d. Tap Confirm.
- Tap Save, and the GFX thumbnail appears in the GFX list.

Apply Apply
You can apply up to 8 CFXs in a show at the same time.
- Tap to open the GFX list.
- Tap one GFX thumbnail, and then the GFX is displayed in the scene. A √ appears on the selected thumbnail.
- If a bullet list is applied, and it is set as manual play mode, you can tap the text content on the screen to display the next line. (Only working in the program scene)
- To cancel, tap one selected thumbnail, the GFX disappears.
If you select or unselect a GFX in the preview scene, your choice only takes effect after you switch the preview to program. If you do not tap the Switch button but tap the program scene again, your choice will be discarded.
For the time counting related policies of some GFXs, including the policies of timer and stopwatch, and the timing of a custom GFX.
- In the program scene, when the GFX is selected, polices execute normally.
- In the preview scene, when the CFX is selected, policed do not execute; only when you switch the preview to program, polices start executing.
- If a GFX is applied in the program scene, in the preview scene, polices will go on executing.
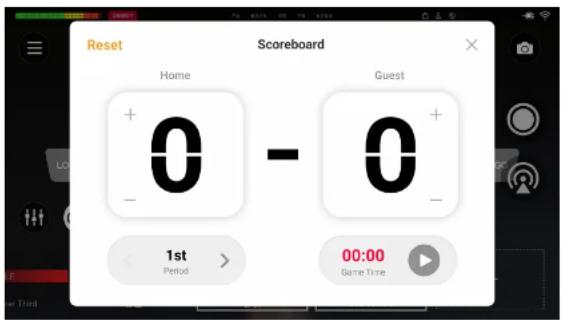
Control Scoreboard Control Scoreboard
You can only apply one scoreboard, but you can control all the scoreboards.
Way 1: When a scoreboard is applied, tap control the displayed one.
Way 2: Tap 📄 Open the GFX list, long-press a scoreboard thumbnail and tap Control on the popup. By this way, you can control each scoreboard separately.
Control General Scoreboard Control General Scoreboard
- Adjust score: Tap the upper part of the number to increase the score, and tap the lower part of the number to decrease the score.
- Select period: Tap the left or right arrow at the bottom left to select a period. If the period is not set to be shown, you can tap "Show" to display it.
- Control game time:
- Tap at the bottom right to start counting; tap to pause counting.
- If the game time is not set to be shown, you can tap "Show" to display it.
- Tap the time number, and scroll time options to adjust, or tap "Reset" to reset the game time to zero or the preset duration.
- Reset: Tap "Reset" to restore the score to 0:0, reset the game time to zero or reset to the preset duration.
- Tap "x" to return to the main screen.

Control Baseball Scoreboard Control Baseball Scoreboard
When you apply a baseball scoreboard, the control method is as follows.
- Tap the upper part of the number to increase the score, and tap the lower part of the number to decrease the score.
Tap to indicate runners on 1st Base, 2nd Base, and 3rd Base. - Tap the left or right arrow of Inning to set inning number and its "top" or "bottom" half. And confirm whether to also clear settings of on-base runners, outs, balls and strikes on the popup.
- Control game time:
- Tap to start counting; tap to pause counting.
- Tap the time number, and then select time in the time box to adjust time, or tap "Reset" to reset the game time to zero or the preset duration.
- Tap the left or right arrow of Out to indicate outs as numbers or shapes.
- Tap the left or right arrow of Ball to indicate balls as numbers.
- Tap the left or right arrow of Strike to indicate strikes as numbers.
- Tap Clear Pitch Count to make balls and strikes both zero.
- Tap Reset to clean all the sets.
- Tap "x" to exit.
If some element is set to be hidden, you can tap "Show" to display it.

Control Soccer Scoreboard Control Soccer Scoreboard
- Adjust score: Tap the upper part of the number to increase the score, and tap the lower part of the number to decrease the score.
• Show stoppage time: - Tap the time number to select the stoppage time, and you can tap "Reset" to reset the stoppage time to zero.
Tap 📋 show the stoppage time, and tap to hide. - Control game time:
- Tap at the bottom right to start counting; tap to pause counting.
- Tap the time number, and scroll time options to adjust, or tap "Reset" to reset the game time to zero.
• Show substitution: - Tap "Substitution" to enter the information of the players to enter and leave the field.
Tap to show the substitution, and tap to hide - Reset: Tap "Reset" to restore the score to 0:0, and reset the game time and stoppage time to zero.
- Tap "x" to return to the main screen.

Control TimerControl Timer
You can open the timer control panel through the following ways.
Way 1: When the scoreboard is applied, Lap

Way 2: Tap GEX Open the
GFX list, long-press the timer thumbnail and tap
Control on the popup.
- Adjust duration: scroll hour, minute or second options to reset duration.
• Control counting: Tap to start counting, tap to pause counting, tap
again to resume counting.
- Reset: Tap Reset to restore the timer to the set duration, and you can re-select the duration.
- Tap "x" to return to the main screen.

Control StopwatchControl Stopwatch
You can open the stopwatch control panel through the following ways.
Way 1: Tap

Way 2: Tap Open the GFX list, long-press a stopwatch thumbnail and tap Control on the popup. By this way, you can control each stopwatch separately.
- Control counting: Tap to start counting, tap to pause counting, tap again to resume counting.
- Reset: Tap Reset to reset the timer to zero.
- Tap "x" to return to the main screen.

Manage Manage
Rename Rename
Each GFX is named as the GFX type by default. You can rename the GFX.
- Tap to open the GFX list.
-
Long-press one GFX thumbnail.
-
Tap Rename, enter the new name and tap Save.
Edit Edit
You can edit the existing GFX.
- Tap to open the GFX list.
-
Long-press one GFX thumbnail.
-
Tap Edit to open the editor and then start to edit.
Copy Copy
You can copy an existing GFX to create a new GFX by the following ways. Method 1:
- Tap to open the GFX list.
-
Long press one GFX thumbnail.
-
Tap Copy, and the copied GFX appears last in the GFX list.
Method 2:
- Tap to open the GFX list.
-
Tap . ⬙
-
Select Rearrange/Size on the popup menu.
-
Tap on the thumbnail of the GFX you want to copy. The new GFX will be named as "The original GFX name + (No.)", such as GFX (1).
- Tap Done at the upper right corner to go back to the main screen.
Delete Delete
You can delete a GFX through the following ways.
Method 1
- Tap to open the GFX list.
- Long-press one GFX thumbnail.
- Tap Delete, and then confirm to delete in the popup.
Method 2
- Tap to open the GFX list.
-
Tap . ⋯
-
Select Rearrange/Size on the popup menu.
-
Tap the button on a thumbnail, and then tap Delete.
-
Tap Done at the upper right corner.
Re-order Re-order
You can rearrange GFX order by long-pressing a thumbnail and then drag it to a desired position in the GFX list.
Besides, here is another method to rearrange GFX order.
- Tap to open the GFX list.
-
Tap . ⬙
-
Select Rearrange/Size on the popup menu.
- Long press a thumbnail and then drag it to a desired position in the scene list.
- Tap Done at the upper right corner.
Zoom ZoomList List
- Tap to open the GFX list.
- Tap on the main screen.
- Select Rearrange/Size on the popup menu.
- Tap of button on the right to change the size of thumbnails. It supports three sizes: small, middle and large. By default, the GFX List uses middle thumbnails.
- Tap Done at the upper right corner.

Use PenUse Pen
OBSBOT Talent provides the Pen to annotate on your show.
- Tap to enter the annotation mode.
- Draw or write on the screen to annotate.
-
Tap to expand the toolbar. To collapse, tap again.
-
Tap Color 1 or Color 2 to switch the pen color, and tap Color 1 or Color 2 again to set color for each.
Tap to clear the annotations. -
Tap more advanced settings.
-
Select the pen thickness.
- Drag the slider of Auto Clear to define the time for each annotation to remain on the screen. The default time is 5 seconds. The range is 0-10s. 0 indicates that the annotation will not disappear unless you manually clear it.
- Tap ☒ exit the annotation mode.
When you exit, all the annotations will disappear.

Set and Call Presets Auto Focus Focus
PTZ ControlPTZ Control
When a source supports UDP-based or NDI-based PTZ function, you can control the PTZ camera.
You can enter the PTZ control mode through the following ways.
Tap, which only applies to the Program and Preview scenes.
- Long-press a scene thumbnail, and select PTZ Control.
- If there are multiple PTZ sources in the scene, select a source on the popup. After that, you can tap the numbers on the left (at the bottom for portrait mode) to switch sources.
- Long-press any blank area on the PTZ control panel and drag it to the desired position.
- For a program or preview scene, tap X to exit the control mode.
• For other scene, tap to cut back to the live program or preview.
Pan/Tilt Control
- On the Pan/Till Control panel, tap the center of the circle and slide your finger across the screen to move the camera. The closer to the center of the circle, the slower the camera moves; The farther away from the center of the circle, the faster the camera moves.
- Long-press the arrows to pan/tilt the camera.
Zoom
Slide on the slide bar at the upper right to zoom.
- Slide up, and the lens zooms in.
- Slide down, and the lens zooms out.
Focus
Slide on the slide bar at the lower right to focus.
- Slide up, and then the lens focuses near and the nearby object gets clear.
- Slide down, and then the lens focuses far and the distant object gets clear.
You can also tap for auto focus.
Presets
A preset is a predefined image position which contains information of pan, tilt, zoom, etc. After the preset is configured, you can move the camera to your desired position quickly by calling the preset.
- Move the camera to your desired position and adjust zoom and focus.
- Tap and then Lap a number to save. For example, if you tap No.1, it will be saved as Preset 1.
- Repeat the steps above to add more presets.
- Tap a preset No. to call the preset.
It supports to add up to 9 presets.


Control OBSBOT camera Control OBSBOT camera
OBSBOT Talent is compatible with OBSBOT cameras. Besides Pan/Tilt Control, Zoom, Focus, and Presets, the PTZ control panel for OBSBOT supports the following features.
For OBSBOT camera, it supports adding up to 3 presets, and the preset numbers change to P1, P2 and P3.
AI Human Tracking AI Human Tracking
-
Tap to open the setting page.
-
Set tracking speed. Options may change with OBSBOT camera modules.
-
Set tracking mode. Options may change with OBSBOT camera modules.
-
Toggle on the switch of Al Human Tracking to start.
- Toggle off the switch of Al Human Tracking to stop.
RecordRecord
If your OBSBOT camera supports recording, such as OBSBOT Tail Air, you can record videos to the SD card installed in the camera.
- Tap Record to start recording.
- Tap Recording to stop.
ResetReset
Tap to reset the OBSBOT camera to its initial position.
Wake Up Wake Up
If the OBSBOT camera has gone to sleep, such as OBSBOT Tiny 2, tap Wake Up to bring it back to work.
![ALL-IN-ONE MULTI-CAM LIVE STREAMING & PRODUCTION STUDIO GFX 1 2 3 Picture OBS/IT Trust OBS/OT The 2.00 TAIL-APL OBROC (OBS) ITEMS You can control the corresponding device by clicking the [2] or [3] button on the remote controller Double-click to switch scene 1 2 3 Click to switch device The camera cannot be controlled; you need to flip the page first](/content/2026/06/1396040/images/bfa11a3cd4a1a6db24bc6c9b1fc6f3f5b38fd2c0bd047f508dea856290644f18.jpg)


Remote Control Remote Control
OBSBOT Talent supports controlling scenes through the OBSBOT Tail Air Smart Remote Controller, and controlling devices such as Tiny 2, Tiny 2 Lite connected to Talent via UVC, as well as Tail Air connected via UVC or NDI. Click select "Remote Controller", Talent will automatically scan for available remote controls. Click the "Connect" button on the corresponding remote controller to establish a successful connection.
Control Scene Control Scene
The scene number is displayed on the scene thumbnail, with the red frame indicating the currently selected scene. You can switch to the corresponding scene by double-clicking the remote control buttons [1], [2], or [3]. Click "→" to switch the controllable scene to the next three scenes.
Control Connected Device Control Connected Device
The remote controller icon is displayed at the top right corner of the scene thumbnail, with the green icon indicating the currently selected device. You can control the devices in the current group (page) by clicking the remote control buttons [1], [2], or [3], which correspond to the devices in the selected scenes (the values match the devices in the respective scenes).
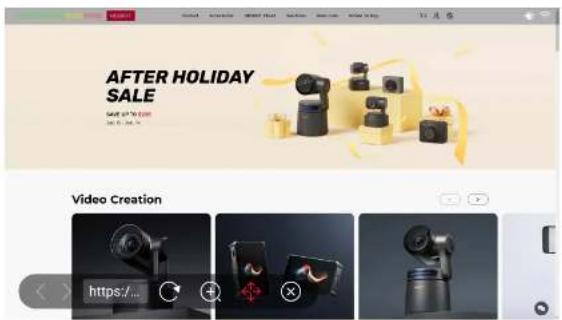
Control WebpageControl Webpage
When a scene contains a webpage source, you can browse the webpage.
- Long press the scene thumbnail, and select Webpage on the popup menu to enter the webpage control mode. The webpage goes to full-screen mode, and a toolbar appears.
- Slide on the screen to scroll the webpage.
- Tap a hyperlink in the webpage to visit.
- Tap a text input box in the webpage and type in text.
- Tap on to go back or forward.
- Tap the address bar, enter a URL and tap the Enter key to jump to a new webpage.
- Tap to reload the webpage.
- Tap and then lap or to dom in or out, and lap Reset to display the webpage at 100% magnification.
- Tap and then drag and drop the toolbar to change its position.
- Tap to go back to the main screen.

Control BGMControl BGM
You can control the playback of the background music.
-
Tap to reveal the BGM playback bar.
-
Tap the buttons on the playback bar to control the BGM playback.
Tap to play or to pause.
Tap to play the previous song or to play the next song.
- Drag the playhead to a specified position.
- Set the loop policy:
• : Repeat the playlist
• : Repeat the song
• ✗ : Shuffle the playlist
Tips for using global and private BGM:
-
The global BGM needs to be started manually.
-
When you switch to a scene with private BGM, the global BCM will be paused. And the private BGM can be started manually or automatically, which can be set in the scene editor. When you switch to a scene without private BGM, the global BGM resumes to play.
-
If you have paused the global BGM manually, you need to resume it manually after you switch scenes.

ReplayReplay
Replay allows you capture some of greatest moments, slow down the action and save your highlights. You can go to ⏱ Settings > Replay to enable and set the function. Please refer to Replay.
Quick ReplayQuick Replay
Tap Quick Replay to review the recent live content.
If you have set Duration of quick replay to a specific duration in "Settings" > "Replay", it will directly enter the replay mode.

- If you have set Duration of quick replay to "Ask me when replay starts" in Ⓤ > "Settings" > "Replay", select the duration in the popup window, and then it enters the replay mode.
If you have enabled two replay cameras, select which camera to replay first on the popup window.
Event ReplayEvent Replay
You can also save events during live program, and replay the events later.
- Double tap on the main screen to set an event, or tap SetEvent.

- If you have set Duration of event replay to a specific duration in "Settings" > "Replay", it will directly save the event.
-
If you have set Duration of event replay to "Ask me when setting" in > "Settings" > "Replay", select the duration in the popup window, and then it save the event.
-
Repeat Step 1 to set more events.

3. Tap Event Replay.
- If only one event is set, it starts replay directly.
- If there are multiple events, select an event thumbnail from the event list on the popup to enter the replay mode.
Control ReplayControl Replay
After entering the replay mode, you can perform the following operations.
- Drag the playhead of progress bar to adjust the progress.
- Tap to rewind to the start.
- Tap or to play or pause the replay.
- Zoom in the image:
• Double tap one position on the screen to zoom in the image to 2x.
- Stretch with two fingers to zoom in. The maximum zoom range is 8x.
- Drag the image to change the displayed area.
- To exit, double tap the screen again or pinch with two fingers to zoom out to the original size.
- Tap for to fast backward or forward at a faster pace, such as 5s, which is set in Replay.
- Tap -1f to rewind one frame, or tap +1f to fast forward one frame. And the replay will be paused at the same time.
- Tap the speed button to change the playback rate. Options include 0.1x, 0.25x, 0.33x, 0.5x (default), 0.75x, and 1.0x.
- Tap the camera switch button to switch the replay image.
• 1: Camera 1
2: Camera 2
• 12: Camera 1 and 2 in side-by-side layout
Tap for more features.
- Save event: save the content of quick replay to the Album.
-
Start annotate: tap to start annotating on the main screen.
-
Tap 📄 expand the toolbar, and refer to Use Pen for details.
- When the image is zoomed in, tap to switch to Move mode, and then you can move the image. Tap to switch back to Annotation mode.
- Mute/Unmute sound: tap to mute or unmute the sound of replay.
- Tap blank area to hide the progress bar and buttons, and tap again to bring them back.
Tap ⑤ cut back to the live program.
View Saved EventsView Saved Events
To view saved events, please go to ☑ Album. The saved event is assigned in the format of "prefix_number sequence_source_REPLAY1/2.file extension".
- Prefix: the file name prefix set in Record.
- Number sequence: it returns to the start of the number sequence (0001 for the file) each time you reset the device.
- Source: the recording source, which can be PGM, HDMI1, HDMI2, WEBCAM1, WEBCAM2 or NDI.
- REPLAY1/2: indicating replay camera 1 or 2.
- File extension: set in Record, which can be MP4 or MOV.
Start Streaming and Recording Start Streaming and Recording
OBSBOT Talent can stream to multiple platforms, and supports recording the show for later use. You can stream and record separately or simultaneously, and implement interactive operations to attract your audience.
Live StreamingLive Streaming
You can stream to two platforms with different encoding formats at the same time. It natively supports streaming to YouTube, Twitch, and Facebook live, and also supports streaming via RTMP or SRT. Besides, it supports two-channel NDI®HX3 streaming.

Stream

Twitch
Not logged in

Facebook Live
Not logged in

NDI
Not configured

RTMP Server
rtmp://a.rtmp.youtube.com/live2/0q1b-hst1-z05k-522w-274m

Youtube Server
Audrey Wang
Configure Streaming Server Configure Streaming Server
Before streaming your show, you need to configure the destinations you want to stream to.
To configure a server, please tap Ⓔ > Settings > Stream to open the stream setting page, and then select a server.
Then follow the steps below to configure the streaming server.

If no Quick Stream is enabled for any server, you can also tap
the main screen and then select a server to enter its configuration page.

| ← | YouTube |
| NameYoutube Server | |
| EncodeEncode 1 | |
| Ingestion ProtocolRTMP | |
| AuthenticationLog in | |
| Ingest Server | |
| ← | YouTube |
| Post To | |
| Quick Stream | |
| NetworkDefault | |
| ○ | Test |
| [IMAGE] | Delete |
Configure YouTube Server Configure YouTube Server
- Select YouTube in the stream setting page.
- Tap Name to enter an alias name for your convenience of multi-item management.
- Tap Encode, and select a stream scheme.
You can customize encode parameters and sources as needed. For details, please refer to Encode.
-
Tap Ingestion Protocol to select RTMP or HLS.
-
Tap Log In under Authentication, and then follow the instructions to log into your account.
Your username and profile image will be displayed after login.
Your nickname, user avatar images and authorization token will be stored encrypted in OBSBOT Talent device after a successful authorization. When you delete the YouTube server or remove OBSBOT Talent from trusted apps from your Google account's security setting, we will follow the policies of Google to clear saved data in 0 to 24 hours.
If you have not enabled live streaming for your YouTube account, your YouTube login will fail. Also note that you need to have live streaming enabled 24 hours before starting streaming. For details, see Why can't log in to my YouTube account.
- Set the Ingest Server.
You can select Primary server (rtmp), Primary server (rtmps), Backup server (rtmp), or Backup server (rtmps).
- Tap Post to, and select a channel, event, or New stream.
If you select New stream, you need to set Title (mandatory), Description, and Privacy.
- Privacy options are:
• Public: The stream is visible to all people.
- Private: The stream is visible only to you and people selected by you.
• Unlisted: The stream is visible only through a link.
-
(Optional) Tap on Quick Stream. When it is enabled, you can start streaming quickly on the main screen.
-
Tap Network to set the network priority for streaming. Options include:
-
Default: The system's default network priority, that is Ethernet > WLAN > Cellular.
- Cellular First
WLAN First -
Ethernet First
-
Tap Test to test whether the previous configurations are working properly.
-
Tap to return to the previous menu.
If you create a new stream to post to, it enables Auto-start by default. When you start streaming to this channel, it goes live at once on YouTube. If you need to preview the stream at first, you may refer to How to start a stream scheduled later for YouTube.
| ← | Twitch |
| NameTwitch | |
| EncodeEncode 1 | |
| AuthenticationLog in | |
| Ingest Server | |
| Quick Stream | |
| ← | Twitch |
| Ingest Server | |
| Quick Stream | |
| NetworkDefault | |
| ○ | Test |
| m | Delete |
Configure Twitch ServerConfigure Twitch Server
- Select Twitch in the stream setting page.
- Tap Name to enter an alias name for your convenience of multi-item management.
- Tap Encode, and select a stream scheme.
You can customize encode parameters and sources as needed. For details, please refer to Encode.
-
Tap Log In under Authentication, and then follow the instructions to log into your account.
-
Set the Ingest Server. The system lists available servers. You can select a nearby server for an optimal network path.
-
(Optional) Toggle on Quick Stream. When it is enabled, you can start streaming quickly on the main screen.
-
Tap Network to set the network priority for streaming. Options include:
-
Default: The system's default network priority, that is Ethernet > WLAN > Cellular.
- Cellular First
- WLAN First
-
Ethernet First
-
Tap Test to test whether the previous configurations are working properly.
-
Tap to return to the previous menu.
| ← | Live |
| NameFacebook Live | |
| EncodeEncode 1 | |
| AuthenticationLog in | |
| Ingest Server | |
| Post To | |
| ← | Live |
| Title | |
| Description | |
| Quick Stream | |
| NetworkDefault | |
| ← | Test |
Configure Facebook Live Server Configure Facebook Live Server
- Select Facebook in the stream setting page.
- Tap Name to enter an alias name for your convenience of multi-item management.
- Tap Encode, and select a stream scheme.
You can customize encode parameters and sources as needed. For details, please refer to Encode.
- Tap Log In under Authentication, and then follow the instructions to log into your account.
Your username and profile image will be displayed after login.
Your nickname, user avatar images and authorization token will be stored encrypted in OBSBOT Talent device after a successful authorization. To delete your information, you can delete the created server or you can remove OBSBOT Talent from trusted apps from Facebook. Your personal data will be deleted upon request in 0 to 24 hours.
After you log in successfully, the system automatically selects a ingest server for you, which you cannot change.
-
Tap Post to access the list of Timeline and Page, and then select Timeline or a Page as the streaming destination.
-
(Optional) Set Title and Description.
Title supports a maximum of 255 bytes.
-
(Optional) Toggle on Quick Stream. When it is enabled, you can start streaming quickly on the main screen.
-
Tap Network to set the network priority for streaming. Options include:
-
Default: The system's default network priority, that is Ethernet > WLAN > Cellular.
- Cellular First
WLAN First -
Ethernet First
-
Tap Test to test whether the previous configurations are working properly.
-
Tap to return to the previous menu.

NDI
Alias NDI
Source Name
Group Name public
Encoding Source Program
Program Stream H.264, 1080p, 60 fps, 62.0 Mbps

NDI
Preview Stream 360p, 30 fps, 3.0 Mbps
Transport Mode TCP (Uni-connection)
Discovery Server
Failover

Test
Configure NDI®Configure NDI Server Server
-
Select NDI ^® the stream setting page.
-
Tap Alias to enter an alias name for your convenience of multi-item management.
-
Tap Source Name to enter a name, which is the name of the output NDI ^ stream for the receiver to recognize. It supports 1-30 characters, which contain A-Z, a-z, 0-9 and -#0%.
-
Tap Group Name to enter a name to specify the client group receiving the NDI®stream. It supports 1-64 characters, contain A Z, a z, 0-9 and _. Multiple group names can be comma-separated. The default group name is public. If you do not want other devices on the network to be able to search for it at will, you can set a private group name, and other devices need to use the private group name to search for this device.
-
Tap Video Source to select the video source to encode. Options include Program, HDMI 1, HDMI 2, Webcam 1, Webcam 2 and Multi-View.
-
Tap Audio Source to select the audio source to encode. Options include Program, HDMI 1, HDMI 2, MIC, available USB MIC, and None.
-
Tap Program Stream to set the following parameters.
• Codec: Options include H.264 and H.265.
• Resolution: Options include 640x360, 960x540, 1280x720, 1920x1080.
- FPS: Options change along with the frame rate of the show, which can be 60/59.94/50/30/29.97/25/24/23.98/15 fps.
- Bitrate: It automatically changes according to resolution and FPS options.
• Profile: Options include Baseline Profile, Main Profile, High Profile.
- Bitrate Mode: It is fixed at CBR.
- Tap Preview Stream to set the following parameters.
• Resolution: It is fixed at 640x360.
- FPS: It changes along with the frame rate of the show.
- Bitrate: It automatically changes according to the settings of Program Stream.
• Profile: Options include Baseline Profile, Main Profile, High Profile.
- Bitrate Mode: It is fixed at CBR.
- Tap Transport Mode, select a mode and set parameters if needed.
- UDP (Unicast): The device sends a UDP stream directly to the receiver. It is used where lower latency matters. And multiple simultaneous streams will work independently for multiple receivers.
- UDP (Multicast): The device sends the UDP stream to a multicast group. It is used for one-to-many broadcast for lower CPU usage. Parameters in a multicast configuration include:
- Multicast IP: IP ranges from 224.0.0.0 to 239.255.255.255.
- Subnet Mask: The legitimate value ranges from 255.0.0.0 to 255.255.255.252.
• Time to live: It ranges from 1 to 255. The default value is 4.
- RUDP (Unicast): Reliable User Datagram Protocol, is a connection-oriented and unicast protocol. RUDP helps to maintain the flow control and reliability of data transfer. The transmission control algorithms on both sending and receiving sides guarantee the RUDP capable of recovering from data loss, duplication, delay and reordering.
- TCP (Uni-Connection): It indicates to establish single TCP connection between the device and the receiver, and transfer all A/V packets via one port. Compared with UDP (Unicast) or TCP (Multi-Connection), it has lower CPU usage. It is used where reliable data transfer matters, which makes it suitable for 4K NDI streams.
-
TCP (Multi-Connection): It indicates to establish multiple TCP connections between the device and receivers, but transfer audio packet and video packet via different ports. It usually works in a complicated networking studio. It is used where reliable transmission of data matters, which makes it suitable for 4K NDI streams.
-
(Optional)Toggle on Discovery Server, and then the device can only be received by the specified receiver, and the mDNS auto-discovery function is unavailable.
i. Ensure that the receiver and device can ping each other.
This function works between device and receiver that can ping each other even from differential network segment. After setting, the output stream of your device can be received by specified server.
ii. Specify the Server IP to the IP address of the discovery server.
iii. Launch the NDI Access Manager tool installed in the reception computer, enter the Advanced tab, uncheck Multicast Sending Enabled, and check Use Discovery Server, and then specify Server IP to the IP address of the receiver server running discovery service function.
Note: The Server IP of NDI Access Manager and OBSBOT Talent device should be the same.
Download the NDI Access Manager from the NewTek official site https://ndi.video/tools/ for free.
-
(Optional) Toggle on Failover to protect your NDI transmission from failure. If the source video fails, the backup device begins to provide a service. The initial source will be restored after it recovers.
-
Source name shows the backup NDI channel name.
Tap Change and select the failover (backup) video device within the same NDI group as the initial source. -
IP address shows the IP Address of the backup NDI channel, which is automatically obtained after you select the backup NDI source.
-
Tap Test to test whether the previous configurations are working properly.
- Tap to return to the previous menu.
| ← | RTMP |
| Name RTMP Server | |
| Encode Encode 1 | |
| URL | |
| Stream Key | |
| Authentication | |
| ← | RTMP |
| Authentication | |
| Quick Stream | |
| Network Default | |
| ○ | Test |
| m | Delete |
Configure BTMP Server Server
- Select RTMP in the stream setting page.
- Tap Name to enter an alias name for your convenience of multi-item management.
- Tap Encode, and select a stream scheme.
You can customize encode parameters and sources as needed. For details, please refer to Encode.
-
Tap URL, and enter the URL of the stream destination. It supports RTMP and RTMPS.
-
Tap Stream Key, and enter the key got from the stream destination.
-
(Optional) Turn on Authentication if needed, and then enter your Username and Password at the third-party live streaming platform.
-
(Optional) Toggle on Quick Stream. When it is enabled, you can start streaming quickly on the main screen.
-
Tap Network to set the network priority for streaming. Options include:
-
Default: The system's default network priority, that is Ethernet > WLAN > Cellular.
- Cellular First
WLAN First -
Ethernet First
-
Tap Test to test whether the previous configurations are working properly.
-
Tap to return to the previous menu.
| ← SRT | |
| NameSRT Caller | |
| EncodeEncode 1 | |
| Address | |
| Port | |
| Stream ID | |
| ← SRT | |
| Latency120ms | |
| Encryption | |
| Quick Stream | |
| NetworkDefault | |
| ○ Test | |
Configure Configulter Caller
- Select SRT in the stream setting page.
- Tap Name to enter an alias name for your convenience of multi-item management.
- Tap Encode, and select a stream scheme.
You can customize encode parameters and sources as needed. For details, please refer to Encode.
- Tap Address, and enter the address of receiver.
- Tap Port, and enter the port number of receiver. Value ranges from 1 to 65535.
- Tap Stream ID, and enter a custom ID, which can contain 0-256 characters.
- Tap Latency, enter a number between 20 and 8000. The default value is 120ms. We recommend that the latency is configured the same as that of the receiver.
B. (Optional) Toggle on Encryption, and then select an encryption algorithm, which can be AES 128, AES 192 or AES 256. And enter the Password, which can contain 10 to 79 characters. -
(Optional) Toggle on Quick Stream. When it is enabled, you can start streaming quickly on the main screen.
-
Tap Network to set the network priority for streaming. Options include:
-
Default: The system's default network priority, that is Ethernet > WLAN > Cellular.
- Cellular First

WLAN First
- Ethernet First
- Tap Test to test whether the previous configurations are working properly.
- Tap to return to the previous menu.
Add More Servers Add More Servers
- Select Add Server in the stream setting page.
- Select one server, and operate as the previous steps.
Edit ServerEdit Server
- Tap a sever in the stream setting page.
- Modify the server's properties.
Delete Server Delete Server
- In the stream setting page, swipe a server to the left, and then lap .
- Or tap a server to enter its configuration page, and then tap Delete at the bottom.

Start Live Streaming Start Live Streaming
OBSBOT Talent supports streaming to two servers at the same time. You can start live streaming through two methods: Manual Stream and Quick Stream. Manual Stream requires you to manually connect and stream to configured servers individually. Quick Stream allows you to specify up to two configured servers and quickly connect and stream to these servers at the same time.
Manual Stream Manual Stream
- Ensure your OBSBOT Talent is connected to the Internet.
- Ensure you have configured streaming sever.
- Start streaming:
a. Tap on the main screen.
b. Tap Connect next to a configured server in the Live Stream window.
If you have not configured the server, tap the server, and it will go to the configuration page.
c. (Optional) Repeat the above steps to stream to another server at the same time.
- The maximum number of servers you can simultaneously connect to is two. This limit is set to ensure stream performance.
-
If you have not configured any other server, you cannot stream to another server, and it will not go to the configuration page when you tapping another server.
-
Stop streaming:

Stream

Twitch
Not logged in

Facebook Live
Not logged

NDI
Not configured

RTMP Server
rtmp://a.rtmp.youtube.com/live2/0q1b-hst1-z05k-S22w-274m

Youtube Server
Not logged in


e main screen.
b. In the Live Stream window, Lap Disconnect of a working server to stop streaming to the server.
c. (Optional) Repeat the above steps to stop streaming to the other server.
Quick StreamQuick Stream
- Ensure your OBSBOT Talent device is connected to the Internet.
-
Ensure you have turned on Quick Stream when you configure streaming sever.
-
You can enable Quick Stream for two servers at most. This limit is set to ensure stream performance.
- You can check which server is enabled with Quick Stream by tapping
(≡) > Settings > Stream, and the server is marked with "Auto".
Settings > Stream, and the server is marked with "Auto".

-
Tap on the main screen to start streaming.
-
Tap on the main screen to stop streaming.
The NDI server does not support Quick Stream.
Technical tips for a successful stream event:
• Test your stream before you go live.
- Check your network connectivity and encoding settings.


Live CommentLive Comment
You can view live comments when streaming to YouTube, Twitch or Facebook, and select one comment as an overlay inside the video feed.
- Tap target live comments.
- Toggle on Show to display live comment box on the screen.
- Set text size.
- Set the style of comment box.
- Tap "x" to go back to the main screen.
The comment box will display real-time comments in chronological order, and the icon of the platform will be displayed on the profile picture to mark it. You can send one comment as an overlay into the Program/Preview view.
- Long press one comment to open the setting page.
- Tap the arrows to switch the overlay style.
- Tap the check box of Auto Clear and set the duration after which the comment automatically disappears.
- Tap Send to sent it as an overlay.
- Tap the overlay comment to cancel.
- Scroll up to view earlier comments, and scroll down to view the most current comments.
- Tap the top of comment box and drag it to the desired position.
- Drag to scale it up and down.
- Tap "x" to close the comment box.
Record and Screenshot Record and Screenshot
You can record a show during live streaming or independently, and you can take screenshots at any time.
OBSBOT Talent supports isolated (ISO) recording. You can record two different sources simultaneously, or record two-channel images with different quality for one source.
← Local record
Record 1
Program, H.264, 1080p, 60 fps, 6.0 Mbps

Record 2
Program, H.264, 720p, 30 fps, 2.5 Mbps

File format
MP4
File name prefix
DeviceName
Save path
SD Card First
← Split file
By time
Start a new file every 1 hour

By size Start a new file every 4 GB

Set Recording Properties Set Recording Properties
Before recording, you may need to set recording properties. Otherwise, it will use the default settings to record.
-
Tap > Settings > Record.
-
Tap Record 1 or Record 2 to select recording source. Options include Encode 1, Encode 2, or NDI source (if added to the show).
Encode 1 and Encode 2 can be customized. For details, please refer to Encode.
-
To enable ISO recording, please toggle on the switches of both Record 1 and Record 2. If you only need to record one-channel image of one source, please toggle on one switch as needed.
-
Tap File format to set the format of recording file. Options include MP4 and MOV. By default, the format is MP4.
-
Tap File name prefix, and select a prefix type.
-
DeviceName
ShowName - DeviceName_ShowName
-
Self-defined name: tap Add, enter a name, and tap Save.
-
Tap Save path, and then select your preferred path, Internal Storage First or SD Card First (default).
You can also set storage path in Storage.
- Tap Split file, and then you can choose to split your recording file by time or by size. By default, it starts a new file every 4 GB.
- By time: start a new file by every x minutes or x hours. Tap to set as your preference. Options include 10 minutes, 20 minutes, 30 minutes, 1 hour, 1.5 hours, 2 hours and 4 hours.
The first file will start from the current time and end on the hour, and then the second file will start, so that it is more convenient for you to view your video clips. For example, when you choose to start a new file every 1 hour, if the first file starts at 8:30:03 am, it will end at 9:00:00 am. Then the second file will start at 9:00:00 am. It also takes effect for x minutes. For example, when you choose to start a new file every 10 minutes, if the first file starts at 8:08:03 am, it will end at 8:10:00 am, and the second file will start at 8:10:00 am.
- By size: start a new file by every x MB or x GB. Tap to set as your preference. Options include 100 MB, 200 MB, 500 MB, 1 GB, 1.5 GB, 2 GB, 2.5 GB, 3 GB, 3.5 GB, 4 GB, 8 GB and 16 GB.
- Tap at the upper left corner to go back.

Tail Air Record Tail Air Record
When Talent and Tail Air are connected via NDI, you can control up to three Tail Air devices for synchronized recording. The recording files will be stored on the Tail Air's SD card.
The Interface displays the currently connected Tail Air cameras and their recording media parameters.
Start RecordingStart Recording
- Long press on the main screen to bring up the "Record/Photo Settings" interface, you can turn on/off a certain way of recording.
- On the main screen, tap to start recording.
- During recording, long press to bring up the "Record Status" interface, you can check the recording status or stop the recording of a certain way.
- Tap to stop recording.
When the recording time is less than 1s, the recording file will not be saved.
Take Screenshots/photos Take Screenshots/photos
Tap to take a screenshot.
Screenshots are saved as .PNG files in the internal storage by default. If you want to change the save path, please refer to Storage.
If Tail Air is connected, the camera side is synchronized to take pictures.

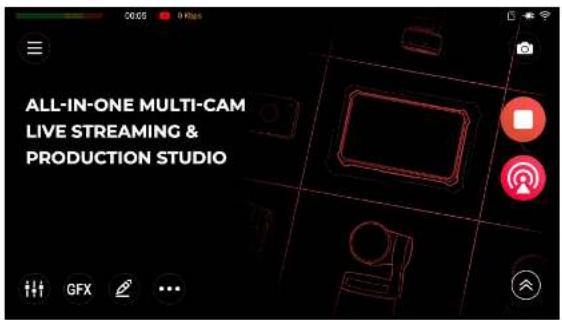
Check Streaming/Recording StatusCheck Streaming/Recording St
Recording status Recording status
Once you start recording, the recording status will be displayed on the status bar. It is marked by a flashing red dot, showing the recording duration. When the time left for record is less than 1 hour, it displays "Time left: xxxx" in red text.
When the remaining free space is insufficient, the device will stop recording automatically. The recording status disappears from the status bar.
Streaming statusStreaming status
Once you start streaming, the streaming status will be displayed on the status bar. It is marked by the logo of streaming server, showing the streaming rate. When you stream to two servers at the same time, it displays information of the two.
- Orange streaming text: The upload speed is not enough to support bandwidth.
- Red streaming text: Director Mini is trying to reconnect to the streaming server.
You can also view streaming status on the Control Center.

NDI TallyNDI Tally
When you start NDI streaming, the top status bar supports displaying NDI Tally.
- When the streaming rate shows a red background, it indicates the NDI streaming signal is in PGM (Program) view.
- When the streaming rate shows a green background, it indicates the NDI streaming signal is in PVW (Preview) view.
AlbumAlbum
The Album displays videos you have recorded, replay events you have set, screenshots you have taken by pressing 📷 or the power button, which are stored in the internal storage or SD card, and sorted by time.
In the album, you can preview, export, and delete the images or video clips.
natural_image
Soccer player in action on a grass field, wearing blue and white uniform with a play button overlay (no visible text or symbols)Preview Video Clips & ImagesPreview Video Clips & Images
- Tap >Album to open the Album.
- Tap a video clip or an image to preview it in full screen.
- While previewing, you can
- Tap ☐ in the upper right corner to export or delete the video or image.
- Tap to play the video, or tap the screen, and then tap the play or pause button to control video playback.
- Tap to go back.
When you preview the video clip, you can see the file name which is assigned in the format of "prefix_number sequence of recording_number sequence of split file_source_REC1/2.file extension".
- Prefix: the file name prefix set in Record.
- Number sequence of recording: it returns to the start of the number sequence (0001 for the file) each time you reset the device.
- Number sequence of split file: for a long time recording, files are split in number sequence. If no file is split, no such number.

- Source: the recording source, which can be PGM, HDMI1, HDMI2, WEBCAM1, WEBCAM2 or NDI.
- REC1/2: indicating Record 1 or Record 2.
- File extension: set in Record, which can be MP4 or MOV.
Export or Delete Video Clips & ImagesExport or Delete Video Clip
- Tap >Album to open the Album.
- Tap Select, and then select some video clips and images.
- Tap at the bottom, then select USB or SD Card to export the selected items.
- Or tap at the bottom to delete the selected items.
If you export a file in the internal storage to the SD card, two same files will be displayed in the album.
SettingsSettings
Tap ≡ > Settings to open the settings page, where you can customize the properties of the device, configure encode parameters, set audio, etc.
← Network
(1) Cellular Not connected
WLAN OBSBOT-VPN-5G
<--> Ethernet
Hotspot & tethering Hotspot off
NetworkNetwork
OBSBOT Talent supports multiple network connections, including wired, Wi-Fi and cellular network. These networks can be connected at the same time. The priority order for the device selecting network connection is wired > Wi-Fi > Cellular network.
CellularCellular
If a USB Modem is connected, tap Cellular to check network connection information.
Wi-FiWi-Fi
You can connect your device to a Wi-Fi network to access the Internet and other devices.
Connect to a Wi-Fi networkConnect to a Wi-Fi network
- Tap WLAN, and then toggle on the switch to enable Wi-Fi.
- Select a Wi-Fi in the displayed list to connect. (The Wi-Fi with a lock icon requires password.)
-
You can tap the connected Wi-Fi to check more network details, such as signal strength, frequency, security, MAC address, IP address, Gateway, Subnet mask, DNS, and link speed.
-
To delete a Wi-Fi, you can tap the connected Wi-Fi and then tap FORGET. Or you can tap Saved networks at the bottom, and tap a Wi-Fi to delete, and then tap FORGET.
Add a Wi-Fi networkAdd a Wi-Fi network
When the router's SSID (wireless signal name) is hidden, the device cannot search for the router's wireless signal. It needs to manually enter the router's SSID, wireless password and other parameters to connect to the router's wireless signal.
- Tap WLAN, and then toggle on the switch to enable Wi-Fi.
- Scroll the network list to the bottom, and tap Add network.
- Enter SSID, and set Security by selecting the same encryption mode as the router and entering the password if needed.
- Tap Save.
Wi-Fi DirectWi-Fi Direct
Wi-Fi Direct uses Wi-Fi to share data between devices.
- Tap WLAN, and then toggle on the switch to enable Wi-Fi.
- Scroll the network list to the bottom, tap Wi-Fi preferences > Wi-Fi Direct. It lists all the detected devices.
- Tap a device, and then follow the prompts to connect. To disconnect from Wi-Fi Direct, tap a connected device to disconnect it.
- (Optional) Tap RENAME DEVICE, enter a new name, and tap OK.
EthernetEthernet
Ethernet is enabled by default. If you want to disable the Ethernet connection when it is in bad status, tap Ethernet, and then toggle off the switch. To enable the Ethernet connection, toggle on the switch.
You can tap Ethernet configuration to check and set more information, including connection type (DHCP or Static IP), IP address, network prefix length, DNS address and gateway address.
Hotspot & TetheringHotspot & Tethering
This function uses your device as a mobile hotspot to share your network connections with other devices.
- Tap Hotspot & tethering > Wi-Fi hotspot, and toggle on the switch to enable hotspot.
- Set the hotspot name.
- Set security. If you select WPA2 PSK, set the hotspot password.
- Tap Advanced to set whether to turn off hotspot automatically and select AP Band. Please refer to Which AP band should I choose for hotspot.
To ensure the connection effect, when 5G is selected, the recommended optimal connection distance is within 5 meters, and a maximum of 5 devices can be connected. When 2.4G is selected, the recommended optimal connection distance is within 5 meters, and a maximum of 2 devices can be connected.
← Bluetooth
Bluetooth Audio Output
Use the Bluetooth device to output the show's audio
Bluetooth Audio Input
Use the Bluetooth device as an audio input source

← Connected devices
Currently connected
Audrey
Pair new device
i Visible as "OBSBOT-BT" to other devices
BluetoothBluetooth
You can use your Bluetooth device for audio output or audio input.
- Tap Bluetooth in the settings page.
-
Select Bluetooth audio usage.
-
Bluetooth Audio Output: Use the Bluetooth device to output the show's audio. (default)
- Bluetooth Audio Input: Use the Bluetooth device as an audio input source.
When you change the mode, the device needs to restart.
- Tap of the right.
- Tap Pair new device.
- (Optional) Tap Device name to rename the device name for Bluetooth pairing.
- Select a Bluetooth device from the list of Available devices.
- Go back to the previous page, and the device is listed in Available media devices.
- To disconnect the Bluetooth device, tap 🎨 > DISCONNECT, and return to the previous page.
- To reconnect a device, Lap Previously connected devices, select the device to reconnect, and Lap CONNECT.
-
DISCONNECT, and return
[Non-Text]
I devices, select the device
[Non-Text] -
To delete the Bluetooth device, tap > FORGET > FORGET DEVICE.


RGET > FORGET DEVICE.
← Display
Brightness level
90%
Energy conservation
Never
Auto Full Screen
After 3 minutes of inactivity
Colors
Boosted
- The relative pages may differ with BT device of different brands, vendors and types. Please operate according to the page prompts.
- You can also connect other Bluetooth devices for more controls, for example, connecting a Bluetooth keyboard for shortcuts control.
DisplayDisplay
Display settings helps you conserve battery and processing power.
- Brightness level: move the brightness slider to the right or left to adjust the brightness.
- Energy conservation: choose the amount of time you want to activate energy conservation.
The screen will turn dark after the set time when there is no activity. It is not enabled by default. - Auto Full Screen: choose a duration. If no operation for a long time, the main screen automatically enters the full screen mode, hiding all the thumbnails and buttons to conserve battery and processing power. Options include 3 minutes, 5 minutes, 10 minutes, 30 minutes, and never.
- Colors: choose one mode you like. Options include Natural, Boosted, Saturated, and Custom. The Custom option allows you setting preferred color by dragging the sliders on the popup.
Audio
Default option of new input Set default mixing options for new input
Monitor device Headphone jack
Input delay Set delay for live audio inputs
Output microphone sound to monitor device Monitor audio includes microphone sound
Output microphone sound to USB-C USB-C output audio includes microphone sound
AudioAudio
Tap Audio in the settings page, to set the properties of audio.
- Default option of new input: set the default mixing options for an audio input when it newly connects to the device.
- Monitor device: select a monitor device.
• Headphone Jack: device connected to the headphone jack
- Bluetooth Device: device connected through BT
- USB device: USB device(s) connected to OBSBOT Talent. The system automatically lists device name(s).
- Input delay: set delay for live audio inputs, to match up the audio and video tracks. You can set the delay for inputs from microphone jack, HDMI 1, HDMI 2, and external USB device(s).
- Output microphone sound to monitor device (enabled by default): In some cases, you may want to input your own microphone using the 3.5mm mic/line input for narration while monitoring the other audio and video sources. To exclude your own microphone audio from only your headphones or Bluetooth connection, toggle the audio off. If you are using the 3.5mm mic/line input from a soundboard and need to monitor that audio source all the time, toggle the audio on.
- Output microphone sound to monitor device (enabled by default): For example, if you don't want microphone audio to play on a large-screen monitor, toggle it off. To play microphone audio in sync, toggle it on.
← Storage
Internal storage 14.3GB of 64.0GB used
SD Card
0.1GB of 15.5GB used
Screenshot
Internal Storage First
Record
SD Card First
StorageStorage
Tap Storage in the settings page, to check the storage status of internal storage and SD card, and set storage path for screenshot and record.
1. Tap Internal storage.
- At the top, you'll see a color-coded bar showing how much space the device has left, how much is taken up, and what's taking it up.
Below there shows how much space is taken by Show and Record and screenshot respectively. You can tap on each item to view more details and delete files. - The last line shows the remained time for recording.
2. Tap SD Card
- At the top, you'll see a color-coded bar showing how much space the SD card has left, how much is taken up, and what's taking it up.
- Below there it shows how much space is taken by Record and screenshot. You can tap the item to view more details and delete files.
• The following line shows the remained time for recording. - The last line is the Format function. Tap it to format the SD card.
3. Tap Screenshot, and then select your preferred path, Internal Storage First or SD Card First.
4. Tap Record, and then select your preferred path, Internal Storage First or SD Card First.
← Encode
Encode 1
Program, H.264, 1080p, 60 fps, 6.0 Mbps
Encode 2
Program, H.264, 720p, 30 fps, 2.5 Mbps
← Encode 1
Program, H.264, 1080p, 60 fps, 6.0 Mbps
Program, H.264, 1080p, 30 fps, 4.5 Mbps
Program, H.264, 720p, 60 fps, 4.5 Mbps
Program, H.264, 720p, 30 fps, 2.5 Mbps
+ Add
EncodeEncode
Each show has two encoders for selection when you configure stream servers and record parameters. You can customize encoding parameters and select encoding source for Encode 1 and Encode 2.
- Tap Encode on the settings page.
- Tap Encode 1 or Encode 2.
-
(Optional) Tap + Add to customize an encode scheme with the following parameters, and then tap Add.
-
Encoding source: Program, HDMI 1, HDMI 2, Webcam 1, Webcam 2.
- Codec: H.264, H.265
• Resolution: 540, 720, 1080 - Frame rate: Options change along with the frame rate of the show, which can be 60/59.94/50/30/29.97/25/24/23.98/15 fps.
- Video bitrate: enter a custom value.
• Audio bitrate: 64, 96, 128 - Advanced:
• Key frame interval: tap + or - to set
• Encode level: Baseline, Main, High
- Bitrate mode: VBR, CBR
- Select an encode scheme from system options or custom options. System options use Program as the default encoding source.
- To edit an exiting encode scheme, swipe it left and tap Edit.
- To delete an exiting encode scheme, swipe it left and tap Delete.

Switch

Scene quick switch

Scene transition

Scene transition duration

200 ms
FTB transition duration
1000 ms

SwitchSwitch
Tap Switch on the settings page to set switch mode and transition effect.
- Scene quick switch: sel scene switch mode.
- Toggle on the switch to enable quick switch mode (default). When you tap thumbnails in the scene list, it switches scenes directly.
- Toggle off the switch to enable manual switch mode. When you tap a thumbnail in the scene, you can preview the scene, and then switch the scene into the Program view.
- Scene transition: select transition effect.
• Cut: Scenes switch directly.
- Fade: Scenes switch with a fade effect.
- DIP: Scenes switch with a two-step transition with a color flash in the middle of the transition. Tap 28 more settings.
- Wipe: One scene is replaced by another gradually sweeping across the screen. Tap 🎨 more settings.
- DVE: One scene is replaced by another according to a 2D DVE pattern. Tap Select a DVE effect.
- Stinger: A stinger with chroma key enabled is played over the top to cover the transition. Tap 3 select a stinger, and tap it again to replace the default stinger with your own one, which should be an MP4 file within 2 to 5 seconds.
• 3D: One scene is replaced by another according to a 3D pattern. Tap to select a 3D pattern.
- Scene transition duration: sel. transition duration.
- Enter the value, ranging from 50ms to 1000ms, and then tap Save.
- FTB transition duration: set transition duration for FTB.
- Enter the value, ranging from 200ms to 2000ms, and then Lap Save.
DIP SettingsDIP Settings
- Onset: Duration from the current scene to the color flash.
- Offset: Duration from the color flash to the next scene.
- Hold: Duration that the color flash is held. This value is the residual of the total transition duration minus the onset and offset.
• Color: Select a preferred color.
Wipe SettingsWipe Settings
• Angle: Set the angle of linear wipe.
- Line 1/2/3: By default, the line is invisible. Toggle on the switch to display the line and tap set thickness, color and transparency.
← Back LED Lights
Use LEDs as battery indicators
Use LEDs as NDI tally lights

Back LED LightsBack LED Lights
You can customize the function of the back LED lights.
- Use LEDs as battery indicators: to indicate the battery status. For details, please refer to Battery Indicator.
- Use LEDs as NDI tally lights: to indicate the signal status for NDI streaming. Red indicates the NDI signal is in PGM view, while green indicates the NDI signal is in PVW view. The two LED lights correspond to the 2 channels of NDI streaming, and keep consistent with the NDI Tally on the top status bar. For details, please refer to NDI Tally.
| USB Type-C | |
| DP + USB HUB modeFor DP video output, WEBCAM input or file transfer | |
| UVC + UAC modeFor video and audio output | |
| MTP modeFor file transfer | |
| UVC/UAC nameOBSBOT-Talent |
USB Type-CUSB Type-C
The USB-C port plays a multifunctional role. You can set its usage mode.
- DP + USB HUB mode: this mode is used for connecting external screen for video output, connecting WEBCAM for video input, or connecting a USB flash drive for file transfer, such as importing and exporting shows.
Tap the right to set the external screen.
- Select displayed content:
- Clean Program
- Preview
- Multi-view: Tap set multi-view appearance.
- Duplicate Screen
- Loop HDMI 1
- Loop HDMI 2
- Select the rotation angle to fit for the external screen: rotate 90^ to left, or rotate 90^ to right.
- Toggle on or off the switch to set whether to pop-up the quick setting when an external screen is detected.
- UVC + UAC mode: this mode is used for connecting to a computer for video and audio output. OBSBOT Talent can be recognized as a webcam by streaming software, such as Skype and Zoom. (Default)
- MTP mode: this mode is use for connecting to a computer for file transfer, referring to How to transfer files with computer via MTP mode.
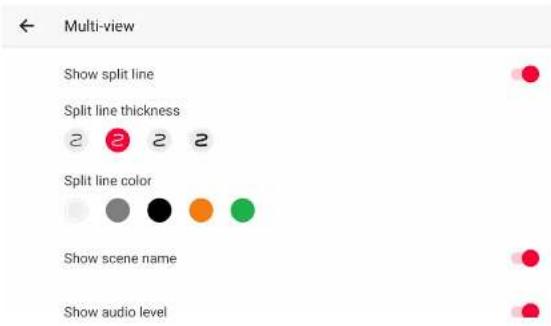
When you switch UVC/UAC mode to/from MTP mode, the device needs to be restarted to take effect.
- UVC/UAC name: tap to change the name for other software recognizing OBSBOT Talent. The default name is OBSBOT Talent.
Set Multi-viewSet Multi-view
You can tap right side of Multi-view for more settings.
- Show split line: toggle on/off the switch to show or hide split lines.
- Split line thickness: select your preferred thickness for split lines.
- Split line color: select your preferred color for split lines.
• Show scene name: toggle on/off the switch to show or hide scene names.
• Show audio level: toggle on/off the switch to show or hide audio level. - Show Preview/Program text: toggle on/off the switch to show or hide Preview/Program texL.
On the external screen connected to the USB-C port, you can see 8 video boxes at the bottom, displaying the scene thumbnails, and two larger boxes at the top, with the left one showing Preview view and the right one showing Program view.

Replay
Replay
Replay buffer length
20s
Replay Camera 1
Program, H.264, 1080p, 60 fps, 6.0 Mbps
Replay Camera 2
Program, H.264, 720p, 30 fps, 2.5 Mbps
Duration of event replay
Jump back by 54

Replay
Replay
Duration of quick replay
Jump back to the start
Replay end action
Stop replay
Switch replay camera action
Jump back to the start
Overlay replay watermark


ReplayReplay
Replay allows you capture some of greatest moments, slow down the action and save your highlights.
Toggle on the switch to enable the function, and then set the following items.
- Replay buffer length: tap and drag the slider to set the buffer length for relay, ranging from 3s to 60s.
- Replay Camera 1/2:
- Tap the Replay Camera 1/2 to select the content to replay. By default, Camera 1 use the content of Encode 1, and Camera 2 use the content of Encode 2. You can also select NDI sources for replay.
- Toggle on/off the switches to set one-channel or two-channel replay. At least one camera should be toggled on.
- Duration of event replay: You can choose a fixed duration, or select "Ask me when setting" to manually choose the duration when setting an event.
- Duration of quick replay: You can choose a fixed duration, or select "Ask me when replay starts" to manually choose the duration when your start quick replay.
-
Replay end action: tap to select the end action.
-
Loop replay: it keeps playing repeatedly.
• Show last frame: it stops replay and shows the last frame. -
Stop replay: it stops replay and goes back to the program view. (Default)
-
Switch replay camera action: define where the video of the target camera will start playing if you switch from one camera to another.
• Overlay replay watermark: toggle on/off the switch to show or hide the

replay watermark during the replay. You can select the default watermark or upload a picture by tapping "+". And you can tap the thumbnail again to change it. Supported format includes PNG, JPEG and BMP.
The watermark is aligned with the upper right corner. Please customize your watermark with a proper size.
- Use stinger transition: when toggled on, the stinger transition will be add to the start and end of the replay. You can select the default video or upload a video clip by tapping "1". And you can tap the thumbnail again to change it. Supported video format is MP4, with a length of 2 to 5 seconds.
- Chroma key for stinger transition: toggle on/off the switch to enable or disable the chroma key for stinger transition.
- Mute mic and global sound during replay: toggle on/off the switch to mute or unmute the microphone and global sound during replay.
- FF/FB step size: tap to select the step size for fast forward and fast backward during replay.
- Side-by-side replay sequence: tap to select the preferred sequence.
- Background of side-by-side: select a color or picture as the background of the side-by-side layout. You can tap + to upload a picture. Supported format includes PNG, JPEG and BMP.
As Replay will continuously consume some resource, it is suggested to disable it if you do not need this function.
← OSC Remote Control
Enable OSC
Host
Port (outgoing) 7000
Port (incoming)
Local IP address WLAN: 192.168.198.96
OSC Remote ControlOSC Remote Control
OBSBOT Talent incorporates the Open Sound Control (OSC) protocol, enabling you to operate the device effortlessly via the OSC protocol. The user datagram protocol (UDP) is used by the device for communication with OSC enabled applications.
Enable OSCEnable OSC
- Toggle on the switch of Enable OSC.
- Tap Host to enter the IP address of the device installed with the OSC enabled app, which is used for OBSBOT Talent sending messages to the app.
- Tap Port (outgoing) to enter the number of outgoing port. It can be entered in the OSC enabled app as the destination for the app sending messages to OBSBOT Talent.
- Tap Port (incoming) to enter the number of incoming port. It can be entered in the OSC enabled app to listen for received synchronization messages from OBSBOT Talent. The default number is 7000.
- View Local IP address to get relative IP address information. It can be entered in the OSC enabled app for the app sending message to OBSBOT Talent.
- Connect your OSC app with the device based on the above information, and then start controlling the device.

Use TouchOSC Use TouchOSC
OBSBOT Talent is compatible with multiple OSC enabled apps, such as TouchOSC. We provide a sample layout program for TouchOSC, which helps you start using OSC control quickly and easily.
The following introduces how to connect the TouchOSC app with OBSBOT Talent and get to start use the sample layout.
- Go to TouchOSC to download the TouchOSC app.
- Open TouchOSC, click the chain link button on the toolbar to open the Connections configuration window.
- Switch to the OSC tab page, enable the checkbox next to Connection 1, select UDP from the drop-down box, and enter the following information.
- Host: The IP address of OBSBOT Talent.
- Send Port: The Port (incoming) you've set on OBSBOT Talent.
-
Receive Port: The Port (outgoing) you've set on OBSBOT Talent.
-
Click File > Open..., and open the OBSBOT Talent OSC Sample Layout file.
-
Click the play button on the toolbar to switch to control surface view.
-
Start to control OBSBOT Talent via the control surface.
For more information about how to use TouchOSC, please go to TouchOSC.

ShortcutsShortcuts
You can connect a USB or Bluetooth keyboard, such as X-Keys and NumberPad, and create Shortcuts to control the device more easily.
Add Shortcuts Add Shortcuts
- Tap Add.
- Enter a custom name for your shortcut.
- Tap Add Function, and then tap the drop-down box of Function to select a function. As some functions may need more selections or operations, follow the on-screen guide to continue. Tap Add.
-
To add more functions for the shortcut, repeat step 3.
-
You can add up to 3 functions for one shortcut. When you press the key, it executes all the functions at the same time.
Besides, it provides the extra 'Wait' function which can be added between each two functions. By setting the wait duration, a group of functions can be activated sequentially with a single press, allowing them to take effect one by one. -
Tap Find a key for the shortcut.
i. Press a key on the keyboard to help find the key code, or you can enter a key code number. You can also press two or more keys at the same time.
ii. Enter the key text on the key to help identify the key. You can also customize the text.
iii. Tap Add to confirm.
- Tap Save to finish adding this shortcut.
- Repeat steps above to add more shortcuts.
- The shortcut list displays all the shortcut keys (including key text and the custom name). Tap a shortcut or press a key to test whether the shortcut works normally.
- (Optional) Tap Key Code at the upper right corner to display or hide key code.
Edit ShortcutsEdit Shortcuts
- Swipe a shortcut to the left.
-
Tap on the right, and then you can change the following properties.
-
Rename the shortcut.
- Reselect functions by tapping a function.
- Reorder functions by dragging and dropping.
- Delete a function by tapping X.
- Add more functions by tapping "Add Function".
-
Change the key by tapping "Key Code" or "Key Text".
-
Tap Save to save your changes.
Set Text and Background Color for KeySet Text and Background C
- Swipe a shortcut to the left.
- Tap to get the text color and background color.
- Tap Save to save your changes.
Delete Shortcuts Delete Shortcuts
- Swipe a shortcut to the left.
- Tap, a tap Delete to confirm.
Re-order Shortcuts Re-order Shortcuts
- Drag and drop one shortcut to the desired position.
← Language
English (United States)
简体中文(中国)
繁體中文(中國)
SystemSystem
Tap System on the settings page to set the system related items.
LanguageLanguage
- Tap Language in the system page.
- Tap a language.
- Tap Continue. The device will restart and change to the selected language.

Date and TimeDate and Time
By default, your device receives date and time information from the network. Tap Date & Time in the system page, and then you can set manually.
- Automatic date and time: Use the date and time provided by the network. When it is disabled, you can set date and time respectively.
- Select time zone: Tap it to select time zone by region, or tap at the upper right corner to select by UTC offset.
- Use 24-hour format: Use 12-hour format by default. You can turn it on to switch to 24-hour format.
← Firmware

Current version: 2.4.721
New version: Checking for update.

Auto Update
Downloaded the new version
Manual Update
Select the update file [zml]
Update FirmwareUpdate Firmware
OBSBOT Talent supports automatically and manually updating firmware. Manual update can update to any firmware version, while auto update can only update to the online latest version.
Auto Update Auto Update
- Ensure your device is connected with network.
- Tap Firmware on the system page.
- Check the information of current version and new version.
You can tap the Gerton to refresh the information of new version.
- If a new version is available, tap Auto Update.
The size of the update file will be displayed under the button.
- Read the release notes of the new version on the popup to decide whether to update to this version.
- Tap Update. The device starts downloading the update file and implementing update automatically. Please wait and do not exit.
During the upgrade process, do not power off or restart your device. This may cause irreversible damage to your device.
- When the firmware update is completed, tap the Reboot button to restart your OBSBOT Talent device.
If it accidentally exits or the network is disconnected during update file downloading, OBSBOT Talent supports resuming from the break point.
Manual Update Manual Update
Please down load the firmware update file on OBSBOT official website, and then follow the steps below to update your OBSBOT Talent device.
-
Import the update file to the internal storage of the device, or import it to an SD card / USB flash driver, and insert the SD card or USB flash driver to the device.
-
Tap Firmware on the system page to enter the Firmware page which displays the information of current version and new version.
-
Tap Manual Update, and then select the update file.
-
OBSBOT Talent will then upgrade automatically. Please wait and do not exit.
During the upgrade process, do not power off or restart your device. This may cause irreversible damage to your device.
- When the firmware update is completed, tap the Reboot button to restart your ORSBOT Talent device.
If the firmware update fails, refer to What to do when firmware update fails.

Reset?
Reset will erase all the shows and their assets, system settings and local stored media files. It will NOT affect the SD Card and USB flash drive.
RESET
ResetReset
This function is going to reset the device. Before resetting, make sure that you have backed up all the files you need.
- Tap Reset in the system page.
- Tap the Reset button. The device will be rebooted with all the shows and their assets, system settings and local stored media files being deleted.
← Device status
| CPU | Memory | Temperature |
| 19.54% | 59% | 50.79°C |
| Up time | Free space | Fan speed |
| 2 d 1 h 34 m | 48.0 GB | 3726 rpm |
Kernel 380
Device StatusDevice Status
Tap Device status in the System page, and it shows the running status of the device.
• CPU: the CPU usage of OBSBOT Talent device, in percentage.
• Memory: the memory usage of OBSBOT Talent device, in percentage.
- Temperature: the temperature of the chipset on OBSBOT Talent device. To avoid overheat, ensure that device is working in a well-aired environment with proper temperature. When the temperature approaches 90 degrees, you need to reduce the temperature, such as by using a fan.
- Up time: the duration that OBSBOT Talent device keeps running since last startup.
• Free space: the available storage of OBSBOT Talent device.
- Fan speed: the rotation speed of the fan per minute. This changes based on the temperature of OBSBOT Talent device.
- Kernel: the usage of kernel resource.
← About
Device Name RMA527231202058
Product Name
Serial Number A527231202058
Hardware Version A
Firmware Version 1.20
← About
Hardware Version
Firmware Version 1.20
Software Version 2.4.721
Warranty
License
AboutAbout
Tap About in the system page, and it shows the information of the device, including its device name, family name, product name, serial number, hardware version, firmware version, software version, warranty, and license.
Rename the device
You can rename the device.
- Tap Device Name, and enter a new name.
- Tap Save
BatteryBattery
OBSBOT Talent supports two hot-swappable NP-F battery packs, which allows for device operation without the need for a physical power connection. You can insert battery and power adapter separately or simultaneously. When they are both inserted, OBSBOT Talent uses the power supplied by the power adapter as the priority.
CautionCaution
If the battery pack is mishandled, the battery pack can burst, cause a fire or even chemical burns. Please read the following cautions before installing batteries.
- Do not disassemble the battery pack.
- Do not crush and do not expose the battery pack to any shock or force such as hammering, dropping or stepping on it.
- Do not short circuit and do not allow metal objects to come into contact with the battery terminals.
- Do not expose to high temperature above 60°C (140°F) such as in direct sunlight or in a car parked in the sun.
- Do not incinerate or dispose of in fire.
- Do not use damaged or leaking batteries.
- Be sure to charge the battery pack with a qualified charger.
- Keep the battery pack out of the reach of children.
- Keep the battery pack dry.

Battery InstallationBattery Installation
OBSBOT Talent supports 7.4V NP-F type battery packs, such as Sony NP-F550 and Sony NP-F750. You can use the same or equivalent types.
- Install: press the lock button first and put the battery into the slots until it is locked in the correct position.
- Remove: press the lock button first and remove the battery.
Battery Indicator Battery Indicator
Power on the device. On the back of the device, the battery indicator corresponds to the battery lights up. The indicator has three colors to indicate the battery percentage.
- Green: 50% - 100%
Orange: 25% - 50% - Red: <25%
When the battery is depleted, the corresponding indicator lights off.
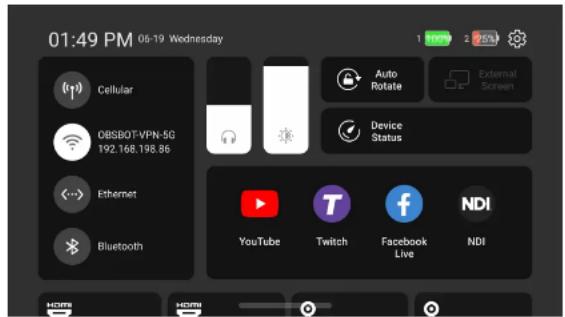
Battery StatusBattery Status
On the screen, you can also see the battery status icon on the status bar. When there are two batteries installed, it shows the two battery status icons.
: 75% - 100%.
: 50% - 75%
: 25% - 50%
- : < 25%
You can also check battery status on the Control Center by swiping down from the top of the screen.
If the power adapter is also connected, the device uses power adapter in priority and it does not show the battery status icon.
During operation, your OBSBOT Talent will use the battery with the lower charge, then swap over to the other when the battery is depleted without interruption.
As OBSBOT Talent supports hot swapping, you can replace the depleted battery without any interruption to your show.
Typical Battery Working Time Typical Battery Worki
The following is what you can expect for a single battery.
| Capacity Working Condition Working Hours | ||
| 7800mAh | Displaying, streaming and recording a multi-view scene consisting of HDMI, Video and WEBCAM sources | 3 hours 30 minutes |
| 2200mAh | Displaying and streaming an HDMI scene | 2 hours 20 minutes |
Based on ideal conditions.
Shortcuts for OBSBOT TalentShortcuts for OBSBOT Talent
You can connect a USB keyboard, such as X Keys and NumberPad, to the device, and then go to the Web UI > Produce page to set shortcuts. Then you can call the following functions.
| Function Name Description Remark | ||
| Show | ||
| Switch to the specific show Switch to a specific show Specify a show by selecting show name | ||
| Switch to the first show Switch to the first show | ||
| Switch to the last show Switch to the last show | ||
| Switch to the next show Switch to the next show | ||
| Switch to the previous show Switch to the previous show | ||
| Scene | ||
| Switch to the specific scene Switch to a specific scene Specify a scene by selecting scene name | ||
| Switch to the first scene Switch to the first scene | ||
| Switch to the last scene Switch to the last scene | ||
| Switch to the next scene Switch to the next scene | ||
| Switch to the previous scene Switch to the previous scene | ||
| GFX | ||
| Turn on GFX | Display a GFX | Specify a GFX by selecting GFX name |
| Turn off GFX | Undisplay a GFX | Specify a GFX by selecting GFX name |
| Turn on/off GFX | Display/Undisplay a GFX | Specify a GFX by selecting GFX name |
| Clear overlay Undisplay all displayed GFXs and live comment | ||
| Transition | ||
| Turn on quick switch Turn on quick switch | ||
| Turn off quick switch Turn off quick switch | ||
| Turn on/off quick switch Turn on/off quick switch | ||
| Set transition effect Set transition effect to "cut" or "fade" | ||
| Set transition duration | Set transition duration, ranging from 50ms to 1000ms | |
| Set FTB transition duration | Set FTB transition duration, ranging from 200ms to 2000ms | |
| Stream | ||
| Start live streaming Start live streaming to a specific destination | Specify the destination by selecting stream name | |
| Stop live streaming Stop live streaming to a specific destination | Specify the destination by selecting stream name | |
| Start/Stop live streaming | Start/Stop live streaming to a specific destination | Specify the destination by selecting stream name |
| Stop all live streaming Stop all live streaming | ||
| Record | ||
| Start recording Start recording | ||
| Stop recording Stop recording | ||
| Start/Stop recording Start/Stop recording | ||
| Screenshot Take a screenshot of the program scene | ||
| Video | ||
| Play video Play video in program view | ||
| Pause video Pause video in program view | ||
| Play/Pause video Play/Pause video in program view | ||
| Rewind to start Rewind to start | ||
| Fast forward to end Fast forward to end | ||
| Rewind by seconds | Rewind at a set step size, ranging from 1s to 10s | |
| Fast forward by seconds | Fast forward at a set step size, ranging from 1s to 10s | |
| Jump to a specific time | Jump to a specific time, ranging from 0s to infinitely | |
| BGM | ||
| Play BGM Play BGM in program view | ||
| Pause BGM Pause BGM in program view | ||
| Play/Pause BGM Play/Pause BGM in program view | ||
| Go to the first song Go to the first song | ||
| Go to the last song Go to the last song | ||
| Go to the next song Go to the next song | ||
| Go to the previous song Go to the previous song | ||
| Go to the song Go to a specified song Specify a song by selecting song name | ||
| Audio Mixer | ||
| Set PROGRAM option Turn on/off PROGRAM audio | ||
| Set PROGRAM volume | Set the gain of PROGRAM audio, ranging from -40dB to 10dB | |
| Set PREVIEW option Turn on/off PREVIEW audio | ||
| Set PREVIEW volume | Set the gain of PREVIEW audio, ranging from -40dB to 10dB | |
| Set MONITOR option Turn on/off MONITOR audio | ||
| Set MONITOR volume | Adjust MONITOR volume, ranging from -40dB to 10dB | |
| Select MONITOR device Set MONITOR device | Specify the device by selecting Microphone Jack, Bluetooth device (if connected) or USB device (if connected) | |
| Set MIC option Turn on/off MIC audio | ||
| Set MIC volume | Set the gain of MIC audio, ranging from -40dB to 10dB | |
| Set Bluetooth option Turn on/off Bluetooth audio | ||
| Set Bluetooth volume | Set the gain of Bluetooth audio, ranging from 40dB to 10dB | |
| Set USB AUDIO option Turn on/off a specific USB | audio Specify the USB audio by selecting device name | |
| Set USB AUDIO volume | Set the gain of a specific USB AUDIO, ranging from -40dB to 10dB | Specify the USB audio by selecting device name |
| Set HDMI 1 action scope | Apply HDMI 1 audio settings to global or per scene | |
| Set HDMI 1 global option | Set global option of HDMI 1 audio, which can be AFV, Always On or Always Off | |
| Set HDMI 1 scene option | Set scene-based option of HDMI 1 audio, which can be Audio On or Audio Off | |
| Set HDMI 1 volume | Set the gain of HDMI 1 audio, ranging from -40dB to 10dB | |
| Set HDMI 2 action scope | Apply HDMI 2 audio settings to global or per scene | |
| Set HDMI 2 global option | Set global option of HDMI 2 audio, which can be AFV, Always On or Always Off | |
| Set HDMI 2 scene option | Set scene-based option of HDMI 2 audio, which can be Audio On or Audio Off | |
| Set HDMI 2 volume | Set the gain of HDMI 2 audio, ranging from -40dB to 10dB | |
| Set STREAM action scope | Apply STREAM audio settings to global or per scene | Select stream by name, including SRT, RTMP, NDI |
| Set STREAM global option | Set global option of STREAM audio, which can be AFV, Always On or Always Off | Select stream by name, including SRT, RTMP, NDI |
| Set STREAM scene option | Set scene-based option of STREAM audio, which can be Audio On or Audio Off | Select stream by name, including SRT, RTMP, NDI |
| Set STREAM volume | Set the gain of STREAM audio, ranging from -40dB to 10dB | Select stream by name, including SRT, RTMP, NDI |
| Set VIDEO action scope | Apply VIDEO CLIP audio settings to global or per scene | Select video clip by name |
| Set VIDEO option Turn on/off VIDEO CLIP audio | Select video clip by name | |
| Set VIDEO volume | Set the grain of VIDEO CLIP audio, ranging from -40dB to 10dB | Select video clip by name |
| Set WEBPAGE scene action scope | Apply WEBPAGE audio settings to global or per scene | Select webpage by name |
| Set WEBPAGE scene global option | Set global option of WEBPAGE audio, which can be AFV, Always On or Always Off | Select webpage by name |
| Set WEBPAGE scene option | Set scene-based option of WEBPAGE audio, which can be Audio On or Audio Off | Select webpage by name |
| Set WEBPAGE scene volume | Set the gain of WEBPAGE audio, ranging from -40dB to 10dB | Select webpage by name |
| Set GFX option Turn on/off | CFX audio Select | GFX by name |
| Set GFX volume | Set the grain of GFX audio, ranging from -40dB to 10dB | Select GFX by name |
| Set audio input delay | Adjust the input delay of Microphone Jack, HDMI 1, HDMI 2 or USB device, ranging from 0ms to 400ms | |
| Output microphone sound to monitor device | Enable or disable outputting microphone sound to monitor device | |
| Output microphone sound to USB-C | Enable or disable outputting microphone sound to external device connected to the USB-C port | |
| Solo monitor Only monitor one audio input Select audio input by name | ||
| Scoreboard | ||
| Reset Scoreboard Reset scoreboard to initial settings | ||
| Adjust team score | Adjust the score of home team or guest team with a value ranging from -100 to 100 | |
| Go to the first period/inning Go to the first period/inning Inning is for baseball scoreboard | ||
| Go to the last period Go to the last period | ||
| Function Name | Description | Remark |
| Go to the next period/inning Go to the next period/inning Inning is for baseball scoreboard | ||
| Go to the previous period/inning Go to the previous period/inning Inning is for baseball scoreboard | ||
| Play game time Start counting game time | ||
| Pause game time Pause counting game time | ||
| Play/Pause game time Start/Pause counting game time | ||
| Adjust game time Adjust game time, ranging from -100s to 100s | ||
| Reset game time Reset game time | ||
| Adjust Out (Baseball) Adjust outs, ranging from -2 to 2 For baseball scoreboard | ||
| Adjust Ball-Strike (Baseball) | Adjust ball number and strike number, ranging from -3 to 3 | For baseball scoreboard |
| Sel on base runners (Baseball) | Set on-base runner indicators for 1st Base, 2nd Base, 3rd Base | For baseball scoreboard |
| Clear pitch count (Baseball) Clear balls and strikes to zero For baseball scoreboard | ||
| Set stoppage time (Soccer) | Set stoppage time, ranging from 0 to 59, in minutes | For soccer scoreboard |
| Reset stoppage time (Soccer) Reset stoppage time | For soccer scoreboard | |
| Show stoppage time (Soccer) Show stoppage time | For soccer scoreboard | |
| Hide stoppage time (Soccer) Hide stoppage time | For soccer scoreboard | |
| Show/Hide stoppage time (Soccer) | Show/Hide stoppage time | For soccer scoreboard |
| Function Name | Description Remark | |
| Show substitution (Soccer) Show substitution For soccer scoreboard | ||
| Hide substitution (Soccer) Hide substitution For soccer scoreboard | ||
| Show/Hide substitution (Soccer) Show/Hide substitution For soccer scoreboard | ||
| Timer | ||
| Reset timer Restore the timer to the preset duration | ||
| Start or resume timer Start or resume counting | ||
| Pause timer Pause counting | ||
| Start/Pause timer Start/Pause counting | ||
| Stopwatch | ||
| Reset stopwatch Restore the stopwatch to zero | ||
| Start or resume stopwatch Start or resume counting | ||
| Pause stopwatch Pause counting | ||
| Start/Pause stopwatch Start/Pause counting | ||
| PTZ | ||
| Select PTZ device Select PTZ device | Specify the PTZ device by selecting device name | |
| Call preset Call preset by number | ||
| Store preset | Store preset by number | |
| Function Name | Description | Remark |
| PTZ zoom in | Start to zoom in at a set speed, ranging from 1 to 10 | |
| PTZ zoom out | Start to zoom out at a set speed, ranging from 1 to 10 | |
| PTZ stop zooming Stop zooming | ||
| PTZ auto focus Apply autofocus | ||
| PTZ focus far Focus far | ||
| PTZ focus near Focus near | ||
| PTZ home Move back to the center of the Pan/Tilt | NDI PTZ does not support this function. | |
| PTZ move up Move upwards | ||
| PTZ move up left Move upwards and leftwards | ||
| PTZ move left Move leftwards | ||
| PTZ move down left Move downwards and leftward | ||
| PTZ move down Move downwards | ||
| PTZ move down right Move downwards and rightwards | ||
| PTZ move right Move rightwards | ||
| PTZ move up right Move upwards and rightwards | ||
| PTZ stop moving Stop moving | NDI PTZ does not support this function. | |
| PTZ start recording (OBSBOT) | Start recording | For OBSBOT Tail Air |
| PTZ stop recording (OBSBOT) Stop recording For OBSBOT Tail Air | ||
| PTZ start/stop recording (OBSBOT) Start/stop recording For OBSBOT Tail Air | ||
| Start AI human tracking (OBSBOT) Start AI human tracking For OBSBOT Webcam, Tail Air | ||
| Stop AI human tracking (OBSBOT) Stop AI human tracking For OBSBOT Webcam, Tail Air | ||
| Start/Stop AI human tracking (OBSBOT) Start/Stop AI human tracking For OBSBOT Webcam, Tail Air | ||
| Set AI human tracking mode (OBSBOT) | Set AI human tracking mode. Options include Normal, Upper Body, Close-up. | For OBSBOT Webcam, Tail Air |
| Set AI human tracking speed (OBSBOT) | Set AI human tracking speed. Options include Slow, Fast, Standard. | For OBSBOT Tail Air |
| Set AI human tracking type (OBSBOT) | Set AI human tracking type. Options include Standard and Motion. | For OBSBOT Webcam |
| Wake up Camera (OBSBOT) Wake up the camera | For OBSBOT Webcam | |
| Reset (OBSBOT) Reset the webcam to its initial position For OBSBOT Webcam | ||
| Replay | ||
| Replay from start of buffer Replay from start of buffer | ||
| Replay from N seconds ago | Replay from N seconds ago, ranging from 3s to 60s | |
| Replay the last event | Replay the last event | |
| Replay event N | Replay event N | Specify the event by selecting the Event No. |
| Exit replay | Exit replay | |
| Function Name Description Remark | ||
| Pause replay Pause replay | ||
| Play or resume replay Play or resume replay | ||
| Play/Pause replay Play/Pause replay | ||
| Fast forward | Fast forward at a set stop size, ranging from 2s to 8s | |
| Fast backward | Fast backward at a set step size, ranging from 2s to 8s | |
| Go to a specific position | Go to a specific position on the process bar, ranging from 0s to 60s. | |
| Rewind to start Rewind to start | ||
| Add replay event Add a replay event | ||
| Delete all events Delete all events | ||
| Delete the last event Delete the last event | ||
| Set the replay speed | Set the replay speed. Options include 0.1x, 0.25x, 0.33x, 0.5x, 0.75x and 1.0x. | |
| Unmute replay sound Unmute replay sound | ||
| Mute replay sound Mute replay sound | ||
| Muto/Unmute replay sound Muto/Unmute replay sound | ||
| Unmute mic sound Unmute mic sound | ||
| Mute mic sound Mute mic sound | ||
| Function Name Description | Remark | |
| Mute/Unmute mic sound Mute/Unmute mic sound | ||
| Switch replay camera | Switch replay camera. Options include Camera 1, Camera 2 and Side by Side. | |
| Webpage | ||
| Go back Go back | ||
| Go forward Go forward | ||
| Zoom out Zoom out | ||
| Zoom in Zoom in | ||
| Reset Reset the webpage content to 100% | ||
| Reload Reload | ||
| Page top Scroll to the webpage top | ||
| Page bottom Scroll to the webpage bottom | ||
| Page up Scroll up a screen | ||
| Page down Scroll down a screen | ||
| Up Scroll up | ||
| Left Scroll left | ||
| Down Scroll down | ||
| Right Scroll right | ||
| Others | ||
| Function Name Description Remark | ||
| Reboot Reboot the device | ||
| Power off Power off the device | ||
| Screenshot Take a screenshot of the device | ||
| Adjust display brightness Adjust display brightness | ||
| Freeze current scene Freeze current scene | ||
| Unfreeze current scene Unfreeze current scene | ||
| Freeze/Unfreeze current scene Freeze/Unfreeze current scene | ||
| Turn on FTB | Turn on FTB | |
| Turn off FTB | Turn off FTB | |
| Turn on/off FTB | Turn on/off FTB | |
| Set USB-C DP output | Set content displayed on the external screen connected to USB-C port | Options include Clean Program, Preview, Multi view, Duplicate Screen, Loop HDMI 1, Loop HDMI 2 |
| Wait | Set a duration between two functions, ranging from 50ms to 10000ms | Only add one Wait between two functions of one shortcut, and one shortcut can add up to two Wait. |
FAQsFAQs
GeneralGeneral
Notice for connecting the USB-C OUT port to the computerNotice for connecting the USB-C OUT port to the computer
- Please connect the device with power cable or battery and power on at first, and then connect to the computer.
- To power off the device, disconnect the USB-C OUT port from the computer at first, and then press the power button to power off.
- When the USB-C OUT port is connected to the computer, after creating a file to the internal storage on the device, such as long-pressing the power button to take a screenshot or recording a video, the computer may not recognize the file just created or a pop-up window prompts that the device is not available, you need to reconnect the USB-C OUT port.
How to create a show? How to create a show?
- Tap

ate a show.
- Enter your show name, select the show's frame rate and choose the screen orientation.
- Tap Create.
How to create a new scene? How to create a new scene?
- Tap on the main screen.
- In the Create New Scene window, select a source that you want to put into the new scene.
- Edit the scene in the Scene Editor.
- Save the changes you have made in the Scene Editor, and then the thumbnail of the new scene will be added to the end of the Scene List.
How to edit a scene? How to edit a scene?
- Long press a thumbnail in the scene list on the main screen.
- Tap Edit to open the Scene Editor.
- You can add more sources, resize the source, add transition effects, etc. For details, please refer to Edit Scenes.
How to configure live stream servers? How to configure live stream servers?
Configure the stream server on the OBSBOT Talent device:
- Tap >Settings >Stream, and select a sever to enter the configuration page.
- Or tap on the main screen, tap a server not configured to enter the configuration page.
Only when you have not configured Quick Stream for any server, you can tap to configure a server; otherwise, it will start streaming.
- Configure the server according to the introductions on the page. For details, please refer to Configure Streaming Server.
How to start and stop live streaming? How to start and stop live streaming?
Manual Stream
- Start streaming:
a. Tap on the main screen.
b. Tap Connect next to a configured server in the Live Stream window.
c. (Optional) Repeat the above steps to stream to another server at the same time.
The maximum number of servers you can simultaneously connect to is two. This limit is set to ensure stream performance.
- Stop streaming:
a. Tap on the main screen.
b. In the Live Stream window, tap Disconnect of a working server to stop streaming to the server.
c. (Optional) Repeat the above steps to stop streaming to the other server.
Quick Stream
If you have turned on Quick Stream when you Configure Streaming Server, you can start stream automatically.
-
Tap on the main screen to start streaming.
-
Tap of the main screen to stop streaming.
How to check whether a sever is enabled with Quick Stream? How to check whether a sever is enabled with Quick Stream?
Tap ≡ > Settings > Stream, and then if you can see a server is marked with an "Quick" tag, it means this server is enabled with Quick Stream.
How to start a stream scheduled later for YouTubeHow to start a stream scheduled later for YouTube
When streaming to YouTube, you may need to preview the stream at first and then goes live as scheduled. You can follow the guide below.
-
Create a channel in your YouTube studio, and set the schedule.
-
Ensure that you have NOT enabled Auto-start.
-
Go to Settings > Stream on the device, and start configuring YouTube.
-
When configuring Post To, select the channel you have created in Step 1.
-
Save your configurations.
-
On the main screen, tap to start streaming to YouTube.
-
On the popup window, select Only Preview to preview the stream at first.
-
In Live Control Room of YouTube, wait for the stream preview to show up, and then click Go live.
If you select Go Live in step 7, it streams to YouTube and goes live at once.
Besides, when you stop streaming, usually it ends live at once. If you want to pause streaming and keeps live, you can refer the following steps.
-
Go to your YouTube studio.
-
Ensure that you have NOT enabled Auto-stop.
-
On the main screen, tap to stop streaming to YouTube.
-
On the popup window, select Pause Streaming to pause stream but keeps live. You can use the END STREAM button in Live Control Room of YouTube to end live.
If you select End Live, it stop streaming to YouTube and ends live at once.
How many sources with video signal can I add to one scene/show?
In the same scene
You can add a maximum of three sources, including HDMI, WEBCAM, SRT stream, RTMP stream, NDI stream and video clips, in which:
• Each HDMI source and WEBCAM can only be added once.
- You can only add one video clip.
In the same show
- You can add up to 3 streams, including up to 3 NDI streams.
How do I confirm the video inputs are successfully connected?
Add a video source into a scene. If it displays the image normally, such source is connected successfully.
Encoding Policy for Streaming, Recording and ReplayEncoding Policy for Streaming, Recording and Replay
- Recording, streaming and replay can use up to 2 different encoders at the same time.
- Different functions can share the same encoder, and only one encoder is counted when they are used at the same time.
Supported encoding combinations: - 2x NDI streaming
- 1x NDI streaming + 1x non-NDI streaming, 1x record, 1x replay (using the same encoder, such as Encode 1)
- 1x non-NDI streaming, 1x record, 1x replay (using Encode 1) + 1x non-NDI streaming, 1x record, 1x replay (using Encode 2).
How to use the keyboard to enter in Chinese? How to use the keyboard to enter in Chinese?
To enter in Chinese, please connect your device with the Internet, it will download the language package automatically.
How to import and export files? How to import and export files?
Use USB flash drive and SD card
The supported file system types include: FAT32 (The maximum file size is 4 GB), exFAT, and NTFS.
- To import:
When you add a video clip or picture source to a scene, add BGM, or add GFX, you can directly select files from the USB flash driver or SD card. These files are stored into the internal storage automatically. When you delete all the scenes or shows using these files, they will also be deleted from the internal storage.
• To export:
- Open the album.
- Tap Select, and then select one or more items.
- Tap at the bottom, and then select USB or SD Card to export the selected items.
In this way, you can only export recorded video clips and screenshots. Please insert only one USB flash drive for exporting files.
- An SD card can be used to store recorded video clips and screenshots directly.
- Tap Ⓤ > Settings > Record > Save path, and select SD Card First. (Default)
- Or tap Ⓤ > Settings > Storage > Record or Screenshot, and then select. SD Card First.
Use computer
- Use a Type C cable to connect the USB-C OUT port of the device and the computer. (The USB-C port should be set to MTP mode.) The device is recognized as OBSBOT Talent, which may differ with the OS. Then you can import and export files with the computer.
Recorded video clips and screenshots are stored in "\OBSBOT Talent\Internal shared storage\OBSBOT\OBSBOT".
- If an SD card is inserted into the device, the computer can also recognize it and perform read and write operations.
Use Web UI
- Connect the device to the network.
- Swipe down from the top of the screen to open the Control Center, and then you can view the connected network and its IP address.
- Using a computer on the same network, open a browser and access the specified IP address.
- Or, you can find the OBSBOT Talent device in the "File Explorer > Network" on a Windows computer on the same network. Double-click the device to access Web UI.
- Enter the user name Admin and password Admin to log in.
- Upload pictures, videos, music on the "Media" page.
- When you browse files, such as adding BGM, you can find the uploaded files in the "System Media" folder.
- For the files added to the show on the device, you can view and download them on the "Media" page of the Web UI. For the recording files and screenshots, you can view and download them on the "Record" page of the Web UI.
Why are my recordings split into 4.0 GB clips? Why are my recordings split into 4.0 GB clips?
OBSBOT Talent applies a default logic to prevent potential damage to the whole video to protect your content by breaking the recording into 4.0 GB clips. You can import video clips to the editing software, then merge them back together without any loss of data. You can also self-define to split recording files by time or by size, which has more options. For details, please refer to Set Recording Properties.
Why can't I log in to my YouTube account? Why can't I log in to my YouTube account?
When you try to log in to your YouTube account, your login may fail with a message indicating that your account is not enabled for live streaming. In this case, you need to go to YouTube to enable live streaming for your account.
- Log in to YouTube on your computer.
- At the upper right corner on the YouTube home page, click >Go live.
- If you haven't, follow the prompts to verify your account.
You will be prompted to enter your country and phone number.
After your account is verified, it takes 24 hours to activate your account for live streaming.
Once live streaming is activated, you can then successfully log in to your YouTube account in OBSBOT Talent and stream to YouTube.
For other information such as what you can stream to YouTube, you can go to the YouTube official website.
It does not show live comments from Twitch? It does not show live comments from Twitch?
The live comments from Twitch are got via SDK. Twitch's SDK does not support binding network card, that is, it does not support setting network priority.
When the device is connected with multiple networks, to use one preferred network for streaming to Twitch while view live comments at the same time, please ensure that all these networks can access the official website of Twitch.
It does not show live comments from Facebook? It does not show live comments from Facebook?
To show live comments from Facebook, you need to share your content to Public audience. You can refer to Choose who can see your post on Facebook.
How to use the USB 3.0 ports? How to use the USB 3.0 ports?
OBSBOT Talent provides two USB 3.0 ports, which can accommodate a variety of usage scenarios.
The USB 3.0 ports support video input of webcam, USB microphone or audio playback device, and file transfer with a USB flash drive.
Moreover, they also allow various devices to connect, such as a USB modem for network connection, and a USB keyboard for shortcuts control.
WEBCAM Frame Rate Information WEBCAM Frame Rate Information
The USB 3.0 ports and USB-C port support connecting WEBCAM. The supported frame rate to capture is shown as follows.
| WEBCAM Connection Frame Rate | |
| One WEBCAM to one USB 3.0 port Up to 60 fps | |
| One WEBCAM to the USB-C port Up to 60 fps | |
| Two WEBCAMs to two USB 3.0 ports Up to 50 fps + 30 fps | |
| One WEBCAM to one USB 3.0 port, one WEBCAM to the USB-C port Up to 60 fps + 60 fps |
What can the USB-C OUT port be used for? What can the USB-C OUT port be used for?
The USB C OUT port is a USB 3.0 Type C port, and provides multiple functions for free usage.
- Connect to computer to Transfer file You can go to Settings > USB Type-C, to set the USB-C port to MTP mode to transfer files between OBSBOT Talent and the computer.
- Connect to computer to output audio and video. You can go to Settings > USB Type-C, to set the USB-C port to UVC + UAC mode to output audio and video to streaming software, such as Zoom and Skype.
- Connect to a USB Hub for more usage You can use a USB Hub to connect WEBCAM for audio and video input, or connect a USB flash drive for file transfer, or a USB modem for network connection, or a USB keyboard for shortcuts control, etc.
- Output audio and video to an external screen It also serves a display port to connect to an external screen, such as a monitor and HDTV, supporting 1920x1080@60hz or 1920x1080@50hz, which changes along with the show's frame rate. You can use a Type-C to HDMI / VGA / DP adapter to connect the USB-C OUT port to the external screen, and select content. To display on the external screen according to the prompt. It supports displaying clear program, preview, multi view, duplicating the device screen, looping HDMI 1 or HDMI 2. Besides, when OBSBOT Talent is connected to an external touchscreen and set to "Duplicate Screen", you can use the external touchscreen to control the device, so as to enlarge your canvas for better scene editing, annotation, etc.
Notice for using the external touchscreen to control OBSBOT Talent:
- The external touchscreen must support HID multi-touch function (no need of driver).
- Connect the touchscreen and OBSBOT Talent with a Type-C to Type-C cable. If you use a Type-C adapter, please connect the Touch Function port of the touchscreen to the device. For details, please refer to your touchscreen's user manual.
- Select Duplicate Screen as the displayed content.
- The external touchscreen should keep the full screen mode and the same orientation as the OBSBOT Talent device.
Mapping between the show's frame rate and each output frame rate
According to different frame rate of the show, the output frame rate or frame rate options related to recording, streaming, USB-C external screen and more will also be different, and the mapping relationship between them is shown in the following table.
| Frame Rate (fps) | |||
| Show USB-C DP-Out Record Streaming | |||
| 60 60 60, 30, 15 60, 30, 15 | |||
| 59.94 60 59.94, 29.97 59.94, 29.97 | |||
| 50 50 50, 25 50, 25 | |||
| 30 60 30, 15 30, 15 | |||
| 29.97 60 29.97 29.97 | |||
| 25 50 25 25 | |||
| 24 50 24 24 | |||
| 23.98 50 23.98 23.98 | |||
How to optimize encoding settings How to optimize encoding settings
Encoding parameters directly affects your final video output. Setting encoding parameters can be a tricky job, always a balancing act, a tradeoff between quality and bandwidth.
You will want to optimize each of the encoding parameters to deliver the best possible video quality.
Resolution
Selecting a resolution is relatively easy. 1280x720 is considered HD resolution and 1920x1080 Full HD. 1920x1080 looks sharper but also requires more processing power and bandwidth.
Frame rates
A wide range of frame rates are available for different use cases. For example, 25fps is usually used for PAL television systems, 29.97fps applies to NTSC television systems, while 24fps is mostly used when shooting and displaying movies.
Generally a higher frame rate provides smoother motion and crisper details. Videos with a lot of motions, such as sports events, will often need a higher frame rate. On the flipside, a high frame rate can put a lot of pressure on your device and network.
A lower frame rate can result in choppy or broken movement, but it puts less stress on your device and network, so it can also be a good choice in some cases, such as when no fast moving objects are present.
High-definition video generally employs 30fps/60fps. To start out, 30fps is a safe choice to get a nice, clean, and stable video.
Bitrate
A higher bitrate can carry more data and often means better video quality, but you must have the bandwidth to accommodate it. Insufficient bandwidth in this case can result in dropped video frames, which can make the video choppy. Moreover, when the bitrate is already high enough for your video, increasing it further will not make an obvious difference for your video quality.
To set the bitrate properly, you have to factor in your network upload speed, device performance, resolution, and frame rate.
If your upload speed allows, you might want to set a bitrate that accommodates both high resolution and high frame rate to make your video look as sharp and smooth as possible. But if you have a limited upload speed, you may have to balance the resolution and frame rate. You need to make your choice based on your specific use case. For example, when your video features less motion but more detail, you might want a resolution of 1920x1080 and a frame rate of 30fps under limited bandwidth. When fast motions come first, streaming at 1280x720 and 60fps makes sense.
Different platforms also have their own recommendations for bitrates. You can click Facebook, Twitch, or YouTube to view the corresponding official guidelines.
Key frame interval
A longer key frame interval means there will be less complete pictures, which can increase compression efficiency and reduce bandwidth consumption.
However, it can also result in longer time for switchover between different bit rates at the player side. For live streaming, 2 seconds is generally recommended for the right balance of quality and performance. For action-packed streams, you may want to try the interval of 1 second.
Audio
Audio format includes sampling rate, codec format and bitrate. The suggested streaming format is 48kHz, aac, 128kbps.
Profile
Profiles are a "family" of encoding techniques targeted for specific application scenarios. The three most commonly applied 11.264 profiles are:
- Baseline: it includes I- and P-frames. This profile is designed for progressive video and supports CAVLC entropy coding. It is used primarily in low-cost applications or those needing extra fault tolerance, for instant messaging scenarios such as video call, and mobile video.
- Main: it includes I-, P-, and B-frames. This profile is for progressive and interlaced videos, and supports CAVLC and CABAC entropy coding. It is used in videos for mainstream consumer electronic devices, such as MP4 with relatively low decoding rate, portable video player, PSP and iPod.
- High: it adds 8x8 internal prediction, custom quantification, lossless video encoding and more YUV formats (e.g., 4:4:4) on the basis of main profile. High profile is used for broadcast and video disc storage (Blu-ray movies), and HDTV applications.
Bitrate mode
Among the different bitrate modes, CBR is the most predictable but generally yields videos of less satisfying quality. VBR involves more complex processing and can be slower, but it usually produces higher quality streams at similar bitrates.
Generally, it is recommended to use VBR for encoding. It gives you the best balance between quality and bandwidth consumption.
Unable to control the camera using VISCA protocol Unable to control the camera using VISCA protocol
Some PTZ cameras use the Visca over IP protocol. For such cameras, enable the "Visca UDP message header" option when setting PTZ control while editing a scene. Refer to your camera's user manual to confirm if it supports Visca over IP.
What to do when an NDI source jitters What to do when an NDI source jitters
If the image of an NDI source jitters, try the following steps:
- Check Network Stability: Ensure you're on a stable network. If unstable, switch to a reliable connection.
-
Adjust URL Settings in Scene Editor :
-
Increase Buffer Duration.
- Change Transport Mode from UDP to TCP or RUDP.
- Enable Ignore Video PTS.
AudioAudio
What audio inputs/outputs does OBSBOT Talent support? What audio inputs/outputs does OBSBOT Talent support?
OBSBOT Talent supports the following audio inputs and outputs:
Audio Input
- Mic/line in: 1x 3.5mm jack, 2-channel, 48 KHz, 16-bit
• Audio input from HDMI 1 and HDMI 2 ports: 2-channel, 48 KHz, 16-bit
• Audio input from USB port: 2-channel, 48 KHz, 16-bit - Audio input from Bluetooth device: 2-channel, 48 KHz, 16-bit
• Audio from SRT streams - Audio from RTMP streams
- Audio from RTSP streams
- Audio from NDI streams
- Audio embedded in video files
• Background music (BGM): MP3, M1A and WAV files
Audio Output
- Streaming and recording output: 2-channel, 48 KHz, 16 bit, aac format, 64/96/128kbps
• USB-C OUT port: 2-channel, 48 KHz, 16 bit - Monitor output, selecting one of the follows as the monitor
- Bluetooth device: 2-channel, 48 KHz, 16 bit
• Headphone output: 1x 3.5mm jack, 2-channel, 48 KHz, 16 bit
USB port: 2-channel, 48 KHz, 16-bit/24-bit/32-bit
How do I adjust volume? How do I adjust volume?
You can adjust audio volume when editing a scene, previewing the show and even during streaming and recording.
Tap the main screen or in the Scene Editor, to open the audio mixer. For details, see Volume Control.
Why is there no audio from the HDMI input? Why is there no audio from the HDMI input?
Check whether OBSBOT Talent is selected as the audio output device on the source computer connected to the HDMI port. Only when OBSBOT Talent is selected will the computer output audio to OBSBOT Talent. The configuration varies depending on the OS.
For example, on Windows 10, click 📄 > 🎨 > System > Sound. In the Output section, choose OBSBOT Talent (******) from the drop-down list box of Choose your output device, such as OBSBOT Talent (Intel(R) Display Audio).
SettingsSettings
Which AP band should I choose for hotspot? Which AP band should I choose for hotspot?
- The advantage of 2.4GHz is that it has a wider coverage area and stronger capability to penetrate solid objects. The main advantage of 5.0GHz is that the transmission rate is faster, which is 2\~3 times that of the traditional 2.4GHz. And its anti-interference ability is stronger, which can avoid the interference of various electromagnetic waves in the daily environment.
- Since most wireless devices currently use the 2.4GHz frequency band, they are often interfered in the daily environment. The signal will not be as good as 5.0GHz, and the network speed will also be affected. At present, most devices already support 5.0GHz. It is recommended to turn on 5.0GHz, so that it is not easy to be interfered, but at the same time, the power consumption of the device will be accelerated.
- However, if your devices are separated by a distance, it is recommended to choose 2.4GHz, so that you can receive a better signal even across obstacles.
Note: When the Wi-Fi connected to the OBSBOT Talent device is 5.0GHz, the AP band can only be selected as 2.4GHz; when the Wi-Fi is 2.4GHz, the AP band can only be selected as 5.0GHz.
What to do when firmware update fails What to do when firmware update fails
Possible causes:
- The device is powered off or rebooted during the update.
- The network is disconnected when the device is downloading the update file for auto update.
- The device is out of storage space when downloading the update file for auto update.
- The update file for manual update is not the correct file.
Troubleshooting procedure:
- Check whether OBSBOT Talent is powered off. Connect OBSBOT Talent with a power supply or install a fully charged battery.
- For auto update, check whether the network connection is normal.
- For auto update, check whether the storage space of the device is sufficient, and delete some files if necessary.
- Check whether you have downloaded the right update file of OBSBOT Talent. Go to (https://www.obsbot.com/download) to download the update file of OBSBOT Talent.
- Update the firmware again.
DO NOT power off or reboot your device during the update.
If your issue is not solved, please contact us: service@obsbot.com
SupportSupport
If you have problems or questions during using OBSBOT Talent, you can find support and help through the following ways.
View HelpView Help
Tap ≡ > Help, to get help information, which will tell you how to use OBSBOT Talent and give answers to some frequently asked questions.
FeedbackFeedback
You can use the feedback feature to ask technical questions, make suggestions and complaints.
Submit New Feedback Submit New Feedback
- Tap > Feedback > Submit new feedback.
- Enter your Email (required).
- Select an Inquiry type: Technical question for product, Suggestion for a new feature, or Complaint.
- Describe your problem with as many details as possible.
- Add an attachment file.
A log file can help the support team analyze your problem. For how to get the log file, please refer to Generate Log File.
- Tick to agree privacy statements.
- Tap Submit, and then you will see a message saying Question Submitted Successfully.
Generate Log FileGenerate Log File
- Tap

edback > Generate log file.
-
Tap Start.
-
Agree the privacy policy.
-
Tap Go to home screen to reproduce the issue you've encountered.
-
After you have finished reproducing the issue, tap

dback to go back to the
Generate log file page.
-
Tap Stop, and then a .zip file is generated in the internal storage.
-
(Optional) Tap Export to export it to the SD card or USB flash drive for more use.
Get the Latest Information Get the Latest Information
If you have any problems using OBSBOT products or need more technical information, please visit the official website for product introduction, user manual, and more.
Technical Support Technical Support
- For after-sales service, please contact service@obsbot.com.
NoticeNotice
Copyright ©2024 REMO TECH Co., Ltd.
All rights reserved. No part of this publication may be reproduced, distributed, or transmitted in any form or by any means, including photocopying, recording, or other electronic or mechanical methods, without the prior written permission of the publisher, except in the case of brief quotations embodied in critical reviews and certain other noncommercial uses permitted by copyright law.
Trademarks Trademarks
HDMI, the HDMI logo and High-Definition Multimedia interface are trademarks or registered trademarks of HDMI Licensing LLC. Windows is trademark or registered trademark of Microsoft Corporation. OS X and macOS are trademarks or registered trademarks of Apple Inc. NDI is trademark or registered trademark of NewTek Inc. Other trademarks and company names mentioned are the properties of their respective owners.
About this Document About this Document
- This document is for reference only. Please refer to the actual product for more details.
- The user shall undertake any losses resulting from violation of guidance in the document.
- In case that PDF document cannot be opened, please upgrade the reading tool to the latest version or use other mainstream reading tools.
- This company reserves rights to revise any information in the document anytime; and the revised contents will be added to the new version without prior announcement. Some functions of the products may be slightly different before and after revision.
- The document may include technically inaccurate contents, inconsistencies with product functions and operations, or misprint. Final explanations of the company shall prevail.
- The only warranties for OBSBOT products and services are set forth in the express warranty statements accompanying such products and services. Nothing herein should be construed as constituting an additional warranty. OBSBOT shall not be liable for technical or editorial errors or omissions contained herein.
Glossary and AbbreviationsGlossary and Abbreviations
AACAAC
AAC (Advanced Audio Coding) refers to digital audio coding standard that represent audio files based on lossy audio compression. It was launched as successor of MP3 file format keeping in view that the lateral faced issues for the implementation of new ideas in the encoding process based on the development of methods for data compression. AAC achieves better sound quality as compared to MP3 at the same bit rate.
AESAES
Advanced Encryption Standard (AES) is a specification for the encryption of electronic data.
CBRCBR
Constant bit rate. It means that your stream will be encoded using the selected bit rate over all the time.
FTBFTB
Fade to black. FTB allows your show to slowly disappear into a black, usually indicating the end of a scene or show.
GFXGFX
Graphic overlays. GFX are text and graphics that are displayed in a stream over the actual content (such as game or video) during a live stream.
RTMPRTMP
RTMP stands for "Real-Time Messaging Protocol". It is an efficient way to transmit large chunks of audio, video, and data from a server to the Internet via an encoder. Most live video streaming relies on RTMP to deliver smooth, real-time playback.
SRTSRT
SRT stands for "Secure Reliable Transport". It is an open source video transport protocol that utilizes the UDP transport protocol. It supports packet recovery while maintaining low latency. SRT also supports encryption using AES.
SSIDSSID
SSID stands for "Service Set Identifier". Under the IEEE 802.11 wireless networking standard, a "service set" refers to a collection of wireless networking devices with the same parameters. So, the SSID is the identifier (name) that tells you which service set (or network) to join.
USB HubUSB Hub
USB hub refers to a device that expands one Universal Serial Bus (USB) port into several and enables those ports can be used at the same time. With this device, you don't have to worry about the port is not enough anymore.
VBRVBR
Variable bit rate. In this mode, the encoder dynamically increases or decreases the bit rate based on the image bitrate needs. VBR is preferred to CBR when you expect better image quality.
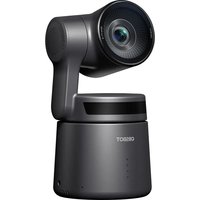
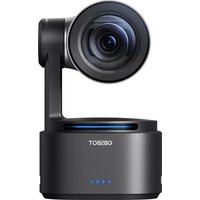

- TABLE OF CONTENTS
- Introduction
- Owners Guide
- Produce Your Show
- Present Your Show
- Start Streaming and Recording
- Settings
- Battery
- Shortcuts for OBSBOT Talent
- FAQs
- Support
- Notice
- Glossary and Abbreviations
- Introduction Introduction
- OBSBOT Talent – Your All-in-One Video CompanionOBSBOT Talent – Your All-in-One Video Compar
- Benefits
- Key Features of OBSBOT TalentKey Features of OBSBOT Talent
- Owners GuideOwners Guide
- Getting StartedGetting Started
- Connect to Power and Turn on the DeviceConnect to Power and
- Power Button Actions Power Button Actions
- Power on
- Power off
- Restart
- Screenshot
- Turn off the screen
- Complete Initial Settings Complete Initial Settings
- Connect to NetworkConnect to Network
- LoginLogin
- Connect to Input DevicesConnect to Input Devices
- - Connect to HDMI source
- - Connect to WEBCAM
- - Connect to media source
- Connect to Audio DevicesConnect to Audio Devices
- (Optional) Connect to External Screen(Optional) Connect to Exter
- Main ScreenMain Screen
- Status BarStatus Bar
- Control CenterControl Center
- Input Information
- NDI
- Input Information Input Information
- Tutorials Tutorials
- Create ShowCreate Show
- Create ScenesCreate Scenes
- Switch ScenesSwitch Scenes
- Adjust VolumeAdjust Volume
- GFX
- Annotate on Screen Annotate on Screen
- Background MusicBackground Music
- Add BGMAdd BGM
- Control BGMControl BGM
- Live Stream, Record and ScreenshotLive Stream, Record and Scre
- Produce Your Show Produce Your Show
- Create and Manage ShowsCreate and Manage Shows
- Show ListShow List
- Switch ShowSwitch Show
- Rename ShowRename Show
- Copy ShowCopy Show
- Delete Show Delete Show
- Export ShowExport Show
- Import Show Import Show
- Create and Manage ScenesCreate and Manage Scenes
- Create Scene Create Scene
- ScenesScenes
- Rename SceneRename Scene
- Delete Scene Delete Scene
- Copy SceneCopy Scene
- Edit SceneEdit Scene
- Zoom Scene List Zoom Scene List
- Rearrange Scene Order Rearrange Scene Order
- Show or Hide the Scene ListShow or Hide the Scene List
- Customize Buttons Customize Buttons
- Edit ScenesEdit Scenes
- Add SourceAdd Source
- - RTMP Pull
- - RTMP Push
- - SRT Caller/Listener
- - RTSP
- - NDI ^ Stream
- - Webpage
- - Text
- - Color
- Notice:
- Add WEBCAMAdd WEBCAM
- Add RAMP Pull Pull
- Add ADMP Push Push
- Add Caller/Listener Caller/Listener
- Add NDI StreamAdd NDI Stream
- Add NDI Stream Manually Add NDI Stream Manually
- Delete.
- Search NDI Stream AutomaticallySearch NDI Stream Automatically
- Add WebpageAdd Webpage
- Select SourceSelect Source
- Change Z-OrderChange Z-Order
- Delete a SourceDelete a Source
- Editing ToolsEditing Tools
- Move, Resize & RotateMove, Resize & Rotate
- To move a source:
- To resize a source:
- Undo or redo:
- To rotate a source:
- PositionPosition
- SizeSize
- CropCrop
- ColorColor
- TransparencyTransparency
- FrameFrame
- LabelLabel
- TransitionTransition
- Add entrance transition:
- Add exit transition:
- Change transition speed:
- Erase transition:
- TextText
- BackgroundBackground
- FlipFlip
- Chromakey Chromakey
- ActionAction
- Play RangePlay Range
- BrowseBrowse
- PropertyProperty
- Change WEBCAM's Properties Change WEBCAM's Properties
- URLURL
- Stream
- Webpage
- FormatFormat
- PTZ ControlPTZ Control
- Add Multi-View SceneAdd Multi-View Scene
- Multi-View Layouts and ToolsMulti-View Layouts and Tools
- Layout 1Layout 1
- Layout 2Layout 2
- Layout 3Layout 3
- Layout 4Layout 4
- Layout 5Layout 5
- Layout 6Layout 6
- Layout 7Layout 7
- Layout 8Layout 8
- Layout 9Layout 9
- Present Your Show Present Your Show
- Control ScenesControl Scenes
- Set Switch ModeSet Switch Mode
- DIP SettingsDIP Settings
- Wipe SettingsWipe Settings
- Quick SwitchQuick Switch
- Manual Switch Manual Switch
- FTB
- Freeze Scene Freeze Scene
- Control VolumeControl Volume
- Audio TypeAudio Type
- Adjust Audio Level Adjust Audio Level
- Set Program AudioSet Program Audio
- Set MonitorSet Monitor
- Set Monitor Properties Set Monitor Properties
- Enable/Disable Monitor Enable/Disable Monitor
- Solo Monitor Solo Monitor
- Set Audio Input Sources Set Audio Input Sources
- Audio Association StateAudio Association State
- Set Audio Mixing Mode Set Audio Mixing Mode
- Use GFXUse GFX
- Create Gfxt with Template with Template
- GFX Templates Templates
- TitleTitle
- General
- Animation
- Lower ThirdLower Third
- Animated TextAnimated Text
- Analog ClockAnalog Clock
- Digital ClockDigital Clock
- Bullet ListBullet List
- Social Media Social Media
- LogoLogo
- ScoreboardScoreboard
- General and Soccer Scoreboards General and Soccer Scoreboards
- Basic Settings
- Advanced Settings
- Baseball Scoreboard Baseball Scoreboard
- TimerTimer
- StopwatchStopwatch
- Create Webpage Create Webpage
- Create Custom Create Custom
- Apply Apply
- Control Scoreboard Control Scoreboard
- Control General Scoreboard Control General Scoreboard
- Control Baseball Scoreboard Control Baseball Scoreboard
- Control Soccer Scoreboard Control Soccer Scoreboard
- Control TimerControl Timer
- Control StopwatchControl Stopwatch
- Manage Manage
- Rename Rename
- Edit Edit
- Copy Copy
- Delete Delete
- Re-order Re-order
- Zoom ZoomList List
- Use PenUse Pen
- Pan/Tilt Control
- Zoom
- Focus
- Presets
- Control OBSBOT camera Control OBSBOT camera
- AI Human Tracking AI Human Tracking
- RecordRecord
- ResetReset
- Wake Up Wake Up
- Remote Control Remote Control
- Control Scene Control Scene
- Control Connected Device Control Connected Device
- Control WebpageControl Webpage
- ReplayReplay
- Quick ReplayQuick Replay
- Event ReplayEvent Replay
- Tap Event Replay.
- Control ReplayControl Replay
- View Saved EventsView Saved Events
- Start Streaming and Recording Start Streaming and Recording
- Live StreamingLive Streaming
- Twitch
- Facebook Live
- RTMP Server
- Youtube Server
- Configure Streaming Server Configure Streaming Server
- Configure YouTube Server Configure YouTube Server
- Configure Twitch ServerConfigure Twitch Server
- Configure Facebook Live Server Configure Facebook Live Server
- Configure NDI®Configure NDI Server Server
- Configure BTMP Server Server
- Configure Configulter Caller
- Add More Servers Add More Servers
- Edit ServerEdit Server
- Delete Server Delete Server
- Start Live Streaming Start Live Streaming
- Manual Stream Manual Stream
- Quick StreamQuick Stream
- Live CommentLive Comment
- Record and Screenshot Record and Screenshot
- ← Local record
- ← Split file
- By size Start a new file every 4 GB
- Set Recording Properties Set Recording Properties
- Tail Air Record Tail Air Record
- Start RecordingStart Recording
- Take Screenshots/photos Take Screenshots/photos
- Check Streaming/Recording StatusCheck Streaming/Recording St
- Recording status Recording status
- Streaming statusStreaming status
- NDI TallyNDI Tally
- AlbumAlbum
- Preview Video Clips & ImagesPreview Video Clips & Images
- Export or Delete Video Clips & ImagesExport or Delete Video Clip
- SettingsSettings
- ← Network
- NetworkNetwork
- CellularCellular
- Wi-FiWi-Fi
- Connect to a Wi-Fi networkConnect to a Wi-Fi network
- Add a Wi-Fi networkAdd a Wi-Fi network
- Wi-Fi DirectWi-Fi Direct
- EthernetEthernet
- Hotspot & TetheringHotspot & Tethering
- BluetoothBluetooth
- ← Display
- DisplayDisplay
- AudioAudio
- StorageStorage
- Tap Internal storage.
- Tap SD Card
- Tap Screenshot, and then select your preferred path, Internal Storage First or SD Card First.
- Tap Record, and then select your preferred path, Internal Storage First or SD Card First.
- ← Encode
- ← Encode 1
- + Add
- EncodeEncode
- SwitchSwitch
- Back LED LightsBack LED Lights
- USB Type-CUSB Type-C
- Set Multi-viewSet Multi-view
- Replay
- Replay buffer length
- Replay Camera 1
- Replay Camera 2
- Duration of event replay
- Replay end action
- Switch replay camera action
- Overlay replay watermark
- OSC Remote ControlOSC Remote Control
- Enable OSCEnable OSC
- Use TouchOSC Use TouchOSC
- ShortcutsShortcuts
- Add Shortcuts Add Shortcuts
- Edit ShortcutsEdit Shortcuts
- Set Text and Background Color for KeySet Text and Background C
- Delete Shortcuts Delete Shortcuts
- Re-order Shortcuts Re-order Shortcuts
- SystemSystem
- LanguageLanguage
- Date and TimeDate and Time
- Update FirmwareUpdate Firmware
- Auto Update Auto Update
- Manual Update Manual Update
- Device StatusDevice Status
- ← About
- Warranty
- License
- AboutAbout
- Rename the device
- BatteryBattery
- CautionCaution
- Battery InstallationBattery Installation
- Battery Indicator Battery Indicator
- Battery StatusBattery Status
- Typical Battery Working Time Typical Battery Worki
- Shortcuts for OBSBOT TalentShortcuts for OBSBOT Talent
- FAQsFAQs
- GeneralGeneral
- How to edit a scene? How to edit a scene?
- How to configure live stream servers? How to configure live stream servers?
- Configure the stream server on the OBSBOT Talent device:
- How to start and stop live streaming? How to start and stop live streaming?
- Manual Stream
- Quick Stream
- How to start a stream scheduled later for YouTubeHow to start a stream scheduled later for YouTube
- How many sources with video signal can I add to one scene/show?
- In the same scene
- In the same show
- How do I confirm the video inputs are successfully connected?
- Encoding Policy for Streaming, Recording and ReplayEncoding Policy for Streaming, Recording and Replay
- How to use the keyboard to enter in Chinese? How to use the keyboard to enter in Chinese?
- How to import and export files? How to import and export files?
- Use USB flash drive and SD card
- Use computer
- Use Web UI
- Why are my recordings split into 4.0 GB clips? Why are my recordings split into 4.0 GB clips?
- Why can't I log in to my YouTube account? Why can't I log in to my YouTube account?
- It does not show live comments from Twitch? It does not show live comments from Twitch?
- It does not show live comments from Facebook? It does not show live comments from Facebook?
- How to use the USB 3.0 ports? How to use the USB 3.0 ports?
- WEBCAM Frame Rate Information WEBCAM Frame Rate Information
- What can the USB-C OUT port be used for? What can the USB-C OUT port be used for?
- Mapping between the show's frame rate and each output frame rate
- How to optimize encoding settings How to optimize encoding settings
- Resolution
- Frame rates
- Bitrate
- Key frame interval
- Audio
- Profile
- Bitrate mode
- Unable to control the camera using VISCA protocol Unable to control the camera using VISCA protocol
- What to do when an NDI source jitters What to do when an NDI source jitters
- Audio Input
- Audio Output
- Which AP band should I choose for hotspot? Which AP band should I choose for hotspot?
- What to do when firmware update fails What to do when firmware update fails
- Possible causes:
- Troubleshooting procedure:
- SupportSupport
- View HelpView Help
- FeedbackFeedback
- Submit New Feedback Submit New Feedback
- Generate Log FileGenerate Log File
- Get the Latest Information Get the Latest Information
- Technical Support Technical Support
- NoticeNotice
- Trademarks Trademarks
- About this Document About this Document
- Glossary and AbbreviationsGlossary and Abbreviations
- AACAAC
- AESAES
- CBRCBR
- FTBFTB
- GFXGFX
- RTMPRTMP
- SRTSRT
- SSIDSSID
- USB HubUSB Hub
- VBRVBR
Brand : OBSBOT
Model : Talent
Category : Camera