
DI850 - Photocopier KONICA MINOLTA - Free user manual and instructions
Find the device manual for free DI850 KONICA MINOLTA in PDF.

| Product Type | Multifunction Digital Copier |
| Brand | Konica Minolta |
| Model | Di850 |
| Print Technology | Electrophotographic Laser |
| Copy Speed | Up to 85 copies/minute (A4) |
| Copy Resolution | 600 x 600 dpi |
| Standard Paper Capacity | 2,150 sheets (80 g/m²): 2 x 500, 1 x 1,000 + bypass tray 150 |
| Maximum Paper Capacity | 6,150 sheets with optional high-capacity cassette |
| Supported Paper Weight | 50 to 200 g/m² |
| Paper Sizes | A3, A4, A5, B4, B5, special and wide sizes (max. 314 x 459 mm) |
| Automatic Document Feeder (ADF) | Capacity up to 100 originals (80 g/m²), sizes A3 to A5 |
| Automatic Duplex | Yes, built-in |
| Finishing Functions | Sorting, stapling, folding, punching, trimming (with options) |
| Touch Screen | Yes, color, for configuration and job management |
| Power Consumption | Max. 3.45 kW (with options) |
| Dimensions (base configuration + ADF) | 887 x 775 x 1,160 mm |
| Weight (base configuration + ADF) | Approximately 280 kg |
| Power Supply | 230 V / 50 Hz |
| Noise Level | Max. 78 dB (with options) |
| Available Options | Finisher, trimmer, punch, folder, high-capacity cassette, print controller, memory extension |
| Maintenance and Cleaning | Regular cleaning of exposure glass and drum, emptying punch waste |
| Safety | Class 1 laser, automatic shutdown in case of overheating, jam protection |
| Repairability | Spare parts available; intervention by authorized technician recommended |
Frequently Asked Questions - DI850 KONICA MINOLTA
User questions about DI850 KONICA MINOLTA
0 question about this device. Answer the ones you know or ask your own.
Ask a new question about this device
Download the instructions for your Photocopier in PDF format for free! Find your manual DI850 - KONICA MINOLTA and take your electronic device back in hand. On this page are published all the documents necessary for the use of your device. DI850 by KONICA MINOLTA.
USER MANUAL DI850 KONICA MINOLTA
www.minoltaeurope.com
The essentials of imaging
Table of Contents
1 Introduction
1.1 We Want You to Be a Satisfied Customer 1-1
1.2 Protecting the Environment. 1-2
Takeback and Reutilization 1-2
What is Energy Star? 1-2
Use of Recycled Paper 1-2
1.3 Guide to this Manual.. 1-3
How is this Manual Structured? 1-3
A Brief Explanation of the Conventions Used in this Manual. 1-4
A Brief Explanation of Important Concepts and Symbols 1-5
1.4 Overview of System Features 1-8
General Features 1-8
Automatic Features 1-12
Finishing Features. 1-13
Features that can only be Set Up by a Service Technician. 1-14
WWW-Server Function 1-15
2 Getting to Know Your System
2.1 System Overview 2-1
External System Overview 2-1
Internal System Overview 2-3
2.2 Options (Accessories) 2-4
Finisher FN-115/FN-7 2-4
Cover Inserter C for Finisher 2-7
Large Capacity Cassette (LCC) C-403N/C-404N 2-8
TMG-2 Trimming Unit (optional for FN-7 Finisher) 2-9
PK-3 Hole Punch Unit 2-11
ZK-2 Punch/Z-fold Unit. 2-12
Memory Expansions. 2-13
Pi8500 Printcontroller 2-13
2.3 Safe Working with Your System 2-14
Laser Safety 2-18
Internal Laser Radiation 2-18
Safety Label. 2-20
System serial number 2-22
2.4 Transporting the System 2-23
2.5 Installing the System 2-23
Environmental Requirements 2-23
Installation Site 2-23
Space required for System 2-24
Storing Supplies 2-25
2.6 Connecting the System 2-25
Voltage and Frequency Tolerances 2-25
2.7 Switching the System on and off 2-26
Switching the System on 2-26
Switching the System off 2-27
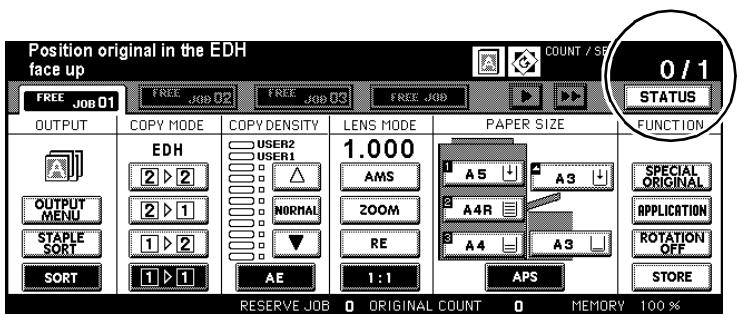
2.8 Control Panel Keys and Indicators 2-28
Control Panel. 2-28
Indicators and Keys on the Touch Screen. 2-30
2.9 Using the Touch Screen 2-33
2.10 Adding Paper 2-34
Refilling Trays 1, 2 and 3. 2-35
Adding Paper to Paper Tray 4 - C-403N (optional) 2-37
Adding Paper to Paper Tray 4 - C-404N (optional) 2-39
Filling the Bypass Tray 2-41
2.11 Adding Toner 2-43
2.12 Replenishing the Staple Supply 2-46
Adding Staples for the FN-115 Finisher (optional) 2-46
Adding Staples for the FN-7 Finisher (optional) 2-49
2.13 Monitoring the PM Count Time 2-52
Viewing the PM Count 2-52
Printing the PM Count 2-53
Closing the PM Count Screen 2-53
2.14 Shutting Down the System 2-54
2.15 Please Observe these Precautions 2-55
...when working with your system 2-55
...when servicing and repairing the system 2-55
2.16 Proper Use of Your System 2-56
3 Initial Steps...
3.1 Basic Operator Steps 3-1
Entering the Number of Copies. 3-1
Start Cycle. 3-2
Stop Cycle. 3-2
Reset System Settings 3-2
3.2 Activating the System 3-3
Ending Energy Saving Mode 3-3
Ending Auto Shut Off 3-3
Interrupting Weekly Timer Mode 3-4
Entering the E.K.C. Password 3-6
3.3 Placing the Originals on the Original Glass 3-8
3.4 Feeding Originals Using the EDH 3-10
Loading Equal-Sized Originals into the EDH 3-11
Loading Single Originals into the EDH (SDF) 3-12
Loading Mixed-Sized Originals into the EDH 3-13
Place Z-Folded Originals in the EDH 3-14
3.5 Checking the System Settings 3-15
Changing Settings. 3-15
Releasing Settings 3-17
Processing a Proof Copy 3-18
3.6 Reserving Copy Jobs 3-19
Setting up Reserve Jobs 3-20
Calling up the Status Display 3-21
Status Display Message Definitions 3-22
Changing the Order of Reserve Jobs 3-23
Deleting a Reserve Job 3-24
Checking the User Name of a Reserve Job. 3-25
Calling up the List of Already Executed Jobs. 3-26
Opening the Noncomplete Job List. 3-27
Interrupting the Setup of a Reserve Job 3-28
3.7 Interrupting a Copy Job 3-30
3.8 Recalling System Settings of the Last Job 3-33
3.9 Saving and Recalling System Settings 3-34
Saving System Settings 3-34
Recalling System Settings 3-37
3.10 Check System Meter Count. 3-39
Viewing the Meter Counts. 3-39
Printing the Counter List. 3-40
3.11 Enabling Energy Saving Modes 3-41
Enabling Energy Saving Mode 3-42
Enabling Auto Shut Off Mode 3-43
3.12 Using the Bypass Tray 3-44
Load the Paper on to the Bypass Tray 3-44
Processing Tab Papers 3-45
3.13 Using the Help Mode 3-46
Open Help Topic Overview 3-47
Call Help for a Specific Cycle 3-48
3.14 UsingBookmark Function 3-49
4 Basic Functions
4.1 Setting the Output Mode 4-1
Non Sort - Output to the Main Tray. 4-3
Sort-Output to the Main Tray 4-4
Staple - Output to the Main Tray. 4-6
Group - Output to the Main Tray 4-9
Output to the Sub Tray 4-11
Folding, Stapling & Folding and Trimming 4-14
Adding Front and Back Cover Sheets 4-19
Hole-Punch 4-22
Z-Fold 4-25
Manual Stapling, Punching or Folding. 4-28
Output without Finisher 4-31
Using two Systems in Tandem 4-35
4.2 Setting the Copy Mode 4-40
Creating 1 and 2-sided Copies (Using the EDH) 4-41
Creating 2-sided Copies (Using the Original Glass) 4-43
4.3 Adjusting the Contrast 4-46
Enabling Auto Exposure Mode 4-47
Manually Adjusting Copy Density 4-48
Adjusting the Image Density 4-49
4.4 Setting the Zoom Ratio 4-51
Enabling Automatic Magnification Selection (AMS) 4-52
Selecting a Preset Zoom Ratio 4-54
Selecting User-set Zoom Ratios 4-55
Horizontal/Vertical Stretch 4-56
4.5 Setting the Copy Paper Size 4-57
Enabling Auto Paper Select Mode (APS). 4-58
Manually Selecting a Paper Tray 4-60
Specifying the Paper Type/Size for the Bypass Tray. 4-61
Specify Copy Start on Wide Size Paper
for the Bypass Tray. 4-63
4.6 Applying Functions 4-65
Storing Originals (from the Original Glass) 4-66
Storing Originals (from EDH) 4-68
Using Rotation Mode 4-70
Set Original Position (Special Originals) 4-74
Setting Text/Photo Enhance (Special Originals) 4-76
Copying Mixed Sizes (Special Originals) 4-78
Copying Z-Folded Originals (Special Originals) 4-80
Feeding Originals Individually - SDF
(Special Originals) 4-82
Defining Special Original Types (Special Originals) 4-86
5 Applications
5.1 Adding Inserts and Cover Sheets 5-2
Information on: Inserts and Cover Sheets. 5-3
Procedure: Adding Inserts and Cover Sheets. 5-4
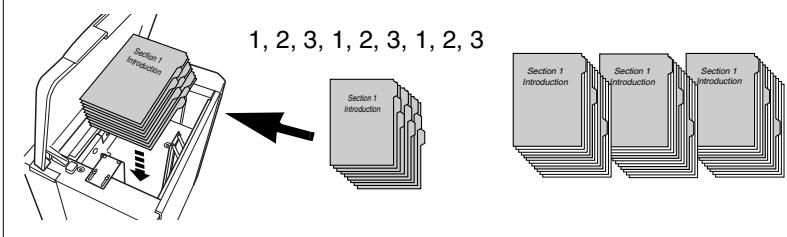
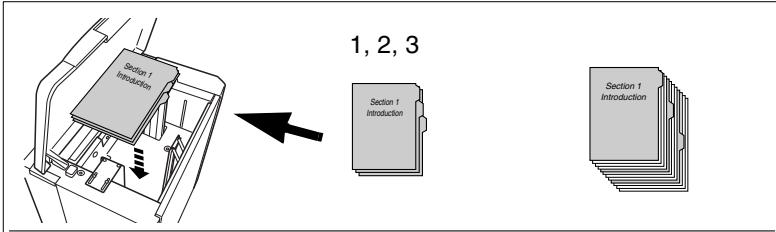
5.2 Executing Chapter Mode 5-6
Information on: Chapter Mode 5-6
Procedure: Executing Chapter Mode 5-7
5.3 Creating Combinations 5-9
Information on: Combination. 5-10
Procedure: Creating Combinations. 5-11
5.4 Creating Booklets 5-13
Information on: Booklets 5-14
Procedure: Creating Booklets 5-15
5.5 Creating OHP Interleave 5-17
Information on: OHP Interleave. 5-17
Procedure: Creating OHP Interleave 5-18
5.6 Inserting Images 5-20
Information on: Inserting Images. 5-20
Procedure: Inserting Images 5-21
5.7 Processing Dual Page Originals 5-23
Information on: Dual Page 5-24
Procedure: Processing Dual Page Originals. 5-25
5.8 Program Job 5-27
Information on: Program Job 5-27
Procedure: Program Job 5-28
5.9 Using Non-Image Area Erase 5-30
Information on: Non-Image Area 5-31
Procedure: Using Non-Image Area Erase 5-32
5.10 Creating Reverse Images 5-33
Information on: Reverse Image 5-33
Procedure: Creating Reverse Images 5-34
5.11 Using Image Repeat Mode 5-35
Information on: Repeat 5-36
Procedure: Using Image Repeat Mode 5-38
5.12 Using Frame/Fold Erasure 5-40
Information on: Frame/Fold Erasure. 5-40
Procedure: Using Frame/Fold Erasure 5-41
5.13 Using Auto Layout 5-43
Information on: Auto Layout 5-43
Procedure: Using Auto Layout 5-44
5.14 Using Full-Image Area 5-45
Information on: Full-Image Area 5-45
Procedure: Using Full-Image Area 5-46
5.15 Creating a File Margin 5-47
Information on: Image Shift 5-48
Procedure: Creating a File Margin 5-49
5.16 Using Stamp/Overlay 5-51
Information on: Using Stamp/Overlay 5-52
Procedure: Using Stamp 5-55
Procedure: Using Watermark 5-57
Procedure: Using Overlay 5-59
Procedure: Overlay Memory (store image) 5-61
Procedure: Overlay Memory (call up image) 5-64
6 Network Functions
6.1 Server Functions 6-1
Storing a Job 6-3
Deleting a Job 6-6
Storing and Printing a Job 6-8
Calling up Jobs from the Hard Drive 6-11
6.2 Web Functions 6-14
Starting Web Utilities. 6-15
Calling up System Status 6-17
Calling up Job Status 6-18
Call up and Edit Hard Drive Data 6-20
E-Mail Transmission Setting 6-24
7 Settings in Key Operator Mode
7.1 Overview 7-2
Calling up Key Operator Mode. 7-2
Leaving Key Operator Mode 7-2
Overview of the Key Operator Mode Menu. 7-3
7.2 (1) System Initial Setting 7-5
(1) Date & Time Setting. 7-5
(2) Language Select Setting. 7-7
(3) IP Address Setting. 7-8
(4) E-Mail Transmission Setting 7-10
7.3 (2) Copier Initial Setting 7-13
7.4 (3)User Setting Mode 7-15
(1) Setting User density Level 1. 7-15
(2) Setting User Density Level 2 7-17
(3) Setting the Zoom Ratio (Lens Mode). 7-19
7.5 (4) E.K.C. Function Setting 7-20
Calling up E.K.C. Mode 7-20
(1) E.K.C. Data Edit. 7-21
(2) E.K.C. All Count Reset 7-27
(3) E.K.C. Function Setting 7-28
7.6 (5) Program Memory Lock/Delete 7-30
Locking and Unlocking Program
Memory Positions. 7-30
Deleting System Settings. 7-31
7.7 (6) Paper Type/Special Size Setting 7-32
Specifying the Paper Type 7-32
Specifying the Paper Size 7-33
Set Copy Start to Wide Size Paper. 7-35
7.8 (7) Panel Contrast/Key Sound Adjustment 7-37
7.9 (8) Key Operator Data Setting.. 7-38
7.10 (9) Weekly Timer.. 7-39
Calling up Weekly Timer Mode 7-39
(1) Weekly Timer ON/OFF Setting 7-40
(2) Timer Setting 7-41
(3) Timer Action ON/OFF Setting 7-44
(4) Lunch Hour Off Setting. 7-46
(5) Timer Interrupt Password Setting. 7-47
7.11 (10) Control Panel Adjustment 7-48
7.12 (11) Set auto tray selection 7-49
7.13 (12) Energy Saver Setting 7-50
7.14 (13) Memory Switch Setting 7-51
Changing Settings 7-51
Overview of Settings. 7-52
7.15 (14) Machine Management List Print 7-57
7.16 (15) Call Remote Center 7-58
7.17 (16) Side 2 Lens Adjustment 7-60
7.18 (17) Finisher Adjustment 7-61
7.19 (18) HDD Management Setting 7-63
(1) Password List/Delete 7-63
(2) JOB Auto Delete Period Setting. 7-65
(3) State of HDD Capacity 7-66
7.20 (19) Scan Transmission Object Change/Del. 7-67
7.21 (20) Non-Image Area Erase Setting 7-67
8 Troubleshooting
8.1 If Your Copy Is Incorrect 8-1
8.2 Your System Is Not Working Correctly 8-3
8.3 If the PM Call Message Is Displayed 8-6
If the System No Longer Operates. 8-6
If the System Still Operates Partially 8-7
8.4 If the Memory "Overflows" 8-8
... while the current job is under way 8-8
... during setup of a reserve job 8-8
8.5 If the "Please Switch OFF/ON" Screen Appears 8-9
8.6 Clearing a Paper Jam 8-10
8.7 Emptying the Hole Punch Unit Waste Container 8-11
8.8 Emptying the Trimming Unit Waste Container 8-13
9 Appendix
9.1 System Maintenance.. 9-1
Cleaning System Parts. 9-1
Cleaning the Original Cover and Original Glass 9-2
9.2 Specifications 9-3
System Di850. 9-3
Document Feeder EDH-5. 9-5
Finisher FN-115 (optional), Finisher FN-7 (optional) 9-5
Trimming Unit C (optional for Finisher FN-115/FN-7) 9-6
TMG-2 Trimming Unit (optional for FN-7 Finisher) 9-6
PK-3 Hole Punch Unit (optional) 9-7
ZK-2 Punch/Z-fold Unit (optional) 9-7
Large Capacity Cassette C-403N (optional) 9-8
Large Capacity Cassette C-404N (optional) 9-8
9.3 Consumables 9-9
9.4 You Can Process This Paper 9-10
... with Paper Trays 1, 2, and 3. 9-10
... with the Large Capacity Cassette LCC (optional) 9-11
... with the Bypass Tray. 9-13
... with the Automatic Duplex Unit 9-14
... with the Cover Inserter C (optional) 9-14
... with the Finishers (optional) 9-15
... with the Hole Punch Unit and Punch/Z-fold Unit (optional) 9-17
TMG-2 Trimming Unit (optional for FN-7 Finisher) 9-18
9.5 CE Marking (Declaration of Conformity) 9-19
9.6 Index 9-20
1 Introduction
1.1 We Want You to Be a Satisfied Customer
Thank you for choosing a Minolta System.
To ensure the best performance and effective use of your system, this manual provides information on the following topics:
- Standard operator procedures
Basic functions - Special applications
- Settings in key operator mode
- Troubleshooting
Please read this manual carefully before using your system. Always keep the manual within reach. A holder for the manual is attached to the back of the system.
For further information and assistance in the event of difficulties, please contact:
- Your technical representative for Minolta
The Minolta hotline, tel. 0800/6466582 (toll-free)
Our Internet website http://www.minolta.com
Please keep the serial number (refer to the identification plate on your system) and the system's date of purchase handy to ensure fast, accurate assistance in the event of difficulties.
... because we want you to be a satisfied customer.
1.2 Protecting the Environment...
Minolta supports the challenge maintaining the environment and does all that it can to actively participate in preventing and resolving ecological problems. Our production is certified with ISO 9000 (quality management) and ISO14001 (environment management).
Takeback and Reutilization
Minolta partners take back old machines and systems as well as empty and used toner and drum units for recycling and reclaiming the materials. You can obtain further information by calling 0800/6466582 (toll-free).
What is Energy Star?

After long periods of idleness, Energy Star® systems switch to Energy Saver Mode or turn themselves off. This function can reduce the annual energy costs for the unit by up to 60% .
Systems with a high copying speed automatically switch to 2-sided copying mode. This reduces the costs for paper and the volume of paper consumed.
Did you know that manufacturing a sheet of paper requires 10 times as much energy as making a copy?
The conservation of paper thus also has a direct global effect on the conservation of energy.
This system complies with the Energy Star® energy efficiency criteria.
Use of Recycled Paper
This system is designed to use recycled paper that conforms to ENV 12281 or DIN 19309. Your local MINOLTA representative will be pleased to provide more information.
1.3 Guide to this Manual
How is this Manual Structured?
If you are not sure where to locate the information you need, please refer to this section. The following table will help you. For detailed information on specific issues, refer to the index at the end of the manual.
| No. | Chapter | Description |
| 1 | Introduction | This chapter contains introductory information, especially for the effective use of this manual. |
| 2 | Getting to Know Your System | This chapter will familiarize you with your system and its features: · System layout · Safe working with the system · Connecting the system |
| 3 | Initial Steps . . . | This chapter shows you how to carry out frequent operating tasks, such as: · Loading originals · Starting the copy cycle · Reserving jobs |
| 4 | Basic Functions | This chapter describes how to choose basic system functions to suit your needs, such as: · Adjusting the contrast · Setting the zoom ratio · Setting the copy paper size |
| 5 | Applications | This chapter shows you how to use special applications correctly, such as: · Adding inserts and cover sheets · Creating reverse images · Creating a file margin |
| 6 | Network Functions | This chapter describes how to store data on files on the hard drive (optional) as well as how to monitor the system by utilizing the Web Utilities. |
| 7 | Settings in Key Operator Mode | In this chapter you will learn how to change the default settings of the system. |
| 8 | Troubleshooting | This chapter contains tables and instructions to help you recognize faults and eliminate malfunctions. |
| 9 | Appendix | The appendix contains a collection of useful supplementary information such as: · System maintenance · Specifications · Index |
A Brief Explanation of the Conventions Used in this Manual
A variety of conventions and types of illustrations are used for special emphasis in this manual. The following examples show the most important conventions and how to respond to them.

DANGER
This is a danger warning!
The danger warning points out a danger of potentially serious injury or death. Not observing the danger warning can lead to serious personal injury.
The arrow marks the precautionary measure required to avoid the danger.

WARNING
This is a warning!
The warning points out a hazardous situation for persons and/or products. Not observing the warning can lead to personal injury and/or serious damage to the system.
The arrow marks the precautionary measure required to avoid the danger.

CAUTION
This is a caution!
The caution points out a potential and dangerous situation. Not observing the caution can lead to personal and/or system damage.
The arrow marks the precautionary measure required to avoid the danger.
[START] e.g. control panel key [START] = key on the control panel
e.g. key [START] = key on the touch screen
ERROR Message on the display panel with the text ERROR
Individual action to be performed (no further steps)
A list begins:
These bullets indicate a list.
- Lists with bullets are not in any specific order.
Where a list with white bullets follows a list with black bullets, the white bullets are ranked below the black bullets.
O
This is the end of the list.
1 Step 1 of a sequence of actions
2 Step 2 of a sequence of actions
? This is additional assistance.
The action described here is sure to achieve the results you desire.
3 Step 3 of a sequence of actions
This bullet indicates a list within a sequence of actions.
O


This is a helpful hint
Texts highlighted in this manner contain useful little tips and tricks for the copying process.
A Brief Explanation of Important Concepts and Symbols
Paper feeding direction, length and width, lengthwise and crosswise are standard terms. They are defined below.
Original and copy
The original is the document being duplicated by the copy cycle.

Original
(document to be copied)
Copy
(copy of the original document)
Copy cycle
enlarge, reduce, sort.
Feeding direction
The feeding direction is the paper's path through the system.
Width and length
Whenever paper dimensions are specified in the Owner's Manual, the first value always refers to the width of the paper (side A) and the second to the length (side B).
Lengthwise and crosswise
If side A of the paper format is shorter than side B, this is referred to as lengthwise. The size label is specified with an "R" e.g. A4R.
If side A of the paper format is longer than side B, this is referred to as crosswise. The size is not identified in any more detail, e.g. A4.
A4R
21 x 29.7 cm
Lengthwise

A4
29.7 x 21 cm
Crosswise


Size data with or without "R"?
Lengthwise sizes are specified with an "R". Sizes for which it is clear which direction they have to be inserted, such as A3 (can only be fed lengthwise), the "R" is omitted.
1.4 Overview of System Features
The digital technology and the memory capacities of this system give it a range of features that goes far beyond common copier functions.
The following pages provide an overview of the range of features offered by this system.
General Features
All-Image Area
Copy originals without losing any of the edge.
Auto Layout
Automatically centers a copy on the copy paper.
Booklet
Combine A4 originals (1-2 or 2-2) into A5 or A4 booklets.
Chapter
Automatically copy previously specified chapter titles on right side sheets. This feature is only available in duplex mode (1-2).
Combination
Copy 2, 4 or 8 originals onto a single copy paper sheet.
Contrast Range
Configure up to seven contrast ranges for four copy modes (automatic, increase contrast, photo and text).
Dual Page
Copy two pages from an open book onto two single A4 pages (1-1) or onto one A4 page (1-2). You can combine this feature with the Title and Back features.
Duplex
Make 2-sided copies from 1- or 2-sided originals.
Energy Saver
Save energy using: auto low power and auto shut off modes.
Frame/Fold Erasure
Removes copy edges from 1 to 300mm and/or fold marks from 1 to 99 mm, for example when copying from books.
Hole Punch for Finisher FN-7 (optional) or FN-115 (optional) (only available with PK-3 or ZK-2 punch units - optional extras)
Punches a set of four holes into the finished copies.
Image Insert
Store image data from a document placed on the original glass. The stored image data can be inserted into another original set, which has been read in through the EDH.
Image Shift
Create an image shift from 0 to 250~mm in 1 mm steps by shifting the image area and if necessary also reducing it.
Interrupt Mode
Interrupt a copy cycle to copy urgent documents without waiting.
Job Status List
View an overview of the current copy job, other reserved copy jobs and copy jobs that have already been processed. The status list can also be used to change the order for processing pending copy jobs.
Magnification Ratio (fixed, variable)
Selecting a Magnification Ratio.Eight fixed and three user-defined magnification ratios can be selected. Or choose a user-set zoom ratio within the range of 25% to 400% in 0,1% increments.
Manual Shut Off
Manually shut off the copier to conserve energy.
Meter Count
Display a list with various meter counts: Total Count, Copy Count, Printer Count and Maintenance Count.
Mixed Original (different-sized originals)
Copy a set of mixed size originals using the APS and AMS features. AMS = Automatic magnification selection to copy mixed sizes onto a desired paper size.
APS = Automatic paper selection to select copy paper based on the originals and a magnification ratio.
Non-Image Area Erase
Copy with the original cover open without getting the familiar black edges.
Non STD Size for Bypass Tray
Specify special sizes for the bypass tray (to prevent faulty paper feeding).
Specify nonstandard sizes for originals. This allows automatic selection of an appropriate copy paper.
OHP Interleave
Insert blank or printed interleaves when copying onto transparencies.
Overlay
Copy two originals to one copy. For example, a letterhead and a text can be copied together onto a page in one process.
Overlay Memory
Functions as with overlay mode. However, the overlay image is permanently saved on the hard disk and can be recalled as required.
Overlay Memory
Store templates to use with the image overlay feature.
Paper Capacity
Total of 2,150 sheets (2 × 500 sheet drawer, 1 × 1,000 sheet drawer and 150 sheet bypass tray). Optionally available large capacity cassette holds up to 4,000 sheets (80 g/m²).
Program Job
Scan originals using various copier configurations and then make the copies in a single process.
Program Memory
Store and call up to 30 copy job configurations.
Proof Copy
Test the copier settings using a proof copy before starting large copy jobs.
Repeat
Make multiple copies of a document onto one copy.
Reserve Jobs
Prepare further copier jobs while the copier is still busy processing the output of a job.
Reverse Image
Make copies using inverse color values (black becomes white, white becomes black).
Rotation Sort/Rotation Group
Output grouped or sorted copy sets, alternating lengthwise and crosswise.
Server Functions (Optional)
Store and call up copy jobs from a hard drive.
Sheet/Cover Insertion
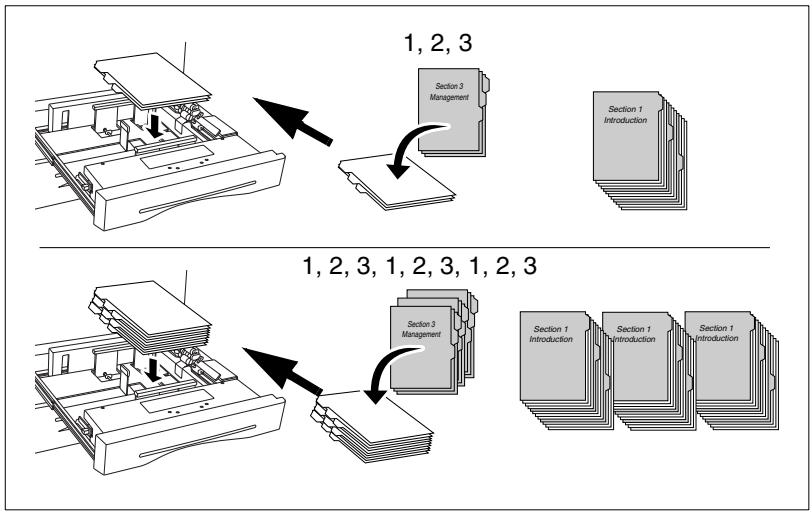
Insert up to 30 separator sheets and/or cover and back sheets from one of the paper drawers or from the bypass tray. The inserts, cover and back sheets can be printed or blank as desired.
Simplex
Make 1-sided copies from 2-sided originals (2-1).
Stamp
Overprint copies with a stamp (set or page number) or print a watermark on copies.
Staple
Specify a stapling position and the number of staples for each copy set.
Status Area
Shows the current system status for better control.
STD Size Original (Special)
Detection of standard sizes that usually are not recognized by an automatic size detection unit.
Store Mode
Store originals that have been read in using the EDH or the original glass.
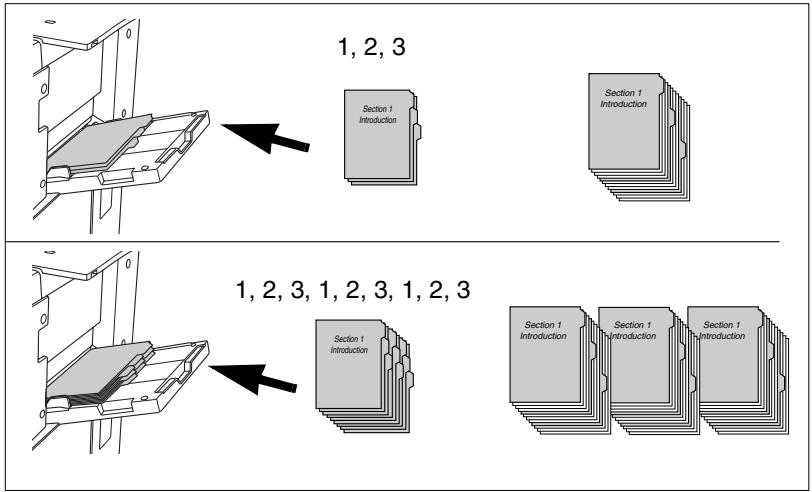
Tab Papers
Copying from and to tab papers gives an exact copy of items such as register tab texts.
Tandem Operation (only with two systems)
Combine two systems into one unit. This lets you complete a copy job in half the time.
Text/Photo Enhance
Improve exposure for optimizing the output of originals that contain text, photographs or very light copy areas.
Trimmer Function for FN-7 Finisher
(only with optional TMG-2 trimmer unit) Trims the front edge of a stapled/folded booklet to make the edge even.
User-set Density
Define two user-defined density settings, which then can be called up on the touch screen.
User-set Zoom Ratio
Define up to three user-defined zoom ratios, which then can be called up on the touch screen.
Weekly Timer
Specify times at which the copier is to switch on and switch off. These times can be specified as individual times or blocks of time. Holidays can be scheduled for up to a year in advance using the calendar function.
Wide Size Paper
Process copy paper sizes that are larger than the standard sizes.
Z-fold for Finisher FN-7 (optional) or FN-115 (optional)
(only available with ZK-2 punch unit for Z-fold - optional)
Provides A3 copies with a Z-fold or folds B4 copies twice.
Z-Folded Original
Automatically feed in originals with Z folds using the EDH.
Automatic Features
Auto Low Power
Automatically reduces the power consumption after a specified idle time.
Auto Panel Reset
Automatically resets the copier settings to their defaults after a specified time.
Auto Shut Off
Automatically shuts off the copier after a specified idle time.
Automatic Exposure Selection (AE)
The most appropriate exposure level is selected automatically based on the originals being processed.
Automatic Magnification Selection (AMS)
Automatically selects a zoom ratio to copy mixed sized originals onto a desired size of paper.
Automatic Paper Selection (APS)
Automatically selects the appropriate copy paper based on the originals and a magnification ratio.
Automatic Tray Switching (ATS)
Automatically switches the paper trays when paper runs out. This enables copying to be continued without interruption when a paper tray is emptied.
Rotation
Automatic rotation of the image area when the alignment of the originals does not correspond to the paper alignment.
Finishing Features
Output with Finisher FN-7 (Optional) or FN-115 (Optional)
The following finishing modes are available:
- Main tray Non Sort, Sort, Staple and Group
- Sub tray Non Sort (face down), Non Sort (face up), Group (face down), Group (face up)
- Booklet output (only FN-7)
Stapling & folding, folding - Trim output (only FN-7 with installed TMG-2 trim unit - optional)
- Trimming
Output with Finisher FN-7 (optional) or FN-115 (optional) with Cover Inserter C (optional)
Insert separating sheets and/or covers and staple manually.
Output without Finisher
The following finishing modes are available:
Non Sort Copies are output in the order in which the originals were scanned.
- Rotation Sort
Copies are output in the order in which the originals were read. The copy sets are output alternating lengthwise and crosswise.
Group The copies are output in groups.
- Rotation Group
- The copies are output in groups. The copy sets are output alternating lengthwise and crosswise.
Features that can only be Set Up by a Service Technician
The following features can only be set up by a service technician. If you want to have the following features set up for your use, contact your technical representative.
Key Operator Password
The service technician can define a 4-digit key operator mode master code. Access to key operator mode then can only be acquired after entering the master code.
E.K.C. Master Key Code
The service technician can define an 8-digit E.K.C. master key code. Access to the settings for the E.K.C. counter then can only be acquired after entering the master code.
Weekly Timer Master Key Code
The service technician can define a 4-digit weekly timer master code. Access to the settings for the weekly timer then can only be acquired after entering the master code.
View the Weekly Timer Times on the Help Screen
The service technician can set up a key on the help screen to call up the weekly timer times. This key then allows the user to view the weekly timer times.
Touch Screen Contrast Settings on the Help Screen
The service technician can set up a key on the help screen to adjust the contrast of the touch screen.
Messages: ADD TONER and PM CALL
The service technician can set up the system to display the following messages automatically:
When the toner level in the bottle is very low: ADD TONER
When maintenance is required: PM CALL.
WWW-Server Function
If the system is networked to a PC, you can view the current system status on the PC using a web browser:
UBL
http:// (system IP address or Host Name)
- Browser
Internet Explorer 5.0 or Netscape 4.0 or higher
- Displayed items
Paper magazine configuration, accessories configuration etc.
- Access to the WWW server
Via browser's URL
2 Getting to Know Your System
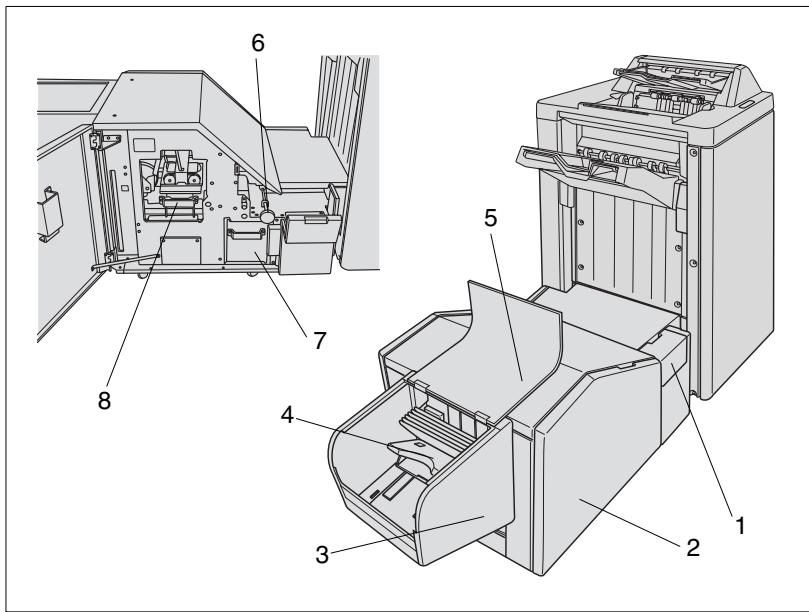
2.1 System Overview
External System Overview

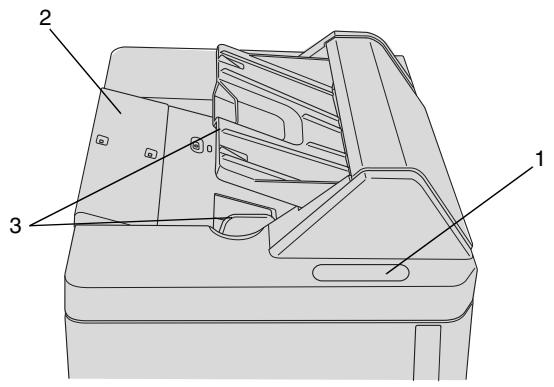
| Item | Name | Description |
| 1 | EDH | Electronic Document Handling Tray Feeds in originals page by page automatically. |
| 2 | Document shelf | Surface for placing originals or copies |
| 3 | Bypass Tray | Holds up to 150 sheets of standard paper (80 g/m2) or 1 sheet of special paper |
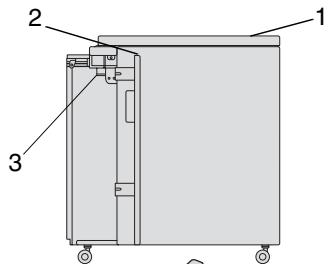
| 4 | Large Capacity Cassette LCC (optional) | Holds up to 4,000 sheets of standard paper (80 g/m2) |
| 5 | Right-hand door | Open this door to clear paper misfeeds. |
| 6 | Tray 3 | Universal drawer holds up to 1,000 sheets (80 g/m2) of various sizes |
| ... continued on next page | ||

| Item | Name | Description |
| 7 | Tray 2 | Universal drawer holds up to 500 sheets (80 g/m2) of various sizes |
| 8 | Tray 1 | Universal tray holds up to 500 sheets of paper (80 g/m2) of various sizes |
| 9 | Front door | Open this door to change the toner or clear a paper jam. |
| 10 | Left door | Open this door together with the front door to clear a paper jam. |
| 11 | Punch unit or Punch/Z-fold unit (optional) | Used for punching holes and Z-folding copies |
| 12 | Finisher (optional) | Used for regulated, stacked or sorted output of copies |
| 13 | Trimming Unit (optional) | Used for trimming the front edge of a stapled/ folded booklet |
| 14 | Power Switch | Switches the system off |
| 15 | Cover Inserter (optional) | Inserts cover sheets |
| 16 | LCD touch screen | Touch-sensitive screen for viewing and modifying system jobs and settings |
| 17 | Control panel | Provides the keys for operating the system |
Internal System Overview
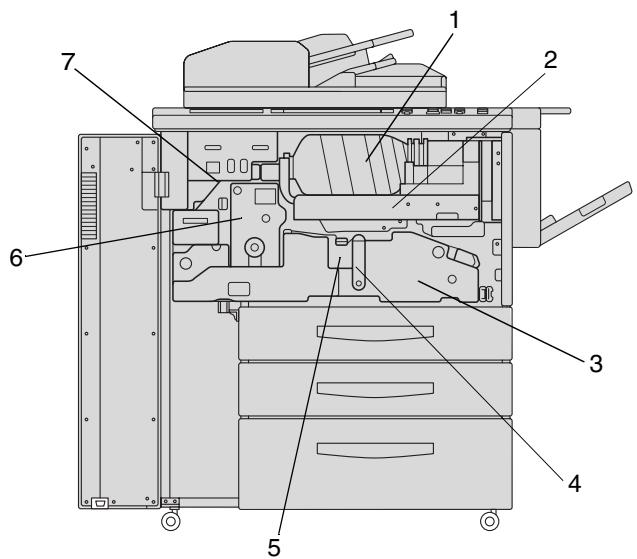
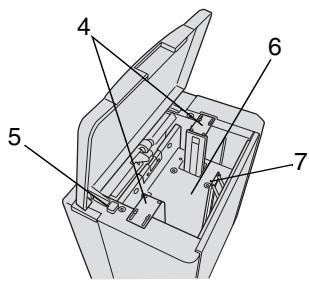
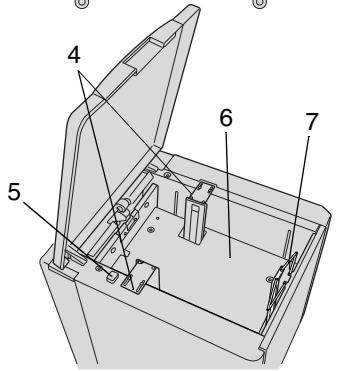
| Item | Name | Description |
| 1 | Toner bottle | Contains the toner. Has to be replaced when toner runs out. |
| 2 | Toner Holder | Holds the toner bottle |
| 3 | Transport Fuser Unit | Transports the paper through the drum unit and fixer unit. The transport carriage can be pulled out to clear a paper jam. |
| 4 | Lever A | Release this lever to clear a paper jam in this area. |
| 5 | Drum unit | The copy image is generated on the drum unit. |
| 6 | Fixer unit | Fuses the toner onto the copy paper. |
| 7 | RESET switch | (for service personnel use only) Interrupts the power supply when the button is pressed. |
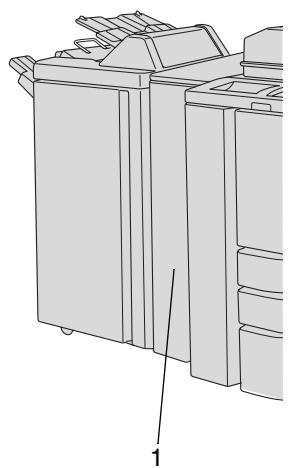
2.2 Options (Accessories)
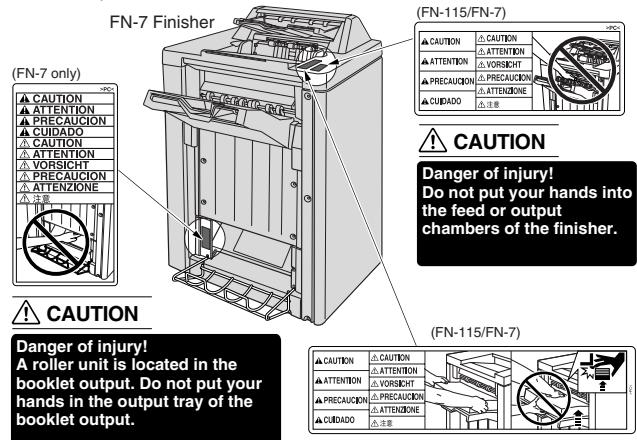
Finisher FN-115/FN-7
The finishers provide regulated output and sorting of copies.
The FN-115 provides the following functions:
- Sort
Staple
Group
The FN-7 provides these additional following functions:
- Folding
- Folding & Stapling (for creating booklets)
- Trimming (with installed TMG-2 trimming unit - optional)

CAUTION
Device damage by incorrect assessment of spacial requirements
The offset trays of a finisher move downward during the output cycle. Objects below the offset trays may seriously damage them.
Do not place any objects below the offset trays of the finisher.

CAUTION
Danger of injury!
The Finisher FN-7 booklet output is fitted with a folding unit.
Do not reach into the booklet output of the Finisher when you are removing folded or stapled booklets.

Do not exceed the capacity of the offset trays!
Do not exceed the capacity of the finisher offset trays, otherwise a paper misfeed may occur. You should empty the offset trays during a large copy job to avoid exceeding the capacity. For more information, see page 9-15.
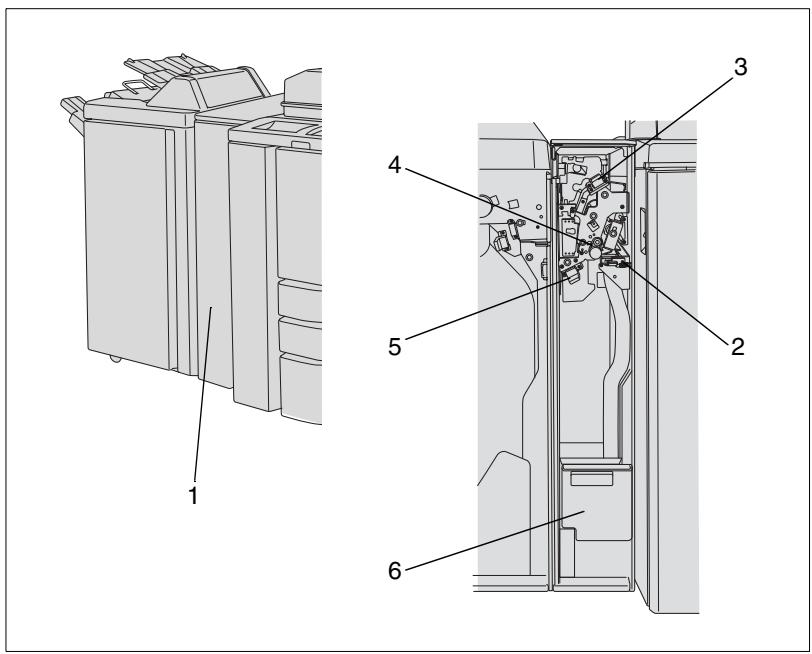
Finisher FN-115/FN-7 (external overview)
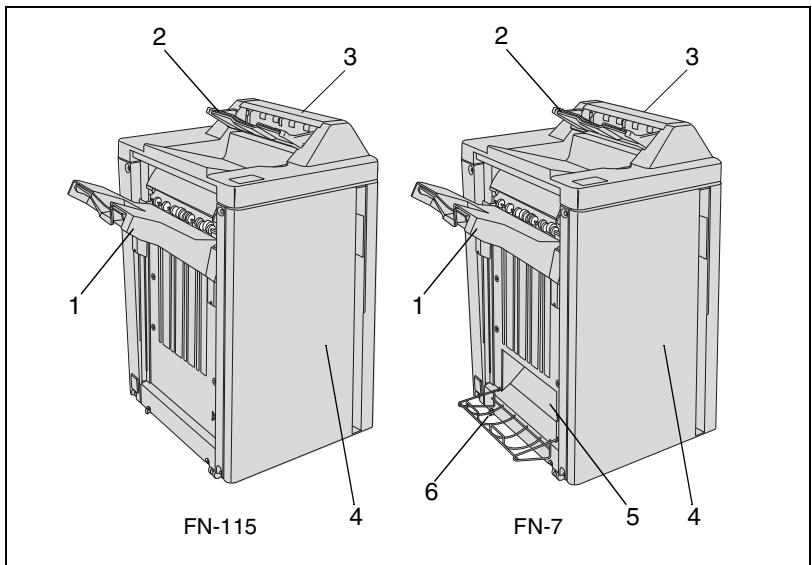
| Item | Name | Description |
| 1 | Main Tray | Copies are output here • Non Sort • Sort (with offset) • Staple • Group (with offset) |
| 2 | Top offset tray | Copies are output here • Non Sort • Group (printed side down/up) |
| 3 | Top offset tray paper misfeed door | Open this door to clear paper misfeeds |
| 4 | Finisher door | Open this door to • clear a paper misfeed • fill the staple cartridges |
| 5 | Booklet output (only FN-7) | Copies processed using the “Folding” or “Stapling & Folding” features are output here. |
| 6 | Booklet Basket (only FN-7) | Catches copies discharged by the booklet output. |
Finisher FN-115/FN-7 (internal overview)
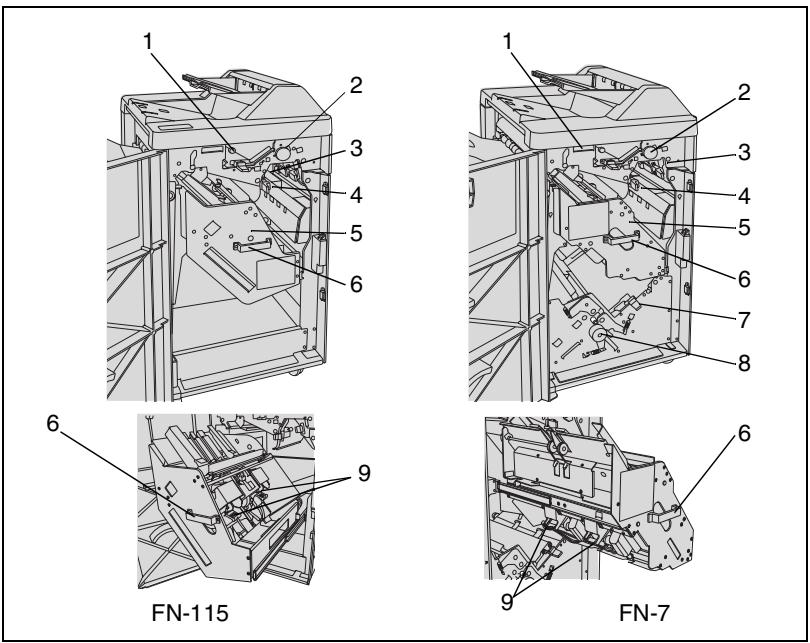
| Item | Name | Description |
| 1 | Lever for opening the paper-jam door | Open the paper-jam door to remove jammed paper |
| 2 | Transport rollers | Rotate the transport rollers to feed jammed paper further |
| 3 | Lever for opening the paper-jam door | Open the paper-jam door to remove jammed paper |
| 4 | ||
| 5 | Staple unit | Staples copies and, with the FN-7, also turns them into booklets |
| 6 | Handle on the stapler unit | Pull the stapler unit out by this handle, to remove jammed paper or fill the staple cartridges |
| 7 | Lever for opening the paper-jam door | Open the paper-jam door to remove jammed paper |
| 8 | Transport rollers | Rotate the transport rollers to transport jammed paper out of the staple unit |
| 9 | Staple cartridges | Replace the staple cartridges when the staples run out |
Cover Inserter C for Finisher
The Cover Inserter is a paper feeding unit for the finishers. It can be used, for example, to feed in cover stock for creating booklets.
Paper fed by the cover inserter is sent directly to the finisher; it does not run through the copier. The paper fed from the cover inserter thus cannot be printed during cover insertion.
| Item | Name | Description |
| 1 | Control panel | Keys for operating manually cover inserter B |
| 2 | Tray | Place cover pages for automatic feed |
| 3 | Guide plates | Ensure correct alignment of the paper stack |
Large Capacity Cassette (LCC) C-403N/C-404N
Additional paper tray with a capacity of up to 4,000 sheets (80g / m^2) of paper.

C-403N
C-404N
| Item | Name | Description |
| 1 | Upper cover | Open the top cover to add more paper |
| 2 | Left door | Open this door to clear paper misfeeds |
| 3 | Lever for opening the paper-jam door | Open the paper-jam door to remove jammed paper |
| 4 | Guide plates | Ensure correct alignment of the paper stack |
| 5 | Button for lowering the paper plate | Press this button to lower the paper plate and refill with new paper |
| 6 | Paper plate | Automatically lifts the paper stack |
| 7 | Rear tray | Ensures correct alignment of the paper stack |
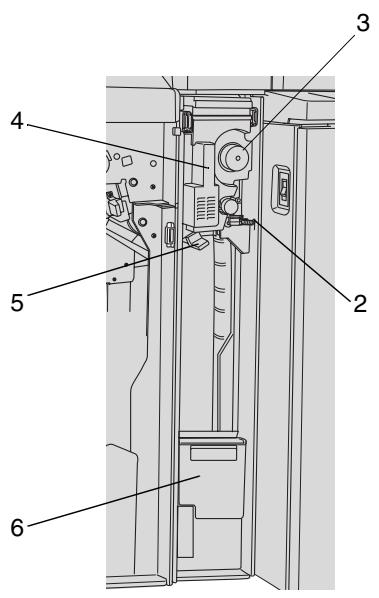
TMG-2 Trimming Unit (optional for FN-7 Finisher)
The trimming unit lets you trim the front edge of stapled or folded booklets. This ensures a smooth booklet edge.

CAUTION
Incorrect handling can cause damage to the system!
Incorrect handling can cause damage to the system. Observe the following safety precautions to prevent system damage.
Never place any objects on or in the trimming unit.
Do not use the trimming unit for storing copy materials or other objects.

Always keep the tray cover closed!
It is not possible to start a copy cycle if the tray cover is not closed. If the tray cover of the trimming unit is opened during a copy cycle, the system stops the cycle automatically. This leads to a paper misfeed.
| Item | Name | Description |
| 1 | Front right panel | Open this panel to clear paper misfeeds |
| 2 | Front door | Open the front door to clear a paper jam or to empty the waste container |
| 3 | Drawer | Receives the trimmed booklets |
| 4 | Tray | Moves in steps to the left when booklets that have been trimmed are output |
| 5 | Tray cover | Open this cover to remove the completed, trimmed booklets |
| 6 | Transport rollers | Rotate the transport rollers to transport jammed paper out of the unit |
| 7 | Waste container | Collects waste paper |
| 8 | Lever for opening the paper-jam door | Open the paper-jam door to remove jammed paper |
PK-3 Hole Punch Unit
Punches four holes in copies.
| Item | Name | Description |
| 1 | Front door | Open the front door • to clear paper misfeeds • to empty the waste container |
| 2 | Lever for opening the paper-jam door | Open the paper-jam door to remove jammed paper |
| 3 | ||
| 4 | Transport rollers | Rotate the transport rollers to feed jammed paper further |
| 5 | Lever for opening the paper-jam door | Open the paper-jam door to remove jammed paper |
| 6 | Waste container | This is where the punch wastes are collected |
ZK-2 Punch/Z-fold Unit
Punches 4 holes into copies and/or Z-folds them.
| Item | Name | Description |
| 1 | Front door | Open the front door • to clear paper misfeeds • to empty the waste container |
| 2 | Lever for opening the paper-jam door | Open the paper-jam door to remove jammed paper |
| 3 | Transport rollers | Rotate the transport rollers to feed jammed paper further |
| 4 | Handle | Pull the unit out by the handle to clear a paper jam |
| 5 | Lever for opening the paper-jam door | Open the paper-jam door to remove jammed paper |
| 6 | Waste container | This is where the punch wastes are collected |
Memory Expansions
Expand the memory capacity of the system. This allows more originals to be read into the document memory, for example.
The following extended memory units can be purchased:
64 MB extended memory
128 MB extended memory
Pi8500 Printcontroller
Allows the system to be used as a printer.
2.3 Safe Working with Your System
The improper use of your system may result in health hazards, electrical shock or even fires. Please observe the following precautions for the safe use of your system.

DANGER
Incorrect use of the system can result in fire and/or electrical shock!
The system is equipped with high-voltage components. Incorrect use of the system may result in fire or electrical shock. Observe the following safety precautions to prevent injury and system damage.
Never use flammable sprays, liquids or gasses near the system.
Never remove any safety equipment.
Do not touch areas designated with safety labels.
When you clear a paper jam etc. only touch the specially marked areas.
Do not make design changes to the system.
Never unplug the system with wet hands.
Ensure that the power supply provides the correct supply voltage for the system.
Never connect the system to a multiple-socket extension cord.
Do not place coffee cups, bottles or other containers with liquids on the system. If liquids should ever accidentally be spilled or splashed into the system, switch the system off immediately. Unplug the power cable. Consult your technical representative.
Never insert paper clips, staples or other small pieces of metal into the openings of the system. If metal items should ever accidentally fall into the system, switch the system off immediately. Unplug the power cable. Consult your technical representative.
Do not dismantle the system.
Allow only specially trained and authorized service personnel carry out maintenance and repairs.
Never touch the drum unit.

DANGER
Incorrect use of the system can result in fire and/or electrical shock! The system is equipped with high-voltage components. Incorrect use of the system may result in fire or electrical shock. Observe the following safety precautions to prevent injury and system damage.
Note that the system is still switched on even when it is in low power mode or in weekly timer mode.
→ Always switch off the system using the power switch if the system is not going to be used for a long time.
Always unplug the power cable when the system is not going to be used for a long time.

DANGER
Incorrect use of the power cable can result in fire and/or electrical shock!
The system is equipped with high-voltage components. Incorrect handling of the system's power cable may cause damage to the cable. This could result in fire and/or cause electrical shock. Observe the following safety precautions to prevent injury and system damage.
Be sure that the power cable is not damaged. If this is not the case, switch off the system immediately. Unplug the power cable. Consult your technical representative. Do not repair the network cable.
Do not pull directly on the power cable itself when unplugging the power cable from the power outlet.
Do not move the system unless it is unplugged.
Never place heavy objects on the power cable.
Do not pull or bend the power cable.
Do not place the system on cables belonging to other devices.
Ensure that no cables of other devices get pinched in the system.
Be sure that the power cable sits correctly in the power outlet.
→ Always make sure that the power outlet is visible and accessible at all times.
Keep the network connector and the socket free from dust.
Never use any extension cords to connect the system to a power outlet.
Never connect the system to a multiple-socket extension cord.

DANGER
System overheating can result in fire and/or electrical shock!
The system is equipped with high-voltage components. Incorrect use or faulty operation of the system may cause the system to overheat. Observe the following safety precautions to prevent injury and system damage.
Switch off the system immediately if it becomes unusually hot, smoke rises from the system or you detect an unusual smell. Unplug the power cable. Consult your technical representative.
If a fuse is tripped during a procedure, repeat the procedure. If a fuse is tripped again, switch the system off immediately. Consult your technical representative.
Be sure the fuses are sufficient for the nominal current ratings.
Always unplug the power cable when the system is not going to be used for a long time.

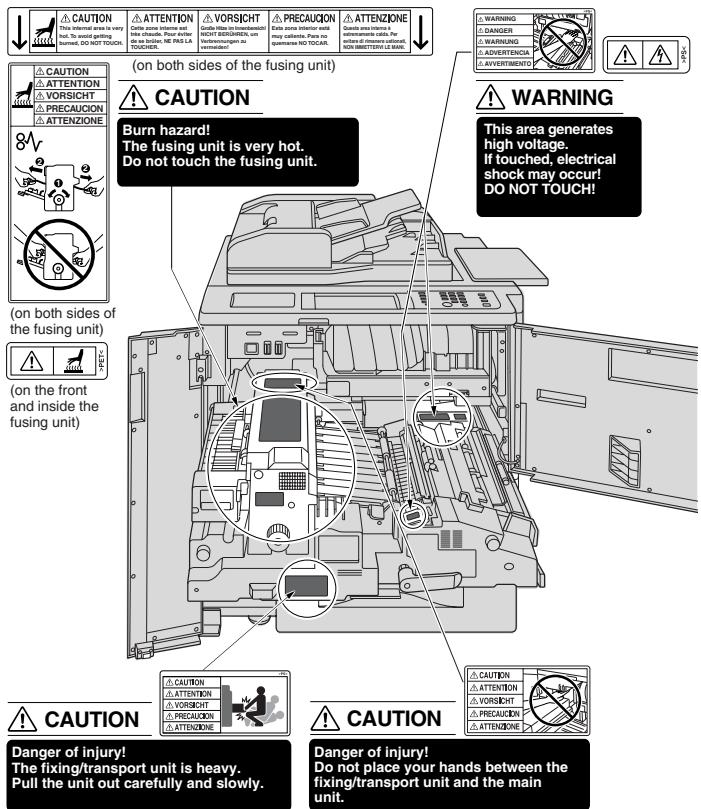
CAUTION
Improper operation of the system can cause injury!
Incorrect operation of the system can lead to personal injury. Observe the following safety precautions to prevent injuries.
Never touch the fusing unit. The fusing unit is hot.
When carrying out a procedure, touch only those parts of the system that must be touched for this procedure as described in this manual.
Never put your hands into the booklet output of the finisher.
Never put your hands into the output tray of the finisher.

CAUTION
Damage to the system by external influences!
External influences can cause damage to the system. Observe the following safety precautions to prevent system damage.
Do not subject the system to vibrations.
Never bring any magnetized object near the system.
Never place any objects heavier than 6.8kg and/or thicker than 30mm onto the system.
Do not put any objects under the main tray of the finisher. During the output cycle, the finisher moves downward and can be damaged by objects in its way.

CAUTION
Incorrect handling can cause damage to the system!
Incorrect handling can cause damage to the system. Observe the following safety precautions to prevent system damage.
Do not open any doors on the system during printing.
Do not switch the system off during printing.
Ensure that the trays are not overloaded during copying. Observe the specifications provided in the appendix! If necessary, remove finished copies during the process to avoid overloading the trays.
Only use the copier and special paper that are expressly specified in this manual.
Never use stapled or conductive paper.

CAUTION
A negligible amount of ozone is released during printing!
While this is not a health hazard, it may result in an unpleasant odor. It is recommended that the room be well ventilated.
Locate the system in a well-ventilated room.
Laser Safety
This system is equipped with a laser. If the system is operated in accordance with the instructions in this manual, the laser poses no possibility of danger.
The laser radiation is completely confined within the machine housing. The laser beam cannot escape the housing at any time of operation.
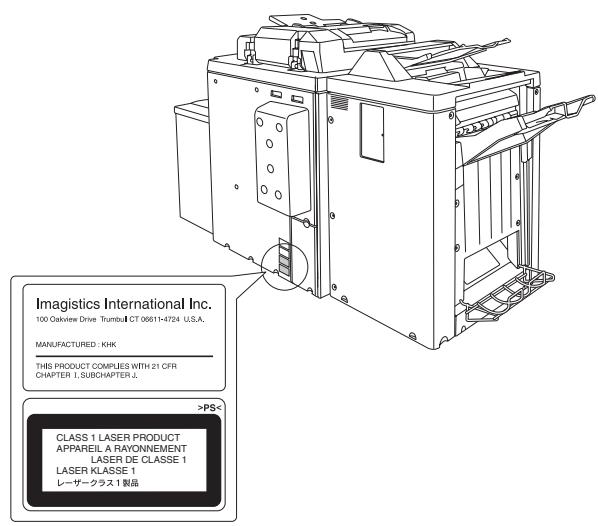
This system is certified as a Class 1 laser product. This means that the system does not generate any hazardous laser radiation.
Internal Laser Radiation
Mean radiation output:
1220~ W at the laser opening of the printer head.
Wave length: 665-695 nm
This system operates using a Class IIIb laser diode that emits an invisible laser beam. The laser diode and scanning polygon mirror are incorporated in the print head unit.
The print head unit is NOT A FIELD SERVICE ITEM. It may not be opened under any circumstances.
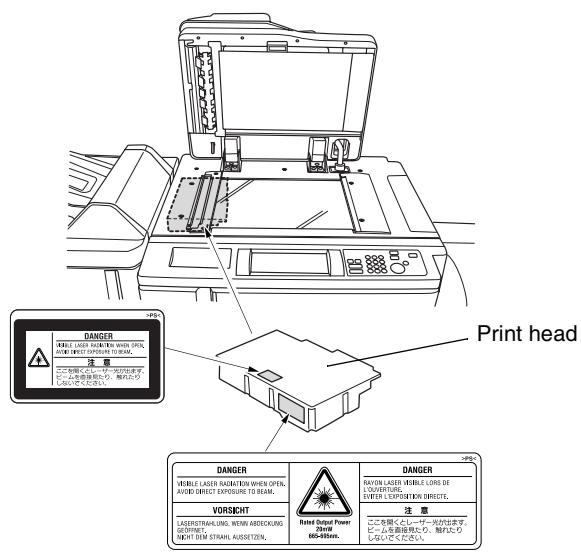
The above illustration indicates the location of the print head of the system.
This is a semiconductor laser system. The maximum radiation capacity of the laser diode is 20mW . The wavelength is 665-695 nm.
Laser safety label on the back of the system

DANGER
Hazardous laser radiation!
Operating the system in a manner that does not conform to the descriptions provided in this manual can lead to the release of hazardous radiation.
Operate the system only in accordance with the instructions provided in this manual.
Safety Label

DANGER
Safety labels indicate hazard areas. Incorrect handling in hazard areas can lead to serious personal injury and/or damage to articles.
Use this operating manual to familiarize yourself with the hazards before carrying out any activity in a hazard area.
Clean soiled safety labels to keep them visible and legible. Replace safety labels if they become illegible. For further information, consult your technical representative.

Danger of injury!
Never place your hands on the output copier paper stack when the Finisher copy tray is moving upwards.
System serial number
The serial number is located on a label at the following position:
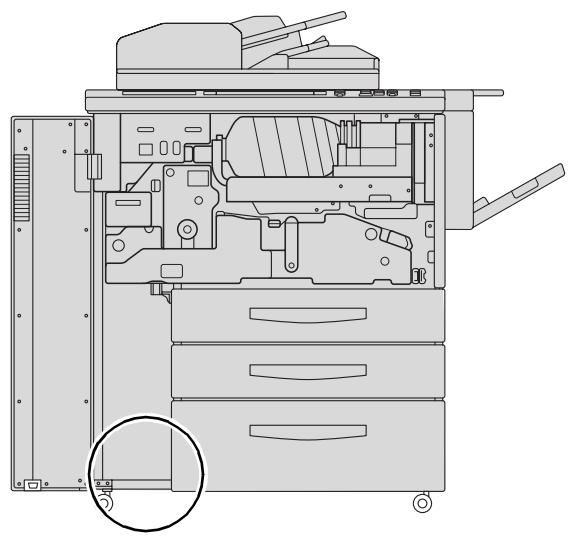
Make a note of the serial number of your system in the table below. Please keep this information at hand in the event of any questions for fast help in the event of problems.
| Model: | |
| Serial No.: |
2.4 Transporting the System
If you need to transport the system, please consult your technical representative.
2.5 Installing the System
Environmental Requirements
The optimal environmental requirements of the system are as follows.
- Temperature from 10^ to 30^ / 50 to 86^ (maximum fluctuation of 10^ / 50^ per hour)
- Humidity of 10% to 80% (maximum fluctuation of 20% per hour)
Installation Site
The installation site must meet the following requirements:
- an area that is dry and free of dust
a level surface free of undue vibrations - provision for good ventilation
- a location away from curtains or other easily-inflammable materials
- away from personnel so that no one is subjected to the direct exhaust air of the system
The system must be protected from the following influences:
- splashing liquids
- direct sunlight
- strong temperature fluctuations
- direct air flow from heating or air conditioning units

CAUTION
Damage to the system by external influences!
The main tray of the finisher lowers during the output cycle. Objects located under the main tray can damage the main tray.
Do not put any objects under the main tray of the finisher.
Space required for System

CAUTION
Device damage by incorrect assessment of spacial requirements Always ensure sufficient free space around the system. Too little space can cause damage to the system, for example from overheating. Furthermore operation is hindered by too little free space.
Leave sufficient space between the back of the device and the wall to ensure adequate ventilation.
Do not put any objects under the main tray of the finisher. The main tray lowers during the output cycle. Objects located under the main tray can cause serious damage to the main tray.
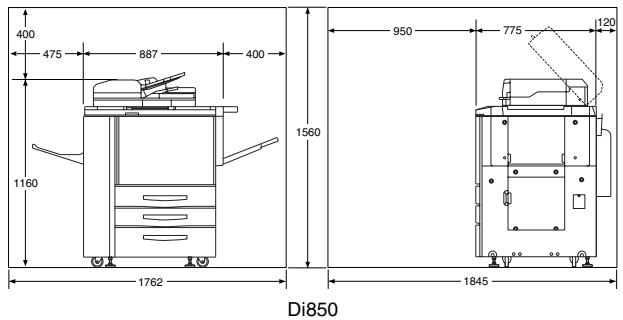
Units in mm
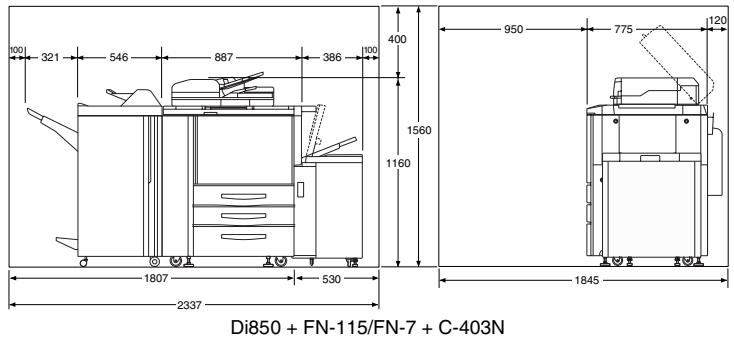
Units in mm
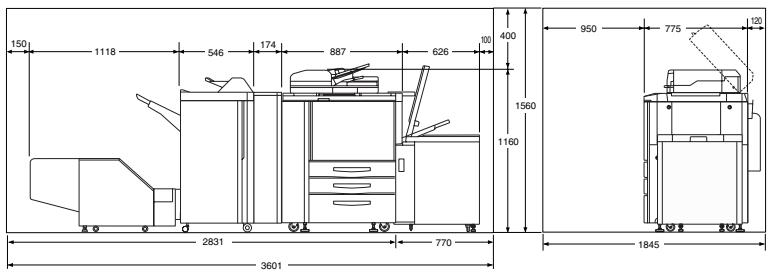
Di850 + FN-7 + TMG-2 + PK-3/ZK-2 + C-404N
Storing Supplies

WARNING
Toner can be hazardous to your health!
Toner is harmful to your health.
If you get any toner on your hands, immediately wash them thoroughly with soap and cold water.
Never dispose of an empty toner bottle in a fire. The remaining toner left in the bottle can ignite and cause a hazardous situation.
Ensure that supplies are stored:
- in their original, sealed packaging
- protected from direct sunlight and heat sources
- in a cool, dry, dust-free location
out of the reach of children
2.6 Connecting the System
Voltage and Frequency Tolerances
The system needs a reliable, consistent power supply. Please call your in-house technical support if required.
Voltage ± 10%
Frequency ± 0.3%
2.7 Switching the System on and off
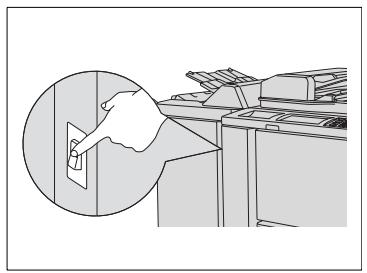
Switching the System on
The power switch is located on the left side of the main unit.
Switch the power switch (POWER) to the I position.
The warm-up phase (about 6 minutes) begins, during which various warm-up indications are displayed on the touch screen.
? If the system will not let you switch it on using the power switch...
The system is equipped with an extra internal power switch (RESET switch). This switch is only used by service and maintenance personnel. For more information, see page 2-3.
Be sure that the RESET switch is set to the I position.
Do not use the RESET switch to switch the system on or off under normal operating conditions.
Initial System Settings:
Number of copies: 1
- Zoom ratio: 1:1
EDH ON
- Copy mode: 1>1
- Auto exposure ON
- Auto paper select mode: ON
Output mode: Non-sort, output to main tray
The initial system settings can be modified in key operator mode. For more information, see page 7-5.

Setting up reserve jobs during the warm-up phase!
You can set up reserve jobs even during the warm-up phase. For more information, see page 3-19.
Switching the System off
The power switch is located on the left side of the main unit.
Switch the power switch (POWER) to the 0 position.
The touch screen and all LEDs on the control panel turn off. The system is switched off.
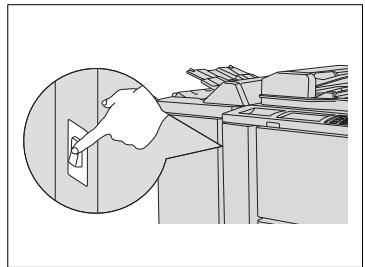

Weekly timer disabled!
The weekly timer is disabled when you switch off the system with the power switch.
2.8 Control Panel Keys and Indicators
Control Panel
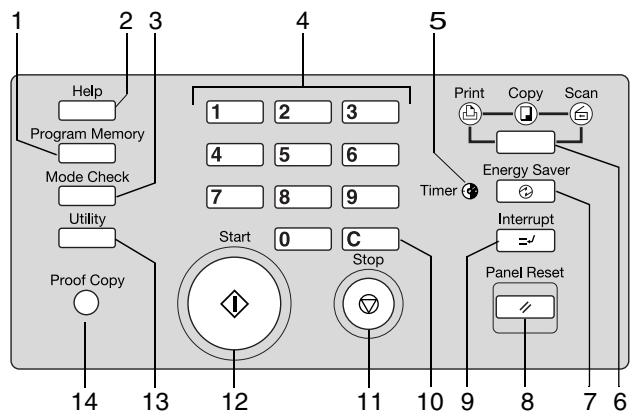
| Item | Name | Element | Description |
| 1 | Program Memory | Key | Press this key to call or save system settings. |
| 2 | Help | Key | Press this key to display the help function, which can also be used to call up key operator mode |
| 3 | Mode Check | Key | Press this key to call up a display of the current copier settings. |
| 4 | 10-Key Pad | Keys | Use to enter numerical values |
| 5 | Timer | Indicator | Is lit if the timer feature is active |
| 6 | Mode | Key | For switching between the system modes: • Copy • Scan • Print |
| 7 | Energy Saver | Key | Press this key to activate/deactivate an energy saving mode. |
| 8 | Panel Reset | Key | Press this key to reset the system to the default setting |
... continued on next page
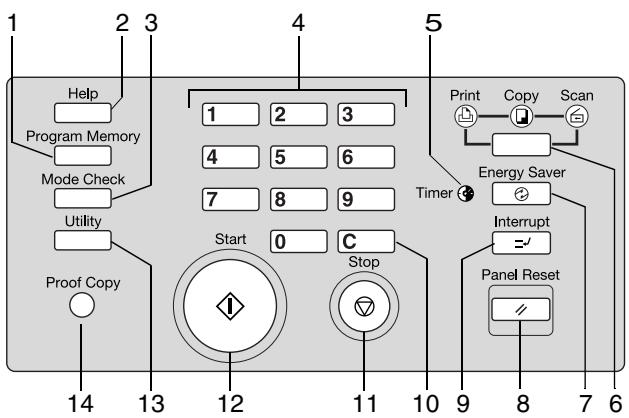
| Item | Name | Element | Description |
| 9 | Interrupt | Key | Press this key to interrupt or continue a copy cycle. |
| 10 | C | Key | Press this key to reset the number of copies. |
| 11 | Stop | Key | Press this key to stop a copy cycle. |
| 12 | Start | Key | Press this key to start a copy or scan cycle. |
| 13 | Utility | Key | Press to display the meter count display. |
| 14 | Proof Copy | Key | To output a test copy with the current copy settings |
Indicators and Keys on the Touch Screen

| Item | Name | Element | Description |
| 1 | Mode status | Indicator | Indicate that one of the following modes is active: • Tandem mode (master) • Tandem mode (slave) • HDD Store • Original Direction • Service • 90° Mode |
| 2 | Count/Set | Indicator | Shows the number of copies already created and the specified number of copies. |
| 3 | Status | Key | This key calls up functions used to monitor and manage reserved jobs. |
| 4 | Special Originals | Key | This key is used to call up functions such as • Original Direction • Text/Photo Mode • Special Originals |
| 5 | Applications | Key | Used to call up various applications, such as • Auto Layout • Dual Page • Chapter Mode |
| 6 | Rotation OFF | Key | This key switches page rotation on or off. |
... continued on next page
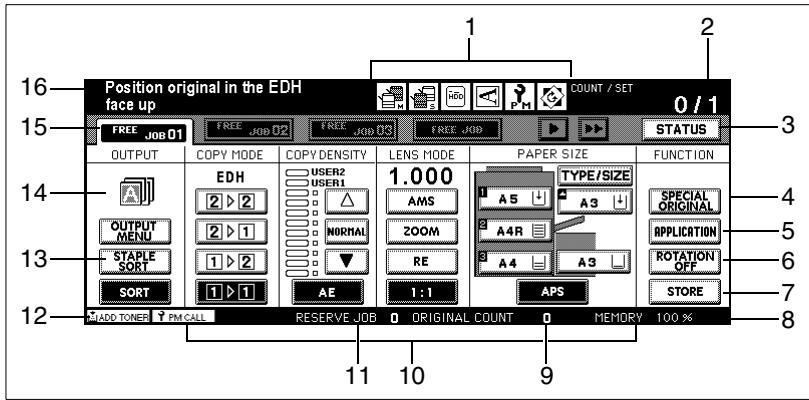
| Item | Name | Element | Description |
| 7 | Store | Key | Turns document memory on or off. |
| 8 | System Memory | Indicator | Shows the remaining available memory capacity. |
| 9 | Original counter | Indicator | Displays the number of originals read • when placed on the EDH: every sheet drawn in increments the counter by 1, regardless of whether one or both sides are being copied • Loading onto the original glass: every scan cycle increments the counter by 1 |
| 10 | Basic settings | Keys / Indicators | Use these to select and view the initial copier settings, such as • Copy Mode • Zoom ratio • Contrast |
| 11 | Reserve Job counter | Indicator | Shows the number of configured reserve jobs |
| 12 | Service messages | Indicator | Displays service messages, such as: • Add toner • PM call |
| 13 | Output | Keys | These keys are used to select the finishing mode. |
... continued on next page

| Item | Name | Element | Description |
| 14 | Output display | Indicator | Displays the selected finishing mode. |
| 15 | Job folder | Key/Indicator | Used to select a reserve job Displays status messages regarding a job |
| 16 | Messages and status displays | Indicator | Displays the current messages and status values. |
2.9 Using the Touch Screen
The system is equipped with a touch screen. Touch screens react to touch. Use the touch screen to change system settings and monitor procedures.
Lightly touch one of the keys illustrated on the touch screen to select functions or change settings.

CAUTION
Incorrect handling can cause damage to the system!
The surface of the touch screen is glass. Incorrect handling can damage the touch screen.
Never place heavy objects on the touch screen.
Use care when touching the surface of the touch screen.
Do not apply strong pressure to the surface.
Avoid touching the surface of the touch screen with sharp objects.
2.10 Adding Paper
The main screen shows the paper levels for each paper tray. You can see how full a tray is from the indicator. If the indicator shows an arrow, that paper tray is empty. If so, refill it with paper.
Note the following important information!
Paper Tray1
Capacity:
up to 500 sheets (80g / m^2)
Paper Tray 2
Capacity:
up to 500 sheets (80g / m^2)
Paper Tray 3
Capacity:
Up to 1,000 sheets (80g / m^2)
Bypass Tray
Capacity:
max. 150 sheets (80g / m^2)
max. 1 sheet of special paper
Paper Drawer 4 - LCC (optional)
Capacity:
Up to 4,000 sheets (80g / m^2)

Inserting special papers!
When you are processing special papers, make sure that the paper tray is set for that type of paper. For more information, see page 7-32.
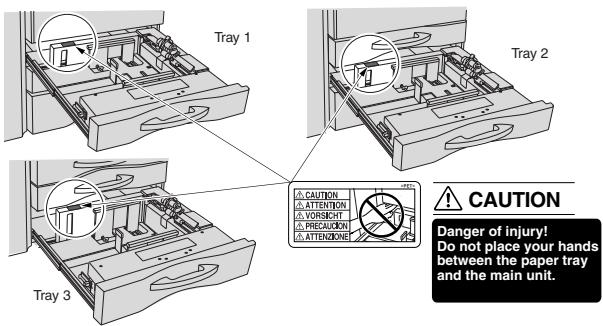
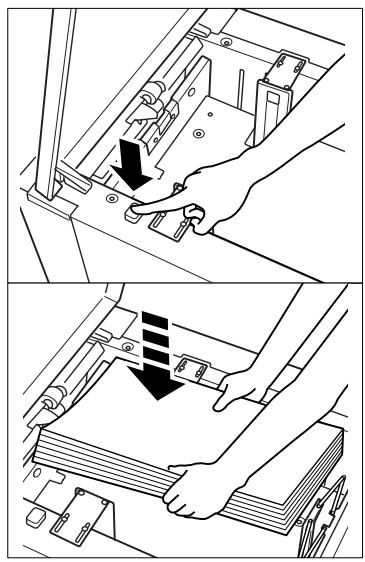
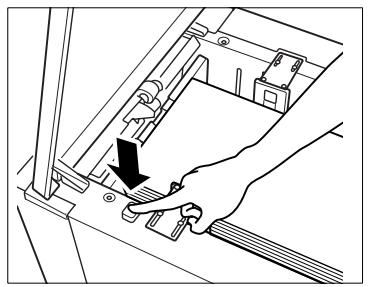
Refilling Trays 1, 2 and 3
Add paper to paper trays 1, 2 and 3.
These trays allow various paper sizes and alignments.
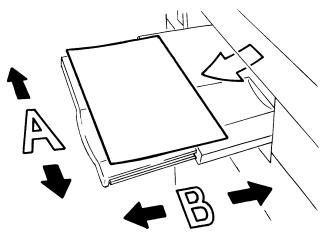
1 Carefully pull the drawer out as far as it will go.
2 Lift the paper feed roller out of the way.
3 Remove any paper that has been left in the paper drawer. Slide the edge guides completely out. Set the back paper guide to the desired size.
4 Fan the new paper. Align the paper edges straight.
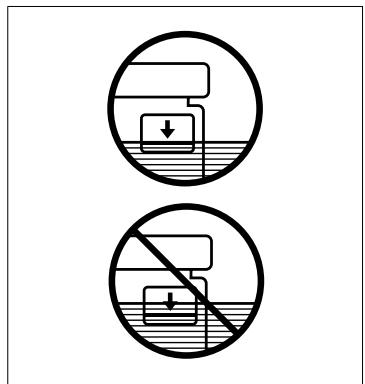
5 Load the new paper so that the side that undulates upward is face up.
Tray 1 up to 500 sheets (80g / m^2)
Tray 2 up to 500 sheets (80g / m^2)
Tray 3 up to 1000 sheets (80g / m^2)
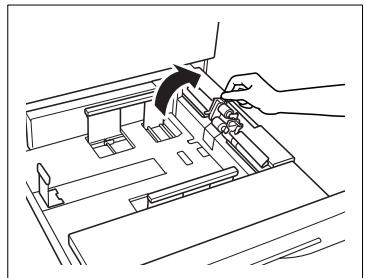
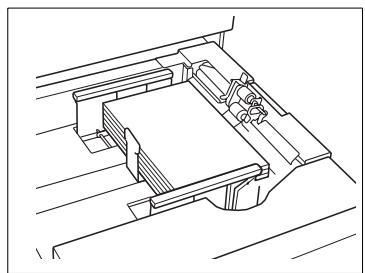
6 Make sure not to exceed the maximum paper filling level. The paper stack must not be higher than the red mark of the indicator.
7 Adjust the guides so that they are flush with the paper.
8 Lower the paper feed roller back in place.
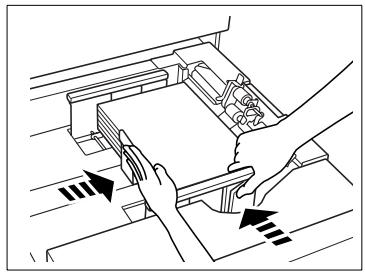
9 Carefully slide the paper tray back. If you have changed the paper size, the new size will be shown on the main screen.

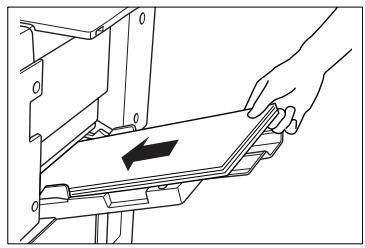
Loading tab papers!
If you want to process tab papers, insert them as illustrated in the following figure. Ensure that the paper type "Tab Paper" is set to the paper tray. For more information, see page 7-32.
Adding Paper to Paper Tray 4 - C-403N (optional)
Add paper to paper tray 4.
The paper size in this paper tray is set to A4 by default. If you want to change the paper size for this paper tray, contact your technical representative.
1 Open the top cover of the tray.
2 Press the button to lower the paper lifting plate to lower the plate slightly.
3 Fan the new paper. Align the paper edges straight.
4 Load the paper so that the side that undulates upward is face down.
up to 4,000 sheets (80g / m^2)
5 Repeat steps 2 to 4 until the tray is full.
6 Make sure not to exceed the maximum paper filling level. The paper stack must not be higher than the red mark of the indicator.
7 Close the top cover of the tray.

Loading tab papers!
If you want to process tab papers, insert them as illustrated in the following figure. Ensure that the paper type "Tab Paper" is set to the paper tray. For more information, see page 7-32.

Adding Paper to Paper Tray 4 - C-404N (optional)
Add paper to paper tray 4.
The paper size in this paper tray is set to A3 by default. If you want to change the paper size for this paper tray, contact your technical representative.
1 Open the top cover of the tray.
2 Press the button to lower the paper lifting plate to lower the plate slightly.
3 Fan the new paper. Align the paper edges straight.
4 Load the paper so that the side that undulates upward is face down.
up to 4,000 sheets (80g / m^2)
5 Repeat steps 2 to 4 until the tray is full.
6 Make sure not to exceed the maximum paper filling level. The paper stack must not be higher than the red mark of the indicator.
7 Close the top cover of the tray.

Loading tab papers!
If you want to process tab papers, insert them as illustrated in the following figure. Ensure that the paper type "Tab Paper" is set to the paper tray. For more information, see page 7-32.

Filling the Bypass Tray
Insert paper into the bypass tray. Use the bypass tray to process special paper.
1 Open the bypass tray on the right side of the system.
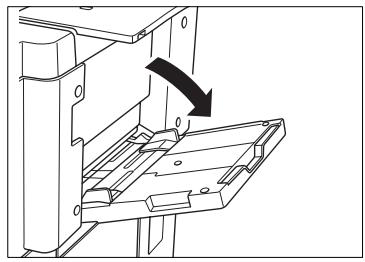
2 If using large sized paper, pull out the extender of the bypass tray.
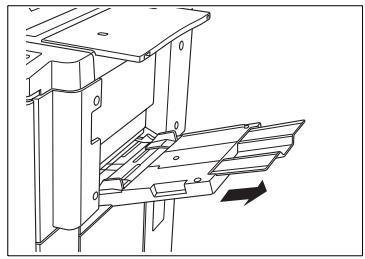
3 Place the paper flush up against the feed chamber of the bypass tray.
Special papers, OHP transparencies: max. 1 sheet
Other: up to 150 sheets (80g / m^2)
4 Slide the edge guides to fit the size of the inserted paper.

Processing special paper using the bypass tray!
You can use the bypass tray to process special paper, such as tab papers, OHP transparencies and others. For more information, see page 3-44.

Loading tab papers!
If you want to process tab papers, insert them as illustrated in the following figure. Ensure that the paper type "Tab Paper" is set to the paper tray. For more information, see page 4-61.
2.11 Adding Toner

WARNING
Toner can be hazardous to your health!
Toner is harmful if swallowed.
If you get any toner on your hands, immediately wash them thoroughly with soap and cold water.
Dispose of the used toner bottle in an environmentally friendly manner.
Keep toner bottles out of reach of children.
If there is too little toner in the system, a message is displayed on the touch screen. Use only toner that is suitable for this system. If you have questions, please contact your technical representative.
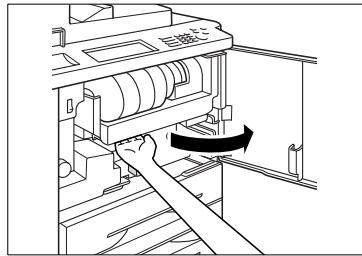
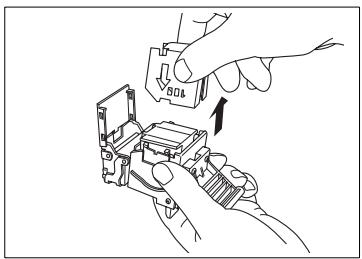
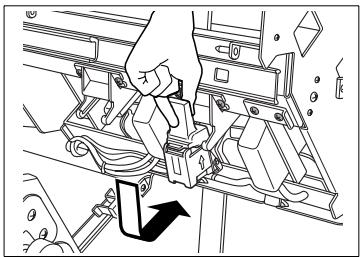
Add toner.
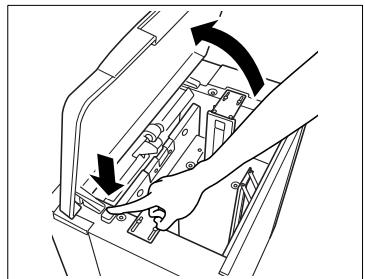
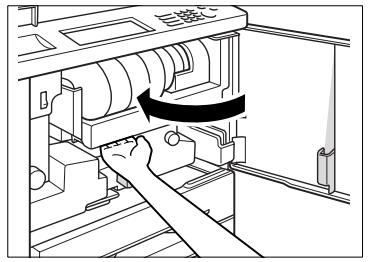
1 Open the front door on the system.
2 Gently lift the toner bottle holder a little and flip it out towards the right.
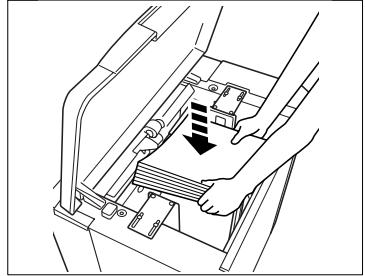
3 Pull the toner bottle latch forward. Remove the empty toner bottle.
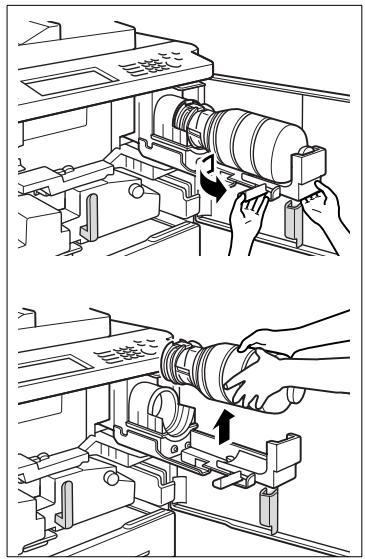
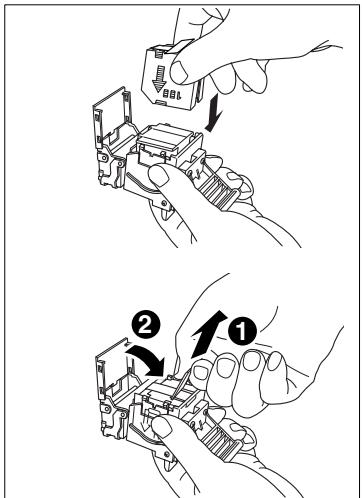
4 Tap the new toner bottle against a hard surface. Then shake the toner bottle gently.
This loosens any clumps of toner.
5 Remove the transparent plastic closure from the toner bottle.
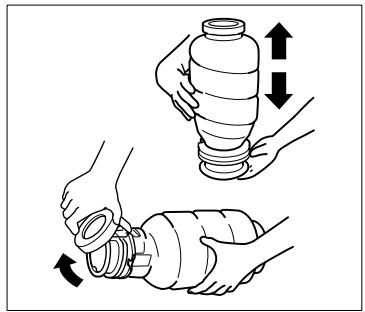
6 Place the toner bottle into its holder.
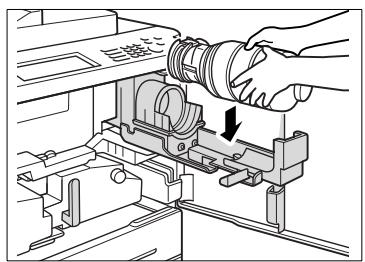
7 Align the notch on the toner bottle with the arrow on the system.
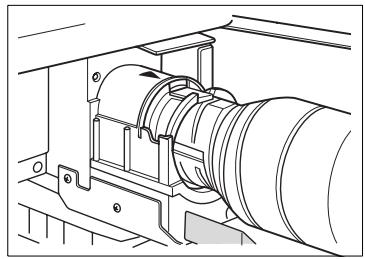
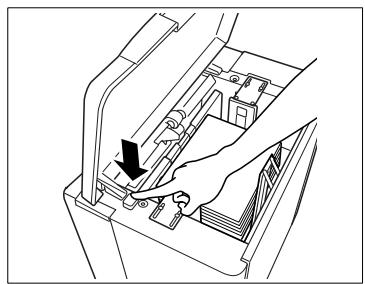
Push the toner bottle latch back. The toner bottle latches in place.
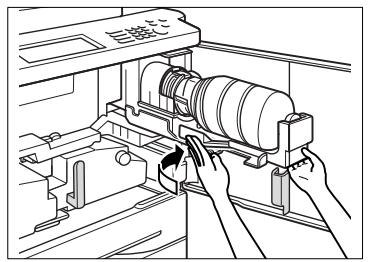
9 Swing the holder back until it clicks in place. Close the front door.
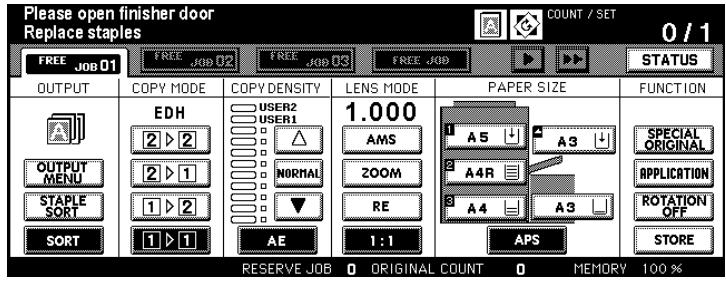
2.12 Replenishing the Staple Supply
(only with FN-115/FN-7 Finisher - optional)
If the staple magazine runs out, a message is displayed on the touch screen. Use only staples that are suitable for this system. If you have questions, please contact your technical representative.
Adding Staples for the FN-115 Finisher (optional)
Fill a staple magazine with a staple cartridge.
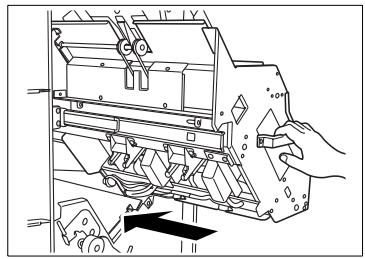
1 Open the finisher door.

2 Carefully pull the stapler unit out.
3 Pull the stapler head up a little to unlatch it. Then pull the stapler head forward along its guides.
4 Press in both the right and left points marked on the stapler head. Open the cover on the stapler head.
5 Remove the empty staple cartridge out of the stapler head. Leave the remaining staples in the stapler head, otherwise the first copy set after refilling it will not be stapled.
6 Insert a new staple cartridge into the stapler head. The arrows must be aligned over each other. Remove the safety strips. Close the cover of the stapler head.
7 Place the stapler head back into the stapler unit. Finally push the stapler head down a little until it latches in place.
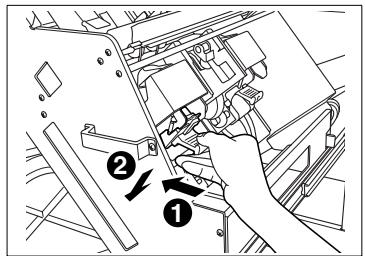
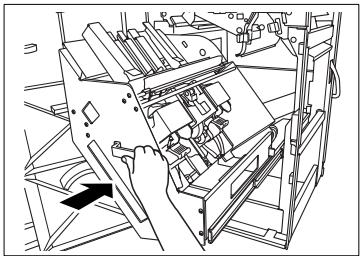
8 Carefully push the stapler unit back in.
9 Close the finisher door.

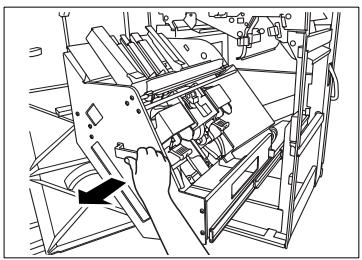
Adding Staples for the FN-7 Finisher (optional)
Fill a staple magazine with a staple cartridge.
1 Open the finisher door.

2 Carefully pull the stapler unit out.
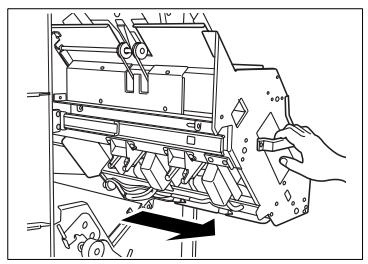
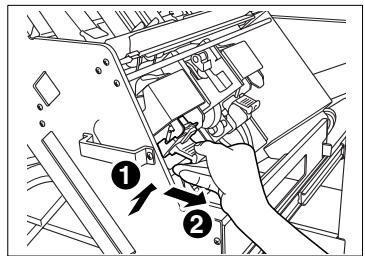
3 Pull the stapler head up a little to unlatch it. Then pull the stapler head forward along its guides.
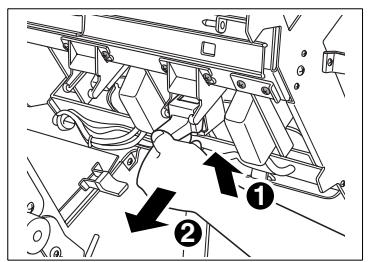
4 Lift the stapler head up and out of its holder.
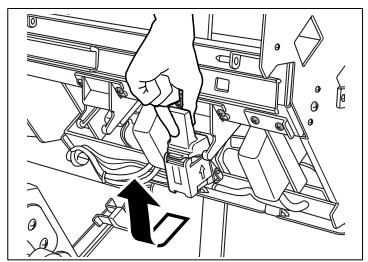
5 Remove the empty staple cartridge out of the stapler head. Leave the remaining staples in the stapler head, otherwise the first copy set after refilling it will not be stapled.
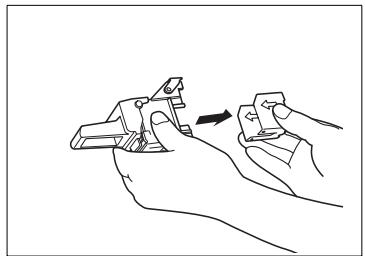
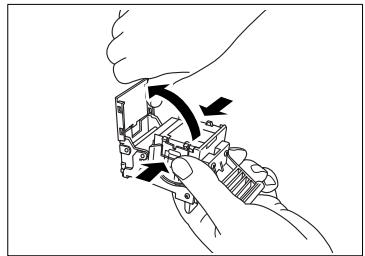
6 Insert a new staple cartridge into the stapler head. The arrows must be aligned over each other. Remove the safety strips.
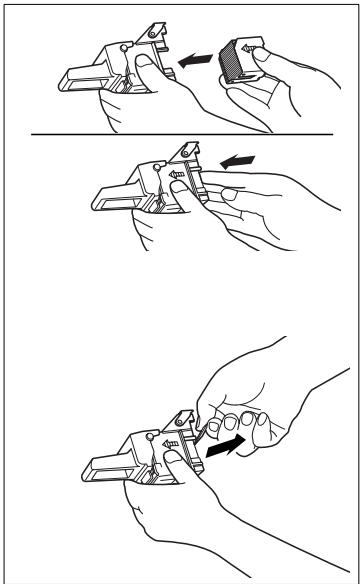
7 Place the stapler head back into the stapler unit. Finally push the stapler head down a little until it latches in place.
8 Carefully push the stapler unit back in.
9 Close the finisher door.
2.13 Monitoring the PM Count Time
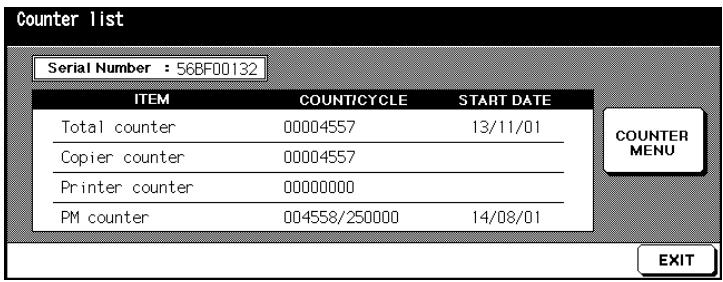
Maintenance should be carried out after a certain number of copies have been processed. You can read the time for the next maintenance call on the PM counter.
When a maintenance interval is reached, a message will be shown automatically on the lower left of the touch screen. When it does, contact your technical representative to set up a maintenance visit.
Viewing the PM Count
View the time of the next maintenance interval.
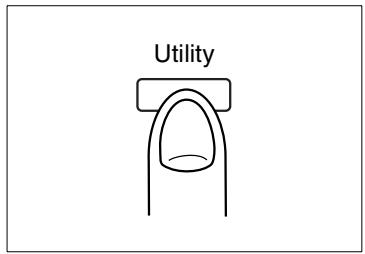
1 Press the [UTILITY] key on the control panel.
The counter list is displayed.
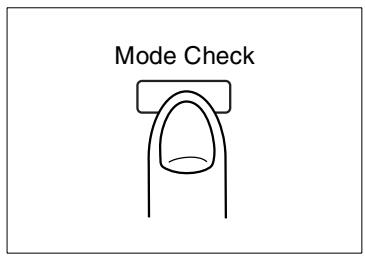
2 Press the [MODE CHECK] key on the control panel.
The PM count is displayed on the counter list.
Printing the PM Count
Print the PM count screen.
1 Press the [UTILITY] key on the control panel. The counter list is displayed.
2 Press the [MODE CHECK] key on the control panel. The PM count is displayed on the counter list.
3 Press the [COUNTER MENU] key.
The default settings are displayed.
4 Select the paper tray containing the paper that you want the counter list printed onto.
5 Press the [START] key on the control panel to start the printout of the counter list.
The counter list is printed.
Closing the PM Count Screen
Close the PM count screen.
Press [EXIT] to return to the default settings.
The default settings are displayed again.
2.14 Shutting Down the System
When shutting down the system for long periods of time, follow these instructions:
- Remove the power plug from the outlet.
- Store the system in a dry, dust-free room.
- Ensure that the system is not subject to vibrations
Protect the system against:
- Splashing liquids
- Direct sunlight
Strong temperature fluctuations - Direct air flow from heating or air conditioning units
2.15 Please Observe these Precautions
... when working with your system
Please observe the following precautions when using your system:
- Never place any objects heavier than 6.8kg and/or thicker than 30mm onto the system.
- Never open the system or switch it off during a working cycle.
- Never bring magnetized objects or use flammable sprays near the system.
- Never use sharp objects inside the open system
... when servicing and repairing the system
The system requires regular maintenance by a technician authorized by Minolta.
Maintenance and repair work may be carried out by specially trained and authorized service personnel only.

DANGER
Incorrect use of the system can result in fire and/or electrical shock!
The system is equipped with high-voltage components. Incorrect use or faulty operation of the system may cause the system to overheat. Observe the following safety precautions to prevent injury and system damage.
Do not dismantle the system.
Never remove any system parts.
Allow only specially trained and authorized service personnel carry out maintenance and repairs.
If the service call message is displayed on the touch screen and the system does not respond, write down the error code. Unplug the power cable. Consult your technical representative.
2.16 Proper Use of Your System
The system may only be used for the tasks described in this manual. Any other applications are considered inappropriate.
Using the system incorrectly can lead to serious personal injury and/or damage to products and articles. Claims and liability and/or guarantees are voided by damage incurred through incorrect use.
Certain types of documents may not be copied for further use or with the intent to pass copies of such documents off as the original.
These include:
Money
- Stamps (cancelled or uncancelled)
- Personal identification cards
- Vehicle registration documents
Copyrighted materials (without the permission of the copyright holder)
If you are unsure whether a certain document may be copied, please consult the relevant public authorities.
3 Initial Steps . . .
3.1 Basic Operator Steps
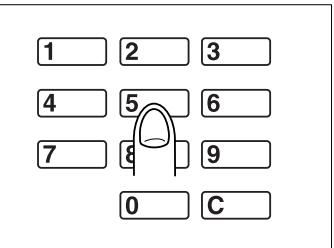
Entering the Number of Copies
Enter the number of sets of copies you want made.
Press the corresponding keys on the 10-Key Pad.
The entered number of copies is displayed in the upper right-hand corner of the touch screen.
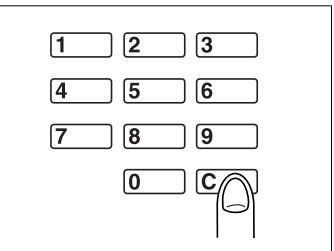
? Did you enter an incorrect number?
Press the [C] key on the control panel and enter the correct number of copies.
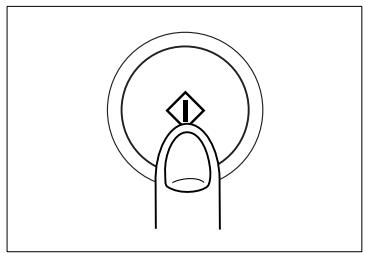
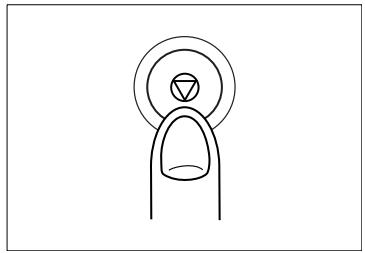
Start Cycle
Start a copy or scan cycle.
A cycle can be started only when the basic functions are displayed on the touch screen.
On the control panel press the [START] key.
The cycle starts.
Stop Cycle
Stop a copy cycle, e.g. to prevent further output of faulty copies.
Press the [STOP] key on the control panel.
The copy cycle stops. A confirmation dialog appears. Select whether you want to interrupt the cycle or continue it.
Reset System Settings
Reset the system to the system default setting.
Press the [PANEL RESET] key on the control panel.
The system is reset to the system default setting.


Automatic Reset of the System
In key operator mode, you can specify a time, after which the system is automatically reset to its initial settings. For more information, see page 7-51.
3.2 Activating the System
Ending Energy Saving Mode
The system is in energy saving mode when the touch screen display is hidden.
Press any key on the control panel to bring the copier out of energy saving mode.
The touch screen display appears normal again. The system is ready for operation.

Set period for energy saving mode
In key operator mode you can specify a period after which the system is automatically switched to energy saving mode. For more information, see page 7-50.
Ending Auto Shut Off
The system is in auto shut off mode if the LED on the [ENERGY Saver] control panel key is on and the touch screen indicator is off.
Press the [ENERGY Saver] key on the control panel to close the mode.
The LED on the [ENERGY Saver] key on the control panel goes out.
The touch screen switches on again. The system is ready for operation.

Setting Period for Automatic Shut off
In key operator mode you can specify a period after which the system is automatically switched off. For more information, see page 7-50.
Interrupting Weekly Timer Mode
The weekly timer is enabled if the LED of the TIMER display on the control panel is lit. Interrupt the weekly timer mode to make copies.
Press the [ENERGY SAVER] key on the control panel.
A message is displayed on the touch screen.
Input copy time 0 hour(s) 05 minute(s)
? Does the message prompt you to enter a code?
The weekly timer is protected with a 4-digit weekly timer code.
Enter the correct code. Confirm your input by pressing [START].
2 Use the 10-Key Pad to enter the number of hours (0-9) by which the weekly timer should be delayed.
Input copy time 8 hour(s) 05 minute(s)
3 Confirm your input by pressing [START].
4 Use the 10-Key Pad to enter the number of minutes (00-59) by which the weekly timer should be delayed.
Input copy time 8 hour(s) 07 minute(s)
5 Confirm your input by pressing [START].
The system is ready for operation.
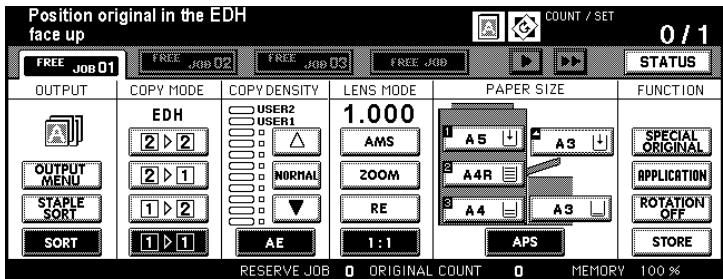
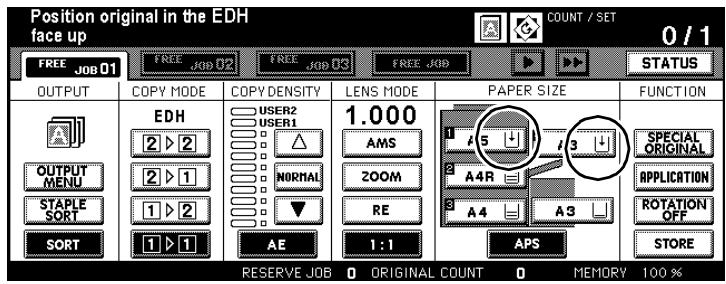
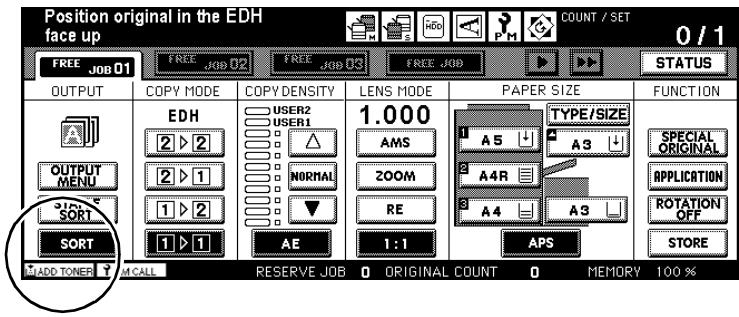
Position original in the EDH face up

Protecting the weekly timer with a code
You can specify a 4-digit code for protecting the weekly timer. For more information, see page 7-47.
Reactivate the weekly timer when you are done copying.
Press and hold the [ENERGY SAVER] key on the control panel for more than one second.
The LED of the TIMER display on the control panel lights up. The touch screen switches off. The weekly timer is active again.
Entering the E.K.C. Password
The system provides the ability to count copies and assign copy limits with the aid of passwords. Use key operator mode to set up the passwords and copy limits. For more information, see page 7-39.
If the plug-in counter (E.K.C.) is enabled, you cannot make copies until the system is unlocked using an E.K.C. password.
To unlock the system, enter an E.K.C. password.
1 Enter your 8-digit E.K.C. password using the 10-Key Pad.
2 Confirm your input by pressing [START].
Your current copy data are displayed on the touch screen for about 3 seconds. The system is then ready for operation.
Is the code not accepted?
You have entered an incorrect code.
Enter the code again. If the code still is not accepted, talk to the system administrator.
What happens if the copy limit is exceeded?
That depends on what has been set in key operator mode.
When you reach the copy limit . . .
. . . a message appears on the touch screen, stating that the copy limit has been exceeded. You can still continue to make copies beyond the copy limit.
or
... the current copy cycle is completed.
Once the copy cycle is finished you cannot make any more copies. or
... the copy cycle is canceled immediately.
No other copies can be processed. Talk to the system administrator.

Leave the system locked when you are finished!
You should lock the system again when you have finished copying to prevent anyone else using your cost center. Proceed as follows:
Press and hold [C] and press [UTILITY]. Your copy data will be saved. The touch screen will show the message "Enter E.K.C. code". The system is locked.
3.3 Placing the Originals on the Original Glass
Originals that are not suitable for the document handling tray (EDH), can be placed on the original glass manually.

CAUTION
Damage to the system by external influences!
The original glass can be damaged by heavy objects.
Never place any objects heavier than 6.8~kg onto the original glass.
Do not press originals on the original glass.
Note the following important information!
Maximum original size:
A3, single sheet or book
Maximum original weight and thickness:
6.8 kg / 30 mm
1 Open the original cover.
2 Place the original face down on the original glass.
3 Push the original into the upper right corner of the original glass.
4 Align the document along the positioning plate.
Is the original transparent?
Place a sheet of white paper of the same size on top of the original.
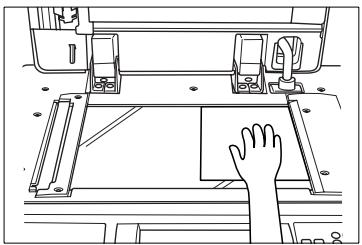
5 Close the original cover.
? Are you using AUTO Layout, Dual Page, Edge Erasing or Image Repeat with automatic detection?
Then leave the original cover open.
The feature can only be run properly with the cover open.


To avoid black edges on your copies . . .
If you are making single-sided copies from books, you can apply the "Frame/Fold Erasure" or "Non-Image Area Erase" feature to prevent unsightly black edges.

Which original sizes are to be recognized?
In key operator mode, you can specify which sizes you want the system to detect automatically: A-sizes, inch sizes, AB-sizes or AB and inch sizes.
For more information, see page 7-51.
3.4 Feeding Originals Using the EDH
To save time, originals can be processed using the document handling tray (EDH). It allows you to load up to 100 originals simultaneously (80 g/ m²), which are then fed automatically one after the other.
Not all documents are suitable for the EDH. Use only suitable originals.
Unsuitable originals include:
- carbon paper, paraffin paper and other very thin paper,
- very thick paper,
- paper with items adhered to it or pieces cut out of it,
- translucent paper, OHP transparencies (overhead projector films),
- folded, curled paper
- punched, stapled or bound paper
Manually place originals that are not suitable for the EDH onto the original glass. For more information, see page 3-8.

Which original sizes are to be detected automatically?
In key operator mode, you can specify which sizes you want the system to detect automatically: A-sizes, inch sizes, AB-sizes or AB and inch sizes.
For more information, see page 7-51.
Loading Equal-Sized Originals into the EDH
Load up to 100 originals (80g / m^2) of the same size into the EDH. The originals are fed in automatically one after the other.
Note the following important information!
- Original sizes: A3, B4, F4, A4R, A4, B5R, B5, A5R, A5,
11"×17", 8.5"×14", 8.5"×11", 8.5"×11"R,
5.5^ × 8.5^ , 5.5^ × 8.5^
(297× 432mm to 140× 216mm)
- Types of originals: plain paper (50 to 130g / m^2 )
Maximum capacity of the EDH: 100 originals (80g / m^2)
1 Load up to 100 originals (80g / m^2) face-up into the EDH.
? Copying 2-sided originals?
Insert the originals with the first page face-up in the EDH.

2 Make sure not to exceed the maximum paper filling level. The paper stack must not be higher than the red mark on the filling level indicator.
3 Push the originals flush up against the feed chamber of the EDH.
4 Slide the document guide plates to fit the size of the originals.


Do you want to scan more than 100 originals?
Use the "Program Job" feature (see page 5-27) or use the document memory (see page 4-68).
Loading Single Originals into the EDH (SDF)
When copying thick originals, place them in the EDH individually. Select "SDF" as the copy mode.
Note the following important information!
- Original sizes: A3, B4, F4, A4R, A4, B5R, B5, A5R, A5,
$$ 1 1 ^ {\prime \prime} \times 1 7 ^ {\prime \prime}, 8. 5 ^ {\prime \prime} \times 1 4 ^ {\prime \prime}, 8. 5 ^ {\prime \prime} \times 1 1 ^ {\prime \prime}, 8. 5 ^ {\prime \prime} \times 1 1 ^ {\prime \prime} R, $$
$$ 5. 5 ^ {\prime \prime} \times 8. 5 ^ {\prime \prime}, 5. 5 ^ {\prime \prime} \times 8. 5 ^ {\prime \prime} R $$
$$ (2 9 7 \times 4 3 2 m m \text {t o} 1 4 0 \times 2 1 6 m m) $$
- Types of originals: 50 to 130g / m^2 copy mode 2-1, 2-2
$$ 5 0 \text {t o} 2 0 0 \mathrm {g} / \mathrm {m} ^ {2} \text {c o p y m o d e 1 - 1 , 1 - 2} $$
Maximum capacity of the EDH: 1 original
1 Enable the "SDF" function. For more information, see page 4-82.
2 Slide the guide plates to fit the size of the original.
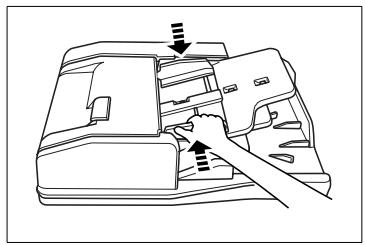
3 Always load only 1 original face-up in the EDH.
? Copying 2-sided originals?
Insert the originals with the first page face-up in the EDH.
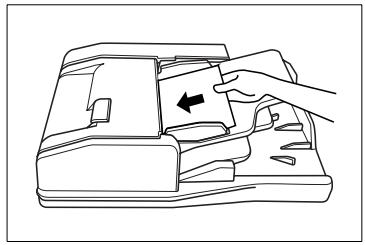
4 Push the original flush up against the feed chamber of the EDH.
The original is fed in automatically and scanned.
Loading Mixed-Sized Originals into the EDH
Load up to 100 originals (80g / m^2) of the different sizes into the EDH. Select one of the following copy modes:
- "AMS" (Copy onto the same paper size) or
- "APS" (Copy the originals onto corresponding paper sizes)
Note the following important information!
| • Original sizes: | A3, B4 A4R, A4, B5, A5 (mixed) |
| B4, A4R, B5R, B5, A5 (mixed) | |
| A4R, B5R, A5 (mixed) | |
| B5R, A5R (mixed) | |
| • Types of originals: | Plain paper (50 to 130 g/m2) |
| • Maximum capacity of the EDH: | 100 originals (80 g/m2) |
1 Enable the "AMS" function. For more information, see page 4-52 or Enable the "APS" function. For more information, see page 4-58.
2 Insert the originals face-up into the EDH as follows:
A3 and B4 lengthwise (short side up against the feed chamber)
A4 and B5 either lengthwise or crosswise
A5 lengthwise (if A5 mixed with B5R then load A5 crosswise)
3 Make sure not to exceed the maximum paper filling level. The paper stack must not be higher than the red mark on the filling level indicator.
4 Align the originals to the back side of the EDH.
5 Push the originals flush up against the feed chamber of the EDH.
6 Slide the guide plates to fit the size of the largest original.
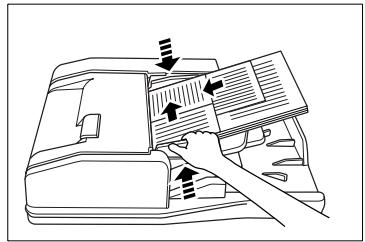
Place Z-Folded Originals in the EDH
Place up to 100 originals (80g / m^2) with Z-fold into the EDH. The originals are fed in automatically one after the other.
| Note the following important information! | |
| • Original sizes: | A3, B4, F4, A4R, A4, B5R, B5, A5R, A5, 11"×17", 8.5"×14", 8.5"×11", 8.5"×11"R, 5.5"×8.5", 5.5"×8.5"R (297×432 mm to 140×216 mm) |
| • Types of originals: | Plain paper (50 to 130 g/m²) |
| • Maximum capacity of the EDH: | 100 originals (80 g/m²) |
1 Set the document feeder for Z-folded. For more information, see page 4-80.
2 Load up to 100 originals (80g / m^2) face-up into the EDH.
? Copying 2-sided originals?
Insert the originals with the first page face-up in the EDH.
3 Make sure not to exceed the maximum paper filling level. The paper stack must not be higher than the red mark on the filling level indicator.
4 Push the originals flush up against the feed chamber of the EDH.
5 Slide the document guide plates to fit the size of the originals.
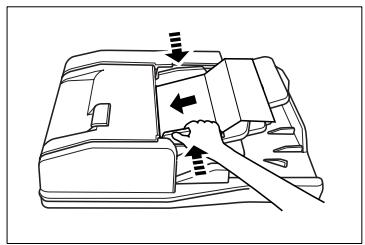
3.5 Checking the System Settings
Before starting any large jobs, you should check to make sure all settings are correct. To do so, you have two options:
- Check system settings in check mode
- Process a proof copy
Check Mode Screen
The system settings are displayed in check mode. System settings that are shown on a shaded key can be directly modified or released in check mode.
A maximum of two pages are shown in check mode:
1st page - Basic & Special. Originals
- 2 nd page - Application Mode
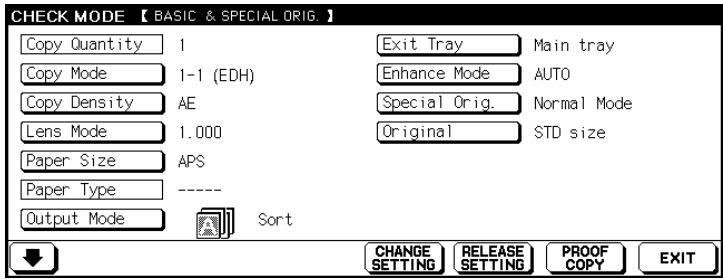
You can switch pages using the arrow keys found on the lower edge of the touch screen. These arrow keys, however, are displayed only if there are features enabled in "Application Mode".
Changing Settings
Modify the system settings in check mode or release them.
1 Press the [MODE CHECK] key on the control panel.
The touch screen then displays the Check Mode screen containing the settings for "Basic - & Special Originals".
Mode Check

2 Press the key for the setting that you wish to modify, e.g. [COPY DENSITY].
The background of the selected key turns black.
3 Press the [CHANGE SETTING] key found on the lower edge of the touch screen.
The basic options are displayed.
Is the [CHANGE SETTING] key dimmed?
The selected function cannot be modified, only released.
For more information, see page 3-17.
4 Change the system setting as desired.
5 Press the [MODE CHECK] key on the control panel to return to the check mode screen.
6 Change any other settings, if necessary.
7 Press the [EXIT] key to end this step.
The basic options are displayed again.
Releasing Settings
Releasing a setting is the same as disabling it.
1 Mark the feature that you want to release.
2 Press the [RELEASE SETTING] key found on the lower edge of the touch screen.
A dialog field is displayed to confirm the release.
3 Confirm the release by pressing [YES].
The feature is released (switched off).
4 Release or change any other settings, if necessary.
5 Press the [EXIT] key to end this step.
The basic options are displayed again.
Processing a Proof Copy
Process a copy set as a proof copy to check your system settings.
Especially when processing large and complex copy jobs, you can avoid expensive mistake copies by running a proof copy.
Process a copy set for verification.
1 Load the originals.
into the EDH or
on the original glass.
2 Make any necessary changes to the system settings.
3 Set the number of copies.
4 Press [MODE CHECK] to open check mode. Then press the [PROOF COPY] key.
or
Press the [PROOF COPY] key on the control panel.
The originals loaded in the EDH are scanned. One copy set is output to test the system settings. The Check
Mode screen is displayed on the touch screen.

Mode Check
? No proof copy created?
If you have selected the "Group" finishing mode, a proof copy cannot be created.
5 Make any necessary changes or releases to the system settings.
? Was the proof copy correct?
If the proof copy is correct, the proof copy set is counted as one of the sets to be completed.
6 Press the [EXIT] key to confirm the new copier settings.
The basic options are displayed.
7 Press the [START] key on the control panel to start the printout.
3.6 Reserving Copy Jobs
You can use the Reserve Job feature to prepare up to nine jobs while waiting for another job to finish scanning or printing. As soon as the current job is completed, the first reserve job is started automatically.
Note the following important information!
These features cannot be combined:
- Basic functions: Interrupt Mode, Proof Copy, Document Memory
- Applications: Overlay Memory

Setting up reserve jobs during the warm-up phase!
You can set up reserve jobs even while the system is warming up. To do so, tap the touch screen during the warm-up phase. A screen showing the basic functions appears. You can now set up reserve jobs one after the next. The first job is started automatically as soon as the warm-up phase finishes.
Setting up Reserve Jobs
Reserve up to nine jobs while the system is busy processing another job. The reserve jobs then start automatically one after the next. This allows you to take full advantage of the system's capacities.
1 Insert the originals with the first job into the EDH.
2 Press the [START] key to start the scanning cycle.
The originals are fed in one after the other. Printing begins immediately after the scanning cycle is done. The job folder for the next job (reserve job) is cleared.
3 Press the key for the next free job folder.
The basic option settings now apply for the reserve job.
Are the reserve jobs 01 to 03 or 04 to 06 occupied?
Press the [FREE JOB] key. The next three reserve jobs are displayed. A total of 10 jobs can be set up (1 job running and 9 other reserve jobs).
4 Make any necessary changes to the settings for the reserve job.
5 Be sure the scanning cycle for the originals of the previously started job is finished.
6 Press the [START] key to start the scanning cycle.
7 Load the originals of the reserve job into the EDH.
8 only when setting up additional reserve jobs Repeat steps 3 to 5.
Calling up the Status Display
You can use the status display to monitor the reserve jobs. You can also change the queuing order of the reserved jobs and delete jobs.
In the basic options on the touch screen press the [STATUS] key. The Status screen is displayed.
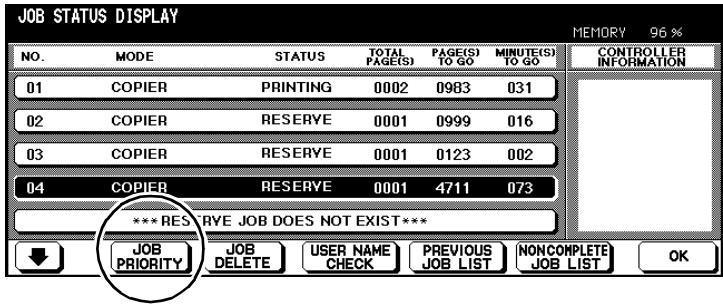
Press the [OK] key to close the status display.
Status Display Message Definitions
| Name | Meaning | |
| No. | Shows the job number assigned to the job by the system (01-99). | |
| Function | Shows which system mode is applied to the reserve job: • Copier • Printer • Scanner | |
| Status | • Ready | There are no copy/print jobs. |
| • Printing | The current job is being processed. | |
| • Interruption | The previous print job was interrupted. | |
| • Error | A malfunction has occurred. | |
| • No paper | A required size of paper is not loaded. | |
| • Stop | The current job has been stopped. | |
| • Reserve | The system is ready for the reserved job. | |
| • Jam | A paper misfeed has occurred. | |
| Total page(s) | Shows the number of scanned originals for the job (0 to 9999). | |
| Page(s) to go | Shows the number of pages that still have to be printed. The total number is a combination of: the number of scanned originals x the number of copies. If a vertical arrow is displayed behind the number 9999, the remaining number of pages is greater than 9999. | |
| Minute(s) to go | Shows the remaining time required to complete the job. If a vertical arrow is displayed behind the number 999, the remaining time is greater than 999 minutes. If less than 1 minute is left, it is indicated by: <1. | |
Changing the Order of Reserve Jobs
Change the order of the reserve jobs, to give a job higher priority.
1 In the basic options on the touch screen press the [STATUS] key. The Status screen is displayed.
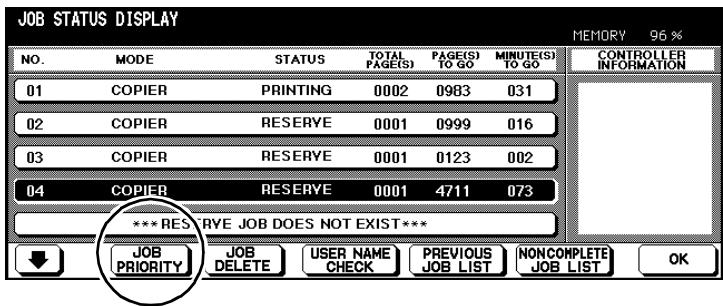
2 Select the reserve job that you want executed with top priority.
The background of the selected job turns black.
3 Press the [JOB PRIORITY] key as often as necessary to move the copy job up to the position desired.
4 Press the [OK] key to close the status display.
The basic options are displayed again.
Deleting a Reserve Job
Delete a reserve job.
1 In the basic options on the touch screen press the [STATUS] key. The Status screen is displayed.
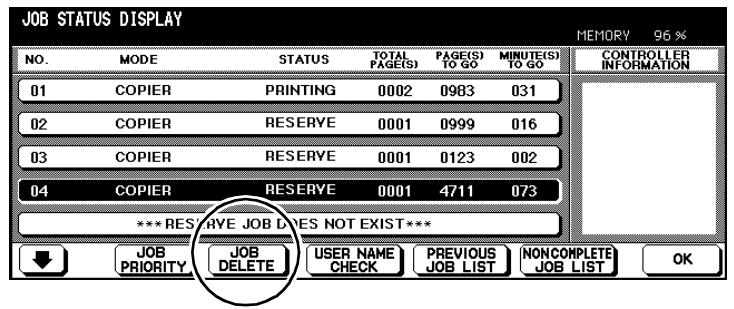
2 Select the reserve job that you want to delete. The background of the selected job turns black.
3 Press the [JOB DELETE] key. A dialog box with a prompt is displayed.
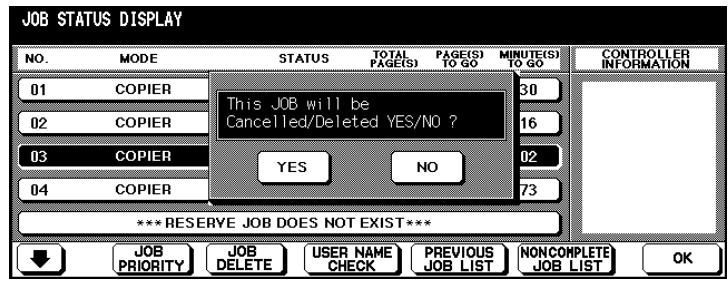
4 Press the [YES] key. The job is deleted.
5 Press the [OK] key to close the status display. The basic options are displayed again.
Checking the User Name of a Reserve Job
See which user created a job.
1 In the basic options on the touch screen press the [STATUS] key. The Status screen is displayed.

2 Press the [USER NAME CHECK] key.
The user name is displayed on the right side.
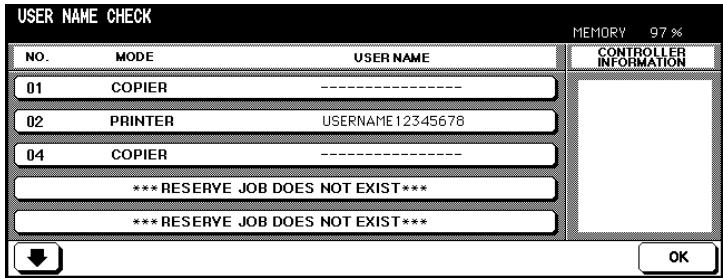
3 Press the [OK] key to hide the user name again. The status displays are shown again.
4 Press the [OK] key to close the status display. The basic options are displayed again.
Calling up the List of Already Executed Jobs
View a list of jobs that have already been executed.
1 In the basic options on the touch screen press the [STATUS] key. The Status screen is displayed.
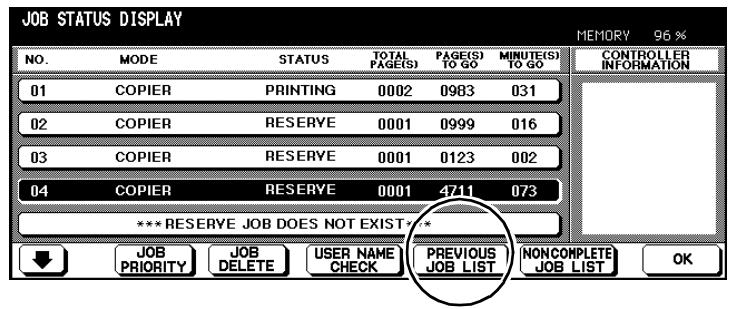
2 Press the [PREVIOUS JOB LIST] key.
The "Previous Job List" is displayed. You can view up to 16 jobs on 4 pages. Scroll through the pages using the arrow keys found on the lower edge of the touch screen.
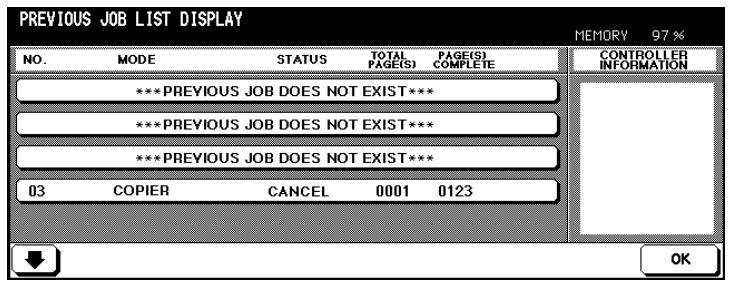
3 Press the [OK] key to return to the status display.
4 Press the [OK] key to close the status display.
The basic options are displayed again.
Opening the Noncomplete Job List
Display a list of the jobs that cannot be completed because of error messages.
1 In the basic options on the touch screen press the [STATUS] key. The Status screen is displayed.
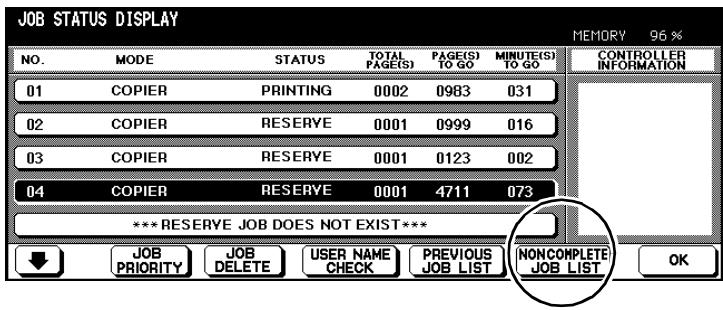
2 Press the [NONCOMPLETE JOB LIST] key. The Noncomplete Job List is displayed.
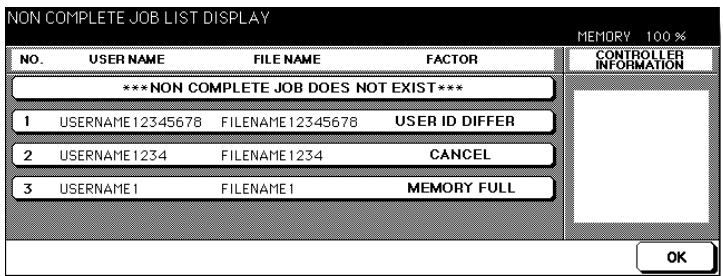
3 Press the [OK] key to return to the status display. The status display appears again.
4 Press the [OK] key to close the status display. The basic options are displayed again.
Interrupting the Setup of a Reserve Job
...in the event of a paper jam
If a paper jam occurs, the message Jam is displayed on the job folder. Interrupt the reserve job setup to remove the paper jam.
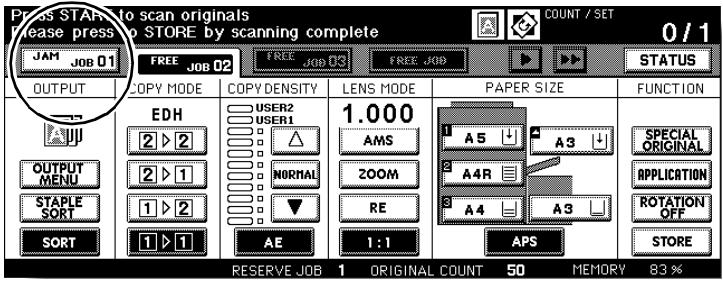
Press the job folder that displays the JAM message.
? Is the arrow key on the basic options screen blinking?
Press the arrow key repeatedly until the job with the "Jam" message is displayed.

2 Clear the paper jam.

For more information, see page 8-10
3 On the control panel press the [START] key.
The job is continued.
4 Press the key for the job folder that you were setting up before you had to interrupt it.
5 Continue setting up the reserve job.
...if the paper runs out
If the paper runs out the job folder shows the flashing message ADD PAPER.
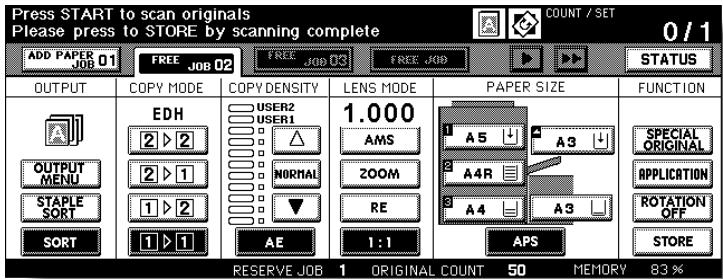
Press the job folder that displays the ADD PAPER message.
? Is the arrow key on the basic options screen blinking?
Press the arrow key repeatedly until the job with the "Paper" message is displayed.
2 Find the tray that is empty.
3 Add paper to the concerned paper tray.
The message in the job folder tab changes to PRINT.
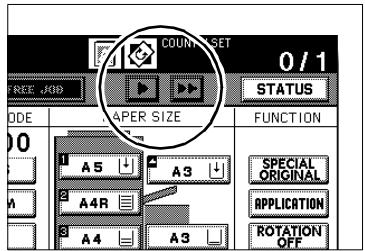
4 On the control panel press the [START] key.
Printing is continued.
5 Continue setting up the reserve job.

Interrupt not always necessary!
If paper runs out, you do not necessarily have to interrupt configuring your reserve job.
3.7 Interrupting a Copy Job
Interrupt a running copy job to create other copies in the meantime.
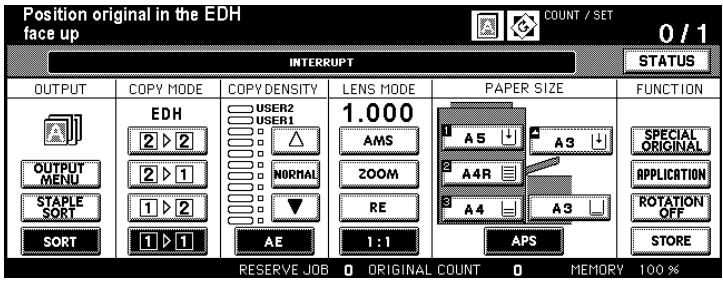
You can interrupt a copy job:
- if the basic options are displayed on the touch screen,
- if the overlay memory is not being used,
- while the system is printing data from memory,
- while originals are being scanned into the document memory, or
- while originals are being scanned into the memory and a job is being executed.
After you press the [INTERRUPT] key on the control panel, the copier continues to complete any important processes before going into interrupt mode.
From the time you press the key until interrupt mode is actually enabled, the LED on the [INTERRUPT] key blinks.
The LED blinks:
- until a copy set of the current copy job is output.
- until all of the originals loaded into the EDH are scanned into memory.
- until all of the originals loaded into the EDH are scanned into memory and the first copy set of the reserve job has been output.
The LED is on, not blinking:
- when interrupt mode is enabled

Interrupt with delay!
In key operator mode you can define when the interrupt is to be enabled. For more information, see page 7-51.
Procedure
1 Press the [INTERRUPT] key on the control panel.
2 Wait until the LED on the [INTERRUPT] key on the control panel is lit (not blinking).
The interrupt is active.

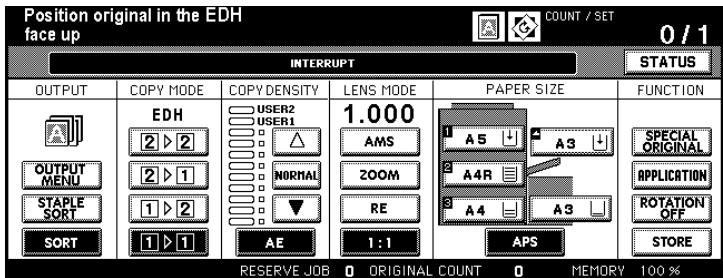
3 Remove the originals of the interrupted copy job from the EDH or the original glass.
4 Load the new originals
into the EDH or
on the original glass.
5 Make any necessary changes to the system settings.
Copy mode: 1-1
EDH: ON
AOE : ON
Zoom ratio: 1.000 (100%)
APS: ON
Finisher: main tray, sorted
What is displayed when check mode is opened?
Check mode shows the settings of the interrupted copy job.
6 Press the [START] key on the control panel to start the copy job.
Continue the interrupted copy job.
1 Press the [INTERRUPT] key on the control panel.
The control panel LED on the [INTERRUPT] key goes out.
2 On the control panel press the [START] key.
The interrupted copy job continues.
3.8 Recalling System Settings of the Last Job
Recall the system settings of the last completed job to continue to work with same system settings.
Please note the following:
- Only the system settings of the last completed job can be recalled.
- The system settings of the last job can also be recalled if the system was switched off in the meantime.
1 Press the [PROGRAM MEMORY] key on the control panel.
The Program Memory is displayed again.
Program Memory

2 Press the [PRE-JOB RECALL] key.
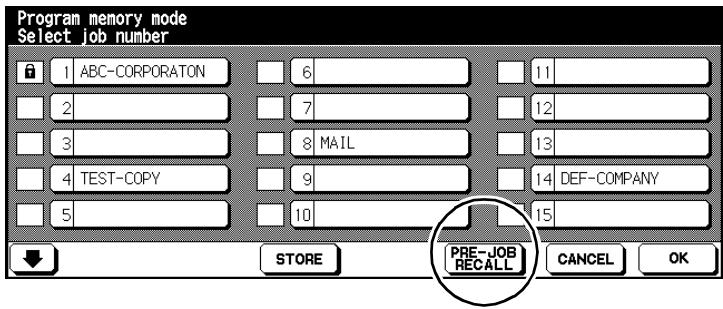
3 Press the [OK] key.
The basic options are displayed again. The system settings of the last completed job are set.
3.9 Saving and Recalling System Settings
Store the system settings for up to 30 different jobs. Recall the system settings as required.
Please note the following:
- In key operator mode program memory slots where system settings are stored can be locked. For more information, see page 7-30.
- Locked program memory positions cannot be deleted nor overwritten.
- When a program memory position is locked, a padlock is displayed in front of its program space number.
- A locked program can be unlocked only in key operator mode.
- Program memory slots with 16 asterisks indicate that system settings were saved without a name.
Saving System Settings
1 Configure the system settings for your job.
2 Press the [PROGRAM MEMORY] key on the control panel.
The Program Memory is displayed again.
Program Memory

3 Press the [STORE] key.
An overview of the current system settings is displayed.
![KONICA MINOLTA DI850 - Press the [STORE] key. - 1](/content/2024/12/139451/images/c4db07224fbd156d2801af4e7348be9ae0cc3337abbae0652fa7829b7661b5e2.jpg)
4 Press the [OK] key to close the overview screen.
The Program Memory is displayed.
? Do you need to make changes of the system settings once more?
Press the [CANCEL] key. The basic options are displayed again. Change the system settings for your job. Start by saving the system settings again.
5 Select a free memory slot to store the system settings.
The memory slot has a black background.
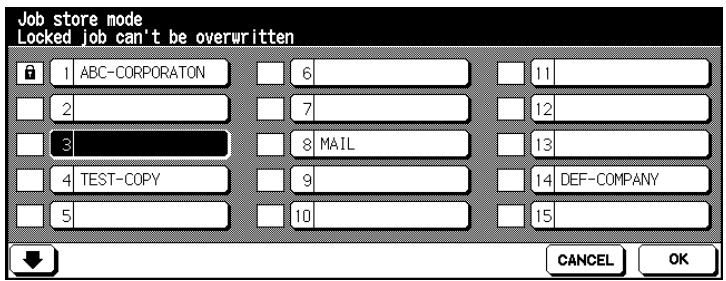
6 Press the [OK] key.
A keyboard for input of the name for the stored system settings is displayed on the touch screen.
![KONICA MINOLTA DI850 - Press the [OK] key. - 1](/content/2024/12/139451/images/d0c151acb74b4965f91eafeda7dfc3a5b2336587db0ab85db9688201ed427472.jpg)
7 Use the keypad on the touch screen to specify a name (up to 16 characters).
Did you enter an incorrect number?
Press the [1-CHARACTER DELETE] key as necessary to delete your input character for character. Then enter the corrections.
Press the [OK] key to confirm your input. The Program Memory is displayed.
? Do you want to cancel this procedure?
Press the [CANCEL] key to cancel the process of saving the job.
9 Press the [OK] key to complete the save procedure.
The basic options are displayed again. The system configuration for the job is now stored and can be called up anytime.
Recalling System Settings
1 Load the originals.
2 Press the [PROGRAM MEMORY] key on the control panel.
The Program Memory is displayed.
Program Memory

3 Select the memory position where you want to store the desired system settings.
or
Press the [CANCEL] key to terminate the procedure.
or
Press the arrow key to view other memory positions.
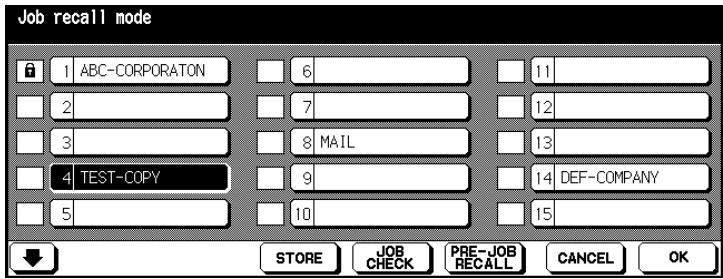
4 Press the [JOB CHECK] key to check the copier settings one last time. An overview of the current system settings is displayed.
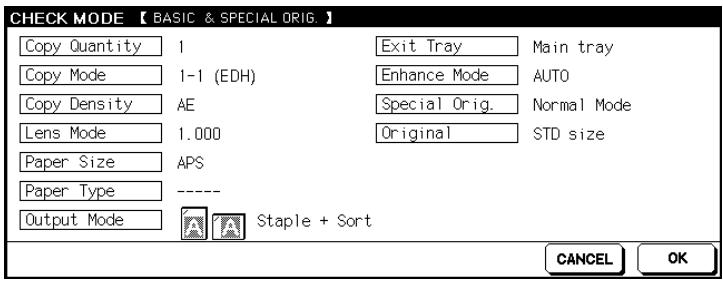
5 Press the [OK] key to close the overview screen.
The basic options are displayed again.
? Do you want to cancel this procedure?
Press the [CANCEL] key.
6 Press the [START] key on the control panel to start the copy job.
3.10 Check System Meter Count
Check the system's meter counts. Counting began the first time the system was employed. The date the system was first started is displayed in the "Counter List" under Start Date.
Viewing the Meter Counts
View the current meter counts.
Press the [UTILITY] key on the control panel.
The counter list is displayed.
Total counter
Shows the total number of copies and printouts.
Copier counter
Shows the total number of copies.
Printer counter
Shows the total number of printouts.
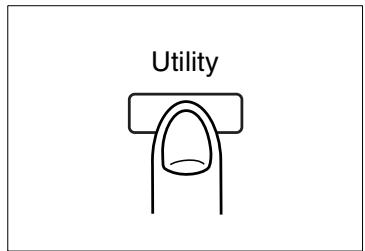
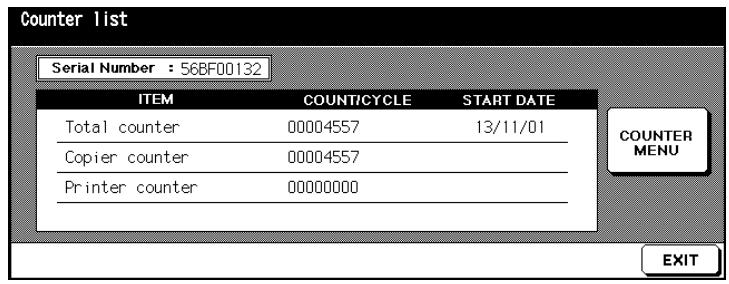
Hide counter list
Press the [EXIT] key to return to the basic options.
The counter list closes. The basic options are displayed again.
Printing the Counter List
Print the counter list.
1 Press the [UTILITY] key on the control panel.
The counter list is displayed.
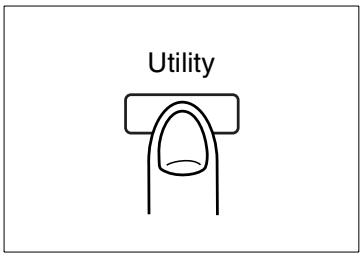
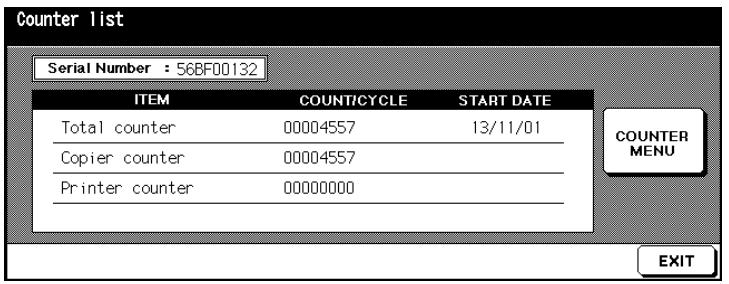
2 Press the [COUNTER MENU] key.
The basic options are displayed.
3 Select the paper tray containing the paper that you want the counter list printed onto.
4 Press the [START] key on the control panel to start the printout of the counter list.
The counter list is printed.
3.11 Enabling Energy Saving Modes
While the system is not being used, enable one of two available energy saving modes to reduce the power consumed by the system.
The system provides two features for saving energy:
Energy Saving Mode
In energy saving mode, the temperature of the fixing unit is reduced to a low level when the system is idle.
Automatic Shut Off
Specific parts of the system are shut off with automatic shut off
Both of these modes can be enabled automatically and manually.

One button for two modes
The energy saving function is activated manually on the control panel by pressing [ENERGY Saver]. This key can be set up to activate either energy saving mode or auto shut off mode. Use the key operator mode to configure which energy saving mode is triggered when this key is pressed.
For more information, see page 7-51.
Enabling Energy Saving Mode
Enable the energy saving mode automatically or manually.

DANGER
Risk of electrical shock by incorrect handling
The system remains under high voltage even when in energy saving mode.
Observe all of the safety measures regarding the handling of high-voltage components listed in this manual.
Automatic Enabling
Set up automatic enabling in key operator mode.
Specify in key operator mode how many minutes should pass after the last system activity before the energy saving mode is enabled. For more information, see page 7-50.
System Initial Setting: ca. 15 Minutes
Manual activation
It is activated manually by pressing the [ENERGY Saver] key on the control panel.
Press and hold the [ENERGY SAVER] key on the control panel for more than one second.
The [ENERGY SAVER] LED key on the control panel lights up. The touch screen display dims. The system is now in energy saving mode.
Exiting Energy Saving Mode
Press any key on the control panel to end this mode.
Enabling Auto Shut Off Mode
Enable the auto shut off mode automatically or manually.
Automatic Enabling
Set up automatic enabling in key operator mode.
Specify in key operator mode how many minutes should pass after the last system activity before the system is shut off automatically. For more information, see page 7-50.
Initial Setting: 90 Minutes
Manual activation
It is activated manually by pressing the [ENERGY Saver] key on the control panel.
Press the [ENERGY SAVER] key on the control panel.
When the system is in auto shut-off mode the [ENERGY Saver] LED on the control panel is on. The touch screen switches off. The system is now in auto shut off mode.
Exit automatic shut off
Press the [ENERGY Saver] key on the control panel to exit this mode.
3.12 Using the Bypass Tray
You can also use the bypass tray to process special paper that you cannot process using the other paper drawers.
| Note the following important information! | |
| • Paper sizes: | Standard Size A3, B4, F4, A4R, A4, B5R, B5, A5R, A5, A6R, 11"×17", 8.5"×11" STD size (special) 8.5"×11"R or F4 instead of A4R, 5.5"×8.5 instead of A5 or A5R Non STD size Max: 314 mm × 459 mm Min: 100 mm × 148 mm Wide size paper A3W, B4W, F4W, A4W, A4WR, B5W, B5WR, A5W, A5WR, 11"×17"W, 8.5"×11"W, 8.5"×11"WR, 5.5"×8.5W, 5.5"×8.5WR |
| • Original weights: | • Standard: 60~90 g/m² • Thick 1: 91~200 g/m² • Thin: 50~59 g/m² • TAB: 91~170 g/m² |
| • Paper capacities: | Plain paper max. 150 sheets (80g/m²) Special paper, max. 1 sheet. |
Load the Paper on to the Bypass Tray
1 Open the bypass tray on the right side of the system.
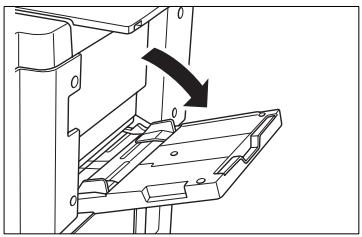
2 If using large sized paper, pull out the extender of the bypass tray.
3 Place the paper flush up against the feed chamber of the bypass tray.
Special papers, OHP transparencies: max. 1 sheet
Other: up to 150 sheets (80 g/m²)

4 Slide the edge guides to fit the size of the inserted paper.
Processing Tab Papers
When using the bypass tray to process tab papers, note the following:
- Make sure that you have set "tab paper" for the "copy size" bypass tray. For more information, see page 4-61.
- Position the tab papers in the bypass tray so that the tabs are located in the back right corner.
- Make sure that the first tab points up. The following tabs must be in the correct sequence below it.
Examples:
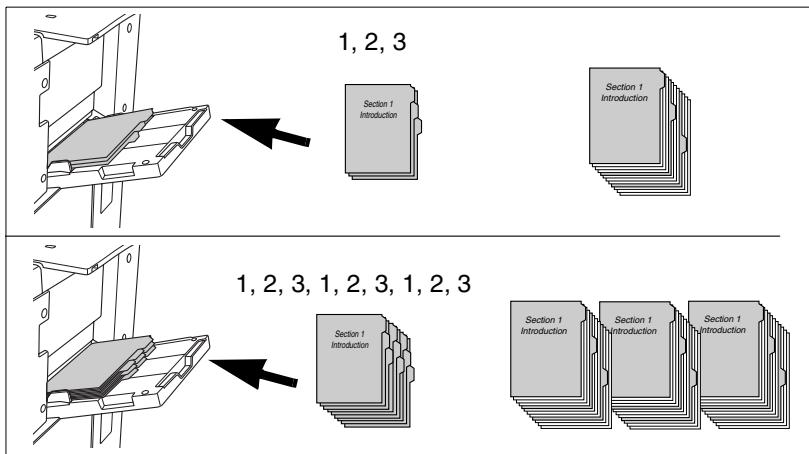
3.13 Using the Help Mode
The system is equipped with a help mode. You can start the help mode from any of the touch screen displays except the Program Memory and Key Operator Mode screen.
The help mode offers two help options:
- Help is available when basic options are displayed:
The help topic overview is displayed. You can select a help topic and display the matching help text.
- Help is available when basic options are not displayed:
Help text for the page currently displayed is shown.

The help topic overview includes:
A key for setting the contrast on the touch screen
- Display of weekly timer times
- Display of phone number for a system administrator
- Display of phone and fax numbers for the technical representative
- A help menu with information on different help topics
- Keys for calling step-by-step instruction on different help topics
A key for calling up the key operator mode
Open Help Topic Overview
Open the help topic overview.
1 Make sure that the basic options are displayed on the touch screen.
2 Press the [HELP] key on the control panel.
The help topic overview is displayed.


3 Select one of the help topics.
Staple supply Add staples
Trimmer Empty waste container
Punch Empty waste container
EDH Loading originals onto the EDH
Paper supply Add paper to a tray
Toner supply Add toner
Help menu Help for other topics
4 Press the [EXIT] key to exit help mode.
The basic options are displayed again.
Call Help for a Specific Cycle
Display information on a cycle that is currently in process. This feature is only available if the basic options are not displayed on the touch screen.
1 Press the [HELP] key on the control panel.
Help text with information on the current screen is displayed.
2 Read the help text.
3 Press the [EXIT] key to exit help mode.
The display in which you called the help topic is displayed again.
3.14 UsingBookmark Function
You can use the bookmark function to mark a page in the area of the "Applications". Then when you press the control panel key [MODE CHECK] to switch to check mode, the second page "application mode" is automatically displayed. You can access the bookmarked page directly from there, for example, to make specific settings.
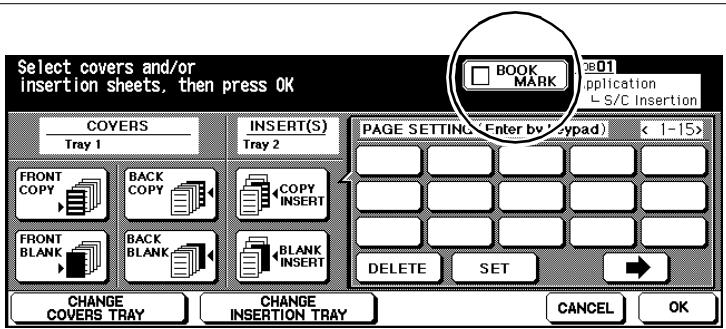
For additional information on check mode see page 3-15.
4 Basic Functions
4.1 Setting the Output Mode
Define how your copies are to be output.
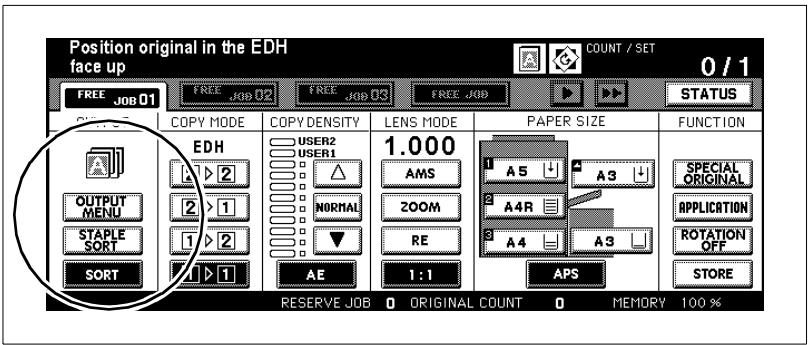
Depending on how your system is equipped, you may have several available options for output.
The system may have the following equipment:
FN-115 Finisher (optional)
FN-7 Finisher (optional)
TMG-2 Trimming Unit (optional for FN-7 Finisher)
- Trimming Unit C
(optional for Finisher FN-115/FN-7)
- without a finisher

CAUTION
Damage to the system by external influences!
The main tray of the finisher lowers during the output cycle. Objects located under the main tray can damage the main tray.
Do not put any objects under the main tray of the finisher.

Do not exceed the capacity of the offset trays!
Do not exceed the capacity of the finisher offset trays, otherwise a paper misfeed may occur. You should empty the offset trays during a large job to avoid exceeding the capacity. For more information, see page 9-15.
Non Sort - Output to the Main Tray
(only with FN-115 or FN-7 Finisher - optional)
Output your copies unsorted. The copy sets are output with the printed side down and without offset.
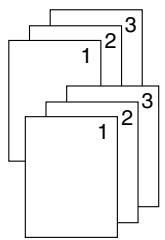
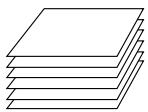
Procedure
1 In the basic options press the [SORT] key to disable the feature. The background of the key turns white.
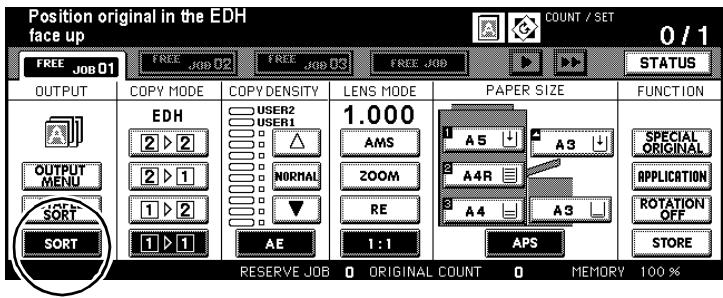
2 Configure the system settings for your job.
3 Use the 10-Key Pad to set the number of copies.
4 Load the originals.
into the EDH or
on the original glass.
5 Press the [START] key on the control panel to start the copy job.
Sort - Output to the Main Tray
(only with FN-115 or FN-7 Finisher - optional)
Output your copies sorted. The copy sets are output with the printed side down and with an offset of 30mm .
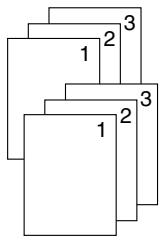
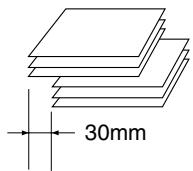
Note the following important information!
These features cannot be combined:
Basic functions:
Loading document onto the original glass (available only with Image Insert, Dual Page, or if the Document Memory is used), Folding, Stapling & Folding
- Applications:
OHP Interleave
Procedure
1 In the basic options press the [SORT] key.
The background of the key turns black.
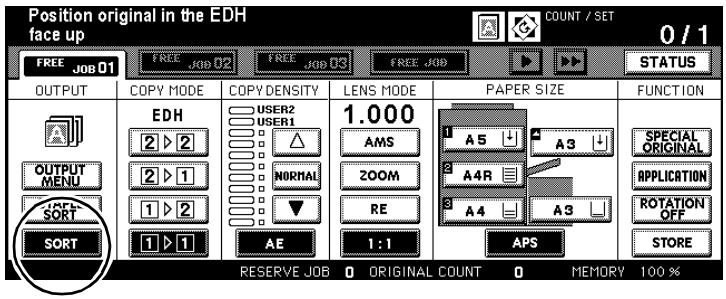
2 Configure the system settings for your job.
3 Use the 10-Key Pad to set the number of copies.
4 Load the originals.
into the EDH or
on the original glass.
5 Press the [START] key on the control panel to start the copy job.
Staple - Output to the Main Tray
(only with FN-115 or FS-112 Finisher - optional)
Output your copies sorted and stapled. You can staple your copy sets once or twice at different positions. The stapled copy sets are output with the printed side down and with an offset of 30mm .
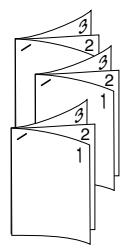
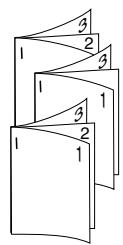
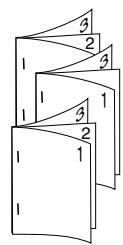
Note the following important information!
Staple capacity:
FN-115
max. 100 sheets (80g / m^2) or
paper block max. 10mm thick
FN-7
max. 50 sheets (80g / m^2) or
paper block max. 5 mm thick
Staple positions:
1 staple (at an angle), 1 staple (parallel), 2 staples (parallel)
These features cannot be combined:
Basic functions:
Loading document onto the original glass (available only if Image Insert, Dual Page, or Document Memory is used), Folding, Stapling & Folding
- Applications:
OHP Interleave
Procedure
1 In the basic options press the [STAPLE SORT] key. The background of the key turns black.

2 Press the [OUTPUT MENU] key. The output menu is displayed.
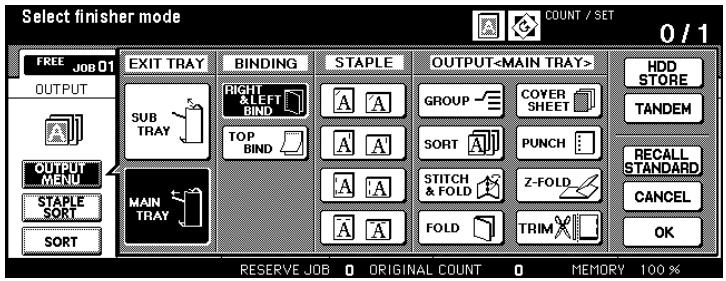
3 Select a staple setting and the type of binding.

4 Confirm your selection by pressing [OK].
The basic options are displayed again.
5 Configure the system settings for your job.
6 Use the 10-Key Pad to set the number of copies.
7 Load the originals.
into the EDH or
on the original glass.
8 Press the [START] key on the control panel to start the copy job.
Group - Output to the Main Tray
(only with FN-115 or FN-7 Finisher - optional)
Output your copies grouped. The copy sets are output with the printed side down and with an offset of 30mm .
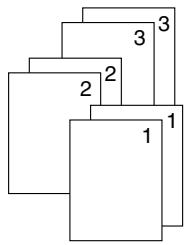
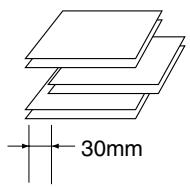
Note the following important information!
These features cannot be combined:
Basic functions:
1-2 and 2-2 when loading document onto the original glass (except with Document Memory), Proof Copy, Folding, Stapling & Folding
- Applications:
Sheet / Cover Insertion, Chapter, Combination, Booklet, OHP Interleave, Image Insert, Repeat
Procedure
1 In the basic options press the [OUTPUT MENU] key.
The output menu is displayed.
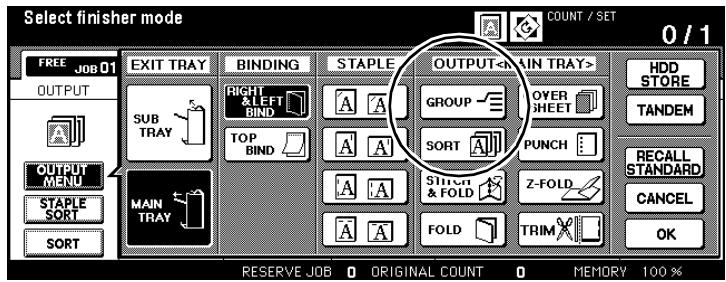
2 Press the [GROUP] key.
The background of the key turns black.
3 Confirm your selection by pressing [OK].
The basic options are displayed again.
4 Configure the system settings for your job.
5 Use the 10-Key Pad to set the number of copies.
6 Load the originals.
into the EDH or
on the original glass.
7 Press the [START] key on the control panel to start the copy job.
Output to the Sub Tray
(only with FN-115 or FN-7 Finisher)
In addition to the main tray, Finisher FN-115/ FN-7 is equipped with a second (sub) output tray. The sub tray supports the following four finishing features.
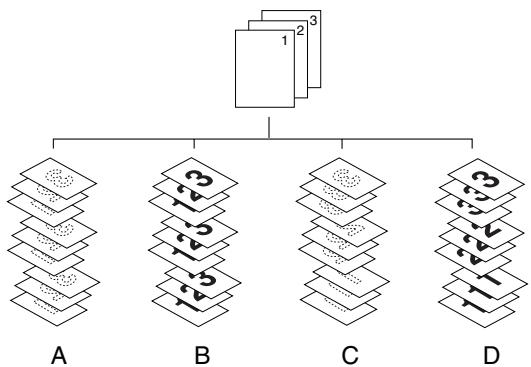
| Item | Features |
| A | Non Sort (output with printed side down) |
| B | Non Sort (output with printed side up) |
| C | Group (output with printed side down) |
| D | Group (output with printed side up) |
Note the following important information!
These features cannot be combined:
when grouping
Basic functions:
1-2 or 2-2 when loading document onto the original glass (except with Document Memory), Proof Copy, Folding, Stapling & Folding, Punching, Cover Sheet Insertion
- Applications:
Sheet / Cover Insertion, Chapter, Combination, Booklet, OHP Interleave, Image Insert, Repeat
when outputting with the printed side down
Basic functions:
1-2 or 2-2 when loading document onto the original glass, Folding, Stapling & Folding, Punching, Cover Sheet Insertion
Procedure
1 In the basic options press the [OUTPUT MENU] key.
The output menu is displayed.

2 Under OUTPUT press the [SUB TRAY] key.
The background of the key turns black. A dialog box appears.

3 Select the output mode for the sub tray.
Non Sort (output with printed side down) [FACE DOWN]
Non Sort (output with printed side up) [FACE UP]
Group (output with printed side down) [FACE DOWN] and [GROUP]
Group (output with printed side up) [FACE UP] and [GROUP]
4 only if required
Select the type of binding if you want to make 2-sided copies.
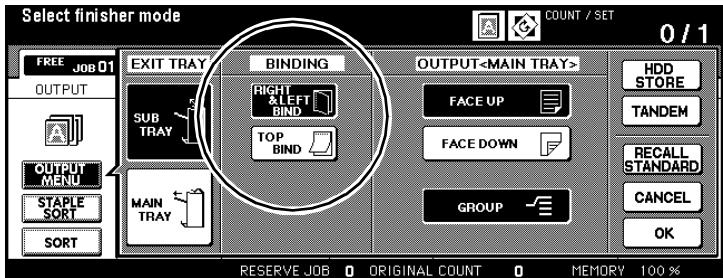
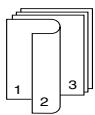
Right & Left binding
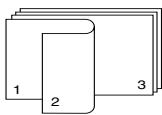
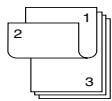
Binding face up
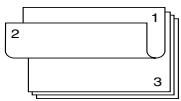
5 Confirm your selection by pressing [OK]. The basic options are displayed again.
6 Configure the system settings for your job.
7 Use the 10-Key Pad to set the number of copies.
8 Load the originals.
into the EDH or
on the original glass.
9 Press the [START] key on the control panel to start the copy job.
Folding, Stapling & Folding and Trimming
(only with FN-7 Finisher, "trimming" function only with TMG-2 Trimming Unit - optional)
If the "Folding" feature is enabled, the copies are folded in the middle.
If the "Stapling & Folding" feature is applied, the copies are stapled in the middle with two staples and then folded.
When the "Trim" function is enabled, the front edge of stapled and folded copies are trimmed. The trimmed copies are then output to the exit tray of the trimming unit.

Folding

Folding and Trimming

Stapling & Folding Stapling & Folding and Trimming
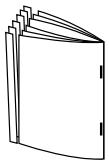
For further information on creating booklets, see page 5-13.

2-sided originals or very dark originals?
If you are copying 2-sided originals, disable the automatically enabled "Booklet" feature in the application settings.
If you are copying very dark originals or are applying the "Reverse Image" feature, the fold might shift somewhat.
Note the following important information!
- Folding, up to 3 sheets (80 g/m²)
- Folding and trimming:
- Stapling & Folding, max. 16 sheets (80g / m^2) - Stapling & Folding max. 15 sheets (with a thick cover sheet) and Trimming:
- Paper sizes: A3, B4, A4R
- Original weight: 60 to 90g / m^2 (80 g/m² is recommended)
- Maximum capacity
- Folding: Booklet output
- 33 sets of 3 folded sheets ( 3 × 33 = 99 sheets)
- Stapling & Folding:
20 sets of 5 folded sheets (20× 5 = 100 sheets) -
6 sets of 15 folded sheets (6 × 15 = 90 sheets)
-
Capacity up to 512 sheets (80g / m^2)
100 sets of 2 to 5 folded sheets (max. 500 sheets)
- 50 sets of 6 to 10 folded sheets (max. 500 sheets)
32 sets of 11 to 16 folded sheets (max. 512 sheets)
These features cannot be combined:
if the Booklet feature is enabled
- Basic functions: 1-1, 2-1, APS, Sorting, Stapling, Grouping, Rotation Sort, Rotation Group, Output to Sub Tray, Trimming, Punching
- Special originals: Mixed Original, Full-Image Area with Special Sizes, Tab Papers
- Applications: Sheet / Cover Insertion, Combination, OHP Interleave, Program Job, Non-Image Area Erase, Reverse Image, Repeat
if the Booklet feature is disabled
- Basic functions: Sorting, Stapling, Grouping, Rotation Sort, Rotation Group, Output to Sub Tray, Trimming, Punching
- Special originals: OHP Interleave, Reverse Image

Do not exceed the capacity of the offset trays!
Do not exceed the capacity of the finisher offset trays, otherwise a paper misfeed may occur. You should empty the offset trays during a large copy job to avoid exceeding the capacity.
If the capacity of the trimming unit is exceeded, the copy cycle is stopped.
Procedure
Press the [OUTPUT MENU] key on the main screen.
The output menu is displayed.

2 Press the [MAIN TRAY] key.
The background of the key turns black.
3 Select the output mode.
folding only
[FOLDING]
stapling and then folding
[STAPLING & FOLDING]
trim folded or stapled or stapled and folded copies (only with trimming unit - optional)
[TRIM]
If the "Folding" options is selected, the "Trim" feature is disabled.
You may have to enable the function manually.
If you select the "Staple & Fold" options, the "Trim" feature is enabled automatically. You may have to disable the function manually.
4 Confirm your selection by pressing [OK].
The main screen is displayed again.
5 Configure copier settings as required.
6 Use the 10-Key Pad to set the number of copies.
What do you need to consider?
The system stops copying automatically if the capacity of the trimming unit is exceeded.
Specify a copy quantity that does not exceed the capacity. For additional information, see page 9-18.
7 Load the originals.
into the EDH or
on the original glass (only if using the document memory)
8 Press the [START] key on the control panel to start the copy job.
What must be considered?
If the tray cover of the trimming unit is open, the copy cycle cannot be started.
Close the tray cover before starting the copy cycle.

Always keep the tray cover closed!
It is not possible to start a copy cycle if the tray cover of the trimming unit is not closed.
If the tray cover of the trimming unit is opened during a copy cycle, the system stops the cycle automatically. This leads to a paper misfeed.
Adding Front and Back Cover Sheets
(only with Finisher FN-115/FN-7 and Cover Inserter C)
This feature is only available if your finisher is equipped with a Cover Inserter C (optional).
For further information on creating booklets, see page 5-13.
Note the following important information!
- Paper sizes: A3, B4, F4, A4, A4R, B5, A5
- Capacity: up to 200 sheets (200 g/m² paper) or paper stack up to 30 mm
These features cannot be combined:
Basic functions: Output to sub tray
- Applications: OHP Interleave, Cover function with Sheet/Cover Insertion and Booklets
Procedure
1 In the basic options press the [OUTPUT MENU] key.
The output menu is displayed.
2 Press the [MAIN TRAY] key.
The background of the key turns black.
3 Press the [COVER SHEET] key and select an output mode.
Cover sheet position
[FRONT], [FRONT + BACK], [BACK]
4 Confirm your selection by pressing [OK].
The output options are displayed again.
5 Confirm your selection by pressing [OK].
The basic options are displayed again.
6 Make any necessary changes to the system settings and enter the number of copies.
7 Load the paper for the front and/or back cover sheets into the cover inserter.
If the paper you load does not match the dimensions of the paper, a message is displayed.
Message:
Please load cover sheet in cover inserter
or
Please make cover sheet size coincide with paper size
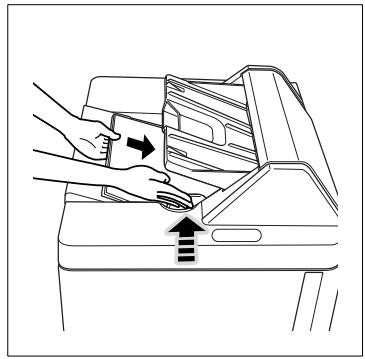
8 Load the originals.
into the EDH or
on the original glass.
9 Press the [START] key on the control panel to start the copy job.

Print the paper for the cover inserter first!
Paper fed by the cover inserter runs only through the finisher. Thus it cannot be printed in the same procedure as the copy job itself.
Hole-Punch
(only with PK-3 Hole Punch Unit or ZK-2 Punch/Z-fold Unit)
Output your copies with punched holes.
If you use the automatic paper tray switching feature, the holes may be on the wrong side when a tray is changed. If this occurs, disable paper tray switching.
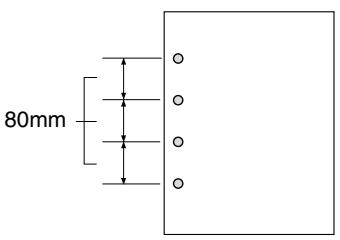
Hole-Punch
Note the following important information!
- Paper sizes: A3, B4, A4, B5
Number of holes: 4 holes - Hole diameter: 6.5 mm ± 0.5 mm
- Distance between 80 mm ± 0.5 mm holes:
- Original weight: (80g / m^2 is recommended)
plain/recycled paper: 60 to 90g / m^2
thin paper: 50 to 59g / m^2
thick paper: 91 to 170g / m^2
These features cannot be combined:
- Basic functions: Loading document onto the original glass (only with
Document Memory), Folding, Stapling &
Folding, Trimming, Output to sub tray
- Special originals: Mixed Original (A4R, B5R, A5, A5R mixed), non STD
sizes
- Applications: Booklets, OHP Interleave
Procedure
1 In the basic options press the [OUTPUT MENU] key. The output menu is displayed.

2 Press the [MAIN TRAY] key. The background of the key turns black.
3 Press the [PUNCH] key. The selection window for the hole position appears.
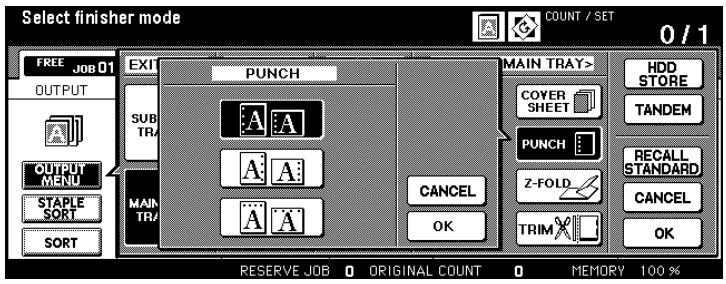
4 Select a punch mode. Confirm your selection by pressing [OK]. The output options are displayed again.
5 Confirm your settings by pressing [OK]. The basic options are displayed again.
6 Configure the system settings for your job.
7 Use the 10-Key Pad to set the number of copies.
8 Load the originals.
into the EDH or
on the original glass.
9 Press the [START] key on the control panel to start the copy job.
Z-Fold
(only with Finisher FN-115/FN-7 and ZK-2 Punch/Z-fold Unit)
Have your copies finished with a Z-fold.
If you combine the Z-fold function with one of the finishing functions for the main tray, the copy is created on A3/B4 copy paper and output to the main tray.
If you combine Mixed Original and Z-folding, do not process A3 and B4 sizes at the same time. Otherwise, the Z-fold may not be carried out cleanly.
Special paper cannot be Z-folded. Attempting to do so may lead to a system malfunction.

Z-Fold
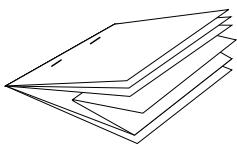
Z-Fold + Staple + APS with Mixed Original
Note the following important information!
- Paper sizes: A3 (Z-fold), B4 (double fold) all other sizes are finished without Z-fold or with double fold
- Original weight: Plain / Recycled Paper 60 to 90g / m^2
- Fold width: 209 mm or less for A3 181 mm or less for B4 (measured from paper edge to first fold crease)
These features cannot be combined:
- Basic functions: Loading document onto the original glass (only with Document Memory), Stapling for B4, Output to sub tray, Folding, Stapling & Folding, Trimming, Tandem Mode
- Applications: OHP Interleave
| Note the following important information! | ||
| Capacity for Mixed Originals with Z-fold, Staple and APS | ||
| Capacity per stapled set | Main tray capacity | |
| Z-Fold | single sheets | |
| 1 sheet | 1~40 sheets | 20 stapled sets |
| 2 sheets | 0~30 sheets | 10 stapled sets |
| 3 sheets | 0~20 sheets | 4 stapled sets |
| 4 sheets | 0~10 sheets | 3 stapled sets |
| 5 sheets | 0 | 2 stapled sets |
| 6 sheets and more | Z-fold cannot be combined with stapling. | |
Procedure
1 In the basic options press the [OUTPUT MENU] key.
The output menu is displayed.
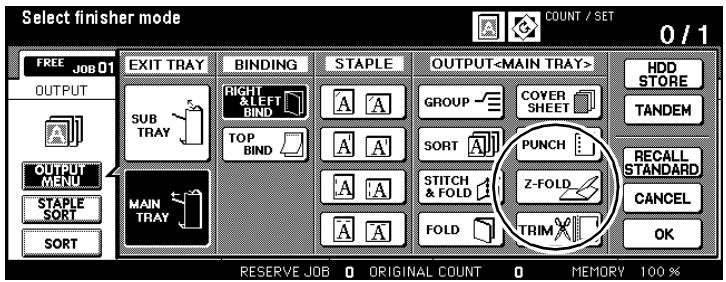
2 Press the [MAIN TRAY] key.
The background of the key turns black.
3 Press the [Z-FOLD] key.
The background of the key turns black. The feature is enabled.
4 Confirm your settings by pressing [OK].
The basic options are displayed again.
5 Configure the system settings for your job.
6 Use the 10-Key Pad to set the number of copies.
7 Load the originals.
into the EDH or
on the original glass.
(only if using the document memory)
8 Press the [START] key on the control panel to start the copy job.
Manual Stapling, Punching or Folding
The following features are available only with the FN-115/FN-7 Finisher and the Cover Inserter C or TMG-2 Trimming Unit:
- FS-115 and Trimming Unit
1 staple (stapled diagonally), 2 staples (stapled perpendicularly) - FS-7 and Trimming Unit
1 staple (stapled diagonally), 2 staples (stapled perpendicularly), Staple & Fold (saddle stitched) - FS-7, Trimming Unit and TMG-2
1 staple (stapled diagonally), 2 staples (stapled perpendicularly), Staple & Fold and Trim (saddle stitched)


Stapling & Folding and Trimming!
If a trimming unit is installed on your system and you select "Staple & Fold", the trim feature is enabled automatically.
Note the following important information!
1 Staple (at an angle) or 2 Staples (parallel)
- Paper size: A3, B4, F4, A4, A4R, B5, A5
- Types of paper: 60 to 90g / m^2 (80 g/m² is recommended)
Number of up to 50 sheets (80g / m^2) sheets:
Output tray: Main Tray
Stapling & Folding
- Paper size: A3, B4, A4R
- Types of paper: 60 to 90 g/m^2
- Number of sheets: max. 16 sheets (80g / m^2) max. 15 sheets (80g / m^2 with thicker cover sheets)
Output tray: Booklet output
Stapling & Folding and Trimming
- Paper size: A3, B4, A4R
- Types of paper: 60 to 90 ~g / m^2
- Number of sheets: max. 16 sheets (80 g/m²)
- Maximum number of sheets: max. 15 sheets (80 g/m² with thicker cover sheets)
Output tray: Trimming unit tray
Procedure
1 Ensure that the type of paper and the number of sheets meets the specifications. For more information, see the table provided on the previous page.
2 Use the MODE key on the finisher control field to select the staple option.
Stapling & Folding (and Trimming)
1 staple (diagonal)
2 staples (parallel)
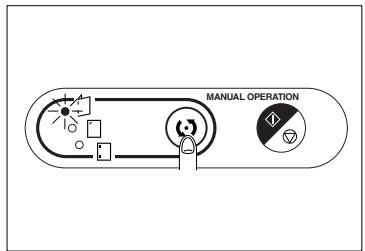
3 Load the paper to be stapled into the cover inserter.
1 staple (diagonally) or 2 staples (perpendicularly) with the front page facing up
Staple & Fold (and Trim) with the page that is to be on the outside later facing up
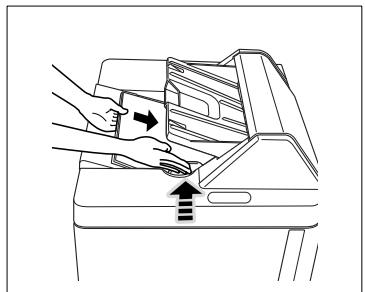
4 Align the paper edge guides.
The LED on the START/STOP key lights up green.
5 Press the START/STOP key to start the staple cycle.
The loaded paper is pulled in and stapled according to the feature you selected.
? How can I interrupt this process?
Press the START/STOP key again to stop the procedure. If you are using booklet mode, the incomplete booklet is left in the stapler unit of the finisher.
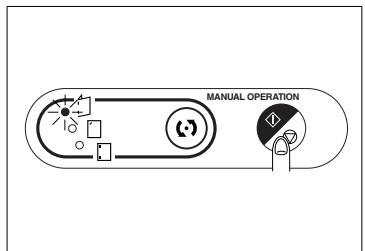
Output without Finisher
There are several available options for sorting and grouping your copies even if you do not have a finisher.
For copy output, select between:
- Output with printed side down, or
- Output with printed side up
Combine the output with one of the following features:
Non Sort
Rotation Sort
- Group
Rotation Group
More information on output options without a finisher is provided on the following pages.
Output with Printed Side Down
Please note the following:
- If you apply the "Non Sort" or "Group" feature, every side of the original must be copied once for each output copy set.
- If you use the "Rotation Sort" or "Rotation Group" feature, the system requires paper in both crosswise and lengthwise formats. Load paper crosswise into one tray and lengthwise into another
Output with Printed Side Up
Please note the following:
- If you are making 1-sided copies (1-1) and have to place the originals onto the original glass, copy from the last to the first page. This will cause the copies to be output sorted correctly.
Procedure
Select your options based on the overview and the table on the following page.
1 Press the [OUTPUT MENU] key.
Change the settings for the finishing mode.
Confirm your settings by pressing [OK].
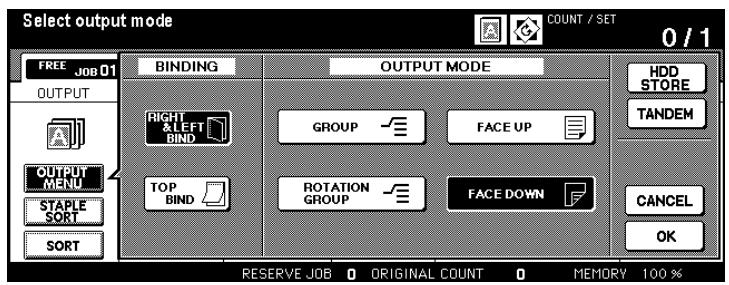
2 Check the settings for the [SORT] key.
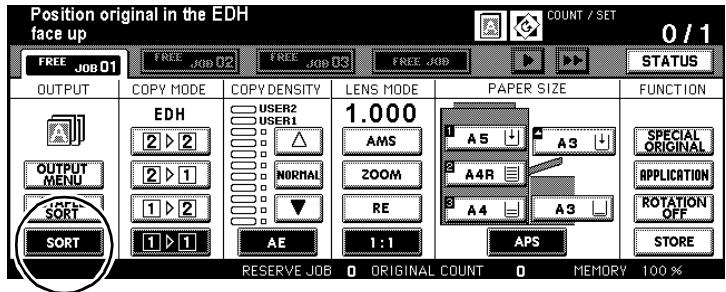
3 Configure the system settings for your job.
4 Use the 10-Key Pad to set the number of copies.
5 Load the originals.
into the EDH or
on the original glass.
6 Press the [START] key on the control panel to start the copy job.
Overview

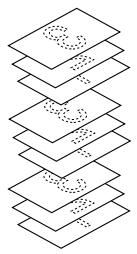
A

B
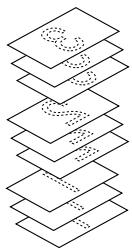
C
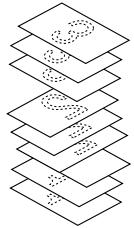
D

E

F

G
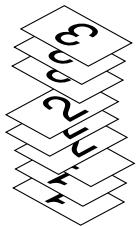
H
| Item | Features |
| A | Non Sort (output with printed side down) |
| B | Rotation Sort (output with printed side down) |
| C | Group (output with printed side down) |
| D | Rotation Group (output with printed side down) |
| E | Non Sort (output with printed side up) |
| F | Rotation Sort (output with printed side up) |
| G | Group (output with printed side up) |
| H | Rotation Group (output with printed side up) |
Settings
| Features | Settings | |
| A | Non Sort (output with printed side down) | |
| ·[OUTPUT MENU]: disabled ·[SORT]: disabled | ||
| B | Rotation Sort (output with printed side down) | |
| ·[OUTPUT MENU]: disabled ·[SORT]: enabled | ||
| C | Group (output with printed side down) | |
| ·[OUTPUT MENU]: enabled Enabled options [ROTATION GROUP], [FACE DOWN] ·[SORT]: disabled | ||
| D | Rotation Group (output with printed side down) | |
| ·[OUTPUT MENU]: enabled Enabled options [ROTATION GROUP], [FACE DOWN] ·[SORT]: not enabled | ||
| E | Non Sort (output with printed side up) | |
| ·[OUTPUT MENU]: enabled Enabled options [FACE UP] ·[SORT]: disabled | ||
| F | Rotation Sort (output with printed side up) | |
| ·[OUTPUT MENU]: enabled Enabled options [FACE UP] ·[SORT]: enabled | ||
| G | Group (output with printed side up) | |
| ·[OUTPUT MENU]: enabled Enabled options [ROTATION GROUP], [FACE UP] ·[SORT]: disabled | ||
| H | Rotation Group (output with printed side up) | |
| ·[OUTPUT MENU]: enabled Enabled options [ROTATION GROUP], [FACE UP] ·[SORT]: not enabled | ||
enabled:
disabled:
Key on the touch screen has a black background
Key on the touch screen has a white background
Using two Systems in Tandem
(only available if two Di850 are present and connected with an interface cable)
In tandem mode, you can run two systems (master and slave units) parallel operation.
Master unit
Slave unit


The master unit is the unit from which tandem mode is controlled. The originals are scanned on the master unit. The copies are then collated and output from both systems equally. This reduces the time needed to complete large copy jobs in half.
If one of the systems in tandem mode fails due to an error, the copy job is automatically completed on the other system.

Tandem mode has to be set up by a service technician!
If you want to use tandem mode, you have to have your systems configured by a service technician. If you have questions, please contact your technical representative.
Information on: Tandem mode
- Both systems need to be equipped with the same options except for the Large Capacity Printer (C-403N/C-404N).
- Energy saving modes and tandem mode:
If tandem mode is enabled while the slave unit is in "power saving mode":
The "power saving mode" is canceled automatically.
The slave unit has been switched off by the "auto shut off" function. The tandem mode cannot be activated Switch the slave unit back on.
- If the "auto shut off mode" switches itself on for the slave unit while settings are being configured in tandem mode:
The "power saving mode" is canceled automatically as soon as the copy cycle is started.
- If the "auto shut off mode" switches itself on on the slave unit while settings are being configured in tandem mode:
Tandem mode is deactivated automatically.
If one of the power saving functions switches on on the master unit: Tandem mode is deactivated automatically. - If one of the systems in tandem mode fails due to an error, the copy job is automatically completed on the other system. This function can be disabled by a service technician. If you have questions, please contact your technical representative.
- If the same password for the key copy counter mode is used on both systems, the systems becomes available for use when the password is entered on the master unit. The password is sent to the slave unit automatically.
- If the [INTERRUPT] key on the control panel is pressed, the copy cycle is canceled on the system on which the control panel key was pressed.
- If the master unit is equipped with a hard drive, the stored data can also be output in tandem mode.
- The paper trays of both systems should be filled with paper of the same type and size.
- The tandem mode is automatically deactivated if the [PANEL RESET] key on the master unit is pressed. If the tandem mode is enabled by default, it is deactivated automatically, if the [PANEL RESET] keys on the control panels of both systems are pressed.
Note the following important information!
These features cannot be combined:
- Basic functions: Rotation Sort, Rotation Group, Grouping, Rotation Mode
- Applications: OHP Interleave, Page Numbering and Watermark Numbering for the stamp feature

Up to nine reserve copy jobs in tandem mode!
If you scan the originals of a reserve copy job while the system is operating in tandem mode, the reserve copy job is also run in tandem mode. This lets you prepare up to nine reserve copy jobs for output in tandem mode.
Procedure
Activate tandem mode to run two systems in parallel operation.
1 Switch both systems on.
2 Wait until both systems are ready to copy.
3 Press the [OUTPUT MENU] key on the system that you want to run as the master unit.
The finishing settings are shown.
4 Press the [TANDEM] key.
The background of the key turns black. This system is now the master unit. The other system will now operate as the slave unit.
? If the tandem mode cannot be activated
Tandem mode cannot be activated in the following situation:
The slave unit has been switched off by the "auto shut off" function. Switch the slave unit back on using the [ENERGY Saver] key on the control panel.
An error has occurred on the slave unit, such as a paper misfeed or paper has run out. Resolve the problem.
Ten reserve copy jobs have been set up on the slave unit (not in tandem mode). Wait until the reserve copy jobs have been processed.
5 Make any necessary changes to the copy settings on the master unit.
6 Enter the number of copies on the master unit using the 10-key pad.
? At which quantity of copies does output in tandem mode begin?
Tandem mode is activated for 2 copies or more.
What happens if an uneven number of copies is specified?
The master unit outputs one copy more than the slave unit.
7 Place the originals on the master unit.
into the EDH or
on the original glass.
8 Press the [START] key on the control panel of the master unit to start the copy cycle.
? What happens if one of the systems is shut off while in tandem mode?
If one of the systems is switched off in tandem mode, the copy cycle has to be completely reconfigured and restarted.
? How can tandem mode be stopped completely?
Press the [STOP] key on the control panel of the master unit. A dialog window is displayed on the touch screen. Confirm the deletion with [EXIT].
? How can output be terminated on the slave unit?
Press the [STOP] key on the control panel of the slave unit. A dialog window is displayed on the touch screen. Confirm the deletion with [EXIT]. The copy job is then completed on the master unit.
? What happens if a memory overflow occurs on one of the systems?
Master unit memory overflow: The scanning cycle for the originals is canceled immediately. Tandem mode is temporarily stopped. For more information, see page 8-8.
Slave unit memory overflow: The output of copies is started automatically on the slave unit only if there is enough free memory, for example after processing several reserve copy jobs. In the meantime, the copies are output only on the master unit. As soon as enough free memory is created on the slave unit, the output continues on both systems.
If a specified time period elapses before sufficient free memory is created, the copy job is completed on the master unit.
4.2 Setting the Copy Mode
Select a copy mode.
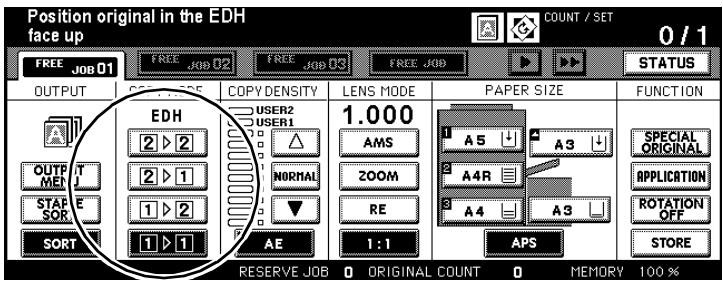
Choose between:
2-2
Make 2-sided copies from 2-sided originals.
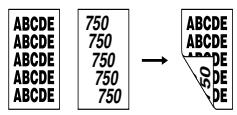
2-1
Make 1-sided copies from 2-sided originals (Simplex).
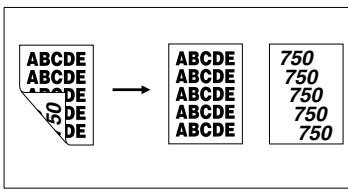
1-2
Make 2-sided copies from 1-sided originals (Duplex).
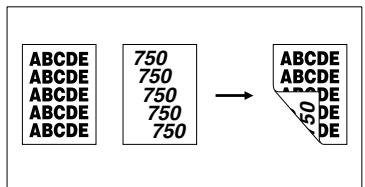
1-1 (initial setting)
Make 1-sided copies from 1-sided originals.
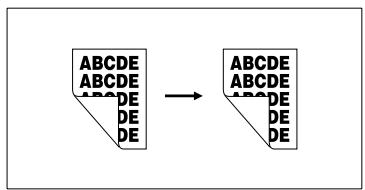
Creating 1 and 2-sided Copies (Using the EDH)
Use the EDH to create single or double-sided copies.
1 Load the originals.
into the EDH
2 Select the copy mode you want.
Not every copy mode can be combined with every feature. When you select a copy mode, the features that cannot be used with it are dimmed.
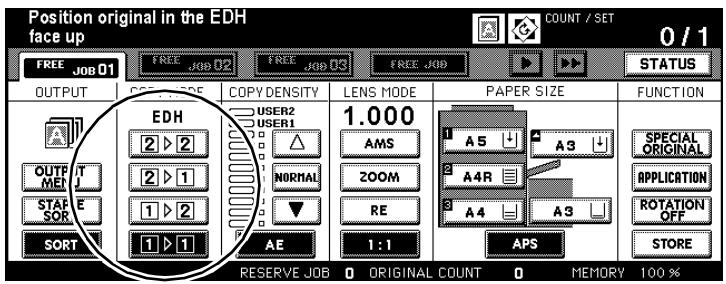
3 only as required
Press the [SPECIAL ORIGINAL] key if the direction of the original is different from the specified default direction. Change the setting of the Original Direction.
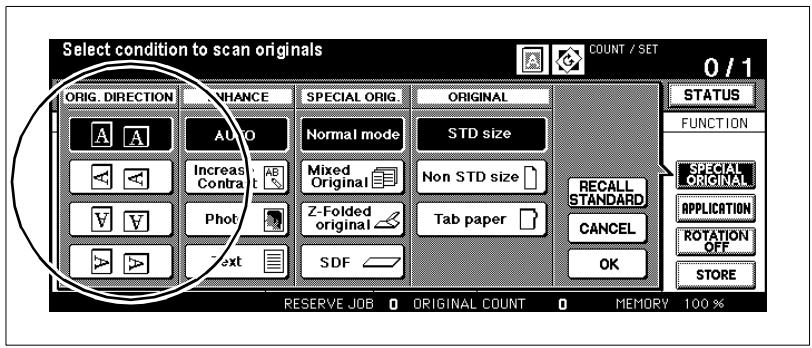
4 only as required Press the [OUTPUT MENU] key. Select the desired binding type.

With Finisher

5 Configure the system settings for your job.
6 Use the 10-Key Pad to set the number of copies.
? Did you enter an incorrect number?
Press the [C] key on the control panel and enter the correct number of copies.
7 On the control panel press the [START] key to start the scan cycle and to output the copies.
Do you want to cancel this procedure?
Press the [STOP] key on the control panel.
Creating 2-sided Copies (Using the Original Glass)
Place originals that are not suitable for the EDH on the original glass one by one to create double-sided copies.
For this process, all of the originals have to be scanned individually before the printout is made. Before scanning, check that enough memory is available.
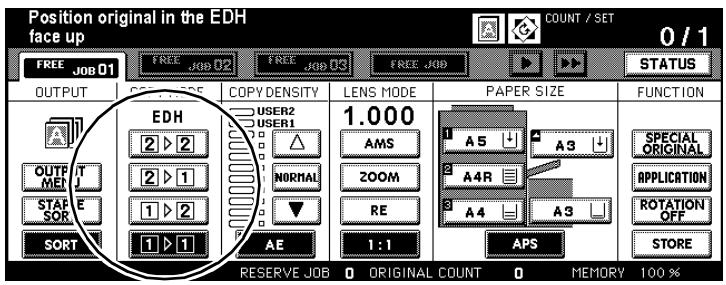
1 Place the first original face down on the original glass with the side to be copied face down. Select Copy Mode [1-2].
The [STORE] key has a black background. The function for scanning documents has been enabled automatically.
2 only as required
Press the [SPECIAL ORIGINAL] key if the direction of the original is different from the specified default direction. Change the setting of the Original Direction.

3 only as required Press the [OUTPUT MENU] key. Select the desired binding type.
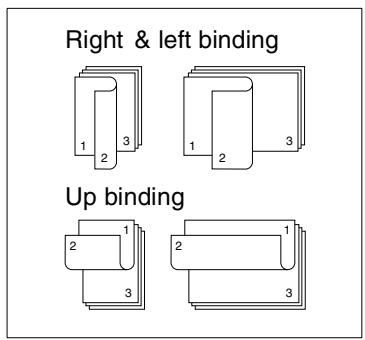

With Finisher
4 Configure the system settings for your job.
5 Use the 10-Key Pad to set the number of copies.
? Did you enter an incorrect number?
Press the [C] key on the control panel and enter the correct number of copies.
6 On the control panel press the [START] key.
The document placed on the original glass is scanned.
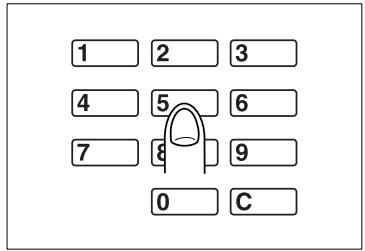
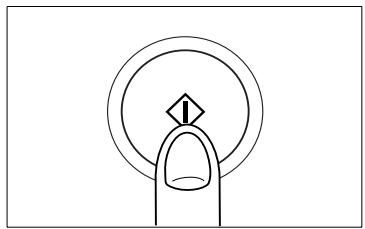
7 Place the next original on the original glass. Repeat steps 6 and 7 until all originals have been scanned.
? Do you want to cancel the scan cycle and delete the scanned data from the document memory?
Press the [STOP] key on the control panel. A confirmation prompt appears.
Press the [EXIT] key to confirm the cancellation.
8 Press the [STORE] key to complete the scanning procedure.
9 Press the [START] key on the control panel to start the printout.
? Do you want to cancel this procedure?
Press the [STOP] key on the control panel.
4.3 Adjusting the Contrast
Select the exposure level for your copies.
Choose between:
- Auto exposure (AE),
- Manual exposure
Enabling Auto Exposure Mode
Copy light and dark originals without having to manually adjust the exposure level for the copies.
The system automatically selects the optimal exposure level for the copies based on the originals.
1 Load the originals.
into the EDH
on the original glass.
2 Press the [AE] key.
The background of the key turns black. "Auto Exposure Mode" is now enabled.
3 Configure the system settings for your job.
4 Press the [START] key on the control panel to start the copy job.
Manually Adjusting Copy Density
Manually brighten or darken the exposure for the copier. There are nine exposure levels and two user-defined settings to choose from.
Press the white arrow as many times as required to make the exposure lighter.
or
Press the [NORMAL] key to retain a balanced exposure.
or
Press the black arrow as many times as necessary to set the exposure to darker.
What are the "User 1" and "User 2" settings?
"User 1" and "User 2" are positions for storing user-defined exposure levels. For more information, see page 7-15.
Press the white arrow key until the black bar is at the desired user-defined setting User 1 or User 2.
Adjusting the Image Density
Adapt exposure ranges to suit your copy needs. Select among six different ranges (0 to 5).
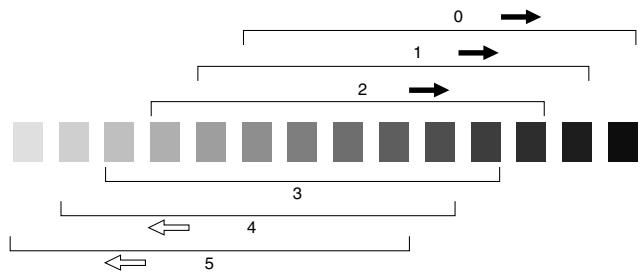
If the copies generally appear too pale, shift the contrast to a darker range or vice versa. You can adjust the copy density for the features "Auto", "Text", "Photo" and "Increase Contrast".
1 In the basic options press the [SPECIAL ORIG.] key.
The Special Originals screen is displayed.
2 Press the key of the function for which you want to define the exposure range.
Auto
Increase Contrast
Photo
Text
The background of the selected function turns black.
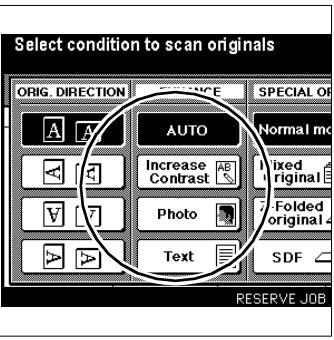
3 Press the [UTILITY] key on the control panel.

Utility
A message is displayed on the touch screen.
Density Shift (Text)
2 (0 5)
Example: If you pressed the [TEXT] key in step 2, the message Density Shift (Text) is displayed.
4 Use the 10-Key Pad to enter the exposure range you want (0 to 5).
Example:
Enter 3 to select exposure range 3.
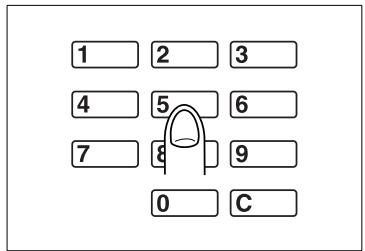
5 Press the [OK] key to confirm your input.
The contrast adjustment is now set.
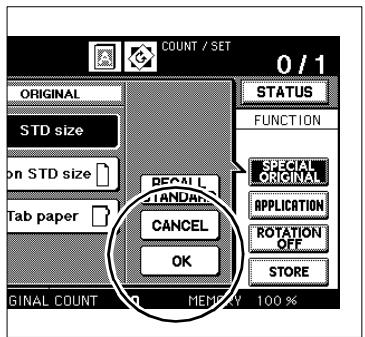
4.4 Setting the Zoom Ratio
Enlarge or reduce the sized of your originals.
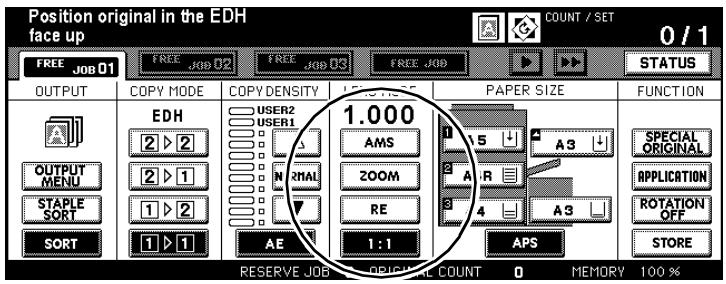
Choose between:
Automatic Magnification Selection (AMS),
- Preset Zoom Ratio (RE)
- User-set Zoom Ratio (Zoom)
Enabling Automatic Magnification Selection (AMS)
Copy a variety of original sizes onto the same paper size.
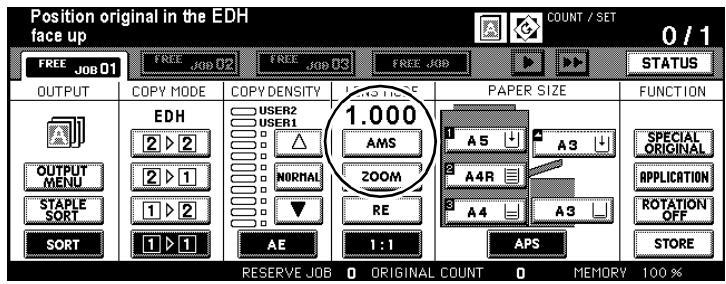
You select the paper size and the system detects the size of the original and determines the correct zoom ratio automatically.
1 Load the originals.
into the EDH
on the original glass.
2 Press the [AMS] key.
The background of the key turns black. "Automatic Magnification Selection" is switched on.
3 Select a paper tray, if necessary.
The zoom ratio depends on the size of the original and the paper in the selected paper tray.
4 Configure the system settings for your job.
5 Press the [START] key on the control panel to start the copy job.

Copy result not as desired?
If necessary, disable the "rotation mode" feature to achieve the desired copy result.
The following table shows the magnification ratios used for various source sizes.
| Original Size | ||||||||||
| A3 | B4 | F4 | A4 | A4R | B5 | B5R | A5 | A5R | ||
| Paper Size | A3 | 1.00 | 1.15 | 1.27 | 1.00 | 1.41 | 1.15 | 1.63 | 1.41 | 2.00 |
| B4R | 0.86 | 1.00 | 1.10 | 0.86 | 1.22 | 1.00 | 1.41 | 1.22 | 1.73 | |
| A4 | 0.50 | 0.58 | 0.64 | 1.00 | 0.71 | 1.15 | 0.82 | 1.41 | 1.00 | |
| A4R | 0.71 | 0.82 | 0.90 | 0.71 | 1.00 | 0.82 | 1.15 | 1.00 | 1.41 | |
| B5 | 0.43 | 0.50 | 0.55 | 0.86 | 0.61 | 1.00 | 0.71 | 1.22 | 0.86 | |
| B5R | 0.61 | 0.71 | 0.78 | 0.61 | 0.86 | 0.71 | 1.00 | 0.86 | 1.22 | |
| A5 | 0.35 | 0.41 | 0.45 | 0.71 | 0.50 | 0.81 | 0.58 | 1.00 | 0.71 | |
| A5R | 0.50 | 0.58 | 0.64 | 0.50 | 0.71 | 0.58 | 0.81 | 0.71 | 1.00 | |
Selecting a Preset Zoom Ratio
Select a preset zoom ratio to reduce or enlarge the size of an original. There are eight programmed zoom ratios and three user-defined ratios to choose from.
1 Press the [RE] key.
A dialog window is displayed on the touch screen.
![KONICA MINOLTA DI850 - Press the [RE] key. - 1](/content/2024/12/139451/images/b10eeed4d5ba6c836e6d01f412737094d3ba636f73e9ce6be9780cddfb4a07bb.jpg)
2 Select a zoom ratio under ENLARGE or REDUCE. or
Select a user-defined zoom ratio under USER PRESET.
The background of the selected option turns black. The dialog closes.
The selected zoom ratio is displayed on the touch screen.

Defining the user-defined zoom ratios!
Define the user-defined zoom ratio in key operator mode. For more information, see page 7-15.

Creating 1:1 copies!
If you want to create a copy of the same size as your original, just press [1:1] on the touch screen.
Selecting User-set Zoom Ratios
Enlarge or reduce (zoom) originals in 1 % increments.
- Enlarge up to: 4.000 (400%)
- Reduce down to: 0.250 (25%)
You can also maintain aspect ratios or stretch when zooming.
Press the [ZOOM] key.
A dialog window is displayed on the touch screen.
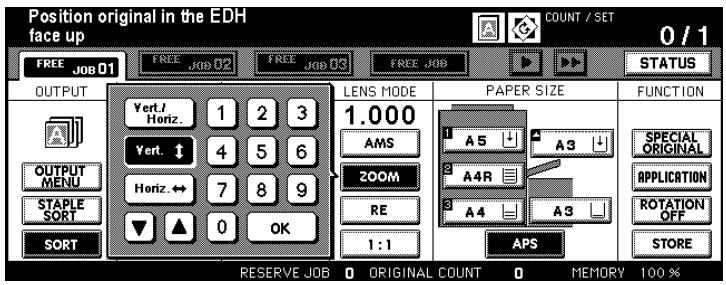
2 Select a zoom mode:
O Vert./Horiz. maintain aspect ratio
Vert zoom vertically (stretch)
Horiz. zoom horizontally (stretch)
3 Enter a 3-digit zoom ratio using the touch screen keypad.
(e.g. input: for 53% , display: 0.530).
or
Select a zoom ratio with the arrow keys.
4 Press the [OK] key to end this step.
The dialog closes. The selected zoom ratio is displayed on the touch screen.
5 Configure the system settings for your job.
6 Press the [START] key on the control panel to start the copy job.
Horizontal/Vertical Stretch
Use individual zoom ratios to achieve special effects. For example, use it to stretch objects or characters.
X:0.500,Y:0.500
X:1.000,Y:0.500

X:2.000,Y:0.500

X:4.000,Y:0.500
X:0.500,Y:1.000
X: 1.000, Y: 1.000

X:2.000,Y:1.000

X: 4.000, Y: 1.000
X:0.500,Y:2.000
X:1.000,Y:2.000
X:2.000,Y:2.000

X:4.000,Y:2.000
X:0.500,Y:4.000
X:1.000,Y:4.000

X:2.000,Y:4.000

X:4.000,Y:4.000
You can produce more effects by placing the original onto the original glass at an angle.
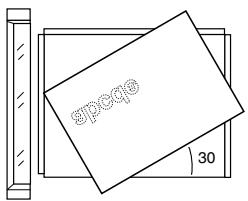

X:2.000,Y:0.500
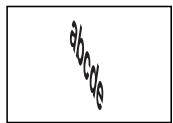
X: 0.500, Y: 2.000
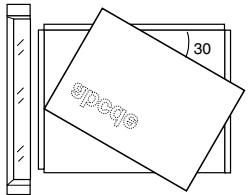

X:2.000,Y:0.500

X: 0.500, Y: 2.000
4.5 Setting the Copy Paper Size
Specify the size and the type of the paper that is loaded in a paper tray. If necessary, manually select the paper tray containing the paper to be used.
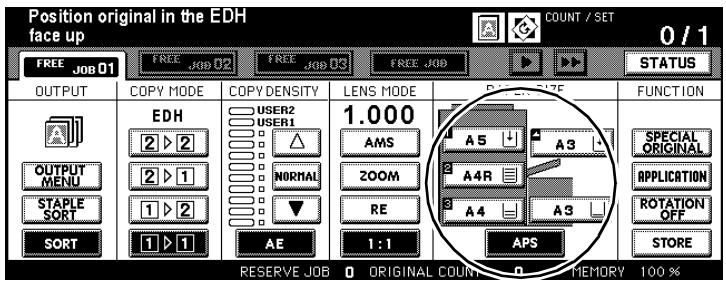
Select from these choices:
- Paper Tray 1
- Paper Tray 2
- Paper Tray 3
- Paper Drawer 4 - LCC (optional)
- Bypass Tray
- Auto Paper Select Mode (APS)
Enabling Auto Paper Select Mode (APS)
Automatically copy a variety of original sizes onto a suitable paper size.
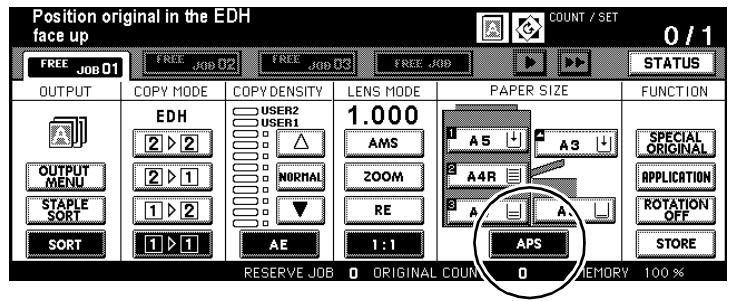
You select the zoom ratio and the system detects the size of the original and determines the correct paper size automatically. If a matching paper size is not available, a message will be shown prompting the user to insert a suitable paper size.
1 Load the originals.
into the EDH
on the original glass.
2 Press the [APS] key.
The background of the key turns black. "Auto Paper Mode" is now enabled.
3 Set a zoom ratio if required.
The paper size is selected depending on the original size and the selected zoom ratio.
4 Configure the system settings for your job.
5 Press the [START] key on the control panel to start the copy job.

Copy result not as desired?
If necessary, disable the "rotation mode" feature to achieve the desired copy result.
The following table shows the paper sizes used for various source sizes and zoom ratios.
| Paper Size | Original Size | Paper Size | ||||||||||
| A3 | B4 | F4 | A4 | A4R | B5 | B5R | A5 | A5R | ||||
| Zoom ratios | 0.25 - 0.42 | B6R | B6R | B6R | B6R | B6R | B6R | B6R | B6R | B6R | 0.25 - 0.42 | Zoom ratios |
| 0.43 - 0.50 | A5R | A5 | 0.43 - 0.50 | |||||||||
| 0.51 - 0.55 | B5R | A5R | A5 | 0.51 - 0.55 | ||||||||
| 0.56 - 0.57 | A5R | 0.56 - 0.57 | ||||||||||
| 0.58 - 0.61 | 0.58 - 0.61 | |||||||||||
| 0.62 - 0.64 | A4R | B5R | A5R | A5 | 0.62 - 0.64 | |||||||
| 0.65 - 0.71 | B5R | 0.65 - 0.71 | ||||||||||
| 0.72 - 0.78 | B4 | A4R | B5 | B5R | A5R | 0.72 - 0.78 | ||||||
| 0.79 - 0.82 | A4R | 0.79 - 0.82 | ||||||||||
| 0.83 - 0.86 | B4 | A4 | A4R | B5 | B5R | A5R | 0.83 - 0.86 | |||||
| 0.87 - 0.90 | A3 | 0.87 - 0.90 | ||||||||||
| 0.91 - 1.00 | F4 | 0.91 - 1.00 | ||||||||||
| 1.01 - 1.10 | A3 | B4 | A3 | B4 | A4 | A4R | B5 | B5R | 1.01 - 1.10 | |||
| 1.11 - 1.15 | A3 | A3 | B4 | 1.11 - 1.15 | ||||||||
| 1.16 - 1.22 | 1.16 - 1.22 | |||||||||||
| 1.23 - 1.41 | A3 | A4 | A4R | 1.23 - 1.41 | ||||||||
| 1.42 - 1.73 | A3 | A3 | B4 | 1.42 - 1.73 | ||||||||
| 1.74 - 4.00 | A3 | 1.74 - 4.00 | ||||||||||
Manually Selecting a Paper Tray
Specify the paper tray containing the paper to be used.
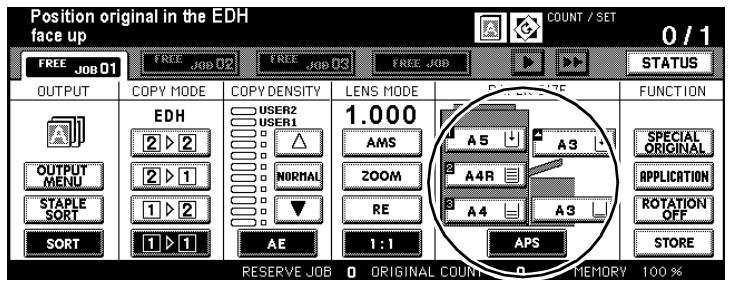
Manually select a paper tray:
Press the key of the desired tray.
The background of the key turns black. The APS feature is switched off. The AMS feature is enabled.
? Do you want to feed the paper using the bypass tray?
If you want to use the bypass tray, you will have to set additional options for the paper type and size.
For more information, see page 4-61.
Is the selected tray empty?
The paper status indicator of the selected tray blinks. A request to add paper appears in the message line on the touch screen.
Add paper to the paper tray.

Use automatic tray switching!
If a tray runs out of paper, the system automatically switches to another tray that has been filled with the same paper if paper tray switching is enabled.
For more information, see page 7-51.
Specifying the Paper Type/Size for the Bypass Tray
Specify the paper type and size that you are using with the bypass tray.
1 Load the paper onto the bypass tray.
For more information, see page 3-44.
2 Select the bypass tray as the paper tray.
The background of the key turns black. An additional key, the [TYPE/SIZE] key, is displayed.
3 Press the [TYPE/SIZE] key.
The screen for selecting the paper type and size appears.
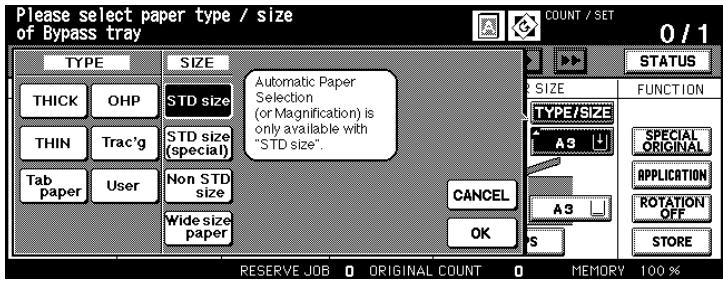
4 Under "TYPE" select the type of the paper you have loaded.
What if I am using plain paper or recycled paper?
If you are not using any of the displayed paper types, clear the selection.
Press the key with the black background. The selection is cleared. All keys now have white backgrounds.
? Are you processing tab papers?
The AMS feature is enabled automatically if you select the "TAB" feature.
Note this when processing tab papers using the bypass tray.
5 Under "Size" select the size of the paper you have loaded.
? Did you select "STD size (special)"?
Use the arrow keys to select the desired size.
? Did you select "Non STD size"?
First select length or width. Then specify the desired dimension using the touch screen keypad or the arrow keys.
? Did you select "Wide size paper"?
Set the copy start. For more information, see page 4-63.
Use the arrow keys to select the desired size from the list. or
Press the [INPUT SIZE] key. The display on the touch screen changes. First select length or width. Then specify the desired dimension using the touch screen keypad or the arrow keys.
6 Press the [OK] key to confirm your input.
The basic options are displayed again.
7 Configure the system settings for your job.
8 Press the [START] key on the control panel to start the copy job.
Specify Copy Start on Wide Size Paper for the Bypass Tray
Specify on what side of the paper the copying should start if you are copying to a wide size paper.
1 Load the paper onto the bypass tray.
For more information, see page 3-44.
2 Select the bypass tray as the paper tray.
The background of the key turns black. An additional key, the [TYPE/SIZE] key, is displayed.
3 Press the [TYPE/SIZE] key.
The screen for selecting the paper type and size appears.
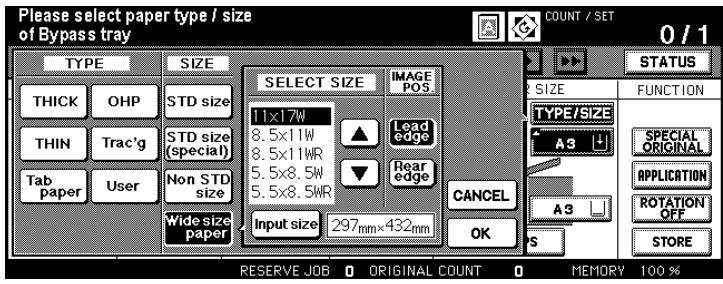
4 Select the paper size [WIDE SIZE PAPER].
A dialog window to select or input a wide size paper will open.
5 Select a wide size from the displayed list.
or
Set a user-defined paper size.
6 Set the copy start in "IMAGE POS".
Lead edge
at the paper feed edge
Rear edge
at the opposite side to the paper feed edge
7 Press the [OK] key to confirm your input.
8 Configure the system settings for your job.
9 Press the [START] key on the control panel to start the copy job.
4.6 Applying Functions
Various additional features for designing your copies to suit your needs are listed under the functions.
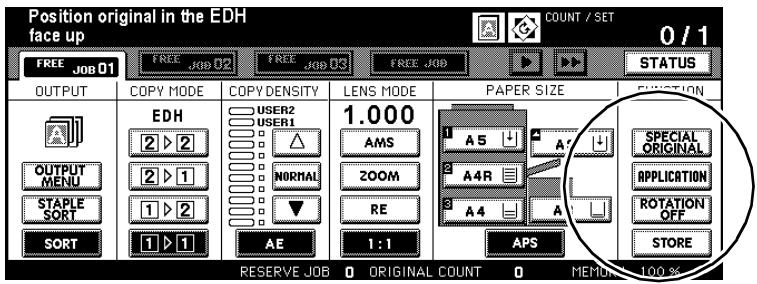
Select one of these additional functions:
SPECIAL ORIGINAL
This function optimizes how originals are scanned.
- [APPLICATION]
Use this function to combine more than one of the useful additional features, such as Overlay, Dual Page, Sheet/Cover Insertion and Reverse Image. The scope of possibilities is very extensive. For this reason, we have described these applications in a separate chapter; see page 5-1.
- [ROTATION OFF]
This function is used to rotate documents.
- [STORE]
Feature for scanning documents in the document memory
Storing Originals (from the Original Glass)
Scan originals that are not suitable for the EDH before copying. Then copy them in a single step.
Note the following important information!
These features cannot be combined:
- Applications: Overlay Memory
Scan the originals.
1 Configure the system settings for your job.
2 In the basic options press the [STORE] key.
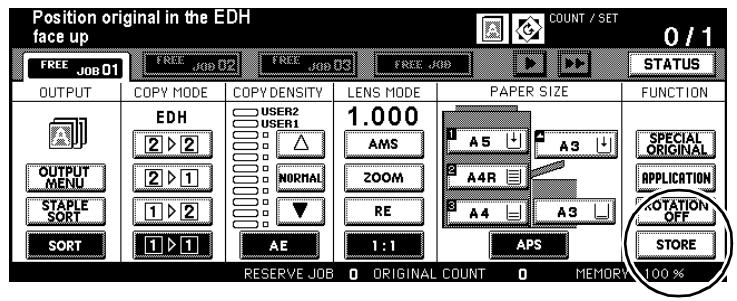
The background of the key turns black. Scan mode is now enabled.
3 Use the 10-Key Pad to set the number of copies.
4 Place the original face down on the original glass.
? Are you using the Dual Page, Frame Erase, Image Repeat (Automatic Detection) or Auto layout functions?
Leave the EDH open. This ensures that these functions are executed optimally.
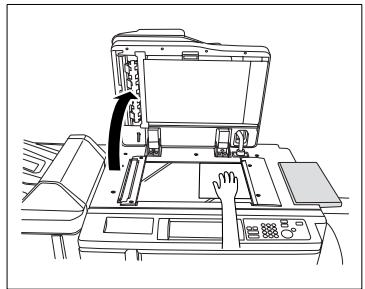
5 Press the [START] key on the control panel to start scanning the original.
The data is scanned into memory.
6 Check that enough memory is still available.
? Is there too little available memory left?
Do not scan any more originals.
7 Repeat steps 4, 5 and 6 to scan other originals.
? How can I delete the data that has been scanned into memory?
Press the [STOP] key on the control panel. A dialog field is displayed on the touch screen. To confirm the deletion of the data press the key [EXIT].
8 Press the [STORE] key to complete the scanning procedure.
9 Press the [START] key on the control panel to start the copy job.
The copies are output. When the output cycle finishes, the scanned data in the memory is deleted automatically.
? Do you want to cancel the copy cycle?
Press the [STOP] key on the control panel.
Storing Originals (from EDH)
Scan up to 100 originals (80g / m^2) into the document memory in one cycle.
To scan more than 100 originals, you have to run more than one cycle, each with a maximum of 100 original pages.
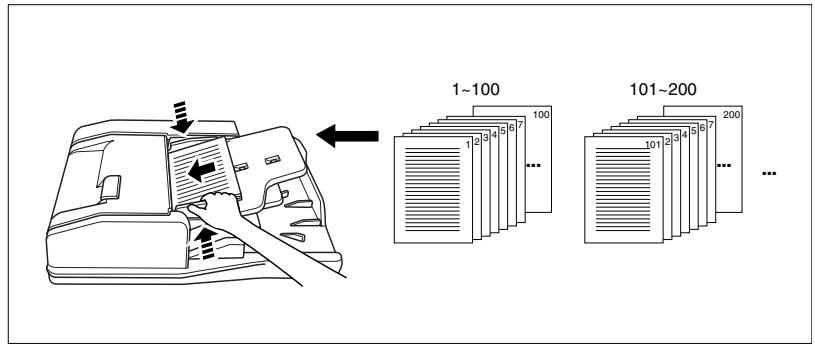
Note the following important information!
These features cannot be combined:
- Applications:
Dual Page, Image Insert, Overlay Memory
1 Configure the system settings for your job.
2 In the basic options press the key [STORE].
The background of the key turns black. Scan mode is now enabled.
3 Use the 10-Key Pad to set the number of copies.
4 Load up to 100 originals (80 g/m²) face-up into the EDH.
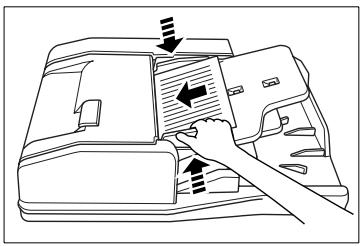
5 Press the key [START] on the control panel to start scanning the original.
The data is scanned into memory.
How can I delete the data that has been scanned into memory?
Press the [STOP] key on the control panel. A dialog field is displayed on the touch screen. To confirm the deletion of the data press the key [EXIT].
6 Check that enough memory is still available.
? Is there too little available memory left?
Do not scan any more originals.
7 Press the [STORE] key to complete the scanning procedure.
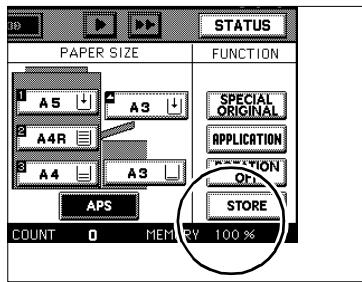
8 Press the [START] key on the control panel to start the copy job. When the copy cycle finishes, the data in the memory is deleted automatically.
Using Rotation Mode
Note the following important information!
- A 90 rotation requires a large amount of memory
- Paper sizes: A4 and B5 (lengthwise and crosswise)
These features cannot be combined:
- Basic functions: Vertical/Horizontal Zoom, Rotation Sort, Rotation Group
- Applications Dual Page, Non-Image Area Erase, Repeat (except 2/4/8)
The "Rotation Mode" function is enabled by default.
You can use the [ROTATION OFF] key to enable and disable the feature.
Press the [ROTATION OFF] key to switch off page rotation.
The background of the key turns black. The "Rotation Mode" function is switched off. The functional display for "Rotation Mode" disappears.

Changing initial settings
Use key operator mode to modify the system's initial settings. For more information, see page 7-1.
Combination Rotation Mode and APS
The following situation occurs:
- You copy an A4 original lengthwise.
However, only A4 paper is loaded crosswise in the system.
The copy image is rotated by 90 automatically. As such, it fits 1:1 onto the paper.

Original

Paper
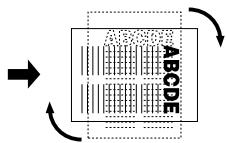
Rotation Mode and APS
The following situation occurs:
- You copy an A4 original crosswise.
However, only A4 paper is loaded lengthwise (R) in the system.
The copy image is rotated by 90 automatically. As such, it fits 1:1 onto the paper.
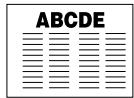
Original

Paper
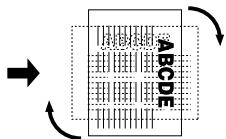
Rotation Mode and APS

APS available only in combination with Rotation Mode
The "APS" feature can only be used in conjunction with the "Rotation Mode" function.
Combination: 90 Mode and AMS
The following situation occurs:
- You copy an A4 original lengthwise.
However, only A4 paper is loaded crosswise in the system
The copy image is rotated by 90 automatically. As such, it fits 1:1 onto the paper.
If you use the "AMS" feature alone, the copy image is reduced in size so much that it will fit onto the A4 paper crosswise without image loss.
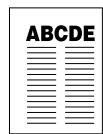
Original

Paper

90 Mode and AMS
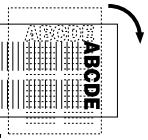
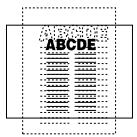
AMS only
The following situation occurs:
- You copy an A4 original crosswise.
However, only B5 paper is loaded lengthwise in the system
The copy image is rotated by 90^ and shrunk automatically.
If you use the "AMS" feature alone, the copy image is reduced in size so much that it will fit onto the B5 paper lengthwise without image loss.
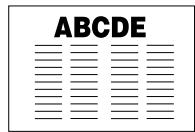
Original

Paper
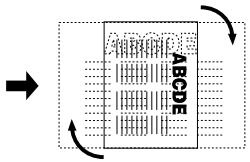
90 Mode and AMS
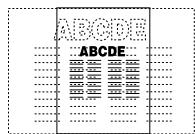
AMS only
The following situation occurs:
- You copy an A4 original lengthwise.
However, only B5 paper is loaded crosswise in the system
The copy image is rotated by 90^ and shrunk automatically.
If you use the "AMS" feature alone, the copy image is reduced in size so much that it will fit onto the B5 paper crosswise without image loss.

Original

Paper
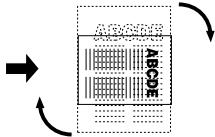
90 Mode and AMS
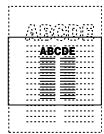
AMS only
Set Original Position (Special Originals)
Specify whether the originals are placed on the EDH or the original glass.
Before working with folding, stapling or punching features, check the setting for the original direction. If the position is wrong, a fold, staple or punched hole may be placed in the wrong position.
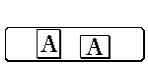
Loading to the EDH


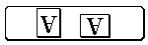


Loading onto the original glass


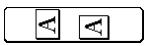


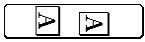


Procedure
1 Load the originals.
into the EDH
on the original glass.
2 In the basic options press the [SPECIAL ORIG.] key.
The screen for selecting scan settings appears.
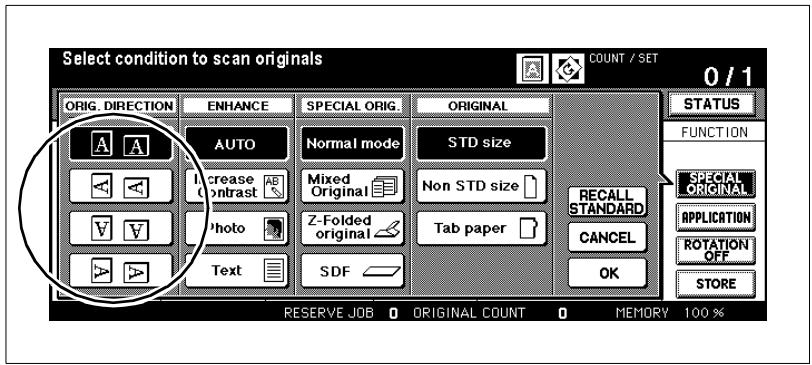
3 Select the document direction corresponding to the original position.
4 Confirm your selection by pressing [OK].
The basic options are displayed again. The background of the[SPECIAL ORIGINAL] key turns black.
5 Change any other necessary system settings.
6 Use the 10-Key Pad to set the number of copies.
7 Press the [START] key on the control panel to start the copy job.
Setting Text/Photo Enhance (Special Originals)
Improve copy quality by selecting one of several special scan modes.
Original
Auto
Photo
Original

Auto
Text
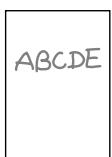
Original
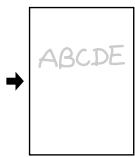
Auto
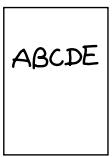
Contrast Increase
Scan
Standard Original: Auto
- Text Original only: Text
- Photo Originals only: Photo
Very light original: Increase Contrast

All lighter or darker?
If the copies seem generally too light or too dark, the copy density setting can be changed. For more information, see page 4-49.
Procedure
1 In the basic options press the [SPECIAL ORIG.] key.
The screen for selecting scan settings appears.
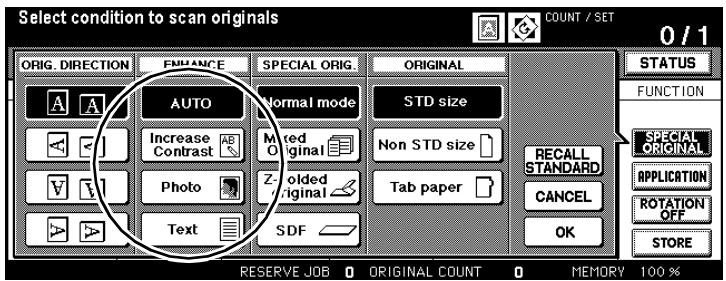
2 Select the desired text/photo mode.
Auto
Increase Contrast
Photo
Text
3 Confirm your selection by pressing [OK].
The basic options are displayed again. The background of the[SPECIAL ORIGINAL] key turns black.
4 Change any other necessary system settings.
Use the 10-Key Pad to set the number of copies.
6 Load the originals.
into the EDH
on the original glass.
7 Press the [START] key on the control panel to start the copy job.
Copying Mixed Sizes (Special Originals)
Copy a variety of original sizes in one step.
Select one of the following copy modes:
- "APS" (Copy the originals onto corresponding paper sizes) or
- "AMS" (Copy onto the same paper size)
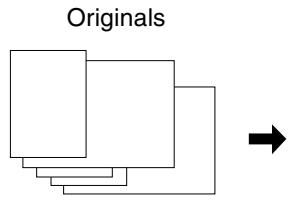
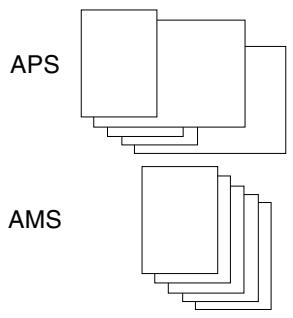
For more information on the "APS", feature, see page 4-58.
For more information on the "AMS", feature, see page 4-52.
Note the following important information!
- Original sizes: A3, B4, A4R, A4, B5, A5 (mixed)
B4,A4R,B5R,B5,A5 (mixed)
A4R,B5R,A5 (mixed)
B5R,A5R (mixed)
- Types of originals: plain paper (50 to 130g / m^2 )
Capacity of the up to 100 originals (80g / m^2) EDH:
These features cannot be combined:
- Basic functions: Stapling (with APS), Rotation Sort, Folding, Folding & Stapling, Trimming, Punching (A4R, B5R, A5 and A5R mixed)
- Special originals: Special Size, Original with Z-Fold, Tab Paper
- Applications: Sheet / Cover Insertion, Chapter, Combination, Booklet, OHP Interleave, Image Insert, Dual Page, Program Job, Non-Image Area Erase, Repeat, Auto Layout, Overlay, Overlay Memory
Procedure
1 In the basic options press the [SPECIAL ORIG.]key.
The screen for selecting scan settings appears.
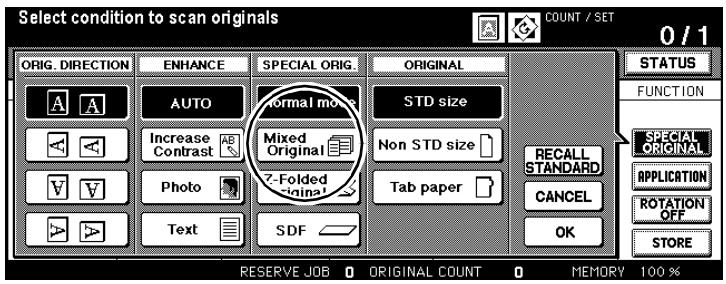
2 Press the [MIXED ORIGINAL] key.
The background of the key turns black.
3 Confirm your selection by pressing [OK].
The basic options are displayed again. The background of the [SPECIAL ORIGINAL] key turns black. The "APS" feature has been automatically enabled.
4 Change any other necessary system settings.
5 Use the 10-Key Pad to set the number of copies.
6 Align the originals against the back edge of the EDH. Then adjust the original guides.
7 Press the [START] key on the control panel to start the copy job.

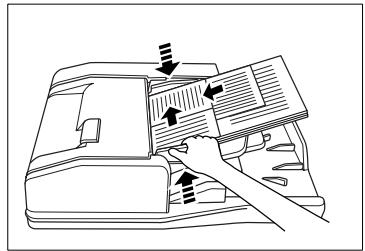
Position Mixed Original?
The originals must be positioned properly so they can be fed in without difficulty. For more information, see page 3-13.
Copying Z-Folded Originals (Special Originals)
Copying originals with a Z-folding with the EDH. The system automatically determines the length of the paper while scanning the original. This can make the scanning process take a little longer than usual.
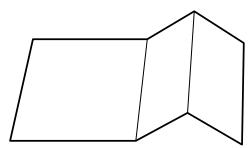
You can load up to 100 originals with or without Z-folds.
Note the following important information!
These features cannot be combined:
- Basic functions: Loading document onto the original glass, Folding, Stapling & Folding, Trimming
- Special originals: Mixed Original, Special Size, Tab Paper
- Applications: Non-Image Area Erase, Auto Layout, Image Repeat, Overlay Memory

Position originals for Z-folding?
The originals must be positioned properly so they can be fed in without difficulty. For more information, see page 3-14.
Procedure
1 In the basic options press the [SPECIAL ORIG.] key.
The screen for selecting scan settings appears.

2 Press the [Z-FOLDED ORIGINAL] key.
The background of the key turns black.
3 Confirm your selection by pressing [OK].
The basic options are displayed again. The background of the [SPECIAL ORIG.] key turns black
4 Configure the system settings for your job.
5 Use the 10-Key Pad to set the number of copies.
6 Load the originals into the EDH.
7 Slide the document guide plates to fit the size of the originals.
8 Press the [START] key on the control panel to start the copy job.
Feeding Originals Individually - SDF (Special Originals)
Use the "Single Document Feed Tray" to copy thick originals or labels. This tray feeds only one original at a time.
Observe the requirements for paper weights. For more information, see page 9-5.
Note the following important information!
- Types of originals: 50 to 130g / m^2 copy mode 2-1, 2-2
- 50 to 200g / m^2 copy mode 1-1, 1-2
Maximum capacity: 1 original
This feature cannot be combined with the following:
- Basic functions: Using the original glass, Folding, Stapling, Grouping, Rotation Sort, Rotation Group
- Special originals: Full-image Area (with special sizes), Mixed Original, Z-Folded Original
- Applications: Sheet / Cover Insertion, Chapter, Combination, Booklet, Image Insert, Frame Erasure, Image Repeat (except 2/4/8), Auto Layout, Overlay Memory

Specifying the auto start function in key operator mode
Use the key operator mode to enable the auto start function. When activated, originals are automatically fed into the copier as soon as they are placed on the feed chamber. For more information, see page 7-51.
Procedure (Normal Single Feeding Mode)
Press the [SPECIAL ORIGINAL ] key on the main screen. The screen for selecting scan settings appears.

2 Press the [SDF] key. The background of the key turns black.
3 Confirm your selection by pressing [OK]. The main screen is displayed again.
4 Change any other necessary copier settings.
Use the 10-Key Pad to set the number of copies.
6 Load the original into the EDH
7 Press the [START] key on the control panel to start the copy job.
Procedure (Auto Start with EDH Document Memory)
Press the [SPECIAL ORIGINAL ] key on the main screen. The screen for selecting scan settings appears.
2 Press the [SDF] key. Confirm your selection by pressing [OK]. The main screen is displayed again.
3 Press the [STORE] key. The background of the key turns black.
4 Change any other necessary copier settings. Use the 10-Key Pad to set the number of copies.
5 Adjust the original guides.
6 Load an original. into the EDH
The original is fed in automatically and scanned.
7 Repeat step 6 until all originals have been scanned.
8 Press the [STORE] key to complete the scanning procedure.
9 Press the [START] key on the control panel to start the copy job.
The copies are printed immediately after the scanning cycle.

First enable SDF mode, then load the original!
If you load the original before enabling "SDF" mode, the copier does not detect the auto start function. In this case, press the [START] key on the control panel to scan the original anyway.
Defining Special Original Types (Special Originals)
Specify special settings if, for example, you wish to use originals of a special size or with register tabs.
| Note the following important information! | |
| These features cannot be combined: | |
| Special Size | |
| • Special originals: | Mixed Original, Original with Z-Fold, Tab Paper |
| • Applications: | Overlay Memory |
| Full Area | |
| • Applications: | Combination, Booklet, Dual Page, Non-Image Area Erase, Image Shift |
| Tab | |
| • Special originals: | Mixed Original, Original with Z-Fold, Special Size |
| • Applications: | Sheet / Cover Insertion, Chapter, Combination, Booklet, Dual Copy, OHP Interleave, Image Insert, Overlay Memory |
Procedure
1 In the basic options press the [SPECIAL ORIG.]key.
The Special Originals screen is displayed.
2 Press the [SPECIAL ORIG.] key if you wish to process originals that do not correspond to a standard size.
or
Press the [TAB] key if you wish to copy originals with tabs.
A selection window appears.
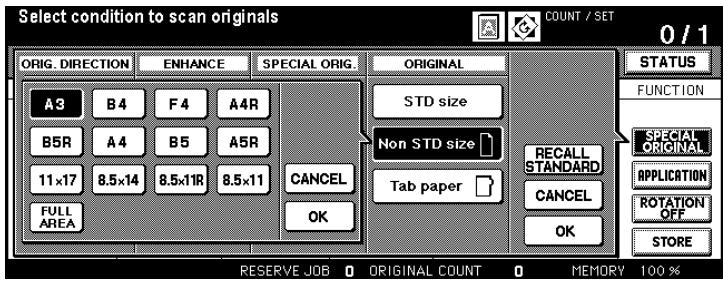
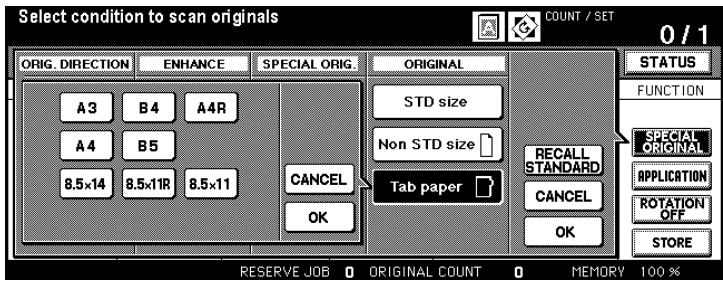
3 Select the size that corresponds to the originals that have been placed.
? What does "full-image area" mean?
When you press [FULL AREA] the entire area of the original glass will be scanned.
Press the [FULL AREA] key to scan the entire area of the original glass.
4 Confirm your selection by pressing [OK].
The selection window closes.
5 Confirm your settings by pressing [OK].
The basic options are displayed again.
6 Change any other necessary system settings.
7 Use the 10-Key Pad to set the number of copies.
8 Load the originals.
into the EDH
on the original glass.
9 Press the [START] key on the control panel to start the copy job.
5 Applications
Use the diverse application options offered by this system. Use the [APPLICATION] key to open the Application area.
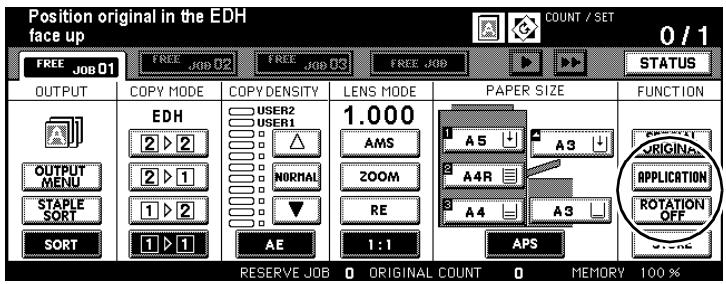
The "Application" screen shows the various application options. Not all applications can be combined. When you select an application, the applications that cannot be combined with it are automatically dimmed.


Disabling applications?
If you want to disable all applications, press the [ALL CLEAR] key. To disable a single application, press the application, which has a black background to indicate that it is enabled. The background of the key turns white. The application is now disabled.
5.1 Adding Inserts and Cover Sheets
Add inserts and front and back cover sheets to your copy job. Specify up to 30 positions for inserts (including front and back cover sheets). Use various types of paper for your inserts and front and back cover sheets.
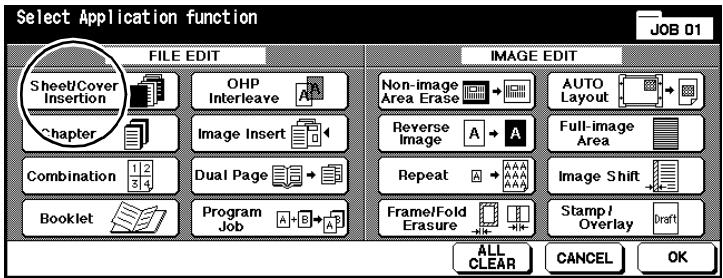
Choose between:
- Front cover sheet printed or blank
- Back cover sheet printed or blank
- Insertion sheet printed or blank.

One paper tray for both front and back cover sheets!
Front and back cover sheets have to be loaded into one tray. If you want to use different paper for the front and back cover sheets, load the paper alternately into the tray. Use a uniform paper thickness.
Information on: Inserts and Cover Sheets
Please note the following:
- Use an identical size for the inserts and front and back cover sheets and the copies.
- The automatic zoom ratio selection (AMS) is automatically enabled.
- If possible, load thick paper or index file folders into the bypass tray.
- The Large Capacity Cassette (LCC) cannot be selected as the paper source, if you have set the paper type to "Thick3".
Note the following important information!
- Maximum number 30 positions (from 1 to 999), including front and back of inserts and cover sheets:
These features cannot be combined:
- Basic functions: APS, Grouping, Rotation Sort, Rotation Group, Folding/Stapling & Folding/Trimming (with booklets)
- Special originals: Mixed Original, Tab
- Applications: Combination, Booklet, OHP Interleave, Image Insert, Dual Page, Program Job, Non-Image Area Erase, Repeat, Auto Layout, Overlay, Overlay Memory
Procedure: Adding Inserts and Cover Sheets
In the basic options press the [APPLICATION] key.
The screen with the Applications is displayed.
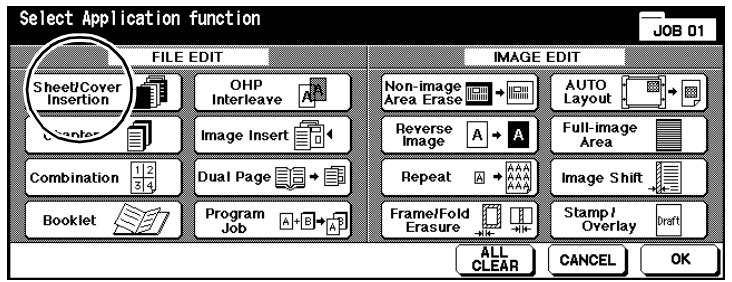
2 Press the [SHEET/COVER INSERTION] key.
The screen for sheet and cover insertion is displayed.
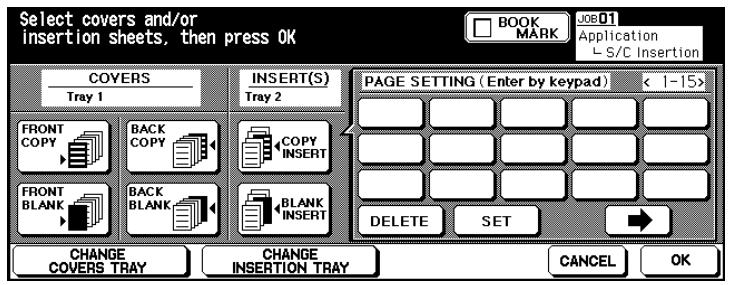
3 Place the paper for the covers, back covers and sheets in the indicated paper trays.
or
Press the [CHANGE COVERS TRAY] or the [CHANGE INSERTION TRAY] key, several times if necessary, to select a different paper tray.
4 Select the desired mode.
Covers printed on front or blank (unprinted)
Back covers printed on back or blank
Sheet copy or blank
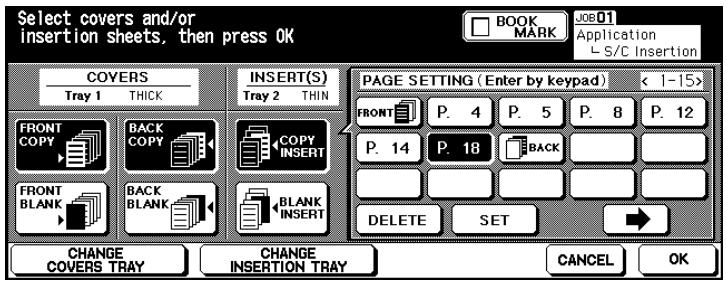
? How are the positions specified for the inserts?
Use the keypad to set the desired position.
Example:Blank insert at position 4
A blank sheet is inserted between pages 4 and 5 of the original.
Example:Copy insert at position 4
Page 4 of the original is copied on to a sheet.
Confirm each position setting by pressing the [SET] key.
If you want to specify more than 15 positions, press the right arrow key. More input fields appear.
Select a position if you want to delete it. Then press the [DELETE] key. The position is deleted.
5 Confirm your input by pressing [OK].
6 Change any other necessary system settings.
7 Use the 10-Key Pad to set the number of copies.
8 Load the originals into the EDH.
9 Press the [START] key on the control panel to start the copy job.
5.2 Executing Chapter Mode
Separate your copy sets by chapters. For 2-sided copies, a new chapter always starts on a front page. You can specify up to 30 positions for chapter pages.
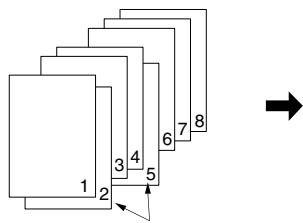
Originals
Title pages
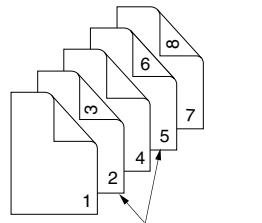
Copies
Title pages
Information on: Chapter Mode
Please note the following:
- The Large Capacity Cassette (LCC) cannot be selected as the paper source, if you have set the paper type to "Thick3".
Note the following important information!
Maximum number 30 positions (from 1 to 999) of title pages:
These features cannot be combined:
Basic functions: 1-1, 2-2, 2-1, Grouping, Rotation Sort, Rotation Group, Output face up
- Special originals: Mixed Original, Tab
- Applications: Combination, OHP Interleave, Image Insert, Program Job, Frame Erase, Image Repeat, Overlay Memory

It makes sense to combine features!
Combine this feature with one of the stamp features, such as page numbering, paragraph numbering or watermark numbering. For more information, see page 5-51.
Procedure: Executing Chapter Mode
1 In the basic options press the [APPLICATION] key.
The screen with the Applications is displayed.

2 Press the [CHAPTER] key.
The screen for chapter mode is displayed.
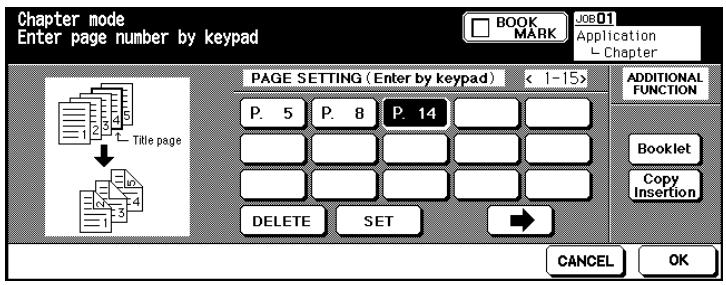
3 Use the keypad to set the position of the title pages. Confirm each position setting by pressing the [SET] key.
? What effect do the title page positions have?
Use the keypad to set the desired position.
Example:Title page at position 4
The back of page 3 is left blank. Page 4 is copied to the front side of the next sheet.
4 only as required
Press the [BOOKLET] key to combine Chapter with the "booklet" feature.
or
Press the [COPY INSERTION] key to combine Chapter with the "Sheet/Cover" feature.
5 Confirm your input by pressing [OK].
6 Change any other necessary system settings.
7 Use the 10-Key Pad to set the number of copies.
8 Load the originals into the EDH.
9 Press the [START] key on the control panel to start the scanning cycle. The copies begin to be printed after all originals have been scanned.
5.3 Creating Combinations
Combine the pages of your original set onto a summary copy set. You can copy 2, 4 or 8 original pages onto a single copy page.
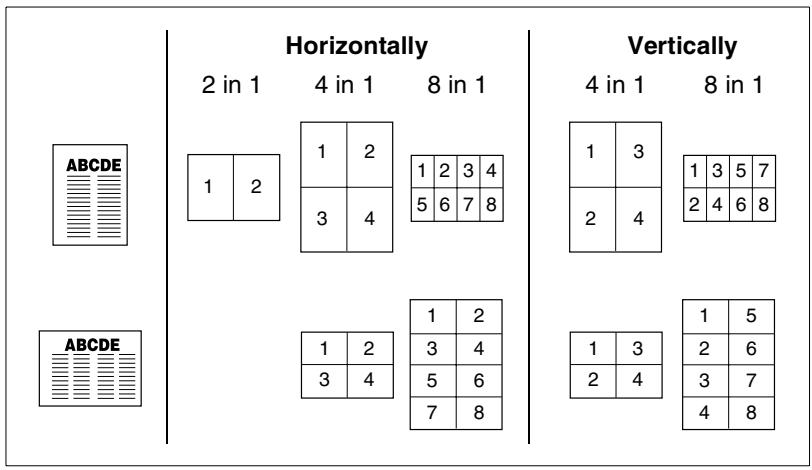
Choose between:
Horizontal order
2 in 1 2 original pages onto 1 copy page
4 in 1 4 original pages onto 1 copy page
8 in 1 8 original pages onto 1 copy page
Vertical order
4 in 1 4 original pages onto 1 copy page
8 in 1 8 original pages onto 1 copy page.
Information on: Combination
Please note the following:
- When you select the "Combination" feature, the "AMS" feature is automatically enabled.
- By default, the paper for this application is fed from the 1st paper tray. If you need to, select another tray manually.
- The originals have to be scanned into the document memory to create a combination copy.
- The Large Capacity Cassette (LCC) cannot be selected as the paper source, if you have set the paper type to "Thick3".
Note the following important information!
These features cannot be combined:
Basic functions:
APS, Grouping, Rotation Sort, Rotation Group, Folding/ Stapling & Folding/Trimming (with booklets)
- Special originals:
Mixed Original
- Applications:
Sheet/Cover Insertion, Chapter, Booklet, OHP Interleave, Image Insert, Dual Page, Program Job, Non-Image Area Erase, Repeat, Overlay Memory
Procedure: Creating Combinations
1 In the basic options press the [APPLICATION] key.
The screen with the Applications is displayed.

2 Press the [COMBINATION] key.
The screen for combination options is displayed.
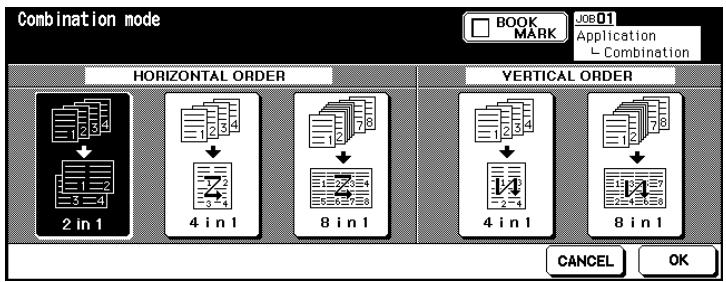
3 Select the desired mode.
Horizontal order
2 in -1, 4 in -1 or 8 in -1
Vertical order
4 in -1 or 8 in -1
4 Confirm your input by pressing [OK].
The basic options are displayed again. The AMS feature is automatically enabled.
![KONICA MINOLTA DI850 - Confirm your input by pressing [OK]. - 1](/content/2024/12/139451/images/ce802ef7535d30e05c4f516b51d6adc0d789cad8feb0c3fefbd0e7f10ada2c01.jpg)
5 Press the [SPECIAL ORIGINAL] key.
The feature for selecting the direction of the original opens.
![KONICA MINOLTA DI850 - Press the [SPECIAL ORIGINAL] key. - 1](/content/2024/12/139451/images/430d8bacce833f5eb83bebb3ac24c47678174528227ef32074d41e7436e08643.jpg)
6 Select the document direction corresponding to the original position. Confirm your selection by pressing [OK].
The basic options are displayed again.
7 Use the 10-Key Pad to set the number of copies.
8 Load the originals into the EDH.
9 Press the [START] key on the control panel to start the scanning cycle.
The copies begin to be printed after all originals have been scanned.
5.4 Creating Booklets
Generate an A4 (A3 folded) or A5 (A4 folded) booklet from your set of originals. First, the single original pages are scanned into document memory. Then the pages are arranged automatically to create a booklet with sequential pages.
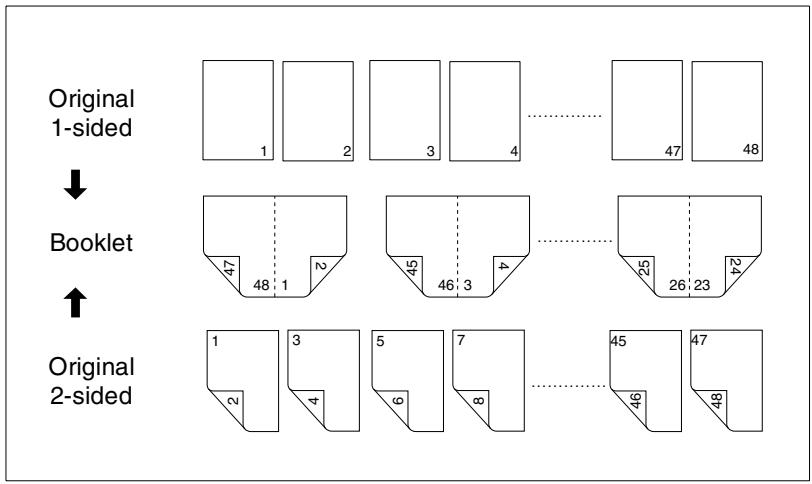
Choose between:
- Booklet without cover sheet
- Booklet with cover sheet without copy
- Booklet with cover sheet with copy.
Information on: Booklets
Please note the following:
- The number of original pages used in copy mode 1-2 should be divisible by 4 and in copy mode 2-2 by 2. Otherwise, blank pages will automatically be appended to the end of the booklet.
- Copy mode 1-2 is enabled automatically.
The "AMS" function is enabled automatically. - The "Folding" and "Stapling & Folding" features can only be enabled when the system is fitted with the Finisher FN-7.
- The Large Capacity Cassette (LCC) cannot be selected as the paper source, if you have set the paper type to "Thick3".
Note the following important information!
- Original size: A3, B4, A4R, A4, B5R, B5
These features cannot be combined:
- Basic functions: APS, Grouping, Rotation Sort, Rotation Group, Output face up, 1-1, 2-1, Cover Inserter with Cover Sheet function for booklets
- Special originals: Mixed Original, Tab
- Applications: Sheet / Cover Insertion, Combination, OHP Interleave, Program Job, Non-Image Area Erase, Repeat, Overlay Memory

Automatically assemble booklets
If your system is equipped with the FN-7 Finisher, you can have your copies folded and saddle-stitched automatically before they are output.
For more information, see page 4-14 and the following pages.

Booklets with page numbers?
If you always want to include page numbering on your booklets, you can set this in key operator mode.
For more information, see page 7-51.
Procedure: Creating Booklets
1 In the basic options press the [APPLICATION] key.
The screen with the Applications is displayed.
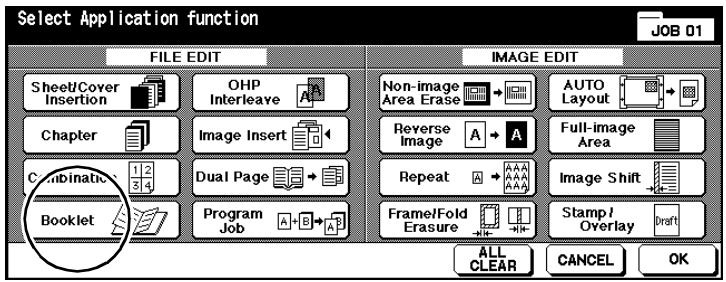
2 Press the [BOOKLET] key.
The screen for booklet settings appears.
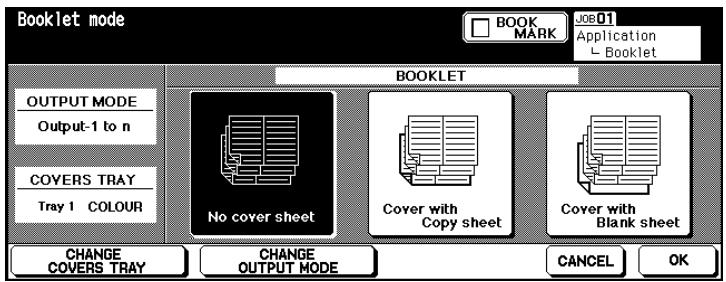
3 Select the desired mode.
No cover sheet
Cover with Copy sheet
Cover with Blank sheet
4 only as required
Place the paper for the cover sheets in the indicated paper tray. or
Press the [CHANGE COVERS TRAY] key, several times if necessary, to select a different paper tray
or
Press the [CHANGE OUTPUT MODE] key to select a different page sequence. Normally, the order “1 to n” is used for the Booklet function.
5 Confirm your input by pressing [OK].
The basic options are displayed again.
6 Select the paper tray containing the paper to be used. Set the copy mode to 1-2 or 2-2. Configure the system settings for your job.
7 Use the 10-Key Pad to set the number of booklets.
8 Load the originals into the EDH.
9 Press the [START] key on the control panel to start the scanning cycle.
![KONICA MINOLTA DI850 - Press the [START] key on the control panel to start the scanning cycle. - 1](/content/2024/12/139451/images/7241c95e3e5ff479647b200ba384d3209af00ccea46e3950eab97385b3c4c048.jpg)
Do not exceed the capacity of the offset trays!
Do not exceed the capacity of the finisher offset trays, otherwise a paper misfeed may occur. You should empty the offset trays during a large job to avoid exceeding the capacity. For more information, see page 9-15.
5.5 Creating OHP Interleave
Creating the transparencies and separator sheets for an overhead projector presentation.
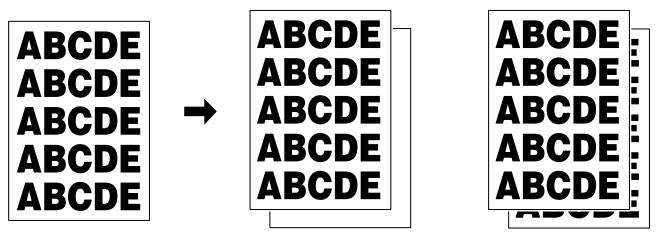
Choose between:
- OHP transparency with blank insert
- OHP transparency with copied insert.
Information on: OHP Interleave
Please note the following:
- Load the OHP transparencies onto the bypass tray one at a time.
The "AMS" function is enabled automatically.
Note the following important information!
- Bypass tray capacity:
1 OHP transparency
These features cannot be combined:
Basic functions:
APS, 1-2, 2-2, Stapling, Sorting, Grouping, Folding, Stapling & Folding, Trimming, Rotation Sort, Rotation Group, Cover Sheet Insertion, Punching
- Special originals:
Mixed Original, Tab
- Applications:
Sheet / Cover Insertion, Chapter, Combination, Booklet, Program Job, Image Repeat, Image Insert, Overlay, Overlay Memory, Tandem Mode
Procedure: Creating OHP Interleave
1 In the basic options select the bypass tray under Paper trays. Set the "OHP" paper type for the bypass tray.
For more information, see page 4-61.
2 In the basic options press the [APPLICATION] key.
The screen with the Applications is displayed.
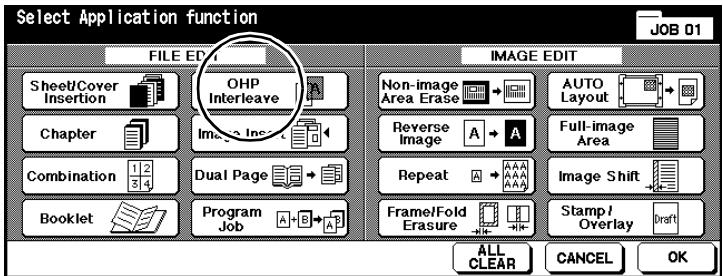
3 Press the [OHP INTERLEAVE] key.
The screen for generating OHP interleaves is displayed.
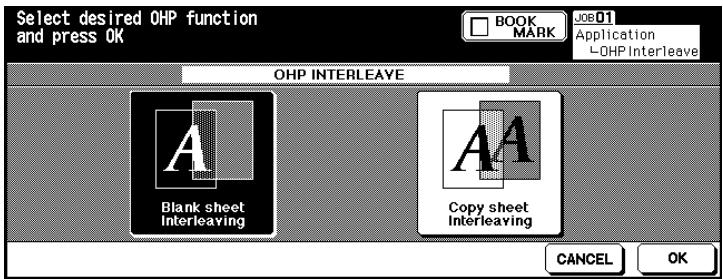
4 Select the desired mode.
Blank sheet Interleaving
Copy sheet Interleaving
5 Confirm your selection by pressing [OK].
6 Change any other necessary system settings.
7 Load an OHP transparency into the bypass tray.
8 Load the originals.
into the EDH
on the original glass.
9 On the control panel press the [START] key.
5.6 Inserting Images
Insert documents that are not suited for the EDH (like photographs and documents with adhesive elements on them) into an original set. Such documents are scanned using the original glass and then inserted with the rest of the originals. You can insert up to 30 documents.
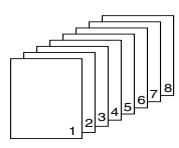
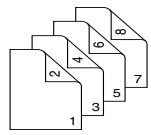
EDH
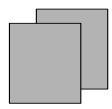
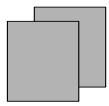
Original Glass

Copy Output
Information on: Inserting Images
Note the following important information!
Maximum number 30 positions (from 1 to 999) of inserted documents:
These features cannot be combined:
Basic functions: Group, Rotation Sort, Rotation Group
- Special originals: Mixed Original, Tab
- Applications: Sheet / Cover Insertion, Chapter, Combination, OHP Interleave, Dual Page, Program Job, Non-Image Area Erase, Repeat, Auto Layout, Overlay, Overlay Memory
Procedure: Inserting Images
1 In the basic options press the [APPLICATION] key.
The screen with the Applications is displayed.
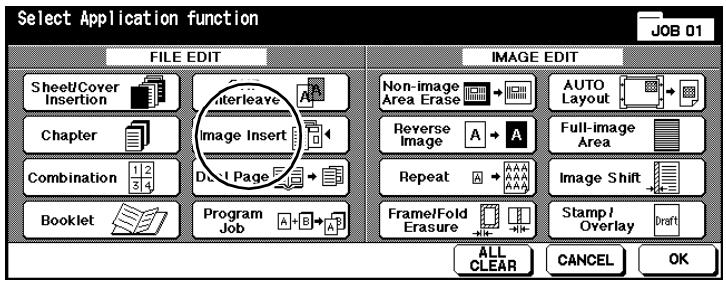
2 Press the [IMAGE INSERT] key.
The screen for inserting images is displayed.
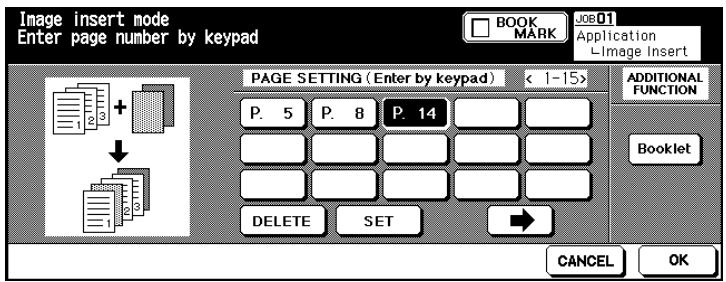
3 Use the keypad to set the desired positions.
? How are the positions specified?
Example: First insert at position 4
The first document scanned from the original glass is inserted between the original pages 4 and 5, which were scanned from the EDH.
Confirm each position setting by pressing the [SET] key.
If you want to specify more than 15 positions, press the right arrow key. More input fields appear.
? Do you want to insert several pages at one position?
Example: First insertion at position 6 (three pages)
Enter position "6" three times in succession. The first three documents scanned from the original glass are inserted after page 6 of the originals, which was scanned from the EDH.
4 Confirm your input by pressing [OK].
5 Change any other necessary system settings.
6 Use the 10-Key Pad to set the number of copies.
7 Load the originals that are suitable for the EDH into the EDH. Start the scan cycle by touching [START].
The originals are fed in and scanned one after the other.
8 Place a document to be inserted onto the original glass. Press the [START] key on the control panel to start the scanning cycle. Repeat this step until all documents have been scanned.
In what order do the inserted documents have to be scanned?
Scan the document in the order in which they are to be inserted.
9 Press the [STORE] key to complete the scanning procedure. Start the copy cycle by touching [START].

Combined with "Booklet"?
You can combine the "Insert Image" application with the booklet feature. To do so, press the [BOOKLET] key in the screen for inserting images and configure any necessary settings there.
5.7 Processing Dual Page Originals
Create 1-sided or 2-sided copies from the right and left pages of an open book. You can also apply the title page and back page of the book.
You may also combine this function with the Booklet feature.
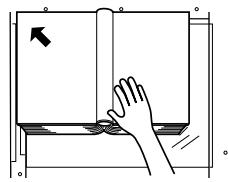
Original direction
Copy mode
1-1/2-1
1-2/2-2
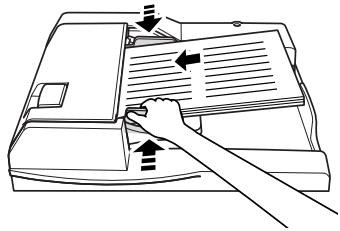
Choose between:
- Double pages
copy the inner pages only
- Cover sheet in front + double pages
copy book title and inner pages
Cover sheet front and back + double pages
copy book title, back page and inner pages.
Information on: Dual Page
Please note the following:
- APS and AMS are disabled automatically. You can manually set a zoom ratio.
- If you place the originals on the original glass and use the "Non-image Area Erase" or "Auto layout" function, the original cover can be opened.
Note the following important information!
- Paper sizes: A4, B5
These features cannot be combined:
- Basic functions: APS, AMS, Rotation Sort, Rotation Group, Folding, Stapling & Folding, Trimming
- Special originals: Mixed Original, Tab
- Applications: Sheet / Cover Insertion, Combination, Image Insert, Program Job, Image Repeat, Image Shift (Reduce & Image Shift), Overlay, Overlay Memory
Procedure: Processing Dual Page Originals
1 In the basic options press the [APPLICATION] key.
The screen with the Applications is displayed.
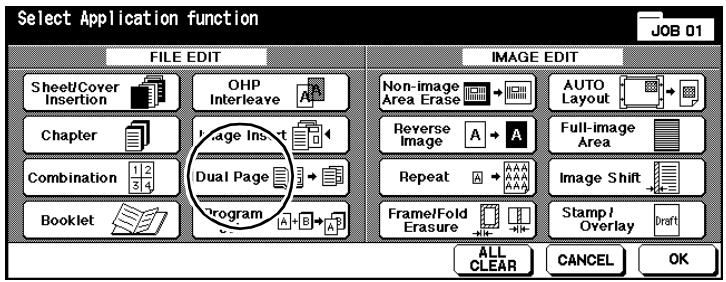
2 Press the [DUAL PAGE] key.
The screen for generating dual page copies is displayed.
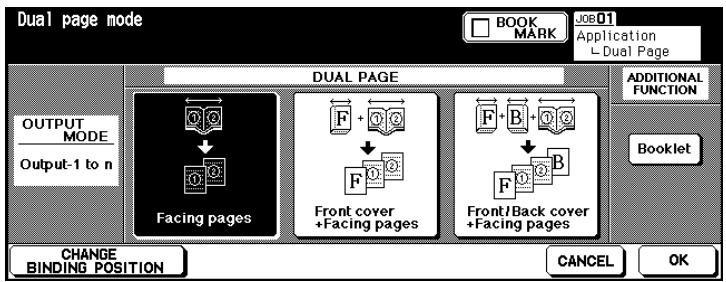
3 Select the desired mode.
Facing pages
Front cover ^+ Facing pages
Front/Back cover + Facing pages
4 only as required
Change the binding position of the book if required. Normally, the order "1 to n" is used for the Booklet function.
5 Confirm your selection by pressing [OK].
The basic options are displayed again.
6 Use the 10-Key Pad to set the number of copies. Configure the system settings for your job.
7 Place the book on the original glass. Press the [START] key on the control panel to start scanning the pages. Repeat this step until all pages have been scanned.
Front cover + Facing pages

Front/Back cover + Facing pages

Front cover + Facing pages
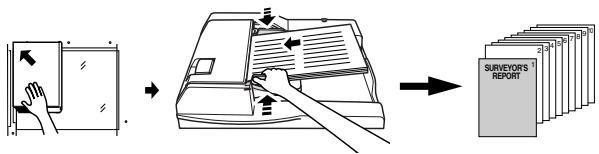
Front/Back cover + Facing pages
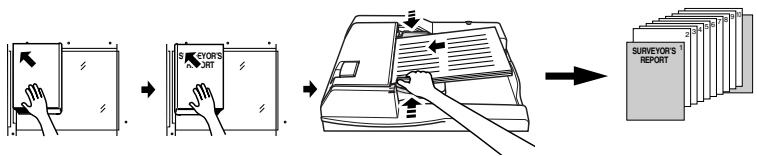
8 Press the [STORE] key to complete the scanning procedure.
9 Press the [START] key on the control panel to start the copy job.
5.8 Program Job
Copy parts of an original set using different settings and have the copies output in a single set. You can split an original set in up to 100 partial jobs.
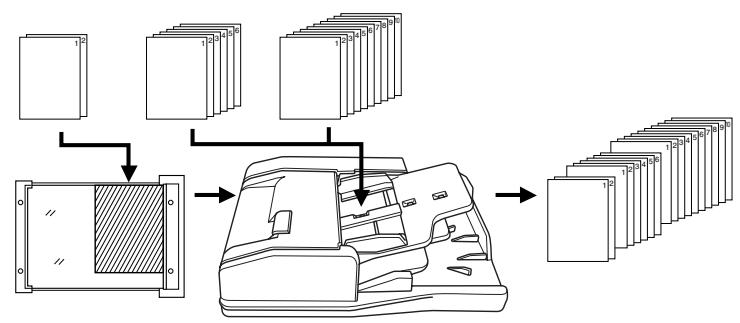
Information on: Program Job
Please note the following:
- The paper size specified for the first partial set cannot be changed for the other partial sets. You can change the paper trays, however, if they are loaded with identical paper sizes.
- The finishing mode specified for the last partial set applies to the entire copy set.
- When using this application, you cannot save the system settings to the program memory.
Note the following important information!
These features cannot be combined:
Basic functions:
APS, Changing paper sizes, Rotation Mode, Grouping, Rotation Sort, Rotation Group, Folding, Stapling & Folding, Trimming, Server Functions
Special originals:
Mixed Original
- Applications:
Sheet / Cover Insertion, Chapter, Combination, Booklet, OHP Interleave, Image Insert, Dual Page, Repeat, Overlay, Overlay Memory
Procedure: Program Job
In the basic options press the [APPLICATION] key.
The screen with the Applications is displayed.

2 Press the [PROGRAM JOBMARK ] key and confirm your selection with [OK].
The basic options are displayed again. The document memory is enabled automatically.
3 Change any other necessary system settings.
4 Load the originals.
into the EDH
on the original glass.
5 Press the [START] key on the control panel to start the scanning cycle.
A dialog appears after every scanning cycle.
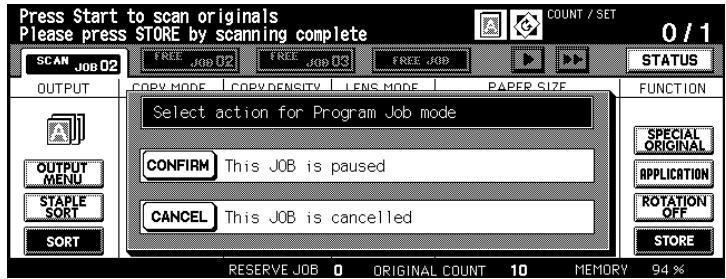
6 Press the [CONFIRM] key to proceed with the scan cycle.
or
Press the [CANCEL] key to delete the last scan cycle.
7 Repeat steps 3 to 6 for the other partial jobs of the original set.
8 Select the output type and enter the number of copies with the 10-Key Pad.
9 PRESS THE [STORE] key to complete the store procedure. Press the [START] key on the control panel to start the copy job.

Correct order maintained?
Scan the originals in the order in which the copies are to be output.
5.9 Using Non-Image Area Erase
Erase unsightly black edges on your copies, which, for example, can result when copying books. For this feature, you first have to place the originals onto the original glass. Leave the original cover open.
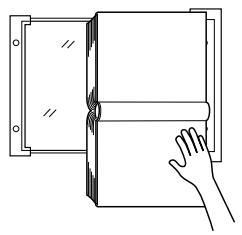
Without Non-Image Area
With Non-Image Area
There are two options available for erasing black edges:
- Erase black areas in rectangles (default system setting) or
- Erase black edges along contours.
At Right Angles
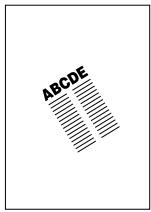
Along Contours

Set type of non-image area erase in key operator mode!
In key operator mode you can specify the non-image area erase mode to be used. For more information, see page 7-67.
Information on: Non-Image Area
Please note the following:
- If you want to create two-sided copies and use the "Non-image Area Erase" feature, you must first scan the originals into the document memory one after the other.
- This feature is not recommended for use with very dark originals.
- A strong light source directly above the system may affect the copy quality.
Note the following important information!
- Copy mode:
1-1 (1-2 when using document memory)
These features cannot be combined:
Basic functions:
EDH, 2-2, 2-1, APS, AMS, Rotation Mode, Rotation Sort, Rotation Group, Folding, Folding & Stapling, Trimming
Special originals:
Mixed Original, Z-Folded Original
- Applications:
Sheet / Cover Insertion, Chapter, Combination, Booklets, Image Insert, Dual Page with EDH and Document Memory, Reverse Image, Full-image Area, Image Shift (Reduce & Image Shift), Overlay Memory
Procedure: Using Non-Image Area Erase
1 In the basic options press the [APPLICATION] key.
The screen with the Applications is displayed.

2 Press the [NON-IMAGE AREA ERASE] key.
3 Change any other application settings.
4 Confirm your selection by pressing [OK].
5 Change any other necessary system settings.
6 Use the 10-Key Pad to set the number of copies.
7 Place the original on the original glass. Leave the original cover open.
8 Press the [START] key on the control panel to start the copy job.
5.10 Creating Reverse Images
Reverse black and white on your copies. Black is output white and white is output black.
To make an inverted copy, the originals have to be scanned into the document memory.


Information on: Reverse Image
Note the following important information!
These features cannot be combined:
- Basic functions: Folding, Stapling & Stapling, Trimming
- Applications: Non-Image Area Erase, Repeat, Full-Image Area, Stamp, Overlay
Procedure: Creating Reverse Images
1 In the basic options press the [APPLICATION] key.
The screen with the Applications is displayed.
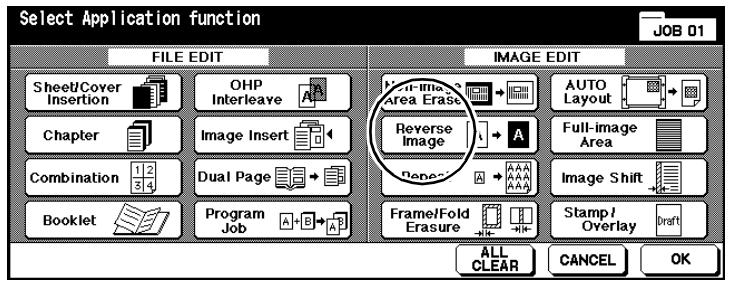
2 Press the [REVERSE IMAGE] key to select the application.
3 Confirm your selection by pressing [OK].
4 Change any other necessary system settings.
5 Use the 10-Key Pad to set the number of copies.
6 Load the originals.
into the EDH
on the original glass.
7 Press the [START] key on the control panel to start the copy job.
5.11 Using Image Repeat Mode
Make a copy consisting of repeated images of an original or elements of an original.
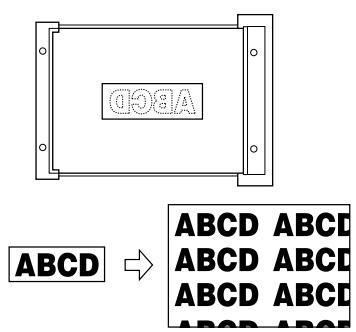
Choose between:
- Width/Height setting
Input of an original area that is to be repeated multiple times. The original area is set from the upper left corner of the original glass.
- Auto Detection
Automatically detect the area of original that is to be repeated several times.
Repeat
Specified number of repeats. 2, 4 or 8 repeats are possible.
Information on: Repeat
Please note the following:
- If you select Copy Mode 1-2, the document memory is automatically enabled.
- APS and AMS are disabled automatically. You can manually set a zoom ratio.
- The automatic detection only functions with the EDH open. The Non-Image Area Erase feature is automatically enabled to prevent black borders
- A strong light source directly above the system may affect the copy quality.
Note the following important information!
Setting width/height
- Original tray: on the original glass only (reference point is the upper right corner of the original glass)
- Defined area: 10 to 150 mm (in 1 mm increments)
These features cannot be combined:
- Basic functions: EDH, 2-2, 2-1, APS, AMS, Rotation Mode, Grouping, Rotation Sort, Rotation Group
- Special originals: Mixed Original, Z-Folded Original
- Applications: Sheet / Cover Insertion, Chapter, Combination, Booklet, OHP Interleave, Image Insert, Dual Page, Non-image Area Erase, Frame/Fold Erasure, Auto Layout, Image Shift (Reduce & Image Shift), Stamp / Overlay
Note the following important information!
Auto Detection
| • Original tray: | Original glass (reference point is the upper right corner of the original glass) |
| • Scanning area: | A3 to 10 × 10 mm |
| These features cannot be combined: | |
| • Basic functions: | EDH, 2-2, 2-1, APS, AMS, Rotation Mode, Grouping, Rotation Sort, Rotation Group |
| • Special originals: | Mixed Original, Z-Folded Original |
| • Applications: | Sheet / Cover Insertion, Chapter, Combination, Booklet, OHP Interleave, Image Insert, Dual Page, Non-image Area Erase, Revers Copy, Frame/Fold Erasure, Auto Layout, Image Shift (Reduce & Image Shift), Full-image Area, Stamp / Overlay |
| Image Repeat | |
| • Original tray: | EDH, Original Glass |
| • Scanning area: | A3 to 10 × 10 mm |
| These features cannot be combined: | |
| • Basic functions: | APS, AMS, Rotation (if zoom ratio is not 1,000), Grouping, Rotation Sort, Rotation Group |
| • Special originals: | Mixed Original, Z-Folded Original |
| • Applications: | Sheet / Cover Insertion, Chapter, Combination, Booklet, OHP Interleave, Image Insert, Dual Page, Non-image Area Erase, Revers Copy, Frame/Fold Erasure, Auto Layout, Image Shift (Reduce & Image Shift), Overlay, Overlay Memory |
Procedure: Using Image Repeat Mode
1 In the basic options press the [APPLICATION] key.
The screen with the Applications is displayed.

2 Press the [REPEAT] key.
The screen for image repeats appears.

3 Press the [VERTICAL/HORIZONTAL] key. Use the arrow keys to define the area of the original to be repeated. You can also press the [ENTER REPEAT WIDTH BY KEYPAD] key to specify the values using the touch screen keypad.
or
Press the [AUTO] key. The print area of the original detected by the system automatically is then repeated.
or
Press the [2 REPEAT], [4 REPEAT] or [8 REPEAT] key. The scanning area is then derived from the selected paper size divided by the selected mode.
4 Confirm your selection by pressing [OK].
5 Change any other application settings. Confirm your selection by pressing [OK].
The basic options are displayed again.
6 Change any other necessary system settings.
7 Use the 10-Key Pad to set the number of copies.
8 Load the originals.
to enter width/height on the original glass
for auto detection on the original glass (leave original cover open)
for repeats in the EHD or on the original glass
9 Press the [START] key on the control panel to start the scanning cycle.
The copies begin to be printed after all originals have been scanned.
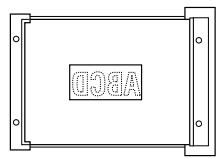
Enter width/height
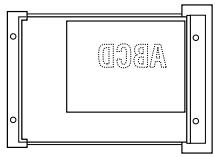
Auto Detection
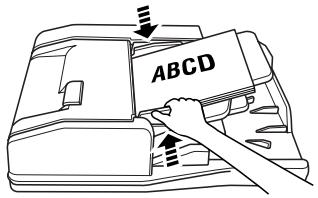
Repeat
5.12 Using Frame/Fold Erasure
Remove bothering edge and fold shadows, which, for example, can result when copying books.
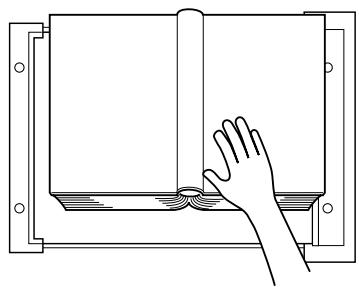

Normal Copy
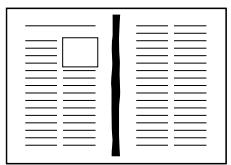
With Non-Image Area
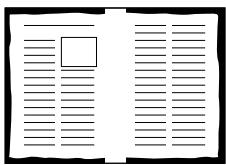
With Fold Erasure
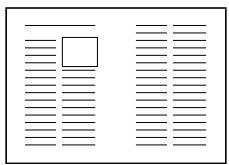
With Frame/Fold Erasure
Choose between:
- Fold Erasure erase only the fold
- Frame Erasure erase only the frame
- Frame/Fold Erasure erase both frame and fold.
Information on: Frame/Fold Erasure
Please note the following:
- A strong light source directly above the system may affect the copy quality.
Note the following important information!
- Erase areas:
Frame erasure
incrementals)
Fold erasure
1 to 300mm (in 1mm
1 to 99 mm (in 1 mm increments)
These features cannot be combined:
- Applications:
Image Repeat, Full-Image Area
Procedure: Using Frame/Fold Erasure
1 In the basic options press the [APPLICATION] key.
The screen with the Applications is displayed.
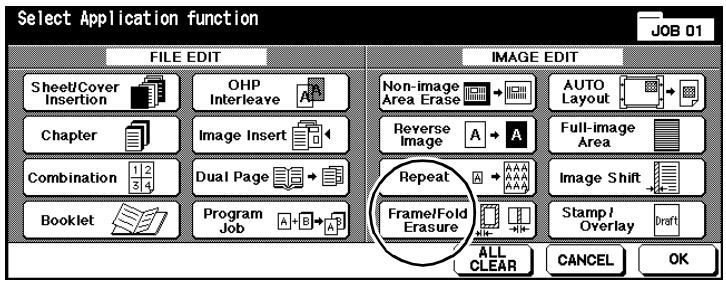
2 Press the [FRAME/FOLD ERASURE] key.
The screen for Frame/Fold Erasure appears.
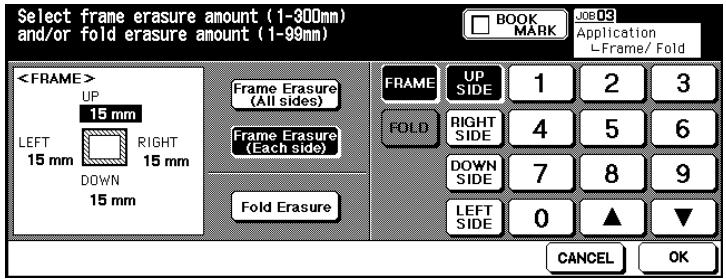
3 Press the [FRAME ERASURE (ALL SIDES)] key to erase a uniformly large frame area. Enter the value with the arrow keys or with the touch screen keypad.
or
Press the [FRAME ERASURE (EACH SIDE)] key to erase borders of different sizes. Select a page and enter the value with the arrow keys or with the touch screen keypad.
or
Press the [FOLD ERASURE] key to set the value for the fold erasure. Press the [FOLD] key and enter the value with the arrow keys or with the touch screen keypad.
4 Confirm your input by pressing [OK].
5 Change any other application settings. Confirm your settings by pressing [OK].
The basic options are displayed again.
6 Change any other necessary system settings.
7 Use the 10-Key Pad to set the number of copies.
8 Load the originals.
into the EDH
on the original glass.
9 Press the [START] key on the control panel to start the copy job.
5.13 Using Auto Layout
Automatically copy and center the print area of an original onto the paper.
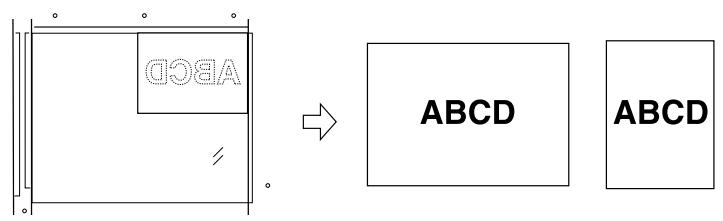
Information on: Auto Layout
Please note the following:
- APS and AMS are disabled automatically. You can manually set a zoom ratio.
- Frame/fold erasure is enabled automatically. You can disable this feature manually if you like.
- A strong light source directly above the system may affect the copy quality.
Note the following important information!
- Copy mode: 1-1, 1-2 (only when using document memory)
These features cannot be combined:
- Basic functions: 2-2, 2-1, APS, AMS, Rotation Mode, Rotation Sort, Rotation Group
- Special originals: Mixed Original, Z-Folded Original
- Applications: Sheet/ Cover Insertion, Chapter (available if non-image Area erase is disabled), Combination, Booklet, Image Insert, Reverse Image, Repeat, Full-Image Area, Image Shift, Overlay, Overlay Memory
Procedure: Using Auto Layout
In the basic options press the [APPLICATION] key.
The screen with the Applications is displayed.
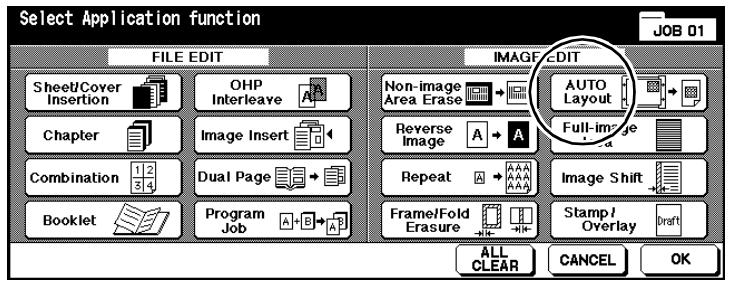
2 Press the [AUTO LAYOUT] key to enable the application.
3 Change any other application settings. Confirm your settings by pressing [OK].
The basic options are displayed again.
4 Change any other necessary system settings.
Use the 10-Key Pad to set the number of copies.
6 Load the originals.
into the EDH
on the original glass.
? Placing the originals on the original glass?
Do not close the EDH during the scanning cycle.
7 Press the [START] key on the control panel to start the scanning cycle. The copies are printed automatically after the scanning cycle.
5.14 Using Full-Image Area
Copy the full area of the original without losing any edge image.

Original

Normal Copy

Full-Image Area
Information on: Full-Image Area
Please note the following:
- Use wide size paper when making all-image area copies.
Note the following important information!
These features cannot be combined:
Basic functions: Rotation Group, Rotation Sort
- Applications: Non-Image Area Erase, Reverse Image, Frame/Fold Erasure
Procedure: Using Full-Image Area
In the basic options press the [APPLICATION] key.
The screen with the Applications is displayed.
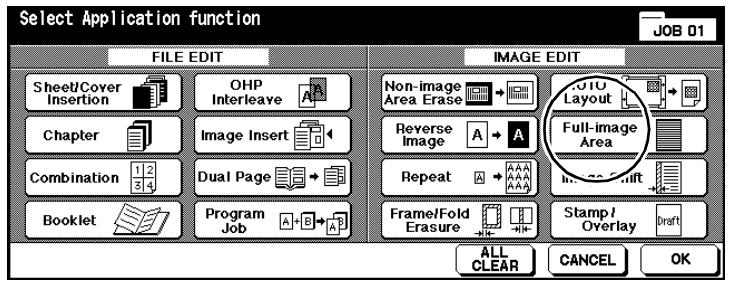
2 Press the [FULL-IMAGE AREA] key to enable the application.
3 Change any other application settings. Confirm your settings by pressing [OK].
The basic options are displayed again.
4 Change any other necessary system settings.
Use the 10-Key Pad to set the number of copies.
6 Load the originals into the EDH.
7 Press the [START] key on the control panel to start the scanning cycle. The copies are printed automatically after the scanning cycle.
5.15 Creating a File Margin
Shift the print area on the copy to create a file margin. At the same time, you can shrink the print area to avoid losing any portions of the image.
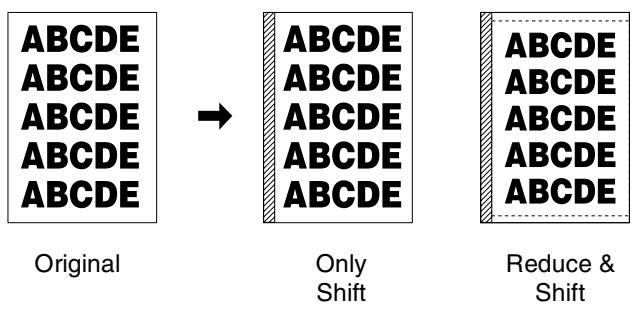
Choose between:
- Image Shift
Shift the print area to create a file margin.
- Reduce & Shift
The print area is reduced in size automatically and shifted to create a file margin.
Information on: Image Shift
Please note the following:
- If you are applying 1 > -2 copy mode and place the originals onto the original glass the document memory is enabled automatically.
- If you select "Reduce & Shift", the AMS feature is automatically enabled.
- When the "Booklet" or "Repeat (2 repeats)" features are enabled, the fold distance can also be specified.
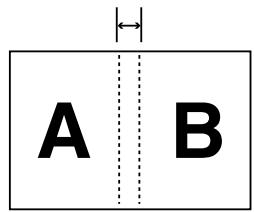
Fold distance
Note the following important information!
- Image shift area: 0 to 250 mm (in 1 mm increments)
These features cannot be combined:
Image Shift
- Applications: Auto Layout, Overlay Memory
Reduce & Shift
These features cannot be combined:
- Basic functions: APS, Zoom Ratio Changes
- Special originals: Mixed Original
- Applications: Dual Page, Non-image Area Erase, Image Repeat, AUTO Layout, Overlay, Overlay Memory
Procedure: Creating a File Margin
1 In the basic options press the [APPLICATION] key.
The screen with the Applications is displayed.

2 Press the [IMAGE SHIFT] key.
The screen for generating a file margin is displayed.
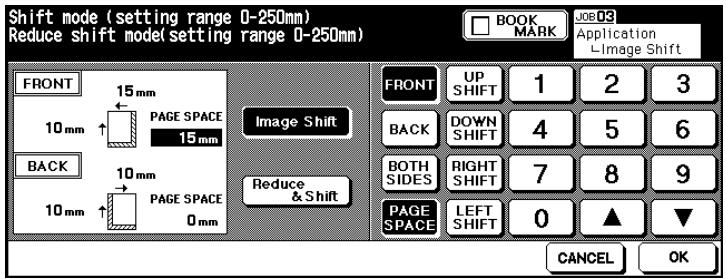
3 Press the [IMAGE SHIFT] key to create the image shift by moving the printed area.
or
Press the [REDUCE & SHIFT] key to create the image shift by automatically reducing and shifting the printed area.
4 Specify the file margin values for the edges. Confirm your input by pressing [OK].
What are the [FRONT], [BACK] and [BOTH SIDES] keys for?
Use these keys to specify the side for the settings will apply, i.e. the front, back or both sides. The settings [BACK] and [BOTH SIDES] are only available when making two-sided copies.
If you have selected "Reduce & Shift", the [BOTH SIDES] key is not available. First set the edges for the front side. This value is also used for calculating the reduction ratio. Then you can specify a value for the back side. This does not change the reduction ratio.
? What are the [UP SHIFT], [DOWN SHIFT], [LEFT SHIFT] and [RIGHT SHIFT] keys for?
Press one of these keys. Then enter a value to shift the print area in the corresponding direction. The settings for the edges can be combined together.
? When is the [PAGE SPACE] key enabled?
The [PAGE SPACE] key is only available when the "Booklet" or "Image Repeat (Repeat 2)" application is enabled. The page space determines the space left between the two pages on a copy.
5 Confirm your input by pressing [OK].
6 Change any other application settings. Confirm your settings by pressing [OK].
The basic options are displayed again.
7 Change any other necessary system settings. Use the 10-Key Pad to set the number of copies.
8 Load the originals.
into the EDH
on the original glass.
9 Press the [START] key on the control panel to start the scanning cycle. The copies are printed automatically after the scanning cycle.
5.16 Using Stamp/Overlay
Use the "Stamp" and "Watermark" functions to add items such as "URGENT" or the current date to copies. Use the "Overlay" function to copy a template original together with other originals.

Watermark
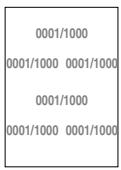
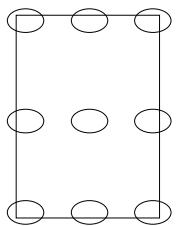
Positioning on a Page
Stamp
URGENT
'00/10/10 10:30AM
2/5
[0002/0005]
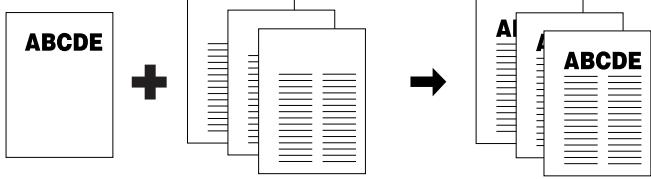
Overlay
Choose between:
- Stamp
A stamp appears in the foreground of an image and covers any other copy image.
Watermark
A watermark appears in the background of an image and is covered by any other copy image.
- Overlay
With overlay image elements from a sample original are copied together with other original pages.
Information on: Using Stamp/Overlay
Please note the following:
- Stamps can be combined.
- Textual watermarks are printed diagonally across the middle of the page.
- Numerical watermarks are printed repeatedly in the background of the image.
- When using "Stamp", "Set Numbering", "Page Numbering" and "Date & Time", nine settings are available for setting up the printout.
- The "Stamp", "Set Numbering" and "Date & Time" functions allow the information to be printed on all sides or on the cover only.
- The imprint can be as follows with the "Page Numbering" feature:
on all pages
in combination with Sheet/Cover Insertion:
[FRONT & BACK: PRINT ON]
Front cover and back cover are printed with a page number
[FRONT:PRINT OFF,BACK:PRINT ON]
Page number is printed only on the back
[FRONT & BACK: PRINT OFF]
No page number on front cover or back cover
in combination with inserts:
[PRINT ON]
Page number is printed
[PRINT OFF]
Page number is not printed but is counted
[SKIP PAGE]
Page number is not printed or counted
in combination with blank insertion:
[PRINT OFF]
Page number is not printed but is counted
[SKIP PAGE]
Page number is not printed or counted
- When using the "Overlay" feature, the originals have to be scanned first.
Note the following important information!
These features cannot be combined:
Stamp/Watermark
- Applications: Reverse Image, Repeat (except 2, 4, 8 repeats), Overlay (with stamp and set number)
Overlay
Basic functions: Rotation Mode, Rotation Sort, Rotation Group
Special originals: Mixed Original
- Applications: Sheet / Cover Insertion, Combination, OHP Interleave, Image Insert, Dual Page, Program Job, Image Repeat, AUTO Layout, Image Shift (Reduce & Image Shift), Stamp, Set Numbering, Watermark, Watermark Numbering
Overlay Memory (store image)
- Basic Functions EDH, 1-2, 2-2, 2-1, AMS, rotation mode, reserve job, interrupt mode, output mode select
- Special originals: Mixed Original, Original with Z-Fold, Tab Paper
- Applications: Sheet / Cover Insertion, Chapter, Combination, Booklet, OHP Interleave, Image Insert, Dual Page, Program Job, Non-Image Area Erase, Reverse Image, Image Repeat, Auto Layout, Image Shift, Stamp, Overlay
Overlay Memory (recall)
- Applications: Reverse Image, Stamp, Set Numbering, Watermark, Watermark Numbering for Stamping

Enter negative starting number for page counting!
For example, if you wish to start the page count from page 4, you can set a negative starting number for the page counting.
Example below: starting number for page counting-2
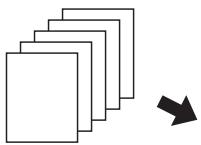
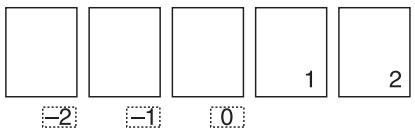
Procedure: Using Stamp
A stamp appears in the foreground of an image and covers any other copy image. Stamps can be combined.
1 In the basic options press the [APPLICATION] key.
The screen with the Applications is displayed.
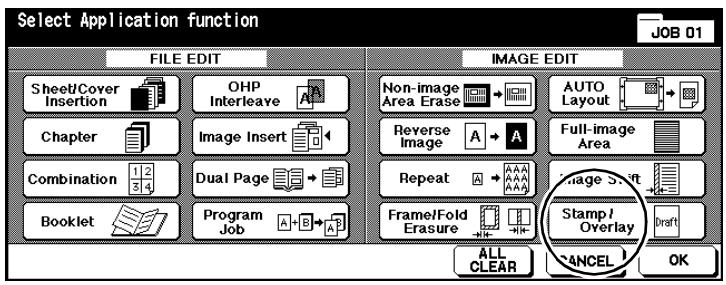
2 Press the [STAMP/OVERLAY] key.
The screen for selecting the Stamp, Watermark and Overlay features is displayed.
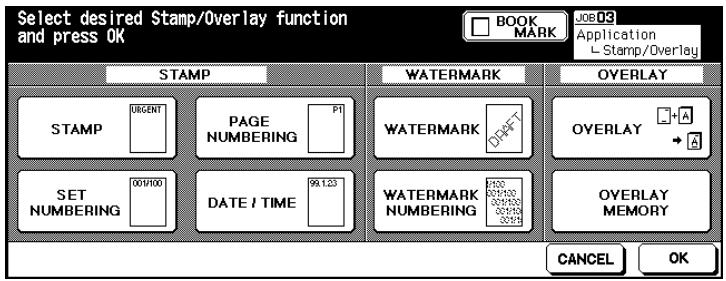
3 Press the key for the desired feature. Confirm your selection by pressing [OK].
The screen for fine adjusting the selected function appears.
4 Set the selected function as desired.
Stamp
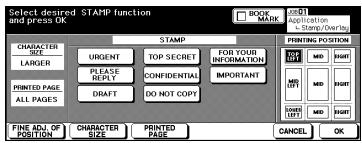
Page Numbering
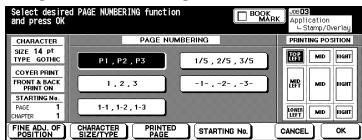
Set Numbering
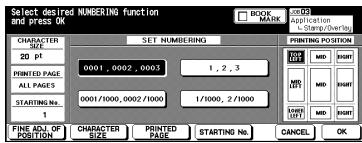
Date/Time
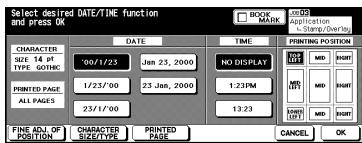
? What options are there?
Select the type of stamp (stamp, page numbering, set numbering, date/time).
Select the position of the imprint on the paper.
Press the [FINE ADJ. OF POSITION] key to define the position of the imprint.
Press the [CHARACTER SIZE] key to select a font size for the imprint.
Press the [CHARACTER SIZE/TYPE] key to select a font for the imprint.
Press the [PRINTED PAGE] key to specify which pages are to receive the imprint.
Press the [STARTING NO.] key to specify the page on which the imprint should begin. When the "Chapter "function is enabled, a chapter number can also be set. For more information, see page 5-54.
5 Confirm your settings by pressing [OK].
6 Change any other necessary system settings.
7 Use the 10-Key Pad to set the number of copies.
8 Load the originals.
9 Press the [START] key on the control panel to start the copy job.
Procedure: Using Watermark
A watermark appears in the background of an image and is covered by any other copy image. A watermark is printed diagonally across the middle of the page. Numerical watermarks are printed repeatedly in the background of the image.
1 In the basic options press the [APPLICATION] key.
The screen with the Applications is displayed.
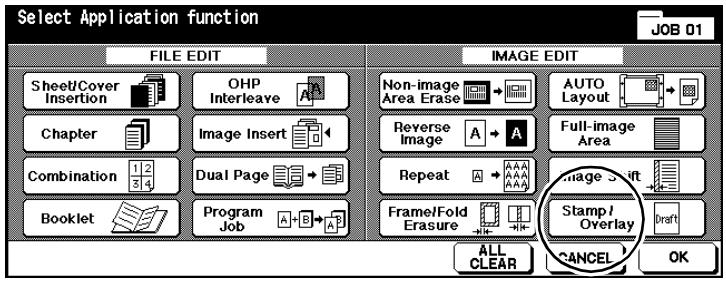
2 Press the [STAMP/OVERLAY] key.
The screen for selecting the Stamp, Watermark and Overlay features is displayed.
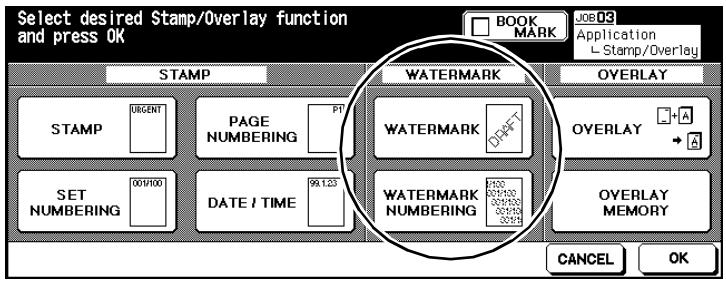
3 Press the key of the desired feature. Confirm your selection by pressing [OK].
The screen for fine adjusting the selected function appears.
4 Set the selected function as desired.
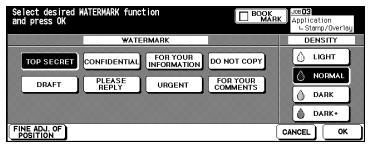
Watermark
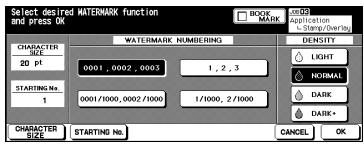
Watermark Numbering
What options are there?
Select the type of imprint you want.
Select the density of the imprint.
Press the [FINE ADJ. OF POSITION] key to define the position of the imprint.
Press the [CHARACTER SIZE] key to select a font size for the imprint.
Press the [STARTING NO.] key to specify the page on which the imprint should begin. For more information, see page 5-54.
5 Confirm your settings by pressing [OK].
6 Change any other necessary system settings.
7 Use the 10-Key Pad to set the number of copies.
8 Load the originals.
9 Press the [START] key on the control panel to start the copy job.
Procedure: Using Overlay
With overlay image elements from a sample original are copied together with other original pages. When using the "Overlay" feature, the originals have to be scanned first.
1 In the basic options press the [APPLICATION] key.
The screen with the Applications is displayed.

2 Press the [STAMP/OVERLAY] key.
The screen for selecting the Stamp, Watermark and Overlay features is displayed.
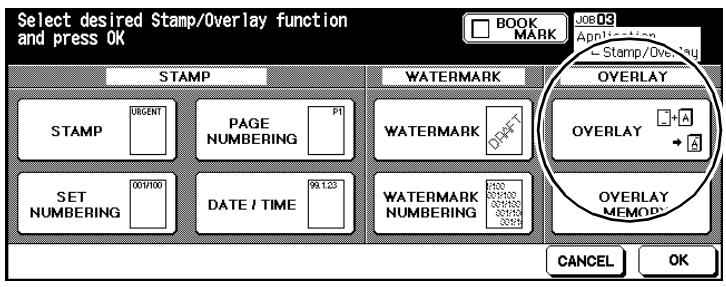
3 PRESS THE [OVERLAY]. Confirm your selection by pressing [OK].
The document memory is enabled automatically.
4 Load the template original into the EDH or onto the original glass. On the control panel press the [START] key.
The original is scanned.
5 Load the pages that are to receive the image element from the template original into the EDH or onto the original glass. On the control panel press the [START] key.
The original pages are scanned.
6 Press the [STORE] key to complete the scanning procedure.
7 Change any other necessary system settings.
8 Use the 10-Key Pad to set the number of copies.
9 Press the [START] key on the control panel to start the printout.
Procedure: Overlay Memory (store image)
With overlay image elements from a sample original are copied together with other original pages. When using the "Overlay Memory" feature the sample original is saved on the hard disk and can be recalled as required.
1 In the basic options press the [APPLICATION] key.
The screen with the Applications is displayed.

2 Press the [STAMP/OVERLAY] key.
The screen for selecting the Stamp, Watermark and Overlay features is displayed.

3 Press the [OVERLAY MEMORY] key.
The overlay memory feature appears.
![KONICA MINOLTA DI850 - Press the [OVERLAY MEMORY] key. - 1](/content/2024/12/139451/images/3521c9d0960d682f6390f13f44dffd8999186f0d8f81304f502aac78777a5761.jpg)
4 Press the [IMAGE STORE] key.
The document memory is enabled automatically.
![KONICA MINOLTA DI850 - Press the [IMAGE STORE] key. - 1](/content/2024/12/139451/images/acbec10309505e1d0288d9aaee42670e843204ef584367c2a674a7ef148157db.jpg)
5 Enter an image name. Press the [OK] key.
? Is there a message saying that the image name has already been assigned?
Confirm the message by pressing [OK]. Specify a different image name.
6 Place the page that you want to import into the image store on the original glass. On the control panel press the [START] key.
The page is scanned and then saved on the hard disk.
? Do you want to cancel the scanning cycle?
Press the [STOP] key on the control panel. This cancels the scanning cycle. The image is not stored on the hard drive.
7 Press the [OK] key.
The overlay memory feature appears. Recall an image to use the image overlay feature. For more information, see page 5-64.
Press [OK], until the basic options appear again.
9 Press the [STORE] key.
Scan is disabled. The sample original is stored.
Procedure: Overlay Memory (call up image)
If template originals have already been stored on the hard drive for the Overlay function, they can be called up as necessary.
In the basic options press the [APPLICATION] key.
The screen with the Applications is displayed.

2 Press the [STAMP/OVERLAY] key.
The screen for selecting the Stamp, Watermark and Overlay features is displayed.
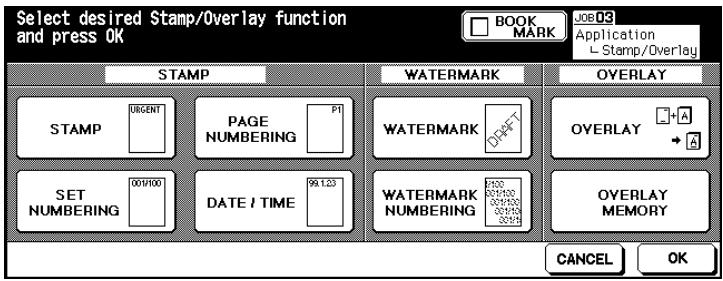
3 Press the [OVERLAY MEMORY] key.
The overlay memory feature appears.
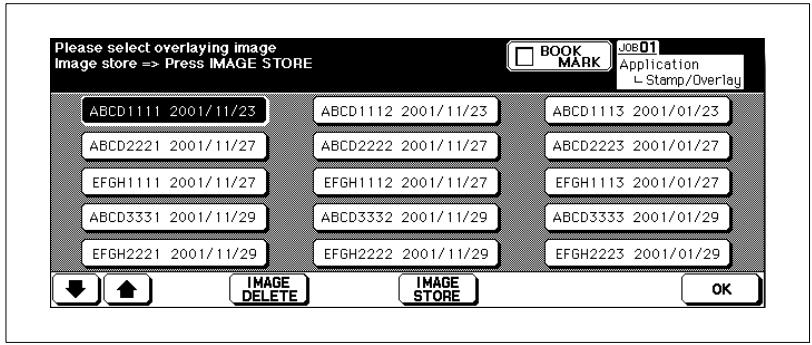
4 Select the desired image.
5 Press [OK], until the basic options appear again.
6 Use the 10-Key Pad to set the number of copies.
7 Insert the original that is to be overlaid with the desired image.
into the EDH
on the original glass.
8 Press the [START] key to start the scanning cycle.
9 Press [STORE] to leave scanning mode. Press the [START] key on the control panel to start the printout of the copies.
6 Network Functions
6.1 Server Functions
(Only available if an auxiliary hard drive is installed)
The server function allows you to store job data on a hard drive (HDD-2) permanently. The data can be called up at any time. The data are then loaded to memory (DIMM) and can be printed from there. You can load and save data from and to the hard drive while carrying out a job.
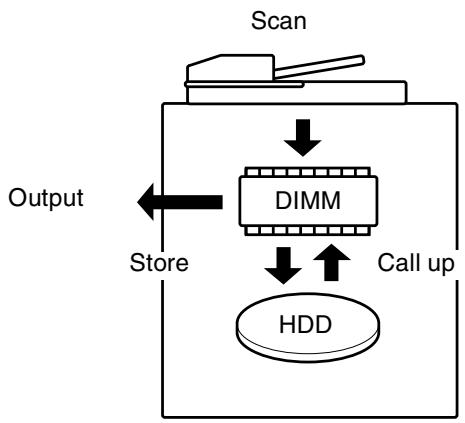
You can select between three server functions:
- Storing/deleting a job
Save the data of a job to the hard drive or delete stored job data from the hard drive.
- Printing and storing a job
Save the data of a job to the hard drive after completing a copy job. Print the job immediately afterwards.
- Calling up a job from the hard drive
Call up the data of a job to print it.

Organize image memory codes!
You can save several jobs under one image memory code. You can delete an image memory code in key operator mode and all of the jobs belonging to it. For more information, see page 7-63.
Storing a Job
(Only available if an auxiliary hard drive is installed)
Store the data of a job onto a hard drive. Delete data from the hard drive.
Note the following important information!
These features cannot be combined:
Basic functions:
1-2, 2-2, AMS, Output Mode Select, Manual Paper
Drawer Selection, Copy Number Input, Rotation Mode,
Full-image Area for Non STD sizes
- Applications:
Sheet / Cover Insertion, Chapter, Combination, Booklet, OHP Interleave, Image Insert, Dual Page, Program Job, Non-Image Area Erase, Reverse Image, Image Repeat, Auto Layout, Image Shift (Reduce & Image Shift), Overlay
1 Press the [MODE] key on the control panel as many times as necessary to select the "Scan" function.
The scan display appears.
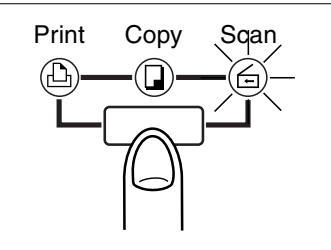
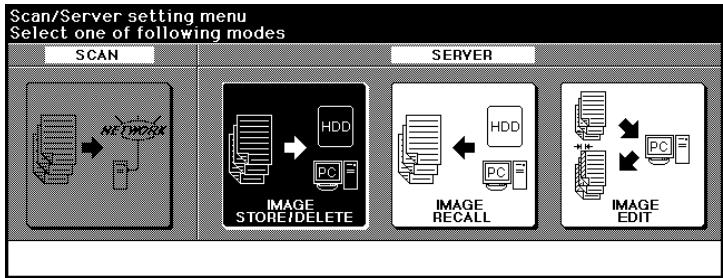
2 Press the [IMAGE STORE/DELETE] key.
The dialog for entering the 8-digit image store password is displayed.
![KONICA MINOLTA DI850 - Press the [IMAGE STORE/DELETE] key. - 1](/content/2024/12/139451/images/e8a385da9850b4cf148152357eb3d61eb1c4bd89cfb685f5ca2e59e2a71ed3e3.jpg)
3 Enter the image store password using the touch screen keypad.
? Did you enter an incorrect number?
Press the [1-CHARACTER DELETE] key as necessary to delete your input character for character. Then enter the correct image store password.
4 Press the [OK] key to confirm the image store password.
The screen for entering a job name appears.
![KONICA MINOLTA DI850 - Press the [OK] key to confirm the image store password. - 1](/content/2024/12/139451/images/c5174ace5cee9b9e674a75c9ae6aa0f7eb925949e4262f03c0015944062abc21.jpg)
5 Enter the job name you want to assign to the job data that you are saving. Confirm your input by pressing [OK].
The basic options for selecting scanner settings appear.
![KONICA MINOLTA DI850 - Press the [OK] key to confirm the image store password. - 2](/content/2024/12/139451/images/35a186fc55ea65fac758ad10657c70beb6780d968f434184a5bd0e28cc4d17e6.jpg)
6 Configure the settings for scanning the originals.
Only settings that influence the scanning of the originals are enabled and can be configured.
7 Load the originals into the EDH.
? Do you want to place the originals on the original glass and scan them?
For more information, see page 4-66.
8 Press the [START] key on the control panel to start scanning the original.
The originals are fed in automatically. When all originals are scanned, the data are automatically stored on the hard disk. The basic options are displayed again.
![KONICA MINOLTA DI850 - Press the [OK] key to confirm the image store password. - 3](/content/2024/12/139451/images/db9031cc943bd676b749249b9e3944c8b2196d3d4475e9143ba0db5f9d8a62a8.jpg)
Proper use of user's choice setting!
In the user's choice setting you can specify whether the window for entering the job name appears again after the store cycle. For more information, see page 7-51.
Deleting a Job
(Only available if an auxiliary hard drive is installed)
delete data from the hard drive.
1 Press the [MODE] key on the control panel as many times as necessary to select the "Scan" function.
The scan display appears.
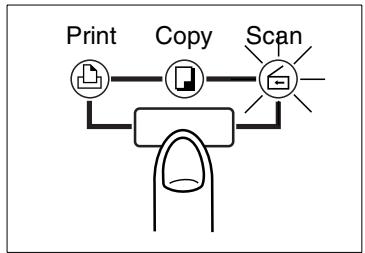
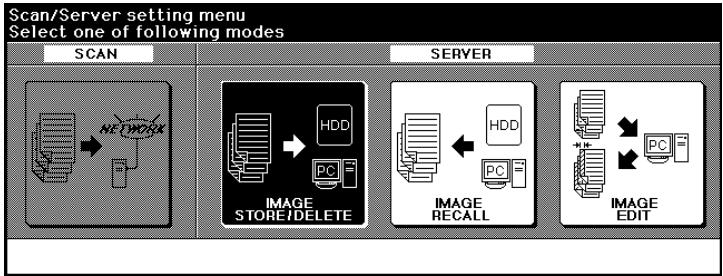
2 Press the [IMAGE STORE/DELETE] key.
The dialog for entering the 8-digit image store password is displayed.

3 Enter the image store password using the touch screen keypad.
? Did you enter an incorrect number?
Press the [1-CHARACTER DELETE] key as necessary to delete your input character for character. Then enter the correct image store password.
4 Press the [OK] key to confirm the image store password.
The screen for selecting a job appears.
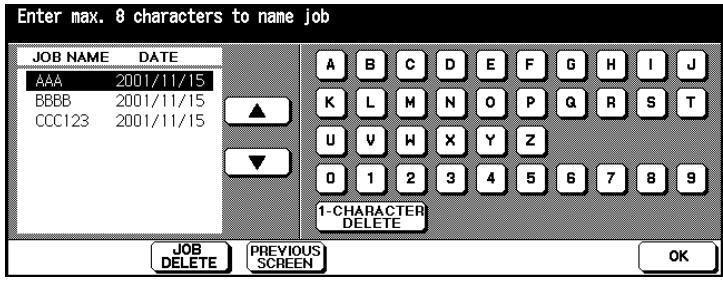
Use the arrow keys to select the job that you want to delete.
6 Press the [JOB DELETE] key.
A dialog appears, prompting whether you are sure you want to delete the job.
7 Confirm the deletion with [YES].
The job is deleted.
8 Press [BACK] to complete the process.
You can enter an image memory code to delete another job.
Storing and Printing a Job
(Only available if an auxiliary hard drive is installed)
Save the data of a job to the hard drive after completing a copy job.
Print the job immediately afterwards.
Press the [OUTPUT MENU] key.
The output menu is displayed.
![KONICA MINOLTA DI850 - Press the [OUTPUT MENU] key. - 1](/content/2024/12/139451/images/8e5fe93343b2f404a1319953598003e7a8fea6b16943f4c94f625bc48bb17642.jpg)
2 Press the [HDD STORE] key.
The dialog for entering the 8-digit image store password is displayed.
![KONICA MINOLTA DI850 - Press the [HDD STORE] key. - 1](/content/2024/12/139451/images/9f80a2db313a3c713218cc2bd510823fc8100ec78a69e1b08ddb310c19bd162f.jpg)
3 Enter the image store password using the touch screen keypad.
Did you enter an incorrect number?
Press the [1-CHARACTER DELETE] key as necessary to delete your input character for character. Then enter the correct image store password.
4 Press the [OK] key to confirm the image store password.
The screen for selecting a job appears.
![KONICA MINOLTA DI850 - Press the [OK] key to confirm the image store password. - 1](/content/2024/12/139451/images/58ddee4f08950d0336d5603c16a5878954580dea3f32e8822ea152b917aa9fd8.jpg)
5 Enter the job name for the job that you want to save. Confirm your input by pressing [OK].
The output menu appears again.
6 Change any other necessary system settings. Set the number of copies.
7 Load the originals into the EDH.
? Do you want to place the originals on the original glass and scan them?
For more information, see page 4-66.
8 Press the [START] key on the control panel to scan the originals and then save the data.
When the scanning cycle completes, the data storage screen is displayed automatically. Once data storage to the hard drive has completed, the basic functions are displayed again.
? Do you want to cancel the entire process?
Press the [STOP] key on the control panel to cancel the process. A dialog field appears.
![KONICA MINOLTA DI850 - Press the [OK] key to confirm the image store password. - 2](/content/2024/12/139451/images/9a67f1ba246ef1b469c83e36bc84eed58d402e0f0c18ed7ac42ba7f38077084e.jpg)
Confirm cancellation of the procedure by pressing [EXIT].
or
Press the [CONTINUE] key if you decide you do not want to cancel the procedure, but instead want to continue.
or (if displayed)
Press the [EXIT AFTER HDD STORE] option if you want to save the data but do not want it output.
![KONICA MINOLTA DI850 - Press the [OK] key to confirm the image store password. - 3](/content/2024/12/139451/images/809ffc661066934414c78c72602ef09e590af419e6bc9714c6e2b2412be8839d.jpg)
Proper use of user's choice setting!
In the user's choice setting you can specify whether the window for entering the image data code appears again after the store cycle. For more information, see page 7-51.
Calling up Jobs from the Hard Drive
(Only available if an auxiliary hard drive is installed)
Call up a job that has been saved to the hard drive to print it.
1 Press the [MODE] key on the control panel as many times as necessary to select the "Scan" function.
The scan display appears.
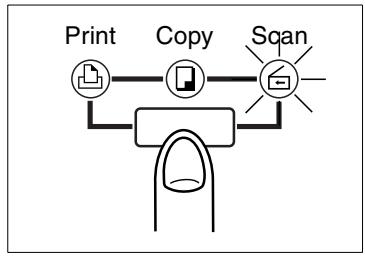

2 Press the [IMAGE RECALL] key.
The dialog for entering the 8-digit image store password is displayed.
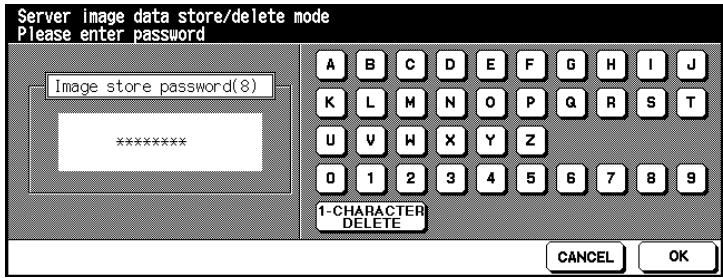
3 Use the touch screen keypad to enter the image store password that was valid when the job was saved.
Did you enter an incorrect number?
Press the [1-CHARACTER DELETE] key as necessary to delete your input character for character. Then enter the correct image store password.
4 Press the [OK] key to confirm the image store password.
The screen for calling up a job appears.

5 Press the key for the job you want to open.
The background of the key turns black.
6 Press the right-arrow key to move the job into the window on the right side of the touch screen.
The selected job is then displayed in the window on the right side (print window).
Can more than one job be recalled simultaneously?
You can only open multiple jobs if they have the same system settings.
? Have you recalled the wrong job?
Mark the wrong job in the print window. Press the left arrow key. The job is hidden in the print window and displayed on the left side.
7 only as required
Press the [JOB CHECK] key to recall check mode and to check the system settings of the lob.
8 Select one of the following features.
Press [WAIT OUTPUT] and [OK]
When the data transfer is completed, the basic options appear. The system settings are correspondingly selected. Enter the desired number of copies. Press the [START] key on the control panel to start the output.
Press [PROOF OUTPUT] and [OK]
The basic options appear. When the data transfer is completed, a copy set is output as proof. Check mode view appears. Change the settings, if necessary. Enter the desired number of copies. Press the [START] key on the control panel to start the output.
Press [AUTO OUTPUT] and [OK]
A dialog box appears. Enter the desired number of copies. Confirm your input by pressing [OK]. The output begins automatically after the data transfer completes.

And recall another job!
In key operator mode you can specify whether the next job is recalled after the end of the previous job. For more information, see page 7-51. If you want to interrupt the cycle, press the [CANCEL] key when the
recall window appears. A dialog box is shown for confirmation. Confirm the cancellation with [YES]. If you interrupt the recall cycle, this will not delete the data from the hard disk.
6.2 Web Functions
If the system is networked to a PC, you can view the current system status on the PC using a web browser: The Web Utilities window is only available in English or Japanese.
You can access the following areas by utilizing Web Utilities:
- Main Page
Information on the current system status.
Job Status
Information on the current print job and waiting or output print jobs.
HDD Job Information
Information on jobs that have been stored on the hard drive (optional).
You can rename or delete jobs here as well as start print output.
- Environment Setup
Set up E-mail transmission (also possible in operator mode).
Machine Status
Information on paper tray configurations, system configuration and installed accessories.
Click on [REFRESH] to update the window.
Starting Web Utilities
Start Web Utilities to gain access to the system information:
- Access to the WWW Utilities Via browser's URL.
- Browser
- Internet Explorer 5.0 or Netscape 4.0 or higher
URL http:// (system IP address or Host Name).
1 Power up the PC that is networked to the system.
2 Launch the web browser (Internet Explorer 5.0 or Netscape 4.0 or higher).
3 In the web browser go to "File" then "Open".

4 Enter the URL: http:// (system IP address or Host Name)
Your network administrator can tell you the system IP address and Host Name.
5 Press the [OK] key to confirm your input.
The "Web Utilities" Main Page is displayed.
![KONICA MINOLTA DI850 - Press the [OK] key to confirm your input. - 1](/content/2024/12/139451/images/14cba78afb0941a92be6d37129c26e70b9e2953a5d08fc39a3799298abd81241.jpg)
The following status displays are shown on the Main Page:
Service call:
Service call is enabled
JAM:
Clearing a Paper Jam
- Paper supply:
Fill the paper tray
- Toner supply:
Change the toner cartridge
Staple cartridge supply:
Change the staple cartridges
- Dispose of Trimmer trash basket:
Empty the Trimmer trash basket
- Dispos of Punch trash basket:
Empty the Punch trash basket
PM call:
Maintenance interval is reached.
Click on [REFRESH] to update the window.
Calling up System Status
Call up System status for information on the paper tray configurations, system configuration and installed accessories.
1 Start the Web Utilities.
For more information, see page 6-15.
2 Click on [MACHINE STATUS].
The paper tray configurations, system configuration and installed accessories are displayed.
Paper Tray Configuration
Option Information
| Paper Tray | Size | Type | Status |
| Manual Tray | A3 | Normal | No Paper in Tray |
| Tray1 | A4 | Normal | Paper in Tray |
| Tray2 | A4R | Normal | Paper in Tray |
| Tray3 | A4 | Normal | Paper in Tray |
| LCC | A3 | Normal | Paper in Tray |
Engine Configuration
| Machine Type | Di850 |
| Country Code | Europe |
| Display Language | English |
| ERDH Capacity(MB) | 128 |
| ERDH Available(%) | 100 |
| Total Count | 32333 |
| Printer Count | 6817 |
| Total PM Count | 32339 |
| Developer Count | 34025 |
| Drum Count | 34025 |
| Finisher Type | FN-7 |
| Trimmer Type | TMG-2 |
| Sheet Feeder | Not Mount |
| Z-Fold Type | ZK-2 |
| ADU | Mount |
| DF Type | EDH |
| HDD Capacity(GB) | 19 |
| HDD Available(%) | 0 |
| LCC | C-404 |
Calling up Job Status
Call up Job status for information on the current print job and waiting or output print jobs.
1 Start the Web Utilities.
For more information, see page 6-15.
2 Click on [JOB STATUS].
The current job status, the number of jobs in the queue and the remaining print time for the current job are displayed.
3 Go to "Job List" and click on the desired [JOB PRIORITY NO.] to display data on the current job or one of the jobs in the queue.
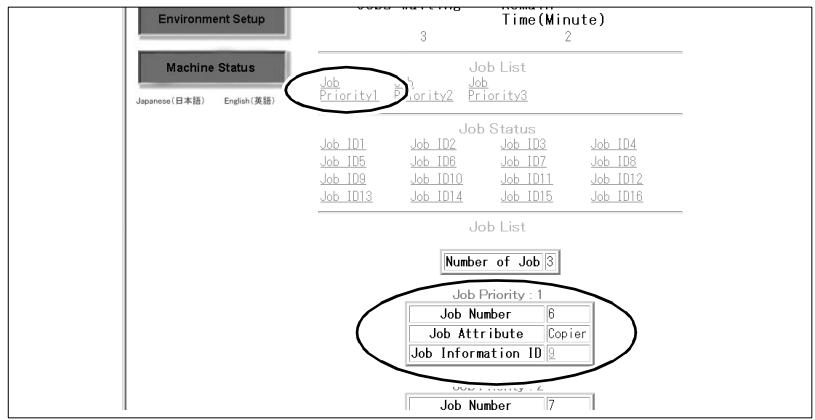
4 Go to "Job Status" and click on the desired [JOB ID NO.] to display information on one of the output jobs. Up to 16 jobs are displayed in the list.
Number of Job
Job Status
Job Information ID:1
| Job Number | 1 |
| Number of Pages | 1 |
| Print Quantity | 1 |
| Output Time | 0 |
| Job Attribute | Printer |
| Job Status | Job end successfully |
| Current print quantity count | 1 |
| Current page number | 0 |
| Remaining Time | 0 |
Job Information ID:2
| Job Number | 2 |
| Number of Pages | 1 |
| Print Quantity | 1 |
| Output Time | 0 |
| Job Attribute | Scanner |
| Job Status | Job end successfully |
| Current print quantity count | 1 |
Click on [REFRESH] to update the window.
Call up and Edit Hard Drive Data
Call up information on jobs that have been stored on the hard drive (optional). You can rename or delete jobs here as well as start print output.
1 Start the Web Utilities.
For more information, see page 6-15.
2 Click on [HDD JOB INFORMATION].
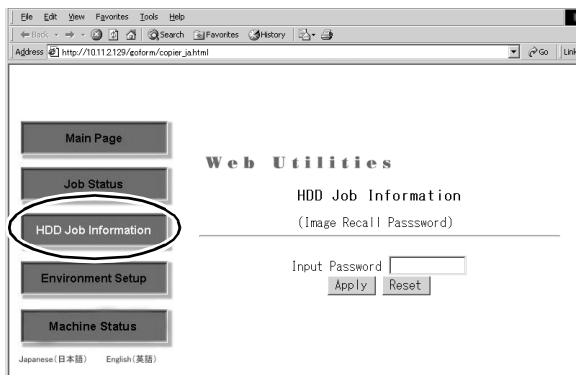
3 Enter the password (image memory code) you used to save your print jobs. For more information, see page 6-3.
Print jobs that were stored using the entered image memory code are displayed alphabetically. Furthermore, print jobs are also shown that were produced with the "Program Job" feature.
? What does it mean when "P Job" is displayed under Page Count?
It means that this job was produced using the "Program Job" feature.
? Can a search be made for a print job?
Yes, you can also search for a print job.
Type the name for the print job required in the dialog field "Job Search". Then click on [SEARCH]. The desired print job is then displayed.
4 Click on [IMAGE], [OUTPUT], [DELETE] or [RENAME] to use the different print job features.
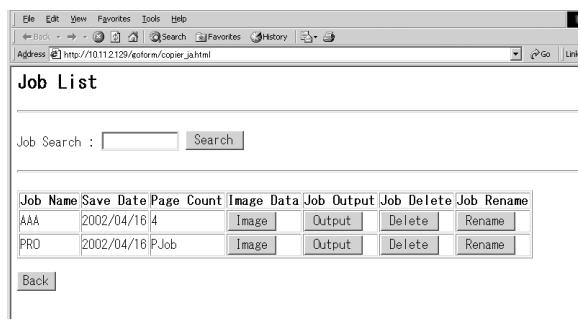
- Click on [IMAGE] to display a preview of the first page along with detailed information on the selected data.
Then click on [OUTPUT] to output the data.
or
Click on [BACK] to go back to the job list.
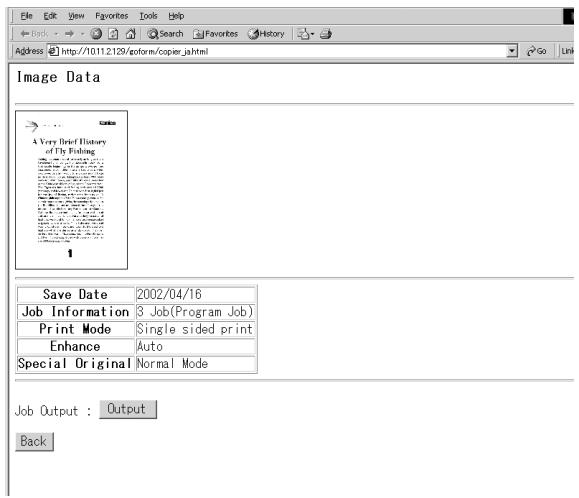
- Click on [OUTPUT] to start printing data to the system. Select the desired output form.
Auto output
Enter the desired number of sets and click on [APPLY]. The print job is output. The print job cannot be stopped or canceled using Web Utilities. This can only be carried out at the system itself. A message on the PC screen indicates when the print job is finished.
Proof output
Enter the desired number of sets and click on [APPLY]. A complete set is output. A message is displayed on the check mode screen. Check the settings. Start the output at the system by clicking on [START]. A message on the PC screen indicates when the print job is finished.
Wait output
Enter the desired number of sets and click on [APPLY]. The date is retrieved from the hard drive but not yet output. Select the desired settings at the system. Change the set number, if necessary. Start the output at the system by clicking on [START]. A message on the PC screen indicates when the print job is finished.
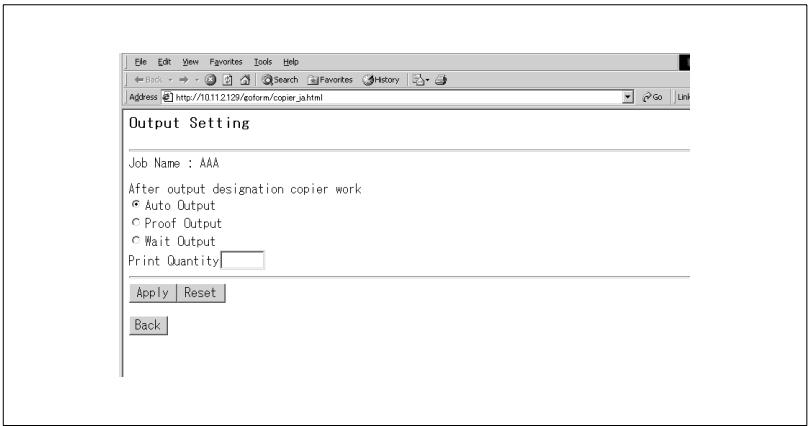
Click on [DELETE] to delete data from the hard drive.
Click on [YES] to start the delete cycle.
or
Click on [NO] to cancel the cycle.
or
Click on [BACK] to go back to the job list.
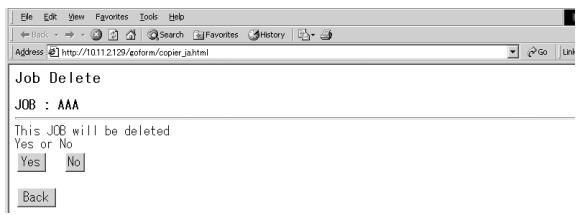
- Click on [RENAME] to rename the data record and store it on the hard drive under a new name.
Enter the new name in the dialog field. Then click on [APPLY] to save the change.
or
Click on [RESET] to cancel the cycle.
or
Click on [BACK] to go back to the job list.

E-Mail Transmission Setting
You can set up E-mail transmission in operator mode or with the Web Utilities. For further information on setting up E-mail transmission refer to page 7-10.
1 Start the Web Utilities.
For more information, see page 6-15.
2 Click on [ENVIRONMENT SETUP].

3 Enter the 4-digit code and confirm your input by pressing [APPLY].
4 Click on [E-MAIL TRANSMISSION SETTING].
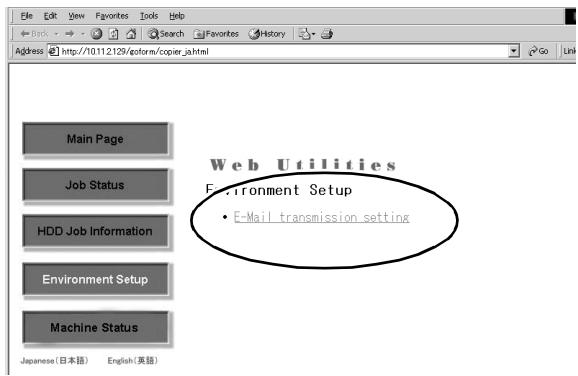
5 Check the settings and change as required.
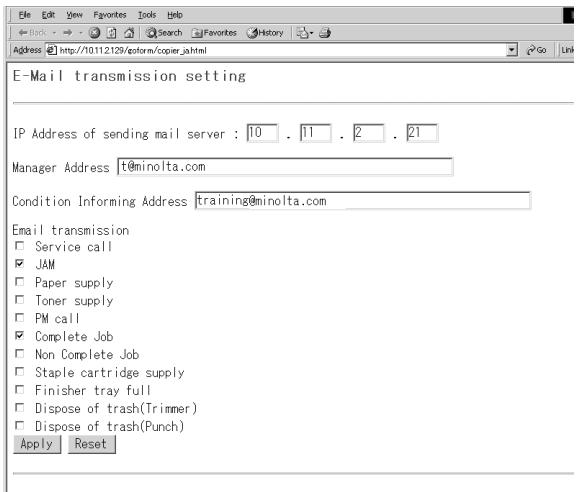
6 Click on [APPLY] to save the settings. or Click on [RESET] to cancel the cycle.
7 Settings in Key Operator Mode
Key operator mode is used to modify basic system settings. For this reason, only specially authorized personnel should be allowed access to key operator mode.
Access to the individual functions in key operator mode is provided from the key operator mode menu.
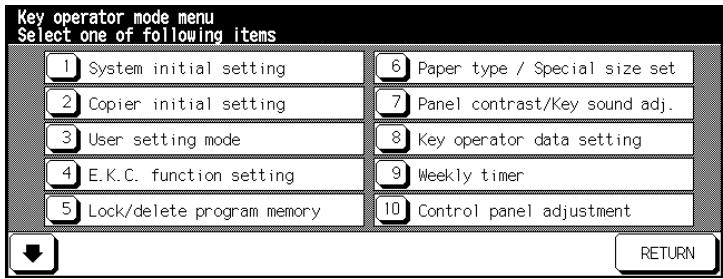
To prevent unauthorized access, you can protect key operator mode and the settings for the E.K.C. counter and weekly timer with master codes. These master access codes can only be set up by a service technician. To take advantage of this feature, contact your technical representative.
We recommend using the same master code for access to key operator mode, the plug-in counter and the weekly timer. You should handle the master code with strict confidentiality. For emergencies, keep the master code in a sealed envelope in a confidential place.

Help cannot be called up from key operator mode...
You can no longer call up help in key operator mode by pressing the [HELP] key on the control panel. To access the help mode, you have to leave key operator mode.
7.1 Overview
Calling up Key Operator Mode
Call up key operator mode to change copier settings.
Press the [HELP] key on the control panel.
Help mode is displayed.

2 Press the [KEY OPERATOR MODE] key.
The key operator mode menu is displayed. You are now in key operator mode.
or
The code prompt appears.
3 Only at the code prompt
Use the touch screen keypad to enter the 4-digit password and confirm your input by pressing the [OK] key.
The key operator mode menu is displayed. You are now in key operator mode.
? Code not accepted?
Enter the code again and confirm your input by pressing [OK]. If the code is still not accepted, contact your system administrator.
Leaving Key Operator Mode
To exit key operator mode, press [RETURN] in key operator mode.
Overview of the Key Operator Mode Menu
| Key Operator Mode Menu | Submenu | ||
| [1] | System Initial Setting | [1] | Date & Time setting |
| [2] | Language select setting | ||
| [3] | IP address setting | ||
| [4] | E-mail Transmission Setting | ||
| [2] | Copier Initial Setting | ||
| [3] | User Setting Mode | [1] | Setting user density 1 |
| [2] | Setting user density 2 | ||
| [3] | Setting the zoom ratio | ||
| [4] | E.K.C. function setting | [1] | E.K.C. data edit |
| [2] | E.K.C. all count reset | ||
| [3] | E.K.C. function setting | ||
| [5] | Lock/delete program memory | ||
| [6] | Paper type/Special size setting | ||
| [7] | Panel contrast/Key sound adj. | ||
| [8] | Key operator data setting | ||
| [9] | Weekly timer | [1] | Weekly timer ON/OFF setting |
| [2] | Timer setting | ||
| [3] | Timer action ON/OFF setting | ||
| [4] | Lunch Hour Off Setting | ||
| [5] | Timer interrupt password setting | ||
| [10] | Control panel adjustment | ||
| [11] | Tray auto select setting | ||
| [12] | Energy saver setting | ||
| [13] | Memory switch setting | ||
| [14] | Machine management list print | [1] | Program memory list |
| [2] | User management list | ||
| [3] | E.K.C. management list | ||
| [4] | Font pattern list | ||
| [15] | Call remote center | [1] | Call for JAM concerns |
| [2] | Call for SC concerns | ||
| [3] | Toner bottle supply call | ||
| [4] | Paper supply call | ||
| [5] | Call for Image quality | ||
| [6] | Call for others | ||
| [16] | Side 2 Lens Adjustment | ||
| [17] | Finisher adjustment | [1] | Staple and Fold stopper adj. |
| [2] | Folding stopper adjustment | ||
| [18] | HDD management setting | [1] | Password list/delete |
| [2] | JOB auto delete period setting | ||
| [3] | State of HDD capacity | ||
| [19] | Set scanner transmission | ||
| [20] | Non-Image Area Erase Setting | ||
7.2 (1) System Initial Setting
Define the system initial settings.
(1) Date & Time Setting
Set the date and time for the system.
1 Call up key operator mode.
The key operator mode menu is displayed.
2 In the key operator mode menu press the [1] System Initial Setting key.
A submenu appears.
3 Press the [1] Date & Time Setting key in the submenu.
The screen for setting the date and time is displayed.
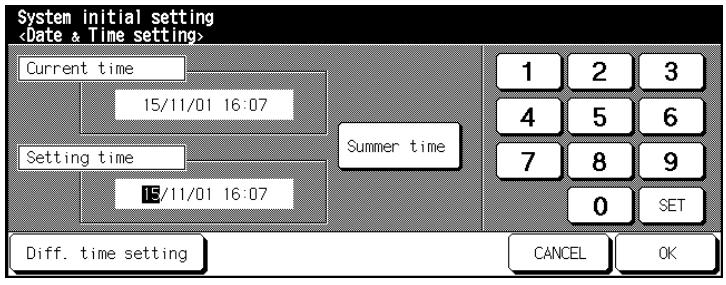
"Current time" shows the current time. The new setting can be made in "Setting time". The format for date and time appear as such: Day/Month/Year Hours:Minutes
4 Set the date and time.
Use the [SET] key to select the value that you want to change.
Enter the new value using the touch screen keypad.
only if necessary
Press the [SUMMER TIME] key to enable the summer time feature. This causes the "Current time" to be shown one hour off.
5 only if necessary
Press the [DIFF. TIME SETTING] key to enter the time difference from central European time.
An input window appears.
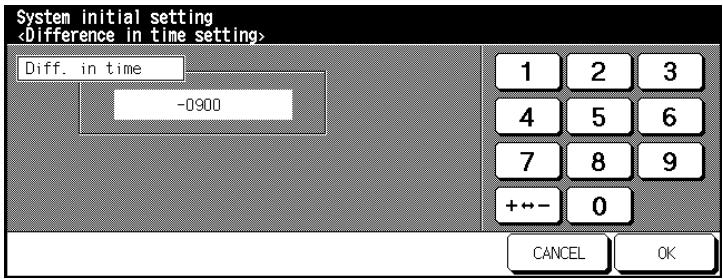
Enter the number of hours difference using the touch screen keypad. Press [+ - > - ] to input a positive or negative time difference.
For example, input -0900 if your time is 9 hours after central European time.
6 Press the [OK] key to confirm your input.
The dialog box for entering the date and time appears again.
7 Press the [OK] key to confirm your input.
The submenu appears again.
8 Press the [RETURN] key.
The key operator mode menu is displayed again.
![KONICA MINOLTA DI850 - Press the [RETURN] key. - 1](/content/2024/12/139451/images/49bbf88a1160eafa842e4f4e11e0ca639b0a574b114ca00a92f0d090ec356c66.jpg)
24-hour days
Specify the hour in 24-hour mode.
(2) Language Select Setting
Specify the language of the touch screen.
1 Call up key operator mode.
The key operator mode menu is displayed.
2 In the key operator mode menu press the [1] System Initial Setting key.
A submenu appears.
3 Press the [2] Language Select Setting key in the submenu.
The screen for setting the language appears.
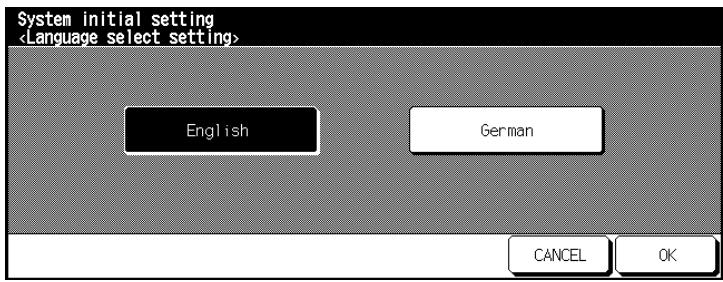
4 Press the key of the desired language.
5 Press the [OK] key to confirm your input.
The submenu appears again.
6 Press the [RETURN] key.
The key operator mode menu is displayed again.
(3) IP Address Setting
To run the system on a network, the system has to be assigned an IP address. Be sure to contact your network administrator for help. An incorrect IP address can lead to network malfunctions.
1 Call up key operator mode.
The key operator mode menu is displayed.
2 In the key operator mode menu press the [1] System Initial Setting key.
A submenu appears.
3 Press the [3] IP Address Setting key in the submenu.
The screen for setting the IP address appears.
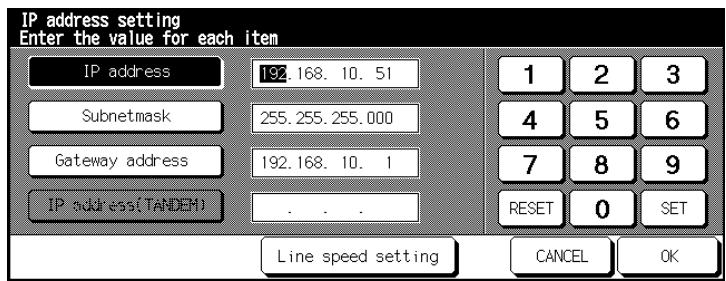
Select a setting. Press the [RESET] key to delete the old value. Enter the new value using the touch screen keypad. Press the [SET] key to save the new value.
4 only if necessary
Press the [LINE SPEED SETTING] key to change other settings.
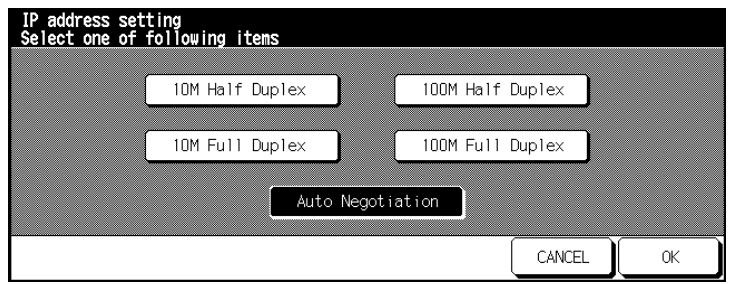
5 Select the desired setting.
or
Press the [AUTO NEGOTIATION] key for automatic selection of the line speed.
6 Press the [OK] key to confirm your input.
The screen for setting the IP address appears again.
7 Press the [OK] key to confirm your input.
The submenu appears again.
8 Press the [RETURN] key.
The key operator mode menu is displayed again.
(4) E-Mail Transmission Setting
In the event of a system malfunction a fault report can be sent by E-mail. This ensures that a system administrator is quickly informed and that the malfunction is corrected quickly. The system will be available again as quickly as possible. System downtime is minimized.
Consult the relevant network administration before changing any settings here. Incorrect settings can lead to network malfunctions.
The following malfunction info or messages can be sent by E-mail:
Service Call
Jam
Add paper
Add toner
- Maintenance
- Complete Job
Non Complete Job
Staple Cartridge Supply empty
- FinisherTray Full
- Dispose of Waste Basket.
1 Call up key operator mode. The key operator mode menu is displayed.
2 In the key operator mode menu press the [1] System Initial Setting key. A submenu appears.
3 Press the [4] E-mail Transmission Setting key in the menu. Another menu appears.
4 Press the [1] IP Address Setting key. Enter the IP address of the E-mail address in your network with the touch screen keypad. Confirm your input by pressing [OK].
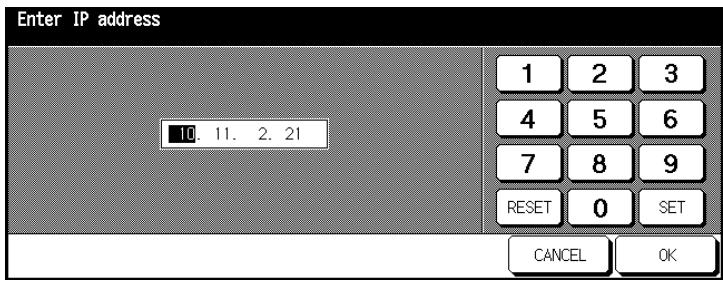
5 Press the key [2] Enter E-mail address
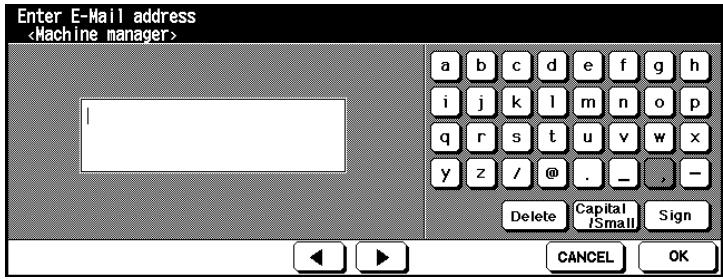
6 Press the key [3] Enter E-mail address
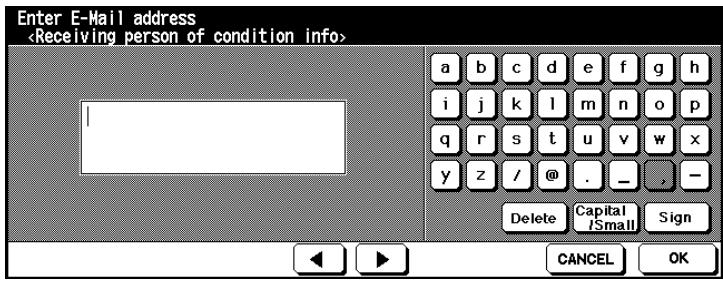
7 Press [4] Select items for E-mail transmission. Select the conditions for which an E-mail is to be sent. Confirm your selection by pressing [OK].
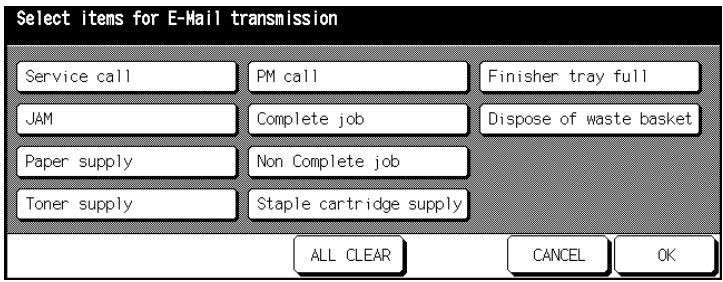
8 Press the [OK] key to confirm your input.
The submenu appears again.
9 Press the [RETURN] key.
The key operator mode menu is displayed again.
7.3 (2) Copier Initial Setting
Specify the settings that are enabled automatically when the system is switched on or a control panel reset is carried out.
| Setting | Option | Default setting |
| Copy Mode | EDH, 1-1, 1-2, 2-2, 2-1 | 1-1 |
| Contrast | AE, manual | AE |
| Zoom ratio | AMS, zoom ratio 0.25 to 4.00 | 1:1 |
| Paper Size | APS, 1., 2. and 3. Paper Printer or LCC | APS |
| Output | Non-Sort Mode, Sorting, Grouping, Stapling, Stapling & Folding, Folding, Punching, Trimming, Cover Sheet | Sorting with offset |
| Special Originals | Direction of Original, Text/Photo Mode, Special Original, Original Type | - |
| 90° Mode | OFF | - |
1 Call up key operator mode.
The key operator mode menu is displayed.
2 In the key operator mode menu press the [2] Copier Initial Setting key. An overview of the basic options appears.

3 Select the settings that are to be enabled automatically when the system is switched on or a control panel reset is carried out.
4 Press the [OK] key to confirm your input. The key operator mode menu is displayed again.
7.4 (3)User Setting Mode
Configure the user-defined density and zoom ratio settings. The user-defined settings can be called up from the basic options.
(1) Setting User density Level 1
Specify the density setting for User 1.
Two user-defined density settings (User1, User2) can be selected in the touch scream basic options screen Density.
1 Load an original.
2 Call up key operator mode.
The key operator mode menu is displayed.
3 In the key operator mode menu press the [3] User Setting Mode Menu key.
A submenu appears.
4 Press the [1] Setting User Density Level 1 key in the submenu.
The screen for setting the copy density appears.
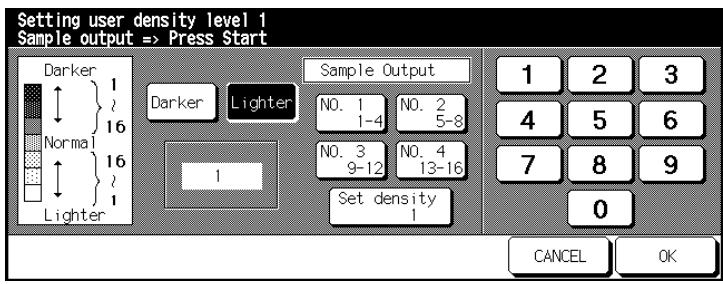
5 Set the desired density level.
Select among the settings [DARKER] or [LIGHTER].
Select a density range (No.1 1~4, No.2 5~8, . . . or Set density) to print a sample output.
Press the [START] key on the control panel to start printing the sample output with the selected density settings.
Check the sample output.
- Specify the desired value for the density setting using the touch screen keypad.
6 Press the [OK] key to confirm your input.
The submenu appears again.
7 Press the [RETURN] key.
The key operator mode menu is displayed again.
(2) Setting User Density Level 2
Specify the density setting for User 2.
Two user-defined density settings (User1, User2) can be selected in the touch scream basic options screen Density.
1 Load an original.
2 Call up key operator mode.
The key operator mode menu is displayed.
3 In the key operator mode menu press the [3] User Setting Mode Menu key.
A submenu appears.
4 Press the [2] Setting User Density Level 2 key in the menu.
The screen for setting the copy density appears.
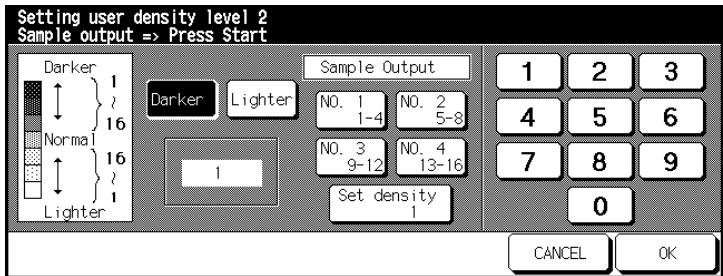
5 Set the desired density level.
Select among the settings [DARKER] or [LIGHTER].
Select a density range (No.1 1~4, No.2 5~8, . . . or Set density) to print a sample output.
Press the [START] key on the control panel to start printing the sample output with the selected density settings.
Check the sample output.
- Specify the desired value for the density setting using the touch screen keypad.
6 Press the [OK] key to confirm your input.
The submenu appears again.
7 Press the [RETURN] key.
The key operator mode menu is displayed again.
(3) Setting the Zoom Ratio (Lens Mode)
Specify the user defaults for the zoom ratio.
1 Call up key operator mode.
The key operator mode menu is displayed.
2 In the key operator mode menu press the [3] User Setting Mode Menu key.
A submenu appears.
3 Press the [3] Lens Mode Ratio Setting key.
The screen for setting the zoom ratios appears.
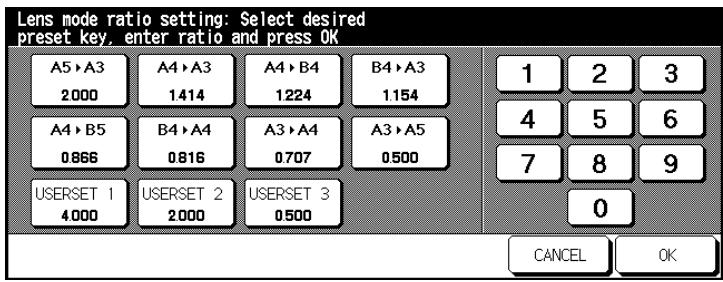
4 Select the zoom ratio that you want to change.
5 Use the touch screen keypad to enter a new zoom ratio from 0.250 to 4.000 (25% to 400%).
The default setting for the user-defined lens ratios is:
USERSET 1:4.000
USERSET 2:2.000
USERSET 3:0.500
6 Change any other zoom ratios as you like.
7 Press the [OK] key to confirm your input.
The submenu appears again.
8 Press the [RETURN] key.
The key operator mode menu is displayed again.
7.5 (4) E.K.C. Function Setting
You can use the E.K.C. counter to manage the copier activities of up to 1000 E.K.C. accounts with password-protected access.
When the E.K.C. is enabled, the system can be used only with a code. Copies can then be managed based on this code. To avoid excessive copying, each E.K.C. account can be assigned a copy limit.
The E.K.C. significantly simplifies the calculating of copy costs.
In the key operator mode, the settings for the E.K.C. can be protected with a master code. The master access code can only be set up by a service technician. To take advantage of this feature, contact your technical representative.
Calling up E.K.C. Mode
Call up E.K.C. mode to change the settings for the E.K.C. counter.
1 Call up key operator mode.
The key operator mode menu is displayed.
2 In the key operator mode menu press the [4] E.K.C. Function key.
A submenu appears. You are now in E.K.C. mode. or
The window prompting for the master code appears.
3 only with master code prompt
Input the 8-digit master code with the touch screen keypad and confirm your input with [OK].
You are now in E.K.C. mode.
? Master code not accepted?
Reenter the master code and confirm your selection with [OK].
If the master code still is not accepted, find out whether the code has been changed.
(1) E.K.C. Data Edit
Editing an E.K.C. Account
Change the settings for an E.K.C. account.
1 Call up E.K.C. mode.
The submenu appears.
2 Press the [1] E.K.C. Data Edit key in the submenu.
The screen for managing E.K.C. accounts appears.

3 From the list of E.K.C. accounts, select the E.K.C. account you want to modify using the arrow keys (to the right of the list).
4 Press the [CHANGE] key.
The screen for modifying E.K.C. data appears.

5 Press [PASSWORD], [NAME] or [LIMIT] and enter the new values with the touch screen key pad.
Code: max. 8 digits
Name: max. 8 characters
Limit: 0 to 999,999 copies
6 Press the [OK] key to confirm your input.
The screen for managing E.K.C. accounts appears again.
? Message that the password has already been used?
Press the [YES] key to assign a code.
or
Press the [NO] key to duplicate the code. Copies are then registered under the password with the lower digit.
? Message that the name has already been used?
Press the [OK] key and enter a different name.
7 Press the [RETURN] key.
The submenu appears again.
8 Press the [RETURN] key.
The key operator mode menu is displayed again.
Creating a New E.K.C. Account
Create a new E.K.C. account.
1 Call up E.K.C. mode.
The submenu appears.
2 Press the [1] E.K.C. Data Edit key in the submenu.
The screen for managing E.K.C. accounts appears.

3 Press the [ADD] key.
The screen for setting up a new E.K.C. account appears.
4 Press [PASSWORD], [NAME] or [LIMIT] and enter the new values with the touch screen key pad.
Code: max. 8 digits
O Name: max. 8 characters
Limit: 0 to 999,999 copies
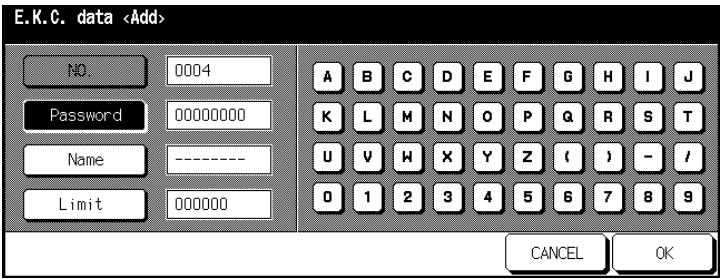
5 Press the [OK] key to confirm your input.
The screen for managing E.K.C. accounts appears again.
? Message that the password has already been used?
Press the [YES] key to assign a code. or Press the [NO] key to duplicate the code. Copies are then registered under the password with the lower digit.
? Message that the name has already been used?
Press the [OK] key and enter a different name.
6 Press the [RETURN] key.
The submenu appears again.
7 Press the [RETURN] key.
The key operator mode menu is displayed again.
Deleting an E.K.C. Account
Delete an E.K.C. account.
1 Call up E.K.C. mode.
The submenu appears.
2 Press the [1] E.K.C. Data Edit key in the submenu.
The screen for managing E.K.C. accounts appears.

3 From the list of E.K.C. accounts, select the E.K.C. account you want to delete using the arrow keys (to the right of the list).
4 Press the [DELETE] key.
A confirmation dialog appears.
5 Confirm the deletion with [YES].
The E.K.C. is deleted.
6 Press the [RETURN] key.
The submenu appears again.
7 Press the [RETURN] key again.
The key operator mode menu is displayed again.
Reset individual E.K.C. count
Reset the number of created copies for individual E.K.C. accounts back to "0".
1 Call up E.K.C. mode.
The submenu appears.
2 Press the [1] E.K.C. Data Edit key in the submenu.
The screen for managing E.K.C. accounts appears.
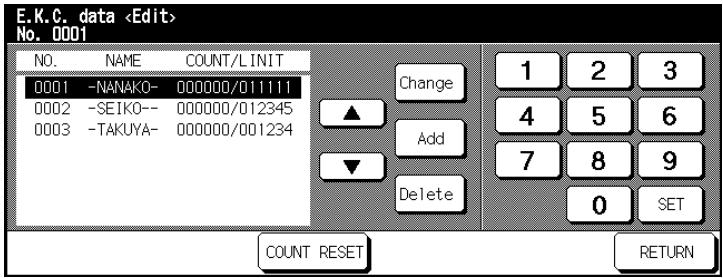
3 From the list of E.K.C. accounts, select the E.K.C. account you want to delete using the arrow keys (to the right of the list).
4 Press the [COUNT RESET] key.
A confirmation dialog appears.
5 Confirm the deletion with the [YES] key.
The E-K-C. count is reset to 0.
6 Press the [RETURN] key.
The submenu appears again.
7 Press the [RETURN] key again.
The key operator mode menu is displayed again.
(2) E.K.C. All Count Reset
Reset the number of copies produced to "0" for all E.K.C. accounts.
1 Call up E.K.C. mode.
The submenu appears.
2 Press the [2] Reset All E.K.C. Accounts key in the submenu.
The screen for resetting the counter appears.
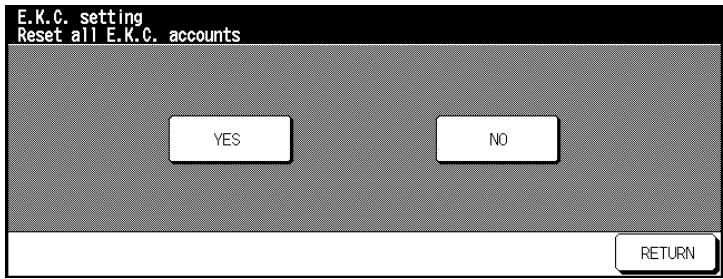
3 Press the [YES] key.
The counters are reset.
4 Press the [RETURN] key.
The submenu appears again.
5 Press the [RETURN] key again.
The key operator mode menu is displayed again.
(3) E.K.C. Function Setting
Enable or disable the E.K.C. features. Specify what happens when a copy limit is reached.
1 Call up E.K.C. mode.
The submenu appears.
2 Press the [3] E.K.C. Function Setting key in the menu.
The screen for configuring the settings appears.
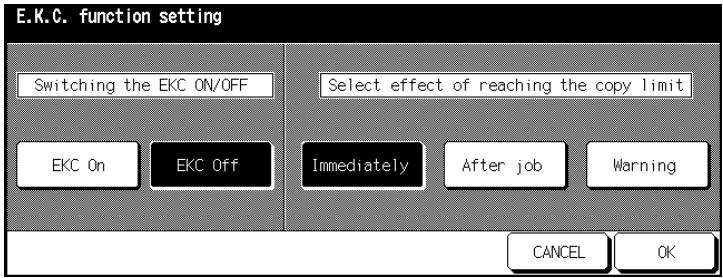
3 Press the [EKC ON] key to enable the function. or
Press the [EKC OFF] key to disable the function.
4 Specify what happens when a copy limit is reached.
O [IMMEDIATELY]
The copy job is interrupted immediately. No more copies can be made.
O [AFTER JOB]
The copy job in process will still be completed. After it, no other copy jobs can be started.
O [WARNING]
A warning is displayed. Copies, however, may continue to be made without restriction.
5 Press the [OK] key to confirm your input.
The submenu appears again.
6 Press the [RETURN] key.
The key operator mode menu is displayed again.
7.6 (5) Program Memory Lock/Delete
Unlock, lock or delete the system settings that have been saved to the job memory.
Locking and Unlocking Program Memory Positions
Lock a program memory position to secure the saved system settings from being modified or deleted or unlock a position.
1 Call up key operator mode.
The key operator mode menu is displayed.
2 Press the key [5] Program Memory Lock/Delete in the key operator mode menu.
The program memory list is displayed.
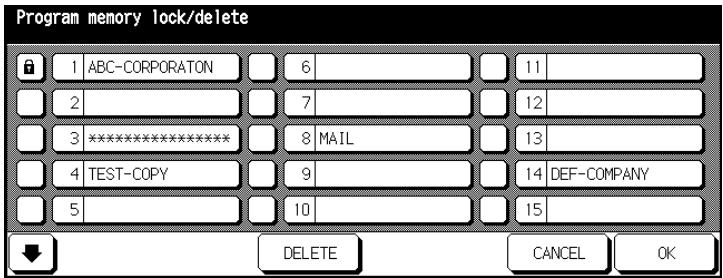
The fields to the left of the program memory positions indicate the status of the memory positions. A lock indicates that the program memory position is locked. The corresponding system settings cannot be deleted nor overwritten. A white field indicates that the program memory position is unlocked.
3 Press the field to the left of the program memory position to change its status.
4 Press the [OK] key to confirm your input.
The key operator mode menu is displayed again.
Deleting System Settings
Delete saved system settings.
1 Call up key operator mode.
The key operator mode menu is displayed.
2 Press the key [5] Program Memory Lock/delete in the key operator mode menu.
The program memory list is displayed.
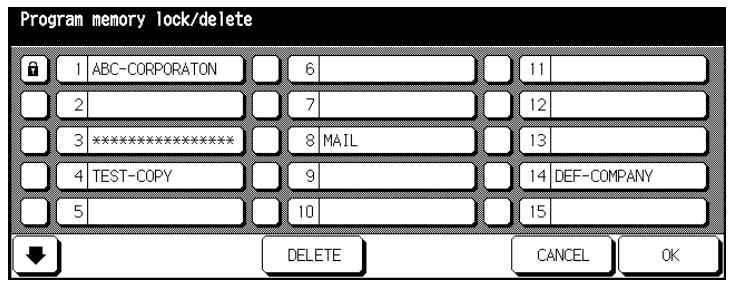
3 Select the program memory position of the system settings that you want to delete.
4 Press the [DELETE] key.
The stored system settings are deleted.
5 Press the [OK] key to confirm your input.
The key operator mode menu is displayed again.
7.7 (6) Paper Type/Special Size Setting
Specify the paper types and sizes that you are processing with the each paper tray.
Specifying the Paper Type
Specify the paper type that you are processing with a paper tray.
1 Call up key operator mode.
The key operator mode menu is displayed.
2 In the key operator mode menu press the [6] Paper Type/Special Size setting key.
The screen for selecting a paper type appears.
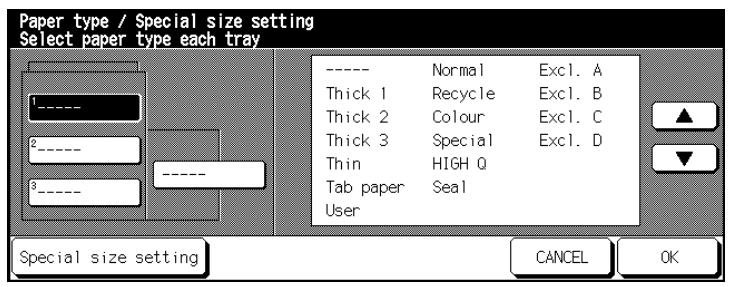
3 Select the paper tray that you want to specify a paper type for.
4 Use the arrow keys on the touch screen to select the paper type that you want to assign to the paper tray.
5 Press the [OK] key to confirm your input.
The key operator mode menu is displayed again.
Specifying the Paper Size
Specify the paper size that you can process with a paper tray.
1 Call up key operator mode.
The key operator mode menu is displayed.
2 In the key operator mode menu press the [6] Paper Type/Special Size setting key.
The screen for selecting a paper type appears.

3 Press the [SPECIAL SIZE SETTING] key.
The screen for selecting a paper size appears.
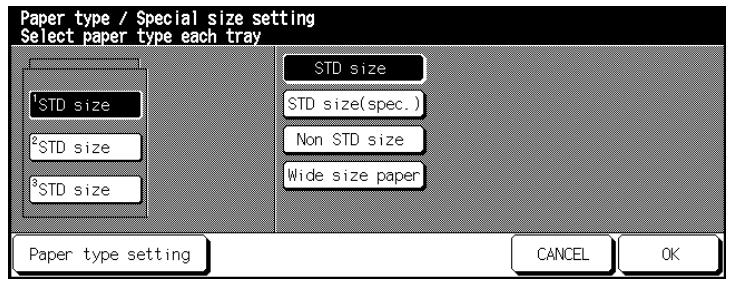
4 Select the paper tray that you want to configure the paper size for.
5 Specify the paper size for the selected paper tray.
STD size
Standard sizes are detected by the system automatically when loaded into the paper tray.
STD size (spec.)
Use the arrow keys on the touch screen to select a paper size.
Non STD size
Use the arrow keys or the keypad on the touch screen to enter a special size.
Wide size paper
Set the copy start. For more information, see page 7-35.
Use the arrow keys on the touch screen to select a wide paper size.
or
Press the [PAPER TYPE SETTING] key and set an overall size with the number keys on the touch pad.
6 Confirm your selection by pressing [OK].
The key operator mode menu is displayed again.
Set Copy Start to Wide Size Paper
Specify on what side of the paper the copying should start if you are copying to a wide size paper.
1 Call up key operator mode.
The key operator mode menu is displayed.
2 In the key operator mode menu press the [6] Paper Type/Special Size setting key.
The screen for selecting a paper type appears.
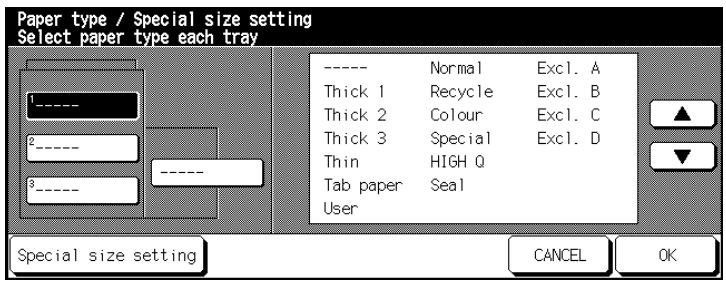
3 Press the [SPECIAL SIZE SETTING] key.
The screen for selecting a paper size appears.
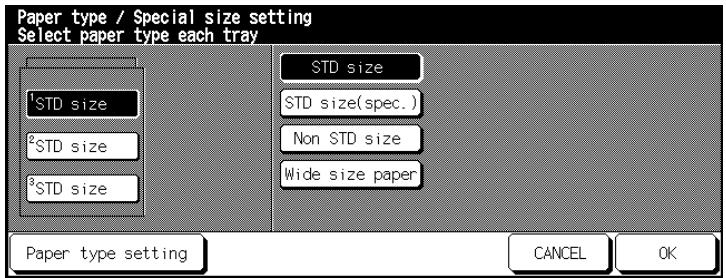
4 Select the paper size [WIDE SIZE PAPER].
A dialog window to select or input a wide size paper will open.
![KONICA MINOLTA DI850 - Select the paper size [WIDE SIZE PAPER]. - 1](/content/2024/12/139451/images/78758fa687c63946559112b9e59cecbd443b17ce164a684cea20bbf97168b5c1.jpg)
5 Select a wide size from the displayed list. or
Set a user-defined paper size.
6 Set the copy start in "IMAGE POS."
Lead edge
at the paper feed edge
Rear edge
at the opposite side to the paper feed edge
7 Press the [OK] key to confirm your input.
The key operator mode menu is displayed again.
7.8 (7) Panel Contrast/Key Sound Adjustment
Specify basic settings for the touch screen.
- Adjust the contrast of the touch screen
- Adjust the volume of the key tones.
Make any necessary changes to the configuration.
1 Call up key operator mode.
The key operator mode menu is displayed.
2 In the key operator mode menu press the [7] Panel Contrast / Cound adj. key.
The screen for setting the panel contrast and key tone is displayed.
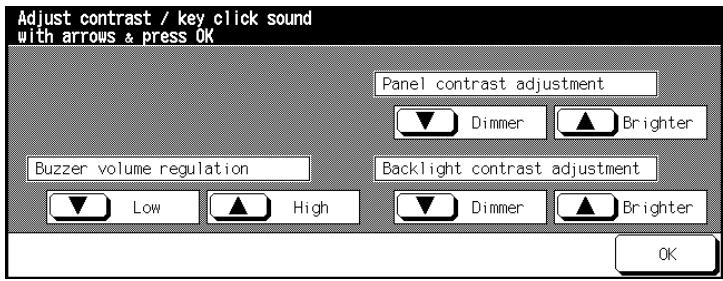
3 Select the setting you want to change using the arrow keys.
Buzzer volume regulation
Press the arrow keys for Low or High to set the volume of the key clicks.
Panel contrast adjustment
Press the arrow keys for Dimmer and Brighter to adjust the contrast of the touch screen panel.
Backlight contrast adjustment
Press the arrow keys for Dimmer and Brighter to adjust the brightness of the touch screen background.
4 Confirm your selection by pressing [OK].
The key operator mode menu is displayed again.
7.9 (8) Key Operator Data Setting
Enter the name and phone number of a contact person for system emergencies. This information will be displayed in help mode and can be called up by anyone using the system by pressing the [HELP] key on the control panel.
1 Call up key operator mode.
The key operator mode menu is displayed.
2 In the key operator mode menu press the [8] Key Operator Data Setting key.
The box for entering the name (max. 8 characters) and the telephone number (max. 5 characters) of the contact for assistance with the system appears.
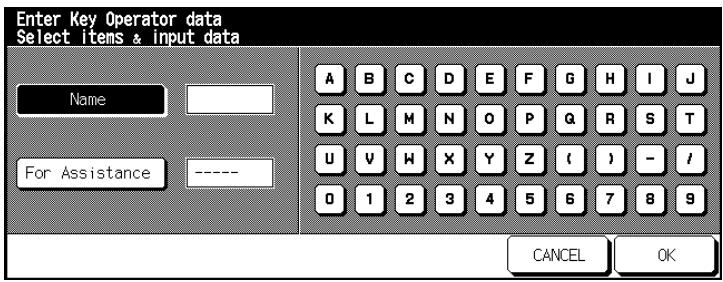
3 Press the [NAME] key.
4 Use the keypad on the touch screen to enter the name of the contact person.
5 Press the [FOR ASSISTANCE] key.
6 Use the keypad on the touch screen to enter the phone number of the contact person.
7 Confirm your selection by pressing [OK].
The key operator mode menu is displayed again.
7.10 (9) Weekly Timer
Use the weekly timer to specify certain times at which the system should switch on and switch off. When the system is switched off, it can still be switched on by hand temporarily. The timer interruption can be protected with a code for security.
Access to the weekly timer settings can be protected with a master code. The master access code can only be set up by a service technician. To take advantage of this feature, contact your technical representative.
Calling up Weekly Timer Mode
1 Call up key operator mode.
The key operator mode menu is displayed.
2 In the key operator mode menu press the [9] Weekly Timer key.
A submenu appears.
or
The prompt for entering the code appears. Enter the 4-digit code with the touch screen keypad and confirm the input with [OK].
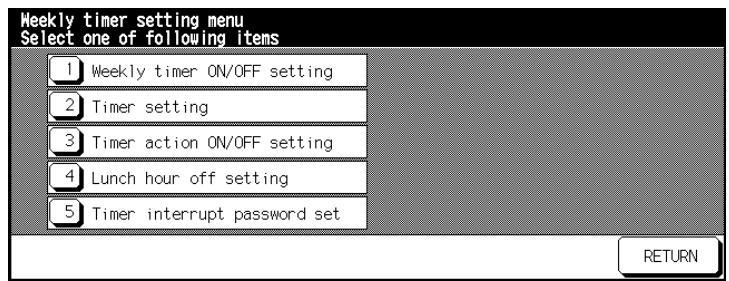
(1) Weekly Timer ON/OFF Setting
Enable or disable the weekly timer.
1 Call up weekly timer mode.
The submenu appears.
2 In the submenu press the [1] Weekly Timer ON/OFF Setting key.
The screen for enabling the weekly timer function appears.
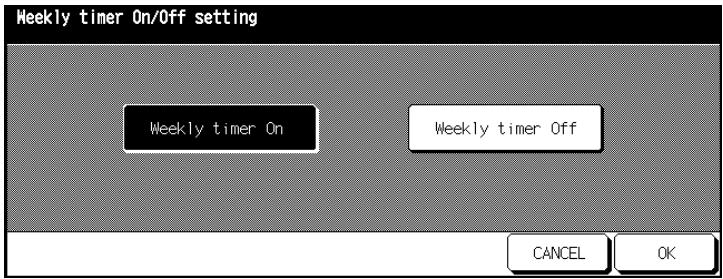
3 Press the [WEEKLY TIMER ON] key to enable the weekly timer.
or
Press the [WEEKLY TIMER OFF] key to disable the weekly timer.
4 Confirm your selection by pressing [OK].
The submenu appears again.
5 Press the [RETURN] key.
The key operator mode menu is displayed again.
(2) Timer Setting
Individual Timer Setting
Specify certain times at which the weekly timer should be enabled or disabled.
1 Call up weekly timer mode.
The submenu appears.
2 In the submenu press the [2] Timer Setting.
The screen for scheduling times appears.
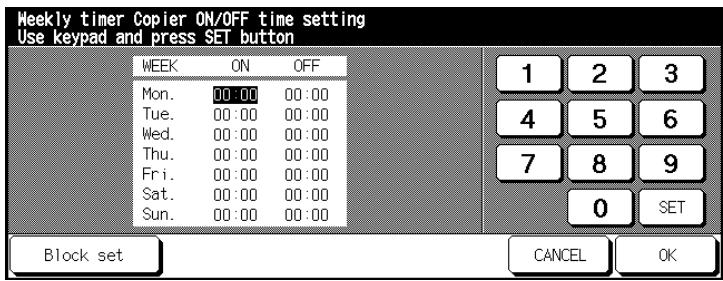
3 Enter the switch-on time for the timer for Mondays using the touch screen keypad. Then press the [SET] key to set the shut off period. or
Press the [SET] key repeatedly until the selection is at the desired value.
? What form is used to enter the times?
Specify the hour in 24-hour mode.
→ Always enter 2-digit values, e.g. 07 for 7 minutes.
4 Set any other on and off times for the weekdays.
5 Confirm your input by pressing [OK].
The submenu appears again.
6 Press the [RETURN] key.
The key operator mode menu is displayed again.
Block Timer Setting
Specify certain times at which the weekly timer should be enabled or disabled.
1 Call up weekly timer mode.
The submenu appears.
2 In the submenu press the [2] Timer Setting.
The screen for scheduling times appears.
3 Press the [BLOCK SET] key.
The screen for scheduling block times appears.
4 Select the weekdays to which the block time will apply.
5 Enter the switch-on time for the weekly timer using the touch screen keypad. Then press the [SET] key to set the switch-off time.
? What form is used to enter the times?
Specify the hour in 24-hour mode.
→ Always enter 2-digit values, e.g. 07 for 7 minutes.
6 Confirm your input by pressing [OK].
The data are copied into the menu for specifying weekly timer times.
7 Confirm your input by pressing [OK].
The submenu appears again.
8 Press the [RETURN] key.
The key operator mode menu is displayed again.
(3) Timer Action ON/OFF Setting
Individual Setting
Set the times on which days the system should be switched on and off.
1 Call up weekly timer mode.
The submenu appears.
In the submenu press the [3] Timer Action ON/OFF Setting key.
The screen for scheduling the weekly timer calendar days appears.
3 Use the arrow keys on the touch screen to select the desired month.
The weekdays of the selected month are displayed.
4 Select the desired weekday on which the system is to be switched on/off.
Black background: System switched on
White background: System switched off
5 Confirm your selection by pressing [OK].
The submenu appears again.
6 Press the [RETURN] key.
The key operator mode menu is displayed again.
Block timer setting
Specify the days on which the system will be switched on or off.
1 Call up weekly timer mode.
The submenu appears.
2 In the submenu press the [3] Timer Action ON/OFF Setting key.
The screen for scheduling the weekly timer calendar days appears.
3 Use the arrow keys on the touch screen to select the desired month. The weekdays of the selected month are displayed.
4 On the right side of the touch screen, set the weekdays on which the system should switch on or off.
Example:
Select Thu. OFF. This disables the weekly timer function on every Thursday of the selected month.
5 Confirm the prompt with [YES] and make any other required settings.
6 Confirm your input by pressing [OK].
The submenu appears again.
7 Press the [RETURN] key.
The key operator mode menu is displayed again.
(4) Lunch Hour Off Setting
Set a lunch hour off period during which the system will be switched off.
1 Call up weekly timer mode.
A submenu appears.
2 In the submenu press the [4] Lunch Hour Setting key.
The screen for scheduling lunch hour pauses appears.
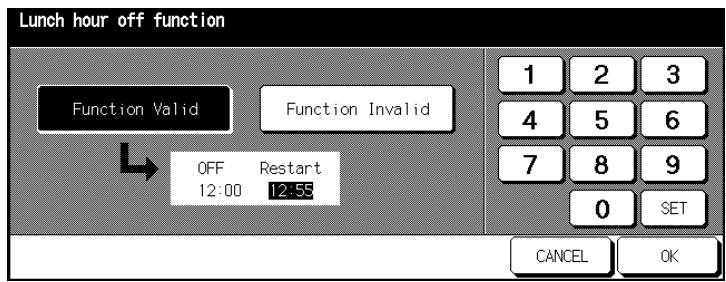
3 Press the [FUNCTION VALID] key to enable the pause function. Specify the starting time for the pause function. Press the [SET] key and then specify the end time for the pause function.
or
Press the [FUNCTION INVALID] key to disable the pause function.
4 Confirm your input by pressing [OK].
The submenu appears again.
5 Press the [RETURN] key.
The key operator mode menu is displayed again.
(5) Timer Interrupt Password Setting
Set the timer interrupt password.
The user must input the timer interrupt password to be able to use the system during the weekly timer period.
1 Call up weekly timer mode.
A submenu appears.
In the submenu press the [5] Timer Interrupt Password setting key.
The dialog for assigning a timer interrupt password is displayed.
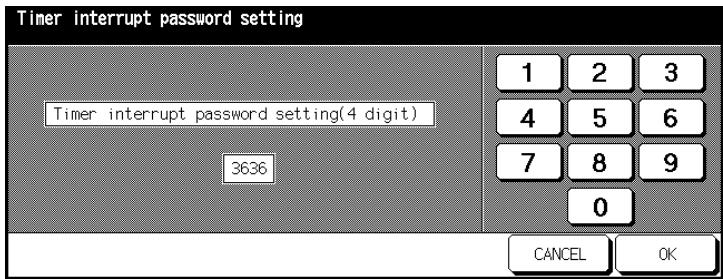
3 Use the numeric keypad on the touch screen to enter the 4-digit password.
4 Confirm your input by pressing [OK].
The submenu appears again.
5 Press the [RETURN] key.
The key operator mode menu is displayed again.
…
Code 0000!
If you input 0000 as the password, the weekly timer can be interrupted by switching the system off and on again. In this case, you will be prompted to input the duration of the interruption after switching on.
7.11 (10) Control Panel Adjustment
Recalibrate the touch screen.
1 Call up key operator mode.
The key operator mode menu is displayed.
2 In the key operator mode menu press the [10] Control Panel Adjustment key.
The screen for calibrating the monitor appears.
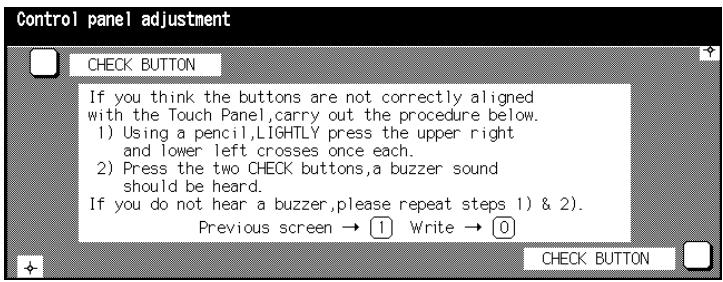
3 Take a pencil. Lightly touch the tip of the pencil to the + symbol displayed in the upper right corner of the touch screen. Then do the same with the + symbol in the lower left corner.
4 Check that the X and Y coordinates of the touch screen displayed in the upper message line are within the range of the standard values, which are displayed in the lower message line.
5 Press the white box labeled "Check Button" first in the upper left corner and then the one in the lower right corner of the touch screen. Each time you should hear a key click sound.
6 Only if necessary
If the X and Y coordinates do not lie within the range of the standard values or you do not hear any key sounds when you press the control panel boxes, repeat steps 3 to 5.
7 Press the [1] key on the control panel to cancel the procedure.
or
Press [0] on the control panel to return to the operator mode menu without saving the new data.
The key operator mode menu is displayed again.
7.12 (11) Set auto tray selection
Set the paper trays and the paper tray sequence for automatic tray switching (ATS) and automatic paper selection (APS).
1 Call up key operator mode.
The key operator mode menu is displayed.
Press the down arrow key on the lower edge of the touch screen.
The second page of the key operator mode menu is displayed.
3 In the key operator mode menu press the [11] Tray Size Setting key.
The screen for setting the paper tray priorities appears.
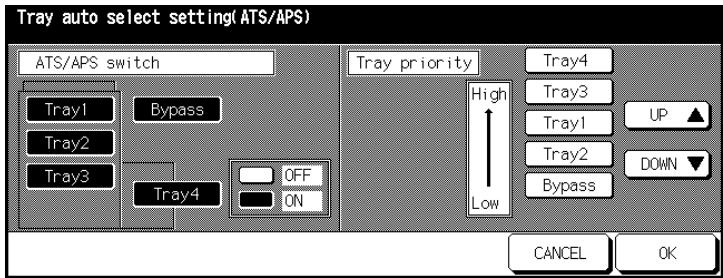
4 Select a tray from the left side of the touch screen. Then use the [OFF] or [ON] button to specify whether the tray should be used when the ATS/APS function is enabled.
Trays that are specified for use with the ATS/APS function are displayed on the right side of the touch screen.
Use the [UP] and [DOWN] arrow keys on the touch screen to sort the trays according to the desired access priority.
6 Confirm your input by pressing [OK].
The key operator mode menu is displayed again.
7.13 (12) Energy Saver Setting
Set the amount of time that should elapse after the last button has been pressed before one of the energy saving modes is triggered.
1 Call up key operator mode.
The key operator mode menu is displayed.
2 Press the down arrow key on the lower edge of the touch screen.
The second page of the key operator mode menu is displayed.
3 In the key operator mode menu press the [12] Energy Saving Setting key.
The screen for setting the energy saver functions appears.
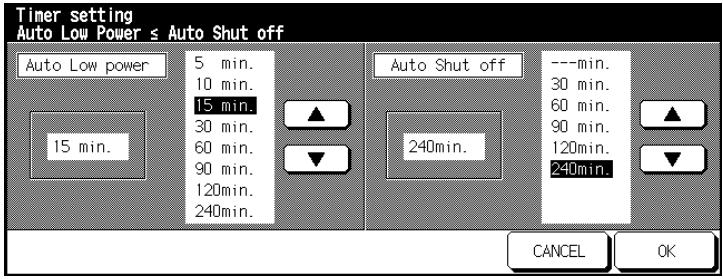
4 On the left side of the touch screen select the idle time for auto low power mode.
5 On the right side of the touch screen select the idle time for auto shut off mode.
6 Confirm your input by pressing [OK].
The key operator mode menu is displayed again.

Set reasonable periods!
The period for the energy saving function must not exceed the period for automatic shut off. If the same period is set for the two functions, the automatic shut off will be enabled instead of the energy saving function.
7.14 (13) Memory Switch Setting
Configure various settings to optimize your system.
Changing Settings
1 Call up key operator mode.
The key operator mode menu is displayed.
2 Press the down arrow key on the lower edge of the touch screen.
The second page of the key operator mode menu is displayed.
3 In the key operator mode menu press the [13] Memory Switch Setting key.
The screen for configuring the settings appears.
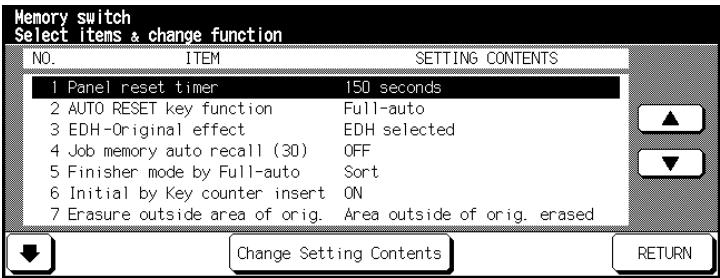
4 Use the arrow keys on the lower edge of the touch screen to select the screen page that contains the setting you want to modify.
Use the arrow keys on the right side of the touch screen to select the setting you want to modify.
6 Press the [CHANGE SETTING CONTENTS] key as many times as necessary until you find the desired value.
7 Confirm your input by pressing [RETURN]. The key operator mode menu is displayed again.
Overview of Settings
| Setting | Function | |
| 1 | Panel reset timer | Time after which the system resets to its initial mode. OFF*/30/60/90/120/150/180/210/240/270/300 seconds |
| 2 | Panel reset key function | Pressing the Panel Reset key switches the system to the selected function. Full-auto*/Initial setting |
| 3 | EDH original effect | Loading originals into the EDH causes function: EDH selected*/EDH+Panel Reset key sele-lected |
| 4 | Auto Program memory recall (30) | Pressing the Panel Reset key activates the copy job stored in program memory position 30. OFF*/ON |
| 5 | Finisher mode by Full-auto | Pressing the Panel Reset key enables finisher mode: Face down (sub tray) / Non Sort/Sort/Staple + sort/Stapling & Folding / Folding / Face up (sub tray) |
| 6 | Initial by Key counter insert | Switch system to initial mode if E.K.C. counter is inserted. OFF/ON* |
| 7 | Erasure outside area of origin | Automatically deletes a frame around an original when original is placed on the original glass. Area outside of origin. erased*/Erased only for APS/AMS / Erased for Original Glass (1:1) |
| 8 | EDH frame erasure selection | Automatically deletes a frame around an original when original is loaded into the EDH. OFF/1mm/2mm/3mm*/4mm/5mm frame |
- Initial setting
| Setting | Function | |
| 9 | Automatic tray switching | Automatically switches to another paper tray with the same paper size when paper runs out. OFF*/ON* |
| 10 | Platen APS | Automatically enables the APS feature when an original is placed on the original glass. OFF/ON* |
| 11 | EDH APS | Automatically enables the APS feature when an original is loaded into the EDH: OFF/ON* |
| 12 | Platen AMS | Automatically enables the APS feature when an original is placed on the original glass: OFF/ON* |
| 13 | EDH AMS | Automatically enables the APS feature when an original is loaded into the EDH: OFF/ON* |
| 14 | Select tray when APS cancel | The following paper tray is used if the APS function is disabled: APS preferential tray*/Tray 1/Tray 2/Tray 3/Bypass |
| 15 | Platen original size detect | Original sizes that are detected when placed on the original glass: AB series*/Only A series/Full-image Area/Inch series |
| 16 | EDH size detect | Original sizes that are detected when loaded into the EDH. AB series*/Only A series/Full-image Area/Inch series |
| 17 | Platen original size detect. SMALL | Smallest original placed on the original glass that can be detected automatically. A5R*/B6R/5.5"×8.5"R/B5/A4/8.5"×11" |
| 18 | Rotation | When rotation is on, this function is enabled: ON- Always /ON- APS /AMS only /ON- APS /AMS / Reduce only* |
- Initial setting
| Setting | Function | |
| 19 | Staple mode reset-function | The “Staple” function is reset when the copy job completes: OFF* / ON |
| 20 | JOB offset operating | More than one reserved copy jobs are output with offset. OFF* / ON |
| 21 | Continuation print | More than one reserved copy jobs are output automatically in sequence. OFF* / ON |
| 22 | SDF Auto start | An original loaded in SDF mode is to be fed in automatically: OFF* / ON only for document memory |
| 23 | Key click sound | Acoustic signal when a key on the touch screen is pressed. OFF / ON* |
| 24 | Indication time | Time after which a new screen is displayed: 3 seconds* / 5 seconds |
| 25 | Energy saver screen | The energy saving function will be enabled when the [ENERGY Saver] key on the control panel is pressed: Auto shut off mode* / Energy save mode |
| 26 | Start key latch function | Auto copy start after warm-up time. OFF / ON* |
| 27 | Stop key function | When the [STOP] key on the control panel is pressed, the copy job is either canceled or only interrupted. JOB momentary stop* / JOB cancel |
| 28 | Auto select of Booklet copy | Enabling the “Folding” or “Stapling & Folding” function enables the booklet function: Automatic selection* / Non Automatic selec-tion |
| 29 | E.K.C. password | Length of the E.K.C. password 8 digits* / under 8 digits |
| * Initial setting | ||
| 30 | Arrow key change image Shift | Interval for image shift Decimal point OFF 1 step-1mm* / Decimal point ON 1 step-0.1 mm |
| 31 | Exit direction of 1stsheet | Single copies are output with: Face down* / Face up |
| 32 | An interruption suspended way | Pressing the [INTERRUPT] key on the control panel interrupts the current copy job. Division of a number of copies* / During of a number of copies |
| 33 | E.K.C. password input timing | The access authorization by input of the user password runs out. Panel reset timer* / complete job |
| 34 | Key click sound (No paper/JAM) | Signal tone for low paper or paper misfeed. OFF / 3 seconds* / 5 seconds / 10 seconds |
| 35 | Reserve copy function | Automatically switch to the next cleared job. Reserve copy by folder select* / Reserve copy by original set |
| 36 | Scan stop by a pull out tray | Pulling a paper tray out interrupts the scanning of the original. ON* / OFF |
| 37 | Change page no. pos. (booklet.) | Page numbers for booklets are placed automatically on the outside. OFF* / ON |
| This function is not released. | ||
| 38 | Trimming (STD/special size) | Enables trimming of folded or stapled and folded copies in special or wide sizes. STD* / special size |
| 39 | Timer prevents print | Specifies the period required after a copy job before a print job can be started. OFF / 15 seconds / 30 seconds* / 60 seconds / 90 seconds |
| 40 | Bookmark | Specifies whether a bookmark is only valid for the active copy job or remains active after that. ON (every job disabled)*/ ON (not every job enabled) / OFF |
- Initial setting
| Setting | Function | |
| 41 | Overlay delete | Sets whether data in overlay memory can be deleted or overwritten. Every job disabled* / Not every job disabled |
| 42 | Orig. direction/binding mode | Sets whether settings of special original settings or user-defined settings should be reset on completion of a copy job. OFF* / ON |
| 43 | Continue image store (SRV) | Sets whether the server mode memory function should remain enabled after a memory cycle. OFF* / ON |
| 44 | Continue image recall (SRV) | Sets whether the server mode recall function should remain enabled after a recall cycle. Face down* / Face up |
| 45 | Document direction | Sets whether non-sorted or sorted 1-sided copies should be output to the main tray. Face down* / Face up |
| * Initial setting | ||
7.15 (14) Machine Management List Print
Print various overviews in the form of lists.
1 Call up key operator mode.
The key operator mode menu is displayed.
2 Press the down arrow key on the lower edge of the touch screen.
The second page of the key operator mode menu is displayed.
3 In the key operator mode menu press the [14] Management List Print key.
A submenu appears.
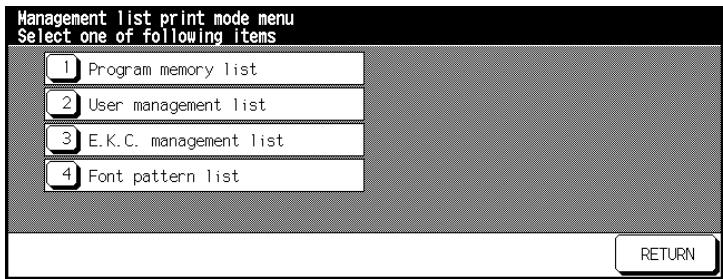
4 Press the [1] Program Memory List key.
List of job memory slots for system settings.
or
Press the [2] User Management List key.
List of basic options in key operator mode.
or
Press the [3] E.K.C. Management List key. E.K.C. counter list with current copier states and copy limits.
or
Press the [4] Font Pattern List key.
Prints a list of system character sets.
The basic options are displayed again.
5 Press the [START] key on the control panel to start the list printout.
6 Press the [UTILITY] and [C] key on the control panel in succession to return to the submenu.
7 Press the [RETURN] key.
The key operator mode menu is displayed again.
7.16 (15) Call Remote Center
By activating the remote diagnostics function, you can have your system monitored automatically by a service technician. If an error occurs, simply select the remote center option. A service technician will then contact you to discuss further steps for resolving the problem.
1 Call up key operator mode.
The key operator mode menu is displayed.
2 Press the down arrow key on the lower edge of the touch screen.
The second page of the key operator mode menu is displayed.
3 In the key operator mode menu press the [15] Call Remote Service-Centre key.
A submenu appears.
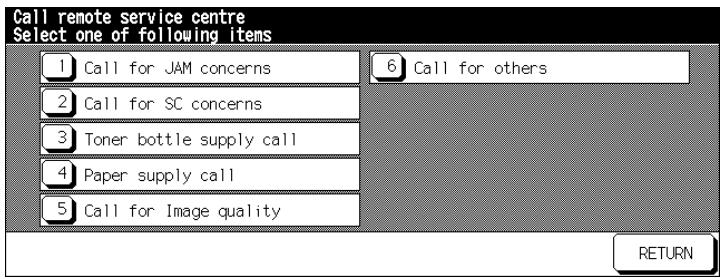
4 From the submenu, select the message that you want to send to the service center.
The screen for sending the message is displayed.
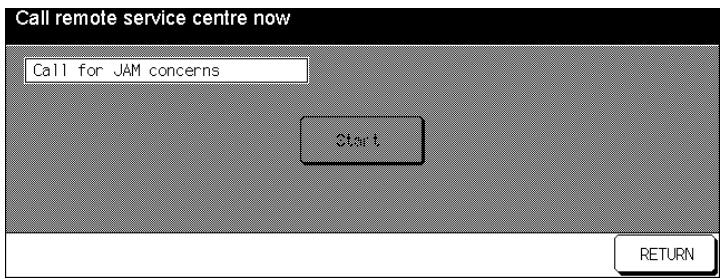
5 Press the [START] key.
The message is sent to the remote center. The service technician will contact you.
![KONICA MINOLTA DI850 - Press the [START] key. - 1](/content/2024/12/139451/images/b9853f4fd4027efbfd0d168aa876b0c8cd8829f5dbc9bc43bddbcb9021c44652.jpg)
6 Press the [RETURN] key. The submenu appears again.
7 Press the [RETURN] key. The key operator mode menu is displayed again.
7.17 (16) Side 2 Lens Adjustment
Adjust the lens settings for the second side to compensate for paper turning due to the heat in the system. This ensures that the back sides of 2-sided copies are positioned accurately.
1 Call up key operator mode.
The key operator mode menu is displayed.
Press the down arrow key on the lower edge of the touch screen.
The second page of the key operator mode menu is displayed.
3 In the key operator mode menu press the [16] Side 2 Lens Adjustment key.
The screen for adjusting the lens for the second side appears.
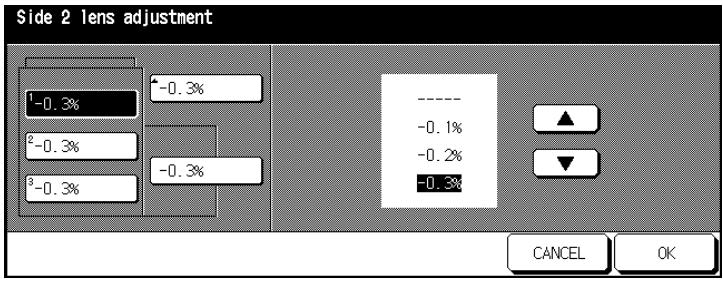
4 Select the paper tray that you want to adjust the lens for.
5 Select the desired value using the arrow keys.
6 Repeat steps 4 and 5 for any other trays.
7 Confirm your settings by pressing [OK].
8 Press the [RETURN] key. The key operator mode menu is displayed again.
7.18 (17) Finisher Adjustment
Set the fine adjustments of position such as the center fold for the center stapling. This enables you to compensate for minor imprecisions and to set the finisher optimally for your requirements.
1 Call up key operator mode.
The key operator mode menu is displayed.
2 Press the down arrow key on the lower edge of the touch screen.
The second page of the key operator mode menu is displayed.
3 In the key operator mode menu press the [17] Finisher Adjustment key.
A submenu appears.
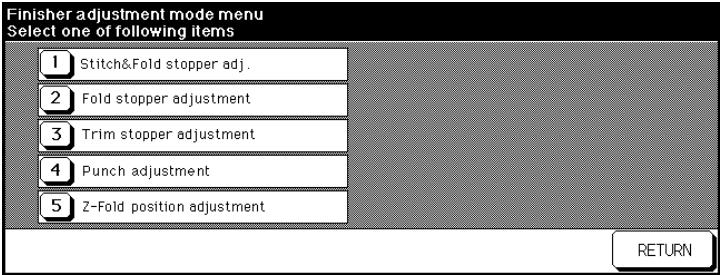
4 Select the item you want to modify from the submenu.
The screen for entering the new values appears.
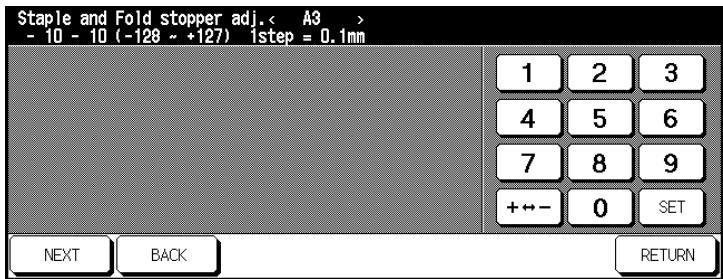
5 only if necessary
Use [NEXT] and [BACK] to select the paper size for which you want to make settings.
6 Confirm your settings by pressing [SET].
7 Press the [RETURN] key.
The key operator mode menu is displayed again.
7.19 (18) HDD Management Setting
Reorganize the print data on the hard drive.
(1) Password List/Delete
View the image store passwords and delete a password together with all of its copy jobs.
1 Call up key operator mode.
The key operator mode menu is displayed.
2 Press the down arrow key on the lower edge of the touch screen.
The second page of the key operator mode menu is displayed.
3 In the key operator mode menu press the [18] HDD management setting key.
A submenu appears.
4 In the submenu press the [1] Password list/delete key.
The image store password list is displayed.

5 Select the image store password that you want to delete and then press the [DELETE] key.
A confirmation dialog appears.
6 Confirm the deletion with [YES].
7 Press the [RETURN] key.
The submenu appears again.
8 Press the [RETURN] key.
The key operator mode menu is displayed again.
(2) JOB Auto Delete Period Setting
Specify a length of time before a password and all associated copy jobs are automatically deleted.
1 Call up key operator mode.
The key operator mode menu is displayed.
2 Press the down arrow key on the lower edge of the touch screen.
The second page of the key operator mode menu is displayed.
3 In the key operator mode menu press the [18] HDD management Setting key.
A submenu appears.
4 Press the [2] JOB Auto Delete Period Setting key in the submenu.
The screen for setting up the automatic delete function appears.

5 Press [AUTO DELETE ON] to enable the function. or
Press [AUTO DELETE OFF] to disable the function.
6 Use the touch screen keypad to specify how many weeks (up to 52) should pass before a password and all of its associated copy jobs are deleted.
7 Confirm your settings by pressing [OK].
The submenu appears again.
8 Press the [RETURN] key.
The key operator mode menu is displayed again.
(3) State of HDD Capacity
Check the actual capacity of the hard drive.
1 Call up key operator mode.
The key operator mode menu is displayed.
2 Press the down arrow key on the lower edge of the touch screen.
The second page of the key operator mode menu is displayed.
3 In the key operator mode menu press the [18] HDD Management Setting key.
A submenu appears.
4 In the submenu press the [3] Hard Disk Capacity key.
The current hard disk capacity is displayed.

5 Press the [RETURN] key.
The submenu appears again.
6 Press the [RETURN] key.
The key operator mode menu is displayed again.
7.20 (19) Scan Transmission Object Change/Del.
(possible if Pi8500 Printcontroller is installed - optional)
You can find further information on this subject in the Pi8500
Printcontroller manual.
7.21 (20) Non-Image Area Erase Setting
Set the type of non-image area erase.
1 Call up key operator mode.
The key operator mode menu is displayed.
2 Press the down arrow key on the lower edge of the touch screen.
The second page of the key operator mode menu is displayed.
3 In the key operator mode menu press the [19] Non-Image Area Erase Setting key.
The image store password list is displayed.
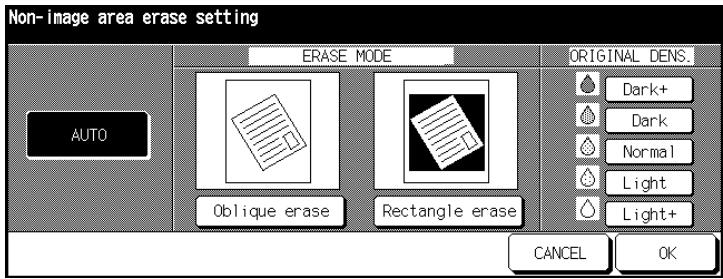
4 Select the method of frame erase.
Press the [AUTO] key. The method of frame erase and the original thickness are selected based on the detection of the original.
5 Confirm your selection by pressing [OK].
6 Press the [RETURN] key.
The key operator mode menu is displayed again.
8 Troubleshooting
8.1 If Your Copy Is Incorrect
| Symptom | Possible Cause | Action |
| The copy is too light. | The exposure is set too light. | Change the basic options for exposure. See page 4-49. |
| Manually brighten or darken the exposure for the copy. See page 4-46. | ||
| The exposure was manually set to too light a value. | Manually brighten or darken the exposure for the copy. See page 4-46. | |
| The selected copy mode does not match the original. | Change the copy mode, see page 4-40. | |
| The paper is damp. | Replace the paper. | |
| The toner has run out. | If the message Add toner appears, add toner. See page 2-43. | |
| The paper is not loaded correctly. | Load the paper correctly. See page 2-34. | |
| The copy is too dark. | The set exposure level is too dark. | Change the basic options for exposure. See page 4-49. |
| Manually brighten the exposure of the copy. See page 4-46. | ||
| The selected copy mode does not match the original. | Change the copy mode, see page 4-40. | |
| The original glass is dirty. | Clean the original glass. See page 9-2. | |
| The original is not flat against the original glass. | Place the original correctly on the original glass. See page 3-8. | |
| The copy is blurred. | The paper is damp. | Replace the paper. |
| The original glass is dirty. | Clean the original glass. See page 3-8. | |
| The original cover is dirty. | Clean the original cover. See page 3-8. | |
| The copy has spots. | The original is very thin or transparent. | Place a sheet of white paper on top of the original. |
| The original is printed on two sides. | Manually brighten the exposure of the copy. See page 4-46. | |
| The exposure level has been set too dark. | Manually brighten the exposure of the copy. See page 4-46. | |
| The copy has a dark edge. | The original cover is dirty. | Clean the original cover. See page 3-8. |
| The original is incorrectly positioned. | Place the original correctly on the original glass. See page 3-8. | |
| The paper size is larger than the original size. | Use paper of the same size as the original. | |
| The lens mode selected does not match the selected paper size. | Select a suitable lens mode. See page 4-51. | |
| The copy is not straight. | The original is incorrectly positioned. | Place the original correctly on the original glass. See page 3-8. |
| Position the original correctly in the original feed. See page 3-10. | ||
| The original is not suitable for the EDH. | Place the original on the original glass. See page 3-8. |
8.2 Your System Is Not Working Correctly
| Symptom | Possible Cause | Action |
| Nothing is shown in the display. | The energy saving function is enabled. | Press any key to close the energy saving function. |
| The system is switched off. | Switch the system on. | |
| The power switch is at position 0 (OFF). | Ensure that the power switch is set to position 1 (ON). | |
| The power plug is not in the outlet. | Plug the power plug into the outlet. | |
| A cycle does not start when the [START] key on the control panel is pressed. | Not all doors are closed on the system or finisher. | Close all doors on the system or finisher. |
| No matching paper size is loaded. | Load a matching paper size. | |
| The copy counter is at "0". | Set the number of copies. | |
| The E.K.C. password was not input. | Input your E.K.C. password. | |
| The copy limit has been exceeded. | Talk to the system administrator. | |
| The basic options are not displayed. | Call up the basic options. | |
| The energy saving key is pressed. | Exit energy saving mode. | |
| A malfunction has occurred in the system. | Note any message shown on the display. | |
| The tray cover on the trimming unit is open. | Note any message shown on the display. Close the cover. | |
| The system will not switch on. | The power plug is not in the outlet. | Plug the power plug into the outlet. |
| The power switch is at position 0 (OFF). | Ensure that the power switch is set to position 1 (ON). | |
| The building circuit breaker is activated. | Switch on the circuit breaker. | |
| The internal power switch is in the OFF position. | Switch the power switch to the ON position, see page page 2-26. | |
| Copying cannot be continued after a paper jam. | There is another paper jam. | Clear all paper jams that you can find. |
| The basics menu display is different from that shown in the manual. | The system administrator has changed settings. | Talk to the system administrator. |
| The system regularly reports a paper jam. | Labels or OHP transparencies were printed previously. | Check whether there are labels stuck to the reported paper jam position. Use the bypass tray only to process special paper. |
| The paper has not been loaded correctly. | Load the paper correctly. See page 2-34. | |
| The copies are output reduced or enlarged although the magnification ration is set to 1:1. | The AMS feature is enabled. | Press [APS] or [1,000] for copies of the same size. |
| The cycle was interrupted. | There is a paper jam. | Clear the paper jam. |
| The copy limit has been reached. | Talk to the system administrator. | |
| The system copies immediately after the warm-up phase. | You pressed the [START] key on the control panel during the warm-up phase. | Do not make system settings until the display shows copier ready. |
| The EDH will not feed originals. | The paper size or the paper thickness is not correct. | Place the original on the original glass. |
| The EDH is overloaded. | Load the up to 100 originals. | |
| The finisher is not working. | There is a paper jam. | Clear the paper jam. |
| The finisher door is open. | Close the finisher door. | |
| No finisher function is enabled in the output menu. | Check the settings in the output menu. | |
| The finisher is stapling at the wrong position. | Automatic rotation is enabled. | Change the position of the original to prevent rotation. |
| The hole punch unit is not working. | The waste container is full. | Empty the hole punch unit waste container. |
| The trimming unit is not working. | The waste container of the trimming unit is full. | Note any message shown on the display. Empty the waste container. See page 8-13. |
If there are any other technical problems:
- switch the system off,
- remove the power plug from the outlet and
- contact the technical representative
8.3 If the PM Call Message Is Displayed...
If the PM call message is displayed, a system malfunction has occurred. Please contact your technical representative.
If the System No Longer Operates...
If the PM call message and a malfunction code are displayed, the system will not function.
Please call service Report code 00-00

TEL
0123-456-7890

987-654-3210
1 Make a note of the malfunction code shown in the message line in the upper left area of the touch screen.
2 Switch OFF the system with the power switch.
3 Remove the power plug from the outlet.
4 Call your technical representative and report the malfunction code.
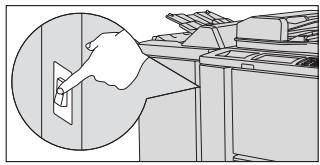
If the System Still Operates Partially...
If the PM call message and a malfunction code are displayed, the system can still function partially. Limited system function is still available.
In any case, call your technical representative and report the malfunction.
1 Make a note of the malfunction message.
Example:
Error tray 1 Reset
Paper tray 1 is no longer available for continuing operation of the system.
2 Press the [PANEL RESET] key on the control panel.
3 Make a note of the message shown in the message line.
Please switch OFF/ON E-18-2
4 Switch off the system with the power switch and then on again.
5 Call your technical representative and report the malfunction message.
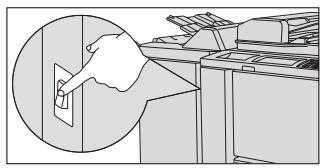
8.4 If the Memory "Overflows"
The system requires memory space during some cycles. If there is not enough memory available, the system reports a "memory overflow".
If the memory repeatedly overflows in your system, you can upgrade your system memory. In this case, please contact your technical representative.
If a memory overflow occurs, a dialog box appears on the touch screen. Decide on the subsequent procedure during processing of the job.
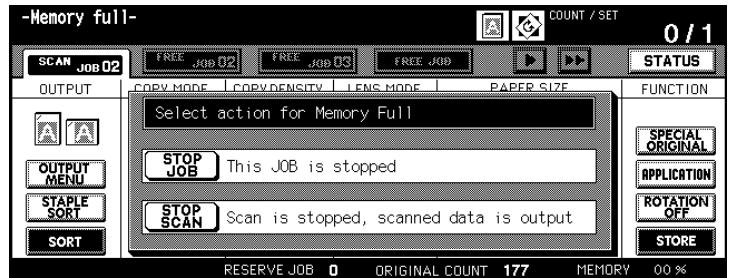
... while the current job is under way
Press [STOP JOB] to delete all scanned data and to interrupt the job. or
Press [STOP SCAN] to interrupt the scan cycle. All previously scanned data will be processed and output.
... during setup of a reserve job
Press [STOP JOB] to delete the scanned data of the last setup reserve job.
or
Press [STOP SCAN] to interrupt the scan cycle for the reserve job. All previously scanned data will be processed and output.
or
Press [CONTINUE] to continue the scan cycle for the reserve job when memory space is released.

No [STOP SCAN] for booklets!
The [STOP SCAN] key cannot be enabled if jobs using the "Booklet" feature are interrupted due to a memory overflow.
8.5 If the "Please Switch OFF/ON" Screen Appears
If the system data flow is interrupted, the "Please switch OFF/ON" screen is displayed.
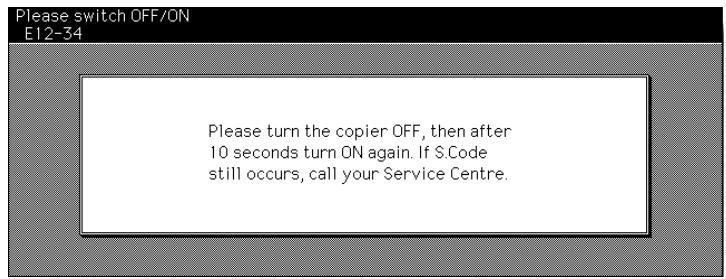
Switch off the system with the on/off switch.
2 Wait approximately 10 seconds.
3 Switch on the system with the on/off switch.
If the display appears again, please contact your technical representative.

8.6 Clearing a Paper Jam

WARNING
Danger of burns from the fixing unit!
The fixing unit reaches temperatures of up to 120^ .
Follow the instructions on the touch screen exactly.
Do not touch any system parts unless they are specifically mentioned in the instructions provided on the touch screen.

DANGER
Danger of electric shock inside the system!
The inside of the system contains high-voltage components.
Follow the instructions on the touch screen exactly.
Do not touch any system parts unless they are specifically mentioned in the instructions provided on the touch screen.
If there is a paper jam in the system, the cycle is interrupted. The touch screen shows the position of the jam.
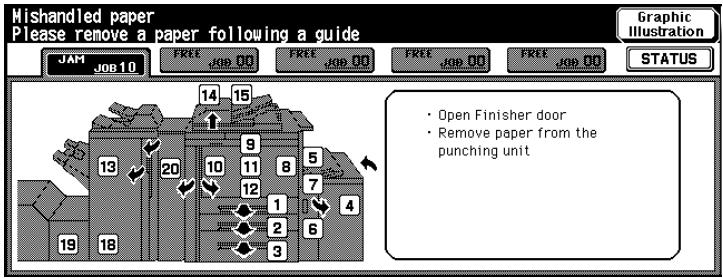
Follow the instructions on the touch screen to clear the paper jam. or Press [GRAPHIC ILLUSTRATION] to remove the paper with the help of a step-by-step diagram.
8.7 Emptying the Hole Punch Unit Waste Container
The hole punch unit waste container collects the waste paper generated when copies are punched.
When the waste container is full, a message to that effect appears on the touch screen.
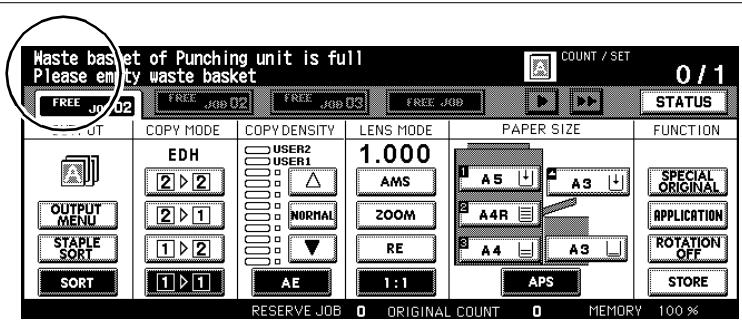
Empty the hole punch unit waste container.
1 Open the finisher door.
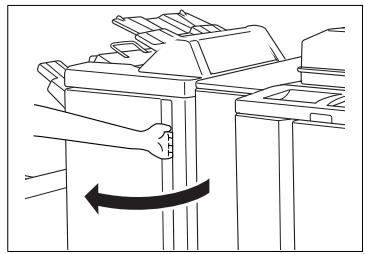
2 Pull the waste container out carefully.
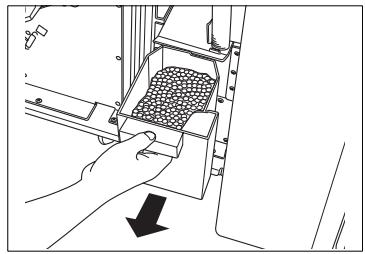
3 Empty the waste container.
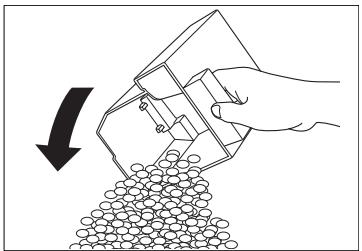
4 Replace the waste container carefully.
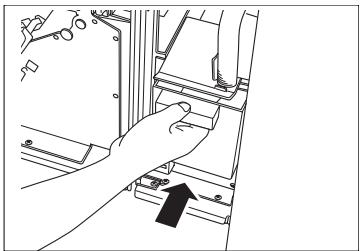
5 Close the finisher door.
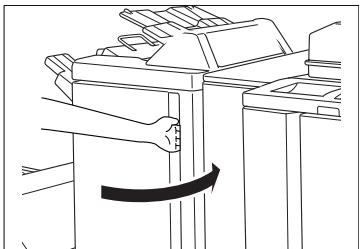
8.8 Emptying the Trimming Unit Waste Container
The trimming unit waste container collects the waste paper generated when folded/stapled copies are trimmed.
When the waste container is full, a message to that effect appears on the touch screen. In this case, empty the waste container.
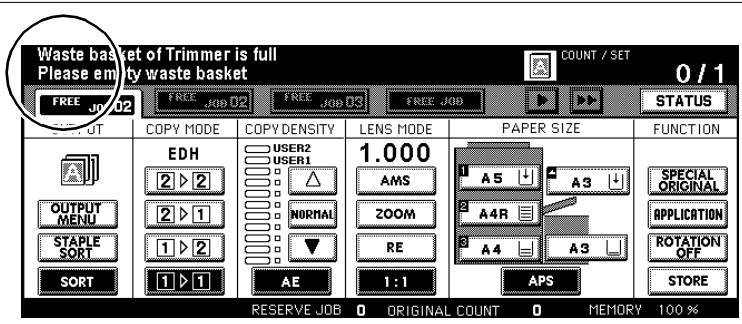
1 Open the front door on the trimming unit.
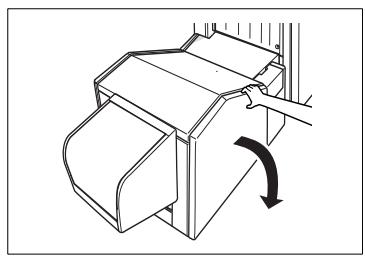
2 Pull the waste container out of the trimming unit.
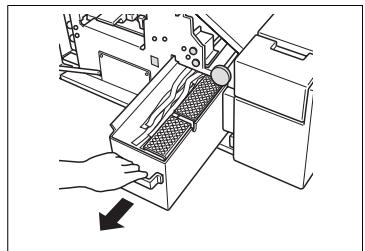
3 Empty the waste container.
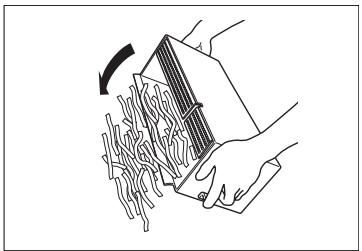
4 Put the waste container back into the trimming unit.
5 Close the front door on the trimming unit.
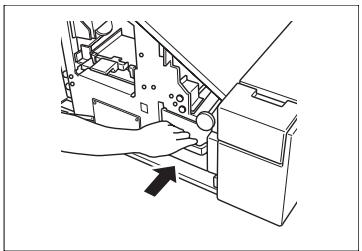
9 Appendix
9.1 System Maintenance
Cleaning System Parts
Wipe clean with a soft cloth moistened with a mild home detergent.
system housing
- original cover
Wipe with a soft, dry cloth:
- Touch screen
- original glass

CAUTION
System may be damaged by improper cleaning
Wipe the surface of the control panel clean using a soft, dry cloth only.
Cleaning the Original Cover and Original Glass

CAUTION
Incorrect handling can cause damage to the system!
The system surfaces may be damaged by solvents.
Do not use cleaning agents containing solvents to clean the system.
Clean the original cover and the original glass so that dirt particles do not mar the quality of your copies.
1 Open the EDH.
2 Wipe the original cover clean with a soft cloth moistened with a mild home detergent.
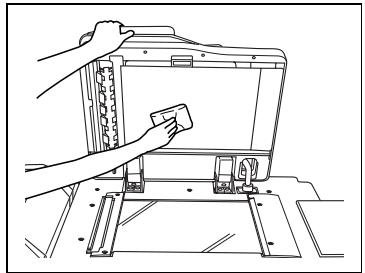
3 Wipe the original glass clean with a soft cloth moistened with a mild home detergent.
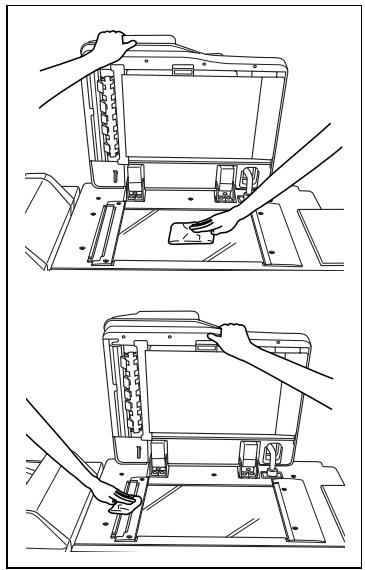
9.2 Specifications
System Di850
| Specifications | |
| Type | Stationary floor unit |
| Copying system | Indirect electrostatic process |
| Platen | Stationary |
| Photoconductor | OPC |
| Light source | Xenon lamp |
| Development process | Dry, 2-component process with magnetic wave |
| Fixing method | Lamp-Heated Roller |
| Density settings | Automatic and manual (9 increments) |
| Zoom ratios | 1:1±1.0% preset zoom ratios for enlargement: 1:1.154 (115,4%), 1:1.224 (122,4%), 1:1.414 (141,4%), 1:2.000 (200%) preset zoom ratios for enlargement: 1:0.866 (86,6%), 1:0.816 (81,6%), 1:0.707 (70,7%), 1:0.500 (50%) user-defined zoom ratios: from 1:0.250 (25%) to 1:4.000 (400%) in 0.1% increments 3 user-defined zoom ratios |
| Paper | Plain paper 50 to 200 g/m2(recommended 200 g/m2 Paper: ColorCopy by Neusiedler Special paper: OHP transparencies, labels, tab paper, paper with 3 holes See paper cassette specifications on page 9-10. |
| Copy speed | up to 85 copies per minute (A4), up to 66 copies per minute (A4R), up to 50 copies per minute (A3), up to 85 copies per minute (B5), up to 74 copies per minute (B5R), up to 56 copies per minute (B4) |
| Multiple copies | 1 to 9,999 copies |
| Types of original | Sheet originals, books |
| Original Size | max. A3 |
| System tray capacity | up to 100 sheets (80 g/m2) |
| Paper sizes | A3 to A6R (image loss range: on the feed edge and the opposite edge 2 mm ± 2 mm, up and down 1.5 mm ± 1.5 mm) Maximum wide size paper: 314×459 mm |
| Paper feeding system | • Paper Drawnler 1 2 - (variable) up to 500 sheets (80 g/m²) • Paper Drawner 3 - (variable) Up to 1,000 sheets (80 g/m²) • Paper cassette 4 LCC (programmed): max. 4.000 sheets (80 g/m²) - C-403 (optional) • Paper cassette 4 LCC (programmed): max. 4.000 sheets (80 g/m²) - C-404 (optional) • Bypass Tray up to 150 sheets (80 g/m²) |
| Warm-up time | ca. 6 Minutes |
| 1. Copy | ca. 3.3 seconds (A4) |
| Power requirements | 230 V/50 Hz |
| Power consumption | max. 3.45 kW (with options) |
| Noise emission | max. 78 dB (with options) |
| Weight | approx. 280 kg (main unit + EDH) |
| Dimensions | Base system + EDH: • Width: 887 mm • Depth: 775 mm • Height: 1160 mm Base system + EDH + FN-115 + C-403N: • Width: 1816 mm • Depth: 775 mm • Height: 1160 mm Base system + EDH + FN-7 + TMG-2 + C-404N: • Width: 3177 mm • Depth: 775 mm • Height: 1160 mm Base system + EDH + FN-7 + PK-3/ZK-2 + TMG-2 + C-404N: • Width: 3351 mm • Depth: 775 mm • Height: 1160 mm |
| Dimensions (with bypass tray open) | Base system + EDH: • Width: 1311 mm • Depth: 865 mm Base system + EDH + FN-7 + C-403N: • Width: 2177 mm • Depth: 865 mm |
Document Feeder EDH-5
| Specifications | |
| Type of original | Plain paper (50 to 200 g/m2) |
| Original sizes | A3, B4, F4, A4, A4R, B5, B5R, A5, A5R, 11"×17", 8.5"×11" |
| Capacity | up to 100 sheets (80 g/m2) |
| Original direction | Automatic feeder |
| Dimensions | • Width: 650 mm • Depth: 570 mm • Height: 170 mm |
| Weight | approx. 21,5 kg |
| Power requirements | Supplied from System |
Finisher FN-115 (optional), Finisher FN-7 (optional)
| Specifications | |
| Sorting system | Sort by Offset (30 2 mm) |
| Paper sizes | A3, B4, F4, A4R, A4, B5R, B5, A5, B6, 11"×17", 8.5"×14", 8.5×11", 8.5"×11"R, 5.5"×8.5" |
| Staple capacity | FN-115: max. 100 sheets (80 g/m²) or paper stack max. 10 mm FN-7: max. 50 sheets (80 g/m²) or paper stack max. 5 mm |
| Staple capacity | 5,000 Staples |
| Dimensions | ·Width: 544 mm ·Depth: 656 mm ·Height: 1095 mm |
| Weight | FN-115: approx. 65 kg, FN-7: approx. 80 kg |
| Power requirements | Supplied from System |
Trimming Unit C (optional for Finisher FN-115/FN-7)
| Specifications | |
| Types of paper | • Plain paper: 60 to 90 g/m2 • Special paper: OHP transparencies, Thin/Thick paper (50 to 59 g/m2, 91 to 200 g/m2) |
| Paper sizes | A3, B4, F4, A4, A4R, B5, A5 |
| Capacity | max. 200 sheets or paper stack max. 40 mm (200 g/m2paper) or less |
| Dimensions | • Width: 330 mm • Depth: 456 mm • Height: 120 mm |
| Weight | approx. 5 kg |
| Power requirements | Supplied from Finisher |
TMG-2 Trimming Unit (optional for FN-7 Finisher)
| Specifications | |
| Copy paper | 60~90 g/m2paper (80 g/m2recommended) Single cover sheet paper (91 to 200 g/m2) |
| Standard sizes | A3, B4, A4R, 8.5"x11"R |
| Trim capacity | • max. 3 sheets in fold mode • max. 16 sheets (80g/m2) in staple/fold mode • max. 15 sheets in staple/fold mode when using a cover sheet |
| Trim width | max. 10 mm |
| Tray capacity | max. 512 sheets • max. 100 booklets, each with 2 to 5 folded sheets • max. 50 booklets, each with 6 to 10 folded sheets • max. 32 booklets, each with 11 to 16 folded sheets |
| Dimensions | • Width: 1117 mm • Depth: 604 mm • Height: 562 mm |
| Weight | approx. 68 kg |
| Power requirements | via power socket |
PK-3 Hole Punch Unit (optional)
| Specifications | |
| Number of holes: | 4 holes (adjustable to 2 holes) |
| Hole diameter: | 6.5 mm ± 0.5 mm |
| Distance between holes: | 80 mm ± 0.5 mm |
| Paper sizes | A3, B4, A4, B5 |
| Types of paper | Plain paper: 50 to 170 g/m2 |
| Dimensions | • Width: 169 mm • Depth: 660 mm • Height: 930 mm |
| Weight | approx. 30 kg |
| Power requirements | via power socket |
ZK-2 Punch/Z-fold Unit (optional)
| Specifications | |
| Number of holes: | 4 holes (adjustable to 2 holes) |
| Hole diameter: | 6.5 mm ± 0.5 mm |
| Distance between holes: | 80 mm ± 0.5 mm |
| Paper sizes | Punch mode: A3, B4, A4, B5 Z-fold mode: A3, B4 |
| Types of paper | • Punch mode: Plain paper (50 to 170 g/m²) • Z-fold mode: Plain paper (60 to 90 g/m²) |
| Fold width | max. 209 mm for A3 max. 181 mm for B4 |
| Dimensions | • Width: 169 mm • Depth: 660 mm • Height: 930 mm |
| Weight | approx. 38 kg |
| Power requirements | via power socket |
Large Capacity Cassette C-403N (optional)
| Specifications | |
| Capacity | up to 4,000 sheets (80 g/m2) |
| Paper sizes | A4, B5, 8.5"x11", wide sizes |
| Types of paper | • Plain/Recycled Paper (60 to 90 g/m2) • Thick Paper (91 to 200 g/m2) |
| Dimensions | • Width: 430 mm • Depth: 639 mm • Height: 690 mm |
| Weight | approx. 30 kg |
| Power requirements | Supplied from System |
Large Capacity Cassette C-404N (optional)
| Specifications | |
| Capacity | up to 4,000 sheets (80 g/m2) |
| Types of paper | • Plain/Recycled Paper (60 to 90 g/m2) • Thick Paper (91 to 200 g/m2) |
| Paper sizes | A3, B4, F4, A4, A4R, 11"x17", 8.5"x14", 8.5"x11", 8.5"x11"R, wide sizes (max. 314 x 459 mm |
| Dimensions | • Width: 670 mm • Depth: 639 mm • Height: 695 mm |
| Weight | approx. 42 kg |
| Power requirements | Supplied from System |
9.3 Consumables
The following table provides an itemization of the consumables. If necessary, please contact you local Minolta partner.
| Consumables | Maximum number of copies |
| Toner | 60,000 (A4 at 6% black ratio) |
| Developer | 1.000.000 |
| Photoconductor | 1.000.000 |
| Staples | 5000 staples |
9.4 You Can Process This Paper
... with Paper Trays 1, 2, and 3
| Paper Trays 1, 2 and 3 | |
| Standard sizes | A3, B4, F4, A4, A4R, B5, B5R, A5R, 11"×17", 8.5"×14", 8.5"×11" (configurable by user) |
| Standard sizes (special) | 8.5"×11"R instead of A4R or F4 5.5"×8.5" instead of A5 |
| Special sizes | min. 210 mm×140 mm max. 314 mm × 459 mm |
| Wide sizes | A3W, B4W, F4W, A4W, A4WR, B5W, A5W, 11"×17"W, 8.5"×11"W, 5.5"×8.5"W |
| Original weights | • Standard: 60~90 g/m2• Thick1: 91~170 g/m2• Thick2: 171~200 g/m2• Thick3: 171~200 g/m2 (improved transfer)• Thin: 50~59 g/m2• TAB: 91~170 g/m2 |
| Paper capacity | Paper Trays , 1 and 2 max. 500 sheets each (80 g/m2) Tray 3: up to 1,000 sheets (80 g/m2) |
| Total paper capacity | max. 2,150 sheets (80 g/m2), including max. 150 sheets (80 g/m2) from bypass tray |

Specifying special paper sizes and weights!
You can configure standard sizes (special), special sizes, wide sizes and paper weights in key operator mode. For more information, see page 7-32.

Recommended for 200g / m^2 paper
ColorCopy by Neusiedler
... with the Large Capacity Cassette LCC (optional)
| Large Capacity Cassette C-403N optional | |
| Standard sizes | A4, B5, 8.5"x11" (set by service technician) |
| Special sizes | min. 182 mm × 257 mm max. 314 mm × 223 mm |
| Wide sizes | A4W, B5W, 8.5"x11"W |
| Original weights | • Standard: 60~90 g/m² • Thick1: 91~170 g/m² • Thick2: 171~200 g/m² • Thick3: 171~200 g/m² (improved transfer) • Thin: 50~59 g/m² • TAB: 91~170 g/m² |
| Paper capacity | Up to 4,000 sheets (80 g/m²) |
| Total paper capacity | max. 6,150 sheets (80 g/m²), incl. in the three standard paper trays max. 150 sheets (80 g/m²) from the bypass tray |
| Large Capacity Cassette C-404N optional | |
| Standard sizes | A3, B4, F4, A4, A4R, 11"×17", 8.5"×14", 8.5"×11", 8.5"×11"R (set by the service technician) |
| Special sizes | min. 210 mm × 257 mm max. 314 mm × 459 mm |
| Wide sizes | A3W, B4W, F4W A4W, A4WR, 11"×17"W, 8.5"×11"W, 8.5"×11"WR, 8.5"×14"W |
| Original weights | • Standard: 60~90 g/m² • Thick1: 91~170 g/m² • Thick2: 171~200 g/m² • Thick3: 171~200 g/m² (improved transfer) • Thin: 50~59 g/m² • TAB: 91~170 g/m² |
| Paper capacity | Up to 4,000 sheets (80 g/m²) |
| Total paper capacity | max. 6,150 sheets (80 g/m²), incl. in the three standard paper trays max. 150 sheets (80g/m²) from the bypass tray |

Specifying special paper sizes and weights!
You can configure special sizes, wide sizes and paper weights in key operator mode. For more information, see page 7-32.

Recommended for 200g / m^2 paper
ColorCopy by Neusiedler
... with the Bypass Tray
Use the bypass tray to process paper sizes that can neither be processed with the standard trays nor the large capacity cassette.
| Bypass Tray | |
| Standard sizes | A3, B4, F4, A4, A4R, B5, B5R, A5, A5R, A6R, 11"×17", 8.5"×11" |
| Standard sizes (special) | 8.5"×11"R or F4 instead of A4R, 5.5"×8.5" instead of A5 or A5R |
| Special sizes | 100 mm 148 mm Min.: max. 314 mm × 459 mm |
| Wide sizes | A3W, B4W, F4W, A4W, A4WR, B5W, B5WR, A5W, A5WR, 11"×17"W, 8.5"×11"W, 8.5"×11"WR, 5.5"×8.5"W, 5.5"×8.5"WR |
| Original weights | • Standard: 60~90 g/m2• Thick: 91~200 g/m2• Thin: 50~59 g/m2• TAB: 91~170 g/m2 |
| Paper capacity | up to 150 sheets 80 g/m2max 1sheet (OHP transparency) |

Specifying paper sizes and weights...
You have to specify the size and type of paper for the bypass tray before beginning the copy cycle. For more information, see page 4-61.

Recommended for 200g / m^2 paper
ColorCopy by Neusiedler
... with the Automatic Duplex Unit
Use only paper recommended by Minolta. to pensure reliable processing and optimum copy quality.
| Automatic Duplex Unit | |
| Standard sizes | min. A5R to A3 |
| Wide sizes | A3W to A5WR |
| Original weights | 60~200 g/m² |

Wide sizes, special sizes and A5...
The automatic duplex unit can process wide sizes and special sizes. Special sizes cannot be processed. A5 paper can be processed lengthwise only.
... with the Cover Inserter C (optional)
| Cover Inserter C | |
| Paper sizes | min. A5 max. 314 mm × 459 mm |
| Weights for covers | 50~200 g/m² paper |
| Paper capacity | 200 sheets (200 g/m²) |
... with the Finishers (optional)
This information is based on paper with a weight of 80g / m^2 . If you use heavier paper, this reduces the capacity of the finisher accordingly..
| Finisher FN-115 | ||
| Main Tray | up to 500 sheets (80g/m2) | A5, A5R, B6R |
| Up to 3,000 sheets (80g/m2) | A4, A4R, B5R, 8.5"×11", 8.5"×11"R | |
| Up to 1,500 sheets (80g/m2) | A3, F4, B4 | |
| Top offset tray | up to 200 sheets (80g/m2) | |
| Original weight | 50~200 g/m2paper60~90 g/m2paper (staple&fold, fold) | |
| Staple capacity/output capacity | |||
| Number of Copies | A3, A3W, 11"×17", 11"×17"W | A5, A5W, 5.5"×8.5" | A3, B4, B4R, F4, A4, A4W, A4R, A4WR, B5, B5W, 8.5"×14", 8.5"×11", 8.5"×11"W, 8.5"×11"R, 8.5"×11"WR |
| 2 to 9 copies | 50 sets | 50 sets | 100 sets |
| 10 to 20 copies | 50 sets | 50 sets | 50 sets |
| 21 to 30 copies | 30 sets | 30 sets | 30 sets |
| 31 to 40 copies | 25 sets | 25 sets | 25 sets |
| 41 to 50 copies | 20 sets | 20 sets | 20 sets |
| 51 to 60 copies | - | 15 sets | 15 sets |
| 61 to 100 copies | - | 10 sets | 10 sets |
| Finisher FN-7 | ||
| Main Tray | up to 500 sheets (80g/m2) | A5, A5R, B6R |
| Up to 3,000 sheets (80g/m2) | A4, A4R, B5R, 8.5"x11", 8.5"x11"R | |
| Up to 1,500 sheets (80g/m2) | A3, F4, B4 | |
| Top offset tray | up to 200 sheets (80g/m2) | |
| Booklet output | |
| Original weight | 50~200 g/m² paper 60~90 g/m² paper (staple&fold, fold) |
| stabling, stapling &folding | A3, B4 (11"x17", 8.5"x14") up to 100 sheets (80 g/m²) • Folding: 33 booklets, each with 3 folded sheets (33 x 3 = 99 sheets = 396 pages) • Stapling & Folding: 20 booklets, each with 5 folded sheets (20 x 5 = 100 sheets = 400 pages) |
| Staple capacity/output capacity | |||
| Number of Copies | A3, A3W, 11"×17", 11"×17"W | A5, A5W, 5.5"×8.5" | A3, B4, B4R, F4, A4, A4W, A4R, A4WR, B5, B5W, 8.5"×14", 8.5"×11", 8.5"×11"W, 8.5"×11"R, 8.5"×11"WR |
| 2 to 9 copies | 50 sets | 50 sets | 100 sets |
| 10 to 20 copies | 50 sets | 50 sets | 50 sets |
| 21 to 30 copies | 30 sets | 30 sets | 30 sets |
| 31 to 40 copies | 25 sets | 25 sets | 25 sets |
| 41 to 50 copies | 20 sets | 20 sets | 20 sets |
... with the Hole Punch Unit and Punch/Z-fold Unit (optional)
| PK-3 | |
| Standard sizes | A3, B4, F4, A4, A4R, B5, B5R, A5, A5R, 11"×17", 8.5"×11" |
| Original weights | 50~170 g/m2 |
| Paper capacity | unlimited |
| ZK-2 | |
| Standard sizes | ·Punch mode: A3, B4, F4, A4, A4R, B5, B5R, A5, A5R, 11"×17", 8.5"×11" ·Z-folding: A3, 11"×17" (only Z-folding) B4, 8.5"×14" (only double fold) all other paper is output with Z-fold or double fold |
| Original weights | ·50~170 g/m² ·60~90 g/m² (for Z-folding) |
| Paper capacity | unlimited, max. 1 sheet for Z-folding |
| Capacity for mixed originals with Z-folding and stapling | ||
| Capacity per stapled set | Capacity of the main tray | |
| Sheets with Z-folding | Sheets without Z-folding | |
| 1 sheet | 1~40 sheets | 20 stapled sets |
| 2 sheets | 0~30 sheets | 10 stapled sets |
| 3 sheets | 0~20 sheets | 4 stapled sets |
| 4 sheets | 0~10 sheets | 3 stapled sets |
| 5 sheets | 0 | 2 stapled sets |
| 6 sheets and more | Z-fold cannot be combined with stapling. | |
TMG-2 Trimming Unit (optional for FN-7 Finisher)
| Trimming Unit TMG-2 | |
| Standard sizes | A3, B4, A4R, 8.5"×11"R and their wide sizes |
| Original weight | 60~90 g/m2paper (80 g/m2recommended) Single cover sheet paper (91 to 200 g/m2) |
| Trim capacity | • max. 3 sheets in fold mode • max. 16 sheets (80g/m2) in fold/staple mode • max. 15 sheets in fold/staple mode when using a cover sheet |
| Trim width | max. 10 mm |
| Tray capacity | max. 512 sheets • max. 100 booklets, each with 2 to 5 folded sheets • max. 50 booklets, each with 6 to 10 folded sheets • max. 32 booklets, each with 11 to 16 folded sheets |
9.5 CE Marking (Declaration of Conformity)
This system conforms to the EU Directives 89/336/EWG, 73/23/EWG and 93/68/EWG. This declaration is only valid within the European Union (EU).

WARNING
Incorrect cable types can cause interference with radio communications.
This system may be operated only if equipped with shielded interface cables. The use of other cable types can impair radio communications. According to EC guidelines, this is not permitted.
Use only shielded interface cables.

If you need the complete Declaration of Conformity
You can obtain a complete Declaration of Conformity at the following telephone numbers:
by fax on demand +49-511-7404-346
telephone number +49-511-7404-272
9.6 Index
2-sided Copies 4-41, 4-43
90^ Mode 4-65, 4-70
A
Accessories 2-4
Adding Toner 2-43
AE 4-47
Aligning
Lens 7-60
Touch screen 7-48
Aligning Control Panel 7-48
AMS 4-52, 4-78
Application 4-65
Applications 5-1
APS 4-58, 4-78
ATS 4-60,7-49
Auto (Special Originals) 4-76
Auto layout 5-43
B
Back Cover Sheets 4-19
Basic Functions 4-1
Block, job memory space 7-30
Booklet 4-19, 5-13
Bookmark 3-49
Brightness 4-46, 4-48
Bypass Tray 3-44, 4-61, 4-63, 9-13
Loading tab papers 3-45
Refilling 2-41
C
Call up, Job 6-11
Capacity 9-15, 9-17, 9-18
Capacity, memory 8-8
Cautions 1-4, 2-14
Chapter Mode 5-6
Check 3-15
Check mode 3-15
Checkusername 3-25
Cleaning 9-1
Cleaning, Original Glass 9-1
Combination 5-9
Configure Counter 7-28
Connection, system 2-25
Consumables 9-9
Consumables, Takeback and Reutilization 1-2
Contact Person 7-38
Contrast 4-46, 4-48
Increase 4-76
Touch screen 7-37
Control Panel, Keys 2-28
Copier Counter 3-39
Copier Initial Setting 7-13
Copy 1-5
Copy mode 4-40
Copy Paper Size 4-57
Copy Start 4-63, 7-35
Cover Inserter C (optional) 2-7, 4-19, 9-14
Cover sheets 4-19, 5-2
Crosswise 1-5
Cycle
Starting 3-2
Stopping 3-2
D
Data transfer to PC 7-67
Date 7-5
Delete
Copy Job 7-65
Job 6-6
System settings 7-31
Density Shift 4-49
Dimensions, system 2-24
Display 2-33, 7-48
Document Feeder 3-10
Document Memory 4-66, 4-68
Dual page 5-23
Duplex 4-41, 4-43
Duplex Unit 9-14
E
E.K.C. 7-20, 7-27
E.K.C. Counter Setting 7-28
E.K.C. Counter Data 7-21
EDH 3-10
E-mail 7-67
E-mail Transmission 7-10
E-mail transmission setting 6-24
Enable, system 3-3
Energy Saving Mode 3-3, 3-42, 7-50
Enlargement 4-51
Entering the Number of Copies 3-1
Environment setup 6-24
Environmental Requirements 2-23
Execute energy saving mode 3-41, 7-50
Exposure Control 4-48
F
face down 4-31
face up 4-31
Fault Report 7-10, 7-58
Features 4-65
Finisher 7-61
Main Tray 4-4, 4-6, 4-9
Sub Tray 4-11
Without a finisher 4-31
Finisher FN-115 (optional) 2-4, 9-15
Finisher FN-7 (optional) 2-4, 9-15
Fold Erasure 5-40
Folding 4-14, 4-25, 4-28
Folding and Stapling 4-14
Frequency Tolerances 2-25
FTP 7-67
Full-Image Area 5-45
Functions
Automatic 1-12
Finishing Features 1-13
General 1-8
Set up by a Service Technician 1-14
G
Group 4-9
H
Hard Disk Drive Kit 6-1
HDD 7-63, 7-67
HDD Job information 6-20
HDD Management 7-63
HDD-2 (optional) 6-1, 6-11
Help Mode 3-46
Hotline 1-1
1
Image Exposure 4-46
Image Position 4-63, 7-35
Image Shift 5-47
Image Store Passwords 7-63
Increase Contrast 4-49
Indicators, Touch Screen 2-30
Initial Setting 3-2, 7-5, 7-13
Inserting Images 5-20
Inserting the Staple Cartridge 2-46
Inserts 5-2
Installation site, system 2-23
Intended Use 2-56
Interrupt 3-30
Interruption 3-30
IP Address 7-8
J
Jam 3-28, 8-10
Job
Call up 6-11
Delete 3-24,6-6
Interrupt 3-30
Print 6-8
Program 5-27
Store 6-3
Job Delete 7-65
Job Memory 3-34, 3-37
Job memory space 7-30
Job priority 3-23
Job Status 6-18
K
KeyOperator Data 7-38
KeyOperatorMode 7-1
Calling up 7-2
Overview 7-3
Keys, Control Panel 2-28
L
Language 7-7
Large Capacity Cassette C-403N (optional) 2-8, 9-11
Large Capacity Cassette C-404N (optional) 2-8, 9-11
Laser Safety 2-18
LCC (optional) 9-11
Adding Paper 2-37, 2-39
Loading tab papers 2-38, 2-40
Lengthwise 1-5
Lens Adjustment 7-60
List
Image Store Passwords 7-63
KeyOperatorMode 7-3
Machine Management Lists 7-57
Meter Count 3-39
Loading tab papers 2-42
Lunch Hour Off Setting 7-46
M
Machine Management Lists 7-57
Machine status 6-17
Main Tray 4-4, 4-6, 4-9
Maintenance 9-1
PM Count 2-52
Malfunction 8-3
Malfunctions 8-1
Manual processing 4-28
Master unit 4-35
Memory capacity 8-8
Memory overflow 8-8
Memory Switch 7-51
Meter Count 3-39
Mixed Original 3-13, 4-78
Mixed Sizes 3-13, 4-78
Mode Settings Reset 3-2
N
Negative Image 5-33
Network Functions 6-1
Non Sort 4-3
Noncomplete Job List 3-27
Non-Image Area 5-30, 5-40, 7-67
0
OHP Interleave 5-17
OHP Transparency 5-17
Operation, Touch Screen 2-33
Original 1-5,4-86
Original direction 4-74
EDH 3-10
Original Glass 3-8
Original Feeder 3-10
Output Menu 4-1
Overlay 5-51
Overlay Memory 5-51
Oversized Paper 5-45
Overview of Features 1-8
Overview, Key Operator Mode 7-3
P
Page Rotation 4-70
Panel Contrast 7-37
Paper Drawer Change 4-60
Paper Feeding Direction 1-5
Paper Size 4-57, 4-61, 7-33, 9-10
Paper Tray 4-57, 4-60, 7-49, 9-10
Paper Trays
Loading tab papers 2-36, 2-38, 2-40, 2-42, 3-45
Refilling 2-34
Paper Type 4-61, 7-32
Password Lists 7-63
Photo Mode 4-76
PK-3 Hole Punch Unit (optional) 2-11, 4-22, 9-17
Plug-In Counter 7-20
Entering the Code 3-6
Pre-Job Recall 3-33
Previous Job List 3-26
Print, Job 6-8
Printer Counter 3-39
Proof copy 3-18
Punching 4-22, 4-28
R
Recycled Paper 1-2
Reduction 4-51
Refilling Trays 2-34
Remote center 7-58
Remote diagnostics 1-15, 7-58
Repeat 5-35
Replenishing the Staple Supply 2-46
Reserve Copy Jobs 3-19
Reserve Job 3-19
Reset Counter 7-27
Reset, system 3-2
Reverse Image 5-33
Rotation 4-70
Rotation Group 4-31
Rotation Sort 4-31
S
Safety Label 2-20
Safety Notes 2-14, 2-55
Scanner transmission 7-67
SDF 3-12,4-82
Sensor Display 2-33
Serial No. 2-22
Server Functions 6-1
Service Call 7-10
Service call display 8-6
Service center 7-58
Setting the Timer Action 7-44
Setting, Touch Screen 7-48
Shut down, system 2-54
Shut Off, Automatic 3-3, 3-41, 3-43, 7-50
Side 2 Lens Adjustment 7-60
Simplex 4-41
Single Feed Tray 3-12, 4-82
Site Requirements 2-24
Slave unit 4-35
Sort 4-4
Special Originals 4-49, 4-65, 4-74
Special Size 4-86, 7-32
Specifications 9-3
Stamp 5-51
Standard Size, Tab, Wide Size 4-86
Staple 4-6, 4-28
Staple capacity 9-15
Start, cycle 3-2
State of HDD capacity 7-66
Status Display 3-21
Stop, cycle 3-2
Storage
Consumables 2-25
System 2-54
Storage of consumables 2-25
Store 4-65, 4-66, 4-68
Job 6-3
Store, system settings 3-34
Stretch 4-56
Sub Tray, Finisher 4-11
Switch off, automatic 3-3
Switch Paper Tray 7-49
Switching off, system 2-27
Switching on, system 2-26
System
Check system settings 3-15
Connecting 2-25
Enable 3-3
Installation 2-23
Malfunction 8-3
Proof copy 3-18
Reset 3-2
Shut down 2-54
Site Requirements (Dimensions) 2-24
Switching Off 2-27
Switching On 2-26
Transporting 2-23
System Initial Setting 7-5, 7-13
System maintenance 9-1
System Malfunction 7-10
System Overview 2-1
System settings
Delete 7-31
Store 3-34
System status 1-15
T
Tab Papers 2-36, 2-38, 2-40, 3-45
Takeback and Reutilization 1-2
Tandem mode 4-35
Text Mode 4-76
Time 7-5
Timer 3-4
Timer Interrupt Password 7-47
Timer setting 7-41
Total Counter 3-39
Touch screen
Aligning 7-48
Contrast 7-37
Indicators 2-30
Operation 2-33
Transport, system 2-23
Tray Size 7-49
Trim 4-14, 4-28
Trimmer Unit 2-9
Trimming 4-14
Trimming Unit TMG-2 (optional) 2-9, 8-13, 9-18
Troubleshooting 8-1
Two-sided Copying 4-41, 4-43
Types of paper 4-57, 9-10
U
URL 1-15
Use, intended 2-56
User Density 1 7-15
User Density 2 7-17
User Setting Mode 7-17
User setting mode 7-15
User-set
User 1 7-15
User 2 7-17
Zoom ratio 4-54, 4-56
V
Voltage Tolerances 2-25
Volume 7-37
W
Waste container (hole punch unit) 8-11
Waste container (trimming unit) 8-13
Watermark 5-51
Web Functions 6-14
Web Utilities 6-14
Weekly Timer 7-47
Weekly timer 7-39
Interrupt 3-4
Wide size 7-35
Wide Size Paper 4-63, 5-45, 7-32
WWW-Server Function 1-15
Z
Z-Fold 3-14, 4-25, 9-17
Z-Fold (Special Originals) 4-80
ZK-2 Punch/Z-fold Unit (optional) 2-12, 4-22, 9-17
Zoom 4-51, 4-55, 4-56
Zoom Ratio 7-19
Zoom ratio 4-51
Fixed magnification ratios 4-54, 7-19
Manual selection 4-54
User-set Zoom Ratio 4-55
Vertical, Horizontally Different 4-56
- Table of Contents
- Introduction
- Getting to Know Your System
- Safe Working with Your System 2-14
- Transporting the System 2-23
- Installing the System 2-23
- Connecting the System 2-25
- Switching the System on and off 2-26
- Control Panel Keys and Indicators 2-28
- Using the Touch Screen 2-33
- Adding Paper 2-34
- Adding Toner 2-43
- Replenishing the Staple Supply 2-46
- Monitoring the PM Count Time 2-52
- Shutting Down the System 2-54
- Please Observe these Precautions 2-55
- Proper Use of Your System 2-56
- Initial Steps...
- Basic Functions
- Applications
- Network Functions
- Web Functions 6-14
- Settings in Key Operator Mode
- Overview 7-2
- (1) System Initial Setting 7-5
- (2) Copier Initial Setting 7-13
- (3)User Setting Mode 7-15
- (4) E.K.C. Function Setting 7-20
- (5) Program Memory Lock/Delete 7-30
- (6) Paper Type/Special Size Setting 7-32
- (7) Panel Contrast/Key Sound Adjustment 7-37
- (8) Key Operator Data Setting.. 7-38
- (9) Weekly Timer.. 7-39
- Troubleshooting
- Appendix
- We Want You to Be a Satisfied Customer
- Protecting the Environment...
- Takeback and Reutilization
- What is Energy Star?
- Use of Recycled Paper
- Guide to this Manual
- How is this Manual Structured?
- A Brief Explanation of the Conventions Used in this Manual
- DANGER
- This is a danger warning!
- WARNING
- This is a warning!
- CAUTION
- This is a caution!
- This is a helpful hint
- A Brief Explanation of Important Concepts and Symbols
- Original and copy
- Feeding direction
- Width and length
- Lengthwise and crosswise
- A4R
- x 29.7 cm
- A4
- x 21 cm
- Size data with or without "R"?
- Overview of System Features
- General Features
- All-Image Area
- Auto Layout
- Booklet
- Chapter
- Combination
- Contrast Range
- Dual Page
- Duplex
- Energy Saver
- Frame/Fold Erasure
- Hole Punch for Finisher FN-7 (optional) or FN-115 (optional) (only available with PK-3 or ZK-2 punch units - optional extras)
- Image Insert
- Image Shift
- Interrupt Mode
- Job Status List
- Magnification Ratio (fixed, variable)
- Manual Shut Off
- Meter Count
- Mixed Original (different-sized originals)
- Non-Image Area Erase
- Non STD Size for Bypass Tray
- OHP Interleave
- Overlay
- Overlay Memory
- Paper Capacity
- Program Job
- Program Memory
- Proof Copy
- Repeat
- Reserve Jobs
- Reverse Image
- Rotation Sort/Rotation Group
- Server Functions (Optional)
- Sheet/Cover Insertion
- Simplex
- Stamp
- Staple
- Status Area
- STD Size Original (Special)
- Store Mode
- Tab Papers
- Tandem Operation (only with two systems)
- Text/Photo Enhance
- Trimmer Function for FN-7 Finisher
- User-set Density
- User-set Zoom Ratio
- Weekly Timer
- Wide Size Paper
- Z-fold for Finisher FN-7 (optional) or FN-115 (optional)
- Z-Folded Original
- Automatic Features
- Auto Low Power
- Auto Panel Reset
- Auto Shut Off
- Automatic Exposure Selection (AE)
- Automatic Magnification Selection (AMS)
- Automatic Paper Selection (APS)
- Automatic Tray Switching (ATS)
- Rotation
- Finishing Features
- Output with Finisher FN-7 (Optional) or FN-115 (Optional)
- Output with Finisher FN-7 (optional) or FN-115 (optional) with Cover Inserter C (optional)
- Output without Finisher
- Features that can only be Set Up by a Service Technician
- Key Operator Password
- E.K.C. Master Key Code
- Weekly Timer Master Key Code
- View the Weekly Timer Times on the Help Screen
- Touch Screen Contrast Settings on the Help Screen
- Messages: ADD TONER and PM CALL
- WWW-Server Function
- System Overview
- Internal System Overview
- Options (Accessories)
- Finisher FN-115/FN-7
- Device damage by incorrect assessment of spacial requirements
- Danger of injury!
- Do not exceed the capacity of the offset trays!
- Cover Inserter C for Finisher
- Large Capacity Cassette (LCC) C-403N/C-404N
- TMG-2 Trimming Unit (optional for FN-7 Finisher)
- Incorrect handling can cause damage to the system!
- Always keep the tray cover closed!
- PK-3 Hole Punch Unit
- ZK-2 Punch/Z-fold Unit
- Memory Expansions
- Pi8500 Printcontroller
- Safe Working with Your System
- Incorrect use of the system can result in fire and/or electrical shock!
- Incorrect use of the power cable can result in fire and/or electrical shock!
- System overheating can result in fire and/or electrical shock!
- Improper operation of the system can cause injury!
- Damage to the system by external influences!
- A negligible amount of ozone is released during printing!
- Laser Safety
- Internal Laser Radiation
- Hazardous laser radiation!
- Safety Label
- System serial number
- Transporting the System
- Installing the System
- Environmental Requirements
- Installation Site
- Space required for System
- Storing Supplies
- Toner can be hazardous to your health!
- Connecting the System
- Voltage and Frequency Tolerances
- Switching the System on and off
- Switching the System on
- Initial System Settings:
- Setting up reserve jobs during the warm-up phase!
- Switching the System off
- Weekly timer disabled!
- Control Panel Keys and Indicators
- Control Panel
- Indicators and Keys on the Touch Screen
- Using the Touch Screen
- Adding Paper
- Note the following important information!
- Paper Drawer 4 - LCC (optional)
- Inserting special papers!
- Refilling Trays 1, 2 and 3
- Loading tab papers!
- Adding Paper to Paper Tray 4 - C-403N (optional)
- Adding Paper to Paper Tray 4 - C-404N (optional)
- Filling the Bypass Tray
- Processing special paper using the bypass tray!
- Adding Toner
- Replenishing the Staple Supply
- Adding Staples for the FN-115 Finisher (optional)
- Adding Staples for the FN-7 Finisher (optional)
- Monitoring the PM Count Time
- Viewing the PM Count
- Printing the PM Count
- Closing the PM Count Screen
- Shutting Down the System
- Please Observe these Precautions
- ... when working with your system
- ... when servicing and repairing the system
- Proper Use of Your System
- Initial Steps . . .
- Basic Operator Steps
- Start Cycle
- Stop Cycle
- Reset System Settings
- Automatic Reset of the System
- Activating the System
- Ending Energy Saving Mode
- Set period for energy saving mode
- Ending Auto Shut Off
- Setting Period for Automatic Shut off
- Interrupting Weekly Timer Mode
- Protecting the weekly timer with a code
- Entering the E.K.C. Password
- Leave the system locked when you are finished!
- Placing the Originals on the Original Glass
- To avoid black edges on your copies . . .
- Which original sizes are to be recognized?
- Feeding Originals Using the EDH
- Which original sizes are to be detected automatically?
- Loading Equal-Sized Originals into the EDH
- Do you want to scan more than 100 originals?
- Loading Single Originals into the EDH (SDF)
- Loading Mixed-Sized Originals into the EDH
- Place Z-Folded Originals in the EDH
- Checking the System Settings
- Check Mode Screen
- Changing Settings
- Releasing Settings
- Processing a Proof Copy
- or
- Reserving Copy Jobs
- Setting up Reserve Jobs
- Calling up the Status Display
- Status Display Message Definitions
- Changing the Order of Reserve Jobs
- Deleting a Reserve Job
- Checking the User Name of a Reserve Job
- Calling up the List of Already Executed Jobs
- Opening the Noncomplete Job List
- Interrupting the Setup of a Reserve Job
- ...in the event of a paper jam
- Interrupting a Copy Job
- Interrupt with delay!
- Procedure
- Recalling System Settings of the Last Job
- Saving and Recalling System Settings
- Saving System Settings
- Press the [STORE] key.
- Press the [OK] key to close the overview screen.
- Select a free memory slot to store the system settings.
- Press the [OK] key.
- Use the keypad on the touch screen to specify a name (up to 16 characters).
- Press the [OK] key to confirm your input. The Program Memory is displayed.
- Press the [OK] key to complete the save procedure.
- Recalling System Settings
- Check System Meter Count
- Viewing the Meter Counts
- Total counter
- Copier counter
- Printer counter
- Printing the Counter List
- Enabling Energy Saving Modes
- Energy Saving Mode
- Automatic Shut Off
- One button for two modes
- Enabling Energy Saving Mode
- Risk of electrical shock by incorrect handling
- Automatic Enabling
- Manual activation
- Enabling Auto Shut Off Mode
- Using the Bypass Tray
- Load the Paper on to the Bypass Tray
- Processing Tab Papers
- Examples:
- Using the Help Mode
- Open Help Topic Overview
- Call Help for a Specific Cycle
- UsingBookmark Function
- Setting the Output Mode
- Non Sort - Output to the Main Tray
- Sort - Output to the Main Tray
- Staple - Output to the Main Tray
- Group - Output to the Main Tray
- Output to the Sub Tray
- when grouping
- when outputting with the printed side down
- only if required
- Folding, Stapling & Folding and Trimming
- 2-sided originals or very dark originals?
- if the Booklet feature is enabled
- if the Booklet feature is disabled
- Adding Front and Back Cover Sheets
- Message:
- Print the paper for the cover inserter first!
- Hole-Punch
- Z-Fold
- Manual Stapling, Punching or Folding
- Stapling & Folding and Trimming!
- Staple (at an angle) or 2 Staples (parallel)
- Stapling & Folding
- Stapling & Folding and Trimming
- Output with Printed Side Down
- Output with Printed Side Up
- Overview
- Settings
- Using two Systems in Tandem
- Tandem mode has to be set up by a service technician!
- Information on: Tandem mode
- Up to nine reserve copy jobs in tandem mode!
- Setting the Copy Mode
- Creating 1 and 2-sided Copies (Using the EDH)
- Creating 2-sided Copies (Using the Original Glass)
- Adjusting the Contrast
- Enabling Auto Exposure Mode
- Manually Adjusting Copy Density
- Adjusting the Image Density
- Example:
- Setting the Zoom Ratio
- Enabling Automatic Magnification Selection (AMS)
- Copy result not as desired?
- Selecting a Preset Zoom Ratio
- Press the [RE] key.
- Select a zoom ratio under ENLARGE or REDUCE. or
- Defining the user-defined zoom ratios!
- Creating 1:1 copies!
- Selecting User-set Zoom Ratios
- Horizontal/Vertical Stretch
- Setting the Copy Paper Size
- Enabling Auto Paper Select Mode (APS)
- Manually Selecting a Paper Tray
- Use automatic tray switching!
- Specifying the Paper Type/Size for the Bypass Tray
- Specify Copy Start on Wide Size Paper for the Bypass Tray
- Applying Functions
- Storing Originals (from the Original Glass)
- Storing Originals (from EDH)
- Using Rotation Mode
- Changing initial settings
- Combination Rotation Mode and APS
- APS available only in combination with Rotation Mode
- Combination: 90 Mode and AMS
- Set Original Position (Special Originals)
- Setting Text/Photo Enhance (Special Originals)
- Scan
- All lighter or darker?
- Copying Mixed Sizes (Special Originals)
- Position Mixed Original?
- Copying Z-Folded Originals (Special Originals)
- Position originals for Z-folding?
- Feeding Originals Individually - SDF (Special Originals)
- Specifying the auto start function in key operator mode
- Procedure (Normal Single Feeding Mode)
- Procedure (Auto Start with EDH Document Memory)
- First enable SDF mode, then load the original!
- Defining Special Original Types (Special Originals)
- Disabling applications?
- Adding Inserts and Cover Sheets
- One paper tray for both front and back cover sheets!
- Information on: Inserts and Cover Sheets
- Procedure: Adding Inserts and Cover Sheets
- Select the desired mode.
- Example:Blank insert at position 4
- Example:Copy insert at position 4
- Executing Chapter Mode
- Information on: Chapter Mode
- It makes sense to combine features!
- Procedure: Executing Chapter Mode
- Example:Title page at position 4
- only as required
- Creating Combinations
- Information on: Combination
- Procedure: Creating Combinations
- Confirm your input by pressing [OK].
- Press the [SPECIAL ORIGINAL] key.
- Select the document direction corresponding to the original position. Confirm your selection by pressing [OK].
- Use the 10-Key Pad to set the number of copies.
- Load the originals into the EDH.
- Press the [START] key on the control panel to start the scanning cycle.
- Creating Booklets
- Information on: Booklets
- Automatically assemble booklets
- Booklets with page numbers?
- Procedure: Creating Booklets
- Confirm your input by pressing [OK].
- Select the paper tray containing the paper to be used. Set the copy mode to 1-2 or 2-2. Configure the system settings for your job.
- Use the 10-Key Pad to set the number of booklets.
- Creating OHP Interleave
- Information on: OHP Interleave
- Procedure: Creating OHP Interleave
- Inserting Images
- Information on: Inserting Images
- Procedure: Inserting Images
- Combined with "Booklet"?
- Processing Dual Page Originals
- Choose between:
- Information on: Dual Page
- Procedure: Processing Dual Page Originals
- Program Job
- Information on: Program Job
- Procedure: Program Job
- Correct order maintained?
- Using Non-Image Area Erase
- Information on: Non-Image Area
- Procedure: Using Non-Image Area Erase
- Creating Reverse Images
- Information on: Reverse Image
- Procedure: Creating Reverse Images
- Using Image Repeat Mode
- Information on: Repeat
- Setting width/height
- Auto Detection
- Procedure: Using Image Repeat Mode
- Using Frame/Fold Erasure
- Information on: Frame/Fold Erasure
- Procedure: Using Frame/Fold Erasure
- Using Auto Layout
- Information on: Auto Layout
- Procedure: Using Auto Layout
- Using Full-Image Area
- Information on: Full-Image Area
- Procedure: Using Full-Image Area
- Creating a File Margin
- Information on: Image Shift
- Reduce & Shift
- Procedure: Creating a File Margin
- Using Stamp/Overlay
- - Stamp
- Watermark
- - Overlay
- Information on: Using Stamp/Overlay
- Stamp/Watermark
- Overlay Memory (store image)
- Overlay Memory (recall)
- Enter negative starting number for page counting!
- Procedure: Using Stamp
- Set the selected function as desired.
- Page Numbering
- Set Numbering
- Date/Time
- Procedure: Using Watermark
- Procedure: Using Overlay
- Procedure: Overlay Memory (store image)
- Press the [OVERLAY MEMORY] key.
- Press the [IMAGE STORE] key.
- Enter an image name. Press the [OK] key.
- Procedure: Overlay Memory (call up image)
- Server Functions
- Organize image memory codes!
- Storing a Job
- Press the [IMAGE STORE/DELETE] key.
- Enter the image store password using the touch screen keypad.
- Press the [OK] key to confirm the image store password.
- Proper use of user's choice setting!
- Deleting a Job
- Storing and Printing a Job
- Press the [OUTPUT MENU] key.
- Press the [HDD STORE] key.
- Calling up Jobs from the Hard Drive
- Select one of the following features.
- And recall another job!
- Web Functions
- Starting Web Utilities
- Press the [OK] key to confirm your input.
- Calling up System Status
- Calling up Job Status
- Call up and Edit Hard Drive Data
- Auto output
- Proof output
- Wait output
- E-Mail Transmission Setting
- Check the settings and change as required.
- Click on [APPLY] to save the settings. or Click on [RESET] to cancel the cycle.
- Help cannot be called up from key operator mode...
- Overview
- Calling up Key Operator Mode
- Leaving Key Operator Mode
- (1) System Initial Setting
- Date & Time Setting
- only if necessary
- Press the [OK] key to confirm your input.
- Press the [OK] key to confirm your input.
- Press the [RETURN] key.
- 24-hour days
- Language Select Setting
- IP Address Setting
- only if necessary
- Select the desired setting.
- E-Mail Transmission Setting
- (2) Copier Initial Setting
- (3)User Setting Mode
- Setting User density Level 1
- Setting User Density Level 2
- Setting the Zoom Ratio (Lens Mode)
- (4) E.K.C. Function Setting
- Calling up E.K.C. Mode
- E.K.C. Data Edit
- Editing an E.K.C. Account
- Creating a New E.K.C. Account
- Deleting an E.K.C. Account
- Reset individual E.K.C. count
- E.K.C. All Count Reset
- E.K.C. Function Setting
- (5) Program Memory Lock/Delete
- Locking and Unlocking Program Memory Positions
- Deleting System Settings
- (6) Paper Type/Special Size Setting
- Specifying the Paper Type
- Specifying the Paper Size
- Set Copy Start to Wide Size Paper
- Select the paper size [WIDE SIZE PAPER].
- Select a wide size from the displayed list. or
- Set the copy start in "IMAGE POS."
- (7) Panel Contrast/Key Sound Adjustment
- (8) Key Operator Data Setting
- (9) Weekly Timer
- Calling up Weekly Timer Mode
- Weekly Timer ON/OFF Setting
- Timer Setting
- Individual Timer Setting
- Block Timer Setting
- Timer Action ON/OFF Setting
- Individual Setting
- Lunch Hour Off Setting
- Timer Interrupt Password Setting
- Code 0000!
- (10) Control Panel Adjustment
- (11) Set auto tray selection
- (12) Energy Saver Setting
- Set reasonable periods!
- (13) Memory Switch Setting
- (14) Machine Management List Print
- (15) Call Remote Center
- Press the [START] key.
- (16) Side 2 Lens Adjustment
- (17) Finisher Adjustment
- (18) HDD Management Setting
- Password List/Delete
- JOB Auto Delete Period Setting
- State of HDD Capacity
- (19) Scan Transmission Object Change/Del.
- (20) Non-Image Area Erase Setting
- If Your Copy Is Incorrect
- Your System Is Not Working Correctly
- If the PM Call Message Is Displayed...
- If the System No Longer Operates...
- If the System Still Operates Partially...
- If the Memory "Overflows"
- ... while the current job is under way
- ... during setup of a reserve job
- No [STOP SCAN] for booklets!
- If the "Please Switch OFF/ON" Screen Appears
- Clearing a Paper Jam
- Danger of burns from the fixing unit!
- Danger of electric shock inside the system!
- Emptying the Hole Punch Unit Waste Container
- Emptying the Trimming Unit Waste Container
- System Maintenance
- Cleaning System Parts
- Cleaning the Original Cover and Original Glass
- Specifications
- System Di850
- Document Feeder EDH-5
- Finisher FN-115 (optional), Finisher FN-7 (optional)
- Trimming Unit C (optional for Finisher FN-115/FN-7)
- Large Capacity Cassette C-403N (optional)
- Large Capacity Cassette C-404N (optional)
- Consumables
- You Can Process This Paper
- Specifying special paper sizes and weights!
- Recommended for 200g / m2 paper
- ... with the Large Capacity Cassette LCC (optional)
- ... with the Bypass Tray
- Specifying paper sizes and weights...
- ... with the Automatic Duplex Unit
- Wide sizes, special sizes and A5...
- ... with the Cover Inserter C (optional)
- ... with the Finishers (optional)
- ... with the Hole Punch Unit and Punch/Z-fold Unit (optional)
- CE Marking (Declaration of Conformity)
- Incorrect cable types can cause interference with radio communications.
- If you need the complete Declaration of Conformity
- Index
- A
- B
- C
- D
- E
- F
- G
- H
- 1
- J
- K
- L
- List
- M
- N
- 0
- P
- R
- S
- Storage
- System
- System settings
- T
- Touch screen
- U
- User-set
- V
- W
- Z
Brand : KONICA MINOLTA
Model : DI850
Category : Photocopier