
SBS-MD-22 - Detector STEINBERG - Free user manual and instructions
Find the device manual for free SBS-MD-22 STEINBERG in PDF.


| Product Type | Metal Detector |
| Brand | Steinberg |
| Model | SBS-MD-22 |
| Dimensions (L x W x H) | 120 x 25 x 10 cm |
| Weight | 1.2 kg |
| Power Supply | 2 9V batteries |
| Main Functions | Detection of ferrous and non-ferrous metals, sensitivity adjustment, discrimination, audible and visual indicator |
| Care and Cleaning | Clean with a soft, dry cloth, avoid abrasive products |
| Safety | Do not use near power lines, keep out of reach of children |
| Spare Parts and Repairability | Replacement search coil, battery, repair kit |
| General Information | Outdoor use, detection up to 30 cm depth |
Frequently Asked Questions - SBS-MD-22 STEINBERG
User questions about SBS-MD-22 STEINBERG
0 question about this device. Answer the ones you know or ask your own.
Ask a new question about this device
Download the instructions for your Detector in PDF format for free! Find your manual SBS-MD-22 - STEINBERG and take your electronic device back in hand. On this page are published all the documents necessary for the use of your device. SBS-MD-22 by STEINBERG.
USER MANUAL SBS-MD-22 STEINBERG
1. General Description
The instruction manual is intended to assist in safe and reliable use. The product is designed and manufactured strictly according to technical specifications using the latest technology and components and maintaining the highest quality standards.
PLEASE CAREFULLY READ AND UNDERSTAND THIS INSTRUCTION MANUAL BEFORE OPERATION.
To ensure long and reliable operation of the unit, make sure to operate and maintain it properly in accordance with the guidelines in this instruction manual. The technical data and specifications contained in this instruction manual are up to date. The manufacturer reserves the right to make changes in order to improve the quality. Taking the technical progress and the possibility of reducing noise into account, the unit is designed and built in such a way so that risks resulting from noise emissions are reduced to the lowest possible level.
Explanation of symbols
| CE | The product complies with applicable safety standards. |
 | Please read the instructions before use. |
 | Recyclable product. |
 | CAUTION! or WARNING! or REMINDER! describing a situation.(general warning sign). |

CAUTION! The illustrations in this instruction manual are for reference only and may differ from the actual product in some details.
The original instruction manual is in the German language version. Other language versions are translations from German.
2. Safety of use

CAUTION! Read all safety warnings and all instructions. Failure to follow warnings and instructions could result in serious injury or even death.
The term "unit" or "product" in the warnings and in the description of the instructions refers to the METAL DETECTOR.
2.1. Safety in the workplace
a) If you have any doubts as to whether the unit is working properly or if it is damaged, contact the manufacturer's service department. b) Only the manufacturer's service department can repair the unit. Do not carry out repairs yourself! c) Keep all packaging materials (plastic bags, cardboard, polystyrene, etc.) out of the reach of children as they are a potential source of danger and must be disposed of in accordance with the regulations in force at the place of use.
2.2. Safe use of the unit
a) Repairs and maintenance should be carried out by qualified personnel using only original spare parts. This will ensure safety of use. b) To ensure the designed operational integrity of the unit, do not remove factory-installed covers or loosen screws. c) Keep these instructions for future reference. If the unit is passed on to a third party, the operating instructions must be handed over together with the unit. d) The unit is not a toy. Children should be supervised to ensure that they do not play with the unit. e) Do not tamper with the unit to alter its performance or design. f) Keep the unit away from sources of fire and heat. g) Non-rechargeable batteries should not be charged. h) Do not mix different types of batteries, or old and used batteries. i) Install batteries according to the polarity indicated on the device and battery symbols. j) Remove used batteries from the device and dispose of them safely in accordance with the law. k) Do not subject the unit to strong shocks. l) For safety reasons, remove the batteries when the unit is not in use. m) Please note that the devices are exposed to electromagnetic interference which may affect their use. n) Do not mix old and new batteries or different battery types! o) If the detector is not going to be used for a week or more, remove the batteries! Chemical substances may leak from the batteries and destroy electronic components. p) Use only new batteries of the required size!
3. Rules of use
The metal detector is a unit intended to support the process of searching for coins, jewelry, gold, silver, etc., and other metallic items with magnetic or non-magnetic properties.
The user is responsible for any damage resulting from misuse.
3.1. Description

- Probe (search coil)
- Probe fixing screw/tilt adjustment screw
- Lower stem
- Clamping nut
- Cable
- Middle stem
- Clamping nut
- Lock hole
- Control panel
- Control panel screw
- Upper stem
- Armrest
CONTROL PANEL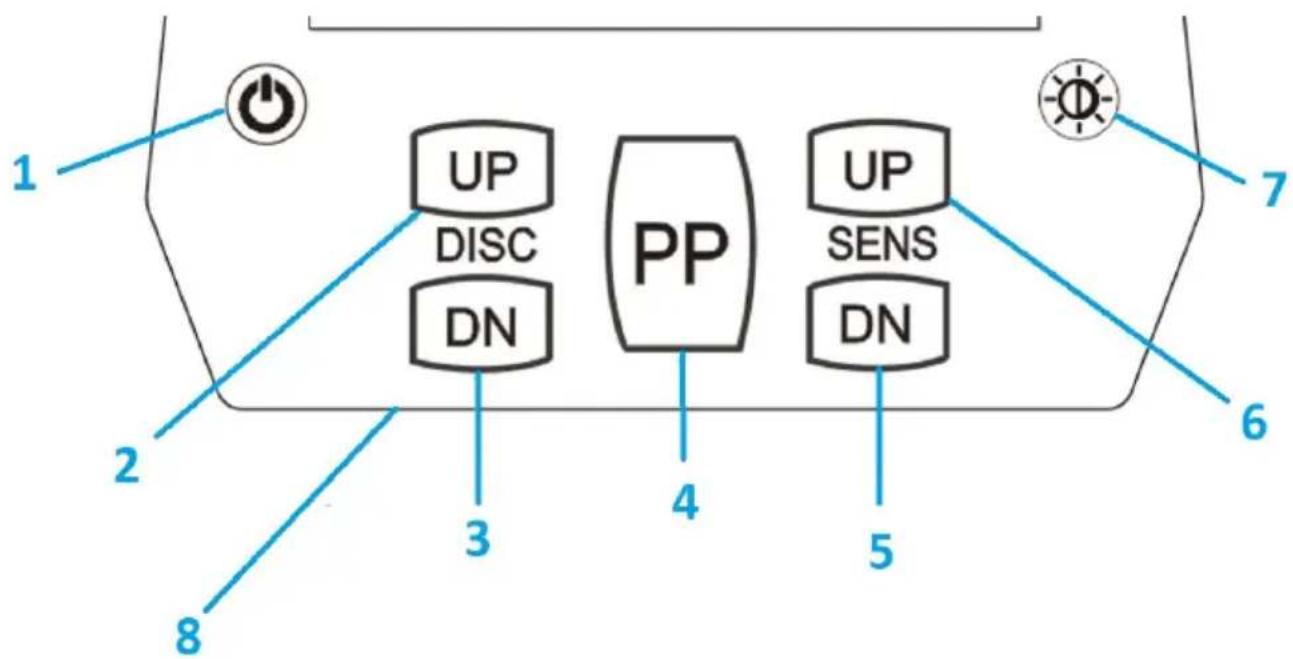
- POWER button: switching the unit on/off
- DISC UP button: eliminating an unwanted metal type in order from left to right
- DISC DN button: retrieve eliminated metal type in order from right to left
- PP button: Precise search mode, shows the precise location of the target.
- SENS DN button: lowers the sensitivity level for object search
- SENS UP button: increases the sensitivity level for object search
- BACKLIGHT button: switch the backlight on/off
Caution: Since the backlight consumes more power, it is better to turn it off in bright areas.
- 3.5mm headphone input.
Display:
- Eliminated target icon
- Depth at which target was detected
- PP function indicator
- Sensitivity level indicator, SENS
- Battery level indicator
- Non-eliminated target icon
- Target ID
3.2. Preparation for operation
ASSEMBLY OF THE UNIT

- Open the package and remove all components.
- Connect the detector's probe (1) to the lower stem (3) and then tighten the probe fixing screw (2).
- Press the lock on the lower stem (8) and slide it into the middle stem (6). The lock must be visible in one of the holes (8).
- Press the lock in the middle stem (8) and slide it into the upper stem (11). The lock must be visible in one of the holes (8).
- Adjust the length of the stem so that you can comfortably stand upright holding the detector with the probe parallel to the ground. The other arm should be relaxed, placed freely along the body. Tighten the locking nut on the middle stem (4) counterclockwise.
- Attach control panel (9) to upper stem (11) and tighten control panel mounting screws (10) securely.
- Wrap the cable (5) around the stem and insert the cable plug into the 5-pin socket (on the back of the control panel).
- Check that the stem length is correct. Stand upright holding the detector with the probe parallel to the ground at a height of 1-5 cm. The other arm should be relaxed, placed freely along the body. Tighten the locking nut on the upper stem (7) in a counter-clockwise direction.
CAUTION! Do not use excessive force or tools to tighten the clamping nuts and bolts!
CAUTION! The cable plug must be placed in the socket in the correct orientation. Do not force the plug or pull the cable - damage may result.
INSTALLING BATTERIES (batteries not included):
- Turn off the unit before installing the batteries.
- Slide the battery cover in the direction indicated by the arrow.
- Insert two 9V alkaline batteries into the battery compartment according to the polarity markings inside the unit.
- Close the battery compartment by sliding the cover back.
- Now the unit is ready for operation.
- Replace the batteries when the battery level icon is not filled with color.

CAUTION! Do not mix different types of batteries, or old and used batteries.

CAUTION! If the detector is not going to be used for a week or more, remove batteries! Batteries can be damaged and lead to destruction of electronic components.

CAUTION! Use only new batteries of the required size and voltage!
CONNECTING HEADPHONES
- Choosing headphones with volume control is recommended.
- Insert the 3.5 mm plug into the headphone socket located at the bottom right of the control panel. When the headphones are connected, the internal speaker is disconnected.
- Adjust the volume.
- Set the headphones to a low volume, then adjust the volume to the appropriate level.
3.3. Working with the unit
MODES OF OPERATION:
The detector has two operating modes: ALL METAL and DISC (DISCRIMINATION). Select the mode appropriate to the target you are searching for:
a) A-M ALL METAL MODE
This mode is designed to detect all types of metals.
When the power is turned on, DISC mode is the default setting. To enable ALL METAL mode, press the DISC DN button twice. The eliminated target icons will disappear and the unit will detect all types of metals.
When a target is detected, the unit emits a signal, gives the depth of the detected object, and a symbol appears below the metal name on the
display: .
b) DISC MODE (DISCRIMINATION)
In DISC mode the user can suppress detection of unwanted metals. The degree of discrimination should be set using the DISC UP, DISC DN buttons.
When the power is turned on, DISC mode is the default setting (this mode has IRON and FOIL targets eliminated by default). To eliminate detection of

To restore eliminated targets to the detector search list, press the DISC DN button and the target icon will be searched by the detector again. The different metal categories are restored in order from right to left.
TESTING
- Testing the unit before using it for the first time both indoors and outdoors is recommended.
- Note how the detector reacts to individual metals.
- Prepare the accessories to perform the test:
- nail,
- a silver coin,
- a gold ring,
- zinc coin.
- Set up the device:
- place the detector on a wooden or plastic table,
- the user should remove any watches, rings or metal jewelry they are wearing. • position the probe so that its flat part is facing the ceiling.


CAUTION! Do not test the detector on the floor inside a building. Most buildings have metals embedded in the floor that can interfere with or completely mask the signal.
- Press the POWER button to turn on the unit.
- Using the DISC function: When the power is turned on, DISC mode is the default setting (this mode has IRON and FOIL targets eliminated by default).
- Move the nail over the probe. This metal will not be detected because it has been eliminated.
- Slide another prepared object over the probe. Check that the detector readings are correct.
- Use the DISC UP and DISC DN buttons to eliminate unwanted targets as desired, then verify the correct search by moving the selected objects over the search coil.
- Metal categories: DIME, QTR, 50¢ (see METALS TABLE) cannot be eliminated because they are valuable.
- Using the ALL METAL search mode: when the power is turned on, the default mode is DISC. To enable ALL METAL mode, press the DISC DN button twice. The eliminated target icons will disappear and the unit will detect all types of metals.
- Slowly move a sample of the material you want the detector to find (e.g., gold ring, coin) a few centimeters above the probe surface. When the detector detects metal, it will beep and the target icon will flash. The LCD display will also show the depth at which the target was detected. Note that the depth is only a reference point.
CAUTION! The detector will detect a coin more easily if it is held with its flat side parallel to the probe. Moving the coin sideways may cause false readings and unstable readings.

- Using the PP (PINPOINT) function:
- Press the PP button to turn the function on.
- Hold the coin still over the probe.
- Try to move the coin closer and further away from the probe. The sound changes depending on the distance of the target from the search coil.
- The depth indicator on the display indicates the depth of the target found and changes as the coin moves closer or further away from the search coil.
- Adjusting sensitivity:
- Press the SENS button, then adjust the sensitivity using the SENS UP and SENS DN buttons.
- The sensitivity level will be displayed on the LCD. To find objects deep in the ground, the sensitivity must be higher. If the sensitivity is set to the highest limit, it is possible that the detector will emit false signals.
- Press the POWER button to turn on the unit.
- Set the desired operating mode (see "OPERATING THE UNIT INDOORS", section 4.5).
- Adjust the sensitivity (see "OPERATING THE UNIT IN ROOMS", step 8).

CAUTION! To detect a deeply buried target, you can set the sensitivity level (SENS) to high. However, do not set the sensitivity level to maximum, or the detector will pick up interference and false signals from the transmitting antenna and other electrical lines. The detector will have unstable and erratic readings.
- Find an outdoor location where there is no metal.
- Place a sample of the material to be found by the detector (such as a gold ring or coin) on the ground.

CAUTION! If a valuable metal such as gold will be used to test the detector, mark the location where the item will be placed to make it easier to find later. Do not place a valuable item in tall grass or bushes.
- Holding the probe parallel to the ground, about 1-5 cm above the surface, move it slowly over the area where the sample is placed. Make the movement from side to side.
MOVING THE DETECTOR'S PROBE
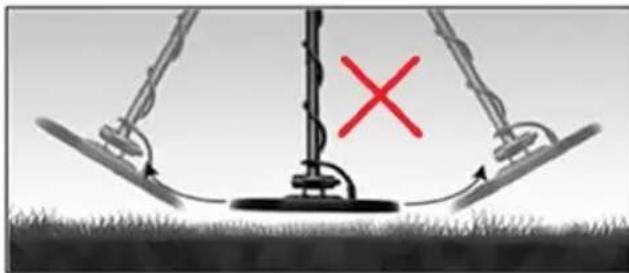
- When searching, it is best to move the detector from side to side, approximately 1-5 cm above the surface being searched. The probe should be guided along an arc with a radius of 7-8 cm, parallel to the ground.


CAUTION! The probe movement should not resemble a pendulum. This may cause false readings of the detector.


- The movement should be slow and at a constant speed.
- When a target under the ground surface is found and identified, the detector will emit a single beep and the target found icon will flash. The LCD display will also show the reading value and the depth at which the target was detected.
- If the detector does not detect any object, make sure that the operating mode is set correctly and that the probe is moved correctly.
- The detector responds with a signal when it detects valuable metal objects. If the signal does not repeat after moving the probe over the target several times, it is probably scrap metal.
- False signals can be caused by contaminated ground, electrical interference, or large irregular pieces of metal. False signals are usually intermittent or not repeated.
FACTORS AFFECTING OBJECT DETECTION:
It is difficult to obtain an accurate detection result. Factors that affect the quality of readings are:
• the angle of the target buried in the ground,
• the depth at which the target is located,
• the degree of oxidation of the target,
• the size of the target,
• electromagnetic and electrical interference surrounding the target,
• measurements in areas of strongly mineralized soil, fertile ground, or wet sand – the detector will emit a sound even if there is no metal present. In this case, you can reduce the sensitivity. You can also increase the distance between the probe and the ground.
• metal digging tools placed near the unit.
TABLE OF METALS, TARGET IDENTIFIERS:
| Iron Gold Silver | ||||||||
| Target | IRON | FOIL | NI/5¢ | ALUM | ZN/1¢ | DIME | QTR | 50¢ |
| iron objects, gold flakes | Aluminum foil | aluminum, nickel, small gold objects | aluminum, some small gold items, can pull tabs, | zinc, aluminum, medium-sized gold objects, bottle tops, | DIME, QTR (quarter), 50¢ -coins used in the United States, silver coins, relics, large items made of any type of metal | |||
| Icon |  |  |  |  |  |  |  |  |
- Notifications for gold items will appear in the center or left of the scale on the display.
- Notifications for small gold items will appear under the FOIL, NI/5¢ categories.
- Notifications for large gold items will appear in the center of the scale on the display.
- Notifications for silver items will appear on the right side of the scale (DIME, QTR, 50¢).
- Notifications for iron objects of any size will appear on the left side of the scale (IRON).

CAUTION! There is a wide variety of metals. The target detected by the unit cannot be uniquely identified until it is unearthed. The table is for general reference.
ILLUMINATION:
To turn on the backlight, press the BACKLIGHT button. Pressing the button again turns the backlight off.
Caution: Since the backlight consumes more power, it is recommended to turn it off in bright areas.
PP (PINPOINT):
When you find a metal object, you can use the PP (PINPOINT) function to determine the precise position of the target.
- Press the PP button to activate the PINPOINT function.
- Slowly move the probe over the selected location. If the detector finds the target, it will beep. The target is located where the sound is loudest.
- Narrow down the search. Press the PP button again. Position the center of the probe near where the detector found the target, but do not position the probe directly over the target. Slowly move the probe over the selected location. Now the sound will only be emitted when the coil is directly over the target.
- Repeat the procedure in step 3 several times. After each repetition of the procedure, the detection field will become narrower and the detector will indicate the position of the metal target more and more precisely.
3.4. Cleaning and maintenance
a) Turn off the unit before each cleaning. b) Use only non-corrosive cleaning agents for cleaning the surfaces. c) After each cleaning, all the parts should be dried well before the unit is used again. d) Store the unit in a dry and cool place protected from moisture and direct sunlight.
e) Do not spray the unit with a stream of water or immerse it in water. f) Make sure that no water enters through the ventilation openings in the casing. g) Clean the ventilation openings with a brush and compressed air. h) Perform regular inspections of the unit checking technical fitness and any damages. i) Use a soft cloth for cleaning. j) Do not leave the batteries in the device when it will not be used for a long time. k) Do not clean the unit with acidic substances, medical products, diluent, fuel, oil or other chemicals as this may cause damage to the unit.
INSTRUCTIONS FOR THE SAFE DISPOSAL OF BATTERIES.
Install 2 9V batteries in the unit.
Remove used batteries from the device in the same way you put them in.
Return the batteries to a unit responsible for their disposal.
DISPOSAL OF USED UNITS.
At the end of its useful life, this product should not be disposed of with normal household waste but should be taken to a collection point for the recycling of electrical and electronic equipment. This is indicated by the symbol on the product, operating instructions or packaging. The materials used in this unit are recyclable according to their marking. You will be making an important contribution to protecting our environment by reusing, recycling or otherwise disposing of used units.
Your local administration will provide you with information about the appropriate disposal point for used units.
TROUBLESHOOTING
| Problem | Possible cause | Action |
| The detector displays a reading or beeps without detecting a target. | The detector may receive interference and false signals from the transmitting antenna and other electrical lines. | Change the search location. Wait a while and try again. |
| The ambient humidity is too high. | ||
| The detector emits false signals. | Sensitivity is too high/environmental electromagnetic interference | Reduce the sensitivity. |
| Too fast or detector probe at wrong angle. | Move the detector probe slower and hold the detector correctly. | |
| Using 2 detectors in close proximity to each other | Keep the two detectors at least 6 meters apart. | |
| The detector does not detect anything. | Sensitivity set too low | Increase sensitivity. |
| Probe is not aligned parallel to the ground | Set the probe parallel to the ground. | |
| The display shows several targets at the same time or emits several sounds simultaneously. | The detector has found several different metal objects. | Reduce sensitivity to eliminate detection of deeper targets. |
| The detector cannot identify the target. Sometimes, oxidized metal also causes a different target and tone to be indicated. | Move the probe at different angles. | |
| The detector does not work. | The 5-pin cable is incorrectly connected. | Connect the cable correctly. |
| The battery is discharged. | Replace the battery. |
Technical specifications


INSTALLING THE BATTERIES (batteries not included):




For the disposal of the device please consider and act according to the national and local rules and regulations.
CONTACT
expondo Polska sp. z o.o. sp. k.


- GENERAL DESCRIPTION
- PLEASE CAREFULLY READ AND UNDERSTAND THIS INSTRUCTION MANUAL BEFORE OPERATION
- EXPLANATION OF SYMBOLS
- CAUTION! THE ILLUSTRATIONS IN THIS INSTRUCTION MANUAL ARE FOR REFERENCE ONLY AND MAY DIFFER FROM THE ACTUAL PRODUCT IN SOME DETAILS
- SAFETY OF USE
- SAFETY IN THE WORKPLACE
- SAFE USE OF THE UNIT
- RULES OF USE
- DESCRIPTION
- PREPARATION FOR OPERATION
- ASSEMBLY OF THE UNIT
- INSTALLING BATTERIES (BATTERIES NOT INCLUDED)
- CONNECTING HEADPHONES
- WORKING WITH THE UNIT
- MODES OF OPERATION
- A-M ALL METAL MODE
- DISC MODE (DISCRIMINATION)
- TESTING
- MOVING THE DETECTOR'S PROBE
- FACTORS AFFECTING OBJECT DETECTION
- ILLUMINATION
- PP (PINPOINT)
- CLEANING AND MAINTENANCE
- DISPOSAL OF USED UNITS
- TECHNICAL SPECIFICATIONS
- INSTALLING THE BATTERIES (BATTERIES NOT INCLUDED)
- CONTACT
Brand : STEINBERG
Model : SBS-MD-22
Category : Detector