
8I845GVM-RZAC - Motherboard GIGABYTE - Free user manual and instructions
Find the device manual for free 8I845GVM-RZAC GIGABYTE in PDF.
| Product Type | Motherboard |
| Brand | GIGABYTE |
| Model | 8I845GVM-RZAC |
| CPU Socket | Socket 478 |
| Chipset | Intel 845GV |
| Form Factor | Micro-ATX |
| Memory | 2 slots DDR SDRAM, max 2 GB |
| Expansion Slots | 1 AGP 8x, 3 PCI |
| Storage | 2 IDE ATA-100, 2 SATA |
| USB Connectors | 4 USB 2.0 ports (rear) + headers |
| Audio | Realtek AC'97 6-channel |
| Network | Ethernet 10/100/1000 Mbps |
| Power Supply | ATX 12V, 20+4 pin connector |
| Dimensions | 244 x 244 mm |
| Weight | Approximately 0.5 kg |
| Maintenance and Cleaning | Clean with a dry, lint-free cloth. Do not use liquids or aerosols. |
| Safety | Disconnect the power supply before any intervention. Avoid electrostatic discharges. |
| Spare Parts and Repairability | Spare parts available via GIGABYTE after-sales service. Repair by a professional recommended. |
| General Information | Warranty: 2 years. Compatible with Windows 98/ME/2000/XP. |
Frequently Asked Questions - 8I845GVM-RZAC GIGABYTE
User questions about 8I845GVM-RZAC GIGABYTE
0 question about this device. Answer the ones you know or ask your own.
Ask a new question about this device
Download the instructions for your Motherboard in PDF format for free! Find your manual 8I845GVM-RZAC - GIGABYTE and take your electronic device back in hand. On this page are published all the documents necessary for the use of your device. 8I845GVM-RZAC by GIGABYTE.
USER MANUAL 8I845GVM-RZAC GIGABYTE
The sequence of installation may differ depending on the type of case and devices used. The installation instructions below apply to GIGABYTE's desktop systems and are for reference only.
Refer to the user's manual included for detailed motherboard specifications.
- Before installing the devices, make sure they are compliant with the connectors on your computer.
- Before installing the devices, be sure to turn off the devices and your computer. Unplug the power cord from the power outlet to prevent damage to the devices and the system components.
- Place the computer system on a stable surface to prevent improper installation resulted from shaking.

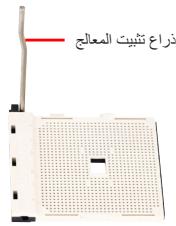
Installing a CPU and CPU Cooler
A. Installing an Intel CPU (skip this step if the motherboard has a built-in CPU)
A-1 Refer to the following instructions based on your CPU specifications:
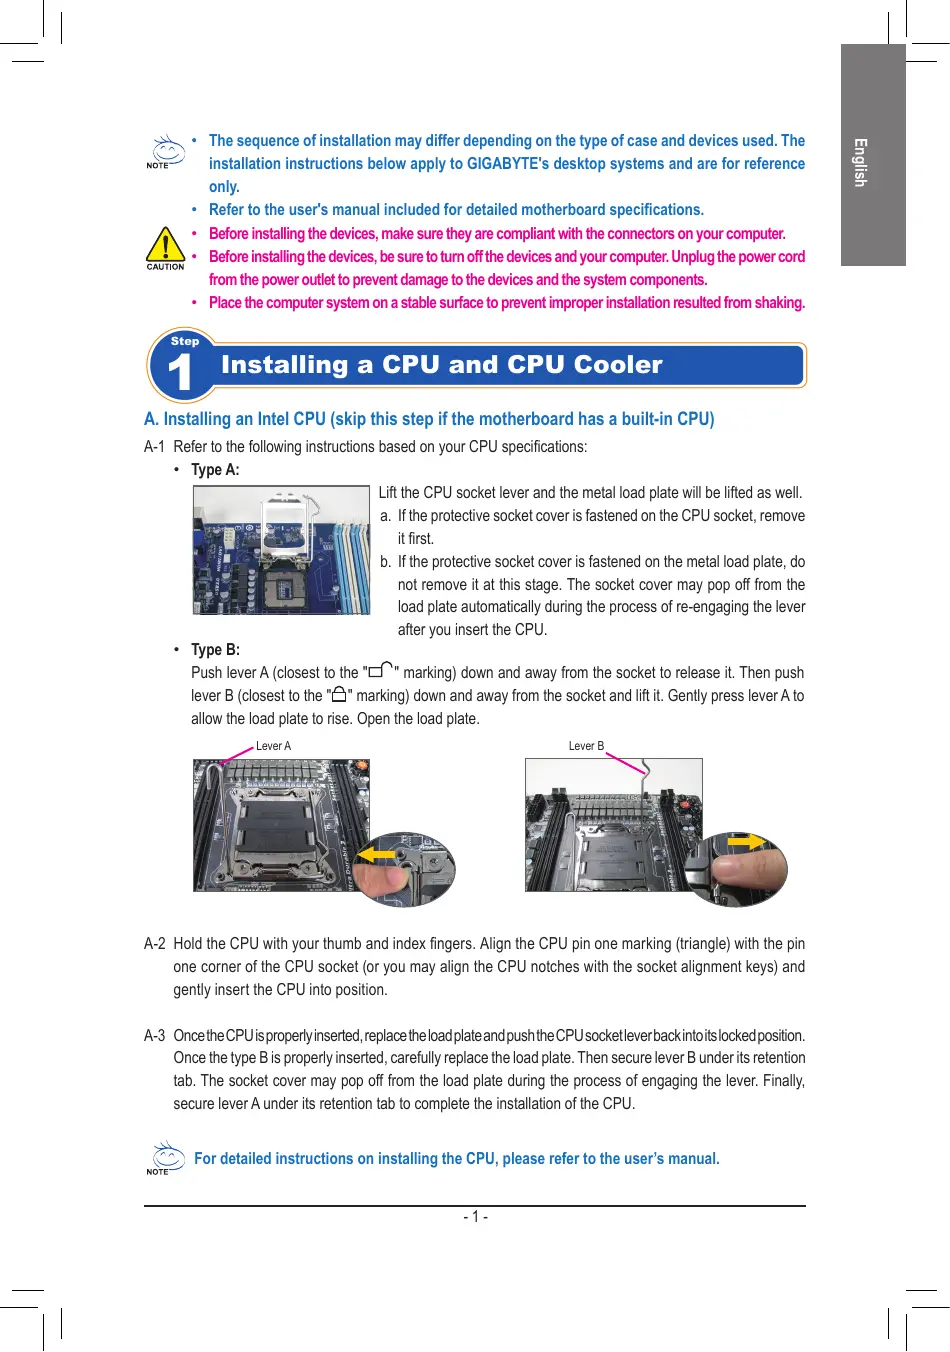
- Type A:
Lift the CPU socket lever and the metal load plate will be lifted as well.
a. If the protective socket cover is fastened on the CPU socket, remove it first.
b. If the protective socket cover is fastened on the metal load plate, do not remove it at this stage. The socket cover may pop off from the load plate automatically during the process of re-engaging the lever after you insert the CPU.
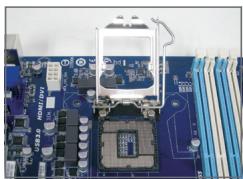
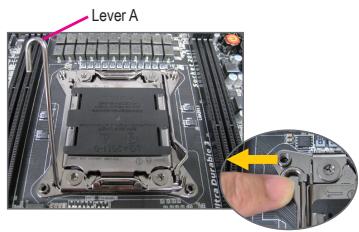
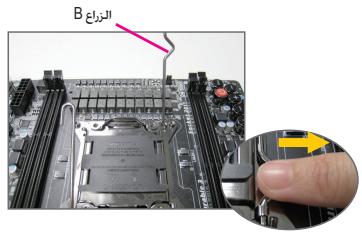
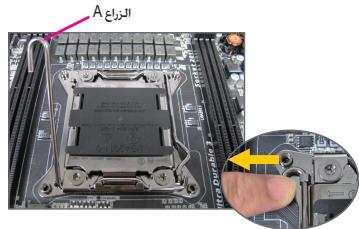
- Type B:
Push lever A (closest to the "□" marking) down and away from the socket to release it. Then push lever B (closest to the "□" marking) down and away from the socket and lift it. Gently press lever A to allow the load plate to rise. Open the load plate.
A-2 Hold the CPU with your thumb and index fingers. Align the CPU pin one marking (triangle) with the pin one corner of the CPU socket (or you may align the CPU notches with the socket alignment keys) and gently insert the CPU into position.
A-3 Once the CPU is properly inserted, replace the load plate and push the CPU socket lever back into its locked position. Once the type B is properly inserted, carefully replace the load plate. Then secure lever B under its retention tab. The socket cover may pop off from the load plate during the process of engaging the lever. Finally, secure lever A under its retention tab to complete the installation of the CPU.

For detailed instructions on installing the CPU, please refer to the user's manual.
B. Installing an AMD CPU (skip this step if the motherboard has a built-in CPU)
B-1 Completely raise the CPU socket lever. Align the CPU pin one (small triangle marking) with the triangle marking on the CPU socket and gently insert the CPU into the socket. Make sure that the CPU pins fit perfectly into their holes.
B-2 Once the CPU is positioned into its socket, place one finger down on the middle of the CPU, lowering the socket lever and latching it into the fully locked position.
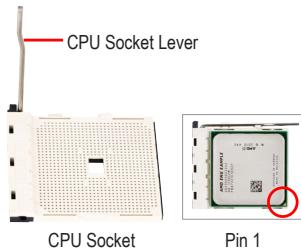

- Do not force the CPU into the CPU socket. The CPU cannot fit in if oriented incorrectly. Adjust the CPU orientation if this occurs.
- DO NOT touch socket contacts. To protect the CPU socket, always replace the protective socket cover when the CPU is not installed.
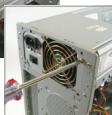
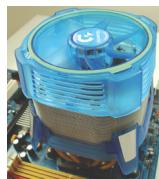
C. Installing the CPU cooler
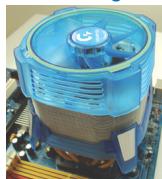
C-1 Before installing the CPU cooler, please first add a thin layer of heat sink paste on the surface of the CPU. Then install the cooler (refer to the installation manual for your CPU cooler).
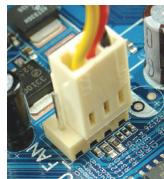
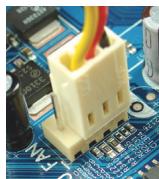
C-2 Connect the CPU cooler cable to the CPU_FAN connector located on the motherboard so that the cooler can properly function to prevent the CPU from overheating.

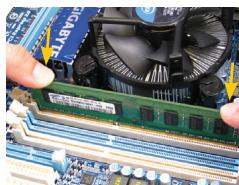
Installing Memory

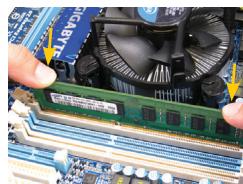
Note the orientation of the memory module. Spread the retaining clips at both ends of the memory socket. Place the memory module on the socket. As indicated in the picture on the left, place your fingers on the top edge of the memory, push down on the memory and insert it vertically into the memory socket. The clips at both ends of the socket will snap into place when the memory module is securely inserted.

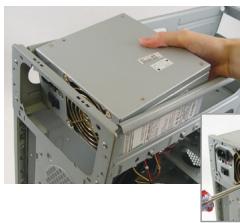
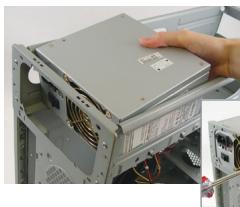
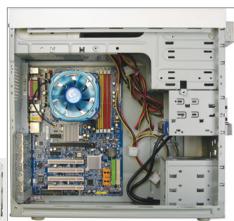
Preparing the Case and Installing a Power Supply
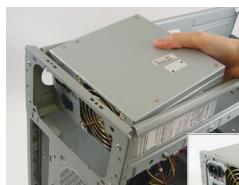
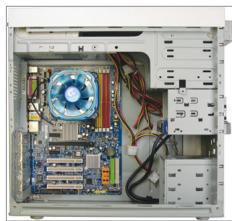
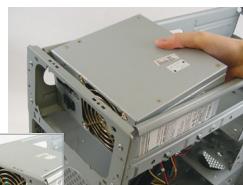
Using the GIGABYTE desktop system as the demonstration example, please first remove both sides and the lid of the case in order to install the power supply. Place the power supply in the correct place in the case and secure it with screws. Installation and placement of the power supply may differ depending on the type of case used.

To ensure sufficient power can be supplied to your system, it is recommended that a power supply of good quality be used. If a power supply is used that does not provide the required power, the result can lead to an unstable or unbootable system.
Step
4
Installing the Motherboard
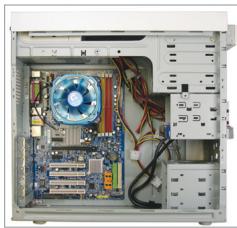
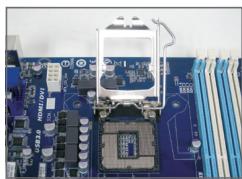
Remove the original I/O shield from the back of the case and replace it with the motherboard I/O shield. Place the motherboard within the case by positioning it into its I/O shield. Align the mounting screw holes on the motherboard with their corresponding mounting holes on the case. Secure the motherboard in place with screws.
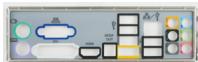
I/O Shield
Step
5
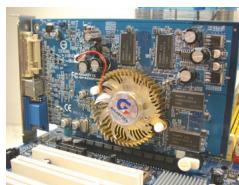
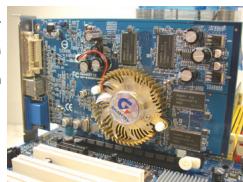
Installing an Expansion Card
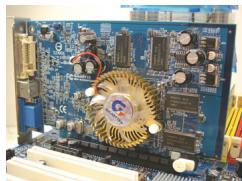
PCI Express Graphics Card
Locate an expansion slot that supports your card and remove the slot cover from the case back panel. Then insert the expansion card into the slot. Secure the expansion card's bracket to the case back panel with a screw.

- Before purchasing an expansion card, check the length of the card, making sure it can fit into your case.
- Make sure that the expansion card is fully seated in its slot.
Step
6
Installing IDE and SATA Devices
Installing an Optical Drive
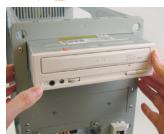
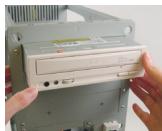
6-1 Install your optical drives, such as DVD-ROM and CD-ROM drives.
Remove the 5.25" drive bay cover from the front of the case. Mount the optical drive in the 5.25" drive bay and secure it with screws.
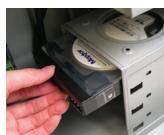
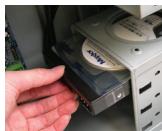
Installing a Hard Drive
6-2 Install your IDE and SATA hard drives.
Install the hard drive into a drive bay within the case and secure it with screws.

- One motherboard IDE connector can connect up to two IDE devices. Prior to installation, check the jumper settings (master and slave) on your IDE devices.
- If more than one hard drive is installed, enter system BIOS Setup to set the hard drive boot sequence.

Connecting Cables to Internal Connectors
7-1 Connect cables to internal connectors and headers on the motherboard, including IDE/SATA connectors, and front panel audio, USB, IEEE 1394 headers, etc.
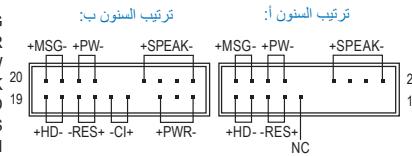
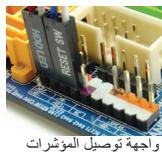
7-2 Attach the front panel module (differs depending on the case design, consisting of power indicator, hard drive activity indicator, speakers, reset switch, power switch, etc.) from the case to the front panel header (F PANEL) on the motherboard.
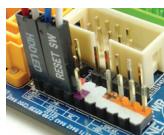
Front Panel Header
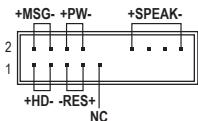
Pin Assignments A:

Pin Assignments B:
MSG: Message/Power/Sleep LED
PWR: Power LED
PW: Power Switch
SPEAK:Speaker
HD: Hard Drive Activity LED
RES: Reset Switch
Cl: Chassis Intrusion Header
(Note) The pin assignments for the front panel header may differ by model. Refer to the motherboard user's manual for the actual pin assignments.

Connecting Peripherals
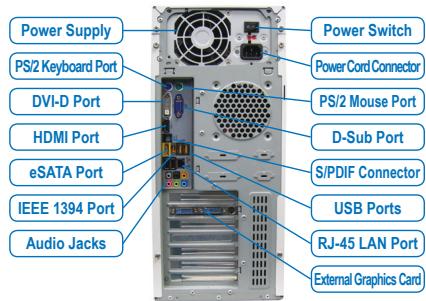
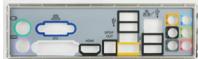
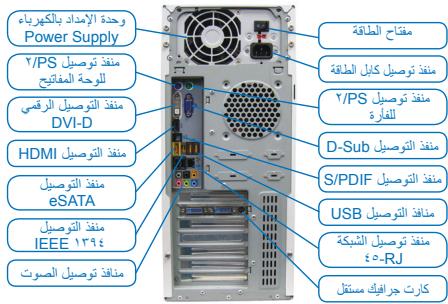
Back Panel of the Case
Once the steps above have been completed, connect the peripheral devices to the computer, such as the keyboard, mouse, monitor, etc. Then connect the power, turn on the system, and install all required software.

3 Chuan Bi Thung May Và Lap Dǎt Bô Nguón
Dûng hé thóng män hìn nèn cuà GIGABYTE nuh ví du minh hoà, trucó tién hyay thao ca hai mát ben surón va nap thung may dé láp dát bó nguàn. Láp bó nguón vào dúng vi tristrong thung
HD:LED Activities Hard Drive
RES: Saklar Reset
C-1 nauwauuauauauauCPU, uuaaauuuuauauauauauauauauauauuuuuuuuuuuuuuuuuuuuuuuuuuuuuuuuuuuuuuuuuuuuuuuuuuuuuuuuuuuuuuuuuuuuuuuuuuuuuuuuuuuuuuuuuuuuuuuuuuuuuuuuuuuuuuuuuuuuuuuuuuuuuuuuuuuuuuuuuuuuuuuuuuuuuuuuuuuuuuuuuuuuuuuuuuuuuuuuuuuuuuuuuuuuuuuuuuuuuUU
C-2 1aFANuuaa aau CPU uuuuCPU_FAN uuuuaua uauuauuuuauuuuuuuuuuuuuuuuuuuuuuuuuuuuuuuuuuuuuuuuuuuuuuuuuuuuuuuuuuuuuuuuuuuuuuuuuuuuuuuuuuuuuuuuuuuuuuuuuuuuuuuuuuuuuuuuuuuuuuuuuuuuuuuuuuuuuuuuuuuuuuuuuuuuuuuuuuuuuuuuuuuUU

n
sueeunneaneeaneeanee ane eaeenee nee eaeenee nee eaeenee nee eaeenee nee eaeenee nee eaeenee nee eaeenee nee eaeenee nee eaeenee nee eaeenee nee eaeenee nee eaeenee nee eaeenee nee eaeenee nee eaeenee nee eaeenee nee eaeenee nee eae

nntnnnnae nnnnne nnne ne nnnnne
waiuuiiiananrnnnnaeunwwaaunnuo 1wauuuiuuiuuiuuiuuiuuiuuiuuiuuiuui uuuuuuuuuuuuuuuuuuuuuuuuuuuuuuuuuuuuuuuuuuuuuuuuuuuuuuuuuuuuuuuuuuuuuuuuuuuuuuuuuuuuuuuuuuuuuuuuuuuuuuuuuuuuuuuuuuuuuuuuuuuuuuuuuuuuuuuuuuuuuuuuuuuuuuuuuuuuuuuuuuuuuuuuuuuuuuuuuuuuuuuuuuuuuuuuuuuuuuuuuUU
#
4
n
unuuaIauu I/O uuuuunununununununun unauuuuununununun unuauu uO uauuuuuaa nunuuuuaanunuauuuuauuuuuuuuuuuuuuuuuuuuuuuuuuuuuuuuuuuuuuuuuuuuuuuuuuuuuuuuuuuuuuuuuuuuuuuuuuuuuuuuuuuuuuuuuuuuuuuuuuuuuuuuuuuuuuuuuuuuuuuuuuuuuuuuuuuuuuuuuuuuuuuuuuuuuuuuuuuuuuuuuuuuuuuuuuuuuUU
的山
#
5 n
nwnnnn PCI
IDE 2 nauuuaa,
- nanaananaananaananaananaananaananaananaananaananaananaananaananaananaananaananaananaananaananaananaananaananaananaananaananaananaananaananaananaananaananaananaananaananaananaananaananaananaananaananaananaananaananaananaananaananaananaananaananaananaanana an

nlaananaananaananaananaananaananaananaananaananaananaananaananaananaananaananaananaananaananaananaananaananaananaananaananaananaananaananaananaananaananaananaananaananaananaananaananaananaananaananaananaananaananaananaananaananaananaananaananaananaananaanaraannnaa
Jae jaaagallgagagagale (gill gill) kellal aalal alalal gssasall cals
aai jai gai jie laiaai aai ai jai (la jz +i all

j 1 j 1 j 1 j 1 j 1 j 1 j 1 j 1 j 1 j 1 j 1 j 1 j 1 j 1 j 1 j 1 j 1 j 1 j 1 j 1 j 1 j 1 j 1 j 1 j 1 j 1 j 1 j 1 j 1 j 1 j 1 j 1 j 1 j 1 j
clalall

Aailll aalll
Jia aaiall o jyjll Juyi ayaiall c gaiil eai j 1 yjiy i dll 2yjg yajaiall o jial jaiaiall a jayaiall jaiill Jx jzjg jzjjj

yss jy
a_b = 1
E
aall lal lal lal lal lal lal lal lal lal lal lal lal lal lal lal lal lal lal lal lal lal lal lal lal lal lal lal lal lal lal lal lal lal lal lal lal lal lal lal lal lal lal lal lal lal lal lal lal lal lal lAL
aannnnn aannnnn
I/O Shield

aui 11 i 11
log10
0
jlll jlll g jilg jilj jil jil l l l l l l l l l l l l l l l l l l l l l l l l l l l l l l l l l l l l l l l l l l l l l l l l
PCExpress
山
a a a a a a a a a a a a a a a a a a a a a a a a a a a a a a a a a a a a a a a a a a a a a a a a a a a a a a a a a a a aaa
y 10000000000000000000000000000000000000000000000000000000000000000
aall j
jlll alg aagaaa 1.IDE lglal glaas ygaae ygaaa glg 1EIDE JgaJ

Jumper)
.BIOS 1234567890
NOTE
(2023 12.10)
a
aaiy jaii aaii 100000000000000000000000000000000000000000000000000000
a a a a a a a a a a a a a a a a a a a a a a a a a a a a a a a a a a a a a a a a a

all 2y jC
C 1-C
C 1-C
A 1-C
A 1-C
15
S BCD = S COD + S BDO - S BOC
Y
jlaa aaii jaii gie iiaaii ciagai gao slll ciaaii ciaii ciaii iaiai iaiai iaiai iaiai iaiai iaiai iaiai iaiai iaiai iaiai iaiai iaiai iaiai iaiai iaiai iaiai iaiai iaiai iaiai iaiai iaiai iaiai iaiai iaiai iaiai iaiai iaiai iaiai iaiai iaiai iaiai iaiai iaiai iaiai
4.2.8.11.12.13.14.15.16.17.18.19.20.21.22.23.24.25.26.27.28.29.30.31.32.33.
10 : 12
yJgSll 12al oJy jI kJgall gj gig GIGABYTE JgJgai zilie
gi Jgell 12al 12aill 12al 12al 12al 12al 12al 12al 12al 12al 12al 12al 12al 12al 12al 12al 12al 12al 12al 12al 12al 12al 12al 12al 12al 12al 12al 12a
slll allo 500 Power Supply 1234567890123456789012345678901234567890123456789012345678901234567890123456789012345678901234567890123456789


puiuui uusjull ciueaui Auaeunll cuiigall uusjll gci iuiyduuui uusjill 4 puii uusjill
GIGABYTE

m = 311
(caae eae y gaiy aagll cuii o gbiil basi) Intel cnae uysjA
1-A
:A
aill jy paa 15g aag aal gaaal aal aal aal aal aal aal aal aal aal aal aal aal aal aal aal aal aal aal aal aal aal aal aal aal aal aal aal aal aal aal aal aal aal aal aal aal aal aal aal aal aal aal aal aal aal aal aal aal aal aal
B
aallll (1) 100000000000000000000000000000000000000000000000000000000000
s socket s s s s s s s s s s s s s s s s s s s s s s s s s s s s s s s s s s s s s s s s s s s s s s s s s s s s s s s s s s s s s s s s s s s s s s s s s s s s s s s s s s s s s
A
jaiy jzjj jz jz jz jz jz jz jz jz jz jz jz jz jz jz jz jz jz jz jz jz jz jz jz jz jz jz jz jz jz jz jz jz jz jz jz jz jz jz jz jz jz jz jz
aJyall aJalll 0i jui Jusiny jiaiyj
aannnll lglg 1 gnnn aag aagaaal aalall saaas yaaai ciadai glaanell

gla 1000 Jua 4 J5 Jua

:1s5 40000000000000000000000000000000000000000000000000000
:A
- Installing a CPU and CPU Cooler
- Installing an Intel CPU (skip this step if the motherboard has a built-in CPU)
- Installing an AMD CPU (skip this step if the motherboard has a built-in CPU)
- Installing the CPU cooler
- Installing Memory
- Preparing the Case and Installing a Power Supply
- Step
- 4
- Installing the Motherboard
- 5
- Installing an Expansion Card
- 6
- Installing IDE and SATA Devices
- Connecting Cables to Internal Connectors
- Connecting Peripherals
- Chuan Bi Thung May Và Lap Dǎt Bô Nguón
- n
- nntnnnnae nnnnne nnne ne nnnnne
- #
- n
- nlaananaananaananaananaananaananaananaananaananaananaananaananaananaananaananaananaananaananaananaananaananaananaananaananaananaananaananaananaananaananaananaananaananaananaananaananaananaananaananaananaananaananaananaananaananaananaananaananaananaananaanaraannnaa
- clalall
- Aailll aalll
- yss jy
- aui 11 i 11
- (2023 12.10)
- all 2y jC
- 15
- 4.2.8.11.12.13.14.15.16.17.18.19.20.21.22.23.24.25.26.27.28.29.30.31.32.33.
- gla 1000 Jua 4 J5 Jua
Brand : GIGABYTE
Model : 8I845GVM-RZAC
Category : Motherboard