
COLOR8 - Color printer OKI - Free user manual and instructions
Find the device manual for free COLOR8 OKI in PDF.
| Product type | Color laser printer |
| Brand | OKI |
| Model | COLOR8 |
| Dimensions (W x D x H) | Approx. 430 x 400 x 340 mm |
| Weight | Approx. 20 kg |
| Power supply | 220-240 V, 50/60 Hz, max consumption 500 W |
| Print resolution | 600 x 600 dpi (black and color) |
| Built-in memory | Flash memory expandable via SIMM (4 MB or 8 MB) |
| Main functions | Color printing, storage of downloaded fonts, barcodes, forms and macros in flash memory |
| Software compatibility | Windows, Mac OS, MS-DOS |
| Interfaces | Parallel, optional RS-232C or OKILAN network |
| Maintenance and cleaning | Unplug the device before any intervention; clean the card contacts carefully; use an antistatic cloth |
| Safety | Unplug before installation; avoid static electricity by touching the computer chassis before handling internal parts |
| Spare parts and repairability | Toner cartridge, drum, fuser, SIMM memory extension kit, serial or network interface card |
| General information | Manufactured by Oki Data; year 2000 compliant; flash memory retains data even after the printer is turned off |
Frequently Asked Questions - COLOR8 OKI
User questions about COLOR8 OKI
0 question about this device. Answer the ones you know or ask your own.
Ask a new question about this device
Download the instructions for your Color printer in PDF format for free! Find your manual COLOR8 - OKI and take your electronic device back in hand. On this page are published all the documents necessary for the use of your device. COLOR8 by OKI.
USER MANUAL COLOR8 OKI
Flash SIMM Kit Hardware Installation Guide
Every effort has been made to ensure that the information in this document is complete, accurate, and up-to-date. Oki Data assumes no responsibility for the results of errors beyond its control. Oki Data also cannot guarantee that changes in software and equipment made by other manufacturers and referred to in this guide will not affect the applicability of the information in it. Mention of software products manufactured by other companies does not necessarily constitute endorsement by Oki Data.
Copyright 1999 by Oki Data Americas, Inc. All rights reserved.
First edition December 1999.
Written and produced by the Oki Data Training and Publications Dept. Please address any comments to:
Training and Publications Department
Oki Data Americas, Inc.
2000 Bishops Gate Blvd.
Mount Laurel, New Jersey 08054
Visit our Web site at:
www.okidata.com
or e-mail us at
comments@okidata.com
OKI, OKILAN and OKIPAGE are registered trademarks of Oki Electric Industry Company, Ltd.; Marques déposées de Oki Electric Industry Company, Ltd.; Marcas Registradas, Oki Electric Industry Company, Ltd.
Microsoft and MS-DOS are registered trademarks and Windows is a registered trademark of Microsoft Corporation in the U. S. and other countries.
Adobe, PostScript, and Acrobat are trademarks of Adobe Systems Incorporated, which may be registered in certain jurisdictions.
Apple, LaserWriter, Macintosh, and EtherTalk are registered trademarks of Apple Computers, Inc.
Year 2000 Compliance
All products currently sold by Oki Data are Year 2000 Compliant. Each product contains information technology that accurately processes date and time data between the years 1999 and 2000, and carries no issue for the September 9, 1999 (9999) programming concern. These products, when used in combination with products purchased from other manufacturers, whose products properly exchange data and time information, will accurately process the date and time. All future products are committed to meeting the same Year 2000 compliance.
Contents
Introduction 4
Kit contents 4
Installing Flash Memory in the OKIPAGE® 10i, 10i/n, 10e, 10ex, 12i and 12i/n Printers............5
Preparing Your Printer 5
Removing the Access Plate 6
Installing the SIMM Card 6
Installing the Board 7
Installing Flash Memory in the OKIPAGE 20, 20DX and 20DXn Printers .8
SIMM Configurations 8
Preparing Your Printer 8
Installing the SIMM Card 9
Installing Flash Memory in the OKIPAGE 18, 18n, 24DX and 24DXn Printers 13
Installing SIMMs 13
Preparation 13
Installing the SIMMs 16
Finishing the Installation 17
Software Utilities Installation 19
Introduction
With the OKIPAGE Flash SIMM (Single In-line Memory Module) card installed in your printer, you can store information such as downloaded fonts, bar codes, form overlays and macros. These are stored in "flash" memory, which means that they are not erased when the printer is switched off.
Use the OKI Image Creator and NetFlash software utilities on the CD included in this kit, to download flash memory fonts and macros, etc.
! Fonts, forms or bar code images are not provided with this kit.
Follow the instructions in this guide to install the Flash SIMM in your OKIPAGE printers and install the Image Creator and NetFlash utilities in your computer. Operating instructions for the Image Creator and NetFlash utilities are located on the CD included in this kit.
- Your OKIPAGE printer accommodates only one Flash SIMM. Be sure to insert the SIMM into the socket specified in the following sections.
Kit contents
Kit # 70035701
4 MB Flash SIMM card
CD
- SIMM Installation Guide
Kit # 70035801
8 MB Flash SIMM card
CD
SIMM Installation Guide
Installing Flash Memory in the OKIPAGE® 10i, 10i/n, 10e, 10ex, 12i and 12i/n Printers
For models listed above, the flash memory SIMM is installed on one of the following optional accessory boards.
1 MB Memory Expansion Kit (Part # 70033101)
RS-232C Serial Interface Kit (Part # 00025302)
- OKILAN® 310e Network Interface Kit (OKIPAGE 10i only) (Part # 70032901)
- OKILAN® 310e+ Network Interface Kit (OKIPAGE 12i only) (Part # 70032902)
If your printer is not equipped with one of these accessories, you will need to purchase the accessory to install the Flash SIMM in the printer. Expansion sockets are provided on each board included in the option kits.
Preparing Your Printer
CAUTION! SIMMs and circuit boards can be damaged
- by static electricity and rough handling. Keep the SIMM card and option board in the packaging until you're ready to perform the installation. To avoid damage to the SIMM card, ground yourself by touching the chassis of your computer each time before handling.
WARNING! Disconnect printer from power before
beginning installation procedure.
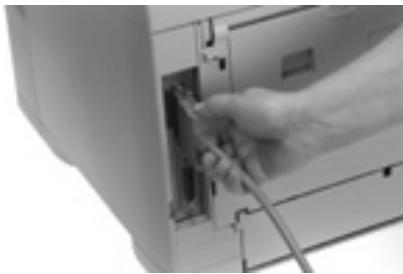
1 Turn the printer off and unplug the power cord.
2 Detach the interface cable.
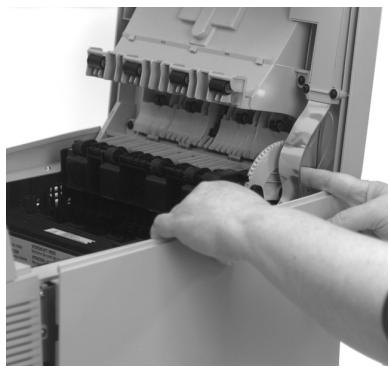
3 If an option board is already installed in your printer, turn the screws counterclockwise, then slide the board out of the printer.
Hardware Installation Guide: English
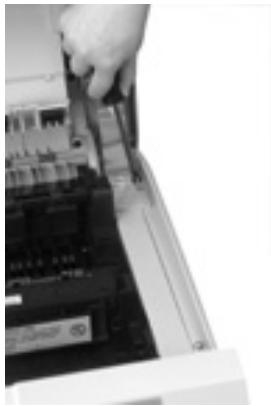
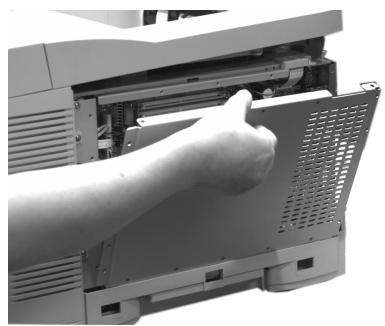
Removing the Access Plate
If you are installing an option board for the first time:
a. Turn the printer around so the rear is facing you.
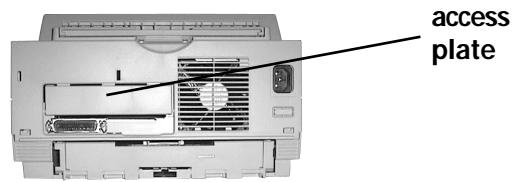
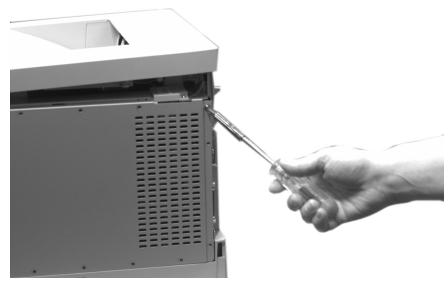
b. Use a screwdriver to pry the plate from the back panel of the printer.
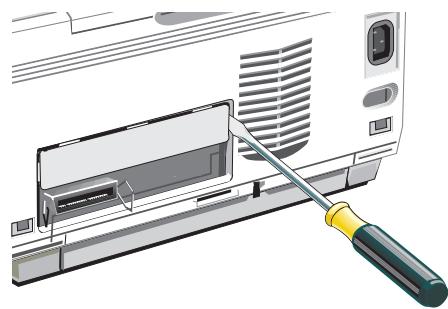
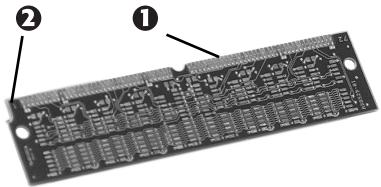
Installing the SIMM Card
Install the Flash SIMM card in the SIMM 2 socket on the option board.
1 Place the option board on a flat surface. Locate the SIMM 2 socket.
2 Remove the SIMM card from its packaging.
3 Hold the SIMM card with the metallic contact edge down, and the notch on the bottom.
4 Insert the metallic contact edge of the SIMM card into the SIMM 2 socket at a 45^ angle.
5 Push in until the metallic contacts are fully inserted into the socket.
6 Push the SIMM card forward slightly until it snaps into place. The plastic mount pins should fit into the holes on each end of the SIMM card.
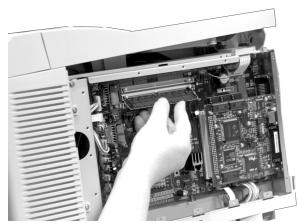
Installing the Board
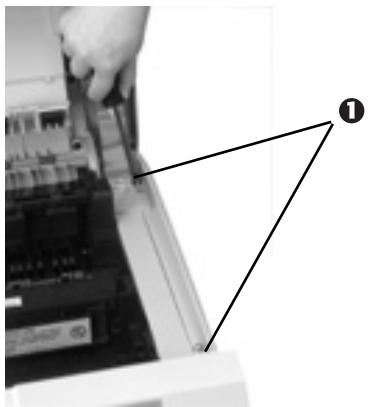
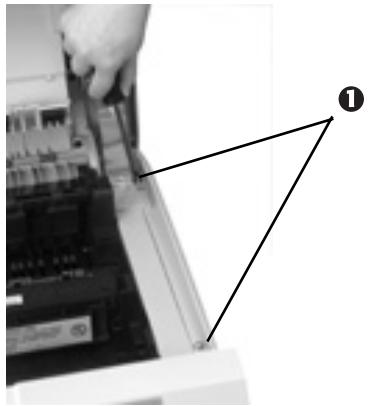
1 Locate the guide rails (1) and edge connector (2) in the printer.
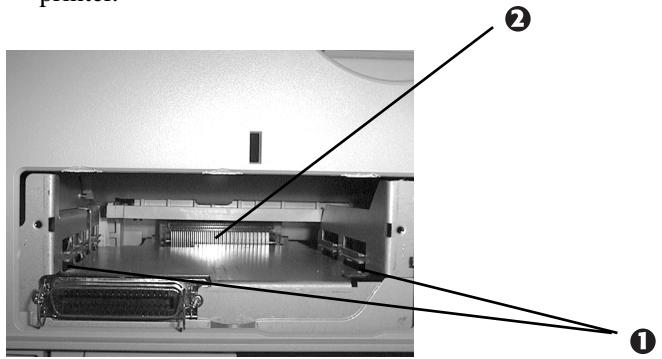
2 Insert the option board into the printer, making sure that it locates in the guide rails. Slide in the board and push it firmly into place.
3 Tighten the screws.
If the screws do not fit, the board may not be properly seated. Slide the board out and reinstall it.
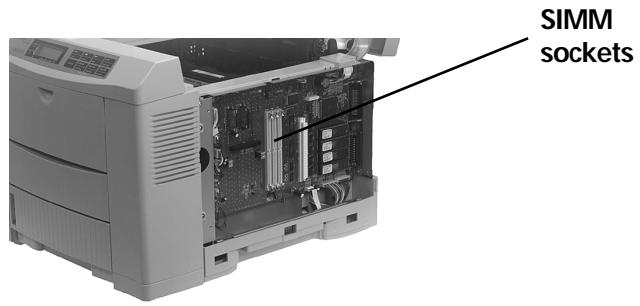
Installing Flash Memory in the OKIPAGE 20, 20DX and 20DXn Printers
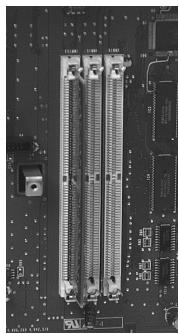
SIMM Configurations
The OKIPAGE 20/20DX has three slots for installation of optional SIMMS:
CAUTION! SIMMs and circuit boards can be damaged
- by static electricity and rough handling. Keep the SIMM cards and option board in the packaging until you're ready to perform the installation. To avoid damage to SIMMs, ground yourself by touching the chassis of your computer each time before handling.
WARNING! Disconnect printer from power before
beginning installation procedure.
Preparing Your Printer
1 Turn printer off and unplug power cord.
2 Detach the interface cable.
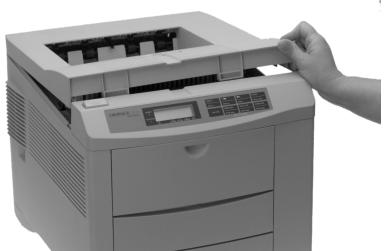
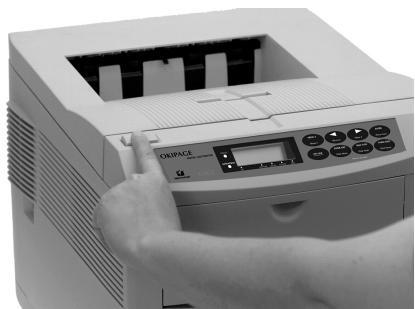
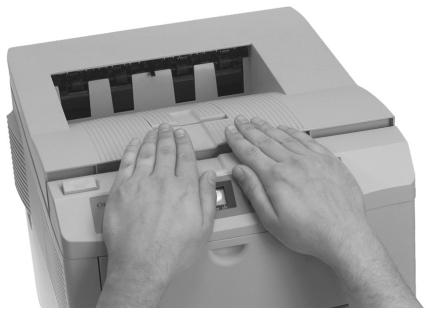
3 Push the OPEN button, then open the top cover.
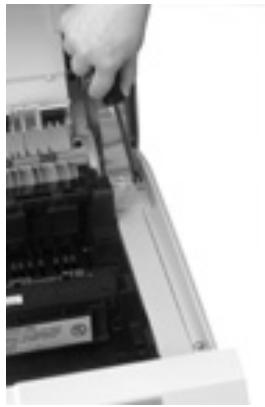
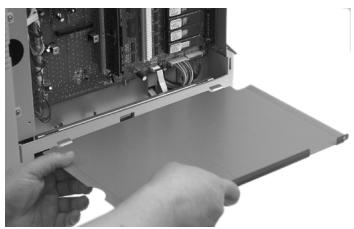
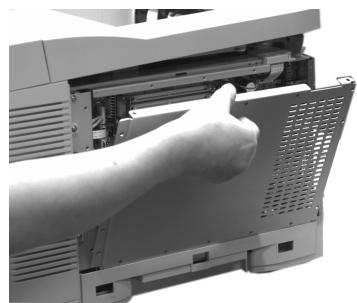
4 Remove and save the two large screws on the right side, which hold the side panel in place.
5 Pull the side panel out and remove it from the printer.
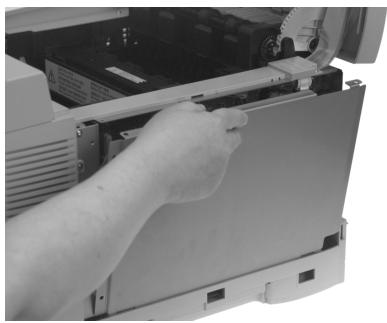
6 Remove and save the two screws on the left of the metal plate covering the internal board, then pull the plate out about an inch and lift it out.
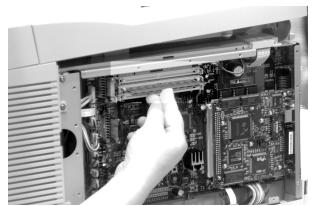
Installing the SIMM Card
1 Locate the three SIMM sockets on the board.
2 Insert the silver metallic contact edge of the SIMM into the left socket (FSIMM1) at about a 45^ angle, with the notched corner of the SIMM at the bottom. Push in until the silver contacts are fully inserted into the socket.
3 Pivot the SIMM to the left until it snaps into place.
OKI Flash SIMM
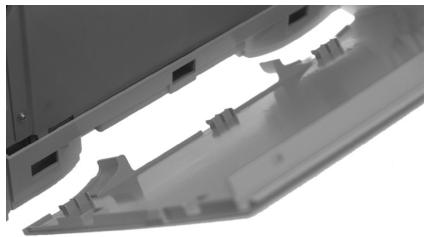
4 Insert the tabs on the metal plate into the slots on the printer housing, then swing it up into place and replace the two mounting screws.
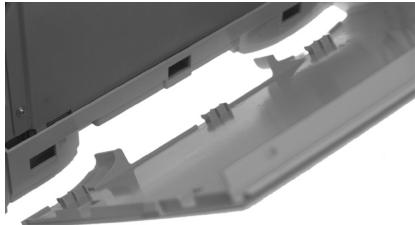
5 Replace the side panel (tabs go in slots): you'll need to move the cover hinge out of the way before you put the side panel back into place.
6 Secure the panel in place with the two screws.
7 Close the printer cover.

8 Reattach the interface cable and plug the power cord into the power outlet.
Installing Flash Memory in the OKIPAGE 18, 18n, 24DX and 24DXn Printers
CAUTION! Circuit boards can be damaged by static electricity and rough handling. Keep board in packaging until you're ready to install it. SIMMs are sensitive to static electricity. To avoid damage, ground yourself by touching the chassis of your computer each time before handling SIMMs.
Installing SIMMs
Preparation
1 Turn the printer off.

2 Unplug the power cord and detach the interface cable from the back of the printer.
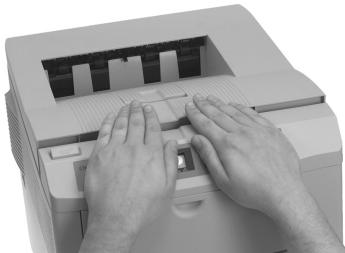
3 Push the OPEN button, then open the top cover.
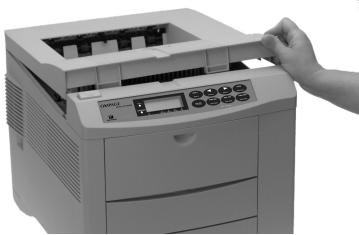
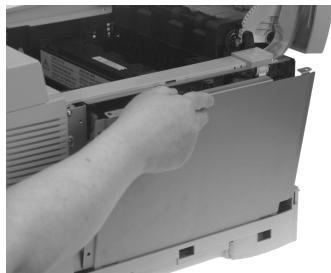
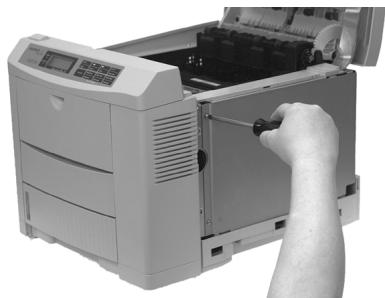
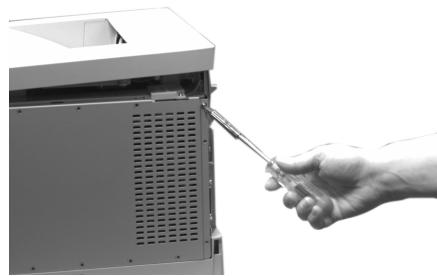
4 Remove and save the two large screws (1) on the right side, which hold the side panel in place.
5 Pull the side panel out and remove it from the printer, then close the cover to protect the image drum from light while you are installing the SIMM.

6 Remove and save the screws on the metal plate covering the internal board, then lift the plate out.
Installing the SIMMs
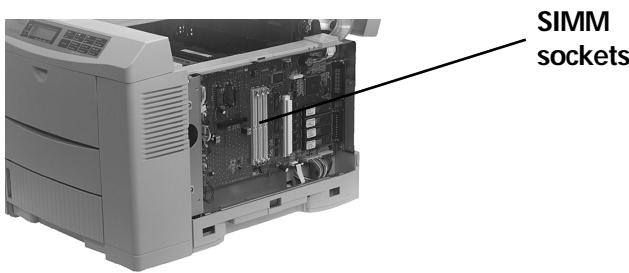
- Locate the SIMM sockets on the board. The top socket (1) is used for a Flash SIMM.

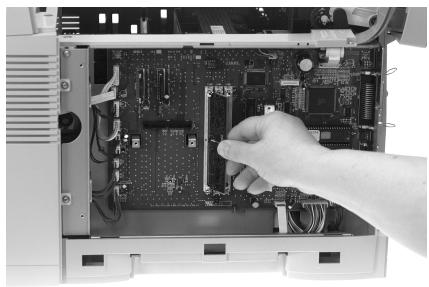
2 Hold the SIMM with the metallic contact edge (1) toward the printer and the notched corner (2) to the left.
3 Angle the SIMM down about 45^ , then insert the contact edge into the top socket and lift the board until it locks in place.
Finishing the Installation
1 Position the metal plate on the housing and replace the mounting screws.
2 Open the cover and replace the side panel (tabs go in slots): you need to move the cover hinge (1) out of the way.
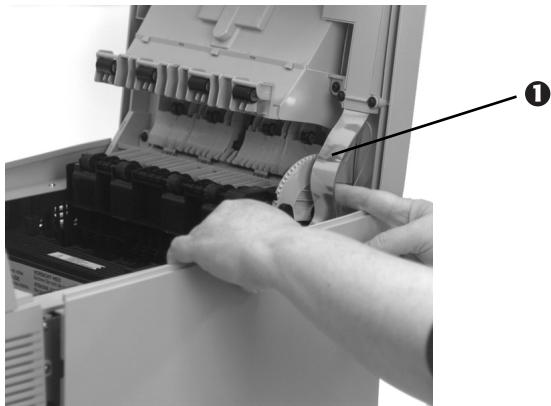
3 Secure the panel in place with the two screws (1).
4 Close the printer cover.
5 Reattach the PC interface cable and plug the power cord into the power outlet.

Software Utilities Installation
To install the Image Creator and NetFlash utilities:
1 Insert the Flash SIMM Kit CD into your CD-ROM drive.
2 Click Start - Run.
3 Type D:\SETUP (if your CD-ROM drive exists at other than D, use the appropriate letter).
4 Follow the installation instructions.