
GEIT6A60WPG - Range hood GORENJE - Free user manual and instructions
Find the device manual for free GEIT6A60WPG GORENJE in PDF.


| Type | Built-in chimney hood |
| Brand | Gorenje |
| Model | GEIT6A60WPG |
| Width | 60 cm |
| Mounting | Wall-mounted |
| Extraction capacity (max) | 650 m³/h |
| Noise level (max) | 62 dB(A) |
| Number of speeds | 3 + intensive |
| Control type | Electronic touch |
| Lighting | LED, 2 x 3.5 W |
| Grease filter type | Metal, washable |
| Recirculation possible | Yes (carbon filter optional) |
| Duct diameter | 150 mm |
| Energy efficiency class | A |
| Annual energy consumption | 45 kWh |
| Power supply | 220-240 V, 50 Hz |
| Power consumption (max) | 180 W |
| Dimensions (W x D x H) | 598 x 350 x 575-1025 mm |
| Weight | 10.5 kg |
| Noise level (min speed) | 49 dB(A) |
| Material | Stainless steel & glass |
| Filter cleaning indicator | Yes |
| Remote control | Not included |
Frequently Asked Questions - GEIT6A60WPG GORENJE
User questions about GEIT6A60WPG GORENJE
0 question about this device. Answer the ones you know or ask your own.
Ask a new question about this device
Download the instructions for your Range hood in PDF format for free! Find your manual GEIT6A60WPG - GORENJE and take your electronic device back in hand. On this page are published all the documents necessary for the use of your device. GEIT6A60WPG by GORENJE.
USER MANUAL GEIT6A60WPG GORENJE
INSTRUCTIONS FOR USE
FREE STANDING COOKER

We thank you for your trust and the purchase of our appliance.
This detailed instruction manual is supplied to make the use of this product easier. The instructions should allow you to learn about your new appliance as quickly as possible.
Make sure you have received an undamaged appliance. If you do find transport damage, please contact the seller from which you purchased the appliance, or the regional warehouse from which it was supplied.
For more detailed instructions and tips, please visit http://www.gorenje.com or scan the QR code on the rating plate.
![graph LR A["输入框"] --> B["QR码"] B --> C["扫描器"] C --> D["打开的书本"] D --> E["输出"]](/content/2026/06/1389915/images/b776ebefa0faf158eade21f811ca8d36e46831c8a5b596e2ec898fb58c3f405f.jpg)
The following symbols are used throughout the manual and they have the following meanings:

INFORMATION!
Information, advice, tip, or recommendation

WARNING!
Warning – general danger

It is important that you carefully read the instructions.
Carefully read the instructions and save them for future reference.
This appliance may only be used by children aged 8 years and above and persons with reduced physical, sensory or mental capabilities or lack of experience and knowledge if supervision or instructions are provided to them concerning use of the appliance in a safe way and if they understand the hazards involved. Do not let the children play with the appliance. Cleaning and user maintenance shall not be made by children without supervision.
WARNING: The appliance and some of its accessible parts may become very hot during use. Be careful not to touch the heating parts of the appliance. Children younger than 8 years of age shall be kept away unless continuously supervised.
WARNING: The accessible parts of the appliance may become hot during use. Young children should be kept away from the oven.
WARNING: Danger of fire: do not store items on the cooking surfaces.
WARNING: Unattended cooking on a hob with fat or oil can be dangerous and may result in fire. NEVER try to extinguish a fire with water, but switch off the appliance and then cover flame e.g. with a lid or a fire proof blanket.
Only use the temperature probe recommended for use in this oven.
CAUTION: The cooking process and a short term cooking process has to be supervised continuously.
WARNING: If the surface is cracked, switch off the appliance to avoid the possibility of electric shock.
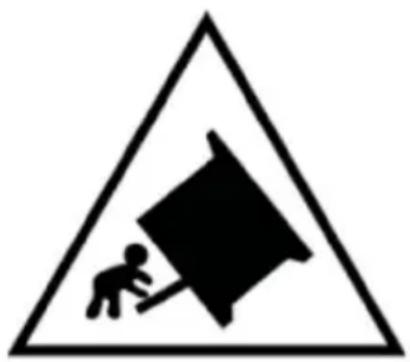
CAUTION: possibility of tilting.

WARNING: In order to prevent tipping of the appliance, stabilising means must be installed. Refer to the instructions for installation.
WARNING: Before replacing the light bulb, make sure the appliance has been disconnected from the mains power, in order to prevent the hazard of an electric shock.
Do not place objects like knives, forks, spoons, or lids on the induction cooking zone as they can become very hot.
Appliance must not be installed behind a decorative door in order to avoid overheating.
Do not use harsh abrasive cleaners or sharp metal scrapers to clean the oven door glass/the glass of hinged lids of the hob (as appropriate), since they can scratch the surface, which may result in shattering of the glass.
Do not use steam cleaners or high-pressure cleaners to clean the appliance, as this may result in an electric shock.
After use, switch off the hob element by its control and do not rely on the pan detector.
The appliance is not intended to be controlled by external timers or separate remote control system.
WARNING: Use only hob guards designed by the manufacturer of the cooking appliance or indicated by the manufacturer of the appliance in the instructions for use as suitable or hob guards incorporated in the appliance. The use of inappropriate guards can cause accidents.
If the supply cord is damaged, it must be replaced by the manufacturer, its service agent or similarly qualified persons in order to avoid a hazard.
CAUTION: This appliance is for cooking purposes only. It must not be used for other purposes, for example room heating.
The appliance is intended to be placed directly on the floor, without any supports or plinths.
Do not install the appliance near powerful sources of heat, such as solid fuel stoves, because high temperature near them can damage the appliance.
The appliance may only be connected to the mains power by an authorized service technician or expert. Clamps (instead of connecting cable) should be protected by a clamp cover (see additional equipment). Tampering with the appliance or non-professional repair thereof may result in risk of severe injury or damage to the product.
Cooker with stainless steel control panel and electrical oven is equipped with a cooling fan. During operation of the oven, air flows from the cooker in the area under the control panel when door is closed. If there is no air flow switch off the appliance and contact service.
If the power cords of other appliances located near this appliance are caught in the oven door, they may be damaged, which may in turn result in a short circuit. Therefore, keep the power cords of other appliances at a safe distance.
Do not line the oven walls with aluminium foil and do not place baking trays or other cookware on the oven bottom. Aluminium foil would prevent air circulation in the oven, hinder the cooking process, and ruin the enamel coating.
Oven door become very hot during operation. A third glass is installed for extra protection, reducing the temperature of the outside surface (only with some models).
Oven door hinges may be damaged when under excessive load. Do not place heavy pans on open oven door and do not lean against open oven door when cleaning the oven cavity. Never stand on the open oven door and do not let children sit on it.
Make sure the vents are never covered or obstructed in any other way.
NOTICE! The appliance is equipped with a glass or glass ceramic cooking surface. In case of breakage:
- Switch off all electric heating elements and disconnect the appliance from the mains.
- Do not touch the surface of appliance.
- Do not use the appliance.
For appliance connection use a 5x1.5 mm² cord with mark H05VV-F5G1.5 or 3x4.0 mm² cord with mark H05VV-F3G4 or better. Cord must be installed by service agent or similar qualified person.
Appliance must be connected to fixed wiring which is in accordance with the wiring rules.
Appliance must be connected to fixed wiring which has incorporated means of disconnection. Fixed wiring must be made in accordance with the wiring rules.

BEFORE CONNECTING THE APPLIANCE
Carefully read the instructions for use before connecting the appliance. Repair or any warranty claim resulting from incorrect connection or use of the appliance shall not be covered by the warranty.
FREE STANDING COOKER
Appliance description

INFORMATION!
Appliance functions and equipment depend on the model.
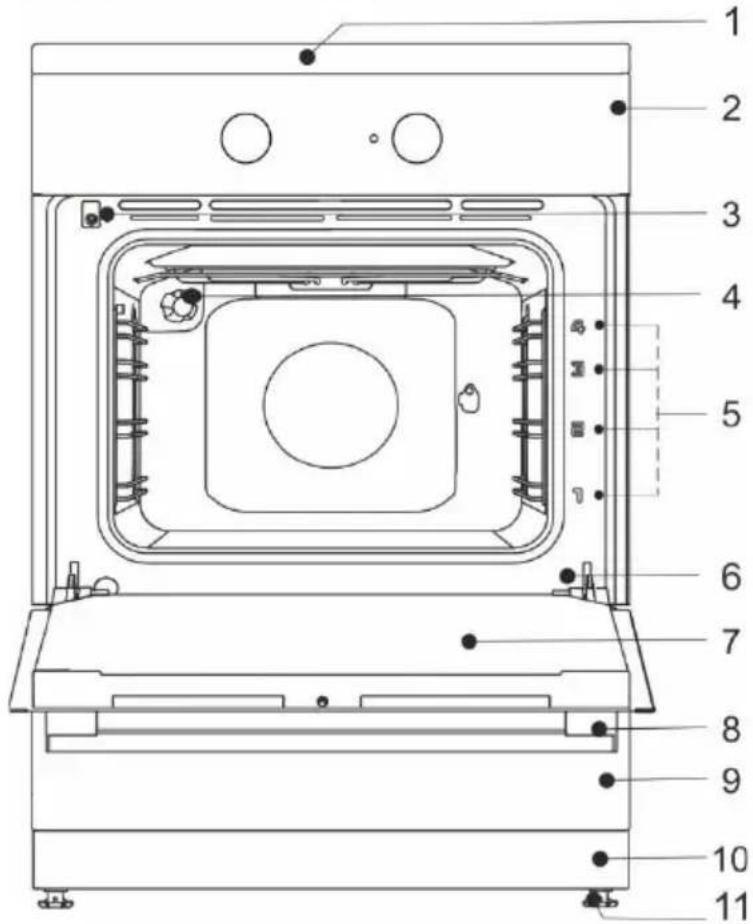
1 cooking hob
2 control unit
3 door switch
4 lighting
5 guides – cooking levels
6 rating plate
7 oven door
8 door handle
9 drawer/flip down
10 plinth
11 adjustable feet
APPLIANCE DRAWER

Do not store combustible, explosive, volatile or temperature-sensitive items (such as paper, dish cloths, plastic bags, cleaners or detergents and spray cans) in the oven's storage drawer, as they can ignite during oven operation and cause a fire.
WIRE GUIDES
The wire guides allow preparation of the food on four levels (please note that the levels/guides are counted from the bottom up). Guides 3 and 4 are intended for grilling.
Appliance operation is safe with and without tray guides.
TELESCOPIC PULL-OUT GUIDES
Telescopic pull-out guides may be fitted for the 2nd, 3rd, and 4th level. Pull-out guides can be partly or fully extendible.
EMBOSSED
The oven has stamped side grooves in four levels for inserting of the grid and baking sheets.
OVEN DOOR SWITCH
The switch deactivates oven heating and the fan when the oven door is opened during the cooking process. When the door is closed, the switch turns the heaters back on.
COOLING FAN
The appliance is fitted with a cooling fan that cools the housing and the appliance control panel. The cooling fan is in operation when the oven is in operation.
After the oven is switched off, the cooling fan continues to operate for a short while in order to cool the oven. (Extended cooling fan operation depends on the temperature in the center of the oven.)

The appliance and some of the accessible parts tend to heat up during cooking. Use oven mitts.
GRID


There is a safety latch on the grid. Therefore, lift the grid slightly at the front when pulling it out from the oven.
The grid or the tray should always be inserted into the groove between the two wire profiles.

With telescopic extendible guides, first pull out the guides of one level and place the grid or the baking tray onto them. Then, push them in with your hand as far as they will go.

Close the oven door when the telescopic guides are retracted all the way into the oven.

As baking accessories heat up, their form may change. This does not affect their functionality and their original form will be restored when they cool down.
PUSH-PULL KNOBS (depending on the model)
Softly press the knob so it lifts from the control panel. Knobs can be pushed back into the control panel only when they are in "zero" position.
BEFORE USING THE APPLIANCE FOR THE FIRST TIME
- Upon receiving the appliance, remove all parts, including any transport equipment, from the oven.
- Clean all accessories and utensils with warm water and regular detergent. Do not use any abrasive cleaners.
- If your hob has a glass ceramic surface, clean it with a damp cloth and some washing-up liquid. Do not use aggressive cleaners, such as abrasive cleaners that could cause scratches, abrasive dishwashing sponges, or stain removers.
- When the oven heats up for the first time, the characteristic smell of a new appliance will be emitted. Ventilate the room thoroughly during the first operation.
INDUCTION COOKING SURFACE (depending on the model)

1 Induction cooking zone rear left 2 Induction cooking zone rear right 3 Induction cooking zone front left 4 Induction cooking zone front right 5 Cooking hob control module
GLASS CERAMIC COOKING SURFACE
- The hob is resistant to temperature changes.
- The glass-ceramic plate is very solid but it is not unbreakable. The plate can break when an object falls with its edge on the plate. Such damage comes out immediately or after a while. Disconnect the damaged hotplate from the main immediately and do not use it.
- Using the glass ceramic hob as a storage area may result in scratches or other damage to it.
- Hob surface is completely flat and smooth, without edges to accumulate dirt.
- Make sure the cooking zone and the cookware bottom is clean and dry. This will allow better conduction of heat and prevent any damage to the heating surface. Do not place empty cookware on the cooking zone.
INDUCTION COOKING ZONE OPERATING PRINCIPLE

- magnetic field
- induction coils
- The cooking hob is fitted with highly efficient induction cooking zones. The heat is generated directly in the bottom of the pan where it is needed the most.
- This avoids any losses through the glass ceramic surface. Power consumption is considerably lower than in conventional cooking zones with radiation heaters.
- The glass ceramic cooking zone is not heated directly, but only indirectly with the heat radiated back by the pan. After the cooking zone is switched off, this heat is indicated as "residual heat".
- In induction cooking zones, heating is made possible by the induction coil installed under the glass ceramic surface. The coil induces a magnetic field which generates eddy currents in the bottom of a ferromagnetic pan (i.e. a pan that a magnet will adhere to), which in turn heats the pan.

If sugar or food with high sugar content is spilled over a hot glass ceramic hob, immediately wipe the hob or remove the sugar with a scraper, even if the cooking zone is still hot. This will prevent any damage to the glass ceramic surface. Do not use detergents and other cleaners to clean a hot glass ceramic hob as this could damage the surface.
INDUCTION COOKWARE
COOKWARE SUITABLE FOR AN INDUCTION HOB
- The induction will work correctly if you use suitable cookware.
- Make sure the pot or pan is in the middle of the cooking zone.
- Suitable cookware includes cookware made of steel, enamel-coated steel pans, or cast iron pans.
- Unsuitable cookware: alloy steel cookware with copper or aluminium bottom, and glass cookware.

- The magnet test: Use a small magnet to check whether the pan or pot bottom is ferromagnetic. If the magnet sticks to the bottom of the pan, then it is suitable for an induction cooker.
- When using a pressure cooker, keep an eye on it until the right pressure is reached. First, set the cooking zone to maximum power; then, following the pressure cooker manufacturer's instructions, use the relevant sensor to decrease the cooking power at the right time.
- Make sure there is enough liquid in the pressure cooker, or any other pot or pan. Due to overheating, using an empty pot on the cooking zone may result in damage to both the pot and the cooking zone.
- When using special cookware, observe the manufacturer's instructions.
- Only use cookware with flat bottom! Concave or convex (indented or bulging) bottom may impede the operation of overheat protection mechanism and the cooking hob may become too hot. This could lead to cracks in the glass surface and melting of the pan bottom. In case of damage resulting from the use of unsuitable cookware or overheating of empty, dried-out pots or pans (with nothing in them), the warranty is void.

Only use cookware suitable for electric and induction cooking, with a:
• thick bottom (at least 2.25 mm) - flat bottom.
| Cooking zone | Minimum pan bottom diameter |
| ∅ 145 mm | ∅ 90 mm |
| ∅ 180 mm | ∅ 110 mm |
| ∅ 210 mm | ∅ 130 mm |


ATTENTION!
When using induction build-in hobs, do not insert any additional equipment (for instance so called reduction rings or induction base, which make cookware with nonmagnetic base possible to use) between the base of cookware and the surface of glass ceramic hob. Application of such an equipment can cause damage of the appliance and a high risk of burning is there.
PAN RECOGNITION

- If the pan is much smaller than the cooking zone, there is a possibility that it will not be recognized by the cooking zone. When the cooking zone is activated, the sign "u" will appear on the cooking power display. If a pan is placed on the induction cooking zone within the next ten minutes, the hob will recognize it and switch on with the selected cooking power. As soon as the pan is removed from the cooking zone, the power supply is cut off.
- If a smaller pan or pot is placed on the cooking zone and it is recognized, the hob will only use as much power as necessary given the pan size.
ENERGY SAVING TIPS
- When purchasing cookware, note that the diameter indicated on the pan usually pertains to the upper edge or the lid, which is normally larger than the diameter of the pan bottom.
- If a dish takes a long time to cook, use a pressure cooker. Make sure there is always sufficient liquid in the pressure cooker. Putting an empty pot on the cooking hob can cause overheating, resulting in a damaged pot or cooking hob.
- Whenever possible, close the pot or pan with a suitably sized lid. Use cookware that fits the amount of food you are cooking. Cooking in a large partly full pot will consume much more energy.
POWER REGULATION
Cooking zone heat power can be set to ten different levels. The table lists some examples of use for each level.
| Power settings | Purpose |
| 0 | Off, using remaining heat |
| 1-2 | Maintaining warm food, slow simmer of smaller quantities (lowest setting). |
| 3 | Slow simmer (continuation of cooking after a powerful start-up). |
| 4-5 | Slow cooking (continuation) of larger quantities, roasting larger chunks. |
| 6 | Roasting, browning. |
| 7-8 | Roasting. |
| 9 | Cooking large amounts, searing/braising. |
| P | “Power boost” setting for start of the cooking process; also suitable for very large amounts of food. |
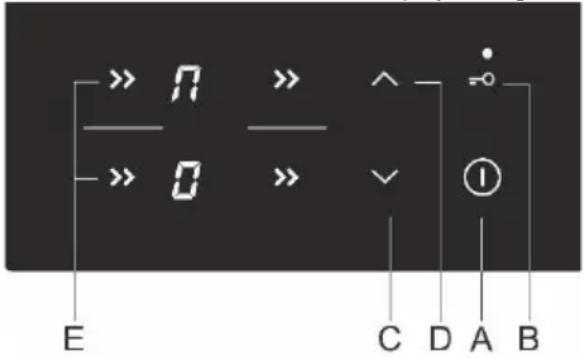
A Hob on/off key B Lock/child lock key C Power and timer decrease key (−) D Power and timer increase key (+) E Cooking zone on key F Decimal point indicating that timer function is activated G Power level displays
SWITCHING ON THE HOB
Touch the on/off key (A) and hold it for 1 second to switch on the hob. An acoustic signal will be sounded and the decimal point will light up on all display units.

If no cooking zone is switched on in 10 seconds, the cooking hob will power off. A short beep will be heard.

When the appliance is first connected to the power mains or re-connected after a power supply failure, the appliance is locked (see chapter "CHILD LOCK").
SWITCHING ON THE COOKING ZONES

After the hob is switched on (in the next 10 seconds), switch on the desired cooking zone (E). Use the keys (C) and (D) to select the desired setting for the activated cooking zone. If you first touch the key (C), the power level will be set to "9". If you first touch the key (D), the power level will be set to "1".
If there is no cookware on the selected cooking zone, the set power level and the symbol will appear alternately on the display unit.
Changing the cooking zone settings
Power level can be changed at any time by selected the desired cooking zone (E) and adjusting the setting by touching the corresponding key (C) or (D).
To increase or decrease the power level faster, touch and hold the key (C) or (D).
POWER ZONE WITH THE POWER BOOST OPTION

Select any cooking zone. Touch the key (C). A short acoustic signal will be emitted and
"9" will appear on the display unit. Touch the key (D) and P will appear on the display unit. The cooking zone will operate at maximum power for 10 minutes; then, an acoustic signal will be emitted and the power level will switch to "9".
Deactivating the power boost
Power can be decreased to desired level by pressing the key (C).

The cooking zone with the power boost function activated is highly powerful.
CHILD LOCK

Child lock may be activated on the hob to prevent the appliance from being switched on easily and quickly and to prevent any changes during operation.
Locking the cooking hob controls
Touch the lock/child lock key (B) and hold it for 1 second. Signal light (B1) will light up.
The cooking hob is now locked.
Unlocking the cooking hob controls
To unlock the cooking hob, proceed in the same way as for locking it. The hob must be switched off. Touch the key (B) and hold it for 1 second.

The lock function can be activated when the cooking zones are switched on or when the cooking hob is switched off. If the cooking hob is switched on, the key lock function locks all keys, except for the cooking hob on/off key (A) and the lock key. If the cooking hob is switched off, the key lock function locks all keys, except for the lock key. Cooking hob lock is always activated when the appliance is connected to the power mains or after the power supply has been disconnected, before switch on.
TIMER FUNCTIONS
This function allows setting the cooking time for the selected cooking zone on which a power level has already been set. When the time expires, the cooking zone is switched off automatically.
Cooking time can be set from to 99 minutes. The program timer can be set for all cooking zones at all power levels.
TIMER ACTIVATION
First, select the cooking zone (E). Then, use the keys (C) and (D) to set the power level. The program timer will not operate if the power level is set to "0". Touch the cooking zone selection key (E) again. An acoustic signal will be emitted, and a decimal point will appear on the cooking zone display unit (G). Remaining time will appear on the opposite cooking zone display.
- Touch the keys (C) and (D) to set the time from 99 minutes.
- When the desired value is set, the countdown begins. If you touch the keys (C) and (D) simultaneously, the time will be reset to "0" or it will be switched off. If you touch and hold the key (C) or (D), the rate at which the setting changes will increase. • After a few seconds, timer display will switch off and a decimal point will be lit next to the power display.
- After the set time has expired, acoustic signal will be activated and the cooking zone will be switched off. Switch off the alarm by touching any key; alternatively, it will switch off automatically after 2 minutes.
Changing the cooking time
- Remaining cooking time can be changed at any time during cooking.
- Press the key for the desired cooking zone twice.
- Touch the key (C) or (D) to set a new desired cooking time.
Displaying the remaining cooking time
If several timer settings are activated, remaining cooking time can be displayed by touching the key (E) twice.
SWITCHING OFF A COOKING ZONE
To switch off a cooking zone (E), use the relevant key (C) to set the power level to "0". To quickly switch off the cooking zone, touch the relevant keys (C) and (D) simultaneously. You will hear a short beep, and "0" will be displayed on the display unit.
If the power of all cooking zones is set to "0", the cooking hob will switch off automatically after a few seconds.
RESIDUAL HEAT INDICATOR
The glass ceramic hob is also fitted with a residual heat display, "H". The glass ceramic cooking zone is not heated directly, but only indirectly by the heat radiated back by the pan. As long as the symbol "H" is lit up after the hob has been switched off, there is residual heat in the cooking zone, which can be used to keep the food warm or for defrosting. When the sign "H" disappears, the cooking zone may still be hot. Be careful as there is danger of burns!
For safety, the cooking time for each cooking zone is restricted to a maximum duration. Duration of operation depends on the selected power level. If the setting is not changed within the set time, the cooking zone will power off automatically.
| Power level | Maximum operating time (hours) |
| 1 | 10 |
| 2 | 10 |
| 3 | 10 |
| 4 | 10 |
| 5 | 10 |
| 6 | 10 |
| 7 | 10 |
| 8 | 10 |
| 9 | 3 |
SWITCHING OFF THE ENTIRE COOKING HOB

Touch the on/off key (A) and hold it for 1 second to switch off the hob. An acoustic signal will be emitted and all cooking zones will be switched off.
AUTOMATIC SWITCH OFF
If the keys are activated for too long during cooking (e.g. due to spilt liquid or an object placed over the sensor keys), the cooking hob will be switched off after 10 seconds. "-" will flash on all displays and an acoustic signal will be emitted. The acoustic signal will stop when you remove the object or wipe the spilt liquid.
SETTING THE MAXIMUM TOTAL APPLIANCE POWER

Maximum cooking hob power is limited to 7200 W. This setting can be decreased to 2800 W, 3500 W or 6000 W. The setting can be made within 30 seconds after connecting the cooking hob to the power mains. First, unlock the appliance. Press the cooking zone selector keys 2 and 4 simultaneously. An acoustic signal will be emitted, and the actual maximum power level will be displayed on the displays for the cooking zones (G1) and (G2). Set the new maximum power level using the keys (C) and (D).
Store the new setting by pressing the 2 and 4 keys simultaneously again.
If a lower maximum total power is set, then it is not possible to set a high power level on all cooking zones simultaneously. An acoustic signal and "r" on the selected cooking zone display will indicate that the total power level has been limited.
BRIDGED COOKING ZONE (depending on the model)
- Some models allow combining two cooking zones into a single large connected cooking zone. Thus, a large oval pan or a griddle can be placed on the combined cooking field. The pan has to be large enough to cover the centres of the upper and lower cooking zone.
- Maximum pan size: 40 x 25 cm. For even heat distribution, we recommend using a heavy-bottom baking dish or pan. During cooking, the dish or pan will heat up. Be careful to prevent burns.
- When placing the baking dish on the hob, make sure it does not cover the control module.
Activating the bridged cooking zone
- Switch on the cooking hob by pressing the on/off sensor (A).
- Simultaneously touch the two sensors and hold them for 3 seconds (E). The sign will appear on the display unit for the rear field to indicate that the two cooking zones are bridged.
- Set the desired cooking power for the bridged cooking zone.
- To change the bridged zone's cooking power later on, use the key (C) or (D) for the lower cooking zone.
- Note: The bridged zone does not allow the power boost setting P. Maximum available power level is "9".
Deactivating the bridged cooking zone
- Reduce the power of the bridged zone to "0". The bridged zone symbol will disappear and heating will be switched off.
- Both cooking zones will operate independently.
NOISE AND SOUNDS DURING INDUCTION COOKING
| Noises and sounds | Cause | Solution |
| Induction-generated operating noise. | Induction technology is based on the properties of some metals under electromagnetic effect. It results in so-called eddy currents that force the molecules to oscillate. These oscillations (vibrations) are transformed into heat. Depending on the type of metal, this could result in quite noises. | This is normal and it is not a result of any malfunction. |
| Transformer-like buzz. | Occurs when cooking at a high power level. The reason for this is the amount of energy transferred from the cooking hob to the pot or pan. | This noise will disappear or weaken when you reduce the power level. |
| Vibration and crackling of the cookware. | This noise appears in cookware (pots or pans) made of different materials. | It results from vibrations along the adjacent surfaces of different material layers. This noise depends on the cookware. It can vary depending on the amount and type of food being cooked. |
| Fan noise. | Correct operation of induction electronic components requires temperature control. Therefore, the cooking hob is fitted with a fan which operates at varying speed, depending on the perceived temperature. | The fan may operate even after the cooking hob has been switched off, if the temperature remains too high. |

In case of an operation failure or if the fault / error indication does not disappear, disconnect the cooking hob from the power mains for a few minutes (undo the fuse or turn off the main switch); then, reconnect it to the power mains and turn on the main switch key.
If the problems persist, call a service technician.
CONTROL UNIT

- Cooking system selector knob
- Oven temperature knob
- Oven control lamp. The lamp is lit when the oven is heating up; when the selected temperature is reached, it goes off.
OVEN (depending on the model)
OPERATING THE OVEN
The oven can be operated with the knob for "oven mode selection" to select the function and "temperature setting" to set the temperature.

Rotate the knob (left and right) to select COOKING SYSTEM.

Settings can also be changed during the cooking process.
OVEN OPERATION
Operation temperature is set with the temperature selector, ranging from 50 – 275/300°C. Clockwise rotation of the selector sets higher temperature, and vice versa, anticlockwise turning reduces the temperature.

Forcible overturning of the zero position will lead to the thermostat damage!
SWITCHING OFF THE OVEN
Turn the COOKING SYSTEM SELECTOR KNOB to position "0".
OVEN LIGHT
With all modes of operation, the oven lighting is turned on automatically when the operation mode is selected.
COOKING SYSTEMS (depending on the model)
| System | Description |
| >>> | RAPID PREHEATUse this function if you wish to heat the oven to the desired temperature as quickly as possible. This function is not appropriate for cooking food. When the oven heats up to the desired temperature, the heating process is completed. Suggested temperature: 50-max°C. |
| = = | UPPER AND BOTTOM HEATER *The heaters in the bottom and in the ceiling of the oven cavity will radiate heat evenly into the oven interior. Pastry or meat can only be baked/roasted at a single height level.Suggested temperature: 200°C. |
| — | TOP HEATEROnly the heater on the oven cavity ceiling will radiate heat onto the food. Use it to brown the upper side of your dish (final browning). Suggested temperature: 180°C. |
| — | BOTTOM HEATEROnly the heater on the bottom of the oven cavity will radiate heat. Use this heater to brown the lower side of the dish. Suggested temperature: 180°C. |
 | TOP AND BOTTOM HEATER WITH FAN *Both heaters and the fan are activated. The fan allows even circulation of hot air inside the oven. It is used for baking pastry, for defrosting, and for drying fruit and vegetables. Suggested temperature: 180°C. |
 | GRILLOnly grill heater, a part of the large grill set, will operate. This system is used for grilling a smaller amount of open sandwiches or beer sausages, and for toasting bread. Maximal allowed temperature: 230°C. |
 | LARGE GRILLThe upper heater and the grill heater will operate. The heat is radiated directly by the grill heater installed in the oven ceiling. To boost the heating effect, the upper heater is activated as well. This combination is used for grilling a smaller amount of open sandwiches, meat or beer sausages, and for toasting bread. Maximal allowed temperature: 230°C. |
 | GRILL WITH FANGrill heater and the fan will operate. This combination is used to grill meat and to roast larger chunks of meat or poultry at a single height level. It is also appropriate for dishes au gratin and for browning to a crispy crust. Suggested temperature: 170°C. Maximal allowed temperature: 230°C. |
 | TOP HEATER AND FANThe top (upper) heater and the fan will operate. Use this system to roast larger chunks of meat and poultry. It is also suitable for dishes au gratin. Suggested temperature: 170°C. |
 | INTENSIVE BAKING (AIR FRY)This cooking method results in a crunchy crust without added fat. This is a healthy version of fast-food frying, with fewer calories in the cooked food. Suitable for smaller cuts of meat, fish, vegetables, and frozen products ready for frying (French fries, chicken nuggets). Suggested temperature: 200-220°C. |
| [YZ8B] | HOT AIR *Round heater and the fan will operate. The fan installed in the back wall of the oven cavity makes sure the hot air constantly circulates around the roast or pastry. This mode is used for roasting meat and baking pastry at several levels simultaneously. Suggested temperature: 180°C. |
 | BOTTOM HEATER AND FANThis is used for baking leavened but low-rising pastry and for preserving fruit and vegetables. Suggested temperature: 180°C. |
 | PIZZA SYSTEMThis program with setting of baking temperature reaching at least 275°C was specifically designed to help you bake the perfect pizza, focaccia, flatbread and similar baked delicacies. |
 | BAKING FROZEN FOODThis method allows baking frozen food in a shorter period of time without pre-heating. Optimum for pre-baked frozen products (bakery products, croissants, lasagne, French fries, chicken nuggets), meat and vegetables. Suggested temperature: 190-200°C. |
 | DEFROSTINGThe air circulates with no heaters activated. Only the fan will be activated. This is used to slowly thaw frozen food. Suggested temperature: 0°C. |
 | AQUA CLEANOnly the bottom heater will radiate heat. Use this function to remove stains and food residues from the oven. The program takes 30 minutes. Suggested temperature: 70°C. |
* It is used for determining the energy efficiency class pursuant to the EN 60350-1 standard.
BAKING WITH STEAM

With these systems, you can cook with the addition of steam. Steam results in better browning of the surface.

Place a baking sheet into the first guide when the oven is still cool. Pour a maximum of 2 dl of water onto the baking sheet. Place the food to be cooked on the second rack and start the system.

Do not insert the deep baking tray into the first guide; insert it one level higher.

For optimum operation of the function, do not open the oven door and do not add water during the cooking process.
DESCRIPTIONS OF SYSTEMS
- Heating an empty oven consumes a lot of energy. Hence, baking several types of pastry or several pizzas successively will save a lot of energy as the oven will already have been preheated.
- Use dark, black silicon-layered or enamel-coated baking sheets and trays as they conduct the heat very well.
- When using parchment paper, make sure it is resistant to high temperatures.
- When preparing food, a lot of steam is formed inside the oven, which is drained through the chimney at the back of the appliance. The steam might condense on the door and lid of the appliance (depending on the model). This is a standard phenomenon which has no effect on the operation of the appliance. After the end of the cooking process, wipe the overflowing condensed water with a cloth.
- Switch off the oven approximately 10 minutes before the end of the cooking process to save energy by making use of the accumulated heat.
- Do not cool the food in a closed oven to prevent condensation (dew).
Cooking with the rotisserie (depending on the model) Maximum temperature when using the rotisserie is 230°C.

Insert the skewer support into the 3rd guide from the bottom and place the shallow baking sheet into the bottom (1st) guide to serve as a drip tray.

Impale the meat on the skewer and tighten the screws. Place the skewer handle on the front skewer support and insert the tip into the opening in the right hand side of the rear oven cavity wall (the opening is protected with a rotating cover). Undo the skewer handle and close the oven door.
Switch on the oven and select the LARGE GRILL system.

The grill shall only be used when the oven door is closed. Do not use the grill on position 4.

Do not insert the deep baking tray into the first guide.
MAINTENANCE & CLEANING

Be sure to unplug the appliance from the power supply and wait for the appliance to cool down. Children should not clean the appliance or perform maintenance tasks without proper supervision.
Stainless steel sheet front side of the housing (depending on the model)
Clean this surface only with a mild detergent (soapsuds) and a soft sponge that will not scratch the finish. Do not use abrasive cleaners or cleaners containing solvents as they may damage the housing finish.
Lacquer-coated surfaces and plastic parts (depending on the model)
Do not clean the knobs and buttons, door handles, stickers, and rating/type plates with abrasive cleaners or abrasive cleaning materials, alcohol-based cleaners, or with alcohol. Immediately remove any stains with a soft non-abrasive cloth and some water, in order to avoid damaging the surface.
You may also use cleaners and cleaning materials intended for such surfaces as instructed by their respective manufacturers.
Enamel surfaces (oven, cooking hob)
Use a damp sponge with detergent for cleaning. Fatty stains can be removed with warm water and special detergent for enamel. Never clean enamelled surfaces with abrasive means producing irremovable damage to the appliance surface.
Glass surfaces
Do not use rough abrasive cleaning agents or sharp metal scrapes for cleaning of oven door glass, as they could crack the surface and causing the breaking of glass. Clean the glass surfaces with special means for glass, mirrors and windows.

INFORMATION!
Never use aggressive or abrasive cleaners.
CLEANING THE GLASS CERAMIC SURFACE
- After each use, wait for the glass ceramic surface to cool down and clean it. Otherwise, all remaining impurities will burn onto the hot surface the next time you use the hob.
- For regular maintenance of the glass ceramic hob, use special care products that create a protective film on the surface to prevent dirt from sticking to it.
- Before each use of the glass ceramic surface, wipe off dust or any other impurities that could scratch the surface, from both the hob and the pan bottom.

Steel wool, coarse cleaning sponges, and abrasive powders may scratch the surface. The surface may also be damaged by aggressive spray cleaners and unsuitable liquid cleaners.
- The surface may be damaged when using aggressive or abrasive cleaners or cookware with coarse or damaged bottoms.
- Use a damp soft cloth to remove minor impurities. Then, wipe the surface dry.
- Remove water stains with a mild solution of vinegar. However, do not use this solution to wipe the frame (only on some models) as it may lose its sheen. Do not use aggressive spray cleaners or descaling agents.
- Use special glass ceramic cleaners for stubborn dirt. Observe the manufacturer's instructions. Be sure to thoroughly remove any cleaner residues after the cleaning process as they may damage the glass ceramic surface when the cooking zones heat up.

- Remove stubborn and burnt residues with a scraper. Be careful when handling the scraper to prevent injury.
- Do not press the scraper perpendicularly against the glass and do not scratch the hob surface with its tip or blade.
- Immediately remove any sugar or sugar-laden food from the glass ceramic hob using a scraper, even if the hob is still hot, as sugar may permanently damage the glass ceramic surface.

Only use the scraper when dirt cannot be removed with a wet cloth or special cleaners for glass ceramic surfaces. Hold the scraper at the correct angle (45° to 60°). Gently press the scraper against the glass and slide it over the surface to remove the dirt. Make sure the plastic handle of the scraper (on some models) does not come into contact with a hot cooking zone.

Discolouration of the glass ceramic surface does not affect the operation or stability of the surface. Such discolouration is most commonly a result of food residues burnt onto the surface, or it may be caused by some cookware materials (such as aluminium or copper). Such discolouration is very difficult to remove entirely. Note: Discolouration and similar flaws only affect the appearance of the hob and do not directly affect its function. Removing such flaws shall not be covered by the warranty.
OVEN
Clean the oven walls with a damp sponge and detergent. To clean stubborn stains burned into the oven wall, use a special detergent for enamel. After cleaning, carefully wipe the oven dry. Clean the oven only when it is completely cold. Never use abrasive agents, because they will scratch the enameled surface. Wash the oven utensils with a sponge and detergent. You can also use special detergents to remove rough stains or burns.

USING THE "AQUA CLEAN" FUNCTION
Turn the COOKING SYSTEM SELECTOR KNOB to position AQUA CLEAN. Set the TEMPERATURE KNOB to 70°C. Pour 0.6 l of water into a baking tray and place it in the lower guide. After 30 minutes, food residues on the oven enamel walls will have softened and they will be easy to clean with a damp cloth.

Use the "AQUA CLEAN" system when the oven has fully cooled down.
REMOVING AND CLEANING WIRE AND TELESCOPIC EXTENDIBLE GUIDES
Only use conventional cleaners to clean the guides.
Hold the guides by the bottom side and pull them towards the center of the oven cavity. Remove them from the openings at the top.

Do not clean the extendible guides in the dishwasher.
INSTALLING THE CATALYTIC INSERTS
Only use conventional cleaners to clean the guides.
Remove the wire guides or extendible guides (depending on the model).
Mount catalytic inserts onto the wire guides. The upper part of the guides must be mounted into the upper openings "A" in the catalytic inserts.


Place the wire guides with the catalytic inserts on the upper openings in the side walls of the oven "A". Press them into the snap lock at the bottom "B".

Do not wash the catalytic inserts in the dishwasher.
REPLACING THE BULB
The bulb is a consumable and therefore not covered by warranty. Before changing the bulb, remove the trays, the grid, and the guides.
Disconnect the appliance from the power mains!
Halogen lamp: G9, 230 V, 25 W. (regular bulb E14, 230 V, 25 W - depending on the model)

A Undo the bulb cover and pull out or undo the bulb.

Use protection to avoid burns.
B Use a flat screwdriver to release the bulb cover and remove it. Remove the bulb.

Be careful not to damage the enamel.
COMFORT DOOR CLOSING (depending on the model)
Cookers are equipped with new secure door hinges COMFORT. These special hinges guarantee very quiet and gentle closing of the oven door.

If the force applied to close the door is too strong, the efficiency of the system can be reduced or the system's safety can be affected.
DOOR LOCK (depending on the model)
Open the door lock by gently pushing it to the right with your thumb while simultaneously pulling the door outwards.

When the oven door is closed, the door lock automatically returns to the initial position.
REMOVING AND REPLACING THE OVEN DOOR (depending on the model)
- Open the oven door (up to end position).
- Rotate the flaps of door hinges (in case of conventional closing). At COMFORT soft closing system, rotate the flaps by 90°.
- Slowly close the oven door until the flaps fit together with the hinges in the side laths of the door. At the angle of 15° (regarding to the closed door position), slightly close the door and pull it out from both hinges of the appliance.


Before replacing the door, always check that the hinge flaps are correctly placed in the side laths of the door. You prevent the sudden closing of the hinge so, which is connected to a strong spring. The releasing of flap causes the damaging of door and a risk of injury.
REMOVING AND REPLACING THE OVEN DOOR (depending on the model)
- Open the oven door (up to end position).
- Raise up and turn the flaps.
- Slowly close the oven door, lift it slightly and pull it out from the both hinges of the appliance.


Provide these steps in reverse order at returning the door back. If the door does not open or close properly,
make sure, that the hinges are correctly located on their hooks.
REMOVING AND INSERTING THE OVEN DOOR GLASS PANE (depending on the model)
Oven door glass pane can be cleaned from the inside, but it has to be removed first. Remove the oven door (see chapter "Removing and replacing the oven door".

- Slightly lift the supports on the left and right side of the door (marking 1 on the support) and pull them away from the glass pane (marking 2 on the support).
- Hold the door glass pane by the lower edge; slightly lift it so that it is no longer attached to the support; and remove it.
- To remove the third glass pane (only with some models), lift and remove it. Also remove the rubber seals on the glass pane.

To replace the glass pane, observe the reverse order. The markings (semicircle) on the door and the glass pane
should overlap.
REMOVING AND INSERTING THE OVEN DOOR GLASS PANE (depending on the model)
Screw out the screws on the left and right sides of the door and pull out the upper lath. You can now pull out the glass pane of the door.


Follow these steps in reverse order when returning the glass pane.
TROUBLESHOOTING TABLE
During the warranty period, only a service center authorized by the manufacturer may carry out any repairs.
Before making any repairs, make sure the appliance is disconnected from the power mains either by removing the fuse or by disconnecting the power plug from the wall outlet.
Unauthorized tampering with and repairs of the kitchen range (cooking hob) can result in electric shock or short circuit; hence, do not attempt to perform any repairs by yourselves. Leave such tasks to an expert or an authorized service unit.
In case of minor faults or problems with the appliance operation, check the following instructions to see whether you can eliminate the causes by yourselves.
Following is some advice on rectifying some common problems.
| OVEN | |
| Problem/error | Cause |
| There is no response of the sensors; the display is frozen. | Disconnect the appliance from the mains power for a few minutes (undo the fuse or switch off the main switch), then, reconnect the appliance and switch it on. |
| The main fuse in your home trips often. | Call a service technician.Make sure the power of all appliances switched on does not exceed the capacity of the power mains in your home. |
| The oven lighting does not work. | The process of changing the light bulb is described in the chapter "Cleaning and Maintenance". |
| The food is underdone . . . | Did you choose the right temperature and heating system?Is the oven door closed? |
| COOKING HOB | ||
| Error and fault display on the cooking hob | Cause | Solution |
| You have switched on the cooking zone, but the "u" _ symbol continues to flash. | The pot or pan is not suitable for induction hobs, or its diameter is too small. Perhaps the pot or pan overheated and lost its ferromagnetic properties. | Check if the cookware is ferromagnetic (if a magnet is attracted to it). Make sure the pan diameter is large enough (usually >12 cm). If the display continues to flash after switching on and off, disconnect the appliance from the power mains. Wait for 5 minutes and reconnect it. |
| The Power Boost rapid heating function is switched off automatically. | It is normal for the Power Boost function to be switched off automatically after a certain period of time and for the hob to switch to power level 9. If the cooking zone is overheated, the safety mechanism will switch off the extra power function! | Reactivate the Power Boost function. If necessary, switch off the cooking zone and reconnect it. Then, activate the Power Boost function. Wait for a while for the hob to cool down. |
| Continuous beep and »-« flashing on the display. | Water spilt over sensor surface, or an object placed over the sensors. | Wipe the sensor surface. |
| »r« on the display | This indicates that the desired power level cannot be set because the limit for maximum total cooking hob power has been activated. | |
| »F« on the display | This indicates that there has been an error during operation. | |
| Error message "C" appears on the display unit. | The hob has overheated. | Wait for the hob to cool down. Then, use a lower power setting. |
If the problems persist despite observing the advice above, call an authorized service technician. Repair or any warranty claim resulting from incorrect connection or use of the appliance shall not be covered by the warranty. In this case, the user will cover the cost of repair.
INSTALLATION AND CONNECTION INSTRUCTIONS
APPLIANCE PLACEMENT (mm)
The walls or furniture adjacent to the appliance (floor, rear kitchen wall, side walls) have to be temperature-resistant to at least 90°C.
LEVELLING THE APPLIANCE AND ADDITIONAL SUPPORT (depending on the model)
A) The height of the cooker is 850 mm. You can adjust the height of the appliance from 850 to 865 mm.

B) The height of the cooker is 900 mm. Depending on the model, you can adjust the height of the appliance from 850 to 920 mm or from 900 to 920 mm.

ADJUSTING THE HEIGHT OF THE COOKER (depending on the model)
The height of the cooker is 900 mm. You can adjust the height of the appliance from 850 to 940 mm.
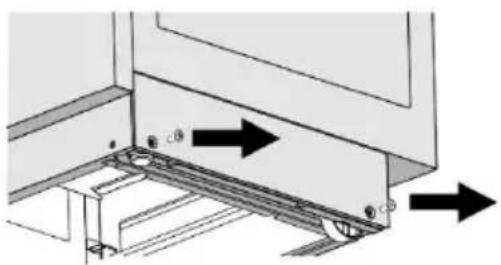
Torx T20
- Put the cooker on the floor with back side.
- Unscrew the screws, see arrows.

- Set the desired height.
- Screw the screws back together
The cooker must be installed horizontally!
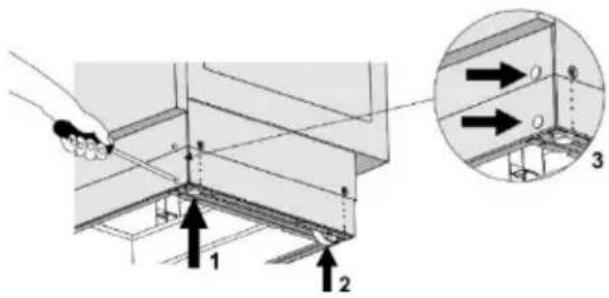
Follow these steps:
- Rotate the height adjustment screws (see figure 1) to adjust the height of the cooker to the correct position.
- Adjust the wheels (see figure 2) by screwing them with two screws at the front of the skirting board. Check the horizontal position of the stove using a spirit level.
- Place the blind plugs into the holes in the front of the skirting board (see Figure 3).
PREVENTION FROM TIPPING OVER (mm)


According to the plan, attach the holder to the wall using the supplied screws and anchors. If the supplied screws and anchors cannot be used, use others that will ensure a secure installation on the wall.
INSTALLATION OF THE DOOR LOCK (depending on the model)

CONNECTING TO THE POWER MAINS
The electric range is a heat consumer, and its installation and location must comply with local standards in force.

Three brass bridges are available for connection. 1 bridge is needed for three-phase connection (380
- 415V 3N~). Three bridges are needed for single-phase connection (220 - 240 V ~).

A device that disconnects the appliance from the mains, with all poles having a contact separation of at least 3 mm, must be installed in the fixed electrical installation before the appliance.
Only an authorized, skilled person may install the range. The authorized person is obliged to set the range cooking plate in a horizontal position, connect it to the mains, and check its operation. Installation of the range must be confirmed in the certificate of warranty.
The recommended three-phase connection of the range is with an H05VV-F5G1.5 type connecting cord (previously CGLG 5Cx1.5), (circuit breaker 3x16 A).
For single-phase connection, use an H05VV-F3G4 (previously GGLG 3Cx4), (circuit breaker 32 - 40 A depending on the type).
It is necessary to secure the conductor ends with pressed terminals to prevent fraying.
After securing the conductor ends beneath the terminal board screw heads, place the cord in the terminal board and secure it with a clip against tearing. Finally, close the terminal board cover.
CLAMP PROTECTION
The clamps should be protected by a clamp cover, see additional equipment. Electric shock danger.

IMPORTANT NOTICE
At any electric range disassembly or assembly besides its current use it is necessary to disconnect the appliance from mains and to keep it out of service.
In installation of the appliance, it is necessary to do in the light of its duty chiefly the following:
• Verification of the correctness of mains connection. - A check on the duty of heaters, control and governing elements. - Presentation to the client of all functions of the appliance and familiarisation with its service and maintenance.
NOTICE
The electric range is a Class I appliance according to the electric current injury prevention degree and must be interconnected with the mains protective conductor.
DISPOSAL

Packaging is made of environmentally friendly materials that can be recycled, disposed of, or destroyed without any hazard to the environment. To this end, packaging materials are labelled appropriately.
The symbol on the product or its packaging indicates that the product should not be treated as normal household waste. The product should be taken to an authorized collection center for waste electric and electronic equipment processing.
Correct disposal of the product will help prevent any negative effects on the environment and health of people which could occur in case of incorrect product removal. For detailed information on removal and processing of the product, please contact the relevant municipal body in charge of waste management, your waste disposal service, or the store where you bought the product.
COOKING TEST
Tested in compliance with the EN 60350-1 standard.
BAKING
| Dish | Equipment | Guide (from the bottom) | System | Temperature (°C) | Cooking time (minutes) | |
| Cookies single level | shallow enamel-coated baking sheet | 3 |  |  | 140-150* | 20-35 |
| Cookies single level | 3 |  |  | 140-150* | 20-35 | |
| Cookies two levels | 2, 3 |  |  | 140-150* | 30-45 | |
| Cookies three levels | 2, 3, 4 |  |  | 130-140* | 30-45 | |
| Cupcakes single level | shallow enamel-coated baking sheet | 3 |  |  | 160-170* | 20-35 |
| Cupcakes single level | 3 |  |  | 160-170* | 20-35 | |
| Cupcakes two levels | 2, 3 |  |  | 140-150* | 30-45 | |
| Cupcakes three levels | 2, 3, 4 |  |  | 140-150* | 35-50 | |
| Cake | round metal mouldø26/wire shelf (support grid) | 2 |  |  | 160-170* | 20-35 |
| Cake | 2 |  |  | 160-170* | 20-35 | |
| Apple pie | 2x round metal mouldø20/wire shelf (support grid) | 2 |  |  | 170-180 | 50-70 |
| Apple pie | 3 |  |  | 160-170 | 50-70 | |
| Toast | wire shelf/grid | 4 | ### | 230* | 0,5-3 | |
| Minced meat patty | wire shelf (support grid) + shallow baking sheet as drip tray | 4 | ### | 230 | 20-35 | |
* Preheat for 10 minutes.
gorenje
GORENJE gospodinjski aparati, d.o.o
Partizanska cesta 12, SI-3320 Velenje, SLOVENIA
info@gorenje.com
- INSTRUCTIONS FOR USE
- FREE STANDING COOKER
- INFORMATION
- WARNING
- CAREFULLY READ THE INSTRUCTIONS AND SAVE THEM FOR FUTURE REFERENCE
- BEFORE CONNECTING THE APPLIANCE
- APPLIANCE DESCRIPTION
- APPLIANCE DRAWER
- WIRE GUIDES
- TELESCOPIC PULL-OUT GUIDES
- EMBOSSED
- OVEN DOOR SWITCH
- COOLING FAN
- GRID
- PUSH-PULL KNOBS (DEPENDING ON THE MODEL)
- BEFORE USING THE APPLIANCE FOR THE FIRST TIME
- INDUCTION COOKING SURFACE (DEPENDING ON THE MODEL)
- GLASS CERAMIC COOKING SURFACE
- INDUCTION COOKING ZONE OPERATING PRINCIPLE
- INDUCTION COOKWARE
- COOKWARE SUITABLE FOR AN INDUCTION HOB
- ATTENTION
- PAN RECOGNITION
- ENERGY SAVING TIPS
- POWER REGULATION
- SWITCHING ON THE COOKING ZONES
- CHANGING THE COOKING ZONE SETTINGS
- POWER ZONE WITH THE POWER BOOST OPTION
- DEACTIVATING THE POWER BOOST
- CHILD LOCK
- LOCKING THE COOKING HOB CONTROLS
- UNLOCKING THE COOKING HOB CONTROLS
- TIMER ACTIVATION
- CHANGING THE COOKING TIME
- DISPLAYING THE REMAINING COOKING TIME
- RESIDUAL HEAT INDICATOR
- SWITCHING OFF THE ENTIRE COOKING HOB
- AUTOMATIC SWITCH OFF
- SETTING THE MAXIMUM TOTAL APPLIANCE POWER
- BRIDGED COOKING ZONE (DEPENDING ON THE MODEL)
- ACTIVATING THE BRIDGED COOKING ZONE
- DEACTIVATING THE BRIDGED COOKING ZONE
- NOISE AND SOUNDS DURING INDUCTION COOKING
- CONTROL UNIT
- OVEN (DEPENDING ON THE MODEL)
- OPERATING THE OVEN
- OVEN OPERATION
- SWITCHING OFF THE OVEN
- OVEN LIGHT
- COOKING SYSTEMS (DEPENDING ON THE MODEL)
- BAKING WITH STEAM
- DESCRIPTIONS OF SYSTEMS
- MAINTENANCE & CLEANING
- GLASS SURFACES
- CLEANING THE GLASS CERAMIC SURFACE
- OVEN
- USING THE "AQUA CLEAN" FUNCTION
- REMOVING AND CLEANING WIRE AND TELESCOPIC EXTENDIBLE GUIDES
- INSTALLING THE CATALYTIC INSERTS
- REPLACING THE BULB
- DISCONNECT THE APPLIANCE FROM THE POWER MAINS
- COMFORT DOOR CLOSING (DEPENDING ON THE MODEL)
- DOOR LOCK (DEPENDING ON THE MODEL)
- REMOVING AND REPLACING THE OVEN DOOR (DEPENDING ON THE MODEL)
- REMOVING AND INSERTING THE OVEN DOOR GLASS PANE (DEPENDING ON THE MODEL)
- TROUBLESHOOTING TABLE
- INSTALLATION AND CONNECTION INSTRUCTIONS
- LEVELLING THE APPLIANCE AND ADDITIONAL SUPPORT (DEPENDING ON THE MODEL)
- ADJUSTING THE HEIGHT OF THE COOKER (DEPENDING ON THE MODEL)
- THE COOKER MUST BE INSTALLED HORIZONTALLY
- FOLLOW THESE STEPS
- PREVENTION FROM TIPPING OVER (MM)
- INSTALLATION OF THE DOOR LOCK (DEPENDING ON THE MODEL)
- CONNECTING TO THE POWER MAINS
- CLAMP PROTECTION
- IMPORTANT NOTICE
- NOTICE
- DISPOSAL
- COOKING TEST
- GORENJE
Brand : GORENJE
Model : GEIT6A60WPG
Category : Range hood