
Focus Pro - Tripod DJI - Free user manual and instructions
Find the device manual for free Focus Pro DJI in PDF.
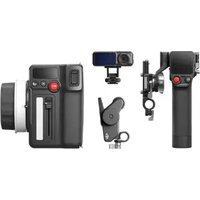


| Product Type | Tripod |
| Brand | DJI |
| Model | Focus Pro |
| Material | Carbon fiber |
| Maximum Height | 150 cm |
| Minimum Height | 20 cm |
| Folded Height | 50 cm |
| Weight | 1.5 kg |
| Load Capacity | 5 kg |
| Leg Sections | 3 |
| Locking Mechanism | Twist lock |
| Leg Tube Diameter | 25 mm (max) |
| Head Type | Fluid head with 1/4" and 3/8" screws |
| Bubble Level | Yes |
| Carrying Case | Included |
| Compatibility | DJI Focus Pro, cameras with 1/4" or 3/8" threads |
| Power Supply | None (manual) |
| Maintenance | Clean with dry cloth; store in dry, dust-free environment |
| Safety | Do not exceed load capacity; secure legs on uneven surfaces |
| Spare Parts | Available through DJI service centers |
| Warranty | 1 year |
Frequently Asked Questions - Focus Pro DJI
User questions about Focus Pro DJI
0 question about this device. Answer the ones you know or ask your own.
Ask a new question about this device
Download the instructions for your Tripod in PDF format for free! Find your manual Focus Pro - DJI and take your electronic device back in hand. On this page are published all the documents necessary for the use of your device. Focus Pro by DJI.
USER MANUAL Focus Pro DJI
This document is copyrighted by DJI with all rights reserved. Unless otherwise authorized by DJI, you are not eligible to use or allow others to use the document or any part of the document by reproducing, transferring, or selling the document. Users should only refer to this document and the content thereof as instructions to operate DJI products. The document should not be used for other purposes.

Searching for Keywords
Search for keywords such as Battery or Install to find a topic. If you are using Adobe Acrobat Reader to read this document, press Ctrl+F on Windows or Command+F on Mac to begin a search.

Navigating to a Topic
View a complete list of topics in the table of contents. Click on a topic to navigate to that section.

Printing this Document
This document supports high resolution printing.
Using this Manual
Legends
Important Hints and Tips

Read Before First Use
The following documents have been produced to help you safely operate and make full use of your DJI product.
DJI Focus Pro Motor Product Information
DJI Focus Pro LiDAR Product Information
DJI Focus Pro Grip Product Information
DJI Focus Pro Hand Unit Product Information
DJI Focus Pro User Manual
Watch the tutorial videos on the product page of the official DJI website.
https://www.dji.com/focus-pro/video

Tutorials
Contact DJI or a DJI authorized dealer if you have any questions or issues during installation and use of this product.
Download the Ronin App
Scan the QR code or search DJI Ronin in the app store to download the Ronin app.

DJI Ronin
iOS 11.0 or above
Android 8.0 or above
Download DJI Assistant 2 (Ronin Series)
Download the DJI Assistant 2 (Ronin Series) via the link below to update the product.
https://www.dji.com/focus-pro/downloads
Contents
Using this Manual 3
Legends
3
Read Before First Use 3
Download the Ronin App 3
Download DJI Assistant 2 (Ronin Series) 3
Product Profile 6
Motor Overview 6
LiDAR Overview 7
Grip Overview 8
Grip Buttons and Ports 8
Grip Touchscreen Functions 10
Hand Unit Overview 14
Hand Unit Buttons and Ports 14
Hand Unit Touchscreen Functions 16
Using DJI Focus Pro Creator Combo 17
Activating the Grip 17
Mounting the Grip 18
Using Manual Focus 19
Mounting the Motor 19
Calibrating the Motor 20
Controlling Focus 20
Controlling Zoom 21
Using Autofocus 22
Mounting the LiDAR 22
Setting the Installation Distance 23
Calibrating the Lens 23
AF Tracking Sensitivity Settings 26
Focus Area Settings 26
Enlarge Settings 27
Focus Mode Settings 27
Using DJI Focus Pro All-In-One Combo 28
Preparing the Hand Unit 28
Activating the Hand Unit 28
Linking the Hand Unit with the Motor 29
Using DJI Focus Pro Hand Unit 30
Hand Unit+Motor+LiDAR+Grip 30
Hand Unit+Motor+LiDAR 31
Hand Unit+Ronin 4D 31
Hand Unit+Ronin 4D Flex 31
Hand Unit+Inspire 3 32
Using with DJI RS 4 and DJI RS 4 Pro 33
Using Manual Focus 33
Mounting the Motor 33
Calibrating the Motor 35
Using Autofocus 36
Mounting the LiDAR 36
Setting the Installation Distance 37
Calibrating the Lens 37
AF Tracking Sensitivity Settings 38
ActiveTrack Pro Settings 38
Focus Area Settings 38
Enlarge Settings 39
Focus Mode Settings 39
Using ActiveTrack Pro 39
DJI Focus Pro Firmware Update 40
Updating the Grip and Hand Unit 40
Updating the Motor 40
Updating the LiDAR 40
Grip and Built-In Battery Safety Guidelines 41
Specifications 44
Product Profile
DJI Focus Pro is an Automated Manual Focus (AMF) lens control system consisting of a Motor, LiDAR, Grip, and Hand Unit. The four units can be used in different combinations according to your shooting needs. Automated manual focus, auto focus, and manual focus can be used for the camera lenses.
Motor Overview
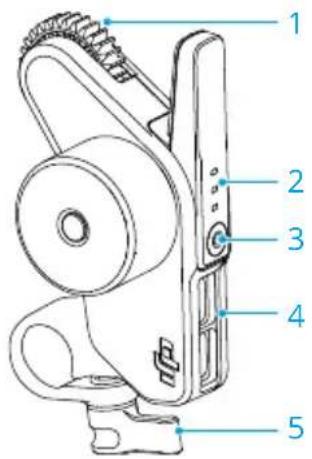
- Gear
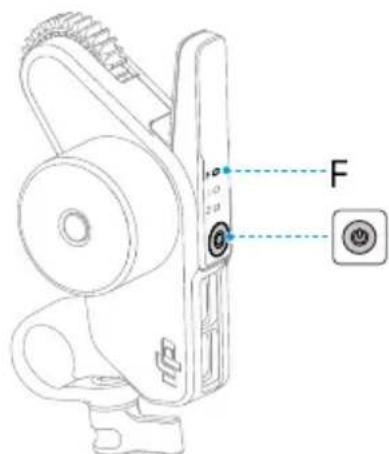
- Status LED (F/I/Z)
Blinking Pattern Description
Solid red: Motor is calibrated.
Blinks red: Motor is not calibrated.
Using with DJI Focus Pro Hand Unit:
Blinking Pattern Description
Solid green: Motor is linked with Hand Unit.
Solid red: Motor is not linked with Hand Unit.
Blinking: Motor is not calibrated.
- Function Button
Press once to switch between F/I/Z channels. Press and hold to start linking. Press twice to start/stop calibrating the motor.
- Data Port (USB-C)
- Rod Clamp
LiDAR Overview
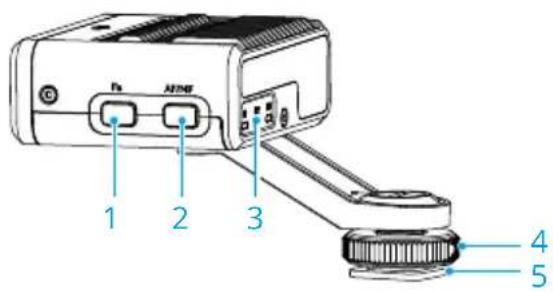
1. Function Button
Press once to switch lens profiles. Press twice to calibrate the motor. Press and hold to enter sleep mode for LiDAR, press once to exit sleep mode.
2. AF/MF Button
Press once to switch between auto focus and manual focus.
3. Status LED
Indicates C1, C2, or C3 lens profile is in use when C1, C2, or C3 is on. Refer to the table below for more information.
Blinking Pattern Description
Solid green AF mode
Solid red MF mode. Motor can be controlled manually.
Solid yellow AMF mode. Based on the autofocus, focus can be controlled manually at anytime using the front dial of the grip and hand unit.
Blinks green twice Lens is not calibrated, no lens reader.
Blinks red twice: Lens is calibrated, and the focus motor endpoints are cancelled.
4. Lock Knob
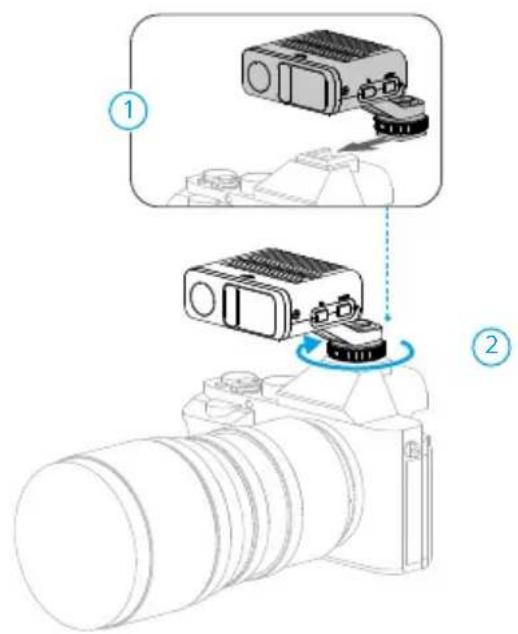
Tighten the lock knob after attaching the LiDAR to a camera.
5. 1/4"-20 Thread to Cold Shoe Adapter
Attach the LiDAR to the hot shoe of a camera.
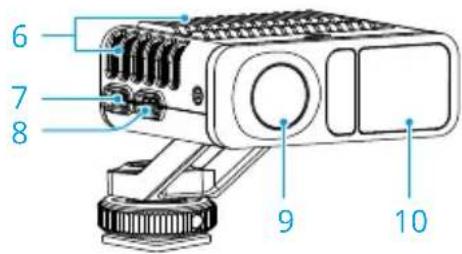
6. Heat Dissipation Slot
DO NOT obstruct the slot during use.
7. Firmware Update Port (USB-C)
8. Data Port (USB-C)
9. Visible Light Camera
10. LiDAR Camera
Grip Overview
Grip Buttons and Ports
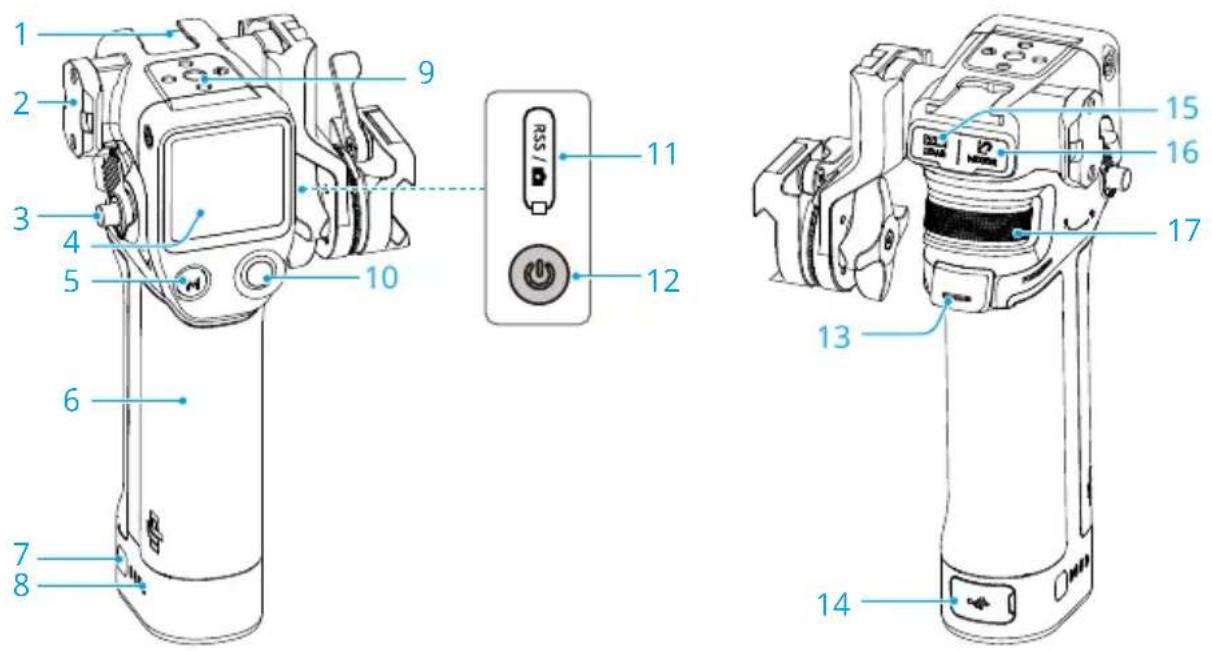
- Cold Shoe
- NATO Port
- Grip Lever/Safety Button
For attaching and detaching the grip.
- Touchscreen
- M Button
Press once to switch between AF/MF or AMF/MF mode, or map the C1/Fn1 button of the camera.
- BG21 Grip
Built-in battery with 1/4"-20 threaded hole.
- Battery Level Button: Press once to check the battery power level.
- Battery Level LEDs
- 1/4"-20 Screw Hole
- Camera Control Button
After connecting to a camera via Bluetooth or a camera control cable, use the button to control the camera shutter. Refer to the Camera & Lens Compatibility of the official website for details.
- RSS Camera Control Port (USB-C)
- Power Button
Press and hold to power on/off the grip. Press once to enter sleep mode for the LiDAR.
- Trigger
Press once to lock the subject for autofocus.
- Charging Port (USB-C)
- LiDAR Port (USB-C)
- Motor Port (USB-C)
- Front Dial
For focus or zoom control. In MF mode, use the front dial to control focus or zoom. In AF mode, use the front dial to switch the focus subject when the LiDAR focus area is set to Wide.
Grip Touchscreen Functions
Home
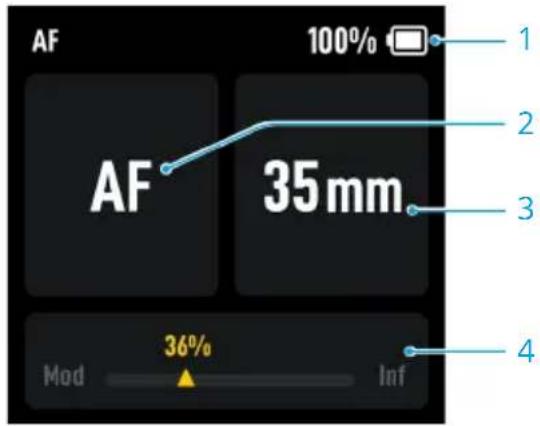
- Displays the battery level of the grip.
- Displays the focus mode in use: AF/AMF/MF.
- Displays the focal length of the lens in use.
- Displays the position that the motor rotates (from minimum object distance to infinite).
Swipe Down - Control Center
Swipe down from the top of the touchscreen on the Home screen to enter the Control Center.
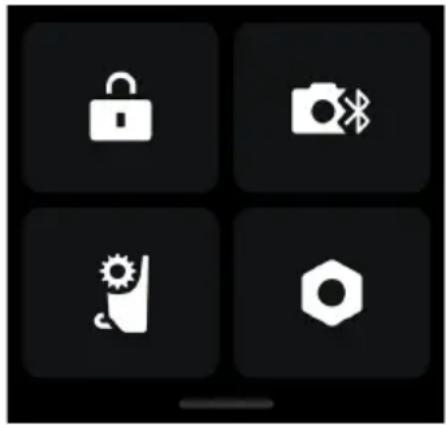

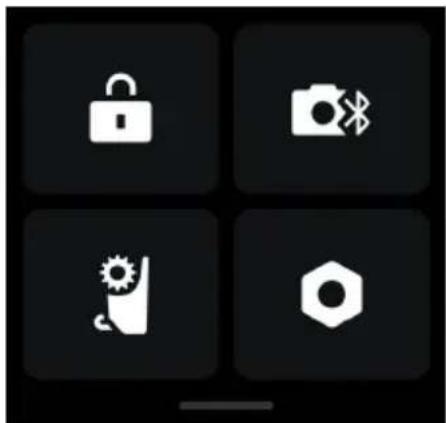
Screen Lock
Tap to lock the touchscreen to avoid unexpected operation and swipe up to unlock the screen.

Bluetooth
Tap the icon to connect the camera via Bluetooth. For BMPCC-series cameras, a password is required before connecting to the grip. The Bluetooth icon turns blue indicating connection is successful.

- The grip can only connect to one camera at a time.

Focus Motor Endpoints
Motor calibration needs to be completed before use, and the endpoints can be set manually or cancelled.

Settings
Startup Auto-Tune: When enabled, the motor will be calibrated automatically after powering on.
Restore Parameters: Tap to reset Bluetooth password and the parameters of the grip.
Languages: Tap to select the onscreen language.
Device Information: Tap to view device information such as device SN, device name, and password.
Firmware Version: Tap to view the firmware version of the grip.
Compliance Info: Tap to view the compliance information of the grip.
Swipe Up - Settings
Swipe up from the bottom of the screen for grip settings.
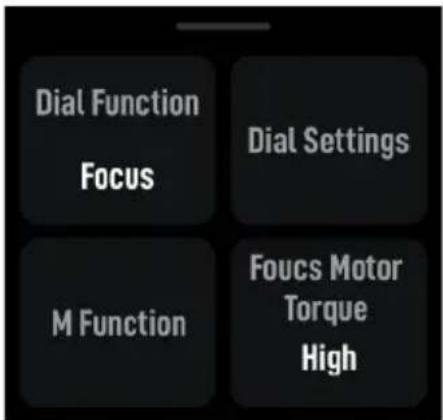
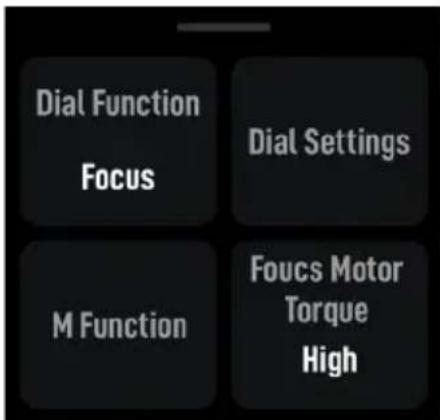
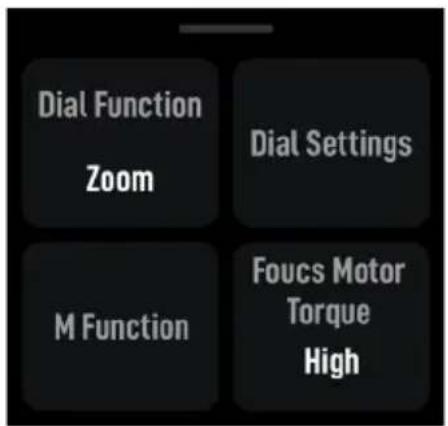
Dial Function
Set the dial function to focus in order to control the F motor, set the dial function to zoom in order to control the Z motor.
Dial Settings
Dial Speed: Can be set from 1-100.
Dial Damping: Can be set from 1-100. The higher the damping value, the higher the resistance when rotating the dial.
Reverse: After enabled, the direction of the motor will be reversed.
M Function
Set the M button function to switch between AF/MF or AMF/MF mode, or map the C1/Fn1 button feature of the camera.

How to map the C1/Fn1 button feature of the camera:
- Map M button to the C1 or Fn1 button of the Sony A7S3, A7M3, ZV-1 and Nikon Z50 and Z6II cameras.
- Complete the settings on the camera for C1/Fn1 button. The function is only available when connected to a camera via Bluetooth.
Focus Motor Torque
Can be set to high, medium, or low.
Swipe Right - Video Transmission
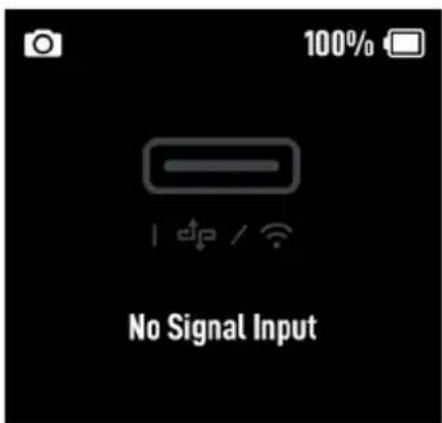
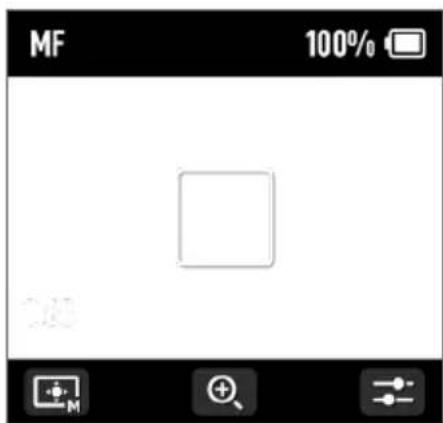
Swipe right from the left edge of the screen to enter the video transmission screen.
When the LiDAR is not connected, a 'No signal input' message will be displayed.
Autofocus can be used after connecting the LiDAR.
Hand Unit Overview
Hand Unit Buttons and Ports
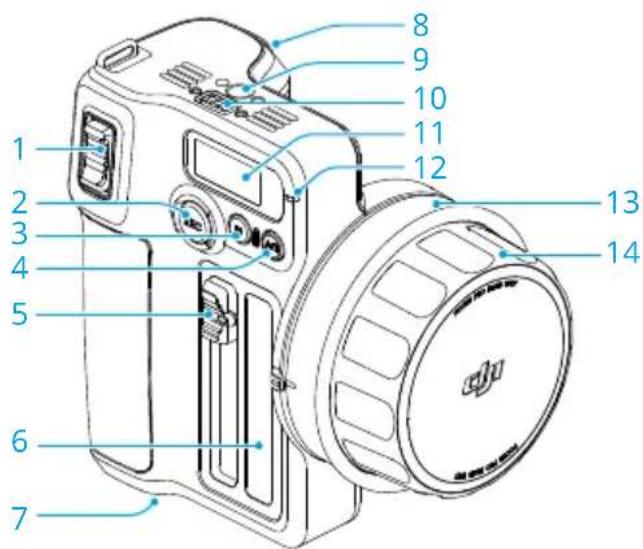
1. Zoom Stick
Push or pull the zoom stick to control the Z motor for zoom control.
2. REC Button
Press and hold the REC button to power on/off. Press once to start or stop recording when the hand unit is powered on.
3. M Button
Press once to switch between AF/MF and AMF/MF modes. The function depends on the M button feature settings in the touchscreen menu. Press and hold to start linking. Press and hold the M button together with the trigger to start motor calibration.
4. A/B Button
A/B points are the endpoints of two specific focus points. Press the button once to set point A, rotate the focus knob to the desired position, and press the button again to set point B. Press the button again to delete both points.
5. Iris Slider
Slide to control the I motor for iris control.
6. Iris Marking Strip
7. Battery Compartment
8. Trigger
Press once to lock the subject for autofocus, press again to unlock the subject. Requires use with LiDAR. Press and hold the trigger to enter the damping adjustment on the hand unit, and then rotate the focus knob to adjust the damping intensity.
9. Screw Hole
- Electronic Contact Pad
- Touchscreen
- Status LED
Blinking Pattern Description
Solid red Disconnected with motor.
Solid green Connected to motor.
Solid yellow Linking.
13. Focus Marking Ring
14. Focus Knob
Rotate the focus knob to control the F motor for focus control.
Hand Unit Touchscreen Functions
Home
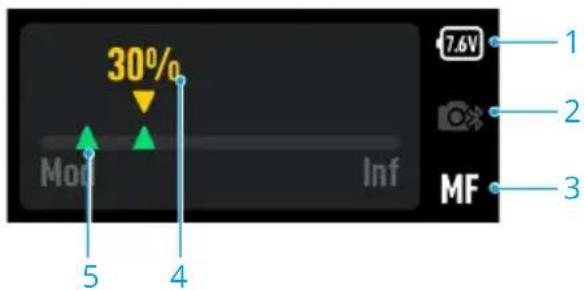
- Displays the current battery voltage.
- Displays the Bluetooth connection status.
- Displays the focus mode in use: AF/MF/AMF.
- Displays the motor position on the focus scale.
- Displays the endpoints when the A/B button is pressed to set the A/B points.
Swipe Down - Settings
Bluetooth: Tap to connect a camera that supports Bluetooth shutter control function.
Focus Motor Calibration: Tap to calibrate the motor.
Link Motor: Tap to link with the motor.
Focus Motor Torque: Tap to adjust the motor torque to high, medium, or low.
Focus Knob Stiffness: Tap to adjust the focus knob stiffness from 1-100.
Invert Function Buttons Direction: Tap to reverse the control rotation for focus, zoom, and iris.
M Button: Tap to set the M button feature to AF/MF or AMF/MF.
Backlight: The backlight can be turned on or off.
General Settings
Startup Auto-Tune: When enabled, the motor will be calibrated automatically after powering on.
Language: Tap to set the onscreen language to Chinese or English.
Reset: Tap to reset the parameters and Bluetooth password to 12345678.
Device Info: Tap to view the device SN, name, and Bluetooth password.
Firmware Version: Tap to view the firmware of the hand unit and the connected motor.
Compliance Info: Tap to view the compliance information of the hand unit.
Using DJI Focus Pro Creator Combo
Activating the Grip
Connect the USB-C cable to the power port of the grip to charge and activate the battery. The battery level LEDs light up to indicate activation is successful.
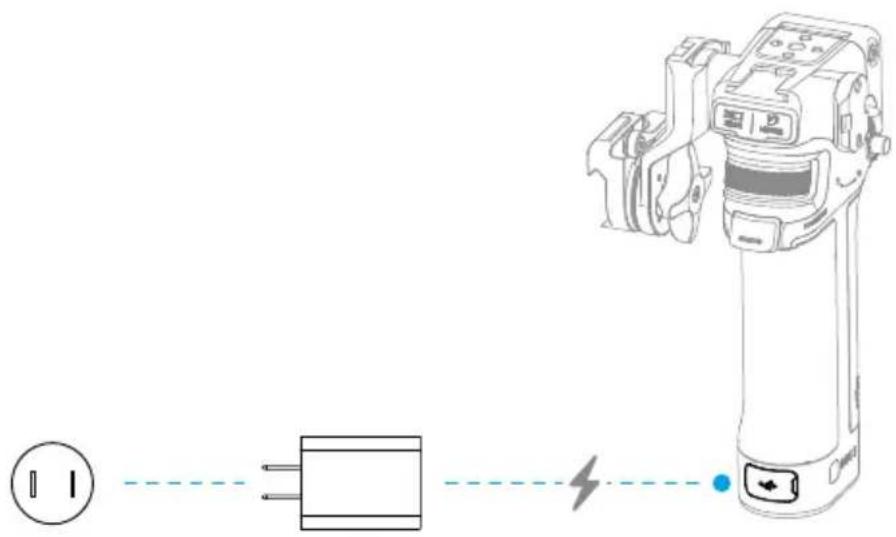

- The grip can be used five times without activation. After that, activation is required for further use. Download and install the DJI Ronin app before activation.
Follow the steps below to activate the grip:
- Press and hold the power button to power on the grip, and select the language on the touchscreen.
- Enable Bluetooth on the mobile phone. Launch the Ronin app and log in with a DJI account. Select Focus Grip, type in the default password 12345678, and activate the grip according to the instructions.

- Make sure the mobile device is connected to the internet during activation.
Mounting the Grip

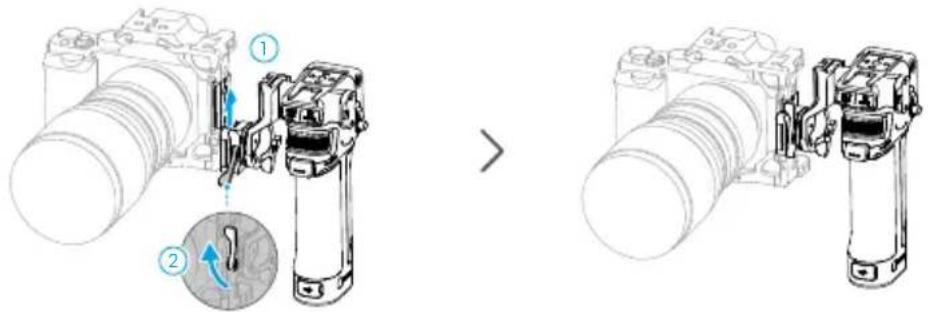
- It is recommended to mount the grip on the camera cage (not included).
If the camera cage comes with the slide rail, insert the grip into the slide rail and lock the lever on the grip.
If the camera cage is not equipped with a slide rail, attach the provided rod adapter slide rail to the camera cage, and then insert the grip into the slide rail and lock the lever on the grip.
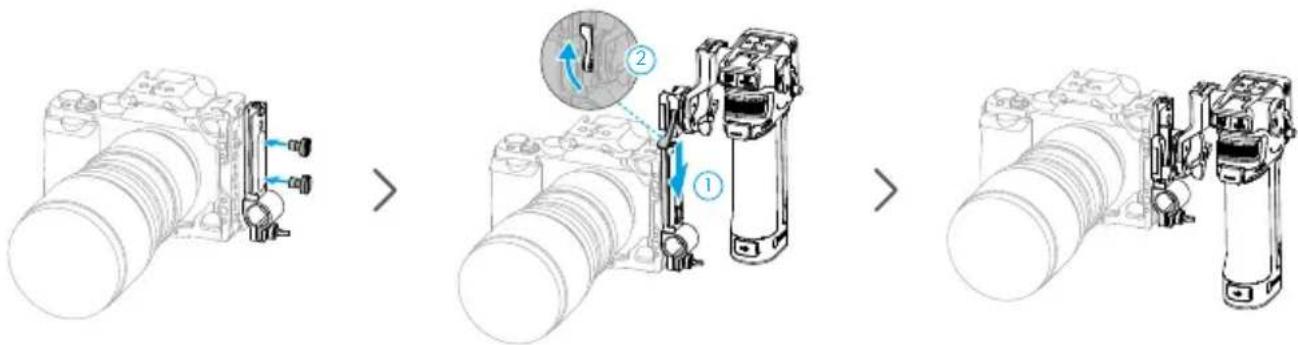
If the grip needs to be moved horizontally, attach the provided horizontal adapter slide rail before installing the grip. The direction of the NATO adapter mount can be adjusted: rotate the knob and pull the connector outward, rotate it counterclockwise, adjust the angle to install the grip onto the horizontal adapter slide rail.
![graph LR A["Camera with 1 unit"] --> B["Assembly step ①"] B --> C["Assembly step ②"] C --> D["Assembly step ③"] D --> E["Assembly step ④"] E --> F["Final assembly with ① and ② parts"]](/content/2026/06/1382064/images/81cb84354c161a9f0413e5e7a647fdfa2ef43d02377a15eef25fb6adab3b61ac.jpg)
Using Manual Focus
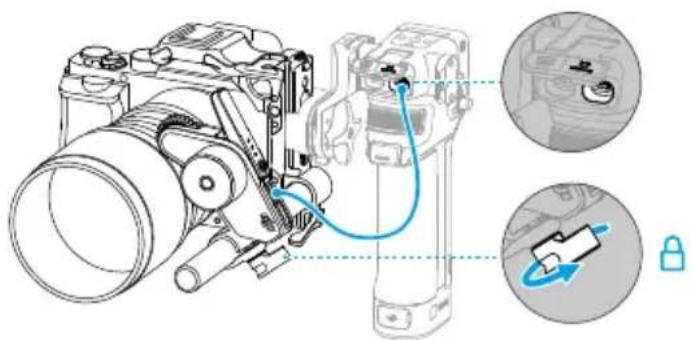
Mounting the Motor
- Attach the 15mm rod to the rod adapter and tighten.
- Attach the motor to the 15mm rod, and match the motor gear to the focus ring of the lens and tighten the clamp.
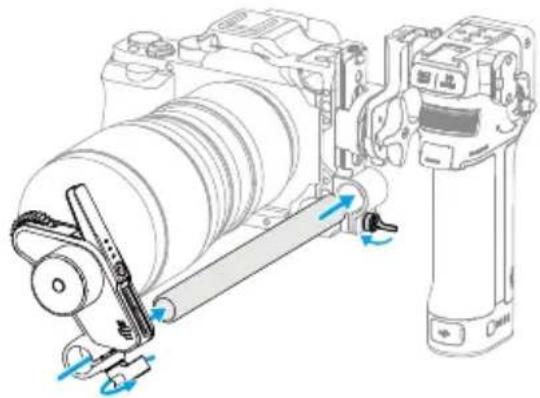
- Connect one of the USB-C ports of the motor to the motor port of the grip.
Calibrate the Motor
The motor needs to be calibrated before use.
Swipe down from the top of the touchscreen on the Home screen to enter the Control Center. Tap the motor icon and select Focus Motor Calibration, tap Confirm to start calibration. By pressing the trigger and the M button on the Grip simultaneously, you can quickly calibrate the motor.

- To avoid focus inaccuracy, motor recalibration is needed when the mounting position of the motor changes.
Control Focus
- Swipe up from the bottom of the touchscreen to access Settings, tap Dial Functions and set to Focus.
- Press once on the function button of the motor and switch to F mode. The front dial can be used to control focus with damping response.
Control Zoom
- Swipe up from the bottom of the touchscreen to access Settings, tap Dial Functions and set to Zoom.
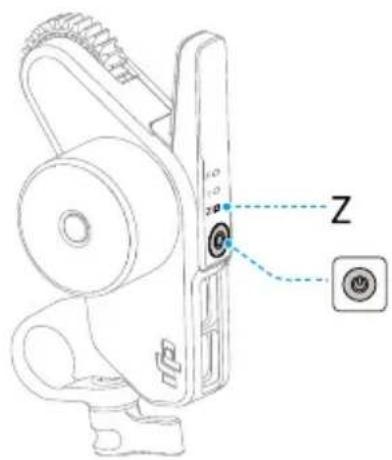
- Press once on the function button of the motor and switch to Z mode. The front dial can be used to control zoom with springback response.
Using Autofocus
Use the grip with the motor and LiDAR, autofocus can be used for manual lenses.
Mounting the LiDAR
- Mount the LiDAR to the cold shoe of the camera, or the 1/4" screw hole on the camera cage near the camera optical axis.

- DO NOT obstruct the LiDAR with the lens hood or cables. Otherwise it may affect the distance detection and result in focus inaccuracy.
- When mounting the camera vertically, make sure the LiDAR is mounted horizontally. DO NOT mount the LiDAR vertically or upside down.
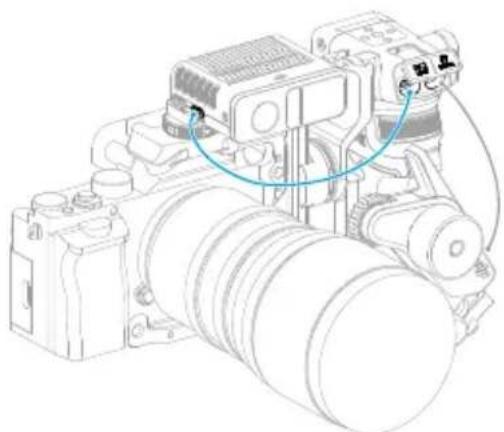
- Use a USB-C cable to connect the data port of the LiDAR and the LiDAR port of the grip. The LiDAR is powered by the grip, it can be used once the grip powered on.
- Swipe right on the screen to access video transmission, the LiDAR shooting view can be displayed here.
Setting the Installation Distance
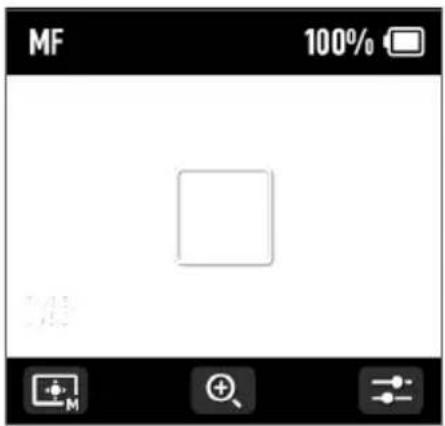
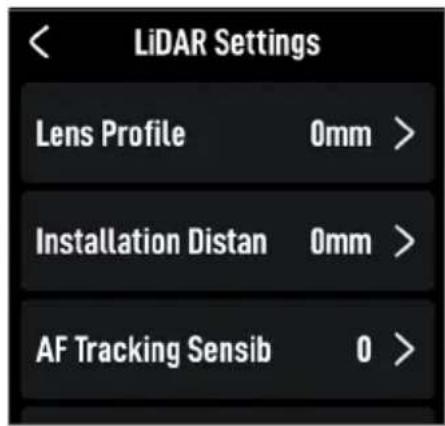
Use the scale on the provided focus card to measure the distance from the image sensor plane of the camera to the glass surface of the LiDAR. In the video transmission view, tap the settings icon on the bottom right corner to access LiDAR Settings, and input the value after tapping Installation Distance.
Calibrating the Lens
Lens needs to be calibrated before using autofocus.
Calibrating the Lens via the Grip
- In the video transmission view, tap the settings icon on the bottom right corner to access LiDAR Settings.
- Tap Lens Profile and + to add a lens profile, input the lens focal length and then tap Confirm, the motor will calibrate the focus range of the lens.
- It is recommended that the focus card be used to complete lens calibration after motor calibration is completed.
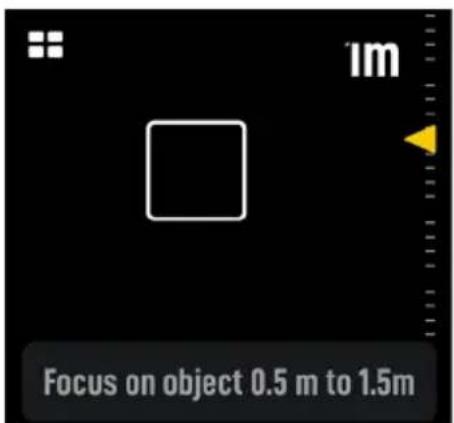
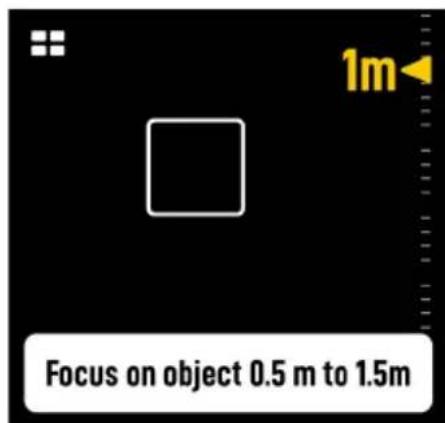
When calibrating the lens, attach the focus card to the wall and place the camera at a distance of 0.5 to 1.5 m from the focus card, then align the focus card in the center of the camera view. When the scale pointer ranges from 0.5 to 1.5 m, rotate the front dial to adjust the focus and check the focus peak. When the focus peak is largest, the lens is in focus.
Place the camera at a distance of 4 to 5 m from the focus card and align the focus card in the center of the camera view. Use the same method to adjust the focus. Tap Confirm to complete lens calibration.
If you need to delete the lens profile, tap the arrow icon in the lens profile, and then tap Delete.
Calibrating Lens via Ronin App
If the lens profile is configured in the Ronin app, lens calibration can be shortened using the Ronin app.
- Access the home page of the Ronin app and select LiDAR Lens Profile.
- Tap + on the C1/C2/C3 to add a new profile, then select Lens Brand, Lens Series, and Lens Focal Length.
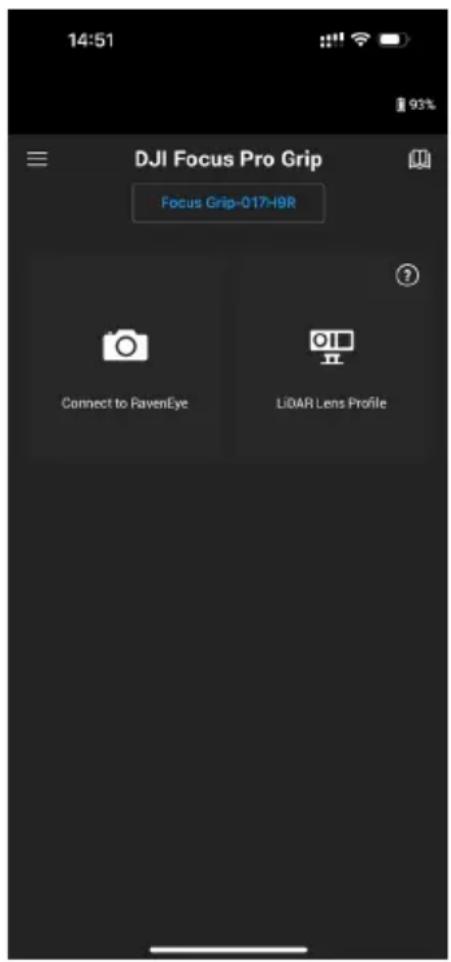
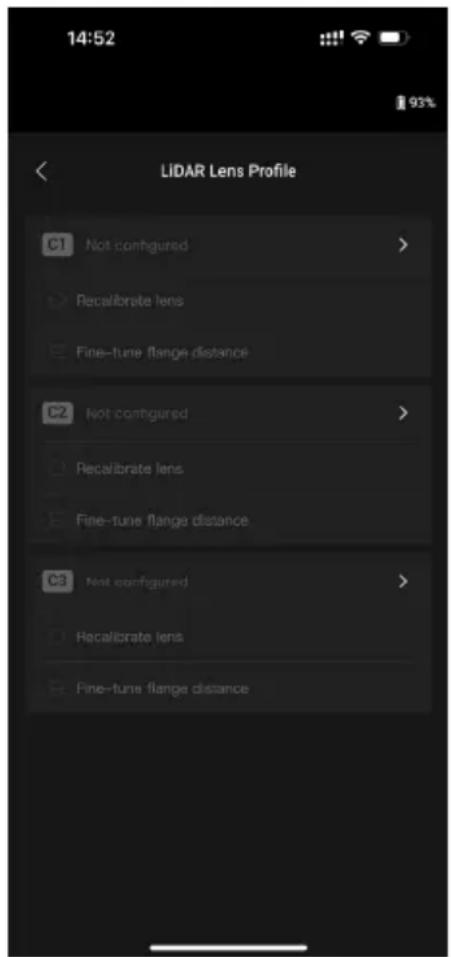
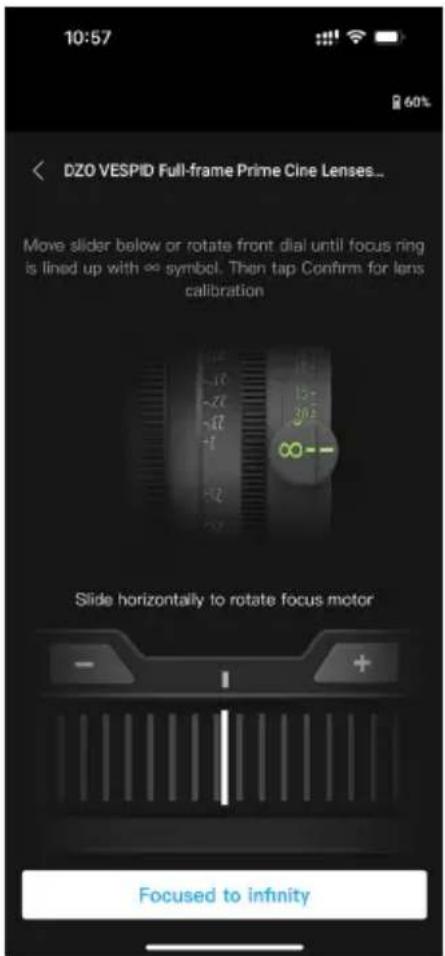
- Tap Next to enter the focus ring calibration page, slide the focus ring to ∞ , and then tap Confirm to start lens calibration. The lens profile will be saved after calibration is completed.
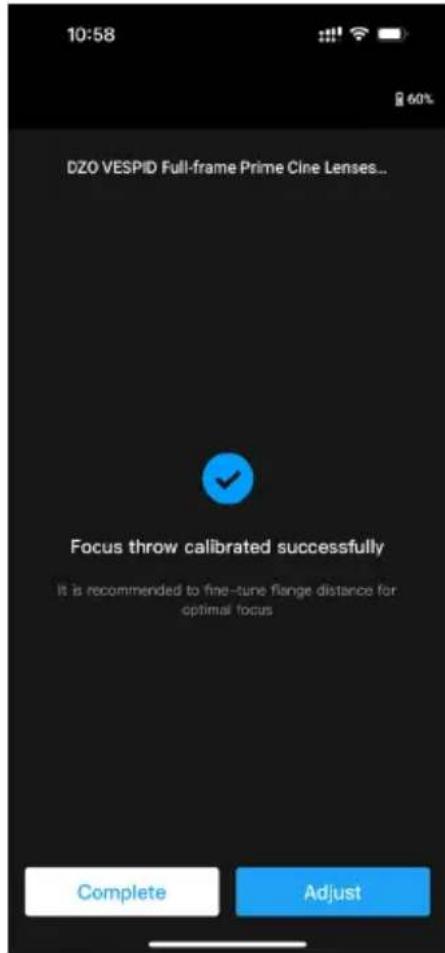
When there is a prompt to adjust the flange, users can confirm using the provided focus card. Point the lens at the focus card, when the image is clear, this indicates it is not necessary to adjust the flange. Tap Complete to confirm. If the image is not clear, tap Adjust. Slide left or right on the slider until the image is clear, tap Complete to complete lens calibration.
Others Settings
- Recalibrate Lens: If the focus is not accurate, users can recalibrate the lens.
- Adjust Flange Distance: Users can adjust the flange distance here to eliminate the focusing error caused by using different lens mounts and to make focusing more accurate.

- If the lens model is not found in the LiDAR Lens Profile list, calibrate lens via the grip.
- Recalibrate the lens if the mounting position of the motor changes after lens calibration is completed to avoid focus inaccuracy.
AF Tracking Sensitivity Settings
The AF Tracking Sensitivity can be set from 1 to 5. The larger the value, the faster the focus speed.
Focus Area Settings
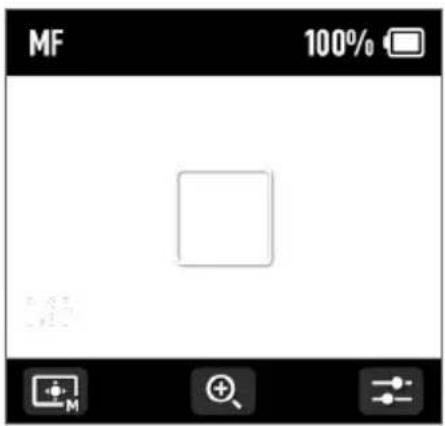
Tap the bottom left button on the screen to switch the focus area.
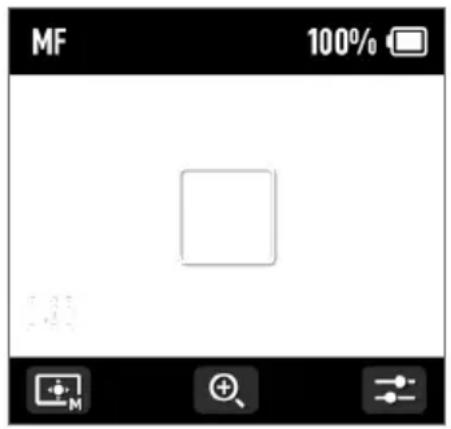
In Wide mode, the LiDAR automatically recognizes subjects such as people or cars and focuses on the subject nearest to the center of the camera view. If there are no people or cars in the camera view, the LiDAR will focus on the center of the camera view.
In Flex Spot mode, the LiDAR automatically focuses on the subject in the frame. Users can also tap the image or drag-select to select the subject.

- Up to five subjects can be recognized in Wide mode, the white frame indicates the subject is selected and focused, the gray frame indicates the subject is recognized but not focused, and the yellow frame indicates the subject is locked. The subject can be locked and unlocked via the front dial or the trigger on the grip.
Enlarge Settings
Tap the + and - icon to zoom in or out. The default equivalent focal length is 30mm, while the LiDAR focus distance is 0.5 to 10 m. When the view is enlarged, the LiDAR focus distance is 0.5 to 20 m.
Focus Mode Settings
Set the M button function to AF/MF or AMF/MF via the grip touchscreen.
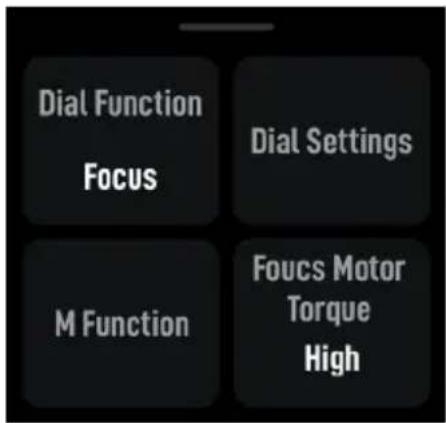
AF: The LiDAR will focus automatically. The front dial can be used to select the focus subject (in Wide mode) and the AF Tracking Sensitivity can be set from 1 to 5.
MF: Users can focus manually via the front dial, the focus range can be adjusted by changing the dial speed.
AMF: The LiDAR will focus automatically. The front dial will rotate when the focus changes, users can focus manually at the same time.
Using DJI Focus Pro All-In-One Combo
The usage of the DJI Focus Pro All-In-One combo is based on the creator combo, and the addition of the hand unit.
Preparing the Hand Unit
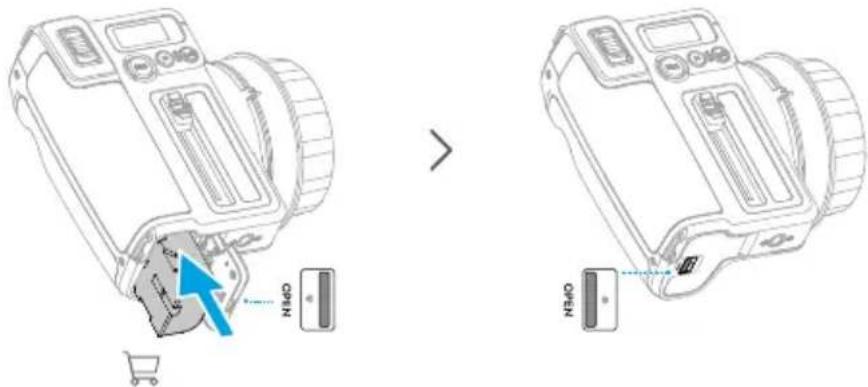
The hand unit is powered by an NP-F550 model battery (not included).
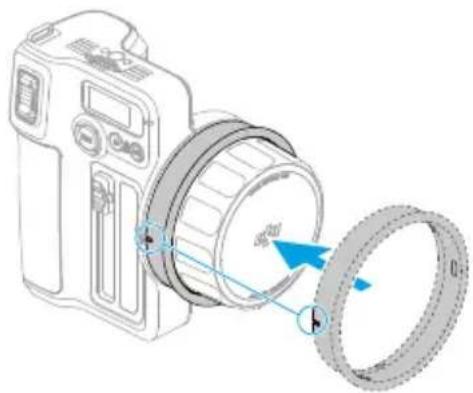
There are five focus marking rings for users to mark the lens focus for re-use. Attach the focus marking ring to the focus knob while aligning the port.
Activating the Hand Unit
Activate the hand unit before using for the first time.

- The hand unit can be used five times without activation. After that, activation is required for further use. Download and install the DJI Ronin app before activation.
Follow the steps below to activate the hand unit:
- Press and hold the REC button to power on the hand unit, and select the language on the touchscreen.
- Enable Bluetooth on the mobile phone. Launch the Ronin app and log in with a DJI account. Select Hand Unit, type in the default password 12345678, and activate the hand unit according to the instructions.

- Make sure the mobile device is connected to the internet during activation.
Linking the Hand Unit with the Motor
The motor needs to be powered by an external power supply. The provided D-TAP to USB-C cable can be used to connect a V port battery to power the motor. The motor can also be powered by the grip.

- DO NOT use the D-TAP to USB-C cable when the motor is powered by an external power supply such as the grip. Otherwise, it may damage the power supply.

- There are up to three motors that can be used in series and used to control the focus, zoom, and iris. Connect the motors using a USB-C cable.
- The provided F/I/Z stickers are used for recognizing the F/I/Z motor.
Follow the steps below to link the hand unit with the motor:
- Press and hold the REC button to power on the hand unit, then press and hold the M button to start linking with the motor. The LED glows solid yellow, indicating it is ready for linking.
- Press and hold the button on the motor to start linking. The status LED will glow solid green when linking is successful. When multiple motors are used in series, only one of the motors requires linking.
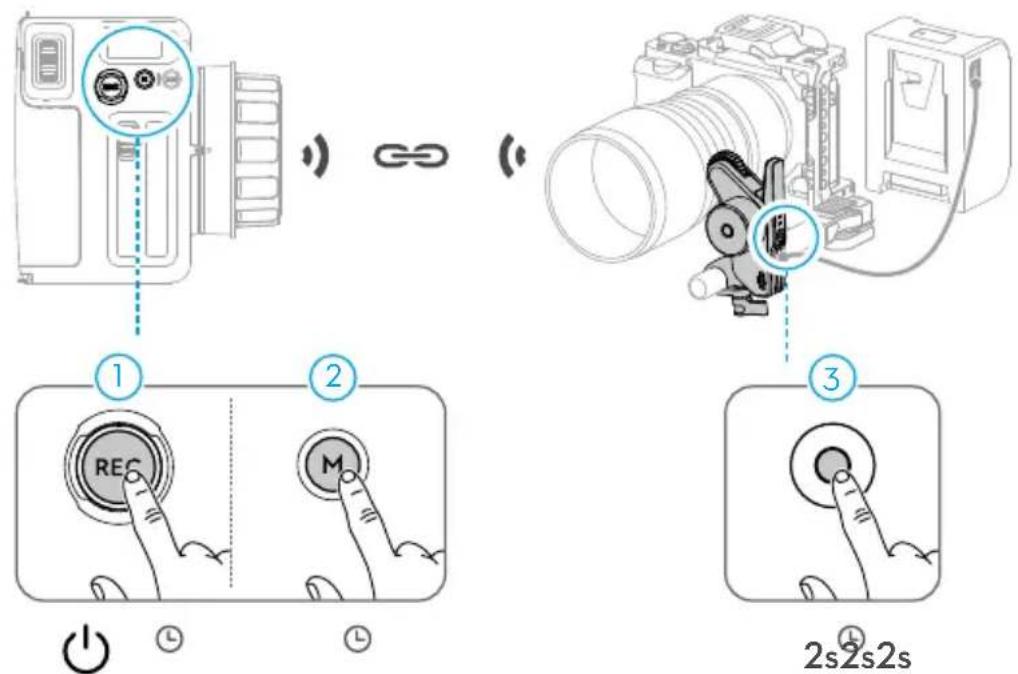
After linking the motor and hand unit, connect the hand unit with the Ronin app to calibrate the lens. Refer to the Calibrating Lens via Ronin App section for details.

- If the lens is calibrated via the grip and the profile is saved in the motor, it is not necessary to calibrate the lens again when using the hand unit.
Using DJI Focus Pro Hand Unit
Hand Unit + Motor + LiDAR + Grip
After mounting the motor, the LiDAR, the grip, and linking the hand unit with the motor, focus, zoom, and iris can be controlled by one user at the same time. AF/MF and AMF/MF modes can be switched via the hand unit.
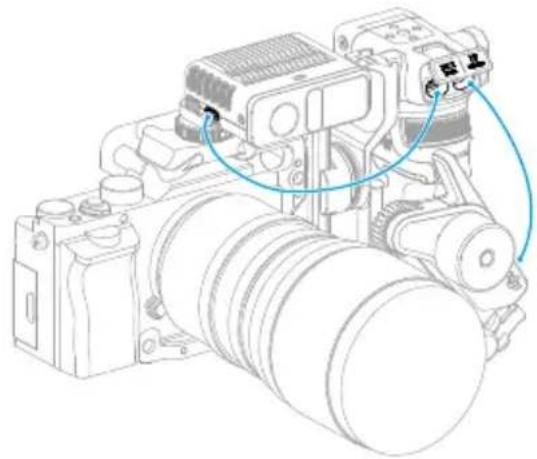
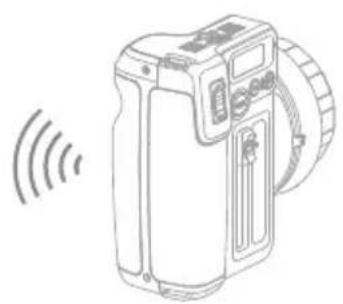

- When the focus mode is set to AMF, the grip cannot control the lens after the hand unit is linked with the motor. When the focus mode is set to MF, the hand unit has higher priority.
Hand Unit + Motor + LiDAR
After mounting the motor and the LiDAR, the motor is powered by the V port battery via the D-TAP to USB-C cable. Use the other USB-C port of the motor to connect to the data port of the LiDAR.
After linking the hand unit and motor, lens calibration can be performed via the Ronin app, and the lens profile will be saved to the motor. AF/AMF/MF can be used via the hand unit.
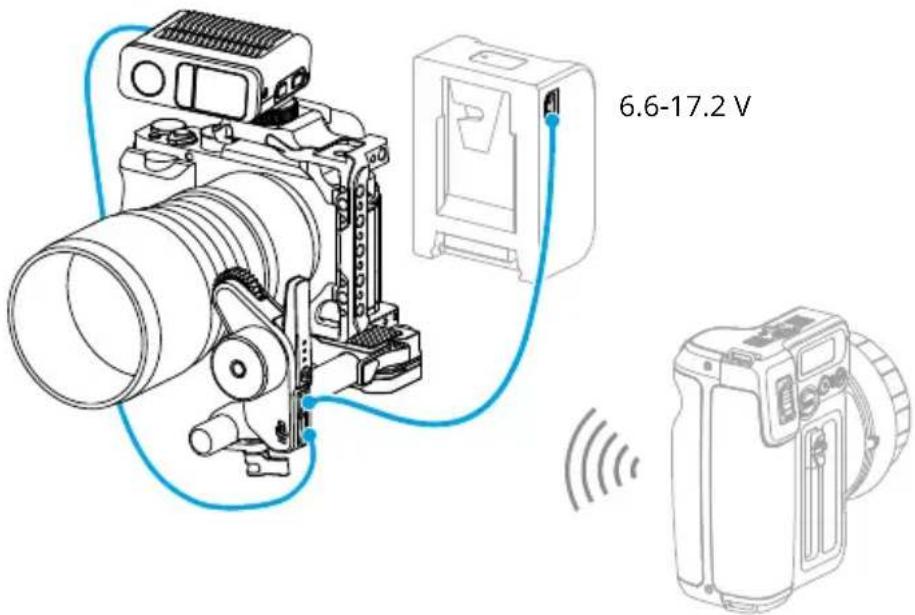
Hand Unit + Ronin 4D
- Attach the hand unit to the DJI High-Bright Remote Monitor via the DJI High-Bright Remote Monitor Holder.
- Connect the DJI High-Bright Remote Monitor with Ronin 4D, and then the focus or zoom of the Ronin 4D can be controlled via the hand unit.
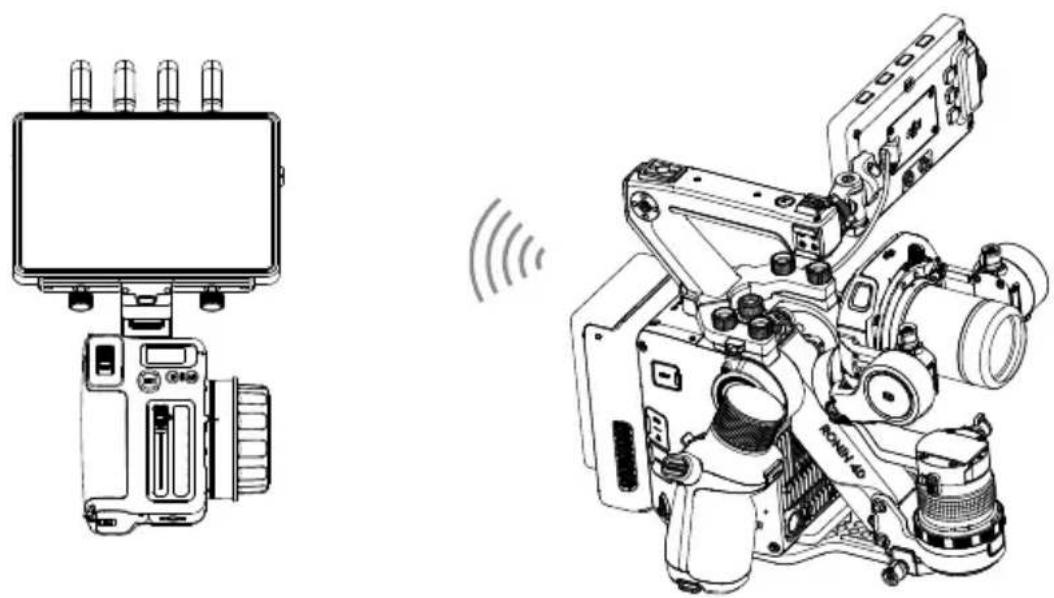
Hand Unit + Ronin 4D Flex
Connect three motors in series and connect the CAN port of the Ronin 4D Flex. After the motor is linked with the hand unit, the focus or zoom of the Ronin 4D can be controlled via the hand unit.
Hand Unit + Inspire 3
- Attach the hand unit to the DJI High-Bright Remote Monitor via the DJI High-Bright Remote Monitor Holder.
- Connect the DJI High-Bright Remote Monitor and remote controller B of Inspire 3, and then connect the USB-A port of remote controller B and the USB-C port of the DJI High-Bright Remote Monitor. After remote controller B is linked with Inspire 3, the focus of Inspire 3 can be controlled via the hand unit.
![graph LR A["Drone"] <--> B["Routter"] B <--> C["Device"] D["User"] --> B E["User"] --> C F["USB-A"] --> C G["USB-A to USB-C"] --> H["Device"] I["O3 Pro HDMI"] --> J["USB-A to USB-C"]](/content/2026/06/1382064/images/61c9f43996222c1007abb92b52cea37672e59f85948d94b7e375e02a60b77174.jpg)
⚠️ • Watch the tutorials for the details.
Using with DJI RS 4 and DJI RS 4 Pro
The lens can be controlled by using the motor with DJI RS 4 and DJI RS Pro. Autofocus can be used with the motor and LiDAR, and DJI RS 4 Pro.
Using Manual Focus
Mounting the Motor
- Unlock the lever on the mount kit, and attach the 15mm rod and then lock the lever.
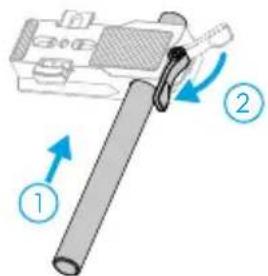
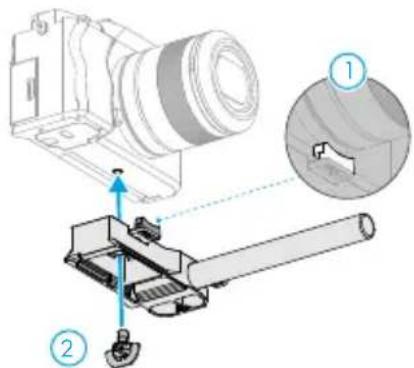
- Attach the motor mount kit to the camera, and align the placement guide with the camera body before tightening the screw.
- Attach the focus gear strip to the lens (if necessary). Attach the motor to the 15mm rod, and match the motor gear with the focus ring of the lens or the focus gear strip and tighten the clamp on the motor.
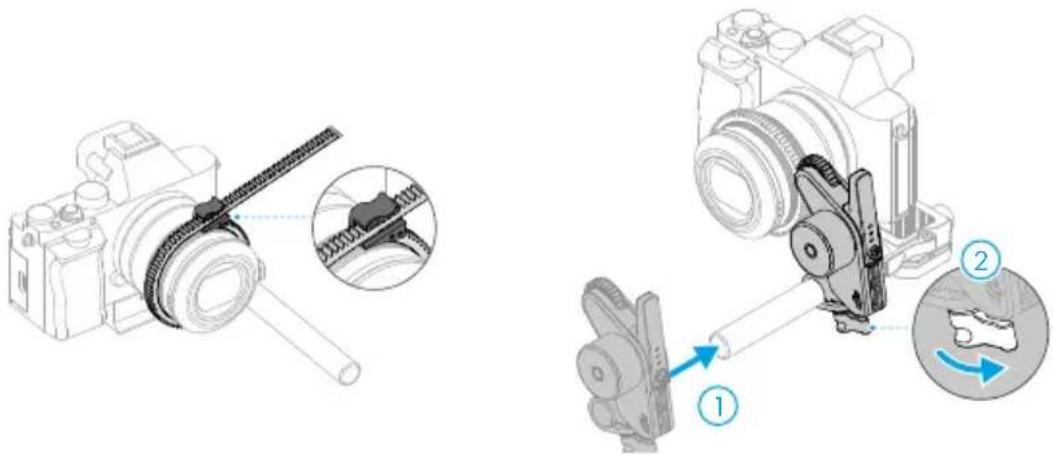
- Mount the camera to the gimbal, and connect one of the USB-C ports of the motor to the motor port of the gimbal using a USB-C cable.
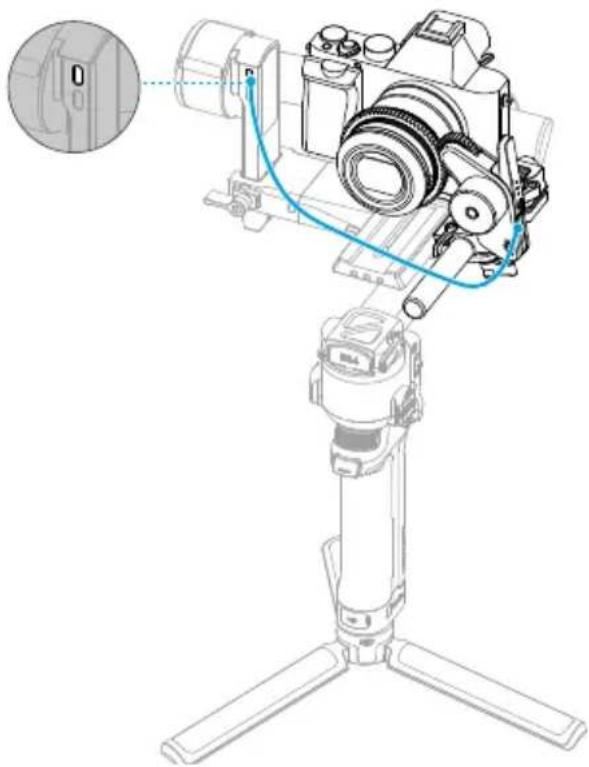

- Motors can be used in series to control the focus or zoom. Connect the motors via the USB-C cable.
Calibrating the Motor
The motor needs to be calibrated before use.
Swipe down from the top of the touchscreen on the home screen to enter the Control Center. Tap the motor icon and select Focus Motor Calibration, then tap Confirm to start calibration.
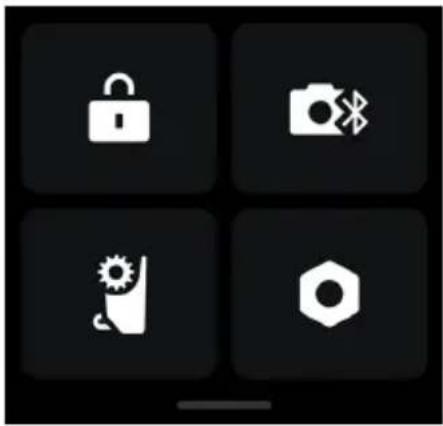

- To avoid focus inaccuracy, motor recalibration is needed when the mounting position of the motor changes.
Controlling the Motor
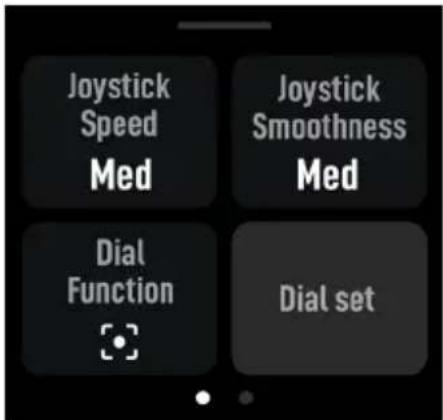
Swipe up from the bottom of the touchscreen on the home screen and tap Dial Functions, then set to Focus Motor. The front dial can now be used to control the motor.
Using Autofocus
Mounting the LiDAR
- Attach the LiDAR to the camera cage or the hot shoe of the camera.
- Connect the data port of the LiDAR to the video transmission/LiDAR port of DJI RS 4 Pro using the multi-camera control cable provided.
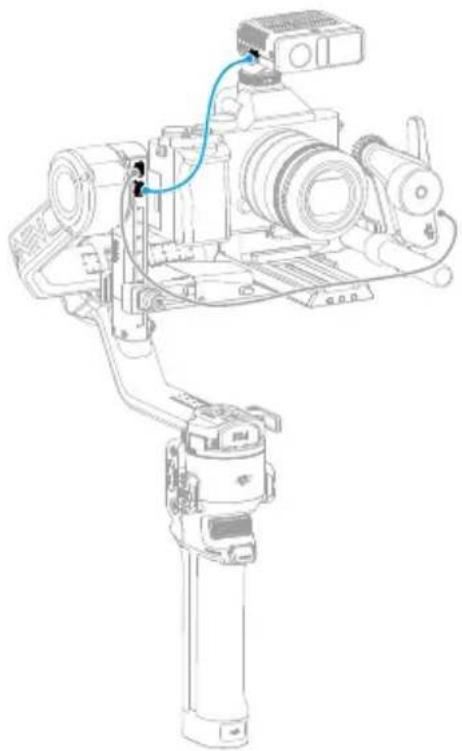

• Balancing is required after mounting the motor and the LiDAR.
The LiDAR is powered by the RS 4 Pro. Swipe right on the home screen of RS 4 Pro to access video transmission; the LiDAR shooting view can be displayed here.
Setting the Installation Distance
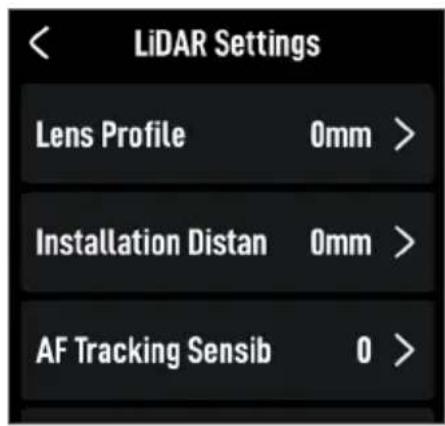
Use the scale on the provided focus card to measure the distance from the image sensor plane of the camera to the glass surface of the LiDAR. In the video transmission view, tap the settings icon on the bottom right corner to access LiDAR Settings, and input the value after tapping Installation Distance.
Calibrating the Lens
The lens needs to be calibrated before using autofocus.

- Make sure the front dial function is set to Focus Motor before calibration. It is recommended to place the gimbal on a steady platform and then fix it in place to make calibration more accurate.
Calibrating the Lens via the Gimbal
- In the video transmission view, tap the settings icon on the bottom right corner to access LiDAR Settings.
- Tap Lens Profile and + to add a lens profile, input the lens focal length, and then tap Start to begin motor calibration, the motor will then start calibration.
- It is recommended that the focus card be used to complete lens calibration after motor calibration is completed.
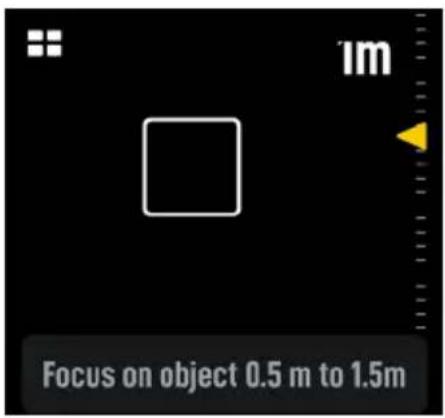
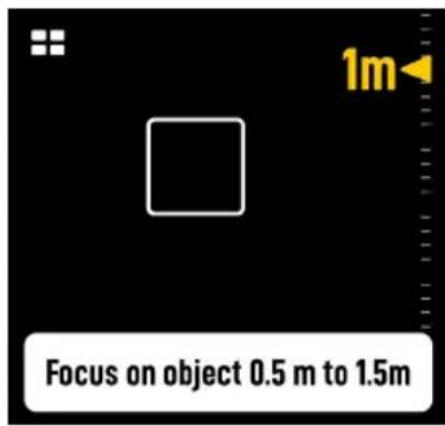
When calibrating the lens, attach the focus card to the wall and place the camera at a distance of 0.5 to 1.5 m from the focus card, then align the focus card in the center of the camera view. When the scale pointer ranges from 0.5 to 1.5 m, rotate the front dial to adjust the focus and check the focus peak. When the focus peak is largest, the lens is in focus.
Place the camera at a distance of 4 to 5 m from the focus card and align the focus card in the center of the camera view. Use the same method to adjust the focus. Tap Confirm to complete lens calibration.

- Recalibrate the lens if the mounting position of the motor changes after lens calibration is completed to avoid focus inaccuracy.
If you need to delete a lens profile, tap the arrow icon in the lens profile, and then tap Delete.
Calibrating Lens via Ronin App

• Refer to the Calibrating Lens via Ronin App section for details.
AF Tracking Sensitivity Settings
The AF Tracking Sensitivity can be set from 1 to 5. The larger the value, the faster the focus speed.
ActiveTrack Pro Settings
In the ActiveTrack settings, the ActiveTrack speed and the tilt follow switch can be set.
Focus Area Settings
Tap the bottom left button on the screen to switch focus area.
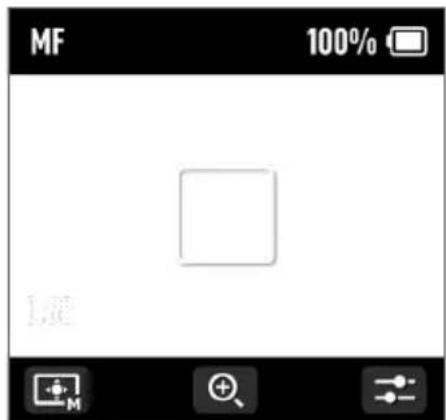
In Wide mode, the LiDAR automatically recognizes subjects such as people or cars and focuses on the subject nearest to the center of the camera view. If there are no people or cars in the camera view, the LiDAR will focus on the center of the camera view.
When in AF mode, the front dial can be used to select the focus subject. When in MF mode, the front dial can be used to focus manually. Press half down on the record button for single auto focus.
In Flex Spot mode, the LiDAR automatically focuses on the subject in the frame. Tap the image or drag-select to select the subject.

- Up to five subjects can be recognized in Wide mode, the white frame indicates the subject is selected and focused, the gray frame indicates the subject is recognized but not focused, and the yellow frame indicates the subject is locked. The subject can be locked and unlocked via the front dial or by using the trigger on the gimbal.
Enlarge Settings
Tap the + and - icon to zoom in or out. The default equivalent focal length is 30mm, while the LiDAR focus distance is 0.5 to 10 m. When the view is enlarged, the LiDAR focus distance is 0.5 to 20 m.
Focus Mode Settings
Set the M button function to AF/MF via the gimbal touchscreen.
Using ActiveTrack Pro
Press the trigger of the RS 4 Pro to start/stop ActiveTrack Pro.
After ActiveTrack Pro is enabled, the subject in the green box indicates the subject is recognized and tracked, move the joystick to adjust the frame. The red box indicates the subject is lost, and the white box indicates ActiveTrack Pro is cancelled.
DJI Focus Pro Firmware Update
Updating the Grip and Hand Unit
Launch the Ronin app and connect to the grip or the hand unit.
- When there is a new firmware update available, there will be a prompt in the app. Tap Update Now to start the update. DO NOT power off the device or exit from the app during the updating process.
- A prompt appears in the Ronin app when the update is successful. If the update fails, restart the grip or the hand unit and the Ronin app, and try again.

- Make sure that the device has sufficient power before updating the firmware.
- Ensure the mobile phone is connected to the internet when updating.
Updating the Motor
To update the motor, connect it to the grip or hand unit first, and then update the firmware via the grip or hand unit and the Ronin app.
Updating the LiDAR
- Connect the update port of the LiDAR to a computer.
- Launch DJI Assistant 2 (Ronin Series) and log in with a DJI account.
- Click the firmware update button on the left of the screen and select the firmware, tap Update to update the firmware. Wait for the firmware to download. The firmware update will start automatically.
- A prompt appears when the update is successful.

- DO NOT disconnect from the internet while updating the firmware. Otherwise, the update will fail.
Grip and Built-In Battery Safety Guidelines
WARNING Procedures, which if not properly followed, create the probability of property damage, collateral damage, and serious injury OR create a high probability of superficial injury.
NOTICE Procedures, which if not properly followed, create a possibility of physical property damage AND a little or no possibility of injury.

WARNING
Read the user manual to become familiar with the features of this product before operating. Failure to operate the product correctly can result in damage to the product, personal property, and cause serious injury. This is a sophisticated product. It must be operated with caution and common sense and requires some basic mechanical ability. Failure to operate this product in a safe and responsible manner could result in injury or damage to the product or other property.
This product is not intended for use by children without direct adult supervision. Do not use with incompatible components or alter this product in any way outside of the documents provided by SZ DJI TECHNOLOGY CO.,LTD. These Safety Guidelines contain instructions for safety, operation and maintenance. It is essential to read and follow all of the instructions and warnings in the user manual, prior to assembly, setup or use, in order to operate the product correctly and avoid damage or serious injury.
To avoid fire, serious injury, and property damage, observe the following safety guidelines when using, charging, or storing the grip.

WARNING
Grip Use
- DO NOT allow the grip to come into contact with any kind of liquid. DO NOT leave the grip out in the rain or near a source of moisture. DO NOT drop the grip into water. If the inside of the battery comes into contact with water, chemical decomposition may occur, potentially resulting in the battery catching on fire, and may even lead to an explosion.
- If the grip falls into water by accident, put it in a safe and open area immediately. Maintain a safe distance from the grip until it is completely dry. DO NOT use the grip again, and dispose of the grip properly as described in the Grip Disposal section.
- Put out any fire using water, sand, fire blanket, or a dry powder fire extinguisher.
- DO NOT use non-DJI batteries. Go to www.dji.com to purchase new batteries. DJI takes no responsibility for any damage caused by non-DJI batteries.
- DO NOT use or charge a swollen, leaky, or damaged grip. If the grip is abnormal, contact DJI or a DJI authorized dealer for further assistance.
- The grip should be used in temperatures from -20° to 45° C (-4° to 113° F). Use of the grip in environments above 50° C (122° F) can lead to a fire or explosion. Use of grip below -10° C (14° F) can lead to permanent damage.
- DO NOT use the grip in strong electrostatic or electromagnetic environments. Otherwise, the battery control board may malfunction.
- DO NOT disassemble or pierce the grip in any way or the battery may leak, ignite, or explode.
- DO NOT drop or strike batteries. DO NOT place heavy objects on the grip.
- Electrolytes in the battery are highly corrosive. If any electrolytes make contact with your skin or eyes, immediately wash the affected area with fresh running water for at least 15 minutes, and then see a doctor immediately.
- DO NOT use the grip if dropped.
- DO NOT heat batteries. DO NOT put the grip in a microwave oven or in a pressurized container.
- DO NOT manually short-circuit the grip.
- Clean grip terminals with a clean, dry cloth.
Grip Charging
- DO NOT leave the grip unattended during charging. DO NOT charge the grip near flammable materials or on flammable surfaces such as carpet or wood.
- Charging the grip outside of the temperature range of 5° to 40° C (41° to 104° F) may lead to leakage, overheating, or battery damage. The ideal charging temperature is 22° to 28° C (72° to 82° F).
Grip Storage
- Keep the grip out of the reach of children and animals.
- If the grip will be stored for an extended period, charge the grip until the battery level reaches between 30% and 50%.
- DO NOT leave the grip near heat sources such as a furnace or heater. DO NOT leave the grip inside of a vehicle on hot days. The ideal storage temperature is 22° to 28° C (72° to 82° F).
- Keep the grip dry.
Grip Maintenance
- DO NOT use the grip when the temperature is too high or too low.
- DO NOT store the battery in environments with a temperature higher than 45° C (113° F) or lower than 0° C (32° F).
Travel Notice
- Before carrying the grip on an airline flight, it must first be discharged until the battery level is lower than 30%. Only discharge the grip in a fireproof location and store the grip in a ventilated location.
- Keep the grip away from metal objects such as glasses, watches, jewelry, and hairpins.
- DO NOT transport a damaged grip or a grip with battery level higher than 30%.
Grip Disposal
Dispose of the grip in specific recycling boxes only after a complete discharge. DO NOT place the grip in regular trash containers. Strictly follow your local regulations regarding the disposal and recycling of batteries.
NOTICE
Grip Use
- Make sure the grip is fully charged before use.
- If a low-battery warning appears, charge the grip as soon as possible.
Grip Charging
- The grip is designed to stop charging when it is full. It is good practice, however, to monitor the charging progress and disconnect the grip when fully charged.
Grip Storage
- Discharge the grip to 40%-65% if it will not be used for 10 days or more. This can greatly extend the battery life.
- If the grip is stored for an extended period and the battery is depleted, the grip will enter sleep mode. Recharge the grip to exit sleep mode.
- Remove the grip from the gimbal when stored for an extended period.
Grip Maintenance
- Battery life may be reduced if not used for an extended period.
- Discharge and charge the grip completely once every three months to keep it in good condition.
Grip Disposal
- If the grip is disabled and the battery cannot be fully discharged, contact a professional battery disposal or recycling agent for further assistance.
- Dispose of the grip immediately if it cannot be powered on after over-discharging.
Specifications
LiDAR
Accessory Port Cold Shoe
1/4"-20 Threaded Hole
USB-C Firmware Update Port (Power/USB)
USB-C Data Port (Power/CVBS/CAN)
Image Sensor Resolution: 1920×1440
FOV:
57.4° (horizontal), 44.6° (vertical), 70.1° (diagonal)
Frame Rate: 30fps
Equivalent Focal Length: 30 mm
ToF Sensor Ranging Points: 76,800
Sensing Range: 0.5-20 m
FOV:
Wide-Angle Mode: 65° (horizontal), 40° (vertical), 76.1° (diagonal)
Telephoto Mode: 20° (horizontal), 20° (vertical), 28.3° (diagonal)
Frame Rate: 30fps
Equivalent Focal Length: 30 mm (wide-angle mode)
Ranging Accuracy: ±1% to 3% (affected by the distance)
Machine Learning Tracking Subject: Can recognize up to five subjects at the same time, and choose one to follow
Smart Object Identification: Human, vehicle
Focus Area: Flex Spot (activate focus lock by framing the subject and pressing the trigger; supports autofocus only, not ActiveTrack); Wide (when subject-locked on human, supports both autofocus and ActiveTrack*; when subject-locked on vehicle, supports autofocus only, not ActiveTrack)
* ActiveTrack is available only when used in conjunction with DJI RS 4 Pro or DJI RS 3 Pro.
Electrical Properties Power Consumption: Average approx. 6.3 W, max 6.8 W Input Voltage: 6.6-17.2 V
Operating Temperature -20° to 45° C (-4° to 113° F)
Mechanical Properties Main Body Dimensions: Approx. 68×25×57 mm (L×W×H)
Weight: Approx. 140 g (0.31 lbs)
Mounting Method and Position Can be mounted directly via cold shoe or using the 1/4" threaded hole. It is recommended to mount the DJI Focus Pro LiDAR close to the camera's optical axis.
Grip Operating Frequency 2.4000-2.4835 GHz Bluetooth Transmitter Power < 8 dBm
| Mechanical Properties | Main Body Dimensions: Approx. 59×73×162 mm (L×W×H) |
| Main Body Weight: Approx. 482 g (1.06 lbs) |
Mounting Method Flexible mounting on either left or right side of the cage via NATO port
Screen 1.8-inch full-color touchscreen
| Port USB-C Port (DJI Focus Pro LiDAR) |
| USB-C Port (DJI Focus Pro Motor) |
| USB-C Port (Camera Control Port) |
| USB-C Port (Battery Charging Port) |
Operating Time Approx. 2.5 hours* * Measured in a 25° C (77° F) environment while simultaneously powering the grip screen, LiDAR, and a focus motor, with AF continuously on, and paired with a manual lens.
Charging Power Supports 18W PD fast charging Battery Model BHX711-3000-7.2V Power Supply Voltage 6.6-8.4 V Operating Temperature -20° to 45° C (-4° to 113° F) Hand Unit Operating Frequency 2.4000-2.4835 GHz Bluetooth Transmitter Power < 8 dBm
| 2.4GHz Transmitter Power (EIRP) | < 20 dBm (CE/SRRC/MIC) |
| < 26 dBm (FCC) |
2.4GHz Transmission 160 m* Distance 100 m** * Measured under FCC standard in an unobstructed environment free of interference. **Measured under CE/SRRC/MIC standards in an unobstructed environment free of interference.
Mechanical Properties Dimensions: Approx. 128×87×87 mm (L×W×H)
Weight: Approx. 555 g (1.22 lbs) (without battery)
Battery Model: NP-F550
Input: 6.3-8.4 V
Dimensions: 71×38.6×21.1 mm (L×W×H)
Screen 1.09-inch full-color touchscreen
Static Power Consumption 0.83 W
Operating Temperature -20° to 45° C (-4° to 113° F) (excluding battery temperature)
Motor
| 2.4GHz Transmitter Power (EIRP) | < 20 dBm (CE/SRRC/MIC)< 26 dBm (FCC) |
| 2.4GHz Transmission Distance | 160 m*100 m*** Measured under FCC standard in an unobstructed environment free of interference.** Measured under CE/SRRC/MIC standards in an unobstructed environment free of interference. |
| Mechanical Properties Dimensions: Approx. 100×61×34 mm (L×W×H)Weight: Approx. 123 g (0.27 lbs)Rod Diameter: 15 mmOutput Gear Teeth: 30Output Gear Module: 0.8 | |
| Performance Max Torque: 0.6 N·m (8 V)Max Speed: 300 rpm (8 V) | |
| Power Supply Voltage 6.6-17.2 V | |
| Stall Current 2 A, 8 V | |
| Free Current 60 mA, 8 V | |
| Operating Temperature -20° to 45° C (-4° to 113° F) | |
| Output Voltage 6.6-17.2 V | |
WE ARE HERE FOR YOU

Contact
DJI SUPPORT
This content is subject to change without prior notice.


https://www.dji.com/focus-pro/downloads
If you have any questions about this document, please contact DJI by sending a message to DocSupport@dji.com.
DJI is a trademark of DJI.
Copyright © 2024 DJI OSMO All Rights Reserved.
- SEARCHING FOR KEYWORDS
- NAVIGATING TO A TOPIC
- PRINTING THIS DOCUMENT
- USING THIS MANUAL
- LEGENDS
- READ BEFORE FIRST USE
- DOWNLOAD THE RONIN APP
- DOWNLOAD DJI ASSISTANT 2 (RONIN SERIES)
- CONTENTS
- PRODUCT PROFILE
- USING DJI FOCUS PRO CREATOR COMBO
- USING DJI FOCUS PRO ALL-IN-ONE COMBO
- USING WITH DJI RS 4 AND DJI RS 4 PRO
- DJI FOCUS PRO FIRMWARE UPDATE
- GRIP AND BUILT-IN BATTERY SAFETY GUIDELINES
- SPECIFICATIONS
- MOTOR OVERVIEW
- BLINKING PATTERN DESCRIPTION
- LIDAR OVERVIEW
- FUNCTION BUTTON
- AF/MF BUTTON
- STATUS LED
- LOCK KNOB
- THREAD TO COLD SHOE ADAPTER
- HEAT DISSIPATION SLOT
- FIRMWARE UPDATE PORT (USB-C)
- DATA PORT (USB-C)
- VISIBLE LIGHT CAMERA
- LIDAR CAMERA
- GRIP OVERVIEW
- GRIP BUTTONS AND PORTS
- GRIP TOUCHSCREEN FUNCTIONS
- HOME
- SWIPE DOWN - CONTROL CENTER
- SCREEN LOCK
- BLUETOOTH
- FOCUS MOTOR ENDPOINTS
- SETTINGS
- SWIPE UP - SETTINGS
- DIAL FUNCTION
- DIAL SETTINGS
- M FUNCTION
- FOCUS MOTOR TORQUE
- SWIPE RIGHT - VIDEO TRANSMISSION
- HAND UNIT OVERVIEW
- HAND UNIT BUTTONS AND PORTS
- ZOOM STICK
- REC BUTTON
- M BUTTON
- A/B BUTTON
- IRIS SLIDER
- IRIS MARKING STRIP
- BATTERY COMPARTMENT
- TRIGGER
- SCREW HOLE
- FOCUS MARKING RING
- FOCUS KNOB
- HAND UNIT TOUCHSCREEN FUNCTIONS
- SWIPE DOWN - SETTINGS
- GENERAL SETTINGS
- ACTIVATING THE GRIP
- FOLLOW THE STEPS BELOW TO ACTIVATE THE GRIP
- MOUNTING THE GRIP
- USING MANUAL FOCUS
- MOUNTING THE MOTOR
- CALIBRATE THE MOTOR
- CONTROL FOCUS
- CONTROL ZOOM
- USING AUTOFOCUS
- MOUNTING THE LIDAR
- SETTING THE INSTALLATION DISTANCE
- CALIBRATING THE LENS
- CALIBRATING THE LENS VIA THE GRIP
- CALIBRATING LENS VIA RONIN APP
- OTHERS SETTINGS
- AF TRACKING SENSITIVITY SETTINGS
- FOCUS AREA SETTINGS
- ENLARGE SETTINGS
- FOCUS MODE SETTINGS
- PREPARING THE HAND UNIT
- ACTIVATING THE HAND UNIT
- LINKING THE HAND UNIT WITH THE MOTOR
- USING DJI FOCUS PRO HAND UNIT
- HAND UNIT + MOTOR + LIDAR + GRIP
- HAND UNIT + MOTOR + LIDAR
- HAND UNIT + RONIN 4D
- HAND UNIT + RONIN 4D FLEX
- HAND UNIT + INSPIRE
- CALIBRATING THE MOTOR
- CONTROLLING THE MOTOR
- CALIBRATING THE LENS VIA THE GIMBAL
- ACTIVETRACK PRO SETTINGS
- USING ACTIVETRACK PRO
- UPDATING THE GRIP AND HAND UNIT
- UPDATING THE MOTOR
- UPDATING THE LIDAR
- WARNING
- GRIP USE
- GRIP CHARGING
- GRIP STORAGE
- GRIP MAINTENANCE
- TRAVEL NOTICE
- GRIP DISPOSAL
- NOTICE
- LIDAR
Brand : DJI
Model : Focus Pro
Category : Tripod