
MZ1200 - Hi-Fi System PHILIPS - Free user manual and instructions
Find the device manual for free MZ1200 PHILIPS in PDF.


| Product Type | Mini Hi-Fi System |
| Brand | Philips |
| Model | MZ1200 |
| Dimensions (Main Unit) | Approx. 200 x 250 x 300 mm (W x H x D) |
| Weight (Main Unit) | Approx. 4.5 kg |
| Power Supply | AC 220-240V, 50/60 Hz |
| Power Consumption | 40 W (typical) |
| Speaker Output Power | 2 x 10 W RMS |
| Supported Disc Types | CD, CD-R, CD-RW, MP3-CD |
| Radio Tuner | FM, AM (MW) |
| Preset Stations | 20 (FM) + 10 (AM) |
| Audio Input | 3.5 mm Aux-in, USB (Playback) |
| Audio Output | Headphone jack (3.5 mm) |
| Features | Dynamic Bass Boost, Digital Sound Control, Sleep Timer, Alarm Clock |
| Remote Control | Included (battery type: AAA) |
| Display | LCD with backlight |
| Cleaning Instructions | Wipe with a soft dry cloth; do not use solvents |
| Repairability | User-replaceable fuse; service by qualified personnel for internal parts |
| Environmental Conditions | Operating temperature: 5°C to 35°C; Humidity: 20% to 80% |
Frequently Asked Questions - MZ1200 PHILIPS
User questions about MZ1200 PHILIPS
0 question about this device. Answer the ones you know or ask your own.
Ask a new question about this device
Download the instructions for your Hi-Fi System in PDF format for free! Find your manual MZ1200 - PHILIPS and take your electronic device back in hand. On this page are published all the documents necessary for the use of your device. MZ1200 by PHILIPS.
USER MANUAL MZ1200 PHILIPS
natural_image
Three green portable speakers with speaker stands, one displaying a 55 timer (no visible text or symbols)MZ1000

natural_image
Red portable electronic device with speaker grille and front panel (no visible text or symbols)MZ1100
natural_image
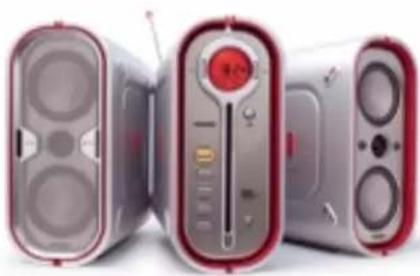
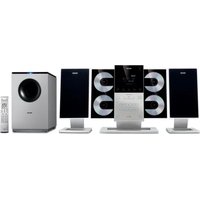
Three silver audio/video speakers with speaker covers and control knobs, shown from different angles (no visible text or labels)MZ1200


Quick Use Guide
Detailed playback features and additional functions are described in the accompanying owner's manual.
Listen to radio station
First time power up...
1 "AUTO INSTALL PRESS PLAY" appears on the display.
2 Press PLAY·PAUSE ▶ II on the system.
3 Once completed, you can listen to the last tuned radio station.
If "P" appears on the display, you can press ◀◀◀ ▶▶▶ to select the previous/next presetting radio stations.
When tuning to a weak reception or non-preset radio station, press ▶II to deactivate the preset mode ("P" will disappear from the display), then press |◀◀▶▶|.
Listen to a CD/MP3-CD
1 Load in a CD/MP3 CD with the label facing right.
2 For MP3-CD, press ◀◀◀ ▶▶▶ to select the album, followed by ▶ II to confirm, then press ◀◀◀ ▶▶▶ again to select the track.
For CD, press |◀◀ ▶▶▶| to select the track.
3 Press ▶II to start playback.
During playback, hold down |◀◀▶▶| to search backward/forward.
During playback, press |◀◀▶▶| briefly and repeatedly to skip backward/forward.
4 Press ■ to stop playback.
5 Press STOP·EJECT ■ to eject the disc.
Setting the Clock
1 In standby mode, press CLK/TIMER.
2 Press or hold down |◀◀▶▶| to set minutes and hours.
3 Press PROGRAM to select 12- or 24-hour clock mode.
4 Press CLK/TIMER to confirm the clock setting.
Switching to or waking up from Eco Power standby mode
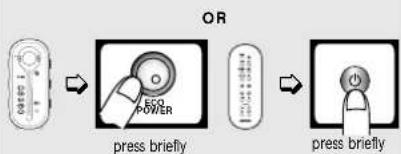
1 Hold down ECO POWER or ⏻ to switch on Eco Power standby mode.
2 Press ECO POWER on the system or MP3-CD, TUNER or AUX on the remote control to wake up from Eco Power standby mode.
Important notes for users in the U.K.
Mains plug
This apparatus is fitted with an approved 13
Amp plug. To change a fuse in this type of plug proceed as follows:
1 Remove fuse cover and fuse.
2 Fix new fuse which should be a BS1362 5 Amp, A.S.T.A. or BSI approved type.
3 Refit the fuse cover.
If the fitted plug is not suitable for your socket outlets, it should be cut off and an appropriate plug fitted in its place.
If the mains plug contains a fuse, this should have a value of 5 Amp. If a plug without a fuse is used, the fuse at the distribution board should not be greater than 5 Amp.
Note: The severed plug must be disposed of to avoid a possible shock hazard should it be inserted into a 13 Amp socket elsewhere.
How to connect a plug
The wires in the mains lead are coloured with the following code: blue = neutral (N), brown = live (L).
●As these colours may not correspond with the colour markings identifying the terminals in your plug, proceed as follows:
- Connect the blue wire to the terminal marked N or coloured black.
- Connect the brown wire to the terminal marked L or coloured red.
- Do not connect either wire to the earth terminal in the plug, marked E (or 12 ) or coloured green (or green and yellow).
Before replacing the plug cover, make certain that the cord grip is clamped over the sheath of the lead - not simply over the two wires.
Copyright in the U.K.
Recording and playback of material may require consent. See Copyright Act 1956 and The Performer's Protection Acts 1958 to 1972.
Italia
Philips Consumer Electronics
Philips, Glaslaan 2
5616 JB Eindhoven. The Netherlands
Norge
Use of controls or adjustments or performance of procedures other than herein may result in hazardous radiation exposure or other unsafe operation.
DK
Environmental information 7
Maintenance 7
Safety information 7
Connections
Supplied accessories 8
Rear connections 8–9
Preparations
Before using the remote control 10
Replacing battery (lithium CR2025) into
the remote control 10
Placing the power box 10
Introduction of Features...... 11
Radio Reception
Plug and Play 12
First time setup/power up
Reinstalling Plug and Play
Switching on to tuner mode.... 12
Presetting radio stations.... 13–14
Automatic preset programming
Manual preset programming
Listening to the preset radio stations
Deleting a preset radio station
CD/MP3-CD Operations
Discs for playback 15
Loading/Unloading the disc 15
Inserting the disc
Ejecting the disc
Playing a CD/MP3-CD.... 16
Selecting a desired MP3 Album/Track.... 17
Programming the disc tracks 17
MP3-CD programming
Clock/Timer
About Clock 18
Setting the clock
About Timer 19
Setting the timer
Cancel/Disable the timer
Activating the timer to the last setting
Other Features
Switching on 20
Switching to Eco Power standby mode
Switching to standby mode
Switching to active mode
Sound control 20
Adjusting the Bass/Treble level
Activating/deactivating Incredible Surround effect
Other Connections
Connecting external devices 21
Connecting an external device for listening
to music/sound
Connecting an external device for analogue
recording
Listening to an external source 21
Specifications 22
Troubleshooting 23
This product complies with the radio interference requirements of the European Community.
The type plate is located at the rear of the system.
For users in the U.K.: please follow the instructions on page 2.
Environmental information
All unnecessary packaging has been omitted. We have tried to make the packaging easy to separate into three materials: cardboard (box), polystyrene foam (buffer) and polyethylene (bags, protective foam sheet).
Your system consists of materials which can be recycled and reused if disassembled by a specialised company. Please observe the local regulations regarding the disposal of packaging materials, exhausted batteries and old equipment.
Maintenance
To clean a CD, wipe it in a straight line from the centre toward the edge using a soft, lint-free cloth. A cleaning agent may damage the disc! Write only on the printed side of a disc and only with a soft felt-tipped pen.

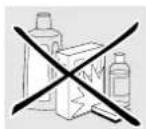
Clean the system with a soft, slightly dampened, lint-free cloth. Do not use any cleaning agents as they may have a corrosive effect.
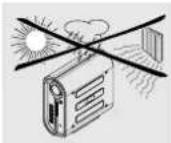
Do not expose the system batteries or discs to humidity, rain, sand or excessive heat (caused by heating equipment or direct sunlight).
Safety information
- Place the system on a flat, hard and stable surface.
- Place the system in a location with adequate ventilation to prevent internal heat build-up in your system. Allow at least 10 cm (4 inches) clearance from the rear and the top of the unit and 5 cm (2 inches) from each side.
- The lens may cloud over when the system is suddenly moved from cold to warm surroundings, making it impossible to play a disc. Leave the system in the warm environment until the moisture evaporates.
- The mechanical parts of the set contain self-lubricating bearings and must not be oiled or lubricated.
- When the system is switched to Standby mode, it is still consuming some power. To disconnect the system from the power supply completely, remove the AC power plug from the wall socket.
- To avoid overheating of the system, a safety circuit has been built in. Therefore, your system may switch to Standby mode automatically under extreme conditions. If this happens, let the system cool down before reusing it.
Connections
Supplied accessories

Rear connections
WARNING!
- Never make or change any connections with the power switched on. - Connect the power cord from the "power box" to the power outlet only after you have finished hooking up everything.
- Adjust the position of the antenna for optimal reception.
- Position the antenna as far as possible from a TV. VCR or other radiation source.
- For better FM stereo reception, connect external FM antenna.
- It is not possible to connect other than the supplied speakers.
- The optional equipments and connecting cords are not supplied.
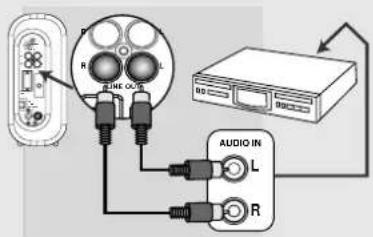
- If you are connecting to equipment with only mono output (a single audio out terminal), connect it to the AUX IN left terminal. Alternatively, you can use a "single to double" cinch cable, but the output sounds still remain mono.
- Do not connect equipment to both the LINE OUT and AUX IN terminals at the same time. Otherwise, noise will be generated and malfunction might occur.
Connections

English
Preparations
English
Before using the remote control
1 Pull out the plastic protective sheet.
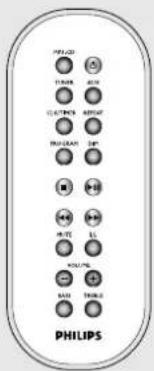
2 Select the source you wish to control by pressing one of the source select keys on the remote control (for example MP3-CD, TUNER).
3 Then select the desired function (for example ▶, |◀◀, ▶▶▶).
Replacing battery (lithium CR2025) into the remote control
1 Pull out the knob Ⓐ slightly to the left
2 Pull out the battery compartment Ⓑ.
3 Replace a new battery and fully insert the battery compartment back to the original position.
CAUTION!
Batteries contain chemical substances, so they should be disposed off properly.
Placing the power box
- Place the power box as close as possible to the power supply.
- Do not place this unit in closed spaces, cover it or block the air vents.
- Do not insert or drop anything into this unit through the air vents as this could cause serious damage.


Introduction of Features
Eco Power standby Plug and Play
ECO POWER or
press and hold to switch the system to low power standby mode.
▶ II in standby mode. press and hold to initiate
Plug and Play mode.
- press briefly to start plug & play installation.
■ press to exit.
Standby mode
ECO POWER or ⏻
press briefly to enter standby mode.
Source selection
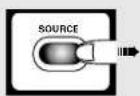
SOURCE press repeatedly to select
CD → TUNER-FM → MW →
AUX → CDR → CD
MP3-CD / TUNER / AUX
- press to enter the selected source mode.
- In Tuner mode, press TUNER to toggle between FM and MW band.
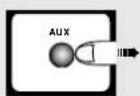
- in AUX mode, press AUX to toggle
between AUX and CDR mode.
Dimming the display
DIM press to select half or full
brightness for display screen.

Volume
VOL ▲▼, VOLUME +/−
press to increase/decease the volume.
MUTE
- press to silence or restore the volume.
Sound control
I.S. press to switch on/off the
incredible surround sound
effect.
BASS / - press to select low tone/high
TREBLE tone sound effect.
- press VOLUME + / - on the
remote control to change the
tone level.
Clock/Timer
CLK/TIMER
- press to view clock or enter clock setting mode.
- press and hold to enter timer setting mode.
PROGRAM
- in clock setting mode, press to change clock display
mode : 24- or 12- hour.
press to set the minutes and hours.
Tuner
▶ I press to toggle between frequency
tuning and preset number selection
mode.
|◀◀ ▶▶▶- press to select a preset radio station.
- press to change the radio frequency.
PROGRAM
- press to start manual preset programming.
press and hold to start automatic preset
programming.
■ press to stop programming or to erase
a selected preset.
CD
▶ I press to start or interrupt playback.
- press briefly to select a desired track.
- press and hold to search backward?
forward
- in playback mode, press to stop the
disc.
- in stop mode, press to eject the disc.
REPEAT press to select repeat the current track
or repeat the whole disc or switch off
the repeat mode.
MP3-CD
▶ II press to start or interrupt playback.
- press to enter track selection mode.
◀◀ ▶▶▶ press to select a desired album/ track.
■ - in playback mode. press to stop the
disc.
- in stop mode, press to eject the disc.
press to enter album selection mode.
REPEAT press to select repeat the current track
or repeat the whole disc or switch off
the repeat mode.
Radio Reception
Plug and Play
Plug and Play allows you to store all available radio stations automatically, starting from FM and followed by MW band.
When all the available radio stations are stored or the memory for 40 presets are used, the last preset radio station will be played.
→First time setup/power up

→Reinstalling Plug and Play
→ All previously stored radio stations will be replaced.
Notes:
- If no stereo frequency is detected during Plug and Play, "CHECK ANTENNA" will be displayed.
- During Plug and Play, if no button is pressed within 15 seconds, the system will exit Plug and Play mode.

To exit without storing the Plug and Play
- Press ■ on the system.
→ If you do not complete the Plug and Play installation, the function will be restarted when you next turn on the main supply again.
Switching on to tuner mode

- Press SOURCE or TUNER repeatedly to select FM or MW band.

plug in the power cord
In standby mode,
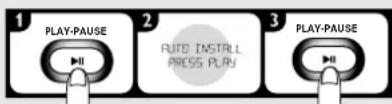
press and hold


Presetting radio stations
You can preset up to 40 radio stations in the memory.
IMPORTANT!
When "P" appears on the display, it only enables preset number selection. Press ▶II to toggle between frequency tuning and preset number selection.
→Automatic preset programming
It enables you to programme all available radio stations automatically from a selected preset number, starting from FM and followed by MW band.
If no preset number is shown, automatic preset will begin from preset (1) and all your former presets will be overridden.
Note:
- If a radio station has been stored in one of the presets, it will not be stored again under another preset number.
To exit programming mode
- Press PROGRAM or ■.
→Manual preset programming
It enables you to programme only the favourite radio stations.
- Hold down |◀◀ ▶▶| for fast tuning, release it when the frequency indication starts to change. For tuning to a weak reception radio station, press |◀◀ ▶▶| briefly and repeatedly.
- Repeat the steps again to store other radio stations.
Notes:
- If you attempt to programme more than 40 preset radio stations, "PROGRAM FULL" is displayed.
- During programming, if no key is pressed within 20 seconds, the system will exit the programme mode automatically.
To exit without storing the preset setting
- Press ■.
In tuner mode,

In tuner mode,

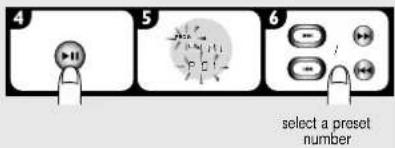

Radio Reception
English
→Listening to the preset radio stations

In tuner mode,

make sure "P" appears, if not press ▶ II.
select a preset number
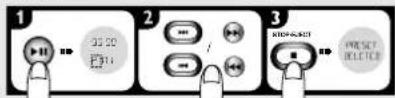
→Deleting a preset radio station

In tuner mode,
When the preset radio station is deleted
→ The deleted radio frequency remains on the display until you select another preset number.
→ The preset numbers of all other preset radio stations in the band with higher numbers are also decreased by one.
Note:
- If you press the STOP·EJECT (■) button for less than three seconds, it will eject the disc (if available) from the disc loader.
flowchart
graph LR
    A["1: Play"] --> B["2: Pause"]
    B --> C["3: Stop"]
    style A fill:#f9f,stroke:#333
    style B fill:#ccf,stroke:#333
    style C fill:#cfc,stroke:#333
make sure "P" appears, if not press ▶ II.
select a preset number
press and hold until "PRESET DELETED" appears
Discs for playback
This system is able to play :
- All pre-recorded audio CDs (8cm/12cm)
– All finalised audio CDR and audio CDRW discs - MP3-CDs (CD-ROMs with MP3 tracks)
maximum albums = 99
maximum titles = 999 (depending on filename length) ISO9660/oliet or UDF1.5 format
Bitrates = 32-256 kpbs, variable bitrates
ID3 tags = V1.1, V2.2, V2.3, V2.4
Loading/Unloading the disc
WARNING!
- Do not load more than one disc into the disc loader.
- When loading an 8cm disc, slot into the middle of the disc loader.
Inserting the disc
Slot the disc slightly into the disc loader and withdraw your fingers immediately.
→ "READ" is displayed, followed by total number of tracks and the playing time.
Notes:
- Load the disc with the label side facing right.
- Loading the disc in any source mode will switch from the current mode to disc mode.
- For MP3 disc, the disc reading time may exceed 10 seconds due to the large number of songs compiled into one disc.
→Ejecting the disc
→ All the programmed tracks will be erased.



natural_image
Illustration of a computer tower with hands inserting a green checkered component (no text or symbols)
Playing a CD/MP3-CD
You can also access the functions via the same buttons on the remote control.
Switching on to disc mode
- Press SOURCE (or MP3-CD on the remote control) to select CD mode.
Start / Interrupt / Resume playback
- In stop mode, press to start playback.
• During playback, press to pause.
- In pause mode, press to resume playback.
→ During playback, the track number and elapsed playing time of the current track are displayed.
→ For mixed mode MP3 discs, only one mode will be selected for playback depending on the recording format.

Searching backward/forward
- During playback, hold down the button until it reaches the desired passage.
→ For MP3 disc, it is only possible to search within the current track.
Selecting a desired track
- Press the button briefly and repeatedly to go to the beginning of the current / next/ previous track
- In stop/programme mode, hold down the button to increase the speed of track selection.
Stop playback / Eject the disc
- During playback, press to stop playback.
- In stop mode, press to eject the disc.
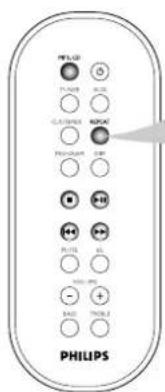
Repeat play
- Press REPEAT repeatedly to select
→ Repeat the current track – RPT lights up.
→ Repeat all tracks – RPT ALL lights up.
To stop repeat play
- Press REPEAT repeatedly until RPT ALL disappears from the display.
Notes:
- If programme mode is active, it will repeat the programmed tracks.
- When the disc is being ejected from the disc slot, it will cancel the repeat mode.
Selecting a desired MP3 Album/Track

If you want to change the album after confirming the selection
1 Press ■ while TRACK icon is flashing.
2 Press |◀◀ ▶▶▶ to select the desired album and repeat steps 3-6.
Programming the disc tracks

Programming tracks is possible when playback is stopped. Up to 99 tracks can be stored in the memory in any order.
If you attempt to programme more than 99 tracks, "PROGRAM FULL" will appear on the display. In this case:
→ The system will exit programming mode automatically.
→ Pressing ■ button will erase all the programmed tracks.
→ Pressing ▶ I button will start the playback of the programmed tracks.
→MP3-CD programming

Notes:
- During programming, if no button is pressed within 20 seconds, the system will exit the programme mode automatically.
- The programme will be erased when the system exits from CD source.
To erase all the programmed tracks
- In stop mode, press ■.
Once the programmed tracks have been erased, pressing ■ will eject the disc.
After inserting the MP3 disc.

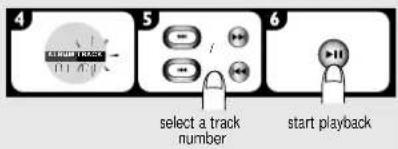
In stop mode.
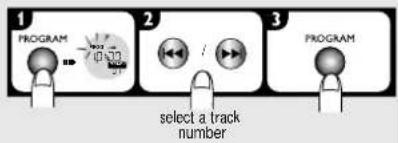
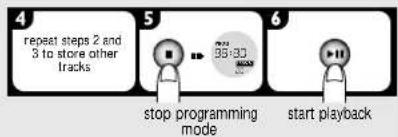
flowchart
graph LR
    A["repeat steps 2 and 3 to store other tracks"] --> B["stop programming mode"]
    B --> C["35:30 timer"]
    C --> D["start playback"]
In stop mode.

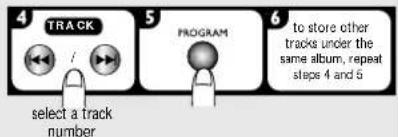
flowchart
graph LR
    A["4 TRACK"] --> B["5 PROGRAM"]
    B --> C["6 to store other tracks under the same album, repeat steps 4 and 6"]
    A -->|select a track number| D

flowchart
graph LR
    A["7 to select tracks from another album, press ■ and repeat steps 2 to 5"] --> B["8 stop programming mode"]
    B --> C["9 start playback"]
Clock/Timer
IMPORTANT!
When in Eco Power standby mode, it is not possible to view or set the clock/timer.
Notes:
- The clock/timer setting will be cancelled when the power cord is disconnected or if a power failure occurs.
- During clock/timer setting, if no button is pressed within 90 seconds, the system will exit the setting mode automatically.
About Clock
The clock can be set in either 12-hour or 24-hour mode ("17:59 PM" or "23:59", for example).
Setting the clock
If you press and hold ◀◀◀ ▶▶▶ for more than two seconds, it will change the minutes in faster speed. The changes in minutes will rollover to the hours, refer to the example shown below.

To check the time in other source mode - Press CLK/TIMER once.
To exit without storing the setting - Press ■.
In standby mode

set minutes and hours
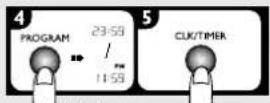
About Timer
The system can switch to CD or TUNER mode automatically at a preset time, serving as an alarm to wake you up.
Setting the timer
- Before setting the timer, ensure that the clock is set correctly.
- The timer will always be switched on after it has been set.
- The volume of the timer will increase gradually from the minimum level to the last tuned volume level.
- If the CD source is selected, the timer will wake you up by playing the first track of the disc or programmed track. If the disc loader is empty, it will switch to Tuner mode.
- If the Tuner source is selected, the timer will wake you up by playing the last tuned radio station.
→Cancel/Disable the timer
→ Activating the timer to the last setting


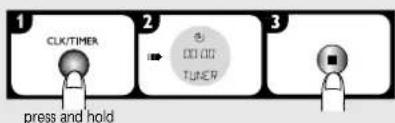
flowchart
graph LR
    A["1 CLK/TIMER"] --> B["2 OUTPUT COI CIS TUNER"]
    B --> C["3 Display with COI"]
    style A fill:#f9f,stroke:#333
    style B fill:#ccf,stroke:#333
    style C fill:#cfc,stroke:#333


Other Features
English
Switching on
→Switching to Eco Power standby mode

To save the power consumption, it is advisable to switch the system to Eco Power standby mode or disconnect the system from the power supply completely when not in use.
→ LED will display a red light.
→ The display screen will go blank.
→Switching to standby mode
→ LED will display a green light.

Switching to active mode

Sound control
Adjusting the Bass/Treble level

The BASS (low tone) and TREBLE (high tone) feature enables you to define the sound-processor settings.
To adjust the Bass or Treble tone level, press the volume buttons on the remote control immediately after you have selected the Bass or Treble sound feature. If the volume button is not used within five seconds, it will resume its normal volume control function.
Activating/deactivating Incredible Surround effect

The Incredible Surround magnifies the virtual distance between the front speakers for an incredibly wide, enveloping, stereo effect.
→ If the Incredible Surround is activated, is is shown on the display.
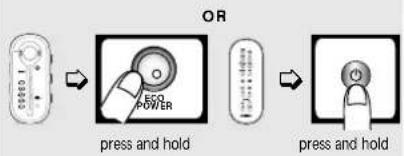
flowchart
graph LR
    A["Press"] --> B["Press and hold"]
    B --> C["Press and hold"]
flowchart
graph LR
    A["Start"] --> B["press briefly"]
    B --> C["OR"]
    C --> D["press briefly"]

flowchart
graph LR
    A["Source"] --> B["CD → TUNER-FM"]
    B --> C["CDR ← AUX → MW"]
    D["MP3-CD"] --> E["/"]
    F["TUNER"] --> G["/"]
    H["AUX"] --> I["/"]

flowchart
graph TD
    A["Display Unit"] --> B["BASS / TREBLE / VOLUME"]
    B --> C["Volume Control"]

Connecting external devices
Connecting an external device for listening to music/sound

Connect the "AUDIO OUT" terminals of the external device (TV, VCR, Laser Disc player, DVD player, for example) to the AUX IN terminals of your system.
Connecting an external device for analogue recording

Connect the "AUDIO IN" terminals of the external device (CD/tape recorder, for example) to the LINE OUT terminals of your system.
Listening to an external source
1 Press SOURCE or AUX repeatedly.
→ Select "AUX" when connecting to a TV, VCR or Laser Disc player.
→ Select "CDR" when connecting to a CD recorder or DVD player.
2 Play the external device.
- When CDR mode is selected, any audio equipment connected to the LINE OUT terminals will be muted. You will not be able to record or listen to the sound on equipment connected to the LINE OUT terminals.
Notes:
- You are advised not to listen to and record from the same source simultaneously.
- All the sound control features (IS., BASS/TREBLE, for example) are available for selection.
- Refer to the operating instructions of the connected equipment for details.


→
CD → TUNER-FM
↑
↓
CDR ← AUX ← MW

→
AUX ⇌ CDR
Specifications
AMPLIFIER
Output power 2 x 50 W MPO 2 x 25 W RMS ^1)
Signal-to-noise ratio..... ≥ 67 dBA (IEC)
Frequency response 50 – 16000 Hz Input sensitivity
AUX / CDR In.... 500 mV / 1V
Output
Speakers ≥ 8 Ω
Headphones 32 Ω - 1000 Ω
Line Out ....500 mV ±2dB, > 22000 Ω
(1) (8 Ω, 1 kHz, 10% THD)
CD/MP3-CD PLAYER
Number of programmable tracks 99
Frequency range 20 - 20000 Hz
Signal-to-noise ratio ≥ 80 dBA
Channel separation ≥ 60 dB (1 kHz)
Total harmonic distortion.... < 0.003%
MPEG 1 Layer 3 (MP3-CD) ...... MPEG AUDIO
MP3-CD bit rate .... 32-256 kbps (128 kbps advised)
Sampling frequencies ....32, 44.1, 48 kHz
TUNER
FM wave range 87.5 - 108 MHz
MW wave range 531 - 1602 kHz
Number of presets 40
Antenna
FM 75 Ω wire /telescopic antenna
AM Loop antenna
POWER UNIT
Material ......Polystyrene
AC Power 220 - 230 V / 50 Hz
Power Consumption
Active 33 W
Standby .... < 10 W
Eco Power Standby .... ≤ 1 W
Dimensions (w x h x d) ....238 x 68 x 158 (mm)
Weight (without speakers).... 1.2 kg
SPEAKERS
System Bass reflex
Impedance 8 Ω
Woofer 2 x 3" polypropylene
Tweeter..... 1 x 18mm Ferrofluid cooled Dome
Dimensions (w x h x d) . 112 x 245 x 235 (mm)
Weight 2.9 kg each
GENERAL INFORMATION
Material
MZ1000 ......Polymethyl methacrylate
MZ1100 Rubber/Lucite
MZ1200 Aluminium alloy
Main unit
Dimensions (w x h x d)112 x 245 x 235 (mm)
Weight 2.85 kg
Specifications and external appearance are subject to change without notice.
WARNING
Under no circumstances should you try to repair the system yourself, as this will invalidate the warranty. Do not open the system as there is a risk of electric shock.
If a fault occurs, first check the points listed below before taking the system for repair. If you are unable to solve a problem by following these hints, consult your dealer or service centre.
| Problem | Solution |
| The disc is ejected automatically. | Load in the disc with label facing right.Replace or clean the disc, see “Maintenance”.Use a finalised CD-RW or a correct MP3-CD format disc. |
| Radio reception is poor. | If the signal is too weak, adjust the antenna or connect an external antenna for better reception.Increase the distance between the system and your TV or VCR. |
| The system does not react when buttons are pressed. | Remove and reconnect the AC power plug and switch on the system again. |
| Sound cannot be heard or is of poor quality. | Adjust the volume.Disconnect the headphones.Check that the speakers are connected correctly.Make sure the MP3-CD was recorded within 32-256 kbps bit rate with sampling frequencies at 48 kHz, 44.1 kHz or 32 kHz. |
| The left and right sound outputs are reversed. | Check the speaker connections and location. |
| The remote control does not function properly. | Select the source (MP3-CD or TUNER, for example) before pressing the function button (▶, |◀◀, ▶▶▶).Reduce the distance between the remote control and the system.Replace the battery.Point the remote control directly toward the IR sensor. |
| The timer is not working. | Set the clock correctly.Press and hold CLK/TIMER to switch on the timer. |

- Quick Use Guide
- Detailed playback features and additional functions are described in the accompanying owner's manual.
- Listen to radio station
- First time power up...
- Listen to a CD/MP3-CD
- Setting the Clock
- Switching to or waking up from Eco Power standby mode
- Important notes for users in the U.K.
- Mains plug
- How to connect a plug
- Copyright in the U.K.
- Italia
- Norge
- DK
- Connections
- Preparations
- Introduction of Features...... 11
- Radio Reception
- CD/MP3-CD Operations
- Clock/Timer
- Other Features
- Other Connections
- Specifications 22
- Troubleshooting 23
- Environmental information
- Maintenance
- Safety information
- Rear connections
- WARNING!
- English
- Before using the remote control
- Replacing battery (lithium CR2025) into the remote control
- CAUTION!
- Placing the power box
- Introduction of Features
- Eco Power standby Plug and Play
- Standby mode
- Source selection
- Dimming the display
- Volume
- Sound control
- Tuner
- CD
- MP3-CD
- Plug and Play
- →First time setup/power up
- →Reinstalling Plug and Play
- To exit without storing the Plug and Play
- Switching on to tuner mode
- Presetting radio stations
- IMPORTANT!
- →Automatic preset programming
- To exit programming mode
- →Manual preset programming
- To exit without storing the preset setting
- Discs for playback
- Loading/Unloading the disc
- Inserting the disc
- →Ejecting the disc
- Playing a CD/MP3-CD
- Switching on to disc mode
- Start / Interrupt / Resume playback
- Searching backward/forward
- Selecting a desired track
- Stop playback / Eject the disc
- Repeat play
- To stop repeat play
- Selecting a desired MP3 Album/Track
- Programming the disc tracks
- →MP3-CD programming
- About Clock
- About Timer
- Setting the timer
- →Cancel/Disable the timer
- → Activating the timer to the last setting
- Switching on
- →Switching to Eco Power standby mode
- →Switching to standby mode
- Switching to active mode
- Adjusting the Bass/Treble level
- Activating/deactivating Incredible Surround effect
- Connecting external devices
- Connecting an external device for listening to music/sound
- Connecting an external device for analogue recording
- Listening to an external source
- Press SOURCE or AUX repeatedly.
- Play the external device.
- Notes:
- Specifications
- AMPLIFIER
- CD/MP3-CD PLAYER
- POWER UNIT
- SPEAKERS
- GENERAL INFORMATION
- WARNING
Brand : PHILIPS
Model : MZ1200
Category : Hi-Fi System