
RC-E451B - Radio JVC - Free user manual and instructions
Find the device manual for free RC-E451B JVC in PDF.


| Product Type | Portable Radio |
| Brand | JVC |
| Model | RC-E451B |
| Frequency Bands | AM, FM |
| Speaker | Built-in monaural speaker |
| Headphone Jack | 3.5mm stereo |
| Power Source | AC 120V 60Hz or 4 x AA batteries (not included) |
| Dimensions (Approx.) | 200 x 100 x 50 mm |
| Weight (Approx.) | 0.5 kg (without batteries) |
| Tuning Control | Analog dial |
| Volume Control | Rotary knob |
| Antenna | Built-in ferrite bar for AM, telescopic rod for FM |
| Battery Indicator | LED indicator |
| Carrying Handle | Built-in |
| Cleaning Instructions | Wipe with a dry soft cloth; do not use liquids or aerosol cleaners |
| Safety Precautions | Do not expose to rain or moisture; refer to manual for details |
| Repairability | Designed for professional repair; no user-serviceable parts inside |
| Spare Parts Availability | Contact JVC authorized service centers |
| Manual Language | English, Czech, Hungarian, Polish, Romanian, Slovak, Bulgarian (available for download) |
Frequently Asked Questions - RC-E451B JVC
User questions about RC-E451B JVC
0 question about this device. Answer the ones you know or ask your own.
Ask a new question about this device
Download the instructions for your Radio in PDF format for free! Find your manual RC-E451B - JVC and take your electronic device back in hand. On this page are published all the documents necessary for the use of your device. RC-E451B by JVC.
USER MANUAL RC-E451B JVC
Portable CD player with CASSETTE/MP3/USB/FM/Bluetooth
RC-E451B / RC-E451W
INTRODUCTION
- Thank you for buying our product.
- Please read through these operating instructions, so you will know how to operate your equipment properly. After you finish reading the instructions manual, put it away in a safe place for future reference.
WARNING
To prevent fire or shock hazard, do not expose this appliance to rain or moisture. To avoid electrical shock, do not open the cabinet; refer servicing to qualified personnel only.
CAUTION
Use of controls or adjustment or performance of procedures other than those specified herein may result in hazardous radiation exposure.
DANGER
Invisible laser radiation when open and interlock failed or defeated. Avoid direct exposure to beam.
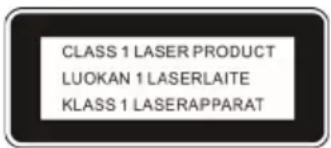
This Compact Disc player is classified as a Class 1 LASER PRODUCT. THE CLASS 1 LASER PRODUCT label is located on the rear exterior.
NOTE: The manufacturer is not responsible for any radio or TV interference caused by unauthorized modifications could void the user's authority to operate the equipment.
- Avoid installing the unit in locations described below:
- Places exposed to direct sunlight or close to heat radiating appliance such as electric heaters, on top of other stereo equipment that radiate too much heat.
- Places locking ventilation or dusty places.
- Places subject to constant vibration.
- Humid or moist places.
- Operate turning controls and switches as instructed in manual.
- Before turning on the power for the first time, make sure that the power cord is properly installed.
WARNING: Remove batteries if exhausted or if they will not be used again for a long period. The incorrect use of batteries can cause electrolyte leakage and will corrode the compartment or cause the batteries to burst, therefore:
- Do not mix battery types, e.g. alkaline with zinc carbonate.
- When inserting new batteries, replace all batteries at the same time.
NAME OF CONTROLS
- FOLDING HANDLE
- USB PORT
- CD COMPARTMENT
- CASSETTE PAUSE KEY
- CASSETTE STOP/EJECT KEY
- CASSETTE FAST FORWARD KEY
- CASSETTE REWIND KEY
- CASSETTE PLAY KEY
- CASSETTE RECORD KEY
- 10/FOLD./MEM.- BUTTON
- PROG./M./P-MODE BUTTON
- 10/FOLD./MEM.+ BUTTON
- TOP BUTTON
- RUN-BUTTON
- LCD DISPLAY
- TUN+ BUTTON
- SCAN/PAIR BUTTON
- VOL+ BUTTON
- FUNC. BUTTON
- VOL- BUTTON
- SPEAKERS
- CASSETTE COMPARTMENT
- AC SOCKET
- BATTERY COMPARTMENT
- AUX IN JACK
- HEADPHONE JACK
- FM ANTENNA
POWER SOURCE
This unit is designed to be operated on AC/DC.
AC OPERATION
Plug the smaller end of AC power cord into AC jack on unit and the other bigger end into household AC wall outlet. The unit will be automatically disconnected.
DC OPERATION
Open the BATTERY COMPARTMENT DOOR. Install 6 pcs UM-1/D size batteries (not included) into compartment. Please follow correct polarities as indicated.
CAUTION
- Remove batteries if they are exhausted or if the unit will not be used for a long time.
- Batteries contain chemical substances, so they should be disposed of properly.
BASIC FUNCTION
SWITCHING ON THE UNIT
After connecting the power, press the ⏻/FUNC. button to turn on the unit, then press the ⏻/FUNC. button again to choose FM / TAPE / CD / USB mode.
NOTE: In CD / USB / AUX mode, when the unit is not providing the main function for 15 minutes, the unit will automatically switch into standby mode. In the tape mode, only the tape stops for 15 minutes, the unit will automatically switch into standby mode. To turn on the unit again, press ⓄFUNC. button or replug the unit.
ESD hints – The product may reset or not reset to operation of control due to electrostatic discharge, just switch off and reconnect again.
TO ADJUST VOLUME
Press VOL.+/- button to increase or decrease volume.
HEADPHONE JACK
For private listening, connect a 3.5mm headphone (not included) to the HEADPHONE jack. The SPEAKER will be automatically disabled.
CAUTION: LISTENING AT A HIGH VOLUME OVER A LONG PERIOD IS NOT GOOD FOR YOUR EARS.
FM OPERATION
TUNING IN RADIO STATIONS
- Press the ⏻/FUNC. button to choose radio mode: FM mode.
- Tune to the desired station by pressing the ▶/TUN+ or ◀/TUN- button; the station frequency will appear on the display.
- Press the VOL.+/- button to adjust the volume to a comfortable level.
- To optimize reception when listening to FM stations, extend the telescopic antenna to its full length. When a stereo signal is received, "ST" will appear on the display.
RADIO AUTO SCAN (SEARCH)
Press the ▶/SCAN/PAIR button on the unit; the unit will conduct an auto scan and program until it finds a strong signal. After the search is finished, the unit will start broadcasting from P01. Then press the 10/FOLD./MEM+ or 10/FOLD./MEM- button to choose the desired stored station.
You may pre-store up to 30 FM radio stations in memory for your preference.
- Press the ▶/TUN+ or ◀/TUN- button to select the first desired station. Then press the PROG./M/P-MODE button on the unit; "P01" will appear on the display.
- Press the 10/FOLD./MEM+ or 10/FOLD./MEM- button to choose the desired sequence for storage, then press the PROG./M/P-MODE button on the unit to confirm.
- Search for another station and repeat steps (1) and (2) until all desired stations are stored. Up to 30 stations can be programmed.
CASSETTE OPERATION
UNDERSTANDING THE BUTTONS
PLAY - Press to play cassettes.
REW - From stop mode, press to rewind the tape toward the beginning.
F.FWD - From stop mode, press to advance the tape toward the end.
STOP/EJ. - Press to stop current tape activity or to open the cassette compartment door when no buttons are active.
PAUSE - Press to interrupt tape play or record mode. Press the second time to resume tape play or tape record mode.
PLAYING A CASSETTE TAPE
- Press the ⏻/FUNC. button to choose TAPE mode.
- Press STOP/EJ. key to open the cassette compartment door.
- Insert cassette tape into the compartment with the open edge facing up and the full reel on the right.
- Close the door securely.
- Press REW or F.FWD to move tape to the desired starting point.
- Press PLAY key to begin playing the tape.
- Adjust the volume to your desired listening level.
AUTOMATIC STOP FEATURE
When the cassette deck is operating in play or record mode and the end of the tape is reached, the unit automatically shuts itself off and returns all buttons to the off position.
- Load a blank tape into the tape compartment and close the door.
- Press the ⏻/FUNC. button to switch to RADIO mode. Tune to required station by pressing the left button.
- Press RECORD key to begin recording. RECORD key and PLAY key go down simultaneously.
- Press STOP/EJ. key to end recording.
- To hear what you recorded, follow instructions in PLAYING A CASSETTE TAPE.
NOTE: PAUSE FOR A MOMENT - Using the PAUSE key on the cassette deck instead of the STOP/EJ. key to momentarily interrupt recording gives you a much clearer recording. Press PAUSE key again to resume recording.
RECORDING FROM CD
- Insert a blank cassette tape into the tape compartment.
- Press the ⏻/FUNC. button to switch to CD or Aux mode.
- Load a CD and select the desired track you want to record.
- Press CD ▶/SCAN/PAIR button to start playback. Press RECORD key to begin recording. RECORD key and PLAY key go down simultaneously.
- Press PAUSE key to interrupt or edit recording. Press it again to resume recording.
- Press STOP/EJ. key to end recording.
- To hear what you recorded, follow instructions in PLAYING A CASSETTE TAPE.
TYPES OF CASSETTE
Use only good quality cassettes (IEC TYPE 1) for making recordings. May be used to replay other types of cassette but is unable to make proper recording on these more specialized tapes. The use of C120 cassettes is NOT recommended in this machine.
PROTECTING RECORDING
Normally, anything recorded on the tape is automatically erased when new recording is made. It is possible to protect your recording from accidental erasure by removing the tabs found on the rear of the cassette.

ERASE TAB FOR SIDE "A"
When the cassette is held with the recorded side uppermost and the exposed tape facing the front, the protective tab will be found on the left rear of the cassette.
All pre-recorded cassettes are protected in this way to prevent accidental erasure of the commercial recording. Protected cassettes will prevent the record button from being operated. If at any time you attempt to record and find that this button will not depress, never force the mechanism or it may be damaged. Check that a cassette has been loaded and that the tab has not been removed. Recording on a cassette from which the tabs have been removed can be done by covering the tab openings with a piece of adhesive tape.
CARE OF CASSETTE MECHANISM
Gently clean the tape head and pinch wheel/capstan assemblies after every 10 hours of using the unit. A range of cassette care products are available.
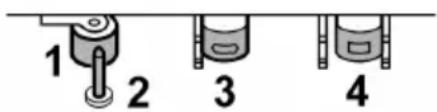
- Pinch Roller
- Capstan
- Record/Playback head
- Erase Head
The erase head, record/play head, and the surface of the pinch roller are delicate and must not be touched with metal objects such as screwdrivers. You may find it easier to clean the assembly by pressing the PLAY button to bring the head and pinch roller into view. Be sure to press the STOP/EJECT button after cleaning the mechanism.
Damage to the pinch wheel can occur if the unit is left in PLAY mode with the power switch off. Under no circumstances should you attempt to lubricate any part of the machine.
CD/MP3 OPERATION
Discs for Playback
This system can play back all digital audio CD, MP3, finalized digital audio CD-Recordable (CD-R) discs, finalized digital audio CD-Rewritable (CD-RW) discs, and CD-DA format digital audio CD/CD-R/CD-RW discs.
LOADING A DISC
- Press the POWER/FUNC. button to choose CD mode.
- Open the CD door. "OP" will be shown on the display.
- Place an audio CD into the tray with the label side facing up.
- Close the CD door. The total number of tracks will appear on the display after reading is finished.
- To remove the CD, press the /☐TOP button and open the CD compartment lid, grasp the CD by its edges, and carefully take it out.
Note:
To ensure good system performance, wait until the disc tray completely reads the disc before proceeding. If no disc is loaded into the compartment, or the disc is placed upside down, the display will show "NO".
PLAYING A DISC
- After loading the disc, the unit starts playback automatically.
- To interrupt playback, press the ▶/SCAN/PAIR button. The “▶” indicator will flash on the display. To resume playback, press the ▶/SCAN/PAIR button again.
- To stop playback, press the /☐TOP button, and the total number of tracks appears on the display.
SELECTING A DESIRED TRACK/PASSAGE
To select a desired track
- Press the ▶/TUN+ or ◀/TUN- button repeatedly in stop mode or during play until the desired track appears on the display.
- Press the ▶/SCAN/PAIR button to start play.
To search for a particular passage during playback (track scanning at high speed)
Press and hold the ▶▶/TUN+ or ◀◀/TUN- button to scan the current playing track at high speed until the desired passage appears, then release the button. Playback will start again from this point.
To select a song whose track number exceeds 10 (for MP3 disc only)
To select a song/track whose number exceeds 10, press the 10/FOLD./MEM.+ or 10/FOLD./MEM.- button each time to skip forward/backward 10 tracks, then press the ▶/TUN+ or ◀/TUN- button to select the desired track. For example: to select the 17th track, press the 10/FOLD./MEM.+ button, and then press the ▶/TUN+ button six times immediately.
To Select A Desired Folder (for MP3 disc only)
(if the MP3 disc contains more than one folder)
To skip to the desired folder during playback, press and hold the 10/FOLD./MEM.+ or 10/FOLD./MEM.- button for about 2 seconds to skip to the next/previous folder.
PROGRAM TRACKS
Programming tracks of a disc is possible when playback is stopped. Up to CD 20 tracks / MP3 99 tracks can be stored in the memory in any order.
- In stop mode, press the PROG./M/P-MODE button; the "PROG" will flash and the "P01" indicator will be on.
- Press the CD ▶/TUN+ or ◀/TUN- button to select the first desired track to be programmed.
- Press the PROG./M/P-MODE button to enter. The display changes to show "P02".
- Repeat steps 2 & 3 to store other desired tracks until all tracks are programmed.
- Press the ▶/SCAN/PAIR button to start playback from the first programmed track.
- Press the /STOP button to stop program playback.
To Erase the Memory (Program)
To clear the program, you have two options:
- Press the /STOP button when the disc is stopped.
- Open the CD compartment lid, program will be erased.
REPEAT
To Repeat a Single Track
- Press the PROG./M/P-MODE button once in play mode, “☐” will flash on the display. The current track will be played repeatedly until the STOP button is pressed.
- To cancel Repeat function, press the PROG./M/P-MODE button until the " " disappears on the LCD display.
To repeat all the Tracks
- Press PROG./M/P-MODE button in play mode till the “☐” shows steady on the display, all tracks on the disc will be played repeatedly until the STOP button is pressed.
- To cancel Repeat function, press the PROG./M/P-MODE button until the " " disappears on the LCD display.
To repeat current folder (for MP3 only)
- Press PROG./M/P-MODE button in play mode, till the “☐FOLD” shows steady on the display, the current folder will be played repeatedly until the STOP button is pressed.
- To cancel Repeat function, press the PROG./M/P-MODE button until the “☐ FOLD” disappears on the LCD display.
RANDOM PLAY
Press the PROG./M/P-MODE button in play mode till the "RDM" shows steady on the display, the random play will start immediately until all tracks are played over and then stop. Press the PROG./M/P-MODE button once to cancel.
INTRO
Press the PROG./M/P-MODE button in play mode until "INTRO" shows steadily on the display. The intro play will start and scan 10 seconds for every track. To cancel intro play, press the PROG./M/P-MODE button until "INTRO" disappears from the display.
USB OPERATION
- Press the ⏻/FUNC. button to choose USB mode.
- Connect the USB to the USB INPUT. The LCD will show the total number of tracks and folders stored in the USB. After reading the USB, the unit will start playback automatically.
- Press the /STOP button on the unit to stop playing. The display will show the total number of USB and folders.
- Proceed with repeat play (repeat 1 - repeat folder - repeat all)/program play/skip up and back operation as described in the above CD/MP3 OPERATION.
CAUTION: Do not use any USB extension cable for connecting the USB bar, which may cause harmful interference.
BLUETOOTH OPERATION
- Press the ⏻/FUNC. button to switch to BLUETOOTH function. The LCD will display flashing "bt" at high speed.
- Turn on the Bluetooth function on the device, scan for the unit "JVC RC-E451W" or "JVC RC-E451B" and connect. Then input the password 0000 if required. The "bt" will show steadily to indicate connection done. Press the ▶/SCAN/PAIR button on the unit or the play key on the device to start playback.
- If the unit can't connect to the relative Bluetooth within 2 minutes, press and hold the \$SCAN/PAIR button on the unit to reconnect.
- Press the VOL.+/- buttons to select your desired level.
- Press /TUN+ or /TUN- on the unit to choose the desired track.
- To stop playback, press /SCAN/PAIR button.
Note: The Bluetooth works best within 10 meters.
AUX IN OPERATION
This unit provides a 3.5 mm AUX IN jack, through which other audio sources can be connected to this unit and be amplified.
- Connect the audio cable (cable not included) into the AUX IN jack and the other end to the AUDIO OUT jack of the external audio source. The unit will change to AUX mode automatically.
- Adjust the volume of the main unit to your desired level.
- Press PLAY on the external audio source (e.g., MP3 player) to start playback.
COMPACT DISC MAINTENANCE
Always use a compact disc bearing the mark as shown.

Notes on handling discs
- Removing the disc from its storage case and loading it.
- Do not touch the reflective recorded surface.
- Do not stick paper or write anything on the surface.
- Do not bend the disc.
Storage
- Store the disc in its case.
- Do not expose discs to direct sunlight or high temperatures, high humidity, or dusty places.
- Should the disc become soiled, wipe off dust, dirt, and fingerprints with a soft cloth.
- The disc should be cleaned from the center to the edge.
- Never use benzene, thinners, record cleaner fluid, or anti-static spray.
- Be sure to close the CD door, so the lens is not contaminated by dust.
- Do not touch the lens.
Cleaning a disc
SPECIFICATIONS
GENERAL
Power Requirement AC 100-240V ~ 60/50Hz
DC 9V UM-1/D x 6 PCS
Power consumption 14 Watts
Standby Power consumption < 0.5 W
Weight Approx. 1.6 kg
Dimensions Approx. 285 (W) x 213 (D) x 140 (H) mm
Operation temperature +5°C - +35°C
RECEIVER SECTION
FM Frequency Range 87.5 – 108 MHz
BLUETOOTH SECTION
BT Frequency Range 2402 – 2480 MHz
EIRP 2.58 dBm
COMPACT DISC SECTION
Optical Pickup 3 – Beam Laser
Frequency Response 100 Hz – 16 kHz
CASSETTE SECTION
Recording System 2 Tracks 2 Channel (Stereo)
Bias System DC Bias
Frequency Response 125 – 6.3 kHz
Wow and Flutter 0.35% WRMS (JIS)
AUDIO SECTION
Power output 2 x 1.6 Watts RMS
ACCESSORIES
Instruction Booklet, AC Cord
WE RESERVE THE RIGHT TO CHANGE TECHNICAL SPECIFICATIONS.

WARNING: DO NOT USE THIS PRODUCT NEAR WATER, IN WET AREAS TO AVOID FIRE OR INJURY OF ELECTRIC CURRENT. ALWAYS TURN OFF THE PRODUCT WHEN YOU DON'T USE IT OR BEFORE A REVISION. THERE
AREN'T ANY PARTS IN THIS APPLIANCE WHICH ARE REPARABLE BY CONSUMER. ALWAYS APPEAL TO A QUALIFIED AUTHORIZED SERVICE. THE PRODUCT IS UNDER A DANGEROUS TENTION.


TO AVOID DANGER OF SUFFOCATION, KEEP THE PLASTIC BAG AWAY FROM BABIES AND CHILDREN. DO NOT USE THIS BAG IN CRIBS, BEDS, CARRIAGES OR PLAYPENS. THIS BAG IS NOT A TOY.
Disposal of old Electrical & Electronic Equipment
(Applicable in the European Union and other European countries with separate collection systems)

This symbol on the product or on its packaging indicates that this product shall not be treated as household waste. Instead it shall be handed over to the applicable collection point for the recycling of electrical and electronic equipment. By ensuring this product is disposed of correctly, you will help prevent potential negative consequences for the environment and human health, which could otherwise be caused by
inappropriate waste handling of this product. The recycling of materials will help to conserve natural resources. For more detailed information about recycling of this product, please contact your local Civic Office, your household waste disposal service or the shop where you purchased the product.
Hereby, ETA a.s. declares that the radio equipment type RC-E451 is in compliance with Directive 2014/53/EU. The full text of the EU declaration of conformity is available at the following internet address: www.JVCAUDIO.cz/doc
INTRODUCTION
TAB FOR SIDE "A"
PROTECTIVE TAB FOR SIDE "A"
TAB FOR SIDE "A"
TAB FOR SIDE "A"
TO ADJUST THE VOLUME
REMOVE THE TAB FOR SIDE "A"
SECTION FOR THE BOX
This product is manufactured and distributed exclusively by ETA a.s., serviced and warranted by its designated partner.
"JVC" is the trademark of JVCKENWOOD Corporation, used by such company under license.
- INTRODUCTION
- WARNING
- CAUTION
- DANGER
- POWER SOURCE
- AC OPERATION
- DC OPERATION
- BASIC FUNCTION
- SWITCHING ON THE UNIT
- TO ADJUST VOLUME
- HEADPHONE JACK
- FM OPERATION
- TUNING IN RADIO STATIONS
- RADIO AUTO SCAN (SEARCH)
- CASSETTE OPERATION
- UNDERSTANDING THE BUTTONS
- PLAYING A CASSETTE TAPE
- AUTOMATIC STOP FEATURE
- RECORDING FROM CD
- TYPES OF CASSETTE
- PROTECTING RECORDING
- CARE OF CASSETTE MECHANISM
- CD/MP3 OPERATION
- DISCS FOR PLAYBACK
- LOADING A DISC
- PLAYING A DISC
- SELECTING A DESIRED TRACK/PASSAGE
- TO SELECT A DESIRED TRACK
- TO SEARCH FOR A PARTICULAR PASSAGE DURING PLAYBACK (TRACK SCANNING AT HIGH SPEED)
- TO SELECT A SONG WHOSE TRACK NUMBER EXCEEDS 10 (FOR MP3 DISC ONLY)
- TO SELECT A DESIRED FOLDER (FOR MP3 DISC ONLY)
- PROGRAM TRACKS
- TO ERASE THE MEMORY (PROGRAM)
- REPEAT
- TO REPEAT A SINGLE TRACK
- TO REPEAT ALL THE TRACKS
- TO REPEAT CURRENT FOLDER (FOR MP3 ONLY)
- RANDOM PLAY
- INTRO
- USB OPERATION
- BLUETOOTH OPERATION
- AUX IN OPERATION
- COMPACT DISC MAINTENANCE
- NOTES ON HANDLING DISCS
- STORAGE
- CLEANING A DISC
- SPECIFICATIONS
- GENERAL
- RECEIVER SECTION
- BLUETOOTH SECTION
- COMPACT DISC SECTION
- CASSETTE SECTION
- AUDIO SECTION
- ACCESSORIES
- DISPOSAL OF OLD ELECTRICAL & ELECTRONIC EQUIPMENT
- (APPLICABLE IN THE EUROPEAN UNION AND OTHER EUROPEAN COUNTRIES WITH SEPARATE COLLECTION SYSTEMS)
- TO ADJUST THE VOLUME
- SECTION FOR THE BOX
Brand : JVC
Model : RC-E451B
Category : Radio