
CARBA-200X - Battery charger Truper - Free user manual and instructions
Find the device manual for free CARBA-200X Truper in PDF.


| Product Type | Battery Charger |
| Brand | Truper |
| Model | CARBA-200X |
| Input Voltage | 120V AC, 60Hz |
| Output Voltage | 12V DC |
| Charging Current | 10A (nominal) |
| Battery Compatibility | Lead-acid, AGM, Gel (12V) |
| Dimensions (L x W x H) | 20 x 15 x 10 cm |
| Weight | 1.5 kg |
| Charging Modes | Automatic, Trickle, Fast |
| Protection Features | Reverse polarity, overload, short circuit, overheat |
| Indicators | LED charge status, power on, fault |
| Cooling System | Natural convection |
| Housing Material | ABS plastic |
| Cable Length (AC) | 1.8 m |
| Cable Length (DC) | 1.5 m with clamps |
| Maintenance | Keep terminals clean; store in dry place |
| Safety Certifications | UL, CE |
| Spare Parts | Available via Truper service centers |
| Manual Availability | Free PDF download at notice-facile.com |
Frequently Asked Questions - CARBA-200X Truper
User questions about CARBA-200X Truper
0 question about this device. Answer the ones you know or ask your own.
Ask a new question about this device
Download the instructions for your Battery charger in PDF format for free! Find your manual CARBA-200X - Truper and take your electronic device back in hand. On this page are published all the documents necessary for the use of your device. CARBA-200X by Truper.
USER MANUAL CARBA-200X Truper
AV. CENTRAL SUR #27, COL. CENTRO, C.P. 30700, TAPACHULA,
CHIS. TEL.: 96 2118 4083
CHIHUAHUA | SUCURSAL CHIHUAHUA
AV. SILVESTRÉ TERRAZAS #128-11, PARQUE INDUSTRIAL BAFAR,
CARRETERA MÉXICO CUAUHTÉMOC, C.P. 31415, CHIHUAHUA, CHIH.
TEL. 61 4434 0052
SONORA | FIX FERRETERÍAS
CALLE 5 DE FEBRERO #517, SUR LT. 25 MZ. 10, COL. CENTRO,
C.P. 85000, CD. OBREGÓN, SON. TEL.: 64 4413 2392
TABASCO | SUCURSAL VILLAHERMOSA
CALLE HELIO LOTES 1, 2 Y 3 MZ. #1, COL. INDUSTRIAL, 2A ETAPA,
C.P. 86010, VILLAHERMOSA, TAB. TEL.: 99 3353 7244
TAMAULIPAS | VM ORINGS Y REFACCIONES
CALLE ROSITA #527 ENTRE 20 DE NOVIEMBRE Y GRAL.
RODRÍGUEZ, FRACC. REYNOSA, C.P. 88780, REYNOSA, TAMS.
TEL.: 89 9926 7552
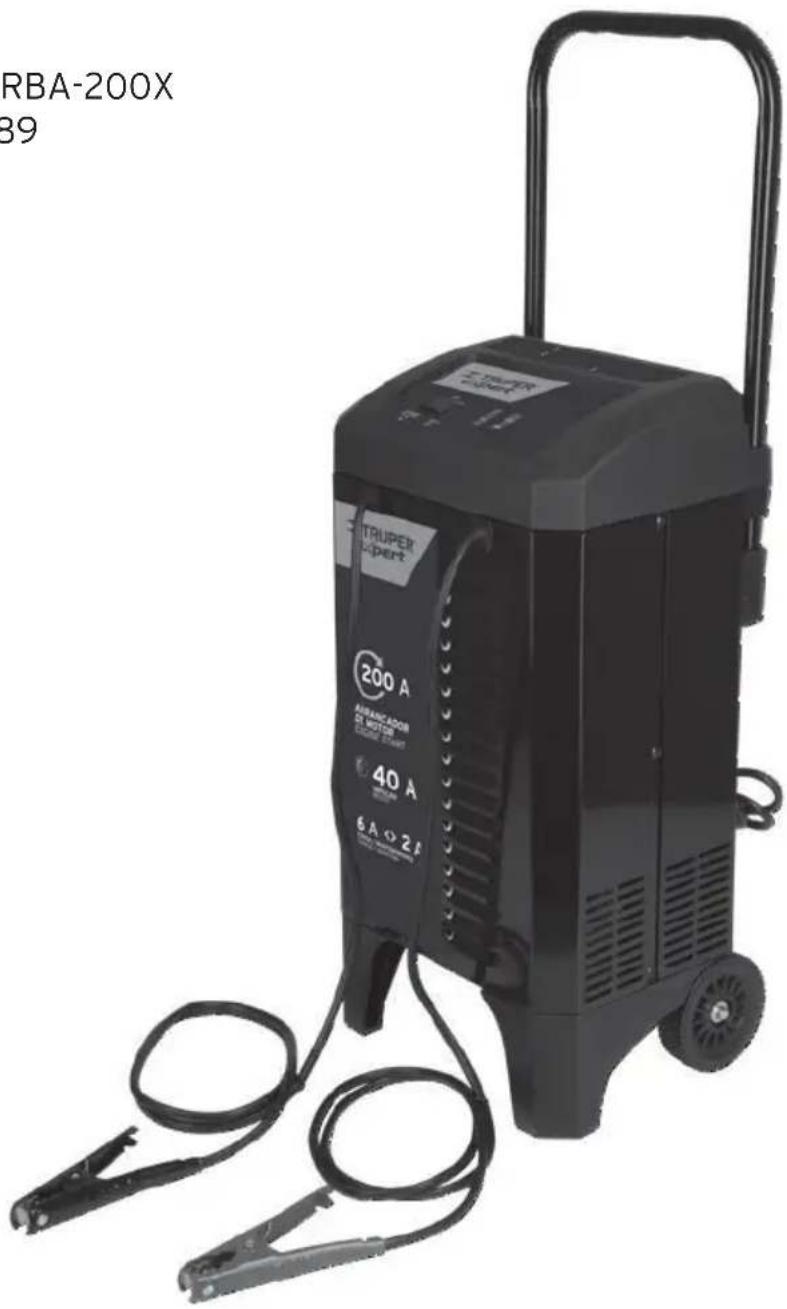
AUTOMATIC Battery charger with jump starter
Model: CARBA-200X
Code: 19589

CAUTION

Read the user's manual thoroughly before operating this tool.

CONTENTS
Technical data 2
Important Safety Instructions 2
Personal Safety Cautions.... 3
Preparation to charge 3
Charger Location 3
Connection Precautions in c.c. connection 3
Follow these steps when the battery is set in the vehicle .... 4
Follow these steps when the battery is set out of the
vehiclevehículo 4
Ground Connections and a.c. power 4
Mounting Instructions 5
Control Panel 5
Operation Instructions 5
Maintenance and Care 7
Troubleshooting 8
Warranty Policy and Authorized Service Centers 9
TECHNICAL SPECIFICATIONS
Input
Voltage: 127 V\~
Frequency: 60 Hz
Current: 0,29 A - 19,1 A
Output
Voltage: 12 V =
Impulse: 40 A
Maintenance Load A - 6 A
Motor kickoff: 200 A
5 seconds ON
180 seconds OFF
Work Cycle: Maximum 5 cycles
Transformer insulation Class: Class "H"
Insulation cable cord grips type: "Y"
All conductors are: 18 AWG x 3 C with 221 °F insulation
temperature
IMPORTANT NOTE: Avoid the risk of electric shock or severe injury. When the power cable gets damaged it should only be replaced by the manufacturer or at a Truper® Authorized Service Center. Power grips used in this product is type "Y" The build quality of the electric insulation is altered if while in use splashing or liquid get into the tool. Do not expose to rain, liquids and / or dampness.

WARNING
Before gaining access to the terminals all
power sources should be disconnected.
This device is built with overload protection through a thermal fuse that turn ON the electricity is OFF


This symbol indicates this equipment is in compliance with the Official Mexican Standard (NOM)
IMPORTANT SAFETY INSTRUCTIONS
-
Keep these instructions. This Manual content are important operative and safety instructions.
-
This charger is not meant to be used by children.
-
Do not expose the charger to rain or snow.
-
Using an accessory not recommended or supplied by the battery charger manufacturer is a risk of fire, electric shock or personal injury.
-
To reduce the risk of damaging the plug or power cable, pull the plug instead of the cable when disconnecting the charger.
-
You shall not use an extension cable unless strictly necessary. Using an extension that is not adequate may start a fire or electric shock. In the event of needing to use an extension cable make sure that:
-
The pins in the extension cable plug are the same number, size and shape as the ones in the charger plug.
- The extension shall be correctly connected and in good electric conditions.
-
The cable size shall be wide enough for the alternate current of the charger as specified in the Ground connections and alternate energy current (page 3)
-
Do not use the charger if the power cord is damaged; replace the power cord at a Truper Authorized Service Center
-
Do not use the charger if it received a strong bump, it fell or is damaged in any way. Only certified personnel shall check it at a Truper Authorized Service Center
-
Do not disassemble the charger. Ask a trained person to check at a Truper Authorized Service Center. If you assemble it back it may cause fire or electric shock.
-
To reduce the risk of electric shock, disconnect the charger from the power supply before carrying out maintenance or cleaning service. Turning OFF the controls DOES NOT reduce those risks.
WARNING RISK OF EXPLOSIVE GASSES.
a) It is risky working near a lead battery. Batteries generate explosive gasses during the normal functioning. Therefore, it is very important to follow the instructions each time you use the charger,
b) To reduce the risk of the battery exploiting, follow these instructions and the manufacturer instructions of any equipment you will be using near the battery. Check the caution measures in this product and the motor.
PERSONAL SAFETY CAUTIONS
- Consider the idea of a second person close to the user to help, when working near an acid lead battery.
- Have handy plenty of fresh water and soap in case battery acid make contact with your skin, clothes or eyes.

-
Use full eye protection and protective clothes. Avoid touching your eyes when working near the battery.
-
In the event acid from the battery make contact with your skin or clothes, wash immediately with water and soap. If acid gets into your eyes, wash with plenty of cold water at least 10 minutes and seek medical help immediately.

-
NEVER smoke or allow sparks or flames near the battery or the motor.
-
Use extreme care when handling metal tools close the battery. If dropped it can cause a spark or short circuit in the battery or any other electric part and cause an explosion.
-
Do not wear metal articles like rings, bracelets and watches when working with an acid lead battery. An acid lead battery may cause a short circuit with extremely high current capable or welding a ring or any other metal article causing severe burns.
-
Use the charger only to charge rechargeable batteries acid lead type (standard or AGM). It is recommended using 22 Ah - 59 Ah (12 V=) battery capacity. This charger is not designed to supply energy to low voltage, only in a motor starting application. Do not use the battery charger to charge dry batteries used commonly with domestic appliances. These types of batteries may explode and injure people and damage property.
-
NEVER recharge a frozen battery.
PREPARING TO CHARGE
- If you need to remove the battery from the vehicle to charge, always remove the battery ground terminal. Verify all the vehicle accessories are OFF no avoid causing an arc.
- Make sure the area around the battery is well ventilated when charging the battery.
- Clean the battery terminals before charging the battery. While cleaning, prevent corrosion produced by air is not making contact with your eyes,
- Add distilled water into each cell until the battery acid is reaching the specified level indicated by the battery manufacturer. Do not cause spills. For batteries built without extractible caps in the cells such as valve regulated acid lead batteries (VRLA), follow carefully the recharge instructions indicated by the manufacturer.
- Read, understand and follow all the instructions for the charger, the battery, the vehicle and any equipment used near the battery and the charger. Control all the specific caution measures established by the battery manufacturer when charging, as well as the recommended load index.
- Determine the battery tension checking the vehicle user manual and make sure the output voltage selection switch is established in the right voltage (if it is the case). If the charger has an adjustable loading speed, charge the battery first in the lowest speed.
PLACEMENT OF THE CHARGER
- Set the charger as far away as the DC battery cables allow.
- Never set the charger directly on top of the battery that is been charged. Gasses in the battery may corrode and damage the charger.
- Do not let the battery acid drip over the charger when checking gravity or when filling up.
- Do not operate the charger in a closed area. Do not block ventilation by no means.
- Do not place the battery on top of the charger.
CAUTION MEASURES WITH THE DIRECT CURRENT CONNECTION
- Connect and disconnect the direct current output clamps only after establishing all the charger switches to the OFF position (if applicable) and after disconnecting the a.c. plug from the power supply. Never set the clamps touching one to the other when the charger is connected. The clamps are energized and can produce sparks.
- Set the clamps in the battery and chassis as indicated in the section "Follow these steps when the battery is set in the vehicle" and "Follow these steps when the battery is outside the vehicle" in page 4.
FOLLOW THESE STEPS WHEN THE BATTERY IS INSTALLED IN THE VEHICLE.
WARNING PRODUCING A SPARK, CLOSE TO THE BATTERY MAY CAUSE AN EXPLOSION. TO REDUCE THE RISK OF CAUSING SPARKS CLOSE TO THE BATTERY:
- Arrange the alternate current and continuous current cables adequately to reduce the risk damages due to the hood, door and mobile or hot parts of the motor.
- Stay away of the fan blades, belts, pulleys or other parts which could cause injuries.
- Check the polarity of the battery posts. The POSITIVE (POS, P+) battery post, usually is of a larger diameter than the NEGATIVE (NEG, N, -) post.
- Determine which of the battery posts is grounded (connected) to the chassis. If the negative post is grounded to the chassis (as it is in most vehicles, see step (5). If the positive post is grounded to the chassis, see step (6).
- In vehicles grounded through a negative post, connect the POSITIVE (RED) clamp of the charger to the post that is not grounded POSITIVE (POS, P+) post of the battery. Connect the NEGATIVE (BLACK) clamp to the vehicle chassis or the motor block that is away from the battery. Do not connect the clamp in the carburetor, fuel lines or body metal sheets. Connect into a metal part with tick caliber or a block in the motor.
- In vehicles grounded through the positive post, connect the NEGATIVE (BLACK) clamp of the battery charger to the post that is not grounded to the NEGATIVE (NEG, N, -) post of the battery. Connect the POSITIVE (RED) clamp to the vehicle chassis or to a block in the motor away from the battery. Do not connect to the carburetor, fuel lines or non-metallic bodies. Connect into a metal part with tick caliber or a block in the motor.
- When disconnecting the charger, also disconnect the power cable. Remove the clamp from the vehicle chassis and then, remove the clamp from the battery terminal.
- See "Operation instructions" for charging times.
FOLLOW THESE STEPS WHEN THE BATTERY IS OUTSIDE OF THE VEHICLE
⚠ WARNING A SPARK NEAR THE BATTERY MAY CAUSE AN EXPLOSION IN THE BATTERY. TO REDUCE THE RISK OF CAUSING SPARKS NEAR THE BATTERY:
- Check polarity in the battery posts. The POSITIVE (POS, P +) battery post of the battery, usually has a larger diameter than the (NEG, N, -) post
- Set at least one insulated battery cable 61 cm (24") long and a 6 gauge in accordance to AWG American gauge to the NEGATIVE (NEG, N, -) battery post
- Connect the POSITIVE (RED) clamp of the battery, to the POSITIVE (POS, P+) post of the battery.
- Your body as well as the free end of the cable previously fastened to NEGATIVE (NEG, N, -) of the battery, shall be set as far away as possible from the battery. Then, connect the NEGATIVE (BLACK) clamp to the free end of the cable.
-
Do not stand in front of the battery when making the final connection
-
When disconnecting the charger, do it in a reverse sequence from the connection procedure and make the first connection as far away as possible from the battery.
- A marine (sea boat) battery shall be removed and charged on ground. Charging on board, require equipment especially designed to marine use
GROUND CONNECTIONS AND POWER CORDS
- This battery charger is designed to be used in a 127 V rated voltage circuit with a ground plug to reduce the risk of electric shock. The plug shall be connected to a properly installed power supply with ground discharge in accordance with all the ordinances and codes. The plug prongs shall fit to the socket. Do not use in a system that is not grounded
- ▲ DANGER Never modify the power cable furnished. If not fitting into the power supply, call a certified electrician to install an adequate socket. An inadequate connection is a risk of electric shock or electrocution
NOTE: Using an adapter plug is not recommended and shall not be used.
3. USE OF AN EXTENSION CABLE
Using an extension cable is not recommended.
If you must use an extension cable follow these guidelines:
- The pins of the cable plugs shall be the same number, size and shape of the charger plug.
- Make sure the extension cable is correctly connected and in good electric conditions.
- The cable length shall have the right gauge according to the charger current capacity, as specified below:
| Length of cables | Cable gauge AWG* |
| 25 ft | 14 |
| 50 ft | 12 |
| 100 ft | 10 |
| 150 ft | 8 |
*It is allowed to use it only if the extensions have an overcurrent protection device.
AWG= American Wire Gauge. Reference:
NMX-J-195-ANCE
MOUNTING INSTRUCTIONS
Untangle all the wires and extend the cables before using the battery charger.
Pull up the handle from the retracted position pulling upwards until clicking in place (Push in the small silver buttons if necessary)
CONTROL PANEL
- ON / OFF SWITCH
Use this switch to select between the charge speed / keep, drive speed and start mode of the motor.
OFF - When the switch is in this position (in the center) the charger is OFF.
- BOOST or CHARGE / MAINTENANCE
When the switch is in this position, the charge selector button can be adjusted to 6 A <> 2 A charge / maintenance or the 40 A impulse configuration.
• MOTOR START
When the switch is in this position, the LED light for motor start will activate and will be constantly kept when connected to the battery.
• CHARGE SELECTION
Use this button to establish the following selections.
• 6 A <> 2 A CHARGE / MAINTENANCE
For small and large batteries. It is not recommended for industrial applications.
• 40 A BOOST
For a fast incorporation of energy to a discharged battery or big capacity battery before starting the motor.
• 200 A MOTOR START
Delivers 200 A to start a motor with a weak or empty battery. always use it in combination with a battery
LED INDICATORS
• LED inverted clamps / defective battery (Red LED blinking)
The connections are reversed.
• LED inverted clamps / defective battery (Red LED stays ON)
The charger is detecting a problem with the battery. See Troubleshooting to learn more
• ON LED (YELLOW / ORANGE) ON:
The charger is connected and the battery is being "fed"
• LED Charging / Maintenance (GREEN) ON:
The battery charge is complete, the charger switched to maintenance mode
NOTE: See the Operation instructions to learn about a complete description of charger modes.
OPERATION INSTRUCTIONS
⚠ WARNING Provoking a spark near the battery may cause an explosion.
CHARGING THE BATTERY IN THE VEHICLE
- Turn OFF all the accessories in the vehicle.
- Keep the hood open.
- Clean the battery terminals.
- Set the switch into the OFF position
- Set the alternate current cables / continuous current cables away from the fan blades, bands, pulleys and other mobile parts that could cause injuries.
- Connect the battery following the instructions indicated in the "Follow these steps when the battery is set inside the vehicle" section in page 4.
- Connect the charger into the power supply.
- Having the charges plugged and connected to the vehicle battery, set the switch into the ☑ Boost or ✕ Charge / Maintenance position
- Select the desired speed.
- When unplugging the charger, adjust the switch into the OFF position. Disconnect the charger from the alternate current. Disconnect the clamp from the vehicle chassis and remove the clamp off the battery terminal.
CHARGING THE BATTERY OUT OF THE VEHICLE
- Set the battery in a well-ventilated area.
- Adjust the switch into the OFF position
- Clean the battery terminals.
- Connect the battery following the instructions indicated in the "Follow these steps when the battery is out of the vehicle" section in page 4.
- Connect the charger to the power supply.
- Having the charger plugged in and connected to the vehicle battery, set the switch into the ☑ Boost or ✕ Charge / Maintenance position
- Select the desired speed.
- When disconnecting the charger, adjust the switch into the OFF position. Disconnect the charger off the vehicle and remove the clamp from the battery terminal.
- A marine (boats battery shall be removed and charge on ground.)
NOTE: The unit will change automatically to the boost mode, depending on the voltage. To select the charge / maintenance mode, press the charge selection button.
To select the boost mode, press the charge selection button until the LED light is yellow / orange to boost to 40 A is lit The light ON LED will light up if the battery is connected correctly and the boost process will start.
NOTE: The boost mode will remain energized until pulsing the charge selection button or until the ON / OFF main switch is in the OFF position

CHARGE / MAINTENANCE MODE
To select this mode, press the charge selection button until the yellow / orange 6 <> 2 A LED light for ✦ charge / maintenance is ON.
The ⒽNLED light will illuminate if the battery is correctly connected; then, the charging process will start.
When the battery is completely charged, the green LED light for charging / maintenance will illuminate. If the charge cannot be completed, the LED light reversed clamps / defective
battery (RED) will illuminate. The battery may be in bad repair. Check it.
NOTE: If the battery voltage is lower than 12.7 V---, the charger will automatically enter the boost mode to add in a fast manner, energy to the battery. To abort / avoid temporary increase and force the charger in the charge selection mode, press the charge selection button again (while boost continues).

USING THE START MOTOR FUNCTION
The battery charger can be used to boost the automobile if the battery is low. Follow all instructions and safety caution measures in charging the battery.
Wear full eye protection and protective clothes.
⚠ WARNING Using the motor start function in the motor when the battery is not installed in the vehicle will damage the electric system.
NOTE: In extreme cold weather or if the battery is smaller than 2 V, boost the battery during 5 minutes before starting the motor.
NOTE: If you have already charged the battery and the vehicle still is not starting, do not use the motor start function. It will damage the electric system in the vehicle. Have the battery checked.
- Set the selector into the OFF position.
- Unplug the charger from the alternate current power supply. Connect the charger to the battery following the instructions in "charging the battery in the vehicle" section
- Connect the charger alternate current power cable to the alternate current power supply.
-
Having the charger connected to the vehicle battery, adjust the ON / OFF switch into the motor start position.
-
Start the motor until it starts running or after 5 seconds. If the motor is not starting, wait a few minutes before trying again. This will cool down the charger and battery.
NOTE: After 3 minutes in the start motor mode, the charger will enter a 180 seconds cooling period. The yellow / orange LED of motor start will blink during the cooling period.
-
If the motor is not starting, use the adjust 40 A boost during 5 minutes before starting again.
-
After the motor is running, turn the selector into the OFF position and disconnect the power cable from the alternate power supply before disconnecting the clamps from the vehicle battery.
-
Clean and store the charger in a dry place.
NOTE: If the motor rotates but is not ON, there is no problem with the starting system, but in any other part of the vehicle. STOP starting the motor until the problem is diagnosed and corrected.
CHARGING TIMES
| APPLICATION | BATTERY SIZE | CHARGING TIME (HOURS) | |||
| 2 A | 6 A | 8 A | 10 A | ||
| Powersports 6 | Ah | 6 | 2 | 1,75 | 1,5 |
| 32 Ah | ↓ | ↓ | ↓ | ↓ | |
| 15 | 5 | 4,5 | 4 | ||
| Automotive | 300 CCA | 12 | 4 | 3,5 | 3 |
| 1 000 CCA | ↓ | ↓ | ↓ | ↓ | |
| 30 | 10 | 8,5 | 7 | ||
| Marine | 50 Ah | 15 | 5 | 4,25 | 3,5 |
| 105 Ah | ↓ | ↓ | ↓ | ↓ | |
| 33 | 11 | 9,5 | 8 | ||
These times are based in a battery 50% discharged and may change depending of the age and condition of the battery.
OVERRIDE CHARGE
If the charge cannot be completed normally, the charge will override. When the charge is interrupted, the charger output is
OFF and the LED inverted clamps 📄 (RED) will illuminate. Do not continue trying to charge this battery. Check the battery and replace if necessary
DESULPHURIZATION MODE
Desulphurization can take 8 to 10 hours. If desulphurization fails, the charge will be aborted and the LED inverted clamp (RED) will illuminate.
COMPLETING THE CHARGE
Completing the charge is indicated with LED charging (GREEN).
When the charger is ON it has passed from the function mode to the maintenance mode.
MAINTENANCE MODE (FLOATING MODE MONITORING)
When the LED charging / maintenance (GREEN) light is ON, it means it has passed to the maintenance mode. In this mode the charger keeps the battery totally charged through a small current when it corresponds. If the charger has to function to the maximum in continuous current of maintenance, during a 12-hour period, it will change into the interrupting mode (see Override charge). This is occasionally caused by a loss of energy in the battery or the battery is damaged. Make sure the battery is not leaking charge and if so, prevent it, otherwise, verify or replace the battery.
MAINTAINING A BATTERY
The CARBA - 200X charge and maintain 12 V== batteries keeping a full charge.
NOTE: Technology in maintenance mode allow to charge safely and keep a battery in good repair during long periods of time. Mow, problems with the battery, electric problems in the vehicle, wrong connections or other condition that may arise, could cause absorption of excessive current. So, occasionally, follow up your battery performance and the charge process required.
FAN OPERATION
It is normal for a fan to operate continuously. Keep the area near the charger with no obstructions to allow the fan to work correctly.
MAINTENANCE AND CARE
You can maintain your charger with minimum care and have it functioning correctly many years.
- Clean the clamps each time you finish using the charger. Clean the battery fluid that could have been in contact with the clamps to prevent corrosion.
- Every now and then, clean the charger housing with a soft cloth to keep the shiny finish and prevent corrosion.
- Roll carefully the input and output cables when storing the charger. This will help to prevent accidental damage to the cables and the charger.
- Store the charger unplugged from the alternate current power supply and in a vertical position.
- Store indoors in a fresh and dry place. Do not store the clamps in the handle joined with a clip in / or around the metal or fasten the cables.
| PROBLEM | POSSIBLE CAUSE | SOLUTION |
| The charger is no ON even when is well connected. | Alternate current socket is not functioningInadequate power connectionDefective battery | Control the possible presence of open fuses or disruptors supplying energy to the alternate current socket.Control the possible loss of the plug belonging to the power cables or electric extensionSend the battery to be checked |
| No start when starting the motor. | Consumption higher than 200 AIt does not wait 3 minutes (180 seconds) between startups.The charger might be in reheating statusThe battery might be severely discharged. | The startup time varies, regarding the amount of energy consumed. If the startup consumes more than 200 A, the starting time cod be lower than 5 seconds.When the motor startup LED is blinking, wait 3 minutes rest before the next startup.The thermal protector might be disconnected and needs a higher rest time. Make sure the charger fans are not blocked. Wait one more minute and try again.If the battery has very low charge, use theboost adjustment 10 to 15 minutes to assist in the startup. |
The red LEE ^ is illuminated. is illuminated. | The voltage in the battery is still below 10 V= after 2 hours chargingIn maintenance mode, the output current is more than 1,5 A during 12 hours.The battery cannot be desulphuratedProgress fault is detected and the battery tension is below 14,2 V=The initial voltage of the battery is below 12,2 V= and the total input es lower than 1,5 Ah.The battery voltage falls below 12,2 V= in the maintenance mode. | The battery might be defective. Verify or replace.The battery might be defective. Verify or replace.The battery may overheat. If so, allow it to cool down. The battery might be too big or have a short circuit. Verify or replace.The battery capacity is too low or the battery is too old. Verify or replace.The battery is not keeping the charge. It might be caused by a discharged battery or a bad battery. The battery might be defective. Double check there are not loads in the battery. If so, eliminate. If none, verify or replace the battery. |
AV. CENTRAL SUR #27, COL. CENTRO, C.P. 30700, TAPACHULA,
CHIS. TEL.: 96 2118 4083
CHIHUAHUA | SUCURSAL CHIHUAHUA
AV. SILVESTRE TERRAZAS #128-11, PARQUE INDUSTRIAL BAFAR,
CARRETERA MÉXICO CUAUHTÉMOC, C.P. 31415, CHIHUAHUA, CHIH.
TEL. 61 4434 0052
MEXICO CITY | FIX FERRETERÍAS
EL MONSTRUO DE CORREGIDORA, CORREGIDORA # 22,
COL. CENTRO, C.P. 06060, CUAUHTÉMOC, CDMX.
TEL: 55 5522 5031 / 55 5522 4861
COAHUILA | SUCURSAL TORREÓN
CALLE METÁL MECÁNICA #280, PARQUE INDUSTRIAL ORIENTE, C.P.
27278, TORREÓN, COAH. TEL.: 87 1209 6823
COLIMA | BOMBAS Y MOTORES BYMTESA DE MANZANILLO
BLVD. MIGUEL DE LA MADRID #190, COL. 16 DE SEPTIEMBRE,
C.P. 28239, MANZANILLO, COL. TEL.: 31 4332 1986 / 31 4332 8013
DURANGO | TORNILLOS ÁGUILA, S.A. DE C.V.
MAZURIO #200, COL. LUIS ECHEVERRÍA, DURANGO, DGO.
TEL.: 61 8817 1946 / 61 8818 2844
ESTADO DE MÉXICO | SUCURSAL CENTRO JILOTEPEC
AV. PARQUE INDUSTRIAL #1-A, JILOTEPEC, C.P. 54240, JILOTEPEC,
EDO. DE MÉX. TEL: 76 1782 9101 EXT. 5728 Y 5102
GUANAJUATO | CÍA. FERRETERA NUEVO MUNDO S.A. DE C.V.
AV. MÉXICO - JÁPÓN #225, CD. INDUSTRIAL, C.P. 38010, CELAYA,
GTO. TEL.: 46 1617 7578 / 79 / 80 / 88
SONORA | FIX FERRETERÍAS
CALLE 5 DE FEBRERO #517, SUR LT. 25 MZ. 10, COL. CENTRO,
C.P. 85000, CD. OBREGÓN, SON. TEL.: 64 4413 2392
TABASCO | SUCURSAL VILLAHERMOSA
CALLE HELIO LOTES 1, 2 Y 3 MZ. #1, COL. INDUSTRIAL, 2A ETAPA,
C.P. 86010, VILLAHERMOSA, TAB. TEL.: 99 3353 7244
TAMAULIPAS | VM ORINGS Y REFACCIONES
CALLE ROSITA #527 ENTRE 20 DE NOVIEMBRE Y GRAL.
RODRÍGUEZ, FRACC. REYNOSA, C.P. 88780, REYNOSA, TAMS.
TEL.: 89 9926 7552
Model: CARBA-200X Code: 19589
This product, its parts and components have a one year warranty against defects in its manufacture, operation and workmanship, except when: the product has been used in conditions other than those recommended, or has not been operated according to the instructions, or has been altered or repaired by personnel not authorized by TRUPER. In order to make the warranty valid or to purchase components and spare parts, you must present the product and its proof of purchase at Av. San Isidro #110, Col. Industrial San Antonio, ALC. Azcapotzalco, C.P. 02760, CDMX, Mex. or at the store where you bought it, or at a TRUPER service center listed in the attached warranty policy and/or at www.truper.com. Transportation costs resulting from compliance of this warranty will be covered by TRUPER. For questions or comments, call 800-690-6990.
Made in Mexico
Manufactured by: Truper, S.A. de C.V. Parque Industrial #1,
Stamp of the business:
Delivery date:
- AUTOMATIC Battery charger with jump starter
- CONTENTS
- TECHNICAL SPECIFICATIONS
- WARNING
- IMPORTANT SAFETY INSTRUCTIONS
- WARNING RISK OF EXPLOSIVE GASSES.
- PERSONAL SAFETY CAUTIONS
- PREPARING TO CHARGE
- PLACEMENT OF THE CHARGER
- CAUTION MEASURES WITH THE DIRECT CURRENT CONNECTION
- FOLLOW THESE STEPS WHEN THE BATTERY IS INSTALLED IN THE VEHICLE.
- WARNING PRODUCING A SPARK, CLOSE TO THE BATTERY MAY CAUSE AN EXPLOSION. TO REDUCE THE RISK OF CAUSING SPARKS CLOSE TO THE BATTERY:
- FOLLOW THESE STEPS WHEN THE BATTERY IS OUTSIDE OF THE VEHICLE
- ⚠ WARNING A SPARK NEAR THE BATTERY MAY CAUSE AN EXPLOSION IN THE BATTERY. TO REDUCE THE RISK OF CAUSING SPARKS NEAR THE BATTERY:
- GROUND CONNECTIONS AND POWER CORDS
- USE OF AN EXTENSION CABLE
- MOUNTING INSTRUCTIONS
- CONTROL PANEL
- - ON / OFF SWITCH
- - BOOST or CHARGE / MAINTENANCE
- • MOTOR START
- • CHARGE SELECTION
- • 6 A <> 2 A CHARGE / MAINTENANCE
- • 40 A BOOST
- • 200 A MOTOR START
- LED INDICATORS
- • LED inverted clamps / defective battery (Red LED blinking)
- • LED inverted clamps / defective battery (Red LED stays ON)
- • ON LED (YELLOW / ORANGE) ON:
- • LED Charging / Maintenance (GREEN) ON:
- OPERATION INSTRUCTIONS
- ⚠ WARNING Provoking a spark near the battery may cause an explosion.
- CHARGING THE BATTERY IN THE VEHICLE
- CHARGING THE BATTERY OUT OF THE VEHICLE
- CHARGE / MAINTENANCE MODE
- USING THE START MOTOR FUNCTION
- OVERRIDE CHARGE
- DESULPHURIZATION MODE
- COMPLETING THE CHARGE
- MAINTENANCE MODE (FLOATING MODE MONITORING)
- MAINTAINING A BATTERY
- FAN OPERATION
- MAINTENANCE AND CARE
Brand : Truper
Model : CARBA-200X
Category : Battery charger