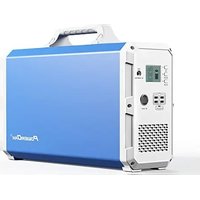
EB240 - Generator BLUETTI - Free user manual and instructions
Find the device manual for free EB240 BLUETTI in PDF.


| Product Type | Portable Power Station |
| Model | EB240 |
| Brand | BLUETTI |
| Battery Type | LiFePO₄ (Lithium Iron Phosphate) |
| Capacity | 2400Wh |
| AC Output (Continuous) | 2400W (120V pure sine wave) |
| AC Output (Surge) | 4800W |
| DC Output | 12V/10A car port, USB-A (5V/3A, 18W max), USB-C PD (100W), 2x 12V/10A DC ports |
| Solar Input | Up to 500W, max open circuit voltage 150V |
| AC Charging Input | 500W max (standard wall outlet) |
| AC Charging Time | ~6 hours (0-100%) |
| Solar Charging Time | ~5-10 hours (depending on sunlight, 200-500W panels) |
| Weight | 52 lbs (23.6 kg) |
| Dimensions | 20.5 x 13.4 x 12.4 inches (52 x 34 x 31.5 cm) |
| Operating Temperature | 32°F to 104°F (0°C to 40°C) |
| Warranty | 2 years (extendable through BLUETTI) |
| Safety Features | MPPT, BMS, overcharge/overdischarge/short circuit protection, temperature control |
| Maintenance | Store in cool, dry place; charge every 3 months if not in use; clean with dry cloth |
| Included Accessories | AC charging cable, DC cable, solar charging cable (MC4), user manual |
| Certifications | UL, CE, FCC, RoHS |
Frequently Asked Questions - EB240 BLUETTI
User questions about EB240 BLUETTI
0 question about this device. Answer the ones you know or ask your own.
Ask a new question about this device
Download the instructions for your Generator in PDF format for free! Find your manual EB240 - BLUETTI and take your electronic device back in hand. On this page are published all the documents necessary for the use of your device. EB240 by BLUETTI.
USER MANUAL EB240 BLUETTI
BLUETTI
Portable Power Station
User Manual
Model: □EB120 □EB150 □EB180 □EB240
Contents
English....01-10
Deutsch....11-20
日本語....21-29
Please read this manual before use and follow its guidance. Keep this manual for future reference.
Product Overview
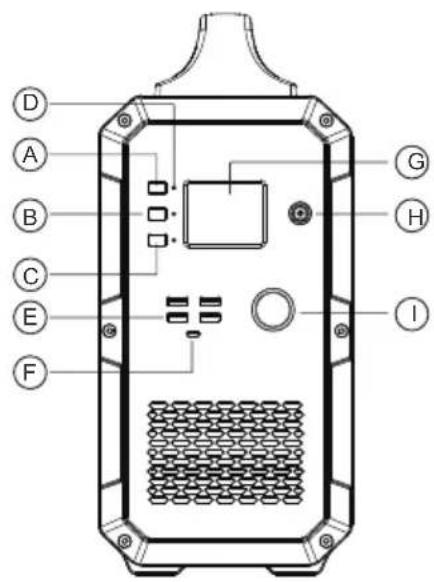
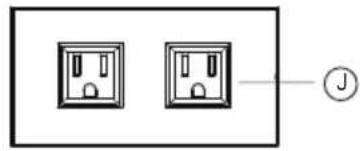
A. Master power button
C. AC power button
E. 5V-USB output ports
G. Display screen
I. 12V cigarette lighter socket
B. DC power button
D. LED indicator lamps
F. Type-C PD output port
H. AC charger/PV input port
J. AC100-120V outlet US standard socket
LCD Display

-
Charging power
-
DC ON/OFF status
-
DC output power
-
AC ON/OFF status
-
AC output power
-
Battery status indicator
Note:
- If the product malfunctions, error codes would be displayed on screen.
- When product is powered on, but not in use, the product would turn off by itself after 60 seconds of inactivity.
- When the product is powered on and the AC/DC output is turned on, the backlight would turn off by itself after a period of inactivity. To turn on the backlight again, press any button.
Safety warning
- please read all the safety warnings before use and keep the manual.warranty does not cover damage caused by failure to follow instructions.
- Please note the warning labels and operate accordingly.
- Avoid exposing the product to rain or using the product in humid environment.
- Do not install the product near heat sources, such as electric furnace and heaters.
- Place and store the product in a well-ventilated place.
- Wipe the product clean with a dry cloth.
- In case of fire, use dry powder fire extinguishers for this product. do not use water fire extinguisher, which may cause electric shock.
- Please do not alter or disassemble this product.
- If the generator needs maintenance, please contact the local designated system installation and maintenance personnel or contact seller
Storage and maintenance
- operating and storage environment may influence product life and the reliability of performance. Thus, remember to:
(1) place the product in a dry and well-ventilated area with mild temperature (suitable temperature: 0° C -40°C, suitable relative humidity 10% \~ 90%)
(2) place the product in a safe area where it would not be hit or shaken.
(3) Keep the product away from corrosive and combustible material.
- The product would turn off itself when the battery voltage is too low, if this happens, you need to charge the battery within 2-3 months.
- If you are not going to use it for a long time, please charge it fully before storage and then charge it at least once every month, store the product in a dry environment.
- Please fully charge the product before storage and charge it at least once every 3 months.
Off-grid power storage system
![graph TD A["DC power or Solar Panel /Charger"] --> B["Charge controller"] C["Car devices"] --> D["12V/9A cigarette lighter"] E["Pure-sine-wave inverter AC output controller"] --> F["Small appliances"] G["Type-C/USB output port"] --> H["Mobilephones, tablets"] B --> I["BMS Battery management system"]…](/content/2026/06/1365595/images/bc7c2f74a316019c3594c7c1738c639797052bbc9789574acd1f379e0e9f7908.jpg)
Unboxing
Before opening the parcel, please check whether if the parcel is damaged or not. If the product is damaged during delivery or if any items went missing upon arrival, please contact Seller customer service(service@kayomaxtar.com) to get it solved. You should receive the following items:
| Item Number of item | ||
| 1 | Portable solar power generator 1 | |
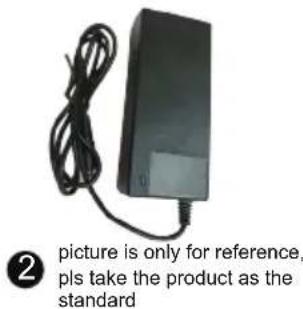
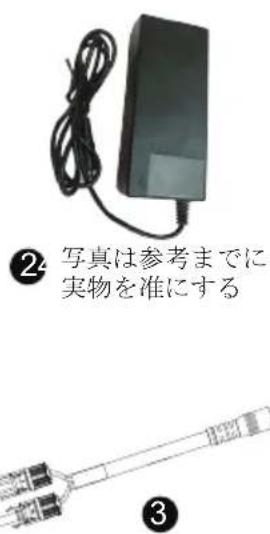
| 2 | AC wall charger(Including AC input charging cable) | 1 |
| 3 | PV solar charge cable(7909 to MC4) 1 | |
| 4 | User manual 1 | |
| 5 | Warranty card 1 | |
| 6 | Certificate of qualification 1 |

1


●
●

6
Operation guidance
Attention:
- the operating environment should meet our requirement.
- Make sure that the air inlet/outlet is not blocked.
- Please power off the product if you are not going to use it.
- Please fully charge the product if you are going to idle for a long period.
How to use the product
Turn on/off the product
- turn on the product: press and hold the master power button about 2 seconds to turn on the product. The LED indicator light and the display screen will light up.
- Turn off the product: press and hold the master power button about 2 seconds to turn off the product. The display screen and the LED indicator light would turn off.
AC/DC output
Note: check to make sure the product is turned on. Otherwise, you can not turn on AC/DC output.
- Turn on AC/DC output: press and hold the AC/DC power button to turn on the product. The corresponding LED indicator light would light up and the display screen would show "AC ON/DC ON".
- Turn off AC/DC output: press and hold the AC/DC power button to turn off the product. The LED indicator light would turn off and the display screen would show "AC OFF/DC OFF".
PV charge activation
Turn off generator, connect PV( or charger)to charge, activate PV charge function ,the
first column on screen will be lit up and show input power, at this time, the generator is in charging state, can not support AC and DC functions. If want to open AC and DC functions, need to press master power button more than 1 second to turn on the generator, screen will be all lit up after generator be turned on. After start-up, connect PV(or charger) to start charging, screen shows input power wattage, at this time, can open AC and DC functions.
Notice:
- If Master Power Button is not turned on, AC button and DC button are in off status, no AC output and DC output.
- If Master Power Button is turned on, AC button and DC button are still in off status, no AC output and DC output. Need to turn on AC power button and DC power button separately.
How to charge the product
Charge with solar power
To charge the product, insert the solar charging cable or AC adapter into the input port of the product. The display screen would light up and the charging power would be displayed. But don't care this the wrong way. The product will not turn on by itself when being charged. If the product is previously turned off, it will remain turned off unless you manually turn it on.
![graph LR A["Sun"] --> B["Photovoltaic Cell"] B --> C["Device with Control Panel"] C --> D["Laptop"]](/content/2026/06/1365595/images/eab9cf4e827dd8eff75d4de4366b892bc0cfea941eab0f6461efd32baf3691b8.jpg)
Charge with AC power
Insert one end of the adapter into wall outlet and insert the other end to the input port of the product. Then, the product will be charged and you can monitor the battery status by checking the battery icon on the LCD screen. The product comes with a built-in advanced control circuit. When the battery is fully charged, it will stop charging itself automatically.
![graph LR A["Power outlet +"] --> B["Device with display"] B --> C["Laptop"]](/content/2026/06/1365595/images/379733f7b94d5106d815ea854e9500af52d02d1f1d6d15a5a96299bea01c35d2.jpg)
Cold Weather
Cold weather can influence battery capacity. In sub-zero temperature ( <0°C ), you may be able to discharge the product, but you should not charge it. Otherwise, the battery of the product would be greatly damaged and the capacity may not even be recovered.
Low temperature charging protection: When the product is charged at a temperature below 0° C, it will shut off and stop charging itself automatically. The product will reboot and start charging itself when the temperature rise to above 10° C.
Low temperature discharging protection: If the product is discharged at a temperature of -20°C , it will turn off. The product will reboot and turn on output when the temperature rise to above -10°C .
FAQ
Q1: How to check charging status?
The battery icon indicates the battery level of this product. The battery level is displayed in 5 segments. When battery is being charged, the icon would flash. When the battery is fully charged, the icon would stop flashing and all 5 segments will be filled.
Q2: Can this product be used to charge my electronic devices?
You need to check the power at each output port. For example, the power at AC output port is provided by the built-in inverter of the product, whose maximum continuous output power is 1000W. This means that it is only suitable for electronic device whose required power is no more than 1000W.
Intelligent Cooling Control
Cooling fan will start working automatically when the following conditions are met :
- The load of inverter exceeds 400w.
- The load of 12V cigarette lighter socket exceeds 80w.
- The charging power of attached appliances exceeds 100W.
Besides, generator intelligent system will adjust the PV input or AC output power based on the outer case temperature, to keep the outer case at a touchable temperature.
Note: Do not use the machine when the cooling tan is broken.
Frequency Setting
When the product is powered on, turn on DC output and keep the AC output turned off. Press and hold both DC button & AC button to enter setting mode Press AC power button to choose inverter AC output frequency. Press and hold both DC and AC power button to exit frequency setting mode Restart the machine.
Trouble shooting and technical specification
| Error | Problem Solution | |
| E001 | Over-voltage protection (battery pack) | Stop charging and start discharging. |
| E002 | Under-voltage protection (battery pack) | Please charge the product in time. Restart the machine once it is fully charged. |
| E003 | Battery failure Restart the machine and charge it. | |
| E004 | Over-temperature protection when dis-charging the battery. | Wait for a while for it to cool down and then restart the machine. |
| E005 | Under-temperature protection when dis-charging the battery. | Wait for a while for it to heat up and then restart the machine. |
| E006 | Over-temperature protection when charging the battery. | Wait for a while for it to cool down and then restart the machine. |
| E007 | Under-temperature protection when charging the battery. | Wait for a while for it to heat up and then restart the machine. |
| E008 | Under-voltage protection for the 1st cell. | Please charge the product in time and re-start it when fully charged. |
| E009 | Under-voltage protection for the 2nd cell. | Please charge the product in time and re-start it when fully charged. |
| E010 | Under-voltage protection for the 3rd cell. | Please charge the product in time and re-start it when fully charged. |
| E011 | Under-voltage protection for the 4th cell. | Please charge the product in time and re-start it when fully charged. |
| E012 | Busbar fault of inverter due to under-volt-age. | Turn off and on the machine. |
| E013 | Over-load protection of inverter. | Check if the output port of inverter is over-loaded. Turn off and on the AC output to recover. |
| E014 | Output port of inverter is short-circuited. | Check if the output port of inverter is short-circuited. Turn off and on the AC out-put to recover. |
| E015 | The heat sink of inverter is overheated. | Wait for it to cool down and then restart the machine. |
| E016 | The temperature of the heat sink is not detected. | Insert the NTC and restart the machine. |
| E017 | Over-voltage protection (PV input). | Disconnect the solar charging cable and then restart the machine. |
| E018 | Over-voltage protection (PV output) | Disconnect the solar charging cable, re- start the machine and then re-insert the solar charging cable. |
| E019 | Over-temperature protection of heat sink for PV module | The heat sink for PV module overheats. Wait for it to cool down and then charge it. |
| E020 | The temperature of the heat sink for PV module is not detected. | Restart the machine. |
| E021 | Charging protection of battery protection board | Wait for the temperature to return to an acceptable temperature and then start charging. |
| E022 Battery protection | Disconnect the solar charging cable and restart the machine. | |
| E023 | Over-power protection (system) | Check if the total output power is overload- ed.Restart the machine. |
| If you have tried the methods mentioned above, but the problem still cannot be solved.Contact seller customer service team. | ||
ATTENTION!
If you cannot find the solution for your problem in the chart above, please provide the following information to our customer service team:
- About the product
(1) Serial number
(2)Model
(3) Displayed information on the screen
(4)Description of your problem
(5) Does it happen before?
(6)In what circumstance does the problem occur?
- About the solar panel (not included)
(1) Manufacturer and model of the solar panel
(2) Output voltage of the solar panel
(3)Output power of the solar panel
(4)MPPT output voltage of the solar panel
(5)MPPT output current of the solar panel
(6)The number of solar panels and how do you connect the panels
Specifications
| ModelEB120EB | 150EB180EB240 | |||
| Output Specifications | ||||
| Inverter Output | Continuous Output Volt-age | 100-120Vac, 220-240Vac | ||
| Rated Frequency | 50/60Hz | |||
| Continuous Output Power | 1000W | |||
| Power Factor 1 | ||||
| THDV@0.7R(under nominal voltage) | <5% | |||
| Over-load protection | 1000W ≤Load<1200W @2Min;1200W≤Load @1s; | |||
| Power Loss (No Load & Turned-off) | <20W | |||
| Max Efficiency (>70% Load) | 88%(100-120Vac), 90%(220-240Vac) | |||
| 12V/9A Cigar Light-er Output | Continuous Output Volt-age | 12.2V(±1V) | ||
| Continuous Output Cur-rent | 9A | |||
| 5V USB Output | Output Voltage Range | 5V±0.3V | ||
| Max Output Current | 3A | |||
| Note: The maximum output of a single USB port is 3A. The maximum output of 2 USB ports is 3A((top and down). | ||||
| Type-C PD Output | Supported Fast Charge | PD Protocol | ||
| Output Voltage Range | 5-20V(±5%) (5V by default) | |||
| Continuous Output Volt-age/Current | (5V/9V/12V/15V)3A(±0.3A), 20V/2.25A(±0.2A) | |||
| Input Specification | ||||
| AC Adapter Charger 42V | /200W | |||
| PV Max Input Power 500W | ||||
| PV Input Voltage Range | 16-60Vdc(OVP 73V±2V) | |||
| PV Max Input Cur-rent 10A | ||||
| MPTT Efficiency 99.5% | ||||
| Max Efficiency >88% | ||||
| Solar Charging Mode MPPT | ||||
| Battery | ||||
| rated voltage 14.8Vdc | ||||
| rated capacity 1200Wh | 1500Wh 180 | 0Wh 2400Wh | ||
| built-in battery cell Li-ion | Li-ion Li-ion Li-ion | |||
| battery packing 4S30P | 4S3P 4S45P | 4S60P | ||
| Min Unit | ||||
| IP Rating IP 21 | ||||
| Operating Environ- ment | Relative Humidity: 10%-90% | |||
| Operating Temperature: 0-40°C | ||||
| Dimensions | 293.5*165.4*364.7mm | 371.5*165.4*364.7mm | 393.5*165.4*364.7mm | 493.5*165.4*364.7mm |
| Net Weight 12.6 KG | 17.2 KG 17 KG | 22 KG | ||
| Note: When the total output power exceeds 1000W, the DC output will be directly shut down. When the load is less than 30W, the output power would not be displayed. When a high-power appliance is attached to the product, the displayed output power and the actual output power could be different for up to 30W. | ||||
Warranty
Our company provides customers with warranty of 12 months from the date of purchase.
Contact us
For any inquiries or comments concerning our products, please contact seller(service@kayomaxtar.com) and we will respond as soon as possible.

1

6
Bedienungshinweise
Beachtung:

A. メイン電源ボタン
C. AC 電源ボタン
E. USB 5V 出力ポート
G. LCD ディスプレイ
I. 12V シガーライター出力
B. DC 電源ボタン
D. LED 表示ランプ
F. Type-C PD 出力ポート
H. アダプター /PV 入力ポート
1
6

操作指示
注意事項:
AC 電源で充電する
寒冷地での使用について
- BLUETTI
- PORTABLE POWER STATION
- USER MANUAL
- CONTENTS
- PRODUCT OVERVIEW
- LCD DISPLAY
- NOTE
- SAFETY WARNING
- STORAGE AND MAINTENANCE
- OFF-GRID POWER STORAGE SYSTEM
- UNBOXING
- OPERATION GUIDANCE
- ATTENTION
- HOW TO USE THE PRODUCT
- TURN ON/OFF THE PRODUCT
- AC/DC OUTPUT
- PV CHARGE ACTIVATION
- NOTICE
- HOW TO CHARGE THE PRODUCT
- CHARGE WITH SOLAR POWER
- CHARGE WITH AC POWER
- COLD WEATHER
- FAQ
- Q1: HOW TO CHECK CHARGING STATUS
- Q2: CAN THIS PRODUCT BE USED TO CHARGE MY ELECTRONIC DEVICES
- INTELLIGENT COOLING CONTROL
- FREQUENCY SETTING
- WARRANTY
- CONTACT US
- BEDIENUNGSHINWEISE
- BEACHTUNG
- 操作指示
- 注意事項:
- AC 電源で充電する
- 寒冷地での使用について
Brand : BLUETTI
Model : EB240
Category : Generator