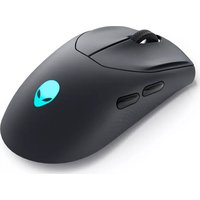
AW720M - Mouse ALIENWARE - Free user manual and instructions
Find the device manual for free AW720M ALIENWARE in PDF.


| Product Type | Wireless Gaming Mouse |
| Brand | Alienware |
| Model | AW720M |
| Dimensions (L x W x H) | Approx. 125 x 67 x 42 mm |
| Weight | Approx. 89 g (excluding cable) |
| Power Source | Rechargeable lithium-ion battery, 700 mAh |
| Charge Interface | USB-C |
| Battery Life | Up to 140 hours (RGB off), up to 30 hours (RGB on) |
| Connectivity | 2.4 GHz wireless (via USB dongle) and Bluetooth 5.0 |
| Sensor | Optical, PixArt PAW3395 |
| DPI Range | 100 – 26,000 DPI (adjustable in 100 DPI steps) |
| Tracking Speed | 400 IPS |
| Acceleration | 50G |
| Number of Buttons | 6 programmable buttons |
| Scroll Wheel | Omnidirectional, clickable |
| Lighting | AlienFX RGB (logo and scroll wheel zones) |
| Software | Alienware Command Center |
| Polling Rate | Up to 1000 Hz |
| Operating System | Windows 10/11 |
| Maintenance | Clean with a soft dry cloth; avoid liquids |
| Safety Warnings | Keep away from heat, moisture, and small children |
| Spare Parts | USB-C cable, USB wireless dongle, user manual |
| Repairability | Limited; battery and switches not user-replaceable without professional help |
| Certifications | CE, FCC, RoHS |
Frequently Asked Questions - AW720M ALIENWARE
User questions about AW720M ALIENWARE
0 question about this device. Answer the ones you know or ask your own.
Ask a new question about this device
Download the instructions for your Mouse in PDF format for free! Find your manual AW720M - ALIENWARE and take your electronic device back in hand. On this page are published all the documents necessary for the use of your device. AW720M by ALIENWARE.
USER MANUAL AW720M ALIENWARE
Alienware Tri-Mode Wireless Gaming Mouse
AW720M
User Guide
Notes, cautions, and warnings
NOTE: A NOTE indicates important information that helps you make better use of your mouse.
△ CAUTION: A CAUTION indicates potential damage to hardware or loss of data if instructions are not followed.
⚠ WARNING: A WARNING indicates a potential for property damage, personal injury, or death.
Copyright © 2022 Dell Inc. or its subsidiaries. All rights reserved. Dell, EMC, and other trademarks are trademarks of Dell Inc. or its subsidiaries. Other trademarks may be trademarks of their respective owners.
2022-01
Rev. A00
Contents
What's in the box....5
Features 6
Magnetic Snap Charging Function 7
Adjustable Dots Per Inch (DPI) 7
Setting up your gaming mouse 8
Connecting the mouse. 8
Wireless mode (2.4GHz) 9
Wireless mode (Bluetooth) 11
Wired mode 13
Turning on the mouse . . . . . . . . . . . . . . . . . . . . . . . . . . . . . . . . . . . . . . . . . . . . 14
Charging the battery .....14
Wired mode 14
Wireless mode. 16
Battery indicator colors 17
Alienware Command Center (AWCC) 18
Installing AWCC through Windows Update .....19
Installing AWCC from the Dell Support website .....19
Updating the firmware 20
Updating the mouse firmware automatically through AWCC ... 20
Updating the USB wireless dongle firmware automatically through AWCC 20
Updating the mouse firmware manually....21
Updating USB wireless dongle firmware manually. 21
Specifications.... 22
General 22
Electrical 22
Physical characteristics .....22
Environmental .23
Wireless....23
Troubleshooting.... 24
Statutory Information 29
Warranty 29
Limited warranty and return policies. 29
For U.S. customers: 29
For European, Middle Eastern and African customers: ..... 29
For non-U.S. customers: 29
What's in the box

-
Mouse 2. USB charging cable
-
Clip
-
USB wireless dongle
-
Dongle extender 6. USB-C magnetic dongle for charging
-
Documents
Features

- Left button 2. Scroll wheel
- Right button 4. Mode button
- DPI adjustment button 6. DPI indicator
- Power button 8. USB-C port
- Forward button 10. Backward button
Magnetic Snap Charging Function
The magnetic snap head supports fast charging (5V=900mA).
Adjustable Dots Per Inch (DPI)
Press the DPI adjustment button to instantly change the mouse tracking resolution.

DPI setting is indicated by the DPI indicator color. The default five DPI settings available are as follows:
- 800: Blue ( )
- 1200: Green ( ) (default)
- 1600: Yellow ( )
- 2400: Purple ( )
- 3200: Red ( )
You can change the default DPI settings and customize the DPI stages with the Alienware Command Center (AWCC) application.
Setting up your gaming mouse
Connecting the mouse

NOTE:
- The mouse supports both wired mode and wireless mode.
- Your mouse has a rechargeable battery. For best results, ensure that the battery is fully charged before using it for the first time.
- To improve battery life, turn off the power switch when the mouse is not used.
-
When using magnetic charging, turn on the power switch to ensure seamless connectivity.
-
Remove the clip, dongle extender, USB wireless dongle, and USB-C magnetic dongle from the accessory box.

natural_image
Diagram of a mechanical device with internal components and directional arrows indicating motion (no text or symbols)- Remove the protective sheet from the mouse.

natural_image
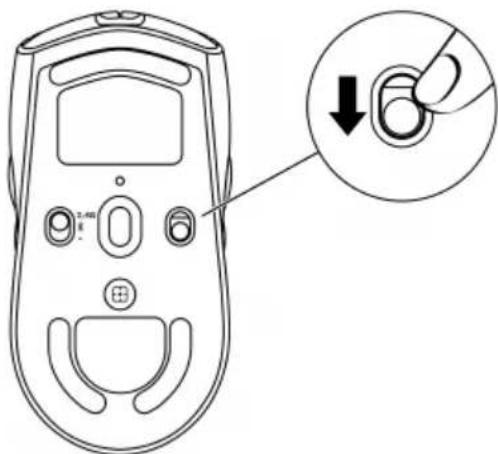
Line drawing of a hand holding a remote control device with buttons and display (no text or symbols)- Slide the power button down to switch on the mouse.
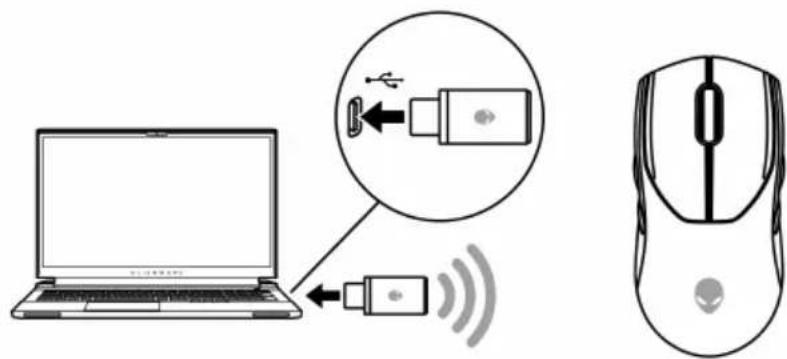
Wireless mode (2.4GHz)
Laptop
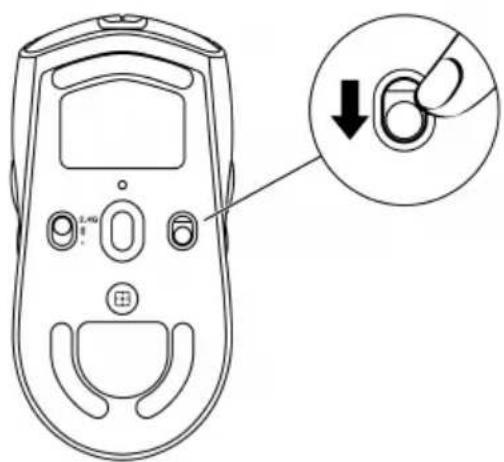
- Slide the mode button to "2.4G".

- Connect the USB wireless dongle to a USB port on your laptop.
Desktop
-
Slide the mode button to "2.4G".
-
Connect the USB-C end of the USB charging cable to the bottom port of the dongle extender. Insert the USB wireless dongle to the top port of the dongle extender.
-
Connect the other end of the USB charging cable to an available port on your computer.

flowchart
graph TD
    A["USB dongle Dongle Extender"] --> B["Computer Mouse"]
    B --> C["2.4G Cable Connector"]
    C --> D["USB Dongle Elonger"]
    D --> E["USB Dongle Elonger"]
    style A fill:#f9f,stroke:#333
    style B fill:#ccf,stroke:#333
    style C fill:#cfc,stroke:#333
    style D fill:#fcc,stroke:#333
    style E fill:#cff,stroke:#333
Wireless mode (Bluetooth)
- Slide the mode button down to "✗" then continue to slide the button down and hold it for three seconds. The DPI LED will blink indicating your wireless mouse is in pairing mode.

- Pair your wireless mouse with your Bluetooth-enabled computer.
Swift Pair:
a. In Windows Search, type Bluetooth.
b. Click Bluetooth and other devices settings. The Settings window appears.
c. Ensure that the "Show notifications to connect using Swift Pair" box is checked.
d. Ensure that the Bluetooth is turned on.

Show notifications to connect using Swift Pair
When selected, you can connect to supported Bluetooth devices quickly when they're close by and in pairing mode.
e. Place your wireless mouse near your computer. The New Bluetooth mouse found window appears.
f. Click Connect and confirm the pairing process on both wireless mouse and your computer.

Add Device:
a. In Windows Search, type Bluetooth.
b. Click Bluetooth and other devices settings. The Settings window appears.
c. Ensure that the Bluetooth is turned on.
d. Click Add Bluetooth or other device > Bluetooth.
e. From the list of available devices, click Alienware AW720M.


NOTE: If Mouse AW720M is not listed, ensure that the pairing mode is enabled on the wireless mouse.
- Confirm that both the wireless mouse and the device are paired.
After the wireless mouse and a device are paired, they connect automatically when Bluetooth is enabled and they are within Bluetooth range.

Wired mode

NOTE: The battery starts charging automatically in wired mode.
- Connect the USB-C end of the USB charging cable to the USB-C port on the mouse.
- Connect the other end of the USB charging cable to an available USB port on your desktop or laptop.

flowchart
graph TD
    A["Desktop"] --> B["USB Port"]
    B --> C["Laptop"]
    C --> D["USB Cable"]
    D --> E["Mouse"]
Turning on the mouse
Slide the power button down to switch on the mouse.
Charging the battery
Wired mode
- Connect the USB-C end of the USB charging cable to the USB-C port on the mouse.
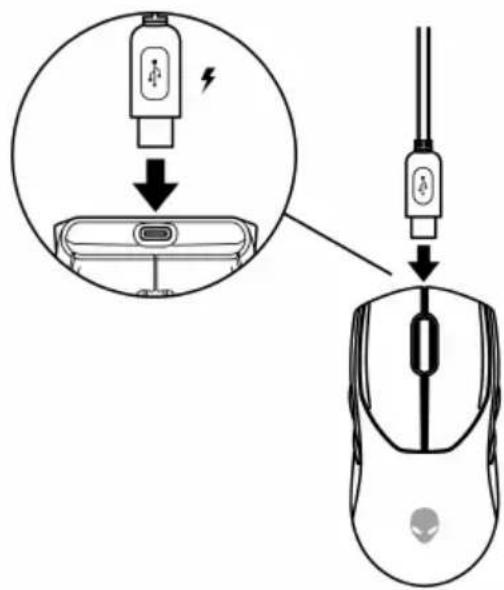
- Connect the other end of the USB charging cable to an available USB port on your desktop or laptop.

- When the battery is fully charged, the battery indicator blinks in green for 2 seconds and then stays static green for 10 seconds. After 12 seconds, it reverts to the user default lighting.
Wireless mode
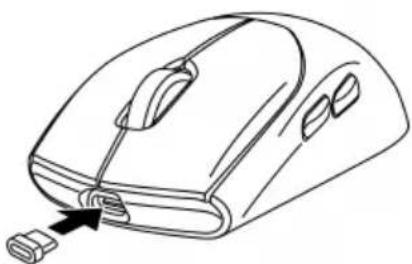
- Connect the USB-C end of the USB charging cable to the bottom port of the dongle extender. Insert the USB wireless dongle to the top port of the dongle extender.

- Connect the other end of the USB charging cable to an available USB port on your desktop or laptop.

- Connect the USB-C magnetic dongle to the USB-C port of the mouse.
natural_image
Line drawing of a computer mouse with a cable inserted, showing the handle and mounting bracket (no text or symbols)- Snap the magnetic end of the USB-C magnetic dongle to the magnetic port of the dongle extender.

natural_image
Diagram showing a computer mouse connected to a plug, with an arrow indicating the cable attachment (no text or symbols present)- When the battery is fully charged, the battery indicator blinks in green for 2 seconds and then stays static green for 10 seconds. After 12 seconds, it reverts to the user default lighting.

NOTE: Use the clip to remove the USB-C magnetic dongle from the mouse.

natural_image
Line drawing of a hand inserting cable into a computer mouse (no text or symbols)Battery indicator colors
- Low power: Amber pulsing ( )
- Charging: Morphing between amber and green ( ) for 12 seconds. After 12 seconds, it reverts to the user default lighting.
- Fully charged: Blinks in green for 2 seconds and then stays static green ( ) for 10 seconds. After 12 seconds, it reverts to the user default lighting.
Alienware Command Center (AWCC)
Alienware Command Center (AWCC) application provides a single interface to customize and enhance the gaming experience. This application enables you to perform the following functions:

NOTE: You will experience limited functionality in AWCC when your device is connected by Bluetooth Low Energy (BLE).
In the FX menu, you can access the following features:
- View device connection type when it is connected by BLE.
- View battery level and charging status.
- Change lighting color and animation in the Lighting tab.
- Assign program shortcuts to device programmable buttons or keys in the Macros tab.
In the Settings tab, you have access to the following settings:
- Change power saving modes in the Settings tile.
- Change mouse button click and scroll bar responses in the Settings tile.
- Swap mouse button in the Settings tile.
- Change DPI levels in the DPI Settings tile.
- Select Lift-Off Distance in the Calibration tile.
- View firmware version and upgrade the device firmware to the latest version in the Update tile.
- Reset the device settings to factory default.

NOTE: For more information, see the Alienware Command Center (AWCC) application Online Help.
Installing AWCC through Windows Update
-
Connect your Alienware peripheral to your computer through the USB port. The AWCC application is downloaded and installed automatically. AWCC installation takes up to 10 minutes to complete.
-
Navigate to the program folder to ensure that the AWCC installation is complete.
-
Launch AWCC and perform the following steps to download the additional software components:
- In the Settings window, click Windows Update, and then click Check for updates to check the Alienware driver update progress.
- If the driver update is not responding in your computer, install AWCC from the Dell Support website.
Installing AWCC from the Dell Support website
-
Download the latest version of the following applications from www.dell.com/support/drivers.
-
Alienware Command Center
-
Alienware Gaming Peripheral driver
-
Navigate to the folder where you saved the setup files.
-
Double-click the setup file and follow the on-screen instructions to install the application.

NOTE: You can customize the mouse features and lighting effects by using the Alienware Command Center (AWCC) application.
Updating the firmware
NOTE: For best performance, update your mouse and USB wireless dongle firmware to the latest version.
Updating the mouse firmware automatically through AWCC
- Connect your mouse to your computer through the USB cable.
- Launch AWCC software and click the FX tab.
- Under SETTINGS, select Alienware AW720M Tri-Mode Wireless Gaming Mouse from the EDIT DEVICE SETTINGS drop-down list.
- Click the Settings tab.
- In the Update tab, and then click the Update button. Once the firmware update is complete, the "Firmware updated successfully" message is displayed.
- Click OK.
NOTE: Disconnecting the USB cable from the computer, closing the AWCC software, or shut down of computer during firmware update may damage the mouse.
Updating the USB wireless dongle firmware automatically through AWCC
- Connect your mouse to your computer through 2.4GHz Wireless mode.
- Launch AWCC software and click the FX tab.
- Under SETTINGS, select Alienware AW720M Tri-Mode Wireless Gaming Mouse from the EDIT DEVICE SETTINGS drop-down list.
- Click the Settings tab.
- In the Update tab, and then click Update button. Once the firmware update is complete, the "Firmware updated successfully" message is displayed.
- Click OK.
NOTE: Disconnecting the USB wireless dongle, closing the AWCC software, or shut down of computer during firmware update may damage the USB wireless dongle.
Updating the mouse firmware manually
- Go to www.dell.com/support and search for AW720M.
- From the Drivers & Downloads tab, download AW720M Mouse FW update tool.
- Connect your mouse to your computer through the USB cable.
- Open the downloaded AW720M Mouse FW update tool file.
- Click on the Update Mouse button. Once the firmware update is complete, the "Update Complete! OK" message is displayed.
- Close the window.
NOTE: Disconnecting the USB cable from the computer, closing the AWCC software, or shut down of computer during firmware update may damage the mouse.
Updating USB wireless dongle firmware manually
- Go to www.dell.com/support and search for AW720M.
- From the Drivers & Downloads tab, download AW720M Dongle FW update tool.
- Connect your mouse to your computer through 2.4GHz Wireless mode.
- Open the downloaded AW720M Dongle FW update tool file.
- Click on the Update Dongle button. Once the firmware update is complete, the "Update Complete! OK" message is displayed.
- Close the window.
NOTE: Disconnecting the USB wireless dongle, closing the AWCC software, or shut down of computer during firmware update may damage the USB wireless dongle.
Specifications
General
Model number AW720M
Connection type Tri-mode Wireless (2.4GHz, Bluetooth 5.1 and wired)
System requirement • Windows 7, 32/64 bit (without Alienware support feature)
- Windows 8, 32/64 bit (without Alienware support feature)
- Windows 8.1, 32/64 bit (without Alienware support feature)
- Windows 10 RS3 and above, 32/64 bit (with Alienware support feature)
- Windows 11 (with Alienware support feature)
- OS X (without Alienware support feature)
Electrical
Operating voltage 5 V
Battery type Polymer Li-ion Rechargeable Battery 500 mAh
Battery life (with LED off) · RF mode: 140 hours
- BLE mode: 420 hours
Physical characteristics
Weight Under 90 g (Under 0.1984 lb)
Dimensions:
Length 125 +/- 0.5 mm (4.921 +/- 0.020 in.)
Width 62 +/- 0.5 mm (2.441 +/- 0.020 in.)
Height 37.5 +/- 0.5 mm (1.476 +/- 0.020 in.)
Environmental
Temperature:
Operating
0^ C to 40^ C (32°F to 104°F)
Storage
-40°C to 65°C (-40°F to 149°F)
Storage humidity
95% maximum relative humidity; non-condensing
Wireless
RF transmission
Supports 2.4GHz and BT5.1 LE
Operation distance
Up to 10-meter
Troubleshooting
Problems Possible solutions
| Mouse is not functioning Turn ON the power switch on the bottom of the mouse and try again. |
| Mouse is not functioning 1. In wireless mode, ensure that the battery has sufficient battery power.2. Slide the power button to turn off the mouse and then turn on again.3. In wired mode, connect the USB charging cable to another USB port. Wait until a notification appears indicating that the driver installation is complete before you use the mouse.4. In 2.4GHz wireless mode, connect the USB wireless dongle to another USB port or connect the USB wireless dongle and USB charging cable to the dongle extender. Wait until a notification appears indicating that the driver installation is complete before you use the mouse.5. Restart the computer. |
Problems Possible solutions
| Mouse lights do not turn on 1. Press any button to wake the mouse from sleep mode.2. In wireless mode, ensure that the battery has sufficient battery power.3. In wired mode, connect the USB charging cable to another USB port. Wait until a notification appears indicating that the driver installation is complete before you use the mouse.4. In 2.4GHz wireless mode, connect the USB wireless dongle to another USB port or connect the USB wireless dongle and USB charging cable to the dongle extender. Wait until a notification appears indicating that the driver installation is complete before you use the mouse.5. Restart the computer. | |
| Mouse is not running based on the configuration selected in the Alienware Command Center (AWCC) application. | 1. Ensure that the Alienware Command Center (AWCC) application is installed on your computer.2. Open the Alienware Command Center (AWCC) application and ensure that the selected configuration is set up and saved. |
Resolving cursor issues 1. In wired mode, connect the USB
charging cable to another USB port. Wait until a notification appears indicating that the driver installation is complete before you use the mouse.
-
In 2.4GHz wireless mode, connect the USB wireless dongle to another USB port or connect the USB wireless dongle and USB charging cable to the dongle extender. Wait until a notification appears indicating that the driver installation is complete before you use the mouse.
-
Ensure that the sensor is not obstructed or dirty.
-
Glass or very smooth glossy surfaces are not suitable for the mouse sensor to capture movement. Using a dark colored fabric mouse pad can improve the tracking.
-
Save any data, close any open program(s), and then restart the laptop/desktop. When you do not have another mouse or touchscreen, hold the power button down for at least 15 seconds to turn the laptop/desktop off. All unsaved data will be lost.
Resolving mouse button issues 1. Ensure that there is nothing
preventing the mouse buttons from moving. Most mouse buttons make a clicking noise when pressed down.
-
In wired mode, connect the USB charging cable to another USB port. Wait until a notification appears indicating that the driver installation is complete before you use the mouse.
-
In wireless mode, connect the USB wireless dongle to another USB port or connect the USB wireless dongle and USB charging cable to the dongle extender. Wait until a notification appears indicating that the driver installation is complete before you use the mouse.
-
Save any data, close any open program(s), and then restart the laptop/desktop. When you do not have another mouse or touchscreen, hold the power button down for at least 15 seconds to turn the laptop/desktop off. All unsaved data will be lost.
| Troubleshooting a slow moving cursor | 1. Ensure that the sensor is not obstructed or dirty.2. Glass or very smooth glossy surfaces are not suitable for the mouse sensor to capture movement. Using a dark colored fabric mouse pad can improve the tracking.3. Change the mouse settings to adjust the pointer speed.Click on the tab that matches the Operating System (OS) installed on your laptop/desktop and perform the steps within that section to change the settings.In theSearchbox, type main.cpl.Click or tap main.cpl in the list of programs.Click or tap thePointer Options tab.Move the slider underSelect a Pointer Speedto adjust the cursor speed to the desired level.Click or tapOK. |
| Troubleshooting cursor lagging Cursor | lagging might be due to wireless interference on the USB wireless dongle. Use the dongle extender to connect the USB dongle to the laptop/desktop. |
| Troubleshooting lift off distance (LOD) surface calibration issues | The LOD surface calibration depends on the surface characteristics.Using a dark colored fabric mouse pad might improve LOD calibration. |
Statutory Information
Warranty
Limited warranty and return policies
Dell-branded products carry a two-year limited hardware warranty. If purchased together with Dell system, it will follow the system warranty.
For U.S. customers:
This purchase and your use of this product are subject to Dell's end user agreement, which you can find at https://www.dell.com/terms. This document contains a binding arbitration clause.
For European, Middle Eastern and African customers:
Dell-branded products that are sold and used are subject to applicable national consumer legal rights, the terms of any retailer sale agreement that you have entered into (which will apply between you and the retailer) and Dell's end user contract terms.
Dell may also provide an additional hardware warranty – full details of the Dell end user contract and warranty terms can be found by going to
https://www.dell.com/terms, selecting your country from the list at the bottom of the "home" page and then clicking the "terms and conditions" link for the end user terms or the "support" link for the warranty terms.
For non-U.S. customers:
Dell-branded products that are sold and used are subject to applicable national consumer legal rights, the terms of any retailer sale agreement that you have entered into (which will apply between you and the retailer) and Dell's warranty terms. Dell may also provide an additional hardware warranty – full details of Dell's warranty terms can be found by going to https://www.dell.com/terms, selecting your country from the list at the bottom of the "home" page and then clicking the "terms and conditions" link or the "support" link for the warranty terms.

- Alienware Tri-Mode Wireless Gaming Mouse
- AW720M
- User Guide
- Notes, cautions, and warnings
- Contents
- What's in the box....5
- Features 6
- Setting up your gaming mouse 8
- Alienware Command Center (AWCC) 18
- Specifications.... 22
- Troubleshooting.... 24
- Statutory Information 29
- What's in the box
- Features
- Magnetic Snap Charging Function
- Adjustable Dots Per Inch (DPI)
- Setting up your gaming mouse
- Connecting the mouse
- NOTE:
- Wireless mode (2.4GHz)
- Desktop
- Wireless mode (Bluetooth)
- Swift Pair:
- Add Device:
- Wired mode
- NOTE: The battery starts charging automatically in wired mode.
- Turning on the mouse
- Charging the battery
- Wireless mode
- Battery indicator colors
- Alienware Command Center (AWCC)
- Installing AWCC through Windows Update
- Installing AWCC from the Dell Support website
- Updating the firmware
- Updating the mouse firmware automatically through AWCC
- Updating the USB wireless dongle firmware automatically through AWCC
- Updating the mouse firmware manually
- Updating USB wireless dongle firmware manually
- Specifications
- General
- Electrical
- Physical characteristics
- Environmental
- Wireless
- Troubleshooting
- Problems Possible solutions
- Statutory Information
- Warranty
- Limited warranty and return policies
- For U.S. customers:
- For European, Middle Eastern and African customers:
- For non-U.S. customers:
Brand : ALIENWARE
Model : AW720M
Category : Mouse