Kiloview NDI Recorder - Recorder

NDI Recorder - Recorder Kiloview - Free user manual and instructions

Find the device manual for free NDI Recorder Kiloview in PDF.

📄 7 pages English EN Download 💬 AI Question 10 questions ⚙️ Specs
Notice Kiloview NDI Recorder - page 2
Pick your language and provide your email: we'll send you a specifically translated version.
Product Type NDI Video Recorder
Brand Kiloview
Model NDI Recorder
Dimensions (W x H x D) 150 mm x 30 mm x 100 mm
Weight 300 g
Power Supply 5V DC via USB-C, 2A
Power Consumption Max 10W
Input Interface NDI (over Ethernet)
Output Interface HDMI (loop-through), USB-C (storage)
Storage Support USB flash drive or external HDD/SSD (FAT32, exFAT, NTFS)
Recording Format MP4 or TS (H.264/H.265)
Max Recording Resolution 1080p60
Network Protocol NDI 4.0 or higher
Control Physical buttons, web interface
LED Indicators Power, Recording, Network, Storage
Operating Temperature 0°C to 40°C
Storage Temperature -20°C to 60°C
Humidity 10% to 90% (non-condensing)
Compliance CE, FCC
Maintenance and Cleaning Wipe with a dry soft cloth; avoid liquids. Unplug before cleaning.
Safety Precautions Do not expose to moisture or extreme temperatures. Use only supplied power adapter.
Spare Parts and Repairability Contact Kiloview support for spare parts. Not user-serviceable.
General Information Designed for reliable NDI recording in professional environments.

Frequently Asked Questions - NDI Recorder Kiloview

How do I connect the NDI Recorder to my network?
Connect the recorder to your local network via the Ethernet port. Ensure the recorder and the NDI source are on the same subnet. Use a PoE switch or the included power adapter.
What storage devices are supported for recording?
The recorder supports USB flash drives and external HDD/SSD formatted as FAT32, exFAT, or NTFS. For best performance, use a USB 3.0 drive.
How do I start recording via the web interface?
Open the recorder's IP address in a browser. Navigate to the Recording tab, select the NDI source, and click Start Recording. You can also schedule recordings.
Can I record multiple NDI sources simultaneously?
The NDI Recorder is a single-channel device. It records one NDI stream at a time. For multi-source recording, you would need multiple units or a different solution.
What video formats are recorded?
The recorder outputs MP4 or TS files using H.264 or H.265 codecs. You can select the format in the settings menu.
How do I update the firmware?
Download the latest firmware from the Kiloview website. Upload the file via the web interface under System > Firmware Update. Do not power off during the update.
The recorder is not detecting my NDI source. What should I check?
Verify that the source is transmitting NDI and is on the same network. Check firewall settings and try disabling the firewall temporarily. Restart both the source and recorder.
Can I power the device via PoE?
Yes, the NDI Recorder supports Power over Ethernet (PoE) 802.3af. Ensure your switch provides PoE. If not, use the included USB-C power adapter.
What is the maximum recording resolution and frame rate?
The recorder supports up to 1920x1080 at 60 fps (1080p60). Higher resolutions like 4K are not supported.
How do I factory reset the device?
To reset, press and hold the Reset button (inside a pinhole on the back) for 10 seconds using a paperclip. The device will reboot with default settings.

User questions about NDI Recorder Kiloview

0 question about this device. Answer the ones you know or ask your own.

Ask a new question about this device

The email remains private: it is only used to notify you if someone responds to your question.

No questions yet. Be the first to ask one.

Download the instructions for your Recorder in PDF format for free! Find your manual NDI Recorder - Kiloview and take your electronic device back in hand. On this page are published all the documents necessary for the use of your device. NDI Recorder by Kiloview.

USER MANUAL NDI Recorder Kiloview

NDI Recorder

Kiloview NDI Recorder - NDI Recorder - 1

KILOVIEW

  1. Download and install NDI Recorder (Windows 10)
  2. Enable NDI Recorder program on your desktop or application
  3. Click "Later" when you see the authorization prompt after enabled the NDI recorder. (Note: free trial only available for 30 days). After expired, copy the device code and send to your sales consultant or agent to purchase License.
  4. Fill in the authorization code once received. After authorization, it can be used within the authorized period on your current PC.

Note: The authorization code is bound to the machine code of your current hardware CPU, You need to purchase the new license when you replace your CPU or PC.

Kiloview NDI Recorder - KILOVIEW - 1

KILOVIEW

  1. Open the NDI Recorder
    Kiloview NDI Recorder - KILOVIEW - 2

Kiloview NDI Recorder - KILOVIEW - 3

KIILOVIEW

2. Add NDI source and preview

Source preview Click source, auto discovery all the NDI sources in current network. Unsynchronized 11.5.11 Mbps LoungeV.com Preview window selection To add NDI sources manually List of NDI sources N:30-2116252003 (Channel-1) 编辑器-1 选

Kiloview NDI Recorder - Add NDI source and preview - 2

KILOVIEW

3. Recording parameter and storage parameter configuration

KBOVIEW NDI Recorder Unsynchronized 113.30Mbps Recruiting Sources LoungeV.com IDLE Open/Close recording Settings Project Storage NTP Language About Save to E/Recorder File Split Split by video file size * Size Limit (MB) 1024 + Name Rule df 默认镜头号 yyyyMMdd File format MOV Example df 默认镜头号-20220124-14.12.16.mov OK Cancel Parameter Function Project Name the currently recorded project name Storage Configure the current recording storage location, recording file size or duration, name rules and file format. NTP Configure NTP server address, to keep it consistent with the NTP server of the NDI video source

Kiloview NDI Recorder - Recording parameter and storage parameter configuration - 2

KILOVIEW

4. Start recording

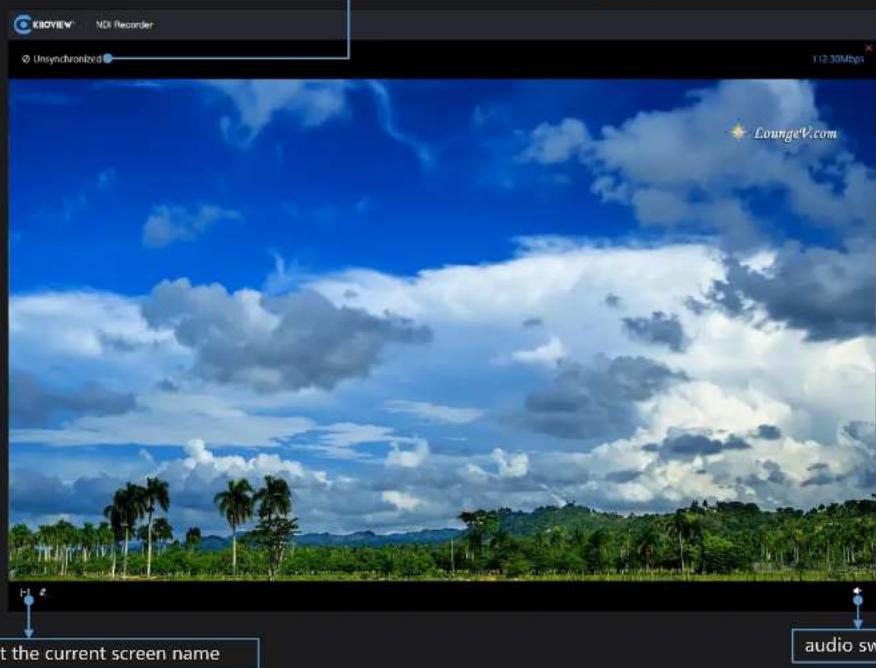
KBOYEW NDI Recorder © Unsynchronized 112.30Mbps LoungeV.com at the current screen name audio sw

It will display *synchronized when NTP setting is successful.
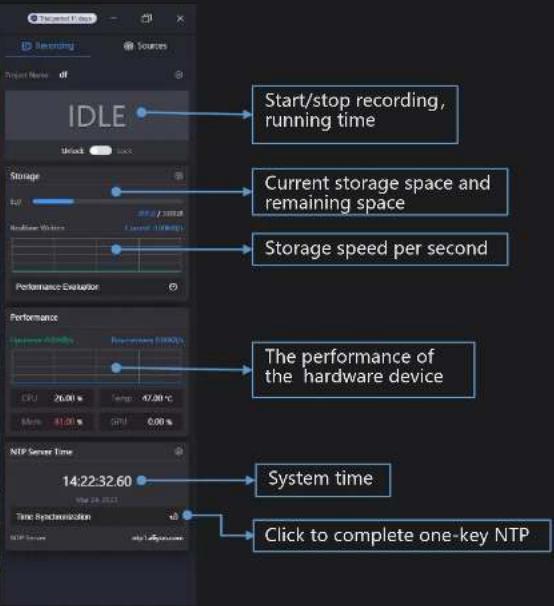
Start/stop recording, running time Current storage space and remaining space Storage speed per second The performance of the hardware device System time Click to complete one-key NTP

audio switch

Kiloview NDI Recorder - Start recording - 3

KILOVIEW

Note:

  1. You need to drag the specified NDI video source into the video preview box on the left if you need to record it.
  2. You can configure 1/4/9/16/20 preview window when you need to record multiple NDI sources.
  3. Multi-window only means multi-view preview and simultaneous recording, each NDI video source is recorded as a separate video file.
  4. After Beta version expired, it does not support to purchase a license. You need to download the official version. After License, it supports up to 20 channels simultaneous recording.
Manual assistant
Powered by Anthropic
Waiting for your message
Product information

Brand : Kiloview

Model : NDI Recorder

Category : Recorder