
TRAVELPILOT EASY - Gps BLAUPUNKT - Free user manual and instructions
Find the device manual for free TRAVELPILOT EASY BLAUPUNKT in PDF.
User questions about TRAVELPILOT EASY BLAUPUNKT
0 question about this device. Answer the ones you know or ask your own.
Ask a new question about this device
Download the instructions for your Gps in PDF format for free! Find your manual TRAVELPILOT EASY - BLAUPUNKT and take your electronic device back in hand. On this page are published all the documents necessary for the use of your device. TRAVELPILOT EASY by BLAUPUNKT.
USER MANUAL TRAVELPILOT EASY BLAUPUNKT
Operating and installation instructions
(Long version)
Device overview
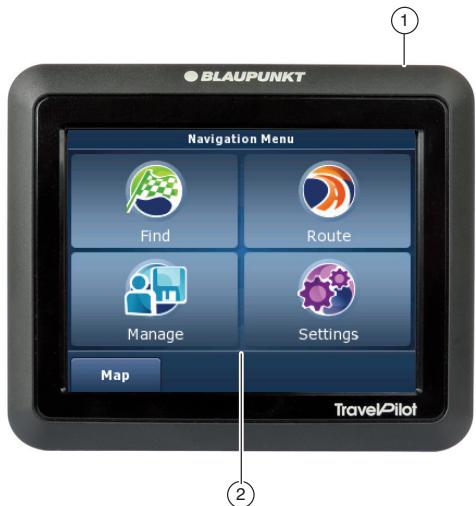
① On/Off switch:
- Long press (longer than 3 seconds): Switches the device to idle state.
- Long press (longer than 5 seconds): Switches the device on or off.
② Display (touchscreen): Simple and intuitive operation by touching the buttons on the display.
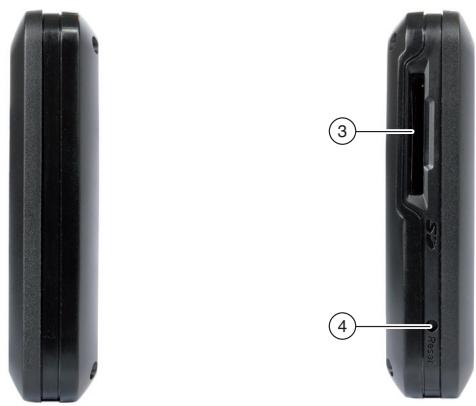
③ Memory card slot
④ Reset button
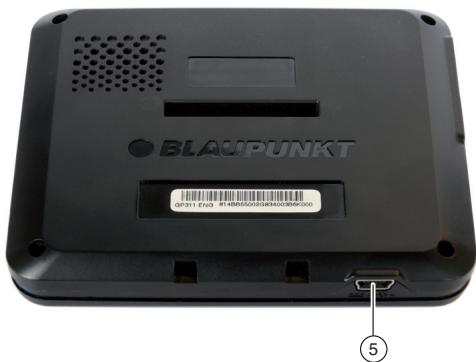
⑤ USB port for battery charging/data transfer
Device overview 2
Safety notes 7
Warning symbols used 7
Use as directed 7
Road safety 7
General safety notes 7
Cleaning notes 8
Disposal notes 8
Initial startup 8
Scope of delivery 8
Protective screen film 8
Suction cup protective film 8
Charging the battery. 8
Switching on the device. 9
Setting the language 9
Select simple mode/advanced mode.....9
Installation in the vehicle 10
Attaching the suction cup holder 10
Attaching the device mount 10
Inserting the device in the mounting cup ..10
Removing the device. 10
Removing the suction cup holder .10
Removing the mount from the bracket ....11
Switching on/off. 11
Switch-on 11
Switching off 11
Reset. 11
Operation of menus 11
Simple mode/advanced mode 11
Toggling the mode 11
Navigation menu 11
Route*advanced menu. 12
Manage*advanced menu. 12
Buttons. 12
Keyboard 12
Lists 12
Information about GPS. 12
GPS mode of operation 12
Displaying GPS info 12
Navigation 13
Destination entry (search menu) 13
Entering an address. 13
Copying the destination from the favourites 14
Copying one of the recent destinations...14
Entering coordinates* 14
Copying a destination from the map*...15
Points of interest (POI) 15
Selecting a point of interest at a specific location 15
Selecting a point of interest nearby, in the destination area or on the route...15
Selecting a point of interest on the map..16
Selecting a point of interest by stored criteria. 16
Route planning* 16
Manually entering a route. 16
Starting the route planning 17
Track information 17
Itinerary. 17
Changing a route 17
Saving a route 18
Loading a route 18
Deleting a route. 18
Fly over/simulate* 18
Starting Fly over/simulate* 18
Ending Fly over/simulate* 18
Additional functions after the destination entry 19
Saving destinations 19
Saving a destination entered/one of the last destinations as favourite.....20
Specifying route settings 20
Route guidance. 21
Starting the route guidance. 21
Reaching the place of destination 21
Quitting the destination guidance 21
Disturbed GPS reception. 22
Voice output during route guidance.....22
Map display during route guidance. 22
Navigation tools 22
Trip information display. 23
Speed limit. 23
Additional functions during the route guidance. 23
Cancelling route guidance 23
Skipping the next destination. 23
Working with the Map 24
Showing a Map 24
Moving and scaling the map 24
Touching the map. 24
Buttons 24
Quick Menu 25
Manage. 25
Changing saved routes* 25
Manage history 26
Managing favourites. 26
Selecting a point of interest by stored criteria 26
Managing user data 26
Manage POI\* 27
Create a new group. 27
Change group details 27
Setting the distance for a POI symbol ..27
Renaming a group 27
Changing the group symbol 27
Deleting a group. 27
Changing POI details. 27
Renaming a POI 27
Changing a POI symbol 28
Changing a POI position 28
Entering a new phone number. 28
Entering new extra info. 28
Deleting a POI. 28
Assigning a POI to a new group. 28
Transferring POI data from the PC. 28
Transferring routes from the PC 28
Track log\* 29
Recording a route 29
Replay track log. 29
Editing a track log (route information) ....29
Renaming a track log. 29
Assigning a colour to a route 30
Displaying the route on the map 30
Deleting a track log. 30
Exporting a track log 30
Settings 30
Settings in simple mode 30
Map display* 31
3D settings. 31
Colour profiles. 31
2D terrain 31
Street names 31
Lane information. 31
Route planning settings* 32
Navigation settings* 32
Maintain position in the street. 32
Plan anew after route deviation 32
Restoring the lock-to-position 32
Automatic overview mode 33
Audio settings* 33
Adjusting the master volume. 33
Adjusting the volume of the voice guidance. 33
Adjusting the key sounds. 33
Adjusting the dynamic volume. 33
Regional settings* 33
Adjusting the program language 34
Adjusting the voice profile 34
Adjusting units 34
Adjusting date & time format settings ...34
Adjusting time and time zone settings...34
Warning settings* 34
Warn when speeding 34
Adjusting radar warning settings. 35
Activating Warn if too fast for a pedestrian 35
Activating the safety mode. 35
Menu settings* 35
Selecting a background. 35
Track log settings* 36
Adjusting the update interval setting ...36
Activating auto save. 36
Specifying the maximum track log size..36
Create NMEA/SIRF log 36
Product information* 36
Software 37
Updating the navigation software. 37
Service 37
Warranty. 37
Technical data 37
Troubleshooting table 38
Safety notes
For your personal benefit, carefully read the following safety notes before operating the device for the first time.
Warning symbols used
In the chapters, warning symbols refer to important notes for you and the device.

DANGER!
Warns about injuries or life-threatening danger

DANGER!
Warns about accidents
Use as directed
The device is designed for mobile use in vehicles.
Special information about the navigation of trucks, busses and campers, such as altitude and width limitations or maximum permissible road load, is not included in the navigation data!
Navigation off the roads (offroad route guidance) is not possible with this navigation device.
Road safety
The navigation device does not release you from your responsibility as a driver for correct and prudent behaviour in traffic. Always observe the applicable traffic rules.
Use your device in such a way that you can always safely control your vehicle. If in doubt, stop and operate the device while the vehicle is standing.
General safety notes
Observe the following notes to protect the device against defects and yourself against injuries and life-threatening dangers from an ignition or explosion:
- Protect the device against moisture since it is not waterproof and not splashproof.
- Do not modify or open the device. Otherwise, it could be damaged and then ignite or explode. Or acidic, flammable liquid could run out of the battery.
- Do not expose the device to very low (below -20^ ) and very high temperatures (above 60^ ), e.g. close to fire, heating devices or in a parked car with direct exposure to the sun. Moisture could form inside the device or the device could overheat. The device or battery could deform and even ignite or explode. Or acidic, flammable liquid could run out of the battery.
If battery liquid comes into contact with your eyes or skin, immediately flush with water and consult a doctor. - Remove the device from the power supply when you park your vehicle since it continues to use battery power and could deplete the vehicle battery. Do not unplug the connector of the power supply by pulling on the wire. The wire could be damaged and cause electrical shock.
Cleaning notes

Clean the display with a dry, soft cloth. Water and other liquids could damage the display.

Do not use strong detergents for cleaning the housing. Use only a moistened, lint-free cloth.
Disposal notes

Use the return and collection systems available to dispose of the old device.

Do not discard any batteries in the household trash; instead, return them to the corresponding collection sites.
Initial startup
Scope of delivery
The scope of delivery contains the following components:
Navigation device
Suction cup bracket
- Charger cable for cigarette lighter
- Operating instructions
Note:
We recommend the use of original Blaupunkt accessories (www.blaupunkt.com).
Protective screen film
Prior to the initial use, carefully remove the protective film from the display.
Suction cup protective film
Prior to the initial use, carefully remove the protective film from the suction cup.
Charging the battery
Upon purchasing the navigation device, the battery could be discharged. Please charge the battery before using the device.
CAUTION!
Unapproved chargers could damage batteries.
Use only the enclosed original charger from Blaupunkt for operating and charging to correctly charge the battery and protect it against overvoltage.
Depending on the type of use, you can operate the device up to 3 hours with the built-in battery. The charging time is 2 to 3 hours. The charge state indicator is located on the top display bar.

In the map display: The top symbol of this button shows the battery charge state.
If the charge state of the battery becomes weak, the navigation device warns you about it.
Connect the battery charger or the charger cable for the cigarette lighter to the charging socket.
Note:
The battery is equipped with a protection against overheating from excessive current flow. The protection prevents charging the battery starting at an ambient temperature above 45^ .

Switching on the device
Press and hold the On/Off switch 1 for longer than 5 seconds.
Setting the language
If you switch on the device for the first time, a dialogue menu is displayed in which you can select the language and the voice for the navigation.
- Select your preferred language and voice in the dialogue menu.
Please follow the instructions.
The language is being loaded. The licensing contract (EULA) is displayed.
Touch the Accept button to confirm the contract.
Select simple mode/advanced mode
After setting up the language and confirming the licensing contract, 2 modes are offered for operation.
Note:
The mode can be switched at any time (ch. "Operation of menus", "Simple mode/advanced mode").
Touch one of the buttons to select the mode.
Simple Mode: Easy operation for quick destination entry. Access to the most important functions and settings. For the remaining settings, values are predefined that are optimized for the device.
- Advanced Mode: Access to additional functions and settings of the device (identified by a *** in these instructions).
Installation in the vehicle
For temporary installation in a vehicle, the navigation device features a holder to attach it to the windshield.

DANGER!
The installation at an unsuitable location can cause injuries.
Install the navigation device so that it does not block your view and does not distract from the traffic.
Do not install the device in the airbag deployment area.
Ensure that the device does not pose a threat to passengers in the vehicle in case of emergency braking.
Check the firm installation of the bracket at regular intervals. The bracket can loosen due to changes in the ambient temperature.
Attaching the suction cup holder
Locate a suitable place inside the vehicle for the installation.
To ensure a perfect hold, the glass must be free of dust and oil. If necessary, clean the glass using a lens cleaning tissue.
Press the suction cup of the holder against the windshield.
Push the lever on the support towards the glass.
Attaching the device mount
The suction cup holder consists of the mount for the device and the suction cup holder with arm.
- Attach the mount for the device at the rear of the device (the button points to the bottom).
Press the button to engage the mount in the device.
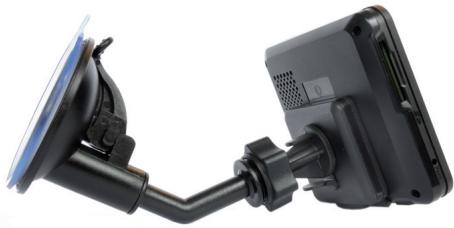
Inserting the device in the mounting cup
Place the mount with the device on the swivel arm.
Push the mount with the device down until you hear it engage.
Loosen the locking screw on the arm of the bracket and move the device to the desired direction.
Fasten the locking screw.
Removing the device
Press the button of the mount to disengage the device from the bracket.
The device disengages from the bracket.
Remove the device.
Removing the suction cup holder
If you change vehicles, you can simply remove the support.
Push the lever on the support away from the glass.
Carefully loosen the suction cup at the edge from the glass so that air can enter between suction cup and glass.
Carefully pull the suction cup off of the glass.
Removing the mount from the bracket
The mount of the device can permanently remain in the suction cup holder. If you want to remove the mount from the suction cup holder, proceed as follows:
Firmly push the small lever on the suction cup holder together.
Pull the mount up and away from the holder.
Switching on/off
The device can be switched on and off with the On/Off switch ①.
Switch-on
Press and hold the On/Off switch 1 for longer than 5 seconds. -or-
Press the On/Off switch 1 for approx. 2 seconds and release it to switch on the device from the pause state.
Switching off
Press the On/Off switch 1 for approx. 2 seconds and release it to switch the device to the pause state.
Press and hold the On/Off switch 1 for longer than 5 seconds to completely switch off the device.
Note:
The device continues to use a small amount of energy even if it is switched off. If you use the device again after an extended period of time, it may be necessary to recharge the battery.
Reset
If the device does not work properly, a simple reset may help.
Use a pointed object (e.g. a ball-point pen) to press the Reset button ④. The device is switched off and automatically restarted.
Operation of menus
Simple mode/advanced mode
2 modes are available for operating the device: the simple mode for quick destination entry and the advanced mode with many additional settings and functions. The mode can be switched at any time.
Note:
The additional settings and functions of the advanced mode are identified by a "" in these instructions.
The enclosed quick guide contains detailed information about the simple mode.
Toggling the mode

Touch the symbol in the menu Navigation Menu menu. The Settings menu is displayed.
Touch the Advanced the advanced mode. -or-
Touch the Simple Mode button to select the simple mode.
Navigation menu
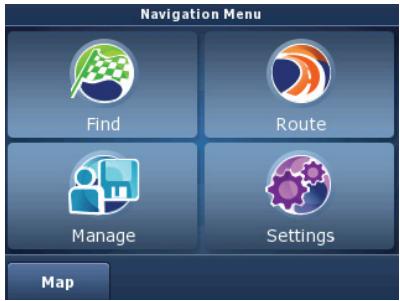
If you selected the advanced mode, additional functions are available with the advanced menus Route and Manage.
Route* advanced menu

The Route menu can be accessed only if you already entered a destination or planned a route with several interim destinations.
The Route menu provides an overview and additional functions for the calculated routes. You can edit or fly over the routes. Relevant descriptions can be found in the chapters "Route planning" and "Fly over/Simulate".
Manage* advanced menu

In the Manage menu, you change saved routes and manage the entire track log. In addition, you can edit the last destinations and favourites, manage POIs and change stored search criteria for POIs. Relevant descriptions can be found in the chapters "Manage" and "Manage POI".
Buttons

Touch this button to return to the previous menu.

Touch this button to change to the next page in the menu.
Done: Touch this button to confirm an entry or a setting.
Keyboard
If text entries are required (e.g. for the destination entry), a virtual keyboard appears on the display. You can perform all entries using your finger.
These buttons are located on the keyboard:

Delete last character

Insert a space

Toggling case-sensitive

Display special character map

Adjust keyboard layout by region
During the entry, the device auto-completes characters as far as possible and offers only those characters on the keyboard that are logically possible.
Lists
You can frequently display lists form which you can select an entry (e.g. a destination). For example, if you do not enter the complete name of a location, a list with possible results is displayed.
To display a list with additional matching entries, touch the Done button. Longer lists require a longer loading time.


Touch one of the buttons to scroll through the list.

Touch an entry directly to accept it.
Information about GPS
The GPS (Global Positioning System) allows world-wide navigation and locating via satellites to determine a position.
GPS mode of operation
The navigation device measures the current position of your vehicle via GPS and compares these coordinates with its map material. The map material contains the geographic coordinates of points of interest, streets and cities that you can view on the display of the navigation device. The device uses this information to calculate the route to the destination you entered.
Displaying GPS info
Information about the GPS reception of the device, your current position and your speed can be found in the GPS Info menu.
In the Navigation Menu, touch the Map button.
The map is displayed.
Touch the symbol.
The Quick Menu is displayed.
Touch the GPS button.
The GPS-Data menu is displayed.
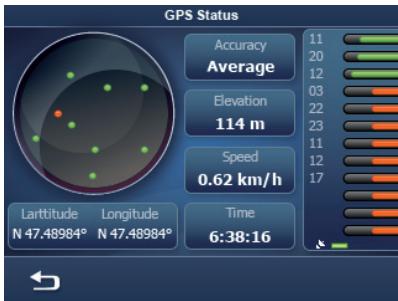
This menu contains this information:
Accuracy: Signal strength of the GPS satellites
- Thenumber of received GPSsatellites is displayed next to it in form of bars (the colour represents the signal strength).
The navigation requires signals from at least 3 satellites.
Latitude/Longitude: Current position in longitude and latitude
Elevation: Current elevation above mean sea level
- Speed: Indicates the current speed of the vehicle
Time: Current time broadcast by the GPS satellite
Note:
Buildings, tunnels and external influences can interfere with the view to the sky and, therefore, the GPS reception of the navigation device.
Navigation
The navigation device does not release you from your responsibility as a driver for correct and prudent behaviour in traffic.

DANGER!
Distraction from the traffic can cause accidents.
Do not operate the device while driving.
View the display only during safe traffic situations.
Notes:
- Routes are best planned before starting your trip.
- Perform the basic settings first.
Destination entry (search menu)
In the destination entry, you can enter an address, select a destination in the memory (Favorites), select one of the last destinations, enter coordinates* or select a point of interest (POI).

Touch the symbol in the menu Navigation Menu menu.
The Find Menu is displayed.
Note:
You can only select places of destination (countries, cities, streets, house numbers, points of interest) that are contained in the map material.
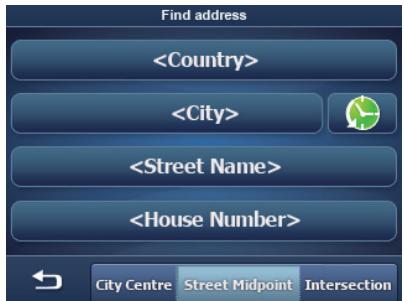
Entering an address

Touch the symbol in the menu Navigation Menu menu.
The Find Address menu is displayed.
Note:
You do not have to repeat entering the country, city and street information every time. Only if your destination is at a different location than the previous one will you have to re-enter the destination address.
Touch the
Touch the <City> button and enter the city or postal code.
-or-
Touch the symbol to call up a list of the cities entered last.
Select the city from the list.
Touch the City Centre button to select the centre of town.
-or-
Touch the
Touch the
-or-
Touch the Street Midpoint to select the street midpoint of the selected street.
-or-
Touch the Intersection button and enter the street that intersects the street entered.
The map is displayed.
Touch the Set as Destination button.
The route is calculated and the route guidance started.
Notes:
- After the destination entry, you can start the route guidance or store the destination. For further details, read the chapter "Additional functions after the destination entry".
- The route guidance starts as soon as a GPS signal is received.
Copying the destination from the favourites
Prerequisite:
- You previously saved at least one destination as favourite (ch. "Additional functions after the destination entry").
Touch the symbol in the Navigation Menu.
The Favourites menu is displayed.
Touch the desired destination.
The address of the destination is displayed.
Touch the Set as Destination button to start the route guidance.
Copying one of the recent destinations
Touch the symbol in the menu Navigation Menu menu.
The History menu is displayed.
Touch the desired destination.
The address of the destination is displayed.
Touch the Set as Destination button to start the route guidance.
Entering coordinates*
Only available in advanced mode:
Touch the symbol in the Navigation Menu.
The Coordinate Input menu is displayed.
A coordinate with latitude and longitude is displayed as an example.
Touch the Coordinate Display Format button to switch between decimal and DMS format (Degree, Minutes and Seconds) for the coordinates.
Touch a latitude directly to change it.
The N/S button allows you to switch between latitude north and south.
Touch a longitude directly to change it.
The E/W button allows you to switch between longitude east and west.
Touch the Done button.
Touch the Set as Destination button to start the route guidance.
Copying a destination from the map*
Only available in advanced mode:
Touch the Plan on Map button.
The map is displayed.
Move and scale the map as described in the chapter "Working with the map".
Touch a location or street of your choice.
The location is selected and its name appears in the lower display bar.
Touch one of the buttons to use the location as start, destination or interim destination of a route:
- Add Start: Use location as destination for the route guidance and start the route guidance
- Insert Via: Add location of a route as interim destination
- Continue: Add location as interim destination in the current route. Additional cities can be entered on the map as interim destination or destination.
- Remove: If you mark a destination, the button is displayed. The destination is removed.
Touch the Start Navigating button to start the route guidance.
Points of interest (POI)
Points of interest (POI) are specific locations, such as parking facilities and petrol stations, that are stored in the map material.

Touch the symbol in the Find Menu. The Where to search? menu is displayed.
Selecting a point of interest at a specific location

Touch the symbol in the Where to search? menu. The Find POI By Address menu is displayed.
Enter an address (ch. "Entering an address").
Select the POI group.
Select the point of interest.
Touch the Set as Destination button to start the route guidance.
Selecting a point of interest nearby, in the destination area or on the route

Touch the symbol in the Where to search? menu to find a point of interest close to your current position.
-or-

Touch the symbol in the Where to search? menu to find a point of interest near the destination.
Note:
The destination to which you started a route guidance last is taken as the destination area.
-or-


Touch the symbol in the Where to search? menu to find a point of interest on the currently selected route.
Select the POI group.
Select the point of interest.
Touch the Set as Destination button to start the route guidance.
Selecting a point of interest on the map

Touch the symbol in the Where to search? menu.
The map is displayed.
Move and scale the map as described in the chapter "Working with the map".
Touch a location of your choice.
The location is selected and its name appears in the top display bar.
Touch the OK button.
Select the POI group.
Select the point of interest.
Touch the Set as Destination button to start the route guidance.
Selecting a point of interest by stored criteria
The search criteria allow a quick search of points of interest. This allows grouping the points of interest into certain categories, e.g. parking, shopping and dining.
In the Where to search? menu, touch the Saved Search Criteria button.
Select one of the saved criteria.
A list with corresponding points of interest is displayed.
Select the desired point of interest.
The map is displayed.
Touch the Set as Destination button to start the route guidance.
Route planning*
Prerequisite:
- You entered a destination and started a route guidance.
Manually entering a route
If you want to enter a route with a different position than your current GPS position, proceed as follows:
The route is entered as usual in the destination entry.
Enter an address (ch. "Destination entry").
Note:
You can enter favourites like an address and edit them in the route planning.
Touch the More Options button on the map.
Touch the Set as Start button.
The selected address is set as the starting point of the route.
Find another address to set an interim destination or a destination.
Touch the Set as Destination button on the map to set the selected address as destination.
-or-
Touch the More Options button on the map.
Touch the Insert as Via button to insert the selected address as interim destination.
Starting the route planning


Touch the symbol in the navigation menu.
The Route menu is displayed.
Track information
The Route Information menu contains information about the route, e.g. about driving time and distance with the current route settings (method).


Touch the symbol.
The Route information menu is displayed.

Touch the Plan on Map button to display the route on the map.

Touch the Start Navigating button to start the route guidance.


Touch the button to exit the menu.
-or-

Touch the Delete Route button to delete the current route.
-or-

Touch the Settings button to change the route settings.
The Route Settings menu is displayed.

Touch the Vehicle button to select a speed profile.
The "Emergency" profile is intended specifically for emergency personnel and will also guide you through one-way streets or special routes.

Touch the Road Types Used for Route Planning button to allow certain road types (check mark) or to avoid them (no check mark).

Touch the Route Calculation Method button to select the type of route calculation:
Fast: The route with the shortest driving time is calculated.
-
Short: The route with the shortest distance is calculated.
-
Easy: The route with the easiest route guidance and particularly few intersections is calculated.
Economical: The route with the lowest possible driving expenses (fuel efficient) is calculated.


Touch the button to exit the menu.
Itinerary
In the Itinerary menu, you can display an overview of the route.


Touch the symbol.
The Itinerary menu is displayed.

Touch the Modus button to switch between the views "Itinerary", "Detailed instructions" and "Road list".


Touch the button to exit the menu.
Changing a route


Touch the symbol.
The route points are displayed.
Touch the route point that you want to move or delete.


Touch the buttons to move the destination up or down in the tour list.
-or-

Touch the Remove button to remove the route point.
-or-

Touch the Optimise button to optimise the route.


Touch the button to exit the menu.
Saving a route

Touch the symbol to save the route. The keyboard is displayed.
Enter a name for the route.
Touch the Done button.
The route is stored under the name entered.
Loading a route
Prerequisite:
- You saved at least one route (ch. "Saving a route").
Note:
If you load a saved route, the current route is overwritten.

Touch the symbol.
The saved routes are listed.
Touch a route in the list to load it.
Deleting a route

Touch the symbol.
A confirmation is displayed.
Touch the Yes button to delete the route.
Fly over/simulate*
Conveniently plan your vacation trip at home and gain an overview of the route and travel time - even without GPS reception.
Select "Fly Over" or "Simulate": A flyover consists of a quick display of the route without voice guidance. During simulation, the route is simulated with voice guidance and realistic speed.
Starting Fly over/simulate*
Prerequisite:
- You planned a route (ch. "Route planning").
If no GPS signal is available, you must set a starting point (ch. "Route planning").
In the Route Menu, touch the Fly Over button to fly over the route.
-or-
In the Route Menu, touch the Simulate button to simulate the route with all the voice guidance.
Note:
During the Simulation/flyover, you have the same options as in a route guidance (ch. "Map display during route guidance").
After the simulation/flyover, the Route Menu is displayed.
Ending Fly over/simulate*
In the map display, touch the Stop button.
Additional functions after the destination entry
Prerequisites:
- You entered a destination as described in the chapter "Destination entry".
-or-
- You entered a point of interest as described in the chapter "Points of interest".
-or-
- You selected a position on the map as described in the chapter "Working with the map", "Touching the map".
The map is displayed.
Touch the Set as Destination button to start the route guidance.
-or-
Only available in advanced mode: Touch the Insert Via* button to insert the location as interim destination.
Note:
An interim destination can be inserted only if you previously defined a destination.
-or-
Only available in advanced mode: Touch the Place Pin* button to start the route guidance.
-or-
Touch the More Options* button to display additional buttons.
-or-
Only available in advanced mode: Touch the Routing Methods* button to display the calculated routes based on the available route variants.
- Select the route that most closely meets your needs.
-or-
Only available in advanced mode: Touch the Set as Start* button to set the selected address as starting point for the route.
-or-
Only available in advanced mode: Touch the Continue* button to set the selected address as the last destination of the route.
The old destination is retained as interim destination.
-or-
Only available in advanced mode: Touch the Save as POI* button to save the selected address as POI.
-or-
Only available in advanced mode: Touch the Save as Camera* button to save the selected address as a location of a traffic monitoring camera.
-or-
Only available in advanced mode: Touch the Add to Favourites* button to save the selected address as favourite.
Note:
The number of functions depends on whether you have already entered a destination or are entering a new destination. Buttons that are available only in advanced mode are identified by a ***.
Saving destinations
Two lists are available in which individual destinations are saved:
In the Favourites
In the Last Destinations list
All destinations to which you started a route guidance are automatically saved under Last destinations. The last 100 destinations are stored.
Every destination entered and the destinations of the Last destinations list can be permanently stored in the Favourites. This is particularly useful if you want to approach this destination repeatedly.
Destinations from the Favourites can be renamed (ch. "Manage").
You can delete individual destinations again from both lists (ch. "Manage").
Saving a destination entered/one of the last destinations as favourite
Prerequisite:
- You entered a destination as described in the chapter "Destination entry".
-or-
- You selected a destination from the History list as described in the chapter "Destination entry".
The map is displayed.
Touch the Add to Favourites button to call up the add-on menu.
A list is displayed.
- Select an item from the list under which you want to save the selected address.
Note:
You can select an empty list item or overwrite an existing one.
The keyboard is displayed.
Enter a name for the destination and touch the Done button.
The destination is stored in the Favourites under the name entered.
Specifying route settings
The Route Information menu contains information about the route, e.g. about driving time and distance with the current route settings (method).
The route settings can be changed at any time. If you change the settings, driving time and distance may change.


During the route guidance, touch the symbol for the next driving instruction in the map view.
The Route information menu is displayed.

Touch the Settings button.
The Route Settings menu is displayed.

Touch the Vehicle button to select a speed profile.
The "Emergency" profile is intended specifically for emergency personnel and will also guide you through one-way streets or special routes.

Touch the Road Types Used for Route Planning button to allow certain road types (check mark) or to avoid them (no check mark).

Touch the Route Calculation Method button to select the type of route calculation:
- Fast: The route with the shortest driving time is calculated.
- Short: The route with the shortest distance is calculated.
- Easy: The route with the easiest route guidance and particularly few intersections is calculated.
Economical: The route with the lowest possible driving expenses (fuel efficient) is calculated.
Route guidance

DANGER!
Disregarding traffic rules can lead to accidents.
Follow the turn-by-turn directions only if the street routing and traffic rules allow it. The navigation device will bring you to your destination even if you have to deviate from the planned route.
Note:
You can always use the map or arrow display for orientation purposes.
Starting the route guidance
When you start the route guidance, a route is calculated with your settings (ch. "Specifying route settings"). The destinations are automatically stored under "Last Destinations".
Prerequisites:
- You entered a destination as described in the chapter "Destination entry". - or -
- You entered a point of interest as described in the chapter "Points of interest". - or -
- You planned a route as described in the chapter "Route planning".
Touch the Set as Destination button.
The route is calculated and the route guidance started. The map is displayed.
Note:
The route guidance does not start until GPS reception is present.

The so-called "cursor" represents your position.
Note:
If you enter an additional destination during an active route guidance and start the route guidance, you have two options:
- You can insert the destination as interim destination. The route is recalculated and the interim destination is approached next.
- Or you start a new route guidance to the destination entered.
Reaching the place of destination
As soon as you have reached the destination point, the message "You have reached your destination" appears. The map now displays only your current position.
Quitting the destination guidance
Touch the upper action arrow on the map. The Route Information add-on menu is displayed.
Touch the Skip Next Via button to exit the route guidance.
Touch the Delete Route button to exit the route guidance.
A confirmation is displayed.
Touch Yes to quit the route guidance.
The menu is displayed.
-or-
Touch No to continue the route guidance.
Disturbed GPS reception
If the GPS reception is disturbed during route guidance for an extended period of time, the route guidance is stopped. As soon as the reception is re-established, the device automatically recognises whether your position has changed and, if necessary, recalculates the route. At that time, you can simply continue your destination guidance.
Note:
External influences can interfere with the view to the sky and, therefore, the GPS reception of the navigation device. For further details, read the chapter "Troubleshooting table".
Voice output during route guidance
Your navigation device supports route guidance with voice-prompted turn-by-turn directions and announces turns in advance.
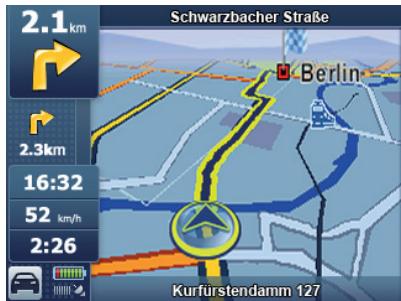
Map display during route guidance
During the route guidance, the map display shows you different navigation tools and route information.

DANGER!
Disregarding the street routing can lead to accidents.
The information on the digital road maps may no longer be current due to short-term changes (construction, etc.).
Additional information, e.g. the speed limit, can be shown only if they are contained in the map material.
The signposts and local street routing always have priority over the information of the navigation device.
Navigation tools
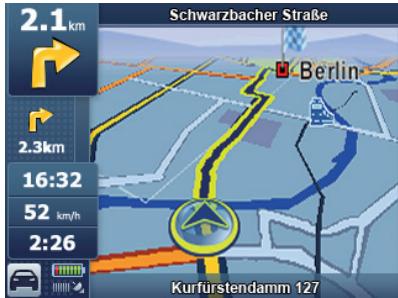

The so-called "cursor" represents your position.
Top field: Name of next street
Bottom field: Name of current street

The top left action arrow shows the next action and the distance to that action.

The bottom left action arrow shows the next but one action and the distance to that action.
Touch the top action arrow to display the Route Information menu.
Touch the bottom action arrow to display the Itinerary menu.
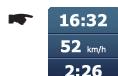
Trip information display
The Destination menu contains information about the route, e.g. about driving time and distance.
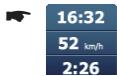
Touch the symbol.
The Destination menu is displayed.
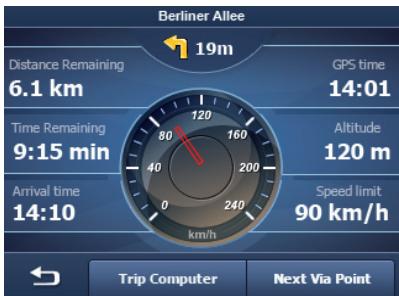
- Touch the different buttons to display the data during the route guidance.
You can select up to 3 buttons. The selected button is marked.
Speed limit

The left area of the map shows the speed limit if it is exceeded (ch. "Navigation settings").
Note:
The speed limit can only be displayed if it is activated in the settings (ch. "Warning settings").
Additional functions during the route guidance
Prerequisites:
- Route guidance
-or-
- Route simulation (Fly Over/Simulate)
Cancelling route guidance


Touch the top left action arrow during the route guidance.
The Route information menu is displayed.
If you entered an interim destination:

Touch the Skip Next Via button.

Touch the Delete Route button.
A query appears.

Touch Yes to quit the route guidance.
The map is displayed.
-or-

Touch No to continue the route guidance.
Skipping the next destination
Prerequisite:
- Route with at least 1 interim destination (route planning)


Touch the symbol to reach the Destination menu. The Destination menu is displayed.

Touch the Next Via Point button to skip the next interim destination.
The route is recalculated and the next destination is approached.
Working with the map
Showing a map
In the navigation menu, touch the Map button.
Touch the symbol to close the map view and return to the navigation menu.
Moving and scaling the map
To view the desired destination area on the map, you can move the map section and scale it (zoom in and zoom out).
Touch any position on the map to display additional buttons.
Touch the symbol to show or hide the buttons.
Touch one of the symbols to zoom in or out of the map.
Touch the map and move the map in the desired direction.
Touch one of the symbols to tilt the map in the 3D view.
Touch one of the symbols to rotate the map in the 3D view.
Note:
If a GPS signal is received, the device automatically adjusts the horizontal angle to the driving direction.
Touching the map
Touch any position on the map to display additional functions.
Touch a location (the street or the point of interest) in the map.
The location is selected and its name appears in the lower display bar.
Touch the Cursor button to operate additional functions after the destination entry.
Note:
If you touch any place in the map during the route guidance, an add-on menu with additional functions is displayed. For further details, read the chapter "Additional functions during the route guidance".
Buttons
In the map view, the following buttons are available:
Touch the Menu button to reach the navigation menu.
3D Touch the 2D or 3D button to toggle between the 2D and 3D display.
Touch the Detour button to reach the Detour menu.
Note:
In the Detour menu, you can quickly insert POIs as destination or interim destination (during the active route guidance).

In the Navigation Menu, touch the symbol to reach the Find Menu.
Note:
If you already entered a destination, the top and bottom action arrow and the Route Information menu appear.

Touch the symbol to reach the Quick Menu (ch."Quick Menu").
Touch the symbol to reach the Destination menu (ch. "Map display during route guidance").
Note:
The display of the button differs depending on which setting you performed in the Destination menu.
Quick Menu
In the Quick Menu, you perform settings that are frequently used during the navigation.

Touch the symbol to open the Quick Menu.
Note:
If you activated options in the Quick Menu, the respective button is marked.
Move the volume control to change the volume for navigation announcements.

Touch the symbol to toggle between mute and activated voice and sound output.

Touch the symbol to toggle between day and night display.

Touch the symbol to activate or deactivate the track log.

Touch the symbol to show or hide the 3D objects.
Note:
3D objects, e.g. important buildings and places of interest, can be shown only if they are contained in the map material.

Touch the symbol to select the speed profile.
The route may be recalculated.
Note:
The symbol for the speed profile varies depending on the selected means of transportation.
Touch the GPS button to display the GPS reception.
Manage
In the Manage menu, you manage the different route options, your user data as well as the favourites and last destinations.
The chapter "Manage POI" describes how you edit points of interest and change symbols as well as groups.
The chapter "Track log" describes how to log routes, display them again and export them to memory cards.
Changing saved routes*
Routes that you created and saved can be renamed and deleted.

Touch the symbol in the navigation menu.
The Manage menu is displayed.

Touch the symbol in the Manage menu.
The Saved Routes menu is displayed. The saved routes are listed.

Touch the buttons to scroll through the menu.
Touch a button in the list to rename the desired route.
The keyboard is displayed.
Enter a new name and touch the Done button.
-or-

Touch the button to delete a route.
-or-
Touch the Clear All button to delete all saved routes.
A confirmation dialogue appears in both cases.
Touch Yes to delete the route or all routes.
-or-
Touch No to cancel the procedure.
Manage history


Touch the symbol in the Manage menu.
The Manage History menu is displayed.

Touch the Clear History button to delete the list.
-or-


Touch the symbol to delete a last destination.
Managing favourites
Prerequisite:
- You saved at least one destination as favourite.


Touch the symbol in the Manage menu.
The Manage Favourites menu is displayed.

Touch a favourite to change the name.

Touch the Clear All button to delete the list.
-or-


Touch the symbol to delete a saved destination.
Selecting a point of interest by stored criteria
The search criteria allow a quick search of points of interest. This allows grouping the points of interest into certain categories, e.g. parking, shopping and dining.


Touch the symbol in the Manage menu.
The Manage Saved Search Criteria menu is displayed. The criteria are listed.

Touch a search criterion to change the name.
-or-

Touch the Clear All button to delete the list.
-or-


Touch the symbol to delete a point of interest.
Managing user data
In the Manage menu, touch the User Data Management button.
The User Data Management menu is displayed.
Touch the Remove Pins button to delete the pins you set.
-or-
Touch the Backup User Data button to create a backup of your user data.
Note:
To be able to back up your user data, a memory card must be located in the card slot. The data can be saved only onto a memory card.
-or-
Touch the Restore User Data button to restore your user data.
Note:
To restore your user data, the data must first have been saved to a memory card.
-or-
Touch the Delete User Data button to delete your user data.
-or-
Touch the Reset All Settings button to reset the settings in the navigation menu.
Manage POI*
In the Manage POI menu, you can edit and delete your points of interest. The following setting options are available:
Create a new group
Changing group details
Changing POI details
Touch the symbol in the Manage menu.
The Manage POI menu is displayed.
Touch the button My POI or All to change between the POIs you created and all POIs.
Touch the buttons to scroll through the menu.
Create a new group
Create groups to sort your POIs.
Touch the New Group button.
The keyboard is displayed.
Enter the name of the group and touch the Done button.
The created group is displayed.
Change group details
You can edit the POI groups and specify the distance at which a POI symbol is displayed on the map.
Setting the distance for a POI symbol
In the POI management, touch the Edit button.
- Touch the button with the desired distance. If the group features additional subgroups, you can also specify the distance of the POI display. If the same setting should be used for all subgroups:
Touch the Same Visibility in Subgroups button to activate (check mark) or to deactivate (no check mark) the setting.
If you performed changes to the settings:
Touch the button to exit the menu.
Renaming a group
In the POI management, touch the Edit button.
Touch the Rename button.
Enter a new name.
Touch the Done button.
Changing the group symbol
In the POI management, touch the Edit button.
Touch the button with the blue symbol. A list of symbols is displayed.
Touch the buttons to scroll through the list of symbols.
Touch the desired symbol.
Deleting a group
You can delete a group with all the POIs it contains.
In the POI management, touch the Edit button.
Touch the Remove button.
Touch Yes to delete the group and all POIs. - or -
Touch No to cancel the procedure.
Changing POI details
Edit individual POIs of a group and enter additional information. A POI can also be assigned another group.
Touch the button of the group. A list of POIs is displayed.
Touch the button with the name of the POI to be edited.
The details are displayed.
Renaming a POI
Touch the button with the name of the POI. The keyboard is displayed.
Enter the name of the group and touch the Done button.
Changing a POI symbol
Touch the button with the blue symbol. A list of symbols is displayed.
Touch the buttons to scroll through the list of symbols.
Touch the desired symbol to assign it to the POI.
Changing a POI position
Touch the symbol.
The map is displayed with the position of the POI.
Touch the desired position on the map.
Touch the Select button.
The new position is assigned.
Entering a new phone number
Touch the symbol.
The Phone Number Input menu is displayed.
Enter the phone number and touch the Done button.
Entering new extra info
Touch the symbol.
The Extra Info menu is displayed.
Enter the information and touch the Done button.
Deleting a POI
Touch the Delete button.
Touch Yes to delete the group and all POIs. -or-
Touch No to cancel the procedure.
Assigning a POI to a new group
Touch the Change Group button. A list of groups is displayed.
Touch the buttons to scroll through the list of groups.
Touch the desired group.
Touch the Add here button. The new group is assigned to the POI.
Transferring POI data from the PC
You can transfer POI data from the PC to the TravelPilot. The POI data must be available in the standardised KML format. You can store KML data using various Internet services for geographic processing.
Connect the TravelPilot to your PC using a USB cable ("Mini USB B-type" to "USB A-type"). The PC recognises your TravelPilot as a removable media drive. Two drives appear: one for the device memory, one for the SD card slot of the TravelPilot.
Select the device drive.
In the X:\content\folder, create a folder called "userdata".
In the X:\content\userdata folder, create a folder called "poi".
Place the KML files in the X:\content\userdata\poi\directory.
In this case, "X" represents any drive letter that your PC creates for the TravelPilot.
The POI data are now available on your TravelPilot.
Search for POIs in the vicinity of the POI in the created KML file (e.g. with the function "Selecting a POI on the map").
Your POI from the KML file appears in the list.
Transferring routes from the PC
You can transfer routes from the PC to the TravelPilot. The data must be available in the standardised KML format. You can create route points using various Internet services for geographic processing and store them in a folder. The first file forms the starting point, the last one the destination, those in between the interim destinations of the route in succession. You save this folder as a KML file.
Connect the TravelPilot to your PC using a USB cable ("Mini USB B-type" to "USB A-type").
The PC recognises your TravelPilot as a removable media drive. Two drives appear: one for the device memory, one for the SD card slot of the TravelPilot.
Select the device drive.
In the X:\content\folder, create a folder called "userdata".
In the X:\content\userdata folder, create a folder called "route".
- Place the KML file in the X:\content\userdata\route\directory.
In this case, "X" represents any drive letter that your PC creates for the TravelPilot.
The route data are now available on your TravelPilot.
Start the TravelPilot in advanced mode.
Click on the Route button.
- Click on Load Route button.
Select your stored route from the list.
You can edit the route like any other route.
Track log\*
In the Manage Saved Routes menu, you record routes and manage recorded routes.

Touch the symbol in the navigation menu.
The Manage menu is displayed.
Recording a route
Touch the symbol.
The Manage Track Logs menu is displayed.
Touch the Record button to start the recording.
The map is displayed.
Touch the Stop Recording to end the recording.
Replay track log
If you already stored track logs, they are displayed in a list.

Touch the button to travel a recorded route.
Touch the Stop symbol during the playback to stop it.
Editing a track log (route information)
Edit the recorded routes, view them on the map and export the geodata to a memory card.
Touch the button with the name of the saved track log.
The Track Information menu is displayed.
Renaming a track log
Touch the button with the name of the track log.
The keyboard is displayed.
Enter a new name and touch the Done button.
Assigning a colour to a route
The route is shown on the map in the selected colour.
Touch the button with the desired colour. - or -
Touch the button to hide the route on the map.
Displaying the route on the map
Touch the Fit to Screen button. The route is shown on the map.
Deleting a track log
Touch the Delete button.
Touch Yes to delete the track log. - or -
Touch No to cancel the procedure.
Exporting a track log
The routes are exported in the GPS Exchange Format (or simply GPX format). These are geodata that can be exchanged between devices and edited by numerous programmes and web services.
A memory card is required for the export. The technical data show which memory cards are supported.
Insert your memory card with the contacts to the front in the card slot ③ until the card engages.
In the Track Information menu, touch the Export button.
The route is stored on the memory card in the GPX format.
To remove the memory card again:
Carefully push on the memory card in the card slot until it disengages.
Settings

Touch the symbol in the Navigation Menu.
The Settings menu is displayed.
You can change the mode in the menu.
Touch the Simple Mode button to change to the simple mode.
Note:
The additional settings and functions of the advanced mode are identified by a "" in these instructions.
The enclosed quick guide contains detailed information about the simple mode.
Settings in simple mode
In the Navigation Menu, touch the Settings button.

In the Settings menu, touch the symbol to select the language for the navigation.

In the Settings menu, touch the symbol to select a different background for the navigation menu.

In the Settings menu, touch the symbol to select the voice for the voice output.

Touch the symbol to display product information.
In the Settings menu, you can change the mode.
Touch the Advanced Mode button to change to the advanced mode.
Map display*
You can perform these settings:
3D settings
Colour profiles
2D terrain
Display street names
Lane information

In the Settings menu, touch the symbol.
The Map Screen Settings menu is displayed.
3D settings
In the 3D settings, you define which of the existing 3D objects should be shown on the map. You also specify how detailed this display should be.
Touch the Landmarks button to activate the 3D display for landmarks (check mark) or to deactivate it (no check mark).
Touch the Elevated Roads button to activate the 3D display for elevated roads (check mark) or to deactivate it (no check mark).
Touch the Building Visibility button to change between the settings "Off", "Wide", "Medium" and "Close".
Touch the Terrain Detail Level to switch between the settings "Off", "High", "Medium" and "Low".
Note:
The settings "Landmarks", "Elevated Roads", "Building Visibility", "Terrain Detail Level" are correctly displayed only if they are stored in the map material.
Colour profiles
In the Colour Profiles menu, you can select different colour profiles for the day and night mode.
Touch the Night Mode button to switch the night mode on, off or to automatic.
Notes:
- If needed, this function can also be conveniently selected in the Quick menu.
- The automatic mode uses the GPS data to determine whether your current position is day or night and automatically changes the colour profile.
Touch the Daytime Colour Profile button to select a colour profile for the day mode.
Touch the Night Colour Profile button to select a colour profile for the night mode.
2D terrain
3D data can also be displayed in 2D display by means of colours and shadings.
Touch the Elevation on 2D-Map to switch elevation of the terrain on or off in the 2D display.
Street names
If the display of street names should become confusing during the navigation, it can be switched off as follows:
Touch the Show Street Names to switch the display of street names on or off in the map display.
Note:
As soon as you manually move the map, the street names are displayed for improved orientation - even if you deactivated the setting in this menu.
Lane information
Some streets contains lane information so that you can be in the correct lane at the next intersection. This setting specifies whether the data of lane information should appear at the top or bottom of the map or not at all.
Touch the Lane Information button to select between the settings "Off", "Top" or "Bottom".
Touch the button to exit the menu.
Route planning settings*


In the Settings menu, touch the symbol.
The Route Settings menu is displayed.

Touch the Vehicle button to select a speed profile.
Note:
The "Emergency" profile is intended specifically for emergency personnel and will also guide you through one-way streets or special routes.

Touch the Road Types Used for Route Planning button to allow certain road types (check mark) or to avoid them (no check mark).

Touch the Route Calculation Method button to select the type of route calculation:
- Fast: The route with the shortest driving time is calculated.
- Short: The route with the shortest distance is calculated.
- Easy: The route with the easiest route guidance with particularly few intersections is calculated.
Economical: The route with the lowest possible driving expenses (fuel efficient) is calculated.
Navigation settings*
You can perform these settings:
- Maintain position in the street
Plan anew after route deviation
Position fixing
Automatic overview mode


In the Settings menu, touch the symbol.
The Navigation Settings menu is displayed.
If you performed changes to the settings:


Touch the button to exit the menu.
Maintain position in the street
Touch the Keep Position on Road button to activate (check mark) or to deactivate (no check mark) no this function.
With activated function, the position information of your vehicle is adjusted to the road network. If you navigate as a pedestrian, this function is automatically deactivated and your exact position is displayed.
Note:
If this function is deactivated, you also switch off the error correction for the GPS position. Your displayed location may be affected by positioning errors.
Plan anew after route deviation
Touch the Off-Route Recalculation button to activate (check mark) or to deactivate (no check mark) this function.
Your route is automatically recalculated if you deviate from it. If this function is deactivated, the navigation is stopped until you return to your original route.
If you select a different starting point than your current GPS position, the function is automatically deactivated.
Restoring the lock-to-position
If you rotated or moved the map and remain inactive for a certain period of time, the map fixes itself back onto your position and reactivates an automatic map rotation. Here, you determine the inactive period of time after which this occurs.
Touch the slide control of the Restore Lock-to-Position button to specify the period of time until the lock-to-position. The extreme right position deactivates this function ("Off").
Automatic overview mode
Touch the Automatic Overview button to activate (check mark) or to deactivate (no check mark) this function.
With activated function, the map switches to overview mode until the next action on your route falls below a certain distance. In overview mode, the map is reduced and displayed in 2D.
You can perform additional settings for the automatic overview mode:
Touch the button with the three dots to display additional settings.
Touch the slide control to change the following settings:
- Turn Distance for Overview: Distance until an action at which the map changes to overview mode
- Default Zoom Level: Scale used for the overview mode
Audio settings*
You can perform these settings:
General volume
Volume of voice guidance
Key sounds
Dynamic volume


In the Settings menu, touch the symbol.
The Sound Settings menu is displayed.
If you performed changes to the settings:


Touch the button to exit the menu.
Adjusting the master volume

Touch the Master Volume button to activate (check mark) or to deactivate (no check mark) all the sounds. The position of the slide control determines the volume.
Adjusting the volume of the voice guidance
The slide control of the Voice Guidance Volume button controls the volume of the voice guidance.
The position all the way on the left deactivates voice guidance. The position all the way on the right adjusts the voice guidance to the master volume.
Adjusting the key sounds
Touch the Key Sounds button to activate sounds when operating the buttons or the touchscreen (check mark) or to deactivate them (no check mark).
Adjusting the dynamic volume
Touch the Dynamic Volume button to automatically raise the volume at a certain speed.
You can perform additional settings for the dynamic volume:
- Touch the button with the three dots to display additional setting options.
You use the Minimum Speed slide control to specify at which speed the volume is increased in increments.
You use the Maximum Speed slide control to specify at which speed the highest volume is set.
Regional settings*
You can perform these settings:
Program language
Voice profile
Units
- Date & time format settings
Time and time zone settings

In the Settings menu, touch the symbol.
The Regional Settings menu is displayed.
If you performed changes to the settings:


Touch the button to exit the menu.
Adjusting the program language
The button shows the program language currently in use.
Touch the Program Language button to select from a list of available languages.
Touch the OK button.
Confirm the restart of the device.
The device starts in the selected language.
Adjusting the voice profile
The button shows the voice profile currently in use, the voice used and the version number.
Touch the Voice Profile button to select from a list of available languages and voices.
Touch the OK button.
Adjusting units
The button shows the units of measure currently in use.
Touch the Units button to specify the units of measure used for the distance.
Note:
If you select a unit of measure that is not supported by the selected voice profile, a warning appears.
Adjusting date & time format settings
Touch the Set Date & Time Format button to display additional setting options.
Touch the Date Format button to adjust the desired order of day (DD), month (MM) and year (YYYY).
Touch the Date Delimiter button to adjust the desired delimiter between day, month and year.
Touch the Time Format button to change between 12 hours with AM/PM and 24 hours.
Adjusting time and time zone settings
Touch the Time and Time Zone Settings button to display additional setting options.
Touch the Auto Time Correction to GPS button to activate the automatic correction of the system time via the GPS signal (check mark) or to deactivate it (no check mark).
Touch the Use Auto Time Zone button to specify whether the device should automatically determine in which time zone you are located. The time is then always correctly displayed for your location.
You can also manually select the time zone:
Deactivate the check mark of the Use Auto Time Zone button.
Touch the Set Time Zone button to select the desired time zone from a list.
Warning settings*
You can perform these settings:
- Warn when speeding
- Radar warning
- Warn if too fast for a pedestrian
Safety mode

In the Settings menu, touch the symbol.
The Warning Settings menu is displayed.
If you performed changes to the settings:

Touch the button to exit the menu.
Warn when speeding
Touch the Warn When Speeding button to activate (check mark) or to deactivate (no check mark) this function.
The maps may contain information about the allowed speed limit. If the function is activated, you receive a warning if you are driving too fast.
Note:
The speed information is not available for every region. Please inquire at your dealership.
Touch the button with the three dots to display additional setting options.
Touch the In built-up areas slide control to adjust a tolerance value for built-up areas. In this case, 100% corresponds to the exact speed limit.
Touch the Elsewhere slide control to adjust a tolerance value for other areas. In this case, 100% corresponds to the exact speed limit.
There are two different types of warnings:
Touch the Audible Warning button to activate (check mark) or deactivate the warning beep (no check mark).
Touch the Visible Warning button to activate (check mark) or deactivate the visible warning (no check mark).
Adjusting radar warning settings
Note:
The radar warnings are not legal in several countries. It is your responsibility to ensure that the use of this function is allowed in the corresponding country.
Touch the Speed Camera Warning button to activate (check mark) or to deactivate (no check mark) this function.
You can perform additional settings for the radar warnings:
Touch the button with the three dots to display additional setting options.
Touch the Audible Warning button to activate this type of warning ("Simple"), to receive early warnings ("Early") or to deactivate it ("Off").
Touch the Visible Warning button to activate ("On") or deactivate ("Off") this type of warning.
Activating Warn if too fast for a pedestrian
Touch the Warn if too fast for a Pedestrian button to activate (check mark) or to deactivate (no check mark) this function.
If you activated this function, you receive a warning if you are driving too fast for the pedestrian mode. You are automatically asked if you want to change to auto mode.
Activating the safety mode
Touch the Safety Mode button to activate (check mark) or to deactivate (no check mark) this function.
If safety mode is activated, you cannot use the touchscreen if you are driving faster than 10 ~km / h (6 mph).
Menu settings*
You can perform these settings:
Background
In the Settings menu, touch the button to scroll to the second page of the menu.
Touch the symbol. The Menu is displayed.
If you performed changes to the settings:
Touch the button to exit the menu.
Selecting a background
Touch the Background button to select a background from a list of available wallpapers.
Track log settings*
You can perform these settings:
Update interval
- Auto save active
Maximum route memory
Create NMEA/SIRF log
In the Settings menu, touch the button to scroll to the second page of the menu.
Touch the symbol. The Track Log Settings menu is displayed.
If you performed changes to the settings:
Touch the button to exit the menu.
Adjusting the update interval setting
You use the slide control of the Update Interval button to control at which time intervals position information is saved during a track log.
The less position information is stored, the less memory capacity is required for the logging.
Activating auto save
Touch the Enable Auto-saving button to automatically save routes (check mark) or to deactivate it (no check mark).
The display Track Log Database Size shows how much memory capacity is occupied by automatic track logs.
Specifying the maximum track log size
You use the slide control of the Track Log Max. Size button to control how much memory capacity is available for automatic track log.
If the maximum memory capacity has been reached, the oldest automatic track log is deleted.
Create NMEA/SIRF log
You have the option of copying the received GPS data as a text file to the memory card. However, they cannot be displayed via the application but, instead, have to be transferred to a computer.
Touch the Create NMEA/SIRF Log button to activate (check mark) or to deactivate (no check mark) this function.
Product information*
In the Settings menu, touch the button to scroll to the second page of the menu.
Touch the symbol. The About menu is displayed.
Here, you obtain information about the software and the installed map material.
Software
Updating the navigation software
To ensure that your navigation device is always state-of-the-art, Blaupunkt offers software updates at regular intervals. They can be found on the Blaupunkt Internet site www.blaupunkt.com.
Service
In some countries Blaupunkt offers a specific repair service including a pick-up service.
In case your device has to be sent to Blaupunkt for service you can order a pick-up service for your device on the Internet.
Refer to www.blaupunkt.com to check if this service is available in your country.
Warranty
We provide a manufacturer guarantee for our products bought within the European Union. Devices purchased outside the European Union are subject to the warranty terms published by our respective regional agency.
The warranty terms can be called up under www. blaupunkt.com or requested directly from:
Weight approx. 140g
Operating temperature 0^ C 60^ C
Storage temperature -20°C ... 60°C
Power supply Battery: Li-ion, 3.7 V/1100 mAh Charger cable for cigarette lighter: Input 12 V
Display 3.5" touchscreen TFT LCD color display 4:3, 320 x 240 pixel
Audio Built-in loudspeaker, min. 1.5 W
GPS receiver Integrated, QuickFind technology Centrality GPS, 16 channels
Platform
ARM9 CPU (400 MHz)
Internal 32 MB SDRAM Memory
512 MB NAND Flash Memory
Memory card slot: SD cards, MMC and SDHC max.8GB
USB USB 1.1
Operating system Microsoft Windows CE 5.0
Subject to changes
Troubleshooting table
| Problem | Cause | Measure |
| The device does not work or does not work correctly. | The operating system is over-loaded. | Perform a reset (ch. "Switching on/off"). |
| Reset the factory settings (ch. "Settings"). All personal settings will be deleted! | ||
| The display remains dark if I switch on the device. | The display may temporarily loose its contrast after long and heavy exposure to the sun and high temperatures. | Place the device in the shade for approximately 10 minutes and switch it on again. |
| At very high temperatures, the device switches off to protect against overheating. | ||
| The battery is not sufficiently charged. | Completely charge the battery (ch. "Charging the battery"). | |
| The battery is empty, even though I did not use the device for some time. | The device continues to use a small amount of energy if it is switched off. Hence, the battery could be discharged after a few days. | To obtain battery operation of up to 3 hours in navigation mode, completely charge the battery. |
| During short driving times, the battery is not completely charged. | Always operate the device in the vehicle together with the charger cable via the cigarette lighter. | |
| The device does not respond when I touch the buttons. | The operating system is over-loaded. | Perform a reset (ch. "Switching on/off") |
| The device does not output any turn-by-turn directions via voice output. | The voice guidance is deactivated. | Activate the voice output in the settings. |
| The volume of the voice guidance is too low. | Increase the volume during a voice output. | |
| The device has no or only a very poor GPS reception. | After switch-on, the device requires approx. 1 minute until it is ready for navigation. During the initial switch-on, it requires a longer time and a strong GPS signal. | Move to the outside and place the device on high ground. Your device is operational again after no more than 2 to 5 minutes. At that time, the navigation is also possible under less than perfect conditions. |
| The GPS reception is generally limited inside of buildings. | ||
| Heavily metal-evaporated wind-shields can interfere with the GPS reception. | You may attempt to install the device in a different location in the vehicle. | |
| Reflection and separation, e.g. due to high-rises, tunnels, mountains or heavy foliage. | The device must have a clear path to the sky. Wait until the GPS reception is available again. The route guidance is then continued automatically. | |
| Heavy snowfall and (thunder) storms. | ||
| Transport of the vehicle by car-sleeper train or ferry. | ||
| The device does not recognise my memory card. | The memory card is not compatible with this device. | Use compatible memory cards. (Ch. "Technical data") |
| The memory card was formatted using the wrong file system. | Format the memory card with the file system FAT16 or FAT32. | |
| Due to continued technical developments, Blaupunkt cannot guarantee the correct functioning of memory cards from different manufacturers and different types of cards. Try a memory card from a different manufacturer or with a different capacity. | ||
| Note: In rare cases, the charger cable may be damaged in older vehicles with a model year before 1995. | ||
| Country: | Phone: | Fax: | |
| Germany | (D) | 0180-5000225 | 05121-49 4002 |
| Austria | (A) | 01-610 39 0 | 01-610 39 391 |
| Denmark | (DK) | 44-898 360 | 44-898 644 |
| Finland | (FIN) | 09-435 991 | 09-435 99236 |
| Great Britain | (GB) | 01-89583 8880 | 01-89583 8394 |
| Greece | (GR) | 210 94 27 337 | 210 94 12 711 |
| Ireland | (IRL) | 01-46 66 700 | 01-46 66 706 |
| Italy | (I) | 02-369 62331 | 02-369 62464 |
| Luxembourg | (L) | 40 4078 | 40 2085 |
| Norway | (N) | +47 64 87 89 60 | +47 64 87 89 02 |
| Portugal | (P) | 2185 00144 | 2185 00165 |
| Spain | (E) | 902 52 77 70 | 91 410 4078 |
| Sweden | (S) | 08-7501850 | 08-7501810 |
| Switzerland | (CH) | 01-8471644 | 01-8471650 |
| Czech. Rep. | (CZ) | 02-6130 0446 | 02-6130 0514 |
| Hungary | (H) | 76 511 803 | 76 511 809 |
| Poland | (PL) | 0800-118922 | 022-8771260 |
| Turkey | (TR) | 0212-335 07 23 | 0212-346 00 40 |
http://www.blaupunkt.com
© 2008 All rights reserved by Blaupunkt. This material may be reproduced, copied or distributed for personal use only.
This product is protected by certain intellectual property rights of Microsoft. Use or distribution of such technology outside of this product is prohibited without a license from Microsoft.