
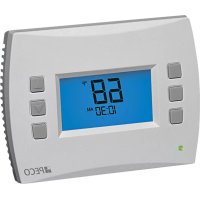
T8532-001 - Thermostat PECO - Free user manual and instructions
Find the device manual for free T8532-001 PECO in PDF.


| Product Type | Programmable Thermostat |
| Brand | PECO |
| Model | T8532-001 |
| Dimensions (W x H x D) | 120 mm x 80 mm x 25 mm |
| Weight | 150 g |
| Power Supply | 2 AAA batteries or 24 V AC |
| Display Type | LCD backlit |
| Temperature Range | 5 °C to 35 °C |
| Accuracy | ±0.5 °C |
| Programmable Schedules | Up to 7 days with 4 periods per day |
| Control Type | Button and touch |
| Compatibility | Most heating and cooling systems (gas, electric, heat pump) |
| Installation | Wall mount with included screws and anchors |
| Wireless Connectivity | None (standalone) |
| Energy Saving Mode | Yes, eco mode |
| Filter Change Reminder | Yes |
| Maintenance | Clean with dry cloth; avoid liquids |
| Safety | Overheat protection, child lock |
| Spare Parts | Batteries, mounting plate (available from PECO) |
| Warranty | 2 years |
Frequently Asked Questions - T8532-001 PECO
User questions about T8532-001 PECO
0 question about this device. Answer the ones you know or ask your own.
Ask a new question about this device
Download the instructions for your Thermostat in PDF format for free! Find your manual T8532-001 - PECO and take your electronic device back in hand. On this page are published all the documents necessary for the use of your device. T8532-001 by PECO.
USER MANUAL T8532-001 PECO
Performance PRO™ Series
• Large 8 square inch blue display
• 7 available outputs, including economizer
• SD memory card interface
• 365-day, 20 holiday programmability
• 7-day, 5-1-1, 5-2 programming


oil

Electric

Gas

Heat Pump
T8000
Series
THE PECO PERFORMANCE PRO T8000 SERIES
Thank you for choosing a PECO® Performance PRO™ thermostat. The Performance PRO T8000 Series is intended for use in residential and commercial environments. It is designed for and can support up to 3-HEAT/2-COOL configurations in conventional systems and heat pump applications. The Performance PRO also provides the capability to meet the requirements for ASHRAE 90.1-2004 and California Building Code Title 24 (2008 edition).
The Performance PRO T8000 Series is comprised of the T8000 non-programmable thermostat models and the T8500 programmable thermostat models. The T8500 model features an 8 square inch blue backlit display with dynamic menus, accessed using soft keys. All Performance PRO T8000 Series offer the following standard features: auto-changeover, optional remote sensors, occupancy sensors, three levels of keypad lockout, a PIN access code, filter replacement reminder, and a heat/cool Demand Indicator. The T8500 programmable models contain: up to four scheduled events per day, a 365-day calendar, 20 holidays, holiday override, temporary override, a Power Harvesting feature (also known as “power stealing”) to preserve battery life, Secure Digital (SD) card capability (card not included), and optional humidity control (T8532-IAQ only).
The T8000 Series can be powered by 24 VAC or batteries or both (recommended). The T8000 Series can control up to 7 outputs and monitor three external sensors. The T8000 Series mounts onto any PECO Performance PRO Series wallplate.
Table of Contents
T8000 Thermostat
The PECO Performance PRO T8000 Series....2
Quick reference: Default Display mode 5
Quick reference: Home Display mode & navigation 6
Quick reference: T8000 Home Display screen 7
Key operation....8
Set the clock, month, and day 11
Select Fahrenheit or Celsius temperature 12
Select system mode 14
Reset filter timer....15
T8500 Thermostat
Program the thermostat (T8500 models only) 16
Program scheduled events....17
Program override 19
Select humidity setpoints ...... 20
Program a holiday 21
Load SD Card settings....23
T8000 Series Product Specifications....24

CAUTION!
- READ INSTRUCTIONS CAREFULLY BEFORE ATTEMPTING TO OPERATE THIS THERMOSTAT.
• FOLLOW THE PERFORMANCE PRO INSTALLATION INSTRUCTIONS BEFORE PROCEEDING. - Failure to observe safety information and comply with instructions could result in PERSONAL INJURY, DEATH AND/OR PROPERTY DAMAGE.
- Use this thermostat only as described in this manual.
- This is a 24 VAC low-voltage thermostat. Do not install on voltages higher than 30 VAC.
- Contact a qualified service person if at any time the thermostat does not operate properly.
- Use care to avoid static discharge to the thermostat.
- To avoid electrical shock or damage to equipment, disconnect power before installing or servicing and use only wiring with insulation rated for full thermostat operating voltage.
- To avoid potential fire and/or explosion, do not use in potentially flammable or explosive atmospheres.
- This product, when installed, will be part of an engineered system whose specifications and performance characteristics are not designed nor controlled by PECO.
- All wiring and applications must conform to local and national building codes and ordinances. Applications and national codes must be reviewed prior to installation to assure the installation is functional and safe.
IMPORTANT NOTE: This thermostat was shipped with factory default settings. The thermostat's installer may have configured the thermostat differently from the factory-default settings, and may have modified or disabled certain features. Contact the installer or a service technician if there are questions about the thermostat's configuration.
QUICK REFERENCE: DEFAULT DISPLAY MODE
Default Display
The factory programmed settings show the time, temperature, and setpoint. This is called the Default Display. The Default Display appears after a short period of inactivity. The Default Display can be custom configured to show user-selected items only (see Service Menu 520 in "Performance PRO T8000 Series Installation Guide").


Note: The Battery Indicator, Service Indicator, Filter Indicator, and Secure Digital (SD) icons appear at bottom of digital display if user action is required.
QUICK REFERENCE: HOME DISPLAY MODE & NAVIGATION
Home Display
The Performance PRO T8000 Series has two ▲ / ▼ (Up and Down) keys and four soft keys (1-3; 6 below). Press any key to enter Home Display from Default Display. Press soft keys to enter submenus. Soft keys have multiple functions; available submenus depend on menu navigation.

Navigate submenu options to customize thermostat settings. Available options are:
Next - Advances to the next menu item in sequence; current selections are held in temporary memory until user completes the menu sequence by pressing "Done."
Go Back - Returns back one step in menu sequence or reverts to Home Display. Changes are not saved if user selects "Go Back" from the first option in sequence.
Done - Saves settings and reverts to the Home Display.
Cancel - Discards changes and reverts to the Home Display.
QUICK REFERENCE: T8000 HOME DISPLAY SCREEN

KEY OPERATION
1 System key
Used to control the operating mode of the Performance PRO T8000 Series thermostats. The options available are dependent on System Type selected in Service Menu 110 (see Advanced Configuration in "Performance PRO T8000 Series Installation Guide").
System modes are:
HEAT – Select for the system to operate in heating mode only. Only one setpoint is displayed.
COOL – Select for system to operate in cooling mode only. Only one setpoint is displayed.
AUTO – Allows system to control to both the Heat and Cool Setpoints. The system will automatically changeover between heating and cooling modes as room temperature varies. Cool Setpoint must always be greater than Heat Setpoint by the deadband value.
OFF – Disables all thermostat outputs; only zone temperature and time are displayed.
EMERGENCY (Em)– Emergency heat can be used when the Heat Pump cannot keep up with the heat load. Use Service Menu 110 (System Type 6 & 11) to enable.
Note: Deadband is the user-defined minimum difference between the Cool Setpoint and Heat Setpoint (see Service Menu 380).
Used with two different menu options:
ON - Continuous fan operation.
AUTO - Fan is activated only when there is demand for heat or cool, with some exceptions.
Note: Several Service Menu options affect the fan operation (See Advanced
Configuration in the "Performance PRO T8000 Series Installation Guide.")
3 More key
Used to view more menu options. From the Default Display, press More to show more menu options that may be accessed by pressing the soft keys.
4 Demand Indicator
Light emitting diode (LED) on lower left front panel that displays red when heating and green when cooling. Available only when 24 VAC power is connected to the thermostat.
5 Up and Down keys (▲ /▼ )
Used in menus to increase or decrease variable settings, or switch to the next input.
Note: Pressing ▲ /▼ keys show the Override display unless Holiday mode is set.
6 Override key
Used to create a temporary override of current setpoint temperature. Pressing Override will display the "Next" and "Done" options and the setpoint will begin flashing.
Temporary Override – The active setpoint is taken from setpoints defined in the Override menu. (In Home Display, “Override” fl ashes during the override time period if selected.)
Service Indicator
Icon appears to notify the user that the remote temperature sensors are reading out of range.
Battery Indicator
Icon appears only when the battery level is low and flashes when the battery level is critically low. Two AA alkaline batteries (2.6 – 3.1VDC) have an approximate 1-year life expectancy.
Keypad Lockout
Icon appears if any type of keypad lockout is active. Keypad lockout blocks access to certain features of the thermostat. (See Service Menu 340 to enable Keypad Lockout).
Filter Filter Indicator
Icon appears in the Default Display when the reminder timer expires (see Service Menu 230). The thermostat will continue to return to the filter menu until the Done key is pressed. After the Filter Indicator icon appears, pressing Done will restart the filter timer.
Secure Digital (SD)
Icon appears (flashes) when SD card is inserted. Optional SD card not provided. SD card functionality allows user to upload/download settings to/from a PECO-formatted SD card (see also "Load SD card settings").
SET THE CLOCK, MONTH, AND DAY
PRESS ANY KEY TO BEGIN
In clock mode press ▲ /▼ to select clock hour.
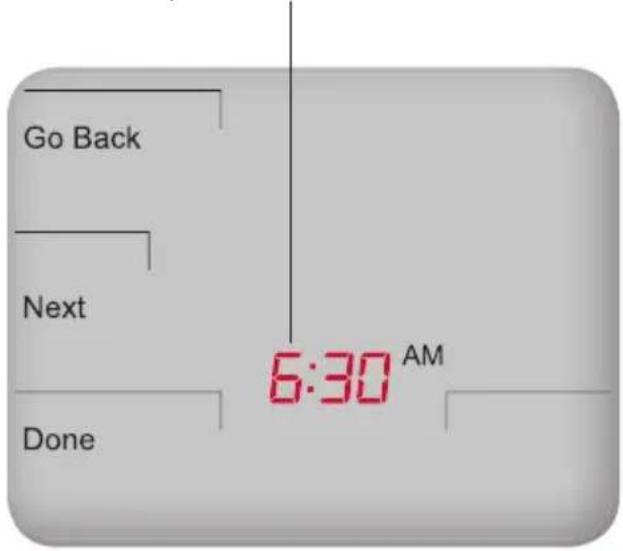

Note: At any time, press Go Back to return to the previous menu, Next to advance and view more options, or Done to save changes and return home.
- Press More to view menu options.
- Press Clock to access menu options.
- Press ▲ / ▼ to select 12 or 24 HR format, then press Next.
- Press ▲ / ▼ to select clock hour, then press Next.
- Press ▲ /▼ to select clock minutes, then press Next.
- Press ▲ / ▼ to select clock year, then press Next.
- Press ▲ / ▼ to select current month, then press Next.
- Press ▲ / ▼ to select current date. Days and Mo (month) appears.
- Press Done to finish clock mode.
SELECT FAHRENHEIT OR CELSIUS TEMPERATURE
After entering the Service Menu mode, press Next continuously until menu "260" appears.
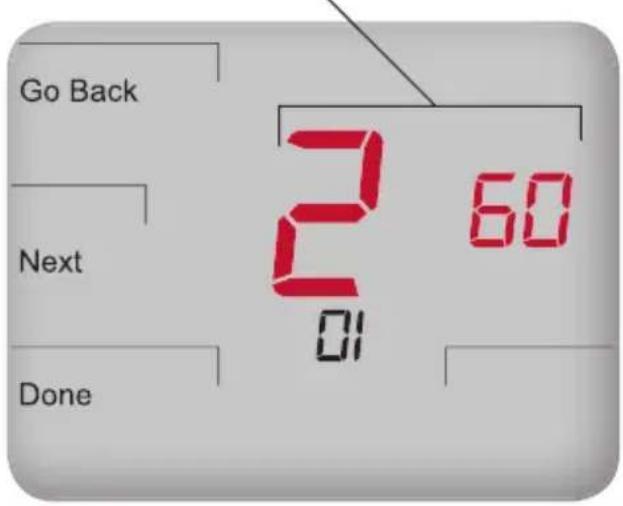

Note: To custom configure thermostat settings, access more Service Menus (See Table 2. Advanced Configuration in the "Performance PRO T8000 Series Installation Guide").
- Press the lower left and lower right keys simultaneously for about five seconds. Go Back, Next, and Done appear.
- Press Next continuously until menu "260" appears.
-
In Service Menu 260, Press ▲ / ▼ to select the desired temperature display:
-
“1” for Fahrenheit (default)
-
"0" for Celsius
-
Press Done when you have completed your selection.

Note: After you complete your selection, the Home Display will appear with temperature in the format selected.
SELECT THE FAN MODE
PRESS ANY KEY TO BEGIN
In Fan mode, press ▲ /▼ to select desired option.

- Press Fan to set fan operation.
- Press ▲ / ▼ to select "On," or "Auto." Note: Selected option fl ashes.
- Select Done to save changes.

Note: "On" mode indicates continuous output. "Auto" mode indicates that fan is activated only when there is demand for heat or cool. Some exceptions apply (see Advanced Conf i guration in the "Performance PRO T8000 Series Installation Guide").
SELECT SYSTEM MODE
PRESS ANY KEY TO BEGIN
Setpoint is displayed on the right side of the screen.

Press ▲ /▼ to scroll through options for system preferences. The selected option flashes.

Note: System modes available depend upon which system type is selected in Service Menus.
- Press System to select system preferences.
Note: Selected option fl ashes.
- Press ▲ / ▼ to select Heat, Cool, Auto, Off, or Em (Emergency).
- Press Done to save changes.
In "Heat" and "Cool" modes, only one setpoint is displayed for each, and only the selected mode (e.g., Heat) is applied. "Auto" mode switches automatically between Heat and Cool. Auto mode controls the room's temperature to the programmed Heat and Cool Setpoints. "Off" mode disables all thermostat outputs; and only the zone temperature and clock are displayed. If Emergency (Em) heat is enabled in a Heat Pump system, Emergency acts as the primary heat source.
RESET FILTER TIMER
PRESS ANY KEY TO BEGIN

When the filter expires, the Home Display will automatically show the Filter Indicator icon.
The Filter Indicator serves as a reminder to change the furnace fi Iter (see note below). When the fi Iter timer expires, the Filter Indicator will be lit continuously.
- From the Default Display, press any key to enter the Filter mode. (Filter, Go Back and Done appear)
- Press Done to reset the fi Iter timer. Note: Pressing Done restarts fi Iter timer with previous time value selected.
- Press Go Back to bypass the reminder and return to the Home Display.

Note: The thermostat will return to the Filter menu from the Default Display until Done is selected (see Service Menu 230 in the "Performance PRO T8000 Series Installation Guide").
PROGRAM THE THERMOSTAT (T8500 MODELS ONLY)
Each day has two or four scheduled events (Occupied1, Occupied2, Unocc1, and Unocc2) per day, depending on Service Menu configuration. Each event can be programmed with a start time and Heat and Cool Setpoints. Heat Setpoint controls system heating during cold weather. Cool Setpoint controls the cooling system during hot weather. The T8500 is preprogrammed with factory default settings for seven days of the week as follows:
| Time Period Start Time Heat Setpoint | Temperature | Cool Setpoint Temperature | |
| Occupied1 | 8:00 am 70°F | (21°C) 75°F (24.0°C) | |
| Unocc1 | 10:00 pm 55°F | (10°C) 85°F (29.5°C) | |
| Occupied2 | — — — | ||
| Unocc2 | — — — | ||
Note: To change the preprogrammed times and/or setpoint temperatures, follow the instructions under "Program scheduled events."
Note: See Service Menu 240 to enable two or four scheduled events per day.
PROGRAM SCHEDULED EVENTS
PRESS ANY KEY TO BEGIN
Press Select Day to underline highlighted day to which a scheduled event will be applied.


Note: At any time, press Go Back to return to the previous menu, Next to advance and view more options, or Done to save changes and return home.
Schedule two or four events per day: Occupied1, Occupied2, Unocc1, and Unocc2.
- Press More to view options.
- Press Schedule to enter main menu.
- Press ▲ / ▼ to highlight day. Note: Selected day fl ashes. (Optional: Select View to modify existing event.)
- Press Edit to apply scheduled events for the selected day(s).
- Press Select Day. Note: Selected day fl ashes. (Continue pressing ▲ / ▼ then press Select Day for multiple days.)
- Press ▲ / ▼ to highlight the day(s) to be programmed. Note: Selected day(s) for scheduled events must be underlined.
- Press Next to advance to event.
PROGRAM SCHEDULED EVENTS
PRESS ANY KEY TO BEGIN
Press ▲ /▼ to select a desired Heat Setpoint for the currently selected scheduled event (Occupied1).
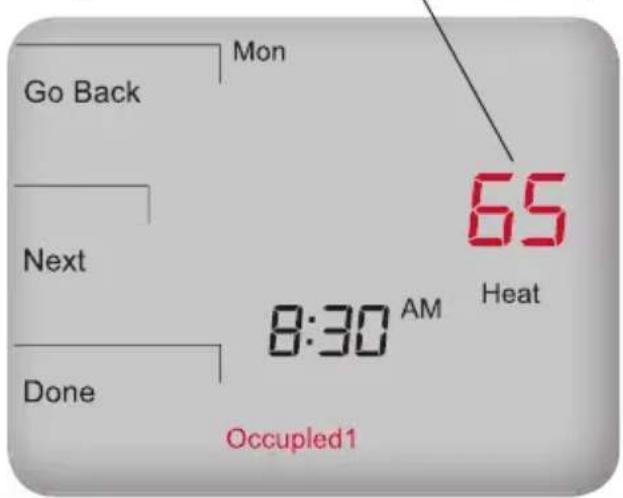

Note: To return to the menu of scheduled events and continue programming, select Next after Step 11.

Note: To program 5-1-1 day or 5-2 days, see Service Menu 100 ("Performance PRO T8000 Series Installation Guide"). Block-programmed days flash as a group.
- Press ▲ / ▼ to select a scheduled event (e.g, Occupied1, etc.), then Next.
- Press ▲ / ▼ to schedule start time for event (in 15-minute periods), then Next.
Now select a Heat Setpoint and/or Cool Setpoint for the scheduled event (available options depend upon system type selected).
- Press ▲ / ▼ to select desired Heat Setpoint, then press Next.
- Press ▲ / ▼ to select desired Cool Setpoint, then press Next. Note: The next event (e.g., Unocc1) begins fl ashing after Next is selected. Complete steps 3-11 for each scheduled event.
- Press Done to exit schedule mode. Note: Pressing Go Back after step 11 will show Select Day on display.
PROGRAM OVERRIDE
PRESS ANY KEY TO BEGIN
Example shows how to select a Cool Setpoint for a temporary period in System Auto mode.
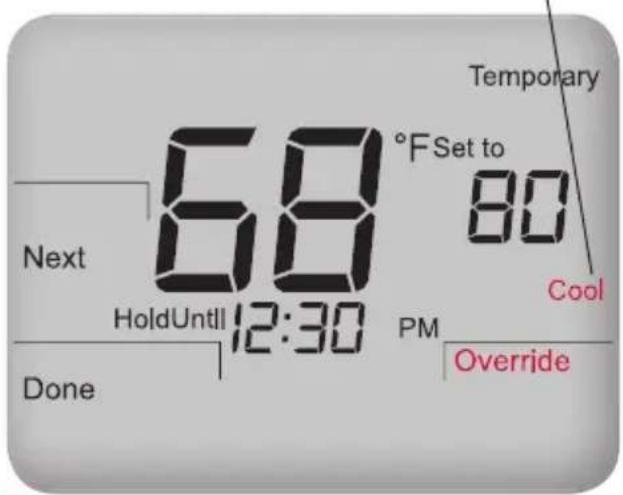

Note: Setpoints available depend on the system mode selected (see "Select System Preferences"). Override display options can be defined in Service Menus.

Note: The installer setup can limit the length of time for an override to 1, 2, 3, or 4 hours beyond the current time.
Override allows application of temporary heat or cool settings. (Example uses System Auto.)
- Press Override, or ▲ / ▼ key.
Note: Setpoint fl ashes. "Hold until" time appears and is changed to show length of override (up to the maximum hold time specified in Service Menu 395).
-
Press ▲ / ▼ to select a Cool Setpoint, then press Next.
-
Press ▲ / ▼ to select a Heat Setpoint, then press Next.
-
Press ▲ / ▼ to adjust time (in 15-minute periods) until override remains in effect.
-
Press Done to save changes and exit.
Note: Override remains (flashing) in effect until the time period ends.
Note: Press Cancel to exit Override.
SELECT HUMIDITY SETPOINTS
PRESS ANY KEY TO BEGIN
Adjust the Dehumidify Setpoint.

Press Humidity to view more options and to select a Dehumidify Setpoint.

Note: Instruction assumes a humidity sensor is installed and dehumidifier is enabled (see Service Menu 490).T8532-IAQ models must be ordered separately.
If the thermostat is model T8532-IAQ, a humidity sensor is present. A humidity sensor allows user to set dehumidify and humidify control setpoints.
- Press More to view options.
- Press Humidity to view more options. Note: "DE" appears in clock area. The Dehumidify Setpoint shows with %.
- Press ▲ / ▼ to select the desired Dehumidify Setpoint.
- Press Next.
- Press ▲ / ▼ to select the desired Humidify Setpoint.
- Press Done. Settings are saved.
PROGRAM A HOLIDAY
PRESS ANY KEY TO BEGIN
20 holidays may be programmed. System type shown supports 1-HEAT and 1-COOL.

Press ▲ /▼ to select the day (e.g., 31) that the holiday starts (Example used is Holiday 1).

Note: Performance PRO supports 20 holidays, leap years, and daylight-saving time.
- Press More to view more options.
- Press Holiday to enter menu.
- Press ▲ / ▼ to select holiday number (1-20). Note: Month number and day of month appear below in clock area.
- Press Edit to select holiday month ("Mo" icon will appear).
- Press ▲ / ▼ to select a month (numerical), then press Next.
- Press ▲ / ▼ to select day (numerical) that holiday starts (Days icon will appear), then press Next.
- Press ▲ / ▼ to select holiday length, which is number of days that the holiday period lasts (1-99), then press Next.
PROGRAM A HOLIDAY (CONT.)
PRESS ANY KEY TO BEGIN


Note: Select the Heat Setpoint (and the Cool Setpoint) for the holiday after selecting the number of days the holiday period lasts.
Now select the Heat and Cool Setpoints for the same holiday number (e.g., "1").
- Press ▲ / ▼ to select the Heat Setpoint, then Next.
- Press ▲ / ▼ to select the Cool Setpoint, then Next.
Optional: To program multiple holidays, wait for the Holiday number to flash (after step 9). Press ▲ / ▼ to select a new Holiday number; repeat steps 3-9.
- Press DONE to complete the holiday display mode.

Note: If "Heat" or "Cool" flashes during process, the deadband value will be enforced; the opposing Heat or Cool Setpoints will be automatically adjusted (for an explanation of deadband value, see Key operation).
LOAD SD CARD SETTINGS
PRESS ANY KEY TO BEGIN
When the SD card is inserted, the SD icon begins flashing. Icon stops flashing when processing data.

Press Paste to copy the settings from SD card to the thermostat.

Note: If SD card is locked, only Paste appears; user may only copy from SD card to thermostat.
Use the SD card to transfer customized settings to or from the thermostat. Insert the SD card into the thermostat only from Home or Default Display.
-
Insert the SD card into the slot located on top of the thermostat where indicated. (SD icon begins flashing).
Note: Copy and Paste options appear. -
Press Paste to copy the settings from SD card to the thermostat.
-
Press Copy to transfer the settings from the thermostat to the SD card.
-
Press Go Back to complete process.

Note: After selecting one of the above options, the SD card display remains active until user selects Go Back and the SD card is removed (or menu reverts to Default Display).
T8000 SERIES PRODUCT SPECIFICATIONS
Temperature Control Range: 50° to 90° F (10° to 32° C)
Differential: 1^ F(0.5^ C)
Input Power: 24 VAC (20-30 VAC) or 50/60Hz (+/-10%) AA alkaline batteries (both
recommended); 5mm terminals accept 14-24 AWG stranded/solid wire.
Output Ratings: 20-30 VAC
0.02-1.0A per terminal; W1 (B/O), W2 (AUX), G, A, E, Y1, Y2.
Note: Collectively, total current draw must not exceed 2.5A.
Operational Temperature: 0° to 120° F (-17° to 48°C)
Shipping Temperature: -20° to 130°F (-29° to 54°C)
Operating Humidity: 5% to 95% RH, non-condensing
Physical dimensions: T8000/T8500 Thermostat: 4.3" H x 5.7" W x 1.3"D
with 3.2" x 2.5" / 8 square inch viewable liquid crystal display (LCD)

PECO
Automation and Controls
Division of PECO, Inc.
PO Box 82189, Portland, OR 97282
Phone: 503-233-6401 | 800-874-8547
E-mail: sales@pecomanufacturing.com
www.pecomanufacturing.com


- Performance PRO™ Series
- THE PECO PERFORMANCE PRO T8000 SERIES
- Table of Contents
- T8000 Thermostat
- T8500 Thermostat
- CAUTION!
- QUICK REFERENCE: DEFAULT DISPLAY MODE
- Default Display
- QUICK REFERENCE: HOME DISPLAY MODE & NAVIGATION
- Home Display
- Navigate submenu options to customize thermostat settings. Available options are:
- QUICK REFERENCE: T8000 HOME DISPLAY SCREEN
- KEY OPERATION
- System key
- More key
- Demand Indicator
- Up and Down keys (▲ /▼ )
- Override key
- Service Indicator
- Battery Indicator
- Keypad Lockout
- Filter Filter Indicator
- Secure Digital (SD)
- SET THE CLOCK, MONTH, AND DAY
- PRESS ANY KEY TO BEGIN
- SELECT FAHRENHEIT OR CELSIUS TEMPERATURE
- SELECT THE FAN MODE
- SELECT SYSTEM MODE
- RESET FILTER TIMER
- PROGRAM THE THERMOSTAT (T8500 MODELS ONLY)
- PROGRAM SCHEDULED EVENTS
- PROGRAM OVERRIDE
- SELECT HUMIDITY SETPOINTS
- PROGRAM A HOLIDAY
- PROGRAM A HOLIDAY (CONT.)
- LOAD SD CARD SETTINGS
- T8000 SERIES PRODUCT SPECIFICATIONS
Brand : PECO
Model : T8532-001
Category : Thermostat