
Cloud Core Wireless - Headset HYPERX - Free user manual and instructions
Find the device manual for free Cloud Core Wireless HYPERX in PDF.


| Product Type | Wireless Gaming Headset |
| Brand | HyperX |
| Model | Cloud Core Wireless |
| Driver Size | 50mm |
| Frequency Response | 15Hz – 21kHz |
| Impedance | 32 Ohms |
| Connectivity | Wireless 2.4GHz via USB dongle |
| Wireless Range | Up to 20 meters |
| Battery Life | Up to 20 hours |
| Charging | USB-C (cable included) |
| Weight | Approx. 275g |
| Microphone | Detachable electret condenser mic |
| Microphone Frequency Response | 100Hz – 7kHz |
| Sound Features | DTS Headphone:X spatial audio |
| Controls | On-ear controls (volume, mute, power) |
| Compatibility | PC, PS4, PS5, Xbox One, Xbox Series X|S |
| Ear Cushions | Memory foam with leatherette |
| Headband | Adjustable steel slider |
| Maintenance | Wipe with a soft, dry cloth |
| Spare Parts | Replacement ear pads available from HyperX |
Frequently Asked Questions - Cloud Core Wireless HYPERX
User questions about Cloud Core Wireless HYPERX
0 question about this device. Answer the ones you know or ask your own.
Ask a new question about this device
Download the instructions for your Headset in PDF format for free! Find your manual Cloud Core Wireless - HYPERX and take your electronic device back in hand. On this page are published all the documents necessary for the use of your device. Cloud Core Wireless by HYPERX.
USER MANUAL Cloud Core Wireless HYPERX
HyperX Cloud Core Wireless

Part Numbers
HHSC1C-CG-BK/G
TABLE OF CONTENTS
Overview ....3
Specifications 4
Setting up with PC....6
Setting up with PlayStation 4....9
Setting up with PlayStation 5....10
Controls 12
Status LED....12
Power button....12
Mic mute / mic monitoring button 13
Volume wheel....13
Charging the Headset....14
Wired charging.... 14
DTS Headphone:X....15
Manually Pairing the Headset and USB Adapter....17
Overview

A. Status LED B. Power button C. Mic mute / mic monitoring button D. Volume wheel E. USB-C charge port F. Microphone port
G. Detachable microphone H. USB adapter I. Wireless pairing pin hole J. Wireless status LED K. USB-C charge cable L. DTS instruction card
Specifications
Headphone
Driver: Dynamic, 53mm with neodymium magnets
Form factor: Over ear, circumaural, closed back
Frequency response: 10 Hz – 21 kHz
Impedance: 60 Ω
Sensitivity: 99 dBSPL/mW at 1 kHz
T.H.D.: ≤ 1%
Frame type: Aluminum
Ear cushions: Memory foam
Microphone
Element: Electret condenser microphone
Polar pattern: Bi-directional, Noise-cancelling
Frequency response: 20 Hz – 6.8 kHz
Sensitivity: -44 dBV (1 V/Pa at 1 kHz)
Connections and Features
Audio connection: Wireless USB
USB audio format: Stereo
USB specification: USB 2.0
Sampling rates: 48 kHz
Bit-Depth: 16 bit
Included virtual surround sound: DTS Headphone:X
Audio controls: Onboard audio controls
Battery
Type: Rechargeable lithium-polymer
Battery life*: 20 hours
Charge time: 3 hours
Wireless
Type: 2.4 GHz
Wireless range**: Up to 20 meters
Physical
Weight: 283g
Weight with microphone: 294g
Cable length(s) and type(s): 0.5m USB charge cable
*Tested at 50% headphone volume. Battery life varies depending upon the usage.
**Wireless range may vary due to environmental conditions.
Setting up with PC

- Connect the wireless USB adapter to the PC.
- Power on the headset.
- Right click Speaker icon > Select Sounds

- Under the Playback tab, click on "HyperX Cloud Core Wireless" and click on the Set Default button.

- Under the Recording tab, click on "HyperX Cloud Core Wireless" and click on the Set Default button.

- Under the Playback tab, verify that "HyperX Cloud Core Wireless" is set as Default Device. Under the Recording tab, verify that "HyperX Cloud Core Wireless" is set as Default Device. The Set Default button should also be grayed out when selecting these devices under the Playback tab and the Recording tab.


Setting up with PlayStation 4

- Set Input Device to USB Headset (HyperX Cloud Core Wireless)
- Set Output Device to USB Headset (HyperX Cloud Core Wireless)
- Set Output to Headphones to All Audio
- Set Volume Control (Headphones) to maximum level.
Audio Devices

Input Device
USB Headset (HyperX Cloud Core Wireless)

Output Device
USB Headset (HyperX Cloud Core Wireless)

Adjust Microphone Level

Volume Control (Headphones)


Output to Headphones
All Audio

Switch Output Device Automatically

Setting up with PlayStation 5

- Go to the home page and select Settings > Sound
- Under Microphone, set the following:
• Input Device to USB Headset (HyperX Cloud Core Wireless)

- Under Audio Output, set the following:
• Output Device: USB Headset (HyperX Cloud Core Wireless) • Output to Headphones: All Audio


- Under Volume, set Headphones slider to maximum level.

Controls

Status LED
| Status | Battery Level | LED |
| Pairing | - | Flash green and red every 0.2s |
| Searching | - | Slow breathing green |
| Connected | 90% - 100% | Solid green for 5s |
| 10% - 90% | Blinking green for 5s | |
| < 10%* | Blinking red for 5s |
*Headset will play a beep notification (hi-low-hi-low) when battery level is less than 10%.
Power button
- Hold button for 3 seconds to power headset on/off
- Press button once to see the battery level status on the status LED
- The status LED will automatically turn off after 5 seconds to conserve battery life
Mic mute / mic monitoring button
- Press button to toggle mic mute on/off
- Hold button for 3 seconds to toggle mic monitoring on/off
- Headset will play a double beep notification indicating mic monitoring has been toggled
Volume wheel
- Scroll wheel up and down to adjust volume level
WARNING: Permanent hearing damage can occur if a headset is used at high volumes for extended periods of time
Charging the Headset
It is recommended to fully charge your headset before first use.
When charging the headset, the headset status LED will indicate the current charge status.
| Status LED | Charge Status |
| Solid green | Fully charged |
| Breathing green | 10% - 99% battery level |
| Breathing red | < 10% battery level |
Wired charging
To charge the headset, plug the headset to a USB port with the included USB-C charge cable.
DTS Headphone:X
To use DTS Headphone:X, the DTS Sound Unbound app must be installed first. This app can be found in the Microsoft Store.
- On Windows 10, open the Microsoft Store app.

- In the app store search bar, type "DTS Sound Unbound" and search for the app.

- Download and install the "DTS Sound Unbound" app.

- Launch "DTS Sound Unbound" app to enable and configure DTS Headphone:X.

DTS Headphone:X can be enabled as long as the headset USB adapter is plugged into the PC. It can be enabled either in the DTS Sound Unbound app or through the Sound icon shortcut in the taskbar. To enable DTS Headphone:X through the taskbar, follow the steps below:
- Right click Speaker icon > Select Spatial sound > Select DTS Headphone: X

Manually Pairing the Headset and USB Adapter
The headset and USB adapter are automatically paired together out of the box. But if manual pairing is needed, follow the steps below to pair the headset and USB adapter.
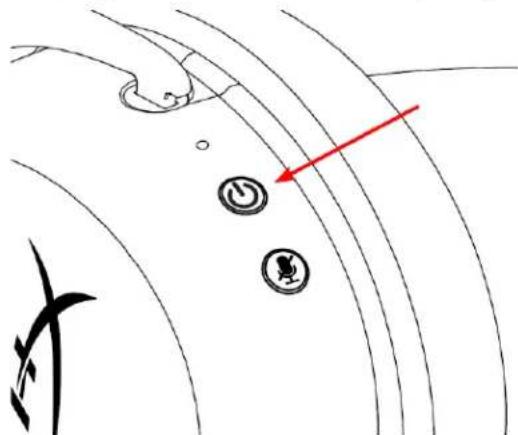
- While the headset is powered off, hold down the power button until the headset status LED starts blinking red/green rapidly. The headset is now in pairing mode.
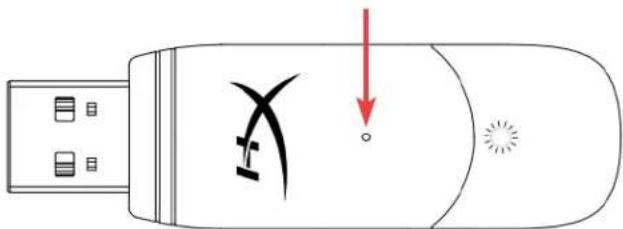
- While the USB adapter is plugged in, use a small tool (e.g. paper clip, SIM tray ejector, etc.) to hold down the button inside the pin hole until the USB adapter LED starts blinking rapidly. The USB adapter is now in pairing mode.
- Wait until both the headset LED and the USB adapter LED are solid. The headset and USB adapter are now paired together.
Questions or Setup Issues?
Contact the HyperX support team at: hyperxgaming.com/support/
- HYPERX CLOUD CORE WIRELESS
- PART NUMBERS
- TABLE OF CONTENTS
- OVERVIEW
- SPECIFICATIONS
- HEADPHONE
- MICROPHONE
- CONNECTIONS AND FEATURES
- BATTERY
- WIRELESS
- PHYSICAL
- SETTING UP WITH PC
- SETTING UP WITH PLAYSTATION
- AUDIO DEVICES
- CONTROLS
- STATUS LED
- POWER BUTTON
- MIC MUTE / MIC MONITORING BUTTON
- VOLUME WHEEL
- CHARGING THE HEADSET
- DTS HEADPHONE:X
- MANUALLY PAIRING THE HEADSET AND USB ADAPTER
- QUESTIONS OR SETUP ISSUES
Brand : HYPERX
Model : Cloud Core Wireless
Category : Headset