
SL253 - Weather Station LIVOO - Free user manual and instructions
Find the device manual for free SL253 LIVOO in PDF.


| Product Type | Weather Station |
| Brand | Livoo |
| Model | SL253 |
| Indoor Temperature Range | 0°C to 50°C (32°F to 122°F) |
| Outdoor Temperature Range | -20°C to 60°C (-4°F to 140°F) |
| Humidity Measurement Range | 20% to 95% RH |
| Barometric Pressure Range | 700 to 1100 hPa |
| Weather Forecast | Sunny, Cloudy, Rainy, Stormy (based on pressure trend) |
| Display Type | LCD with backlight |
| Wireless Sensor Range | Up to 30 meters (98 feet) in open area |
| Power Supply - Main Unit | 2 x AAA batteries (not included) |
| Power Supply - Outdoor Sensor | 2 x AAA batteries (not included) |
| Dimensions (Main Unit) | 150 x 100 x 25 mm (5.9 x 3.9 x 1.0 in) |
| Dimensions (Outdoor Sensor) | 60 x 40 x 20 mm (2.4 x 1.6 x 0.8 in) |
| Weight (Main Unit) | 200 g (7.1 oz) without batteries |
| Weight (Outdoor Sensor) | 50 g (1.8 oz) without batteries |
| Battery Life | Approximately 12 months under normal use |
| Mounting Options | Table stand or wall mount (bracket included) |
| Maintenance | Clean with a soft dry cloth. Avoid water and solvents. |
| Safety Precautions | Keep away from direct sunlight and heat sources. Use only specified batteries. |
| Spare Parts Availability | Outdoor sensor (model: SL253-S) available from Livoo customer service. |
| Repairability | No user-serviceable parts. Contact Livoo support for repairs. |
Frequently Asked Questions - SL253 LIVOO
User questions about SL253 LIVOO
0 question about this device. Answer the ones you know or ask your own.
Ask a new question about this device
Download the instructions for your Weather Station in PDF format for free! Find your manual SL253 - LIVOO and take your electronic device back in hand. On this page are published all the documents necessary for the use of your device. SL253 by LIVOO.
USER MANUAL SL253 LIVOO
Weather station with barometer

Reference : SL253
Version : 1.5
Language : English
Livoo
Feel good moments
User manual
Thank you for buying our LIVOO product. We take great care in design, ergonomics and ease of use of our products. We hope that this product will give you complete satisfaction.
This instruction manual is also available on our website www.livoo.fr
PLEASE, TAKE TIME TO READ WELL THE INSTRUCTIONS FOR USE PARTICULARLY BEFORE THE FIRST USE.
A misuse of the appliance can damage it or hurt the user. Assure that you use the appliance for the use for which it is designed; we refuse any responsibilities as for the damages by an incorrect use or a bad manipulation.
FEATURES:
DCF Radio control time function
Perpetual Calendar Up to Year 2099
Day of week in 7 languages user selectable: English, German, Italian, French, Spanish, Netherlands and Danish
Time in optional 12/24 hour format.
Daily Alarm Function
Automatic snooze function
The moon phase display
Barometric pressure:
— Barometric pressure measurement ranges: 600 hPa/mb \~ 1100 hPa/mb & 17.72 inHg \~ 32.50 inHg
— Pressure alternatively in hPa/mb or inHg
Humidity: Indoor & Remote measurable range: 20%RH \~ 95%RH
Temperature:
— Indoor temperature measurement ranges: 0^ C ( 32^ F) \~ 50^ C ( 122^ F)
— Remote temperature measurement ranges: -20^ ( -4^ ) \~ 60^ ( 140^ )
— Temperature alternatively in ^ C or ^ F.
— Remote thermometer and frost alert
Minimum/maximum display for air humidity and temperature
Wireless Remote Sensor:
— Wall Mount or Table Stand
— One Wireless Thermo Sensor Included
— 433.92MHz RF transmitting frequency
— 60 meter transmission range in an open area
The weather forecasting function
Power Supply:
Weather Station: Battery: 2 x LR6 AA
Wireless Remote Sensor: Battery:2 x LR03 AAA
Livoo
Feel good moments
User manual
A1: Remote Temperature
A2: Remote Humidity
A3: Remote Temperature Alert
A4: Time/Calendar or Alarm time/ Weed Indoor Temperature
A5: Moon Phase
A6: Barometric pressure
A7: Histogram shows the trend of 24 hours of atmospheric pressure
A8: Indoor Humidity
A9: Indoor comfort
A10: Indoor Temperature
A11: Weather Forecasting

B1: "☀/z" touch field
B2: "button
B3: "💡" button
B4: "▲" button
B5: "▼" button
B6: "R" button
B7: "button"
B8: "MEM" button
B9: Alarm on/off shift switch
B10: Power supply socket
B11: USB charger output socket
B12: Battery compartment

natural_image
Technical line drawing of a mechanical component with no visible text or symbolsB1

Remote Sensor
C1 Battery compartment

natural_image
Diagram of two electronic devices with labeled components, no readable text or symbols presentLivoo
Feel good moments
User manual
How to insert the batteries:
- Open remote sensor battery compartment cover, insert 2 x AA batteries respecting polarity
- Open battery compartment cover of weather station.
- Insert 2 x AA batteries respecting polarity, all the icon on the LCD display will light up for 3 seconds, and you will hear a beep tone, and detect indoor temperature & humidity.
- The weather station will start to make a connection to the remote sensor. This operation takes about 3 minutes and is displayed by a flashing reception RF antenna symbol in the “remote sensor” display area on the receiver.
- After receiver has created a connection to the remote sensor, it will enters the radio control time receive mode.
Low battery:
If the battery symbol “” appears the batteries in the remote sensor should be replaced as soon as possible.
Reception of the Radio signal:
- The clock automatically starts the DCF signal search after 7 minutes of any restart or changing of new fresh batteries. The radio mast icon starts to flash.
- At 1:00 /2:00 / 3:00 am, the clock automatically carries out the synchronization procedure with the DCF signal to correct any deviations to the exact time.
If this synchronization attempt is unsuccessful (the radio mast icon disappears from the display), the system will automatically attempt another synchronization at the next full one hour. This procedure is repeated automatically up to total 5 times.
- To start manual DCF signal reception, press and hold down the “▲” button for two seconds. If no signals received within 7 minutes, then the DCF signal search stops (the radio mast icon disappears) and start again at the next full one hour.
- During RC reception to stop searching radio signal, press the “▲” button once.
F.Y.I.:
- A flashing radio mast icon indicates that the DCF signal reception has started
- A continuously displayed radio mast icon indicates that the DCF signal was received successfully
- We recommend a minimum distance of 2.5 meters to all sources of interference, such as televisions or computer monitors
- Radio reception is weaker in rooms with concrete walls (e.g.: in cellars) and in offices. In such extreme circumstances, place the system close to the window.
- During the RC receive mode, only the "▲" button function, other button operation have no function, If you want to carry out other functions of operation, please press "▲" button to exit the RC receiving mode.
Livoo
Feel good moments
User manual
Manual time setting:
- Press once “💡” button, can switch the display calendar or second - Press and hold down the “💡” button for 2 seconds, the 12/24 hour mode display starts to flash. Now use “+” and “-” buttons to set the correct 12/24 hour mode.
- Press “✗” to confirm your setting, the Time zones start to flash, Now use “▲” and “▼” buttons set a correct time zone (-12 to +12).
- Press “💡” to confirm your setting, the hour display starts to flash. Now use “▲” and “▼” buttons to set the correct hour.
- Press “💡” to confirm your setting, the minute displays starts to flash. Now use “▲” and “▼” buttons to set the correct minute.
- Press “💡” button to confirm your setting, the Month and Date icon display starts to flash. Now use “▲” and “▼” buttons to set the date display on Month/Date or Date/Month.
- Press “💡” button to confirm your setting, the year display starts to flash. Now use “▲” and “▼” buttons to set the correct year.
- Press “💡” button to confirm your setting, the month display starts to flash. Now use “▲” and “▼” buttons to set the correct month.
- Press “💡” button to confirm your setting, the date display starts to flash. Now use “▲” and “▼” buttons to set the correct date.
- Press “💡” button to confirm your setting, the language selection for the Weekday displays starts to flash. Now use “▲” and “▼” buttons to select a language.
| Languages | Sunday | Monday | Tuesday | Wednesday | Thursday | Friday | Saturday |
| German, GE | SO | MO | DI | MI | DO | FR | SA |
| English, EN | SU | MO | TU | WE | TH | FR | SA |
| French, FR | DI | LU | MA | ME | JE | VE | SA |
| Italian, IT | DO | LU | MA | ME | GI | VE | SA |
| Spanish, SP | DO | LU | MA | MI | JU | VI | SA |
| Dutch, DU | ZO | MA | DI | WO | DO | VR | ZA |
| Danish, DA | SO | MA | TI | ON | TO | FR | LO |
- Press “💡” to confirm your setting and to end the setting procedures, enter the clock mode. F.Y.I.:
- After 20 seconds without pressing any button, the clock switches automatically from set mode to normal time mode.
• There are 7 languages of weekday: English, German, Italian, French, Spanish, Dutch and Danish.
Livoo
Feel good moments
User manual
Setting the daily alarms:
- Press once “💡” button, can switch the display calendar or alarm time.
- Press and hold down “💡” button for 2 seconds until alarm time hour display of the alarm time starts to flash. Use the “▲” and “▼” buttons to set the required hour.
- Press “💡” button to confirm your setting, the minute display of the alarm time starts to flash. Use the “▲” and “▼” buttons to set the required minute.
- Press "💡" button to confirm your setting and to end the setting process.
F.Y.I.:
- After 20 seconds without pressing any button the clock switches automatically from setting mode to normal clock mode.
The alarm for opening and closing:
- The alarm shift switch (B9) is pushed in the “◀” position, LCD display the “◀” icon, the alarm function is open
- Product back of the alarm shift switch is pushed in the “▲” position, the “▼” icon disappears, the alarm function is close
F.Y.I.:
- The alarm will sound for 2 minutes if you do not deactivate it by pressing any button. In this case the alarm will be repeated automatically after 24 hours.
- Rising alarm sound (crescendo) changes the volume 4 times whilst the alarm signal is heard.
- Press any button except the “/z” button to stop the alarm signal. It is not necessary to reactivate the alarm. It switches itself automatically to the alarm time which has already been set.
Snooze function:
Press the "button" the alarm signal sounds to get to SNOOZE mode. The alarm signal sounds again after approx. 5 minutes.
Lunar phases and tide indicator:
The weather station has a display which automatically displays the current lunar phase
 |  |  |  |  |  |  |  |  |  |  |  |
| New moon | Waxing half-moon | Half-moon | Waxing full moon | Full moon | Waning full moon | Half-moon | Waning half-moon | ||||
Livoo
Feel good moments
User manual
°C/°F temperature display :
The temperature is displayed either in °C/°F. Briefly pressing the “▲” button allows you to switch between the individual modes.
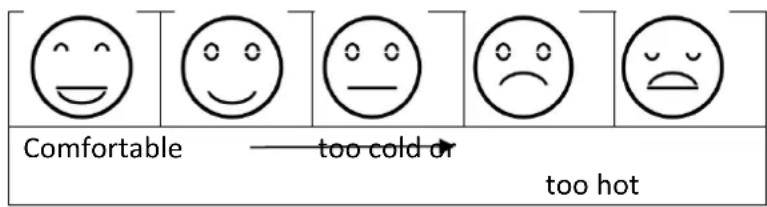
Comfort display:
Indoor comfort level is calculated according to the indoor temperature and humidity, a total of 5 levels.
Displaying temperature/humidity/ barometric pressure and temperature/humidity trend:
- The current indoor temperature/humidity/barometric pressure and the temperature/humidity trend (indoors) are shown in the LCD display after successfully connecting with the remote sensor.
- You may see the following displays:
The temperature/humidity is rising.
→ The temperature/humidity is remaining constant.
The temperature/humidity is falling.
Remote sensor transmission:
When the weather station successfully receives signals from the wireless sensor, the temperature and humidity of the "REMOTE SENSOR" are displayed on the "REMOTE SENSOR" column of the weather station.
If the weather station failed to receive transmission from remote sensor (“- -” display on the LCD), press and hold “▼” button for 3 seconds to receive transmission manually.
The remote temperature will show an animation of the RF antenna symbol, the base station will re receive the wireless signal of the remote sensor.
You can connect 3 different sensor to the unit and choose to display 3 different channels. To change the channel, press the ▼ button on the right side of the display. After channel 3, you have the possibility to use the "scroll" mode symbolized by "C" which will display each channel successively for a few seconds.
Livoo
Feel good moments
User manual
F.Y.I.:
- When the wireless sensor set up different channels, the weather station "REMOTE SENSOR" also wants to switch to the same channel.
When there is no wireless sensor signal transmission on the channel, "--" will be displayed in the channel of the weather station
- When the wireless remote sensor has no channel selection function, the sensor defaults to channel 1.
Maximum/Minimum Temperature/Relative Humidity:
- To toggle indoor/ remote maximum, minimum temperature and humidity data, press the "MEM" button:
Once to show the maximum temperature and humidity values.
Twice to sow the minimum temperature and humidity values
Three times to return to the current temperature and humidity levels
- To reset the maximum and minimum temperature and humidity, press and hold down the "MEM" button about 2 seconds. This will reset all minimum and maximum data recorded to the current displayed values.
F.Y.I.:
▶ If the temperature reading is below ranges, the LL.L will be displayed. If the temperature reading is above ranges, the HH.H will be displayed.
Remote Temperature alert setting:
- Press and hold down the “⚡” button for 2 seconds until the icon for the Temperature Alert” starts to flash
- The icon of upper limit of the temperature alarm starts to flash. Use the “▲” and “▼” buttons to set the required maximum temperature. Press “⚡” to confirm your setting.
- The icon of the lower limit of the Temperature alarm starts to flash. Use the “▲” and “▼” buttons to set the required minimum temperature. Press “ ” button to confirm your setting and to end the setting procedure
F.Y.I.:
- Before entering the setup, you must select the remote channel, different channels can set different temperature alarm range
Temperature and frost alert:
- Press “💡” button to activate or deactivate the remote temperature alert. When the remote temperature alarm is activated, the temperature alarm icon is displayed (A3)
Livoo
Feel good moments
User manual
- When the remote channel temperature value exceeds the set temperature range, it will activate the alarm every minute one five occasion, at the same time, temperature alarm in alarm icon " flashes
When the temperature is higher than the upper limit of the alarm temperature setting, the activation of the upper limit alarm, symbol "flashing,
When the temperature is lower than the lower limit of the alarm temperature, the lower limit alarm is activated, and the symbol "N flashes.
When the temperature of REMOTE SENSOR is -1^ to +3^ or +30^ to +37^ , the frost alarm will be activated, symbol "flashing.
The weather forecast:
- The weather station calculates a weather forecast for about the next 12 hours based on the barometric pressure trend. Of course this forecast can't compare to that of professional weather services supported by satellites etc
- Press and hold the “⚙” button for 2 seconds to enter the air pressure unit and weather settings, the pressure units will be flashing display, use the “▲” and “▼” button to set the pressure unit to display in the "hPa/mb" or "inHg".
- Press the “⚙️” key to confirm the settings and switch to the weather, the weather graphics will be flashing display, Use the “▲” and “▼” button to set the current weather conditions, so that the weather forecast is more accurate.
- The weather station displays the following weather symbols:
| FORECAST | FORECAST | FORECAST | FORECAST | FORECAST | FORECAST |
| Sunny | Slightly cloudy | Cloudy | Rainy | Heavy rainy | Snowy |
- The weather station can display the barometric pressure trend.
You may see the following displays:
The barometric pressure will rise.
The barometric pressure will remain constant.
The barometric pressure will fall.
Background lighting
- If the product is powered by batteries, touch the "☀/z" field. Backlight lit 15 seconds.
- When the power supply of the product is inserted into the power supply adapter, the battery will automatically disconnect the power supply, and the backlight will always be bright.
Press the “*button to adjust the brightness of the backlight, you can adjust the 5 state:
Livoo
Feel good moments
User manual
4 different brightness backlight and close the backlight.
Turn off backlight when you can touch the "field to light the backlight 15 seconds.
Livoo
Feel good moments
User manual
EU DECLARATION OF CONFORMITY
We
DELTA
BP61071
67452 Mundolsheim – France
Herewith declare under our sole responsibility, that the radio equipment
Weather station with barometer
SL253 (Frequency range 433.92MHz)
Fulfils the essential requirements of the Directive 2014/53/EU
The following standards were applied:
Radio:
ETSI EN 300 220-1 V3.1.1 :2017-02
Mundolsheim, January 19, 2021
Livoo
Feel good moments
User manual

natural_image
Symbol of a trash bin crossed with a diagonal line, no text or labels presentCorrect disposal of the unit
(Electrical and Electronic Equipment)
(Applicable in the European Union and the rest of Europe that have adopted separate collection systems countries)
The European Directive 2012/19/EU on Waste Electrical and Electronic Equipment (WEEE), requires that old household electrical appliances must not be disposed of in the normal household waste stream. Old appliances must be collected separately in order to optimize the recovery and recycling of the materials they contain and reduce the impact on human health and the environment. The symbol of the crossed out dustbin is marked on all products to remind the obligations of separate collection. Consumers should contact their local authority or retailer for information concerning the correct disposal of their product.

LIVOO
BP 61071
67452 Mundolsheim
• Non contractual illustration.
- Product information is subject to change without prior notice.
- Weather station with barometer
- Livoo
- User manual
- PLEASE, TAKE TIME TO READ WELL THE INSTRUCTIONS FOR USE PARTICULARLY BEFORE THE FIRST USE.
- FEATURES:
- Remote Sensor
- Feel good moments
- How to insert the batteries:
- Reception of the Radio signal:
- F.Y.I.:
- Manual time setting:
- Setting the daily alarms:
- The alarm for opening and closing:
- Snooze function:
- Lunar phases and tide indicator:
- °C/°F temperature display :
- Comfort display:
- Displaying temperature/humidity/ barometric pressure and temperature/humidity trend:
- Remote sensor transmission:
- Maximum/Minimum Temperature/Relative Humidity:
- Remote Temperature alert setting:
- Temperature and frost alert:
- The weather forecast:
- Background lighting
- EU DECLARATION OF CONFORMITY
Brand : LIVOO
Model : SL253
Category : Weather Station