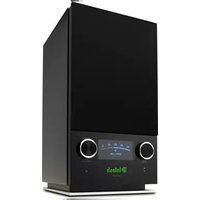
RS150 - Loudspeaker MCINTOSH - Free user manual and instructions
Find the device manual for free RS150 MCINTOSH in PDF.


| Product Type | Bookshelf Speaker |
| Brand | McIntosh |
| Model | RS150 |
| Dimensions (H x W x D) | 12.5 x 7.5 x 10.0 inches (317 x 190 x 254 mm) |
| Weight | 18 lbs (8.2 kg) each |
| Driver Configuration | Two-way: 1-inch soft dome tweeter, 5.25-inch polypropylene cone woofer |
| Frequency Response | 55 Hz - 20 kHz ±3 dB |
| Impedance | 8 Ohms |
| Sensitivity | 87 dB (2.83V/1m) |
| Recommended Power | 20 - 200 Watts |
| Enclosure Type | Bass reflex with front-firing port |
| Connector Type | Gold-plated binding posts |
| Magnetic Shielding | Yes |
| Warranty | 5 years (parts and labor) |
| Power Supply | Passive (no internal amplification) |
| Placement | Bookshelf or standmount, away from walls for optimal bass |
| Grille | Removable magnetic grille |
| Finish | Black gloss or real wood veneer |
| Cleaning | Wipe with a dry, soft cloth; avoid solvents |
| Spare Parts | Available through authorized McIntosh service centers |
Frequently Asked Questions - RS150 MCINTOSH
User questions about RS150 MCINTOSH
0 question about this device. Answer the ones you know or ask your own.
Ask a new question about this device
Download the instructions for your Loudspeaker in PDF format for free! Find your manual RS150 - MCINTOSH and take your electronic device back in hand. On this page are published all the documents necessary for the use of your device. RS150 by MCINTOSH.
USER MANUAL RS150 MCINTOSH
McIntosh Laboratory, Inc. 2 Chambers Street Binghamton, New York 13903-2699 Phone: 607-723-3512 www.mcintoshlabs.com
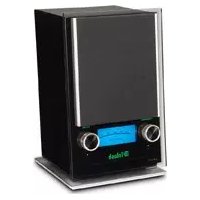
RS150
Wireless Loudspeaker System Owner's Manual

natural_image
Black industrial air conditioner unit with digital display and control knobs (no visible text or symbols)Quick Start
is on page 4

Safety First
It is a smart idea to read all the enclosed RS150 SAFETY INFORMATION included in separate documents; even if you already know this stuff, you can't be too safe.
Here is some compliance information:
FCC Information (For US Customers)
1. IMPORTANT NOTICE: DO NOT MODIFY THIS PRODUCT
This product, when installed as indicated in the instructions contained in this manual, meets FCC requirements. Modification not expressly approved by McIntosh may void your authority, granted by the FCC, to use the product.
2. CAUTION:
- To comply with FCC RF exposure compliance requirement, separation distance of at least 20cm must be maintained between this product and all persons.
- This product and its antenna must not be co-located or operating in conjunction with any other antenna or transmitter.
3. COMPLIANCE INFORMATION:
• Product Name: RS150 Wireless Loudspeaker System
• Model Number: RS150
• This product contains FCC ID:2AJYB-S810
McIntosh Laboratory, Inc.
2 Chambers Street
Binghamton, NY 13903
Tel. (607) 723-3512
IC Information (Canadian Customers)
1. PRODUCT:
This product contains IC: 20504-S810
This product complies with RSS-210 of Industry Canada. Operation is subject to the following two conditions:
(1) this product may not cause harmful interference, and (2) this product must accept any interference received, including interference that may cause undesired operation. This Class B digital Apparatus complies with Canadian ICES-003.
2. CAUTION:
To reduce potential radio interference to other users, the antenna type and its gain should be so chosen that the equivalent isotropically radiated power (e.i.r.p.) is not more than that permitted for successful communication.
Canadian Customers: CAN ICES-003 (B)/NMB-003 (B)
RF Exposure Information
This equipment complies with FCC/IC radiation exposure limits set forth for an uncontrolled environment and meets the FCC radio frequency (RF) Exposure Guidelines in
Supplement C to OET65 and RSS-102 of the IC radio frequency (RF) Exposure rules. This equipment has very low levels of RF energy that are deemed to comply without testing of specific absorption ratio (SAR).
1. DECLARATION OF CONFORMITY
Our products follow the provisions of EC/EU directives:
LVD: 2014/35/EU
EMC: 2014/30/EU
RED: 2014/53/EU
ERP: EC regulation 1275/2008 and its frame work directive 2009/125/EU
RoHS: 2015/863/EU
2. IMPORTANT NOTICE: DO NOT MODIFY
THIS PRODUCT
This product, when installed as indicated in the instructions contained in this manual, meets RED directive requirements. Modification of the product could result in hazardous Radio and EMC radiation.
3. CAUTION:
Separation distance of at least 20cm must be maintained between this product and all persons.
This product and its antenna must not be co-located or operating in conjunction with any other antenna or transmitter.
Table of Contents
Safety First....2
FCC Information (For US Customers) ......2
IC Information (Canadian Customers) ......2
Thank you from all of us at McIntosh ....3
Make a Note....3
Trademark and License Information ....4
Quick Start (Bluetooth) 4
More Connections....5
AirPlay 2....5
Wi-Fi connection using an iOS Device .... 5
Ethernet....5
Setting up Wi-Fi Without Ethernet 5
Chromecast 5
Note About Initial Network Connection...... 6
Roon....6
Tidal Connect 6
Spotify Connect 6
Qualcomm® aptXTM Audio 6
Front View Labeled 7
Installing the Grille ....7
The Knobs and LEDs on the Front 8
The Right Knob 8
The Left Knob 8
Network/Wi-Fi Indicator LED 8
Automatic Input Select 8
Sleep Mode LED....8
Input Indicators....8
Rear View Labeled 9
Rear Connections....9
Ethernet Port 9
AC Connector 9
USB Service Port 9
The Browser Interface ....10
OVERVIEW Menu 10
SETTINGS Menu ....11
UPDATE Menu 12
Re-packing the RS150 13
Dimensions 14
Technical Specifications....15
List of Figures
Figure 1- AC Power Cord ....4
Figure 2- Scan for bluetooth devices ....4
Figure 3— Ethernet connection ....5
Figure 4- Front View 7
Figure 5- Installing the Grille ....7
Figure 6—Rear View .....9
Figure 7- OVERVIEW submenu ....10
Figure 8- SETTINGS submenu .... 11
Figure 9- UPDATE submenu .....12
Figure 10- Packing Material ....13
Figure 11- Dimensions ....14
Thank you from all of us at McIntosh
Your new RS150 Wireless Loudspeaker System is a precision instrument that will provide many years of enjoyment. Please take a few moments to familiarize yourself with the features and instructions to get the maximum performance from your equipment.
If you need further technical assistance, please contact your dealer who may be more familiar with your particular setup including other brands. You can also contact McIntosh with additional questions or in the unlikely event of needing service.
McIntosh Laboratory, Inc.
2 Chambers Street
Binghamton, New York 13903
Technical Assistance Phone: (607) 723-3512
Customer Service (for repairs)
Phone: (607) 723-3515
Fax: (607)-724-1917
support@mcintoshlabs.com
Website: mcintoshlabs.com
Make a Note
For future reference, you can jot down your serial number and purchase information here. We can identify your purchase from this information if the occasion should arise. The serial number is located on the back label of the RS150.
| Serial Number: | |
| Purchase Date: | |
| Dealer Name: |

Trademark and License Information
The McIntosh RS150 incorporates copyright protected technology that is protected by U.S. patents and other intellectual property rights. The RS150 uses the following Technologies:
| Trademark Logo | License Information |
| Use of the Works with Apple badge means that an accessory has been designed to work specifically with the technology identified in the badge and has been certified by the developer to meet Apple performance standards. Apple, iPad, iPad Air, iPad Pro, iPhone and AirPlay are trademarks of Apple Inc., registered in the U.S. and other countries. To control this AirPlay 2-enabled speaker, iOS 11.4 or later is required. | |
| The Bluetooth® word mark and logos are registered trademarks owned by Bluetooth SIG, Inc. and any use of such marks by McIntosh Group, Inc. is under license. Other trademarks and trade names are those of their respective owners. | |
| Qualcomm aptX is a product of Qualcomm Technologies, Inc. and/or its subsidiaries.Qualcomm is a trademark of Qualcomm Incorporated, registered in the United States and other countries. aptX is a trademark of Qualcomm Technologies International, Ltd., registered in the United States and other countries. | |
| The Wi-Fi CERTIFIED logo is a registered trademark of the Wi-Fi Alliance.Wi-Fi Certification provides assurance that the device has passed the interoperability test conducted by the Wi-Fi Alliance, a group that certifies interoperability among wireless LAN devices. | |
| Room Ready network devices have Room's streaming technology built in, and are certified by Room Labs to provide the highest level of quality and performance in network streaming. |
| Trademark Logo | License Information |
| TIDAL is the first global music streaming service with high fidelity sound, hi-def video quality, along with expertly curated playlists and original content — making it a trusted source for music and culture. | |
| The Spotify software is subject to third party licenses found here: https://developer.spotify.com/esdk-third-party-licenses.CONNECT UPDATE | |
| Chromecast built-in is a trademark of Google LLC. |
Quick Start (Bluetooth)
Here are the basic steps to start enjoying the RS150 Wireless Loudspeaker System right away. This Quick Start will get sound flowing from the RS150 via a Bluetooth connection. That way you can hear some music as you read the rest of this manual.
- Connect to the RS150 to AC Power. See Figure 1

natural_image
Simple line drawing of a wall socket connected to a TV screen with a plug (no text or symbols)Figure 1- AC Power Cord
• Power the RS150 On by pressing and releasing the Right Knob
- The BT above the Left Knob will Flash. If it is no longer flashing, press and hold the Left Knob for two seconds and then release
- On the phone (or other device) you wish to
connect, press SCAN in the Bluetooth section of Settings. Generally, this is found in the Connections' submenu of settings (devices may vary)
Settings>Connections>Bluetooth
- The RS150 will appear as “RS150 xxxx” in Available Devices. See Figure 2

Figure 2 Scan for bluetooth devices
- Choose the RS150 to pair
- When asked to confirm you want to pair the RS150 to your device, select OK
- The RS150 should now be "Connected for audio"
- Play some music
More Connections
AirPlay 2
AirPlay 2 is an Apple technology designed to control home audio systems and speakers in any room – with a tap or by simply asking Siri – right from iPhone, iPad, HomePod or Apple TV.
To control this AirPlay 2-enabled speaker, iOS 11.4 or later is required.
Multiroom Audio
AirPlay 2 technology lets you play a song on every RS150 in your house at the same time or adjust the volume in any room – all in sync.
After installing your RS150, add it to the Apple Home App with a few simple steps using your iPhone or iPad.
Siri Voice Control
Use Siri on your iPhone, iPad, HomePod, or Apple TV to control your RS150 with just your voice.
Wi-Fi connection using an iOS Device
Setting up the RS150 as a AirPlay Speaker will connect the RS150 to your Wi-Fi network:
• Make sure your iOS device is on the Wi-Fi network you wish to connect the RS150 to
- With the RS150 powered on, the LED below the Left Knob should not be solidly illuminated green (if it were lit, it would indicate the RS150 is currently connected to a network)
- Open up Settings on the iOS device
- Open up the Wi-Fi submenu
- Look at the Wi-Fi network list and find “Set Up New AirPlay Speaker”
- Select the RS150
• The RS150 will be added to your network
Ethernet
For a wired connection to your network, use an Ethernet cable to connect the RS150 to your router. See Figure 3.

Figure 3— Ethernet connection
Note: a solid red Network/Wi-Fi LED indicates that a network error has occurred. See "Network/Wi-Fi Indicator LED" on page 8.
Note that plugging in an ethernet cable will disable the Wi-Fi radio of the RS150. The RS150 will use the ethernet connection for all network activity. To enable Wi-Fi, the ethernet cable must be removed.
With an ethernet connection, you can use the RS150 browser interface to provide the RS150 with your Wi-Fi settings. For more information, see “The Browser Interface” on page 10.
Setting up Wi-Fi Without Ethernet
To initially connect your RS150 to a Wi-Fi network without using an ethernet connection or iOS connection (as described above) follow these steps:
• Power the RS150 Off and then On
- When the green LED below the Left Knob is blinking, open your PC or phone's Wi-Fi Connection Settings
- Locate the RS150 in the list of available networks and connect to it.
- Open a web browser (Chrome or Firefox)
- Type 192.168.255.249 in the browser's address bar and open that page
- Select SETTINGS from the RS150 interface (see Figure 8 on page 11)
- Select Wireless in Network Type
- Select Start Scan
- Select your network
- Provide your password and press Connect
- Your RS150 will connect to your network
Chromecast
To Cast to your RS150, you will need:
• The latest version of Google Home App
- Wireless network and access password
With your mobile device/tablet connected to the same Wi-Fi network as your RS150 and the RS150 powered on:
- Open the Google Home App
- Follow the steps for the RS150 if they automatically appear
To manually add the RS150
- Tap the + at the top of the screen
- Select "Set up device"
- Select "Setup new devices"
- Follow the set up steps for a "Speaker"
Once the RS150 is setup, you can choose to Cast to it. To Cast:
- Choose the Cast button in the top right corner of a Chromecast-enabled app
- Choose the RS150
- When connected the Cast button will change colors
- Cast music, etc. to your RS150

Note About Initial Network Connection
When your RS150 connects to your network for the first time, it will automatically look for the latest software update. If available, the RS150 will install the newest version. When updating, the Red LED below the Right Knob will blink twice, pause and repeat.
You may adjust how future updates are handled. See "UPDATE Menu" on page 12.
Roon
When connected to your network, the RS150 will be available as a Zone for your Roon server. (If you have a Roon server.) The RS150 can be connected to your Wi-Fi using AirPlay (see "Wi-Fi connection using an iOS Device" on page 5) or Chromecast. It can also be directly connected with an ethernet cable.
Tidal Connect
To listen to music on TIDAL through the RS150, using the Tidal app, select the content you want to
play and then select the connect icon Now Playing page.

This will bring up a list of nearby devices to stream through. Locate the RS150 and select to pair.
If you are unable to find your device, make sure the device is connected to the same Wi-Fi network you are streaming from.
Once paired you can use your TIDAL app as a remote. TIDAL is compatible with select smart assistants that enable voice controls. Depending on your region, you may enable this feature by linking your TIDAL account with your selected smart device. This option can normally be found in the
Settings section of your respective Smart Devices app.
Spotify Connect
Use your phone, tablet or computer as a remote control for Spotify. Go to spotify.com/connect to learn how.
Qualcomm® aptX™ Audio
aptX™ is a codec that can provide CD quality music over Bluetooth connections. The RS150 will automatically utilize aptX when connected to a source that supports aptX. Simply connect with Bluetooth as described in "Quick Start (Bluetooth)" on page 4.
The RS150 also supports the higher resolution aptX HD (24-bit/48kHz). If your device utilizes aptX HD then that resolution will be utilized automatically.
The RS150 also features aptX LL (Low Latency) which automatically ensures Bluetooth can deliver sound in sync with visual media. It reduces delay and improves end-to-end speed of the audio transmission, resulting in a high quality, synchronized user experience with any transmitting device that supports aptX LL.
Front View Labeled
Installing the Grille
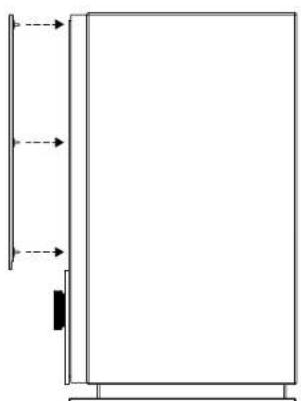
The RS150's Grille can be installed by lining up the eight plastic pegs on the back of the Grille with the eight holes framing the speakers of the RS150. Gently push with even pressure to install and pull straight away from the front to remove the Grille. See Figure 5 below.
Note that the Grille has a top and bottom. The bottom has a lip that extends further from the pegs than the top does.

natural_image
Simple line drawing of a vertical wall with arrows indicating direction, no text or symbols presentFigure 5- Installing the Grille
Figure 4—Front View

The Knobs and LEDs on the Front
The Right Knob
The Right Knob is primarily the Volume and Power Knob.
| Command Right Knob Action | |
| Raise Volume Rotate clockwise | |
| Lower Volume Rotate counter clockwise | |
| Mute/ Pause Short press (less than half a second) | |
| Unmute/Play Short press (less than half a second) or rotate in either direction | |
| Adjust Bass Level Press and Hold while turning clockwise to increase the Bass Level and counter clockwise to decrease. The Meter will graphically show the level as adjusted. The midpoint on the meter is considered neutral | |
| Enter Sleep State (power down) | Press and Hold for two seconds |
| Wake from Sleep State (power up) | Short Press |
The Left Knob
The Left Knob can be used to adjust lighting levels and to place the RS150 in Discovery Mode.
| Command Left Knob Action | |
| Adjust Lighting Press and Hold while turning clockwise to increase the lighting level and counter clockwise to decrease. The Meter will graphically show the level as adjusted | |
| Enter Bluetooth Discovery Mode | Press and Hold for two seconds |
| Sleep Mode Lighting | Within two seconds of entering Sleep State (see “The Right Knob” above), turn the Left Knob to toggle the Meter Lighting on/off |
Network/Wi-Fi Indicator LED
When connected to a network, the Network/Wi-Fi indicator LED will be glow a solid green. For network states, see the table below:
| LED Status | |
| Green- slow pulse | RS150 is in process of joining the network |
| Green- solid Connected to the network | |
| Red- solid a network error has occurred | |
| Red- slow pulsing | there is a critical firmware issue.Please upgrade firmware |
Automatic Input Select
There is no Input Select Knob. Input selection is automatic. There is a hierarchy of input types. A Wi-Fi connection will take precedence over a Bluetooth connection. If there is no Wi-Fi connection present, Bluetooth connection is automatic.
If a Bluetooth connection is interrupted then it must be re-established from the mobile device.
Sleep Mode LED
The LED will glow red when the RS150 is connected to a live AC outlet and the unit is in Sleep Mode. When the RS150 receives a power on command, the Sleep Mode LED will turn off.
Input Indicators
When a network streaming session is active, the NET light will be lit.
When a Bluetooth connection is established, the BT LED will be solidly lit. The BT flashing indicates that the RS150 is in Bluetooth discovery mode.
Rear View Labeled
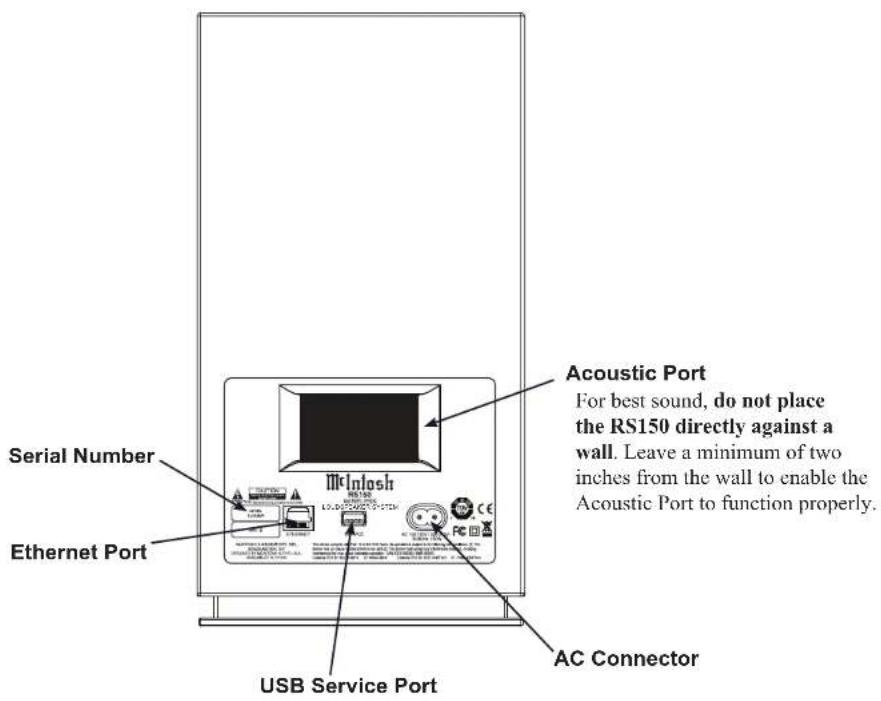
Figure 6 Rear View
Rear Connections
Ethernet Port
The Ethernet Port connects your RS150 to your network's router using a standard CAT5, CAT5E or CAT6 cable with an RJ45 connector. Using a wired connection is one way to access the RS150's setup via a browser. For more information, see "The Browser Interface" on page 10.
AC Connector
Use the supplied AC Power Cord to connect the RS150 to a live AC outlet.
USB Service Port
The USB port is only for performing service functions by a qualified service technician. It is not intended for USB device support or playback.

The Browser Interface
To view the RS150's browser interface, you will need its IP address.
There are several ways to find a device's IP address. For instance, you can use IP scanner software. Here is one way with out additional software. To find the RS150's IP address:
With the RS150 connected to your network with a wired or wireless connection:
- Type the IP address of your router into the address bar of a browser (often 192.168.1.1)
- Enter the router's Username and password. (The default can be found in the router's documentation, but changing it is a good security rule)
- Look for the RS150 in the list of wired or wireless clients for your router
- Note the IP address
With the RS150's IP address: - Type the address of the RS150 into the address bar of your router
The RS150 Browser interface has three submenus:
• OVERVIEW - SETTINGS
- UPDATE
Click on the desired heading to enter that menu.

Figure 7- OVERVIEW submenu
OVERVIEW Menu
The Overview menu provides the following information about the RS150:
- Serial Number
- MAC Address
• Network IP Address - Firmware versions
You can provide a Custom Name for the RS150. This is the name that will display for available AirPlay devices. If you wish to change the default name, type the new name in the box and press Enter.
The Overview Menu provides an indicator for the status of your Wi-Fi (WIFI enabled). When enabled the indicator will show ON and be green. An ethernet connection takes precedence and will automatically disable Wi-Fi. Wi-Fi, if set up, will re-engage when the ethernet cable is disconnected.
SETTINGS Menu
The Power Sleep Timer has two settings:
- ON (default)
• OFF
When the Power Sleep Timer is set to ON, the RS150 will power off into a sleep state after approximately 30 minutes of no sound or user input. After 60 minutes of uninterrupted sleep, the RS150 will enter a Standby Mode. In this Standby Mode, the Wi-Fi radio is powered off and the unit can not be woken via the network. Standby Mode power consumption is less than 0.5 watts.
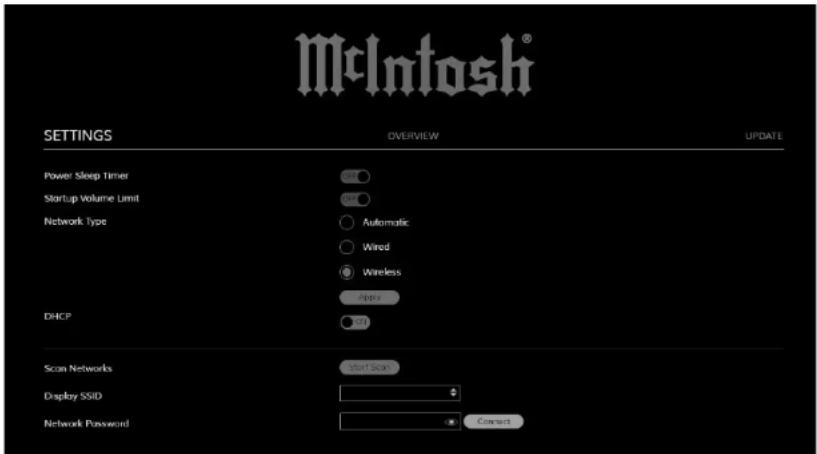
Figure 8- SETTINGS submenu
If the Power Sleep Timer is set to OFF, the RS150 will power off into a sleep state after 30 minutes of non-activity. The RS150 can be woken from sleep by input from the network (or physically pushing the Power Button). In a sleep state, the RS150 will continue to work with devices configured to control it in your Google Home collection.
The RS150 can be made to immediately enter a sleep state by pressing and holding the Right Knob for two seconds. If Power Sleep Timer is set to ON, the RS150 will enter Standby Mode after 60 minutes of uninterrupted sleep.
The Startup Volume Limit has two settings:
• ON
- OFF (default)
When the Startup Volume Limit is ON, upon power loss or return to play from Sleep or Standby, the first playback of the product will start at a low volume level. When switched to OFF, the product will resume playback at the last volume level.
The Settings Menu allows you to change settings for Wired and Wireless network connections.
Select Network Type to see/change settings:
- Automatic
- Wired
- Wireless
If Network Type is set to Automatic, the RS150 will
automatically connect to Wi-Fi when the ethernet cable is unplugged provided the Wireless connection has previously been setup. Selecting Wired for Network Type will limit the RS150 network connection to the ethernet port connection. Select Wireless to setup a Wi-Fi network or to restrict the network connection to Wi-Fi.
If you selected the Network Type of Wireless, the following submenus appear:
- Scan Networks
- Display SSID
• Network Password
To set up a wireless connection for the RS150:
- Select Start Scan
- In the Display SSID submenu, select a wireless network using the up/down arrows
- Enter the Network Password for that Network
- Select Connect
DHCP can be set to ON (Default) or OFF. If you change this setting to OFF, you will need to provide the following information manually:
• IP
- Netmask
- Gateway
• DNS (1st and 2nd)
With DHCP ON, this information is automatically acquired and the submenus to enter the information are not visible.


Figure 9- UPDATE submenu
UPDATE Menu
The UPDATE menu allows you to reset settings to the factory defaults as well as update your RS150.
To restore Factory settings, select the "Start Factory Reset" button. Done. Note that you will lose your Wi-Fi settings.
An alternative method for Factory Reset, is to Press and Hold the Left and Right Knobs for 10 seconds.
Update Method allows you to set how the RS150 updates its firmware. When set to the default of OTA Auto, the RS150 will periodically check for updates and install them automatically. When set to OTA Manual, the RS150 will check for available updates when you select the Start Search button to the right of Check for Update. If an update is available, you
can install it by selecting Start Update. (OTA stands for "over-the-air".)
The Service option for updating is for service purposes by a McIntosh qualified technician only.
While the RS150 is in the process of updating the firmware, the power status LED will blink twice in quick succession, pause for 2 seconds, and then repeat during the entire process.
Re-packing the RS150
When shipping the RS150, it is highly recommended that the unit be packed as it was originally shipped to avoid damage. Failure to properly pack the unit will likely result in damage. If you need any of the packing material, you can contact McIntosh Customer Service.

Figure 10- Packing Material
| Item | QTY | Description Part # | |
| 1 | 1 Inner Carton | 310761SP | |
| 2 | 4 Paper Protector | 1 310762SP | |
| 3 | 2 Paper Protector | 2 310763SP | |
| 4 | 1 Accessory | Box 310764SP | |
| 5 | 2 Outer Carton | 310765SP | |
| 6 | 1 Left Foam | 310766SP | |
| 7 | 1 Right Foam | 310767SP |

Dimensions

Figure 11- Dimensions

Technical Specifications
Power Output
120W: 30W Tweeter, 90W Woofer
Speakers
One 20mm Titanium Dome Fluid-filled Tweeter
One 5-1/4 inch Long Throw Woofer
Crossover Frequencies
2,000Hz
Overall Frequency Range
48Hz to 20,000Hz
Streaming Support
Apple AirPlay 2, Google Chromecast, Spotify
Connect, Tidal Connect, Roon
Supported Audio Formats
(Must also be supported by chosen source app and
device) MP3, AAC, FLAC, ALAC, WMA, Ogg
Vorbis, WAV, M4A, OGG, AIFF
Connectivity
Wi-Fi CERTIFIED ^TM a, b, g, n, ac
WPA ^TM , WPA2 ^TM , WMM ^®
2.4/5 GHz, ethernet
Bluetooth 5.0
AVRCP, A2DP, aptX, aptX HD, aptX LL
Power Requirements
100-120V/220-240V \~ 50/60 Hz 150 Watts
Dimensions
Width 7 11/16 inches (19.5cm)
Height 14 3/8 inches (36.8cm)
Depth 8 5/8 inches (21.9cm)
Shipping Carton Dimensions:
Width 12 3/4 inches (32.4cm)
Height 20 inches (50.8cm)
Depth 14 3/8 inches (36.5cm)
Weight
18.5 pounds (8.4kg) net
24.0 pounds (10.9kg) in shipping carton

The continuous improvement of its products is the policy of McIntosh Laboratory Incorporated who reserve the right to improve design without notice. The RS150 is designed to employ non-McIntosh-provided services some of which require separate customer subscriptions and some of which do not, as part of the Product's functionality. Because McIntosh cannot control the providers of such services or the services themselves, the owner of the Product therefore assumes all risks related to the use of services provided by anyone other than McIntosh itself. McIntosh cannot and does not warrant against, and shall have no liability of any kind for any of the following that are attributable to non-McIntosh providers or services: (i) interruption, discontinuance, or other unsatisfactory performance of service; (ii) reduced Product functionality that is so attributable; or (iii) any other loss or damage of any kind that is so attributable.

- RS150
- Quick Start
- Safety First
- FCC Information (For US Customers)
- IMPORTANT NOTICE: DO NOT MODIFY THIS PRODUCT
- CAUTION:
- COMPLIANCE INFORMATION:
- IC Information (Canadian Customers)
- PRODUCT:
- Canadian Customers: CAN ICES-003 (B)/NMB-003 (B)
- RF Exposure Information
- DECLARATION OF CONFORMITY
- IMPORTANT NOTICE: DO NOT MODIFY
- THIS PRODUCT
- CAUTION:
- Table of Contents
- List of Figures
- Thank you from all of us at McIntosh
- McIntosh Laboratory, Inc.
- Make a Note
- Trademark and License Information
- Quick Start (Bluetooth)
- Settings>Connections>Bluetooth
- More Connections
- AirPlay 2
- Multiroom Audio
- Siri Voice Control
- Wi-Fi connection using an iOS Device
- Ethernet
- Setting up Wi-Fi Without Ethernet
- Chromecast
- Note About Initial Network Connection
- Roon
- Tidal Connect
- Spotify Connect
- Qualcomm® aptX™ Audio
- Front View Labeled
- Installing the Grille
- The Knobs and LEDs on the Front
- The Right Knob
- The Left Knob
- Network/Wi-Fi Indicator LED
- Automatic Input Select
- Sleep Mode LED
- Input Indicators
- Rear View Labeled
- Rear Connections
- Ethernet Port
- AC Connector
- USB Service Port
- The Browser Interface
- OVERVIEW Menu
- SETTINGS Menu
- UPDATE Menu
- Re-packing the RS150
- Technical Specifications
- Power Output
- Speakers
- Crossover Frequencies
- Overall Frequency Range
- Streaming Support
- Supported Audio Formats
- Connectivity
- Bluetooth 5.0
- Power Requirements
- Dimensions
- Shipping Carton Dimensions:
- Weight
Brand : MCINTOSH
Model : RS150
Category : Loudspeaker