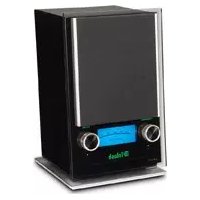
RS100 - Loudspeaker MCINTOSH - Free user manual and instructions
Find the device manual for free RS100 MCINTOSH in PDF.


| Type of Product | 2-way bookshelf speaker |
| Speaker Configuration | 2-way, bass reflex |
| Woofer Size | 6.5 inches (165 mm) |
| Tweeter Size | 1 inch (25 mm) soft dome |
| Frequency Response | 45 Hz - 20 kHz |
| Impedance | 8 ohms |
| Sensitivity | 87 dB (2.83V/1m) |
| Recommended Amplifier Power | 50 - 200 watts |
| Dimensions (W x H x D) | 8.5 x 14 x 11.5 inches (216 x 356 x 292 mm) |
| Weight (each) | 22 lbs (10 kg) |
| Power Handling (continuous) | 100 watts |
| Power Handling (peak) | 200 watts |
| Connector Type | Binding posts with banana plug compatibility |
| Cabinet Material | MDF with real wood veneer |
| Grille | Magnetic detachable grille |
| Magnetic Shielding | No |
| Recommended Placement | Bookshelf, stand, or wall-mounted |
| Recommended Room Size | Medium (up to 300 sq ft) |
| Accessories Included | Grille, user manual, cleaning cloth |
| Warranty | 5 years (parts and labor) |
Frequently Asked Questions - RS100 MCINTOSH
User questions about RS100 MCINTOSH
0 question about this device. Answer the ones you know or ask your own.
Ask a new question about this device
Download the instructions for your Loudspeaker in PDF format for free! Find your manual RS100 - MCINTOSH and take your electronic device back in hand. On this page are published all the documents necessary for the use of your device. RS100 by MCINTOSH.
USER MANUAL RS100 MCINTOSH
McIntosh Laboratory, Inc. 2 Chambers Street Binghamton, New York 13903-2699 Phone: 607-723-3512 www.meintoshlabs.com

McIntosh Laboratory, Inc.
2 Chambers Street
Binghamton, NY 13903
www.mcintoshlabs.com
The continuous improvement of its products is the policy of McIntosh Laboratory Incorporated who reserve the right to improve design without notice.
The RS100 is designed to employ non-McIntosh-provided services (including but not limited to Play-Fi® and Wi-Fi®), some of which require separate customer subscriptions and some of which do not, as part of the Products' functionality. Because McIntosh cannot control the providers of such services or the services themselves, the owner of the Product therefore assumes all risks related to the use of services provided by anyone other than McIntosh itself. McIntosh cannot and does not warrant against, and shall have no liability of any kind for any of the following that are attributable to non-McIntosh providers or services: (i) interruption, discontinuance, or other unsatisfactory performance of service; (ii) reduced Product functionality that is so attributable; or (iii) any other loss or damage of any kind that is so attributable.
McIntosh Part No. 041725SP
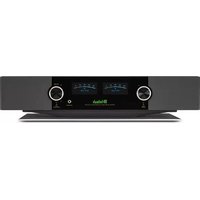
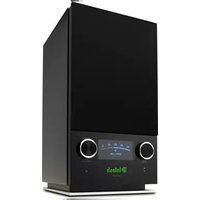
RS100
Wireless Loudspeaker
System
Operation Guide

natural_image
Black industrial electronic device with digital display and control knobs (no visible text or symbols)
RS100 Quick Start, for Apple Powered Devices
Important Safety Information is supplied in a separate document "Important Additional Operation Information Guide"
Thank You
Your decision to own this McIntosh RS100 Wireless Loudspeaker System ranks you at the very top among discriminating music listeners. You now have "The Best." The McIntosh dedication to "Quality," is assurance that you will receive many years of musical enjoyment from this unit. Please take a short time to read this information. We want you to be as familiar as possible with all the features and functions of your new McIntosh.
Please Take A Moment
The serial number, purchase date and McIntosh Dealer name are important to you for possible insurance claim or future service. The spaces below have been provided for you to record that information:
Serial Number:
Purchase Date:
Dealer Name:
Technical Assistance
If at any time you have questions about your McIntosh product, contact your McIntosh Dealer who is familiar with your McIntosh equipment and any other brands that may be part of your system. If you or your Dealer wish additional help concerning a suspected problem, you can receive technical assistance for all McIntosh products at:
McIntosh Laboratory, Inc.
2 Chambers Street
Binghamton, New York 13903
Phone: 607-723-5512
Fax: 607-724-0549
Customer Service
If it is determined that your McIntosh product is in need of repair, you can return it to your Dealer. You can also return it to the McIntosh Laboratory Service Department. For assistance on factory repair return procedure, contact the McIntosh Service Department at:
McIntosh Laboratory, Inc.
2 Chambers Street
Binghamton, New York 13903
Phone: 607-723-3515
Fax: 607-723-1917
Table of Contents
Safety Instructions......Separate Supplied Document Thank You and Please Take a Moment....2 Technical Assistance and Customer Service....2 Table of Contents....2 General Information....2 RS100 Quick Start....2 - 8
Introduction....9 Performance Features....9 Rear Panel Connections....9 Connecting to External Components....9 How to Operate the RS100....10-11 Specifications....12 Packing Instructions....12
General Information
-
For additional connection information, refer to the owner's manual(s) for any component(s) connected to the RS100 Wireless Loudspeaker System.
-
For the RS100 to receive streaming audio signals from a mobile device, a wireless router with Wi-Fi capabilities is required, in order to facilitate communications between the RS100 and the mobile device.
-
When connecting the RS100 to a wired Home Computer Network (of which includes a wireless router) a USB (2.0) to Ethernet (RJ45) Adapter such as a Monoprice (109466) is required.
-
The RS100 is designed to be
compatible with the majority of Powered Subwoofers. However, do to a wide range of Powered Subwoofer Designs, it is important the input sensitivity of the Subwoofer be at least 0.2 Volts. This will assure music recordings are reproduced with adequate dynamic range. Check with your McIntosh Dealer for additional information.
-
The RS100 performance is dependent upon the speed and operational range of the Wireless Router used.
-
When the RS100 is connected to a wired Home Computer Network with a Wireless Router, the speed should be 1 Gigabit or faster.
-
The Play-Fi App for Streaming Music and Remote Control Operation of the RS100 is available at Web Sites for download free of charge:
For Apple Powered Mobile Devices: https://itunes.apple.com/us/app/play_je/id779245456?
For Android Powered Mobile Devices:
https://play.google.com/store/apps/details?id=com.phorus.play&hl
-
When discarding the unit, comply with local rules or regulations.
-
Periodically, check the McIntosh Web Site at www.mcintoshlabs.com for the latest information on the RS100 and other McIntosh Products.
-
Additional FCC INFORMATION(For US and Canada Customers). This Product Contains FCC ID:2AAWQ-CAPRICA2L, IC 11138A - Caprical 2L.
Copyright 2016 © by McIntosh Laboratory, Inc.
STEP 1 REMOVE UNIT FROM CARTON

STEP 3 CONNECT THE SUPPLIED AC CORD

STEP 2 REMOVE PROTECTIVE COVERS AND OPEN ACCESSORY PACK
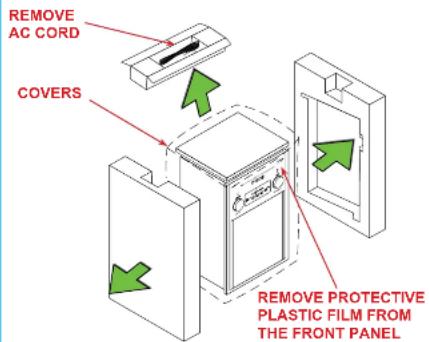
STEP 4
THE RS100 IS COMPATIBLE WITH BOTH APPLE POWERED AND ANDROID POWERED MOBILE DEVICES. THERE ARE OPERATIONAL DIFFERENCES BETWEEN BOTH TYPES OF MOBILE DEVICES
WHEN USING AN APPLE POWERED MOBILE DEVICE, PROCEED TO STEP 5 ON PAGE 3 "RS100 QUICK START"-SECTION OF THIS OPERATION GUIDE
WHEN USING AN ANDROID POWERED MOBILE DEVICE, PROCEED TO STEP 9 ON PAGE 6 "RS100 QUICK START" SECTION OF THIS OPERATION GUIDE
STEP 5
DOWNLOAD AND INSTALL THE PLAY-FI APP TO YOUR APPLE POWERED MOBILE DEVICE
MOBILE DEVICE
The Play-Fi App for Music Streaming and Remote Operation of the RS100 is available at the Web Site for download free of charge:
For Apple Powered Mobile Devices: https://itunes.apple.com/us/app/play-fi/id779245456?mt-8
PLAY-FI APP

NOTE:
The graphic illustration of this Apple Powered Mobile Device may vary slightly from your Apple Mobile Device.
STEP 6
ESTABLISH CONNECTION WITH A WIRELESS ROUTER
NOTE: If your Apple Powered Mobile Device is currently Wi-Fi Connected to your Wireless Router, proceed to STEP 7.
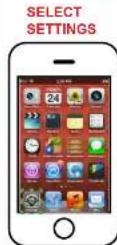
SELECT Wi-Fi SETTINGS

SELECT YOUR ROUTER
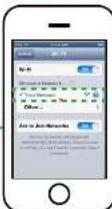

WIRED NETWORK WITH WIRELESS WI-FI ROUTER
OR
WIRELESS NETWORK Wi-Fi ROUTER


NOTES:
^1 Refer to the page 1, note 3 for additional information.
^2 The remote "Your Network" is used to refer to name of the wired Network (with Wireless Router) connected to the RS100 or just a Network Wireless Router used with the RS100.
^3 It is advisable, during the initial communications setup, to physically locate the RS100 and the Wireless Router in close proximity to one another.
If there is difficulty in establishing communications between the network Router, RS100 and/or the Mobile Device, temporarily switch Off other Wi-Fi devices connected to the same Router.
The performance capability of the network wireless router can affect whether the RS-00 connects to your mobile device and the quality of the music streamed. For additional information on wireless routers refer to https://doi-s.100/100/index/100/100/100/100/100/100/100/100/100/100/100/100/100/100/100/100/100/100/100/100/100/100
STEP 7
ESTABLISH COMMUNICATIONS WITH THE MOBILE DEVICE, SETTING UP THE PLAY-FI APP FOR A SINGLE RS100 AND EACH RS100 OF A STEREO PAIR

3rd - SELECT "Play-Fi APP"

4th - SELECT "Set-up New Device"
NOTE: Proceed with "Set-up new Device" after the "Wi-Fi/NET" LED indicator changes from flashing rapidly to slowly pulsing On/Off.

- up New Device" 5th - SELECT
eed with "Set-up new De-" Settings"

5th - SELECT "Settings"

6th - SELECT "Wi-Fi"
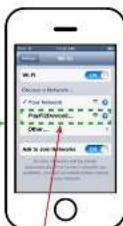
7th - LOCATE Play-Fi Device (RS100)

8th - Setting Up communications with RS100

flowchart
graph LR
    A["9th - Communications established with RS100"] --> B["10th - SELECT "Play-Fi APP""]
    B --> C["11th - SELECT "Your Network""]
    C --> D["12th - Enter your Network Password if required"]
    D --> E["13th - SELECT "Set-up""]
    E --> F["Play-Fi Connecting to Your Router"]
    F --> G["14th - SELECT the name of the room where the RS100 is located"]
    G --> H["15th - SELECT "Location Name" NOTE: The "Wi-Fi/NET" LED indicator will change from slowly pulsing On/Off to On all the time."]
    H --> I["16th - SELECT "Music" to start playback of the desired music"]
    I --> J["Continue to STEP 8, on the next page"]
STEP 8
ESTABLISH COMMUNICATIONS WITH THE MOBILE DEVICE, SETTING UP THE PLAY-FI APP FOR A STEREO PAIR
While a single RS100 may be used in a room for a Monaural Sound Stage, most RS100s will be used in pairs to produce a Stereo Sound Stage.
When RS100s are going to be used as a Stereo Pair in a room, some additional setup procedures are required.
After Step 7 (number 3 thru 16) has been completed and music is streaming from your mobile device to the single RS100, then perform the following additional steps:
- Stop the stream of music and return to the Mobile Device Main Icon Screen.
- Then switch Power Off to the working RS100.
- Switch Power On to the second RS100 and perform Step 6 (number 3 thru 16) for this RS100.
- After music is playing from the second RS100, stop music playback and return to the Mobile Device Main Icon Screen, refer to number 16.
- Switch power back On to the first RS100 (switched Off in step 1).
- Perform Step 8 (number 17 thru 28) to setup the pair of RS100s as Left and Right Channels.

flowchart
graph LR
    A["17th - SELECT "Play-Fi APP""] --> B["18th - Display of the RS100 pair located in the same room"]
    B --> C["19th - Select the "Play-Fi Settings Menu""]
    C --> D["20th - Select "Stereo Pair""]
    D --> E["21st - Select "Create a Stereo Pair""]
    E --> F["22nd - Press the Icons (one at a time) to identify which Loudspeaker is playing the Left Channel Sound"]
    F --> G["23rd - Select the "Left Channel Loudspeaker""]
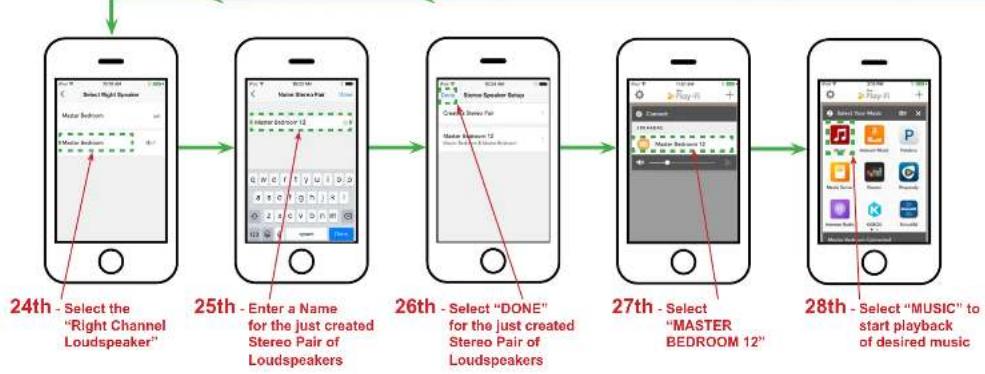
flowchart
graph LR
    A["Select Right Channel Loudspeaker"] --> B["Enter a Name for the just created Stereo Pair of Loudspeakers"]
    B --> C["Select "DONE" for the just created Stereo Pair of Loudspeakers"]
    C --> D["Select "MASTER BEDROOM 12""]
    D --> E["Select "MUSIC" to start playback of desired music"]
STEP 9
DOWNLOAD AND INSTALL THE PLAY-FI APP TO YOUR ANDROID POWERED MOBILE DEVICE
MOBILE DEVICE
The Play-Fi App for Music Streaming and Remote Operation of the RS100 is available at the Web Site for download free of charge:
For Android Powered Mobile Devices: https://play.google.com/store/apps/details?id=com.phorus.playfile&bl

PLAY-FI APP
NOTE:
The graphic illustration of this Android Powered Mobile Device may vary slightly from your Android Mobile Device.
STEP 10
ESTABLISH CONNECTION WITH A WIRELESS ROUTER
NOTE: If your Android Powered Mobile Device is currently Wi-Fi Connected to your Wireless Router, proceed to STEP 11.
SELECT SETTINGS SELECT Wi-Fi SETTINGS

flowchart
graph LR
    A["Desktop System"] --> B["Table with Display"]
    B --> C["Table with Tablet"]
    D["Control Panel"] --> B
    B --> C
WIRED NETWORK WITH WIRELESS Wi-Fi ROUTER WIRELESS NETWORK Wi-Fi ROUTER

flowchart
graph TD
    A["USB to Ethernet Adapter"] --> B["Wireless Network Router"]
    B --> C["Wireless Network Router"]
    C --> D["Wireless Network Router"]
NOTES:
^1 Refer to the page 1, note 3 for additional information.
^2 The term "Your Network" is used to refer to name of the wired Network (with Wireless Router) connected to the RS100 or just a Network Wireless Router used with the RS100.
It is advisable during the initial communications set on virtually inside the RS101 and the Wireless Router in close proximity above another
If there is difficulty in establishing communications between the network Router, RS100 and/or the Mobile Device, temporarily switch Off other Wi-Fi devices connected to the same Router.
The performance capability of the network wireless router can effect whether the RS100 connects to your mobile device and the quality of the music streamed. For additional information on wireless routers refer to https://play-ft.com/faq/entry/reccommended-router-and-network-specifications.
STEP 11
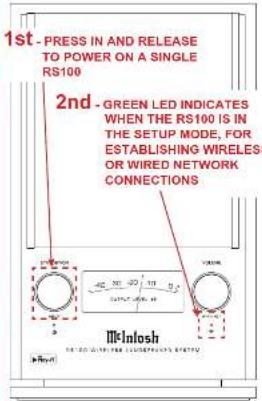
1st
- PRESS IN AND RELEASE TO POWER ON A SINGLE RS100
ESTABLISH COMMUNICATIONS WITH THE RS100
2nd
GREEN LED INDICATES
WHEN THE RS100 IS IN
THE SETUP MODE, FOR
ESTABLISHING WIRELESS
OR WIRED NETWORK
CONNECTIONS
3rd - SELECT "Play-Fi A


4th - SELECT "Set-up New Device"
NOTE: Proceed with "Set-up new Device" after the "WI-FI/NET" LED indicator changes from flashing rapidly to slowly pulsing On/Off.
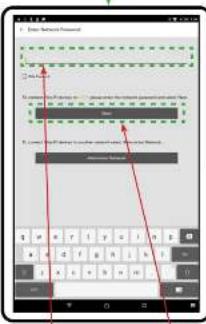
5th - ENTER
"Network (Router) Password"
6th - SELECT "Next"

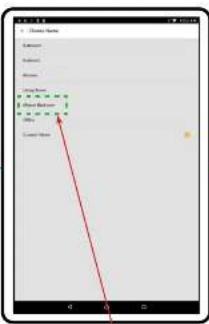
7th - SELECT the name of the room where the RS100 is located

8th - SELECT "Location Name" NOTE: The "WI-FI/NET" LED Indicator will change from slowly pulsing On Off to On all the time.

9th - SELECT "Music" to start playback of desired music
STEP 12
ESTABLISH COMMUNICATIONS WITH THE MOBILE DEVICE, SETTING UP THE PLAY-FI APP FOR A STEREO PAIR
While a single RS100 may be used in a room for a Monaural Sound Stage, most RS100s will be used in pairs to produce a Stereo Sound Stage.
When RS100s are going to be used as a Stereo Pair in a room, some additional setup procedures are required.
After Step 11 (number 3 thru 9) has been completed and music is streaming from your mobile device to the single RS100, then perform the following additional steps:
- Stop the stream of music and return to the Mobile Device Main Icon Screen.
- Then switch Power Off to the working RS100.
- Switch Power On to the second RS100 and perform Step 11 (number 3 thru 9) for this RS100.
- After music is playing from the second RS100, stop music playback and return to the Mobile Device Main Icon Screen, refer to number 9.
- Switch power back On to the first RS100 (switched Off in step 1).
- Perform Step 12 (number 10 thru 18) to setup the pair of RS100s as Left and Right Channels.

10th - SELECT "Play-Fi APP"
11th - Display of the RS100 pair located in the same room

12th - Select the "Play-Fi Settings Menu"
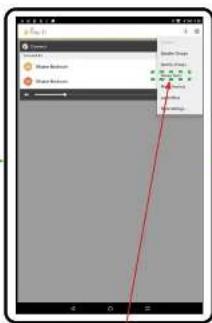
13th - Select "Stereo Pair"

14th - Press the Icons (one at a time) to identify which Loudspeaker is playing the Left Channel Sound
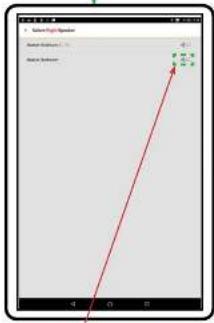
15th - Select the "Left Channel Loudspeaker"
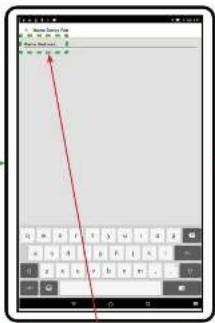
16th - Enter a Name for the just created Stereo Pair of Loudspeakers
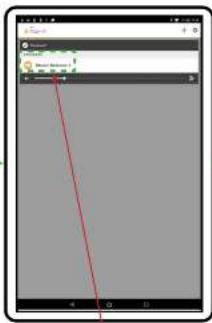
17th - Select "MASTER BEDROOM 2"

18th - Select "MUSIC" to start playback of the desired music
Introduction
Now you can take advantage of traditional Melntosh standards of excellence in the RS100 Wireless Loudspeaker System.
The RS100 provides superior spaciousness sound reproduction with unusual sound stage depth. The McIntosh Sound is "The Sound of the Music Itself"
Performance Features
• Play-Fi
Listen to music from wireless mobile devices.
• Streaming Radio
The RS100 allows for listening to Internet Radio Stations and local AM/FM Stations (via the Internet) when connected to a mobile device using the Play-Fi App.
• Auxiliary Input
The RS100 Aux Input accommodates a wide range of analog audio components. The Amplifier uses noiseless and reliable Electronic Input Switching and is designed to drive the built-in McIntosh Loudspeakers to a high level of performance.
• Built-in Networking Capability
The RS100 has the ability to connect to an existing network for connecting to other devices such as NAS Storage Devices.
- Subwoofer Output
The RS100 Sub Output accommodates a wide range of available Powered Subwoofer Loudspeakers.
• Integrated Loudspeaker Design
The RS100 Integrated Loudspeaker Design incorporates a Wooler and Midrange/Tweeter, a DSP Electronic Crossover with active Equalization, dual Power Amplifiers and achieves a high level of sonic performance.
• Illuminated Output Level Meter
The Illuminated Peak Responding Output Level Meter on the RS100 is calibrated in Decibels and responds to 95% of a full scale reading to a single cycle tone burst signal.
• Solid State Front Panel Illumination
The illuminated Front Panel is accomplished by extra long life Light Emitting Diodes (LEDs).
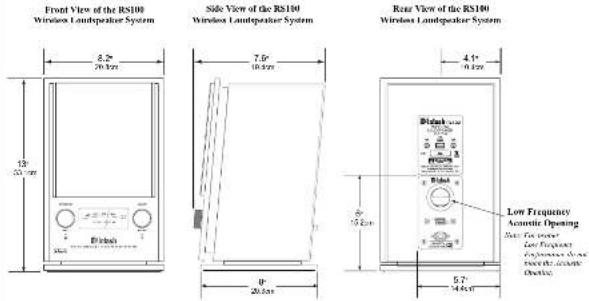
Dimensions
The following dimensions can assist in determining the best location for your RS100. There is additional information below pertaining to installing the RS100 into cabinets.
Installation
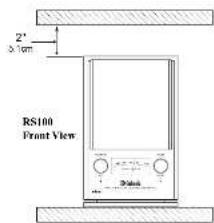
The RS100 is designed to be placed upright on a table or shelf. For proper Low Frequency performance do not block the Acoustic Opening located on the RS100 Rear Panel. Do not install the RS100 directly above a heat generating device. Allow at
least 2 inches (5.1cm) above the top, 1 inch (2.5cm) on both sides and at least 3 inches (7.6cm) behind the Rear Panel so that airflow is not obstructed and proper Low Frequency performance is achieved.
RS100 Side View

Rear Panel Connections
AUX INput accepts high level signals from a source SUB OUT supplies an analog audio signal to the input on a Powered Subwoofer
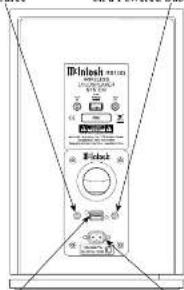
USB Connector for connection to a wired network via an adapter and for service use
Connect the supplied AC Power Cord to a live AC outlet
"For additional information refer to page 2 "General Information", number 3
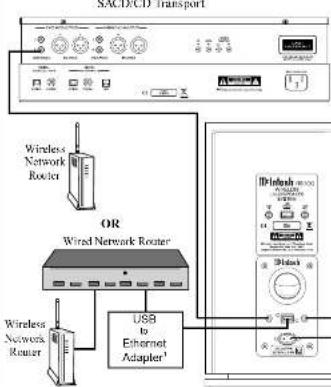
Connecting to External Components
The RS100 connection instructions below, together with the Connection Diagram below (single channel) is an example of connecting optional external components. Your external components may vary from this, however the actual components would be connected in a similar manner.
Analog Audio Connections:
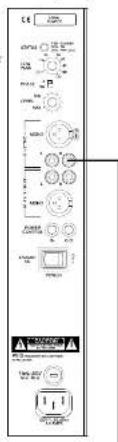
- Connect a cable(s) from the RS100 AUX INput to the external SACD/CD Transport unbalanced audio output jack.
Note: For Stereo Operation between the RS100s (Left and Right Channels) and the SACD/CD Transport two jacks are
- Connect a cable(s) from the RS100 SUBwoofer OUT to the external Powered Subwoofer input jacks (Left and Right Channels).
Note: If the Powered Subwoofer has only one input jack, use a "Y" Adapter to connect the outputs from both RS160's to the single input jack.
- Connect the supplied AC Power Cord between the AC Socket on the Rear Panel of the RS100 to a live AC outlet (that is always On).

| Standby/On and Input Indicator |
| Color Operation |
| Red Connected to AC Power and in Standby Mode |
| Yellow Sleep Mode |
| Green Play-Fi Input (Network Connection) |
| Blue Ace Input (Rose Panel Connection) |
| WI-Fi Indicator | |
| LED Operation | |
| Green(Rapid Flashing) | Indicates the initial start of the Network Communication Process |
| Green(Slow Pulsing) | Indicates the the Network Communication Process is proceeding |
| Green(Steady On) | Indicates the the Network Communication Process has been established |
How to Operate the RS100
Your McIntosh RS100 is factory configured for immediate enjoyment of superb audio from a Mobile Device via Play-Fi or an external Audio Component Source connected to the AUX Input.
If you wish to make a Play-Fi Wireless Connection between the Mobile Device and the RS100, please refer to "RS100 Quick Start" starting on page 2 (step 4) for additional information.
Power On/Off
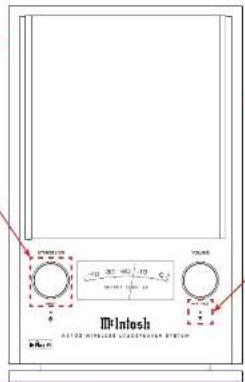
Momentarily press the STANDBY/ON - INPUT Control on the RS100 Front Panel to switch it On. To switch Off the RS100 Press and release the STANDBY/ON - INPUT Control on the Front Panel.
Power Mode
The RS100 incorporates an Auto Off Feature, which automatically places it into one of three Power Saving Modes. This occurs approximately 30 minutes after there has been an absence of audible audio signals on the selected input. To change between the three different modes perform the following:
Press and hold in simultaneously the STANDBY/ON - INPUT Control and the VOLUME Control until the LED located below STANDBY/ON - INPUT Control flashes twice. Note: The color of the LED when it flashes indicates which of the three Power Saving Mode the RS109 is now set to.
| Power Mode Standby/On Momentary Indication | |
| Red Power | er Save Mode Off |
| Green Power | er Save Mode On(Network connection dropped) |
| Yellow Power | er Save Mode On(Network connection maintained) |
Source Selection
Select Play-Fi Input by pressing the Play-Fi Screen Icon located on the Mobile Device used to establish Network Connection with the RS100. Refer to "RS100 Quick Start" starting on page 2 (step 4) for additional information.
Select the AUX Input Source by rotating the STANDBY/ON - INPUT Control. The I.FD below the Control will change from green to blue in color to indicate the AUX Input Source has been selected.
Note: The Mobile Device will pause the current track
playing when switching to AUX Input Source on the RS100.
Volume Level
To increase the Volume Level, rotate the Front Panel VOLUME Control clockwise. To lower the Volume Level, rotate the Front Panel VOLUME Control counterclockwise. When the maximum or minimum volume level is reached the word "VOLUME" will flash rapidly.
Notes: 1. When the RS100 is in Play-Fi Mode, and the Front Panel Volume Control Setting is changed, the Mobile Device Volume Adjustment Indicator will also indicate the change.
- When using a pair of RS100s in the Stereo Mode of Operation, the Front Panel VOLUME Controls on the RS100 may be used to alter the channel balance between the Left and Right Channels. When the RS100s are switched Off and back On, the previous Channel Balance adjustment made is returned to the normal setting.
Mutc
To mute the volume level, momentarily press in on the Front Panel VOLUME Control. During the time the sound is muted the Front Panel word "VOLUME" will flash slowly. To un-mute and return to the previous volume level, momentarily press in on the Front Panel VOLUME Control. When the Play-Fi Input is selected on the RS100, the Mobile Device can also Mute and Un-Mute the sound.
Note: When the RS100 is in Play-Fi Mode and the Mate Function is engaged using the Front Panel VOLUME Control, the Mobile Device Mate indication will also indicate the change.
Meter Illumination
If desired, the illumination of the OUTPUT LEVEL Meter may be switched Off by performing the following steps:
-
Momentarily press the STANDBY/ON - INPUT Control and VOLUME Control at the same time and the Meter Illumination will switch Off.
-
To switch On the Meter Illumination repeat step 1.
Play-F1
For Mobile Device specific information (Apple or Android) go to the Play-Fi web site at https://play-fi.com/
Notes: 1. If you have questions about the Play-Fi App and its Operation refer to the Play-Fi "Knowledge Base" for additional information.
- Some of the Internet Music Streaming Services (available via the Play-Fi App) offer the listener the ability to alter the sound quality of music being streamed. Refer to each of the Music Streaming Service's Internet Web Site for additional information on how to make changes to their default settings, if available.
Critical Listening Mode
The Play-Fi App supports the native sound resolution formats of the music played. When the sound format is high resolution, the sound is normally down-sampled to insure proper Wi-Fi Streaming Capability with the most common wireless network hardware. In the Play-Fi App there is a Critical Listening Mode which keeps the original sound resolution up to 96kHz/24Bit. This requires the RS100 and Mobile Device be connected by high performance network equipment. To activate the Critical Listening Mode perform the following steps using the Play-Fi App:
- Select the "Hi RES Audio" Icon. Refer to figure 1.

- Referring to figure 2 on the next page, select the RS100 (in this example it is the "Living Room").
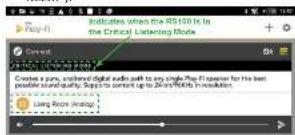
Figure 2
How to Operate the RS100, con't
- Select "Music". Refer to figure 3
Note: When a recording is in a sound format not supported by the Critical Listening Mode, a message will appear stating "This file is encoded in an unsupported sample rate and cannot be played". Refer to Figure 4.
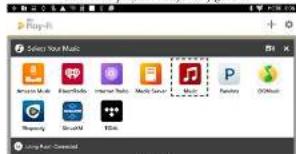
Figure 3

Figure 4
- The music selection that has the unsupported sample rate may be listened to by switching Off the Critical Listening Mode. Switch Off the Critical Listening Mode by first selecting the "X". Refer to figure 5. Then select "OK" in the "Are you sure? Closing will stop playback"
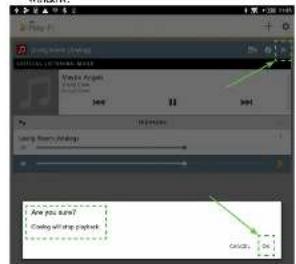
Figure 5
- Then select the RS100 (Living Room) followed by selecting "Music". Refer to figures 6 and 7.
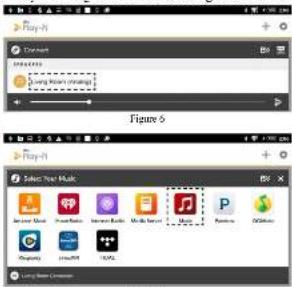
Figure 7
- Then select the music. Refer to figure 8.

Figure 8
Reset of Microprocessors
In the unlikely event the controls of the RS100 stop functioning, the internal microprocessors can be reset by performing the following:
- Disconnect the AC Power Cord from the Rear Panel of the RS100, wait two minutes and then reconnect AC Power Cord to the Rear Panel of the RS100.
- Momentarily press the STANDBY/ON - INPUT Control switching back On the RS100 and then resume listening.
Resetting to Factory Default Settings
If it becomes desirable to reset all of the RS100 settings to the factory default values, perform the following steps:
Warning: After the RS100 is returned to Factory Default Settings, it will become necessary to re-establish communications between the RS100 and the Mobile Device via the Network Communications. Refer to "RS100 Quick Start" starting on page 2 (step 4) for additional information.
- With the RS100 On, press and hold in simultaneously the STANDBY-ON - INPUT Control and VOLUME Control. Approximately 14 seconds later the meter illumination will flash once followed by an audible beep sound. Then release both controls.
- Disconnect the AC Power Cord from the Rear Panel of the RS100, wait one minute and then reconnect the AC Power Cord to the Rear Panel of the RS100.
- Proceed to "Quick Start" STEP 6, on page 3 of this Operation Guide.

Specifications and Packing Instructions
Audio Specifications
Aux Iput Sensitivity 200mV
Aux Input Impedance 10,000 ohms
Subwoofer Output Filter 2,000Hz Low Pass
Subwoofer Output Impedance 200 ohms
Loudspeaker Specifications
System Driver Complement One 4 inch Woofer/Midrange (with acoustic port) One 3/4 inch Dome Elevator
Frequency Response 55Hz - 20kHz
Crossover Frequency 2,000Hz
Enclosure Finish High Gloss Black
Grille Finish Black Knit Cloth
Grille Attachment Magnetic
USB Connector
Type A connector with Host Mode. Used for firmware Updates and Network Connection using a special adapter (see page 2, note 3 for additional information)
Wi-Fi Connectivity
IEEE 802.11a/b/g/n; Wi-Fi (Dual Band).WPS
General Specifications
Power Requirements 100-240 Volts, 50/60Hz at 60 Watts Standby: Less than 0.5 watt
Overall Dimensions
Width is 8.2 inches (20.8cm) Height is 13 inches (33.1cm) Depth is 10 inches (25.4cm) including the Front Panel and connection cables.
Weight
14.5 pounds (6.6Kg) net, 17 pounds (7.7Kg) in shipping carton
Shipping Carton Dimensions
Width is 11.25 inches (28.6cm) Height is 18.25 inches (46.3cm) Depth is 11 inches (27.9cm)
Packing Instructions
In the event it is necessary to repack the equipment for shipment, the equipment must be packed exactly as shown below. Failure to do this will result in shipping damage. Use the original shipping carton and interior parts only if they are all in good serviceable condition. If a shipping carton or any of the interior part(s) are needed, please call or write Customer Service Department of McIntosh Laboratory. Refer to page 2. Please see the Part List for the correct part numbers.
Quantity Part Number Description 1 310573SP Shipping carton only 1 310569SP Left side foam pad 1 310572SP Right side foam pad 1 310570SP Nonwoven bag 1 310571SP Plastic bag 1 310568SP Accessory box

flowchart
graph TD
    A["Device with Box"] --> B{Process Step}
    B -->|Green Arrow Down| C["Product with Box"]
    B -->|Green Arrow Up| D["Product with Box"]

natural_image
Isometric line drawing of a box with a green downward arrow above it, no text or symbols present.

- Important Safety Information is supplied in a separate document "Important Additional Operation Information Guide"
- Thank You
- Please Take A Moment
- Technical Assistance
- Customer Service
- Table of Contents
- General Information
- STEP 4
- STEP 5
- STEP 6
- STEP 7
- STEP 8
- STEP 9
- STEP 10
- ESTABLISH CONNECTION WITH A WIRELESS ROUTER
- STEP 12
- Introduction
- Performance Features
- • Play-Fi
- • Streaming Radio
- • Auxiliary Input
- • Built-in Networking Capability
- - Subwoofer Output
- • Integrated Loudspeaker Design
- • Illuminated Output Level Meter
- • Solid State Front Panel Illumination
- Dimensions
- Installation
- Rear Panel Connections
- Connecting to External Components
- Analog Audio Connections:
- How to Operate the RS100
- Power On/Off
- Power Mode
- Source Selection
- Volume Level
- Mutc
- Meter Illumination
- Play-F1
- Critical Listening Mode
- How to Operate the RS100, con't
- Audio Specifications
- Loudspeaker Specifications
- USB Connector
- Wi-Fi Connectivity
- General Specifications
- Overall Dimensions
- Weight
- Shipping Carton Dimensions
- Packing Instructions
Brand : MCINTOSH
Model : RS100
Category : Loudspeaker